Pfaff tipmatic 1045 Le manuel du propriétaire
- Catégorie
- Machines à coudre
- Taper
- Le manuel du propriétaire
Ce manuel convient également à
La page est en cours de chargement...
La page est en cours de chargement...

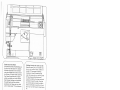
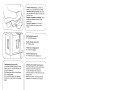
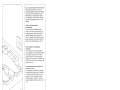
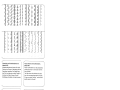
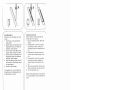
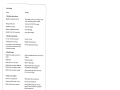
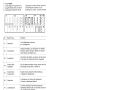
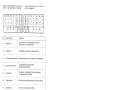
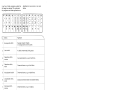
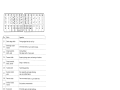
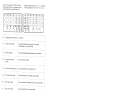
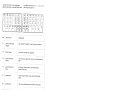
Pièces
de
Ia
machine
100
Poignee
101
Couvercle
superieur
102
Volant
103
Disque
de
debrayage
104
Interrupteur
general
105
Touches
de
reglage
106
Réglage
de
Ia
longueur
de
point
107
Boite
de
rangement
formant
plan
de
travail
avec
compartiments
a
accessoires
108
Plaque
a
aiguille
109
Support
de
semelle
du
pied
presseur
avec
semelle
110
Enfileur
d’aiguille
Ill
Disque
de
réglage
des
points
d’ornementation
(1147)
Il
2
Relève-pied
presseur
113
Pince-aiguille
avec
vis
de
fixation
114
Touche
,,arrière”
1
5
Tableau
des
programmes
(1047,
1147)
Ii
6
Tableau
des
points
de
bordage
Ill
Dévidoir
118
Plaque
de
base
119
Capot
couvrant
le
compartiment
du
crochet
120
Bras
libre
121
Passage
du
fil
122
Tension
du
fil
d’aiguille
23
Guide-fil
de
dévidoir
24
Levier
releveur
de
fil
125
Guide-fil
de
dévidoir
(escamotable)
126
Porte-bobine
avec
dérouleur
127
Deuxième
porte-bobine
(relevable)
128
Barre
du
pied
presseur
avec
coupe-fil
Elementi
di
comando
della
macchina
per
cucire
100
Maniglia
101
Coperchio
102
Volantino
103
Disco
disinnesto
104
lnterrutore
principale
105
Tasti
di
comando
106
Regolatore
lunghezza
punto
107
Piano
di
cucito
variabile
con
cassettino
e
scomparto
per
accessori
108
Placca
d’ago
109
Portapiedino
con
piedino
110
Infilatore
d’ago
111
Regolatore
punto
ornamentale
(1147)
112
Leva
alzapiedino
11
3
Morsetto
d’ago
con
vite
di
fissagglo
114
Tasto
per
cucire
indietro
11
5
Tabella
dei
programmi
(1047,
1147)
11
6
Scomparto
con
tabella
per
bordure
11
7
Spolatore
118
Placca
base
119
Sportello,
dietro
crochet
120
Braccio
libero
121
Fessure
per
infilatura
122
Tensione
superiore
123
Guidafilo
per
spolatore
124
Leva
tendifilo
125
Guidafilo
per
spolatore
(estraibile)
126
Portarocchetto
con
disco
di
scorrimento
127
Secondo
portarocchetto
(da
girare
in
sü)
128
Barra
premistoffa
con
rasafilo
)

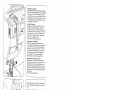
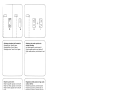
4
N
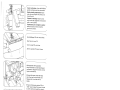
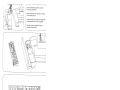
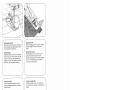
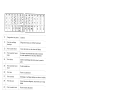
Die
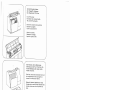
Kofferhaube
abheben.
Den
Iragegriti
umklappen.
Den
Klappdeckel
101
öffnen.
Lift
off
the
cover.
Fold
down
the
carrying
handle.
Tilt
cover
101
backwards.
Enlever
le
couvercie
de
a
valisette.
Basculer
a
poignée.
Ouvrir
le
couvercle
101.
Aizare
Ia
custodia.
Ribaltare
Ia
maniglia.
Aprire
il
coperchio
101.
4
Den
Anlasser
und
die
Bedienungs
anleitung
aus
dem
Fach
N
nehmen.
So
wie
die
Abbildung
oben
zeigt,
beides
wieder
einräumen.
Take
foot
control
and
instruction
book
out
of
compartment
N.
Put
back
again
as
shown
in
the
illustration
above.
Retirer
le
rheostat
a
pédale
et
Ia
notice
d’emploi
de
Ia
case
N
et
es
remettre
dans
Ia
case
comme
on
voit
sur
Ia
photo
du
haut.
Togliere
iI
pedale
d’awiamento
e
le
istruzioni
per
Iuso
dallo
scomparto
N.
Come
rappresentato
nella
figura
supe
riore,
riporli
entrambi
nello
scomparto.
2
La page est en cours de chargement...
La page est en cours de chargement...
La page est en cours de chargement...
La page est en cours de chargement...

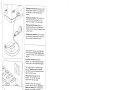
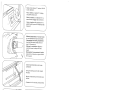
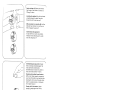
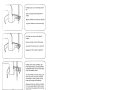
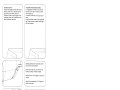
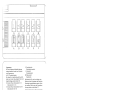
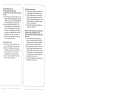
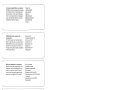
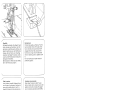
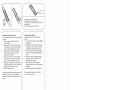
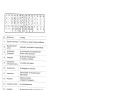
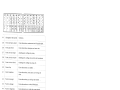
Rempissage
de
Ia
canette
a
partir
d’une
deuxième
bobine
Bascuter
te
guide-fit
125
vers
‘avant.
Pas
ser
le
fit
par
le
guide
fit
123
puis,
seton
le
dessin,
dans
te
guide-fit
125,
entre
ce
guide
et
te
ressort
de
tension
N.
Enrouler
te
fit
de
quetques
tours
sur
Ia
canette
et
a
pousser
vers
a
droite.
Appuyer
sur
Ie
rheostat
et
bobiner.
Pousser
a
canette
garnie
vers
ta
gauche:
ta
retirer,
tirer
te
fit
vers
‘avant
et
te
couper
sur
te
coupe-fit
0.
tmportant:
Veitter
a
ce
que
tes
fentes
de
maintien
du
fit
de
ta
bobine
passée
sur
a
broche
se
trouvent
a
droite.
Auvogere
a
spolina
da
un
secondo
rocchetto:
Spostare
in
avanti
ta
guida
125
per
to
spolatore.
Tenere
it
fito
netta
guida
123
e,
come
indicato
net
disegno,
netta
guida
125
facendo
attenzione
che
it
fib
passi
tra
ta
guida
e
ta
motta
di
tensione
N.
Avvot
gore
ora
it
fito
atcune
votte
attorno
atta
spotina.
Premere
ta
spotina
verso
destra.
Azionare
it
reostato
e
avvotgere
ta
bobina.
Premere
a
spotina
piena
verso
sinistra,
togtierta,
tirare
it
fito
in
avanti
e
reciderto
net
tagtiafito
0.
tmportante:
quando
si
usano
rocchetti
con
intagtio
fermafiti,
occorre
inserire
a
parte
intagtiata
verso
destra.
Nähwerk
einschalten:
Handrad
festhat
ten
und
Scheibe
103
nach
hinten
drehen.
Dann
Handrad
nach
vorne
drehen,
bis
es
einrastet.
Engaging
the
sewing
mechanism:
Hotd
the
hand
wheet
firmly
and
turn
disk
103
toward
the
back,
then
turn
the
hand
wheet
forward
again
until
it
snaps
in.
Embrayage
du
mécanisme
Retenir
to
votant
of
tourner
te
disque
103
vers
‘ar
rière.
Tourner
te
votant
vers
‘avant
jusqu’à
ce
qu’it
s’enctenche.
nserimento
meccanismo
di
cucito:
tenere
fermo
it
votantino
e
girare
it
disco
103
verso
dietro.
Girare
quindi
it
volantino
in
avanti
fincha
s’innesta.
)
7
La page est en cours de chargement...

7-
do
Ia
canette
avec
Ia
til
pwsseur
a
aiguille
en
posi
‘I
l
canette
sur
le
dévi
1y(
lo
rnécanisme,
Passer
le
le
pied
presseur
vers
Ia
h
,i’sjjl
125
avant
de
l’en
U’ftU0S
tours
sur
Ia
canette
et
ci
vers
Ia
droite.
Appuyer
nt
bobiner.
Pousser
a
vors
Ia
gauche,
l’enlever
et
‘i.
I’n.’ant
puis,
le
couper
sur
le
Avvolgere
Ia
spolina
attraverso
I’ago:
Alzare
ii
piedino.
Posizione
ago
superiore.
Inserire
Ia
spolina
sullo
spolatore
117.
Disinserire
ii
meccanismo
di
cucito,
Por
tare
il
fib
superiore
sotto
ii
piedino
verso
destra
attraverso
Ia
guida
125
(vedere
disegno).
Avvolgere
ii
fib
alcune
volte
attorno
alla
spolina
e
premerla
quindi
verso
destra.
Azionare
ii
reostato
e
bobi
nare.
Premere
Ia
spolina
piena
verso
sinistra,
toglierla,
tirarla
in
avanti
e
recidere
II
fib
nel
tagliafibo
“N”.
(
Nähwerk
einschalten:
Handrad
festhal
ten
und
Scheibe
103
nach
hinten
drehen.
Dann
Handrad
nach
vorne
drehen,
bis
es
einrastet.
Engaging
the
sewing
mechanism:
Hold
the
hand
wheel
firmly
and
turn
disc
103
toward
the
back,
then
turn
the
hand
wheel
forward
again
until
it
snaps
in.
Embrayage
du
mécanisme
Retenir
le
volant
et
tourner
le
disque
103
vers
l’ar
rière.
Tourner
le
volant
vers
l’avant
jusqu’à
ce
qu’il
s’enclenche.
Inserimento
meccanismo
di
cucito:
tenere
fermo
il
volantino
e
girare
1
disco
103
verso
dietro.
Girare
quindi
1
volantino
in
avanti
finchè
s’innesta.
)
9
La page est en cours de chargement...
La page est en cours de chargement...
La page est en cours de chargement...
La page est en cours de chargement...
La page est en cours de chargement...

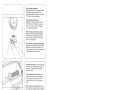
4
çni
15
Ndhfläche
107
an
die
Maschine
schwen
ken.
Swing
work
support
107
back
against
the
free
arm.
Remettre
en
place
Ia
boite
de
rangement
107
contre
le
bras.
Avvicinare
ii
piano
variabile
107
alla
macchina.
I
7
Stoff
unter
den
Nähfu5
legen.
N
Place
fabric
under
the
sewing
foot.
Placer
du
tissu
sous
le
pied
presseur.
Porre
Ia
stoffa
sotto
il
piedino,
7-
Beim
Einlegen
extrem
dicker
Stofflagen
Hebel
112
höher
anheben.
To
insert
extra-thick
fabric
plies
raise
lever
112.
Pour
les
tissus
très
épais,
lever
davantage
le
levier
112.
In
caso
di
spessori
di
stoffa
estremamente
grossi
alzare
ulteriormente
Ia
leva
112.
-7
Stoffdrückerhebel
112
senken,
(N
1st
die
Stellung
zum
Stopfen).
Lower
presser
bar
lifter
112.
(N
shows
the
darning
position).
Descendre
le
levier
112.
Pour
le
reprisage,
utiliser
Ia
position
N.
Abbassare
Ia
eva
112
(N
corrisponde
alla
posizione
per
rammendo).
\
La page est en cours de chargement...

4
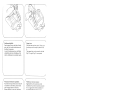
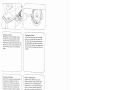
17
Tensions
des
fils:
Position
de
reglage
normale
dans
Ia
plage
blanche,
entre
3
et
5.
Tension
d’autant
plus
forte
que
le
chiffre
est
élevé.
Contrder
a
‘aide
du
point
zigzag.
Coudre
quelques
points.
Les
fils
doivent
se
nouer
dans
I’épaisseur
des
tissus.
Controllo
della
tensione
del
fib:
La
regolazione
normale
si
trova
nel
set-
tore
da
3-5.
Piü
alto
il
numero
piü
forte
sara
Ia
tensione.
II
controllo
viene
fatto
con
In
zig-zag
piü
argo.
Cucire
una
breve
cucitura.
Lannodamento
dei
fili
deve
avvenire
al
centro
dello
spes
sore
del
materiale.
—I
4
N
Stoffdrückerhebel
112
hochstellen.
Stoff
nach
hinten
herausnehmen.
Raise
presser
bar
lifter
112.
Remove
the
fabric
by
pulling
it
toward
the
back.
Relever
le
levier
112.
Dégager
le
tissu
vers
l’arrière,
Alzare
Ia
eva
alzapiedino
112.
Togliere
Ia
stoffa
verso
dietro.
4
Fadenabschneider
N.
Fäden
einlegen
und
nach
unten
ziehen.
Thread
cutter
N.
Draw
the
threads
into
the
slot
and
pull
them
downwards.
Coupe-fil
N.
Coucher
es
fils
dans
Ia
fente
et
les
tirer
vers
le
bas.
Tagliafibo
N.
Inserire
i
fili
e
tirarli
verso
ii
basso.

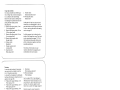
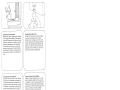
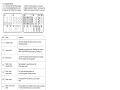
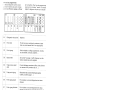
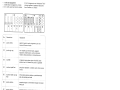
7
Stichlange
einstellen:
Die
Zahien
auf
dem
Stichldngen-Einsteller
106
geben
die
Stichlange
in
mm
an,
Der
Einstellbereich
ist
0
bis
6
mm.
Die
gewünschte
Stichlange
wird
an
die
Em
stelimarkierung
N
gedreht.
Die
Abbildung
0
unten
zeigt
die
Einstei
lung
des
Stichlängen-Einstellers
zum
Nähen
der
rot
abgebildeten
Stretchstiche
auf
den
Tasten,
Regulating
the
stitch
length
The
numbers
on
stitch
length
control
106
ndicate
the
stitch
length
in
millimeters.
The
stitch
length
range
is
0
to
6
mm.
Turn
the
desired
stitch
length
to
the
indicating
mark
“N’.
Fig.
0
(bottom)
shows
how
to
set
the
stitch
length
control
for
sewing
stretch
stitches
(red
stitch
symbols
on
push
but
tons).
Réglage
de
Ia
longueur
du
point:
Les
chiffres
sur
le
disque
106
indiquent
a
longueur
du
point
en
mm.
La
longueur
du
point
est
réglable
entre
0
et
6
mm.
La
Iongueur
de
point
choisie
est
indiquée
face
au
repére
N.
Lillustration
0
(en
bas)
montre
Ie
réglage
du
règle-point
pour
a
couture
des
points
élastiques
marques
en
rouge
sur
los
tou
ches.
Regolazione
della
lunghezza
del
punto:
I
numeri
sul
bottone
regolatore
della
lun
ghezza
del
punto
106
corrispondono
alla
lunghezza
del
punto
in
mm.
La
regola
zione
si
estende
da
0
a
6
mm.
La
lun
ghezza
del
punto
desiderata
si
regola
sulla
marcatura
N.
La
figura
0
sotto
mostra
Ia
regolazione
del
bottone
regolatore
per
cucire
i
punti
flexi
(stretch)
raffigurati
in
rosso
Sui
tasti.
18

RUCkWaIlSflahefl
Die
Taste
114
niederdrücken
Solange
die
Taste
gedruc
wird,
näht
die
Maschjne
rückwâs
Reverse
sewing
Press
button
114
As
long
as
you
hold
this
button
the
machine
sews
backwards
Couture
en
marche
arrlère.
Abajsser
Ia
touche
114.
La
machine
coud
en
arrière
aussi
longtemps
que
Ia
touche
est
mainteflue
en
bas.
La
cucjtura
iridjetra
Premere
il
tasto
114.
Finchè
ii
tasto
rimane
premuto
Ia
macchina
cuce
indietro
/
/
/
La page est en cours de chargement...

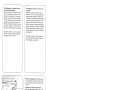
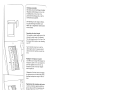
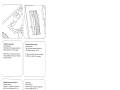
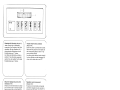
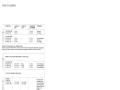
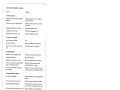
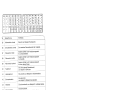
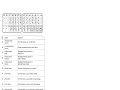
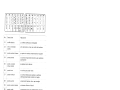
Fmger-tip
contr&s
The
various
models
have differing
num
bers
of
finger-tip
controls
and
programs.
A,
B,
C:
Buttons
for
buttonholing
Button
B
is
also
used
as
clearing
button
for
releasing
the
pushed
buttons
and
for
setting
the
left
needle
position
(see
page
26).
D
Elastic
triple zigzag
stitch,
2
mm
2-mm
zigzag
stitch
E
Elastic
triple
zigzag
stitch,
3.5
mm
3.5
mm zigzag
stich
F
Elastic
triple
zigzag
stitch,
5.0
mm
5-mm
zigzag
stitch
G
Elastic
triple
straight
stitch
Straight
stitch
H
Pullover
stitch
Blindstitch
I
Closed
overlock
stitch
Joining
stitch
K
Overlock
stitch
Shell-edge
stitch
L
Feather
stitch
Elastic
decorative
stitch
M
Honeycomb
stitch
Elastic
stitch
On
Model
1147
the
fancy-stitch
thumb
wheel
has
to
be
disengaged
in
order
to
sew
the
stitches
on
the
finger-tip
buttons.
To
do
so,
set
the
white
dot
at
the
setting
mark,
see
page
27.
A
stitch
program
chart
is
found
on
the
inside
of
the
hinged
top
cover.
This
chart
is
also
reproduced
on
pages
72—75
of
this
booklet
and
shows
all
stitches
and
stitch
combinations
together
with
their
possible
applications.
The
letters
of
the
buttons
on
your
machine
determine
the
programs
and
combinations
that
can
be
sewn.
Touches:
Le
nombre
des
touches
et
des
program
mes
vane
selon
le
modèle
de
machine.
A,
B,
C
Touches
boutonniere
La
touche
B
sert
egalement
a
débrayer
les
touches
enfoncées
et
a
déporter
le
point
a
gauche
(voir
page
26).
D
Triple
point
zigzag
élastique,
2
mm
Point zigzag
2
mm
E
Triple
point
zigzag
élastique,
3,5
mm
Point
zigzag
3,5
mm
F
Triple
point zigzag
elastique,
5
mm
Point
zigzag
5
mm
G
Triple
couture
droite
elastique
Point
droit
H
Point
pullover
Point
invisible
I
Point
de
surjet
fermé
Point
d’assemblage
K
Point
de
surjet
Point
bord
coquille
L
Point
d’Cpi
Point
elastique
décoratif
M
Point
nid
d’abeille
Point
elastique
Sur
le
modéle
1147,
il
faut
débrayer
le
régle-point
pour
points
décoratifs
si
‘on
veut
coudre
les
points
reproduits
sur
les
touches.
Pour
ce
faire,
régler
le
point
blanc
face
au
repère
de
réglage,
page
27.
Dans
le
couvercle,
vous
trouverez
le
tableau
de
programmes
illustrant
les
points
et les
combinaisons
de
points.
Dans
le
tableau
sur es
pages
76-79,
vous
trouverez es
indications
correspondantes
pour
Ia
couture.
Les
lettres
gravées
sur
les
touches
de
votre
machine
déterminent
les
program
mes simples
et
combines
réalisables.
21
La page est en cours de chargement...

Alle
Zickzack-
und
Nutzstiche
werden
durch
zusätzliches
Tippen
der
Taste
G
in
der
Breite
halbiert.
J
Regtage
des
points
utilitaires:
(symboles
blancs)
Appuyer
sur
Ia
touche
et
regler
Ia
Ion
gueur
de
point
désirée
entre
1
et
6.
En
appuyant
également
sur
Ia
touche
G,
tous
es
points
zigzag
et
utilitaires
sont
réduits
de
moitié
en
largeur.
punti
utili:
(simboli
bianchi)
Premere
il
tasto
e
regolare
Ia
lunghezza
del
punto
desiderata
tra
1-6.
Tutti
i
punti
a
zig-zag,
elastici
e
stretch
vengono
dimezzati
nella
loro
larghezza,
se
si
preme
in
aggiunta
il
tasto
G.
/
Nutzstiche
einsteflen:
j
f
S&ecting
utNity
stitches
(weilte
Symbole)
Taste
tippen
und
die
gewunschte
Stich
lange
zwischen
1
und
6
einstellen.
(white
symbols>
Push
the
button
required
and
set
the
stitch
length
between
1
and
6.
All
zigzag,
and
utility
stitches
are
halved
in
width
when
button
G
is
pressed.
23

By
also
pressing
button
G,
all
stretch
stit
ches
can
be
halved
in
width.
Regobzone
dei
punti
flexi
(stretch):
(simboli
rossi)
Premere
il
tasto
e
girare
1
regolatore
per
a
lunghezza
del
punto
fino
all’arresto
sul
simbolo
rosso.
Tutti
i
punti
flexi
si
dimezzano
in
ar
ghezza,
premendo
in
aggiunta
1
tasto
G.
Stretchstiche
einsteflen:
(rote
Symbole)
Taste
tippen
und
Stichlängen-Einsteller
bis
zum
Anschlag
auf
rotes
Symbol
stel
len.
4
Alle
Stretchstiche
werden
durch
zusätz
liches
Tippen
der
Taste
G
in
der
Breite
halbiert.
S&ecting
stretch
stitches
(red
symbols)
Push
the
button
required
and turn
the
stitch
length
control
as
far
as
it
will
go
(red
symbol).
Régage
des
points
éastiques:
(symboles
rouges)
Appuyer
sur
Ia
touche
et
regler
le
régle
point
de
Ia
longueur
de points
sur
le
sym
bole
rouge,
jusqu’à
Ia
butée.
Tous
los
points
élastiques
sont
réduits
de
moitié
en
appuyant
sur
Ia
touche
G.
1
24

Nutz-
und
Stretchstich-Kombinationen:
Die
Stichkombinationen
sind
out
der
Programmtabelle
im
Klappdeckel
angege
ben
und
am
Lnde
dieser
Anleitung
mit
Nähhinweisen.
Zum
Beispiel
der
Elasti
sche-Blindstich:
Taste
M
und
F
gleichzei
tig
tippen.
Stichlänge
zwischen
1
und
4
wählen.
Utility-
and
stretch-stitch
combinations
The
various
stitch
combinations
are
shown
in
the
chart
on
the
inside
of
the
hinged
top
cover
and at
the
end
of
this
booklet,
together
with
sewing
instruc
tions.
For
example,
if
you
want
to
sew
an
elastic
blindstitch,
push
buttons
M
and
F,
select
a
stitch
length
between
1
and
4.
Points
utilitaires
et
éastiques
combines:
Les
combinaisons
de points
possibles
sont
indiquees,
avec
des
conseils
et
idées,
sur
Ic
tableau
des
points
a
Ia
fin
de
ce
mode
d’emploi.
Pour
le
point
invisible
elastique,
par
exemple,
il
faut
enfoncer
les
touches
F
et
M
et
choisir
une
longueur
de
point
entre
1
et
4.
Ic
combinazioni
del
punti
utili
con
i
punti
flexi
(stretch):
Le
combinazioni
dci
punti
sono
indicate
sulla
tabella
del
programmi
nd
coperchio
e
al
termine
di
questo
libretto,
con
con
sigh
per
il
cucito.
Ad
esempio
il
punto
invisibile
elastico:
tasto
M
e
F
premuti
insieme.
Scegliere
lunghezza
del
punto
tra
1
e
4.
25

C2D
III
[+
H
Stichage
einstellen
bei
Geradstich:
Stichlage
links:
Taste
B
tippen
Stichlage
Mitte:
Taste
G
tippen
Stichlage
rechts:
Taste
H
und
I
tippen
Selecting
the
needle
position
for
straight
stitching
Left
needle
position:
push
button
8
Central
needle
position:
push
button
G
Right
needle
position:
push
buttons
H
and
Deport
du
point
droit:
Deport
a
gauche:
appuyer
sur
Ia
touche
B
Deport
au
milieu:
appuyer
sur
Ia
touche
G
Deport
a
droite:
appuyer
sur es
touches
H
et
I
N
Regolazione
della
posizione
d’ago
nella
cucitura
diritta:
Posizione
ago
sinistra:
premere
tasto
B
Posizione
ago
centro:
premere
tasto
G
Posizione
ago
destra:
premere
tasti
H
e
I
26
La page est en cours de chargement...

U
—
[i[1[1[ZLtH*1
,1
4
4
Thumb
wheel
for
fancy
stitches
(Model
1147)
Every
fancy
stitch
is
provided
with
a
letter.
Select
the
fancy
stitch
from
the
table.
Set
the
corresponding
letter
at
mark
“0”
by
turning
thumb
wheel
N.
For
sewing
utility
stitches,
thumb
wheel
N
for
fancy
stitches
must
be
disengaged.
To
do
so,
set
the
white
dot
at
mark
“0”.
Regolatore
punti
ornamentali
(Modello
1147):
Ad
ogni
punto
ornamentale
corrisponde
una
lettera.
Scegliere
il
punto
secondo
Ia
riproduzione
nella
tabella.
Col
selettore
di
registrazione
“N”
ruotare
Ia
lettera
deside
rata
sotto
Ia
marca
di
registrazione
“0”.
Per
cucire
con
i
punti
comuni
disinserire
1
regolatore
“N”
dei
punti
ornamentali.
Allo
scopo
ruotare
II
punto
bianco
sotto
Ia
marca
di
registrazione
“0”.
N
Einstellrad
für
Zierstiche
(Modell
1147):
Jedem
Zierstich
ist
em
Buchstabe
zugeordnet.
Den
Zierstich
auf
der
Tabelle
auswählen.
Mit
dem
Einstellrad
,,N”
den
entsprechenden
Buchstaben
unter
die
Einstellmarkierung
,,0”
drehen.
Zum
Nàhen
der
Nutzstiche
muR
das
Em
stellrad
,,N”
der
Zierstiche
ausgeschaltet
werden.
Dazu
den
weiRen
Punkt
unter
die
Emnstellmarkierung
,,0”
drehen.
Disque
de
réglage
des
points
d’orne
mentation
(1147):
Chaque
point
d’ornementation
est
désigné
par
une
Iettre-code.
A
l’aide
du
disque
,,N”
placer
Ia
lettre-code
du
motif
désiré
sous
le
repére
,,0”.
Pour
pouvoir
coudre
les
points
utilitaires,
débrayer
le
disque
de
reglage
,,N”
des
points
d’ornementation
en
placant
le
point
blanc
de
ce
disque
sous
le
repère
,,0”.
28
La page est en cours de chargement...
La page est en cours de chargement...

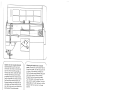
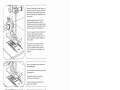
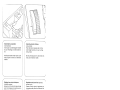
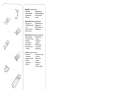
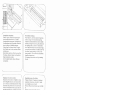
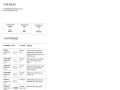
Verwandlungsnähflache
und
Zubehor:
Nähfläche
kann
herausgenommen
werden
N.
Nähfläche
öffnen,
Zubehörkästchen
P
herausnehmen.
Unter
dem
Zubehärkäst
chen
ist
em
Zubehörfach
0.
Abbildung
Q
zeigt,
wie
Nähfü5e,
Nadein
und
Spulen
eingeordnet
werden
müssen.
o
Stopfful
1
NormalnähfuI,
2
Klarsichtful
3
Säumer
4
BIindstichfuE
5
ReiE,verschluBfuE.
6
KnopflochfuR
7
Lineal
Detachable
work
support
and
accessories:
The
work
support
can
be
lifted
out
(N>.
Open
its
lid
and
take
out
accessory
box
P.
Underneath
the
box
is
an
accessory
com
partment
0.
Illustration
0
shows
hw
to
arrange
sewing
feet,
needles
and
bobbins
in
the
accessory
box.
o
Darning
foot
1
Standard
sewing
foot
2
Clear-view
foot
3
Hemmer
foot
4
Blindstitch
foot
5
Zipper
foot
6
Buttonhole
foot
7
Edge
guide
Bolte
de
rangement
et
accessoires:
Enlever
Ia
bolte
de
rangement
N,
l’ouvrir
et
enlever
Ia
bolte
d’accessoires
R
Sous
celle-ci
se
trouve
le
casier
0.
Figure
0
vous
montre
comment
ranger
es
pieds
presseurs,
les
aiguilles
et
les
canettes.
O
Pied
a
repriser
1
Semelle
normale
2
Semelle
transparente
3
Pied
ourleur
4
Semelle
a
point
invisible
5
Semelle
pour
poser
Ia
fermeture
a
glissiere
6
Semelle
pour
boutonniere
7
Guide-bord
II
piano
d
lavoro
variabile
e
gli
accessori:
II
piano
di
lavoro
puô
essere
tolto
(N).
Aprire
il
piano
di
lavoro,
togliere
il
casset
tino
degli
accessori
P.
Sotto
ii
cassettino
degli
accessori
si
trova
uno
scomparto
per
accessori
0.
Figura
0
mostra
come
siste
mare
piedini,
aghi
e
spoline.
o
piedino
da
rammendo
1
piedino
normale
2
piedino
trasparente
3
orlatore
4
piedino
per
punto
invisiblle
5
piedino per
cerniere
6
piedino
per
occhielli
7
lineale
di
guida
31
La page est en cours de chargement...

Nähfüe
(Normalzubehör)
o
StopffuB
4
Blindstichfu6,
1
NormalnähfuR
5
ReiRverschlu6,fu6,
2
KlarsichtfuB
6
Knopflochfu6
3
Säumer
7
Lineal
Sewing
feet
(standard
accessories)
O
Darning
foot
4
Blindstitch
toot
1
Standard
sewing
5
Zipper
foot
foot
6
Buttonhole
foot
2
Clearview
foot
7
Edge
guide
3
Hemmer
foot
Pieds
presseurs
(accessoires
standards)
o
Pied
a
repriser
5
Semelle
pour
1
Semelle
normale
poser
Ia
2
Semelle
fermeture
a
transparente
glissière
3
Pied
ourleur
6
Semelle
pour
4
Semelle
a
point
boutonniere
invisible
7
Guide-bord
piedini
(corredo
normale)
o
piedino
da
4
piedino
per
punto
rammendo
invisibile
1
piedino
normale
5
piedino
per
2
piedino
cerniere
trasparente
6
piedino per
3
orlatore
occhielli
7
lineale
di
guida
D
33

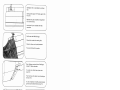
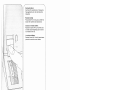
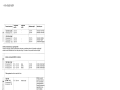
Fuhrungslineal
(N):
Das
Lineal
in
die
Bohrung
0
schieben
und
nach
Einstellen
des
gewünschten
Abstan
des
Schraube
P
festdrehen.
4
Edge
guide
(N):
Push
the
edge
guide
into
hole
0,
set
the
required
edge
distance
and
tighten
it
there.
BIindstichfuf:
Blindstichnähen
(Q):
Mit
der
Schraube
R
die
Führung
nach
inks
stellen.
Die
Füh
rung
wird
dann
für
den
Nadeleinstich
reguliert,
An
der
Führungskante
S
läuft
der
Bruch
des
Oberstoffes
entlang.
Bhndstitching
foot
Blindstitching
(Q):
turn
screw
R
to
set
guide
at
the
left.
The
guide
is
then
adjusted
according
to
the
needle
penetra
tions.
The
folded
edge
of
the
material
runs
along
guide
edge
S.
t
Guide-bord
(N):
Glisser
le
guide-bord
dans
le
trou
0,
régler
Ia
distance
souhaitée
et
resserrer
ensuite
Ia
vis
P.
Pied
a
point
invisible:
Couture
au
point
invisible
(Q):
Déplacer
le
guide
é
gauche
par
Ia
vis
R.
Le
guide
est
régle
pour
Ia
pénétration
de
l’aiguille
dans
le
tissu,
La
cassure
du
tissu
supérieur
longe
le
bord
du
guide
S
Line&e
di
guida
(N):
Infilare
ii
lineale
nel
foro
0
a
avvitare
Ia
vite
P
dopo
aver
regolato
a
distanza
desi
derata.
Piedino
per
punto
invisibile:
Punto
invisibile
(Q):
Portare
con
vite
R
Ia
guida
verso
sinistra.
La
guida
viene
quindi
regolata
per
Ia
corretta
entrata
delI’ago.
La
piegatura
della
stoffa
scorre
lungo
ii
bordo
di
guida
S.
34

Stopffuf:
Die
Nadel
hochstellen.
Den
Bugel
P
nach
hinten
drücken
und
testhalten.
Den
Stift
des
Fules
in
die
Bohrung
N
einfUhren,
die
Gabel
R
greitt
dabei
urn
die
StoffdrUcker
stange,
und
den
FuE
bis
zurn
Anschlag
einsetzen.
Den
Bdgel
P
loslassen,
wobei
er
sich
cut
die
Halteschraube
G
legt.
Die
Schraube
0
festdrehen.
Beirn
Stopten
mit Wofle
wird
der
Wollfa
den
in
die
Fuhrung
S
gezogen.
Pied
a
repriser:
Lever
In
barre
a
aiguille.
Déplacer
l’ètrier
P
vers
l’arriére
et
Ic
maintenir.
Introduire
Ic
tenon
de
a
sernelle
dens
Ic
trou
N:
Ia
fourche
R
entoure
Ia
barre
du
pied
pres—
seur;
introduire
Ic
pied
jusqu’a
Ia
butée.
Lächer
l’étrier
P;
il
se
pose
sur
Ia
via
de
rnaintien
U.
Ensuite
resserrer
Ia
vis
0.
En
reprisant
de
Ia
Paine,
enfiler
Ic
hi
de
Paine
dens
le
guide
S.
4
N
piadino
cia
rammendo:
Alzare
l’ago.
Prernere
Ia
stafta
P
verso
dietro
e
tenerla
ferrna.
Inserire
P
perno
del
piedino
nd
foro
N,
Ia
forcella
R
si
aggan
cia
in
taP
rnaniera
sulla
barra
prernistoffa.
quindi
innestare
il
piedino
fino
all’arresto.
Rilasciare
Ia
staffa
P
che
si
appoggerà
sulla
vite
di
fissaggio
0.
Avvitare
Ia
vite
0.
Rarnrnendando
con
lana
infilarla
nella
guide
S.
Darning
foot:
Position
the
needle
up.
Push
bar
P
to
the
back
and
hold
it
there.
Fit
the
pin
of
the
foot
in
hole
N;
at
the
sarne
time,
fork
R
engages
the
presser
bar,
and
push
the
foot
fully
in.
Let
go
of
bar
P,
which
then
rests
on
retaining
screw
U.
Tighten
screw
0.
For
wool
darning
the
woollen
thread
is
pulled
into
guide
S.
35

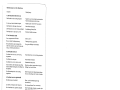
0.
The
zipper
foot
can
be
moved
to
the
left
(Fg.
P)
or
right
(Fig.
Q),
as
required.
Pedhio
per
cernie’e
lampo:
Agganciare
il
perno
posteriore
nella
scanalatura
N,
prernere
ii
piedino
davanti
in
su
e
agganciarlo
nella
scanalatura
0.
A
secondo
della
lavorazione
si
puà
spostare
il
piedino per
ceniera
a
sinistra
P
o
a
destra
Q
4
4
Rei(verschIu(tuis:
Den
hinteren
Steg
in
die
Nute
N
einhdn
gen,
den
Putt
vorne
hochdrbcken
und
in
die
Nute
0
einrasten.
Je
nach
Verarbeitung
kann
der
Reiltver
schlultfult
nach
links,
Abbildung
P
oder
rechts,
Abbildung
Q
verschoben
werden.
Zipper
foot:
Push
the
rear
stud
into
slot
N.
Then
push
the
foot
up
until
it
snaps
in
place
in
slot
4
4
Pied
pour
fermeture
a
gPssere:
Accrocher
Ia
tige arrière
dans
Ia
rainure
N
et
soulever
Ia
semelle
du
pied
a
l’avant
pour l’engager
dans
Ia
rainure
0.
Suivant
besoin,
le
pied
pour
fermeture
a
glissiere
peut
ètre
déplacé
vers
Ia
gauche
(fig.
P)
ou
vers
Ia
droite
(fig.
Q).
36
)

i(rwpNoch
esteilen:
Taste
C
tippen.
Qbaiisdr
nspe
uruno
in
den
Knoolloci
bsreicl
set
stelien.
Knnptlochtirlt
anbnrigen.
stichdici
tie
rn
friapiIochlsercich
N
sinsteilen.
i—.nrlauijn
den
wie
fcicjl
rn
Ndhlult
einlegen:
Faden
dber
dit.
hintete
Nocke
C)
iegeii,
straff
iiehen
und
in
der
voidereri
Nooks
P
nklenirnen.
Bein
rähen
ldui
‘tar
Ptail
U
sn
der
3ksIe
R
enarig.
Dadurch
kanu
dre
Knoflucla
lange
hestirnirL
werden.
Zusi
t
nopliochnahon
teiras
Nil
gain
verwenden.
3i’ronhae
ettiiig:
Psh
button
C.
.et
the
ieette
thread
ten
son
at
range
tar
Lt’
orihole
sewing.
,L\ttach
the
buttonhole
foot.
Set
roe
stitch
density
at
range
N
irc,tir
a
giinp
thread
in
the
sewing
Foot
as
shown
in
the
llustra—
hen
Place
the
[tread
ovei
Itie
back
ridge,
cud
pull
it
taut
so
that
it
is
hold
in
tab
P
at
the
front.
Dii
rig
sewing,
,-lnow
J
runs
aung
scale
K.
is
is
how
tie
buttonhoie
length
is
data
mint.
For
sowing
britroisuies
se
ant
sewing
ihraad.
/
Zégraqr.
Us
Ia
bout
art
lore
Appuyer
sur
a
touche
C’
Regler
Ta
tension
du
fil
daigitille
dens
Ta
sane
boLionnihre;
stir
3
Fixer
a
salt
idle
tiUiOfliIeiit
IldijIer
Ta
denote
des
0
oints
UCuts
Ta
Lone
boutui
nidr’l\l.
Inirodirire
to
Lii
he
prssa
dens
Ia
ten
Gild
cunhine
suit.
Luci
tar
Ia
il
cur
Ie
crochet
auriere
0
ci
a
Unce
‘Tans
Ic
pinne
fil
P
Petulant
Is
coriturc
Ta
iteche
0
coulisse
Ic
long
de
I’echelle
gridi
roe
It.
Ainsi,
ii
est
possible
tIe
dcterrnirier
Ia
Ion
gueril
do
I
i.,ontonriree.
Utiliser
,ii
il
C
coucirs
tin.
(
Negolaziotie
PCI
Prernere
il
tasto
C.
Recloldra
Ia
tensione
stiperroro
nd
settee
ucchiallo
3.
Appli
rue
it
piedino
Jer
flu
Tiniii
Fitrea
4
a
dcl
purto
tel
setrore
cci
ocaitielli
N.
Iriserire
cone
segue
it
trIo
dppoggiare
1
tilo
sop
a
it
ganco
pose
i
ore
0,
tenderlo
bene
a
hssarlo
Ci
35i
010
rnterinre
P
Cucendo,
Is
Ireccia
0
soorre
lingo
Ia
scala
R
In
tale
maniera
Si
puO
detenriinsre
con
esettezas
a
l’’rrghesza
dell’occhrello.
Users
per
Insonrallo
del
tilto
fine.
N
I
37
.-
La page est en cours de chargement...
La page est en cours de chargement...
La page est en cours de chargement...
La page est en cours de chargement...
La page est en cours de chargement...
La page est en cours de chargement...
La page est en cours de chargement...
La page est en cours de chargement...
La page est en cours de chargement...
La page est en cours de chargement...
La page est en cours de chargement...
La page est en cours de chargement...
La page est en cours de chargement...
La page est en cours de chargement...
La page est en cours de chargement...
La page est en cours de chargement...
La page est en cours de chargement...
La page est en cours de chargement...
La page est en cours de chargement...
La page est en cours de chargement...
La page est en cours de chargement...
La page est en cours de chargement...
La page est en cours de chargement...
La page est en cours de chargement...
La page est en cours de chargement...
La page est en cours de chargement...
La page est en cours de chargement...
La page est en cours de chargement...
La page est en cours de chargement...
La page est en cours de chargement...
La page est en cours de chargement...
La page est en cours de chargement...
La page est en cours de chargement...
La page est en cours de chargement...
La page est en cours de chargement...
La page est en cours de chargement...
La page est en cours de chargement...
La page est en cours de chargement...
La page est en cours de chargement...
La page est en cours de chargement...
La page est en cours de chargement...
La page est en cours de chargement...
La page est en cours de chargement...
La page est en cours de chargement...
La page est en cours de chargement...
La page est en cours de chargement...
La page est en cours de chargement...
-
 1
1
-
 2
2
-
 3
3
-
 4
4
-
 5
5
-
 6
6
-
 7
7
-
 8
8
-
 9
9
-
 10
10
-
 11
11
-
 12
12
-
 13
13
-
 14
14
-
 15
15
-
 16
16
-
 17
17
-
 18
18
-
 19
19
-
 20
20
-
 21
21
-
 22
22
-
 23
23
-
 24
24
-
 25
25
-
 26
26
-
 27
27
-
 28
28
-
 29
29
-
 30
30
-
 31
31
-
 32
32
-
 33
33
-
 34
34
-
 35
35
-
 36
36
-
 37
37
-
 38
38
-
 39
39
-
 40
40
-
 41
41
-
 42
42
-
 43
43
-
 44
44
-
 45
45
-
 46
46
-
 47
47
-
 48
48
-
 49
49
-
 50
50
-
 51
51
-
 52
52
-
 53
53
-
 54
54
-
 55
55
-
 56
56
-
 57
57
-
 58
58
-
 59
59
-
 60
60
-
 61
61
-
 62
62
-
 63
63
-
 64
64
-
 65
65
-
 66
66
-
 67
67
-
 68
68
-
 69
69
-
 70
70
-
 71
71
-
 72
72
-
 73
73
-
 74
74
-
 75
75
-
 76
76
-
 77
77
-
 78
78
-
 79
79
-
 80
80
-
 81
81
-
 82
82
-
 83
83
-
 84
84
-
 85
85
-
 86
86


Pfaff tipmatic 1045 Le manuel du propriétaire
- Catégorie
- Machines à coudre
- Taper
- Le manuel du propriétaire
- Ce manuel convient également à
dans d''autres langues
- italiano: Pfaff tipmatic 1045 Manuale del proprietario
- English: Pfaff tipmatic 1045 Owner's manual
- Deutsch: Pfaff tipmatic 1045 Bedienungsanleitung
Documents connexes
-
Pfaff tipmatic 1115 Le manuel du propriétaire
-
-
-
-
-
-
-
-
Pfaff Varimatic 6089 Le manuel du propriétaire
-