
Operating Instructions
Mode d’emploi
4-108-811-61(1)
©2008 Sony Corporation
Wireless Stereo
Headset
DR-BT160AS
US
FR

2
US
WARNING
To reduce the risk of fire or electric
shock, do not expose this
apparatus to rain or moisture.
To reduce the risk of electrical
shock, do not open the cabinet.
Refer servicing to qualified
personnel only.
Do not install the appliance in a confined
space, such as a bookcase or built-in
cabinet.
To reduce the risk of fire, do not cover the
ventilation of the apparatus with
newspapers, tablecloths, curtains, etc.
And do not place lighted candles on the
apparatus.
To reduce the risk of fire or electric
shock, do not place objects filled with
liquids, such as vases, on the apparatus.
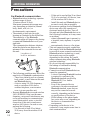
Connect the AC power adaptor to an
easily accessible AC outlet. Should you
notice an abnormality in the AC power
adaptor, disconnect it from the AC outlet
immediately.
Do not expose the batteries (battery pack
or batteries installed) to excessive heat
such as sunshine, fire or the like for a long
time.
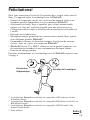
Excessive sound pressure from
headphones can cause hearing loss.
The Bluetooth word mark and logos are
owned by the Bluetooth SIG, Inc. and any
use of such marks by Sony Corporation is
under license.
Other trademarks and trade names are
those of their respective owners.
MPEG Layer-3 audio coding technology
and patents licensed from Fraunhofer IIS
and Thomson.
Information
This device complies with Part 15 of FCC
Rules and RSS-Gen of IC Rules.
Operation is subject to the following two
conditions: (1) this device may not cause
harmful interference, and (2) this device
must accept any interference received,
including interference that may cause
undesired operation of this device.
You are cautioned that any changes or
modifications not expressly approved in
this manual could void your authority to
operate this equipment.
This equipment must not be co-located or
operated in conjunction with any other
antenna or transmitter.
This equipment complies with FCC/IC
radiation exposure limits set forth for
uncontrolled equipment and meets the
FCC radio frequency (RF) Exposure
Guidelines in Supplement C to OET65
and RSS-102 of the IC radio frequency
(RF) Exposure rules. This equipment has
very low levels of RF energy that it is
deemed to comply without testing of
specific absorption ratio (SAR).

US
3
US
Table Of Contents
What is
Bluetooth
wireless
technology? .................. 4
Welcome! .......................... 5
3 steps to Bluetooth function .... 6
Location and Function of
Parts............................... 7
Charging the unit ............. 8
Pairing ............................. 10
What is pairing? ...................... 10
Procedures of pairing .............. 10
Wearing the unit ............. 12
Indications of
Bluetooth
function ....................... 14
Listening to music ......... 15
Controlling the audio device –
AVRCP ............................... 16
Calling ............................. 18
Controlling the Bluetooth
mobile phone –
HFP, HSP............................ 20
Calling while playing
back music .................. 21
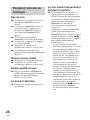
Precautions .................... 22
Troubleshooting ............. 24
Initializing the unit ......... 26
Specifications................. 27
US
For the customers in the Canada
RECYCLING LITHIUM-ION
BATTERIES
Lithium-Ion batteries
are recyclable.
You can help preserve
our environment by
returning your used
rechargeable batteries
to the collection and recycling location
nearest you.
For more information regarding
recycling of rechargeable batteries, call
toll free 1-800-822-8837, or visit
http://www.rbrc.org/
Caution: Do not handle damaged or
leaking Lithium-Ion batteries.

4
US
What is
Bluetooth
wireless
technology?
Bluetooth
®
wireless technology is a
short-range wireless technology that
enables wireless data
communication between digital
devices, such as a computer or
digital camera. Bluetooth wireless
technology operates within a range
of about 10 meters (about 30 feet).
Connecting two devices as
necessary is common, but some
devices can be connected to
multiple devices at the same time.
You do not need to use a cable for
connection, nor is it necessary for
the devices to face one another, such
is the case with infrared technology.
For example, you can use such a
device in a bag or pocket.
Bluetooth standard is an
international standard supported by
thousands of companies all over the
world, and employed by various
companies worldwide.
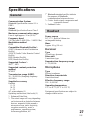
Communication System
and Compatible
Bluetooth
Profiles of this unit
Profile is standardization of the
function for each Bluetooth device
specification. This unit supports the
following Bluetooth version and
profiles:
Communication System :
Bluetooth Specification version 2.0 +
EDR*
1
Compatible Bluetooth Profiles:
– A2DP (Advanced Audio Distribution
Profile): Transmitting or receiving
audio content of high-quality.
– AVRCP (Audio Video Remote Control
Profile): Controlling A/V equipment;
pausing, stopping, starting playback,
volume control, etc.
– HSP (Headset Profile)*
2
: Talking on the
phone/Operating the phone.
– HFP (Hands-free Profile)*
2
: Talking on
the phone/Operating the phone by
hands-free.
*
1
Enhanced Data Rate
*
2
When you use a Bluetooth mobile
phone supported by both HFP (Hands-
free Profile) and HSP (Headset
Profile), set to HFP.
Notes
• To be able to use the Bluetooth
function, the Bluetooth device to be
connected requires the same profile as
the unit’s.
Note also that even if the same profile
exists, devices may vary in function
depending on their specifications.
• Due to the characteristic of Bluetooth
wireless technology, the sound played
on this unit is slightly delayed from the
sound played on the Bluetooth device
during talking on the telephone or
listening to the music.

5
US
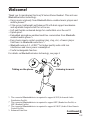
Welcome!
Thank you for purchasing this Sony Wireless Stereo Headset. This unit uses
Bluetooth wireless technology.
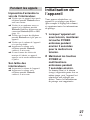
• Enjoy music wirelessly from Bluetooth Stereo-enabled music players and
mobile phones.*
1
• Ultra secure, lightweight and balanced fit with dual support mechanism
and adjustable earpiece shaft for active use.
• Soft and flexible contoured design for comfortable over-the-ear fit.
• Splash proof.
• Embedded microphone enables hand-free conversation from Bluetooth-
enabled mobile phone.*
2
• Enjoy basic remote control operation (play, stop, etc.) of music player
functions via Bluetooth connection.*
3
• Bluetooth version 2.0 + EDR*
4
for higher quality audio with less
interference and lower power consumption.
• Useful rechargeable function.
For details on Bluetooth wireless technology, see page 4.
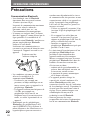
Listening to music
Talking on the phone
*
1
The connected Bluetooth device is required to support A2DP (Advanced Audio
Distribution Profile).
*
2
The connected Bluetooth device is required to support HFP (Hands-free Profile) or
HSP (Headset Profile).
*
3
The connected Bluetooth device is required to support AVRCP (Audio Video Remote
Control Profile).
*
4
Enhanced Data Rate
Continued

6
US
V
Calling
V
Listening to music
V
V
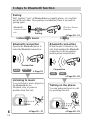
3 steps to
Bluetooth
function
Bluetooth
mobile phone,
etc.
Pairing
Wireless Stereo
Headset
Bluetooth
connection
Operate the Bluetooth device to
make the Bluetooth connection.
Connection
Listening to music
You can listen to music played on
the Bluetooth device.
Playback, stop, or pause is
possible from this unit.
Music
Bluetooth
connection
When the unit is turned on, the
unit starts making the Bluetooth
connection to the recognized
mobile phone automatically.
Talking on the phone
You can make and receive a call
by operating this unit.
Pairing
First, register (“pair”) a Bluetooth device (mobile phone, etc.) and this
unit with each other. Once pairing is established, there is no need for
pairing again.
Voice
Connection
A2DP
AVRCP
HFP HSP
c Page 10 - 11
c Page 15
c Page 18 - 20
c Page 18 - 21c Page 15 - 17

7
US
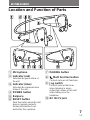
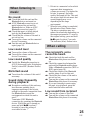
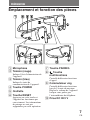
Location and Function of Parts
1 Microphone
2 Indicator (red)
Indicates the power status of
the unit.
3 Indicator (blue)
Indicates the communication
status of the unit.
4 POWER button
5 Earpiece
6 RESET button
Push this button when this unit
does not operate properly.
Pairing information is not
deleted by this operation.
7 PAIRING button
8
Multi function button
Controls various call functions.
9 Jog switch
Controls various functions
when listening to music.
Adjust the volume of this unit
when talking over the
telephone.
0 DC IN 3 V jack
GETTING STARTED

8
US
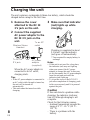
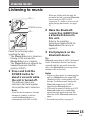
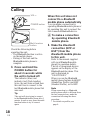
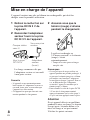
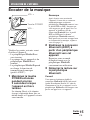
1 Remove the cover
attached to the DC IN
3 V jack on the unit.
2 Connect the supplied
AC power adaptor to the
DC IN 3 V jack on the
unit.
When the AC power adaptor is
connected to an AC outlet,
charging starts.
Tips
• If the AC power adaptor is connected to
an AC outlet while the unit is turned on,
the unit will be turned off
automatically.
• This unit cannot be turned on while
charging.
Wireless Stereo
Headset
To DC IN
3 V jack
AC power
adaptor
(supplied)
To an AC
outlet
3 Make sure that indicator
(red) lights up while
charging.
Charging is completed in about
2.5 hours* and the indicator
(red) goes off automatically.
* Time required for empty battery to
recharge.
Notes
• If this unit is not used for a long time,
the indicator (red) may not light up
when you connect the AC power
adaptor to charge this unit. In this case,
do not disconnect the AC power adaptor
from the unit and wait until the
indicator (red) lights up.
• To close the cover of the DC IN 3 V
jack after completion of charging, push
in the cover securely until it is pressed
against the jack.
Caution
If this unit detects a problem while
charging, the indicator (red) may
turn off, although charging is not
complete.
Check for the following causes:
– Ambient temperature exceeds the
range of 0 °C – 45 °C (32 °F –
113 °F).
– There is a problem with the
battery.
Charging the unit
The unit contains a rechargable Lithium-Ion battery, which should be
charged before using for the first time.

9
US
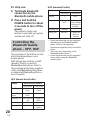
Approx.
usage hours
7 hours
100 hours
Status
Full
Mid
Low (needs to
charge)
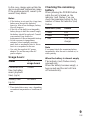
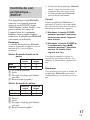
Checking the remaining
battery
When pressing the POWER button
while the unit is turned on, the
indicator (red) flashes. You can
check the remaining battery by the
number of times the indicator (red)
flashes.
Indicator (red)
3 times
2 times
1 time
Note
You cannot check the remaining battery
immediately after the unit is turned on, or
while pairing.
When the battery is almost empty
The indicator (red) flashes slowly
automatically.
When the battery becomes empty, a
beep sounds and the unit will turn
off automatically.
In this case, charge again within the
above-mentioned temperature range.
If the problem persists, consult your
nearest Sony dealer.
Notes
• If the battery is not used for a long time,
battery may be quickly depleted,
however, after a few recharges, battery
life will improve.
• If the life of the built-in rechargeable
battery drops to half the normal length,
the battery should be replaced. Consult
your nearest Sony dealer for
replacement of the rechargeable battery.
• Avoid exposure to temperature
extremes, direct sunlight, moisture,
sand, dust or mechanical shock. Never
leave in a car parked in the sun.
• Use only the supplied AC power
adaptor. Do not use any other AC
power adaptor.
Usage hours
*
Status
Communication
time (including
music playback
time) (up to)
Standby time
(up to)
* Time stated above may vary, depending
on ambient temperature or conditions of
use.

10
US
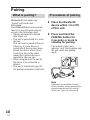
Procedures of pairing
1 Place the
Bluetooth
device within 1 m (3 ft)
of this unit.
2 Press and hold the
PAIRING button for
2 seconds or more to
standby for pairing.
The indicator (blue) and
indicator (red) flash together and
the unit enters into pairing
mode.
Note
If pairing is not established within
about 5 minutes, pairing mode will be
cancelled and this unit will turn off.
In this case, start over from step 1.
Pairing
What is pairing?
Bluetooth devices need to be
“paired” with each other
beforehand.
Once Bluetooth devices are paired,
there is no need for pairing again,
except in the following cases:
• Pairing information is deleted
after repair, etc.
• This unit is paired with 9 or more
devices.
This unit can be paired with up to
8 devices; if a new device is
paired after 8 devices have been
paired, the device whose latest
connection time is the oldest
among the 8 paired devices is
replaced by the new one.
• When recognition of the unit by
the device to be connected is
deleted.
• This unit is initialized (page 26).
All pairing information is deleted.

11
US
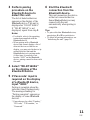
3 Perform pairing
procedure on the
Bluetooth
device to
detect this unit.
The list of detected devices
appears on the display of the
Bluetooth device. This unit is
displayed as “DR-BT160AS.”
If “DR-BT160AS” is not
displayed, repeat from step 1.
Notes
• For details, refer to the operating
instructions supplied with the
Bluetooth device.
• When pairing with a Bluetooth
device that cannot display a list of
detected devices or that has no
display, you may pair the device by
setting both this unit and the
Bluetooth device to pairing mode.
At this time, if passcode is set
besides “0000” on the Bluetooth
device, pairing cannot be done with
this unit.
4 Select “DR-BT160AS”
on the display of the
Bluetooth
device.
5 If Passcode* input is
required on the display
of a
Bluetooth
device,
input “0000.”
Pairing is complete when the
indicator (blue) flashes slowly.
The message standing for
“Pairing complete” appears on
the display of some Bluetooth
devices.
* Passcode may be called “Passkey,”
“PIN code,” “PIN number,” or
“Password.”
6 Start the
Bluetooth
connection from the
Bluetooth
device.
This unit memorizes the device
as the last connected device.
Some Bluetooth devices may
connect with the unit
automatically when pairing is
complete.
Tips
• To pair with other Bluetooth devices,
repeat steps 1 to 5 for each device.
• To delete all pairing information, see
“Initializing the unit” (page 26).

12
US
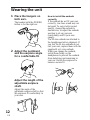
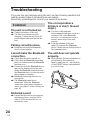
Wearing the unit
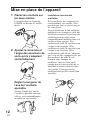
1 Place the hangers on
both ears.
The headset with the POWER
button is for the right ear.
2 Adjust the neckband
and the earpiece angle
for a comfortable fit.
Adjust the length of the
adjustable earpiece
shaft.
Adjust the angle of the
adjustable earpiece shaft so that
the earpieces fit comfortably in
your ears.
How to install the earbuds
correctly
If the earbuds do not fit your ears
correctly, low-bass sound may not
be heard. To enjoy better sound
quality, change the earbuds to
another size, or adjust the earbuds
position to sit on your ears
comfortably and fit your ears
snugly.
The M size earbuds are attached to
the headphones before shipment. If
you feel the M size earbuds do not
suit your ears, replace them with the
supplied S or L size earbuds.
When you change the earbuds,
install them firmly on the
headphones to prevent the earbuds
from detaching and remaining in
your ear. Rotate the earpieces to
ensure a secure fit.

13
US
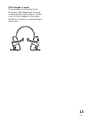
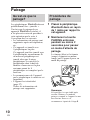
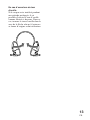
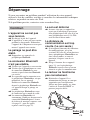
If the hanger is open,
If the headset is left unused for a
long time, the hanger may be open
as shown in the figure below. In this
case, twist the hanger in the arrow
direction to restore its original shape
before use.

14
US
Pairing
Connecting
Connected
Phone
Music
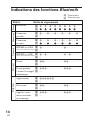
Indications of
Bluetooth
function
B : Indicator (blue)
R : Indicator (red)
Status Flashing patterns
Searching
B
– – – – – – – –
...
R
– – – – – – – –
...
Connectable
B
– – – – – – – – – –
...
R
–
Connecting
B
– – – – – – – – – –
...
R
– – – – – – – – – –
...
HFP/HSP or A2DP
B
– – – – – – – – – – – – – –
...
(standby for receiving audio signal)
R
–
HFP/HSP and A2DP
B
– – – – – – – – – – – –
...
(standby for receiving audio signal)
R
–
Listening
B
– – – – – – – – – – – –
...
R
–
Listening during standby
B
– – – – – – – – – –
...
for telephone call
R
–
Incoming call
B
...
R
–
Talking
B
– – – – – – – – – – – –
...
R
–
Calling while
B
– – – – – – – – – –
...
playing back music
R
–

15
US
Check the following before
operating the unit.
– The Bluetooth device is turned on.
– Pairing of this unit and the
Bluetooth device is complete.
– The Bluetooth device supports the
transmitting music function
(profile: A2DP*).
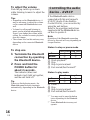
1 Press and hold the
POWER button for
about 2 seconds while
the unit is turned off.
The indicator (blue) and
indicator (red) flash together
twice and the unit is turned on.
Note
After the unit is turned on, the unit
attempts to connect to the last
connected Bluetooth device
automatically with HFP or HSP.
Listening to music
When not calling with this unit, do
not make the last connected Bluetooth
device ready for HFP or HSP
connection. To make or receive a call
while playing back music, see page
21.
2 Make the
Bluetooth
connection (A2DP) from
a
Bluetooth
device to
this unit.
Refer to the operating
instructions supplied with the
Bluetooth device on how to
operate it.
3 Start playback on the
Bluetooth
device.
Tip
Bluetooth connection of A2DP (Advanced
Audio Distribution Profile) can also be
operated with the jog switch from this
unit to the Bluetooth device except when
making a call on this unit.
Notes
• When you play music by connecting the
unit to a Bluetooth device using HSP
(Headset Profile), sound quality will not
be high. For better sound, change the
Bluetooth connection to A2DP by
operating the Bluetooth device.
• If this unit is turned off while an A2DP
Bluetooth connection is established,
operate the unit again from step 1 to
make the A2DP Bluetooth connection
again.
* For detail on profiles, see page 4.
OPERATING THE UNIT
POWER button
VOL –
VOL +
Continued

16
US
To adjust the volume
Push the jog switch up or down
while listening to music to adjust the
volume.
Tips
• Depending on the Bluetooth device, it
may be necessary to adjust the volume
on the connected Bluetooth device as
well.
• Volume for calling and listening to
music can be adjusted independently.
Even if you change the volume while
calling, the volume for music playback
does not change.
• The volume level on this unit may vary
depending on the connected Bluetooth
device.
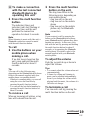
To stop use
1 Terminate the
Bluetooth
connection by operating
the
Bluetooth
device.
2 Press and hold the
POWER button for
about 2 seconds.
The indicator (blue) and
indicator (red) light up together,
and the unit turns off.
Tip
When you finish playing music, the
Bluetooth connection may terminate
automatically, depending on the Bluetooth
device.
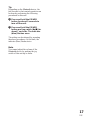
Controlling the audio
device – AVRCP
If the Bluetooth audio device
connected with this unit supports
AVRCP (Audio Video Remote
Control Profile), you can control by
using the unit buttons.
Refer to the operating instructions
supplied with the Bluetooth device
on how to operate it.
Note
Operation of the Bluetooth connecting
device by this unit will vary depending on
its specification.
Status: In stop or pause mode
1 Starts playback*
1
2 Stop
3 Skip to previous/next
4 Fast-rewind/Fast-forward*
2
Status: In play mode
5 Pause*
1
6 Stop
7 Skip to previous/next
8 Fast-rewind/Fast-forward*
2
*
1
You may need to press the button
twice depending on the Bluetooth
device.
*
2
Some
Bluetooth
devices may not
operate.
1
3
Short Press Long Press
Nx
.
/
>
2
4
Short Press Long Press
Nx
.
/
>
5
7
6
8

17
US
Tip
Depending on the Bluetooth device, the
fast-forward or fast-rewind operation can
be done by performing the following
procedures on this unit.
11
11
1 Press and hold the POWER
button for about 2 seconds to
turn off the unit.
22
22
2 Press and hold the POWER
button and jog switch (
Nx
) for
about 7 seconds. The indicator
(blue) flashes once.
The setting can be released by repeating
the above procedures. At this time, the
indicator (blue) flashes twice.
Note
You cannot adjust the volume of the
Bluetooth device by pushing the jog
switch of this unit up or down.

18
US
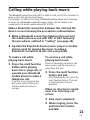
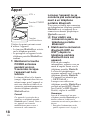
Calling
Check the following before
operating the unit.
– The Bluetooth function is active
on the mobile phone.
– Pairing of this unit and the
Bluetooth mobile phone is
complete.
1 Press and hold the
POWER button for
about 2 seconds while
the unit is turned off.
The indicator (blue) and
indicator (red) flash together
twice, the unit turns on and then
this unit tries to connect to the
last Bluetooth mobile phone that
was used.
Tip
This unit will stop trying to connect
to the Bluetooth mobile phone after 1
minute. In such a case, press the multi
function button to try to connect
again.
Multi function
button
POWER button
VOL –
VOL +
When this unit does not
connect to a
Bluetooth
mobile phone automatically
You can make a connection by
operating Bluetooth mobile phone or
by operating this unit to connect the
last connected Bluetooth device.
A To make a connection
by operating
Bluetooth
mobile phone
1 Make the
Bluetooth
connection (HFP or
HSP*) from the
Bluetooth
mobile phone
to this unit.
Refer to the manual supplied
with your Bluetooth mobile
phone for operation details.
The list of recognized devices
appears on the display of the
Bluetooth mobile phone. This
unit is displayed as
“DR-BT160AS.”
When you use the Bluetooth
mobile phone features both HFP
(Hands-free Profile) and HSP
(Headset Profile), set to HFP.
Note
When connecting to a Bluetooth
mobile phone which is different from
the last connected one, make the
connection following the above
procedure.
* For details on profiles, see
page 4.

19
US
1 Press the multi function
button on the unit.
The ring tone differs in the
following ways, depending on
your mobile phone.
– ring tone set on the unit
– ring tone set on the mobile
phone
– ring tone set on the mobile
phone only for Bluetooth
connection
Note
If you received a call by pressing the
button on the Bluetooth mobile phone,
some Bluetooth mobile phones may have
handset use priority. In this case, set to
talk with the unit by pressing and holding
the multi function button for about 2
seconds, or by operating the Bluetooth
mobile phone. For details, refer to the
manual supplied with your Bluetooth
mobile phone.
To adjust the volume
Push the jog switch up or down to
adjust the volume.
Tips
• You cannot adjust the volume when not
communicating.
• Volume for calling and listening to
music can be adjusted independently.
Even if you change the volume while
playing back the music, the volume of a
call does not change.
To terminate a call
You can end a call by pressing the
multi function button on the unit.
B To make a connection
with the last connected
Bluetooth
device by
operating this unit
1 Press the multi function
button.
The indicator (blue) and
indicator (red) start flashing at
the same time, and the unit
performs the connection
operation for about 5 seconds.
Note
When listening to music with this unit, a
Bluetooth connection cannot be made
with the multi function button.
To call
1 Use the buttons on your
mobile phone when
making a call.
If no dial tone is heard on this
unit, press and hold the multi
function button for about 2
seconds.
Tip
You can call in the following way,
depending on the Bluetooth mobile phone.
Refer to the manual supplied with your
mobile phone on operating details.
– When not communicating, you can call
using the voice-dial function by
pressing the multi function button.
– You can call the last dialed number by
pressing the multi function button for
about 2 seconds.
To receive a call
When an incoming call arrives, a ring
tone will be heard from the unit.
Continued

20
US
To stop use
1
Terminate
Bluetooth
connection by the
Bluetooth
mobile phone.
2
Press and hold the
POWER button for about
2 seconds to turn off the
power.
The indicator (blue) and
indicator (red) light up together,
and the unit turns off.
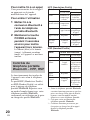
Controlling the
Bluetooth
mobile
phone – HFP, HSP
The operation of the buttons on this
unit varies depending on your
mobile phone.
HFP (Hands-free Profile) or HSP
(Headset Profile) is used for
Bluetooth mobile phone. Refer to
the operating instructions supplied
with your Bluetooth mobile phone
on supported Bluetooth profiles or
how to operate.
HFP (Hands-free Profile)
HSP (Headset Profile)
*
1
Some functions may not be supported
depending on the Bluetooth mobile
phone. Refer to the operating
instructions supplied with your mobile
phone.
*
2
This may vary, depending on the
Bluetooth mobile phone.
*
3
Some functions may not be supported
when calling using the Bluetooth
mobile phone.
Status Multi function button
Standby
Voice Dial
active
Outgoing call
Incoming call
During call
Short Press
Start Voice
Dial*
1
Cancel Voice
Dial*
1
End outgoing
call
Answer
End call
Long Press
Last number
redial
–
Change call
device
Reject
Change call
device
Status Multi function button
Standby
Outgoing call
Incoming call
During call
Short Press
–
End outgoing
call
*
1
Answer
End call
*
3
Long Press
Dial
*
1
End outgoing
call or change
call device to
headset*
2
–
Change call
device to
headset
La page charge ...
La page charge ...
La page charge ...
La page charge ...
La page charge ...
La page charge ...
La page charge ...
La page charge ...
La page charge ...
La page charge ...
La page charge ...
La page charge ...
La page charge ...
La page charge ...
La page charge ...
La page charge ...
La page charge ...
La page charge ...
La page charge ...
La page charge ...
La page charge ...
La page charge ...
La page charge ...
La page charge ...
La page charge ...
La page charge ...
La page charge ...
La page charge ...
La page charge ...
La page charge ...
La page charge ...
La page charge ...
La page charge ...
La page charge ...
La page charge ...
La page charge ...
-
 1
1
-
 2
2
-
 3
3
-
 4
4
-
 5
5
-
 6
6
-
 7
7
-
 8
8
-
 9
9
-
 10
10
-
 11
11
-
 12
12
-
 13
13
-
 14
14
-
 15
15
-
 16
16
-
 17
17
-
 18
18
-
 19
19
-
 20
20
-
 21
21
-
 22
22
-
 23
23
-
 24
24
-
 25
25
-
 26
26
-
 27
27
-
 28
28
-
 29
29
-
 30
30
-
 31
31
-
 32
32
-
 33
33
-
 34
34
-
 35
35
-
 36
36
-
 37
37
-
 38
38
-
 39
39
-
 40
40
-
 41
41
-
 42
42
-
 43
43
-
 44
44
-
 45
45
-
 46
46
-
 47
47
-
 48
48
-
 49
49
-
 50
50
-
 51
51
-
 52
52
-
 53
53
-
 54
54
-
 55
55
-
 56
56


dans d''autres langues
Documents connexes
-
Sony DR-BT10CX Mode d'emploi
-
Sony TMR-BT10 Le manuel du propriétaire
-
-
-
Sony SRS-BTM30 Le manuel du propriétaire
-
-
-
-
-
Autres documents
-
Pioneer SE-MJ553BT Manuel utilisateur
-
JVC HAW700BT - Headset - In-ear ear-bud Manuel utilisateur
-
Insignia NS-CAHBTEB01 Guide d'installation rapide
-
Velodyne vBold Manuel utilisateur
-
Acoustic Research ARS70 Manuel utilisateur
-
Outdoor Tech Chips Ultra 2.0 Manuel utilisateur
-
Philips HR150 Manuel utilisateur