Summit BKRF14SS Manuel utilisateur
- Catégorie
- Frigos
- Taper
- Manuel utilisateur

Leer las instrucciones de uso antes de
Seleccione un área amplia, limpia
y sin humedad.
Select a clean, damp-free, spa-
cious area.
Quite todo el material de empa-
que: cintas, cartones, bolsas de
plástico y demás.
Remove all packaging materials:
tape, cardboard, plastic bags,
Styrofoam, etc.
Colocación:
Para que circule el aire, deje
espacios de 5 cm a ambos lados; detrás,
10 cm, y arriba, de 5 a 10 cm.
Installation Clearances
Leave 5 cm (2 in) of space on both
sides, 10 cm (4 in) behind, and 5-10 cm on
top so that air can circulate.
Antes de conectarlo, limpie el equi-
po con un trapo o esponja suave y
jabón neutro.
Clean the refrigerator with a cloth
connecting it.
Conéctelo. Antes de llenarlo, deje
que funcione vacío y cerrado
durante 4 horas.
Connect the refrigerator. Before
using it, let it run empty and closed
for four hours.
Deje reposar el refrigerador de 6 a
8 horas para que se asiente el gas. Let the refrigerator stand for six to
Guía rápida
Quick Start Guide
Bienvenido
Todo lo que desee saber para el correcto
funcionamiento de su refrigerador se en-
cuentra aquí. Lo invitamos a conocerlo y
sacar el máximo provecho de él.
Welcome
Everything you need to know for run-
ning your refrigerator correctly can be
found here. We invite you to get to know its
features and take full advantage of what it
has to offer.
No use extensiones.
No conecte otros aparatos en
el mismo contacto.
Sujete el conector por la cla-
vija, no por el cable.
Su refrigerador está provisto
de un tomacorriente pola-
rizado tipo «Y» con cable a
tierra integrado. No elimine
la terminal de tierra ni use
adaptadores.
Si el cordón de alimentación
es dañado, este debe susti-
tuirse por el fabricante, por
su agente de servicio autori-
zado o por personal calificado con el fin de
evit
ar un peligro.
Si en su región suele haber variaciones
de voltaje, use un regulador de voltaje con
capacidad de 500 a
Do not use extension cords.
Do not connect other appli-
ances in the same outlet.
Take the cord by the plug.
Never pull on the cable.
The refrigerator has a
Y-shaped polarized outlet
with an integrated ground
wire. Do not remove the
ground wire or use adaptors.
Because of potential safety
hazards under certain con-
ditions, we strongly recom-
mend against the use of an
extension cord. However, if you still elect to
use an extension cord, it is absolutely neces-
sary that it be a UL listed 3-wire grounding
type plug and outlet and that the electrical
rating of the cord be 15 amperes (minimum)
and 120 volts.
If there are voltage variations where you
live, use a voltage regulator with 500 to
1000
Importante: Si no sigue las advertencias
y pasos anteriores, usted es enteramen-
te responsable de los daños personales
o materiales que pueda sufrir con el uso
de este equipo.
Warning: Ignoring the above-mentioned
advice places the responsibility of any
personal or material risk entirely with
the customer.
Instrucciones
generales
General
instructions
Para que su refrigerador funcione bien,
debe circular aire alrededor. Revise el pun-
to 3 de la Guía Rápida.
No coloque el refrigerador cerca de fuen-
tes de calor (estufas, hornos, calentadores)
ni lo exponga al sol.
Nota: Las puertas de estos modelos no
son reversibles.
modelo y
capacidad (L)
dimensión total
(puertas cerradas)
espacio total requerido
(puertas abiertas)
profun -
didad
ancho
profundi-
dad útil
ancho útil
Características eléctricas nominales:
tensión de
alimentación
frecuencia corriente
México y CA
Uruguay y Chile
Air must circulate around the refrigera-
tor for it to work well. Review point three of
the Quick Start Guide.
Note: These models are not reversible.
Do not place the refrigerator near a heat
source (stove, oven, heater) or expose it to
the sun.
Supply
Voltage
Frequency Current
Mexico
and CA
V Hz A
Uruguay
and Chile
V Hz
Place the refrigerator on a flat surface.
The leveling screws are located on the bot-
tom of the refrigerator at the front. Adjust
them so that the product does not move
during normal usage.
Two people are needed to level the refrig-
erator. While one person tilts it backward,
the other must turn the screws clockwise.
Between the floor and the edge there must
be approximately 48 millimeters (1.9 inches).
for six to eight hours. Before connecting it,
mild soap or baking powder dissolved in
water.
Adjust the temperature between the
minimum and maximum levels marked on
the dial. Before making another adjust-
ment, wait four to six hours to be sure that
the refrigerator has reached the desired
temperature.
1 When placing items in the refrigera-
tor, be sure that nothing is blocking the
air vents.
2 Do not store cans. Transfer contents
to storage containers with lids (eliminates
odor contamination).
3 To save energy, let food cool before
storing it.
Recommended Temperatures
Minimum: Cold days, few items stored,
doors usually closed.
Medium: For normal usage.
Maximum: Hot days, many items
stored, doors that are frequently opened.
Important:
a) Read the technical instructions for
installing this product.
b) Read the operating instructions
before turning on this product.
Temperaturas recomendadas
Mínima: Días fríos, pocas cosas alma-
cenadas, puertas regularmente cerradas.
Media: Para el uso normal.
Máxima: Días calientes, muchos ali-
mentos almacenados, puertas que se
abren con frecuencia.
Importante: Las imágenes correspon-
den a los modelos más equipados.
Important: The images correspond to
the more highly equipped models.
Coloque el refrigerador sobre una super-
ficie plana. Los tornillos niveladores están
al frente del equipo, en la parte inferior.
Debe ajustarlos para que el aparato no se
mueva durante el uso normal.
Para nivelar el refrigerador se necesitan
dos personas. Mientras una lo inclina un
poco hacia atrás, la otra debe girar los tor-
nillos en el sentido de las agujas del reloj.
Entre el piso y la arista delantera debe ha-
ber 48 mm (1.9 in), aproximadamente.
Tras la nivelación, deje que el refrigera-
dor repose de 6 a 8 horas. Antes de conec-
tarlo, limpie el interior con una esponja
suave y jabón neutro o bicarbonato de so-
dio disuelto en agua.
Gradúe la temperatura entre el mínimo
y máximo marcados en el dial. Antes de
hacer cualquier nuevo ajuste, espere de 4 a
6 horas y compruebe si el refrigerador al-
canzó la temperatura deseada.
1 Al acomodar los alimentos, cuide que
nada obstruya las salidas de aire.
2 No almacene latas. Traspase el con-
tenido a otros depósitos con tapa (con esto
evitará la contaminación de olores).
3 Para ahorrar energía, deje que los
alimentos se enfríen un poco antes de
guardarlos.
4 Guarde las aguas de sabor en depósi-
tos tapados para que no se contaminen con
otros olores y sabores.
5 No lave las frutas ni las verduras an-
tes de meterlas en el refrigerador. Póngalas
dentro de bolsas y solo lávelas antes de
prepararlas.
6 Guarde las cebollas en bolsas.
7 La oscuridad y el frío favorecen la
germinación del ajo. No es conveniente
refrigerar esta hortaliza.
8 Abra las puertas el menor tiempo
posible.
9 Haga porciones pequeñas para conge-
lar. Esto ayuda a que circule el aire.
10 Antes de guardar productos, revise
las
fec
has de caducidad.
11 Evite guardar bebidas gaseosas o
efervescentes en el congelador.
12 Algunos productos, como los helados
de agua, no deben consumirse demasia-
dos fríos.
13 Cuando meta algo en el congelador
por primera vez, no lo deje en contacto con
algo ya congelado.
14 No utilice dispositivos mecánicos
ni otros medios para acelerar el proceso
de deshielo, salvo los que recomiende el
fabricante.
Para cambiar el foco:
1 desconecte el refrigerador;
2 retire la cubierta del foco (tómela de
la media luna superior y jale hacia usted);
3 desenrosque el foco y consiga otro de
las mismas características;
4 monte el foco nuevo y reinstale la
tapa. Al presionar la tapa de vuelta en su
lugar debe oírse un clic.
El sistema contra la condensación pue-
de causar calentamientos en el exterior.
Es normal. No obstante, en condiciones de
alta temperatura y alta humedad en el am-
biente, es posible que se forme una conden-
sación ligera. Séquela con un trapo.
Limpieza y
conservación
Para limpiar su refrigerador y preservar
su buen funcionamiento:
1 siempre desconéctelo antes de cual-
quier revisión;
2 nunca use limpiadores tóxicos;
3 no use productos abrasivos, fibras ni
objetos puntiagudos que puedan dañar las
superficies;
4 utilice una esponja suave o un trapo
humedecido y jabón neutro, enjuague las
partes y séquelas con un trapo limpio y
seco;
5 en la limpieza del interior, puede usar
una cucharada de bicarbonato disuelta en
dos litros de agua;
6 si bien las parrillas de cristal templa-
do tienen bordes para contener un po
co
de líqui
do, limpie los derrames tan pronto
como pueda;
7 cada seis meses, por lo menos, pase
un
8 las puertas de acero inoxidable pueden
limpiarse con paño de microfibra aplicando
agua, jabón (neutro) o algún producto en
aerosol para limpiar acero inoxidable.
No utilice cera, pulidores, ni productos que
contengan cloro.
cepillo, un trapo o una esponja por el
condensador (el serpentín metálico que el
refrigerador tiene por detrás).
La temperatura ambiente afecta el rendi-
miento del equipo. Seleccione una tempe-
ratura más fría si abre frecuentemente las
puertas del refrigerador.
Al guardar los alimentos, no obstruya las
salidas de aire.
Si tiene las manos mojadas, no toque el
interior del congelador.
A veces, inmediatamente después de
cerrar la puerta, cuesta trabajo abrirla de
nuevo, pues el intercambio de aire a dife-
rentes temperaturas crea un vacío. Basta
con esperar de 10 a 15 segundos.
Importante: Se considera que el apa-
rato no ha sido usado de manera normal
cuando:
— su instalación u operación no se han
hecho conforme al presente instructivo de
uso en español;
— ha sido utilizado para fines comercia-
les, industriales o de cualquier forma que
sea diferente a las explicadas en las ins-
trucciones de manejo;
— ha sido reparad
o por p
ersonas o talle-
res de servicio no autorizados;
— ha sufrido daños en actos de fuerza
mayor o casos fortuitos.
Enrosque un poco los tornillos nivelado-
res. Si necesita acostar el refrigerador, há-
galo únicamente sobre el costado izquierdo
(viéndolo de frente).
Este aparato no está previsto que sea
utilizado por personas (incluidos niños)
mentales reducidas, o con falta de expe-
riencia y conocimiento, excepto que se
le haya dado instrucción o supervisión
referida al uso del aparato por una per-
sona responsable de su seguridad.
Los niños se deben supervisar para ase-
gurar que no jueguen con el aparato.
4 Store juice in containers with lids so
that it does not contaminate other food
with odors and flavors.
5 Do not wash fruit or vegetables before
in a bag and wash them before using them.
6 Store onions in bags.
7 Darkness and cold favor garlic ger-
mination. It is not advisable to refrigerate
this vegetable.
8 Ensure that doors remain open for the
least amount of time possible.
9 Divide food into small portions for
freezing. This helps air to circulate.
10 Before storing products, check expi-
ration dates.
11 Avoid storing soda or sparkling bev-
erages in the freezer.
12 Some products, like ice pops, should
not be consumed at too cold a temperature.
13
-
er for the first time, do not let it come into
contact with something that has already
been frozen.
14 Do not use mechanical devices or
other means to accelerate the thawing pro-
cess except as recommended by the manu-
facturer.
15 Do not use electrical appliances in-
side the food storage compartments except
as recommended by the manufacturer.
To change the bulb:
1 Disconnect the refrigerator
2 Pull back the bulb cover (hold the top
half and pull towards yourself)
3 Unscrew the bulb and replace it with
one of the same
4 Screw in the new bulb and reinstall
in place, a click should be heard
The anti-condensation system can cause
heating of the exterior; this is normal. Nev-
ertheless, in conditions of high heat and hu-
midity it is possible that light condensation
will develop. Dry it with a cloth.
Cleaning
and Upkeep
To clean the refrigerator and maintain it
in good working order:
• Always disconnect it before an inspection
• Never use toxic cleaning products
• Do not use abrasive products, fibers, or
sharp objects that can damage surfaces
•
mild soap to rinse inside the refrigerator
and dry with a clean cloth
• When cleaning the inside, a spoonful of
baking soda dissolved in two liters of water
may be used
• Although the tempered glass shelves
can contain some liquid, clean spills as soon
as possible
• Use a brush, cloth or sponge at least
e
• The stainless steel door can be cleaned
with microfiber cloth applying water, soap
or some product in aerosol to clean stainless
steel. Do not use wax, polish or chlorine
containg products.
very six months to wipe down the con-
denser (the metal cooling coil on the back
of the refrigerator)
Ambient temperature affects the refriger-
ator’s efficiency. Select a colder temperature
if the doors are frequently opened.
When storing food, do not block the air
vents.
If your hands are wet, do not touch the
inside of the freezer.
the door, it is difficult to open again. The
exchange of air of different temperatures
creates a vacuum. Wait 10 to 15 seconds.
Important: The product is considered to
not be used in a normal way when:
• Its installation or operation has not
been carried out according to these usage
instructions in Spanish
• It has been used for commercial, indus-
trial or any other means apart from those
stipulated in the operating instructions
• It has been repaired by unauthorized
persons or service centers
• It has been damaged by an act of God
or unforeseen circumstances
Tilt the refrigerator backwards slightly
and screw the leveling screws some turns
to avoid damage. If the product needs to be
from the front).
-
tor in its new place, follow the installation
instructions so that the cooling gas and the
The product is considered not to be used
in a normal way when:
• There is rust caused by dents, scratches,
saline environments, etc. (Note that our
authorized service centers offer mainte-
nance and repair services and that these
are charged at a reasonable price)
• The product shows signs of damage
because of improper use by the client,
or others), because of dust or the environ-
mental conditions where the product has
been installed, such as humidity or exces-
sive salinity.
• It has been damaged while being trans-
ported by the buyer.
If you are going to be away for more than
two weeks, disconnect the refrigerator.
Leave it clean and empty, including the ice
trays. If possible, leave the doors half-open
so as to prevent an accumulation of odors.
During the first four hours, the tempera-
ture in the refrigerator will not change very
No permita que los niños se cuelguen
de las puertas ni que jueguen cerca
de un refrigerador que tenga la puer-
ta abierta, ya que pueden lastimarse
o quedarse atrapados.
Do not allow children to hang on the
doors or play near the refrigerator when
the door is open as they can hurt them-
selves or become trapped.
Si debe desechar el equipo, desmonte
todas las puertas y anaqueles. Con esto
evitará que algún niño quede atrapado
o escale dentro.
If you have to throw out the product,
take off the doors and remove all the
shelves. This will ensure that no child
can become trapped or climb inside.
(Continued on back)
(Continúa a la vuelta)
This product is not meant to be used by
persons (including children) with physi-
cal, sensory or mental disabilities or those
with a lack of experience and knowl-
edge except when they have been given
instruction or are supervised with regard
to the use of the product by a person re-
sponsible for their safety.
Children must be supervised to ensure
they do not play with the refrigerator.
Es muy importante:
a)
b)
encender este artefacto.
c) Mantener libres de obstrucción las
aberturas de ventilación envolvente del
aparato o en la estructura de ensamble.
d) No dañar el circuito de refrigeración.
No. de parte: 225D8225P022 rev. 1
Instructivo y advertencias
Instructions and Warnings
Leer las instrucciones técnicas antes
de instalar este artefacto.
Hecho en México por (made in Mexico by):
LEISER S. de R.L. de C.V.
Carretera Federal 51 Km 110
Poblado Ojo Seco. Celaya, Gto. C.P. 38158
15 No utilice aparatos eléctricos dentro
de los compartimentos de almacenamien-
to de comida, salvo los que recomiende el
fabricante.
A excepción de modelos FF1427
Models FF1427 are reversible.

Mabe garantiza la disponibilidad de
repuestos por cinco (5) años.
Cancelación de la garantía
El amparo bajo la garantía quedará au-
tomáticamente cancelado por las siguien-
tes causas:
a) Por la eliminación o modificación
del número de serie o la ruptura de cual-
quier sello que tenga el artefacto.
b) Por la alteración de la información
suministrada en este certificado o sobre
el producto.
Mabe no asumirá ni autorizará asu-
mir a su nombre otras obligaciones en
relación con la venta del producto o cual-
quiera de sus partes, diferentes a las con-
templadas en este certificado.
Advertencias
1 Esta garantía no es de cubrimiento
internacional, solo tiene vigencia en el
país donde fue adquirido el producto, de
acuerdo con los términos establecidos
para cada país por parte del fabricante y
respetando las leyes de garantía del mis-
mo.
Para respaldar el origen del producto,
es necesario que el usuario presente el
documento de compra o factura, si así se
requiere.
2 Pasado un (1) mes a partir de la
fecha prevista para la devolución o la
fecha en que el consumidor debía acep-
tar o rechazar expresamente el servicio,
y no acuda a retirar el bien, el centro de
Servicio Técnico lo requerirá para que lo
retire dentro de los dos (2) meses siguien-
tes a la remisión de la comunicación. Si el
consumidor no lo retira se entenderá por
ley que abandona el bien. En dado caso,
el Centro de Servicio Técnico dispondrá
del mismo conforme con la reglamenta-
ción que expida el gobierno nacional para
tal efecto. Los gastos que se deriven por
el abandono del bien (almacenamiento,
bodegaje y mantenimiento) deberán ser
asumidos por el consumidor.
Las siguientes condiciones no se consi-
deran como uso normal del aparato, por
lo que deben tenerse en cuenta para ha-
cer válida esta garantía.
La garantía no podrá hacerse efectiva
en los siguientes casos:
— el uso del aparato con fines comer-
ciales, de prestación de servicios o
cualquier otro propósito que no sea
;ocitsémod etnematcirtse
— daños causados por fluctuaciones
de voltaje provocadas por corto circuito,
sobrecargas accidentales en la línea de
alimentación o sobrecargas por causas de
descargas eléctricas;
— daños por uso de partes que no sean
genuinas;
— daños en el producto causados por
su transportación, cuando este sea por
cuenta del consumidor;
— daños al producto causados por
ed sotca o senoicadnuni ,ogeuf ,setnedicca
la Naturaleza;
— cualquier ot
ra condición de instala-
ción y operación diferente a la especifica-
da en el instructivo de uso;
— daños ocasionados por mal manejo
del cliente, por animales (roedores, insec-
tos, otros), por polvo o por causa de las
condiciones ambientales en que se instale
el producto, tales como humedad excesiva
o salinidad.
Mabe garantiza este producto en todas
sus piezas, componentes y mano de obra
por el tiempo de 1 año en su producto final
—contado a partir de la fecha de recepción
de conformidad del consumidor final—
contra cualquier defecto de fabricación y
funcionamiento durante el uso normal y
doméstico de este producto. Incluye los
gastos de transportación del producto que
se deriven del cumplimiento de esta póliza
dentro de su red de servicio. Esta garantía
ampara únicamente el modelo, marca y
serie referidos en el cuadro «D
atos de iden-
tificación de producto», ubicado en la parte
superior del presente documento.
Defectos de fabricación que impidan
total o parcialmente el correcto funcio-
namiento del aparato que se presenten
dentro de los términos de vigencia de esta
garantía. Esta garantía ampara todas las
piezas y componentes del producto e inclu-
ye la mano de obra, así como el reemplazo
de cualquier pieza o componente defec-
tuoso sin costo adicional para el consu-
midor. Se incluyen también los gastos de
transportación del producto que deriven
del cumplimiento de la presente dentro de
cualquiera de nuestros centros de servicios
indicados en el listado que se incluye en
esta póliza.
a) Cuando el producto se hubiese utiliza-
do en condiciones distintas a los normales.
b) Cuando el producto no hubiese sido
operado de acuerdo con el instructivo de
uso que se le acompaña.
c) Cuando el producto hubiese sido al-
terado o reparado por personas y/o talleres
de servicio no autorizado por Mabe.*
Para hacer efectiva la presente garantía
el consumidor deberá presentar esta pó-
liza debidamente sellada por el estableci-
miento que vendió el producto, o la factura
o recibo o comprobante, con los datos de
identificación de producto que se detallan
arriba, en cualquiera de nuestros Centros
de Servicio Técnico referidos en la presente
póliza o llamando a los teléfonos del direc-
torio incluido en este documento. En donde
también los consumidores podrán obtener
las partes, consumibles y accesorios corres-
pondientes.
Póliza de garantía
Datos de identificación de producto
Este formulario debe ser llenado por el distribuidor
rodimusnoc le euq al ne ahcefotcudorp
recibe el producto
rodiubirtsidacram
olles o amrfioledom
número de serie
México
LEISER S. de R.L. de C.V.
Carretera Federal 51 Km 110
Poblado Ojo Seco. Celaya, Gto. C.P. 38158
Teléfonos de servicio:
01 800 902-9900, (55) 52-27-1000.
Argentina
Valentín Gómez 151, Haedo, Buenos Aires.
Teléfono de servicio:
0 800 666-6253
Ecuador
Mabe Ecuador
Kilómetro 14 ½, Vía Daule, Guayaquil.
RUC: 0991321920001
Teléfono de servicio:
1 800 73-7847
Colombia
Mabe Colombia, S. A. S.
Carrera 21, no. 74-100, parque industrial
Alta Suiza, Manizales, Caldas.
U. A. P.: #141 de la
Teléfonos de servicio:
Dentro de Bogotá: (571) 489-7900
Fuera de Bogotá: 01 900 555-6223
Venezuela
Mabe Venzuela, C. A.
Av. Sanatorio del Ávila,
urbanización Boleita Norte,
edificio La Curacao, Pisos 1 al 3,
Caracas, zona postal 1060
RIF: J-00046480-4
Teléfono de servicio:
(501) 737- 8475
Perú
Mabe Perú S. A.
Calle Los Antares 320, torre A,
oficina 701, urbanización La Alborada,
Santiago de Surco, Lima.
R. U. C.: 20293670600
Teléfonos de servicio:
700-5590 y 0-800-70630
Chile
Comercial Mabe Chile Ltda.
Av. Presidente Riesco 5711, piso 14,
.ogaitnaS ,sednoC saL ,3041 anicfio
Teléfonos de servicio:
01 600 364-3000, 3768649
Acapulco
Virgilio Uribe, 26, fraccionamiento Costa
Azul (entre Andrés Sufrend y Jaime Cook),
39850, Acapulco (Guerrero).
(744) 482-8075, (744) 482.9045.
Aguascalient
es
Jardín del Encino, 416, Lindavista, 20270,
Aguascalientes (Aguascalientes).
(449) 978-7395.
Cancún
Av. Miguel Hidalgo, reg. 92, manzana 47,
lote 10, 77516 Cancún (Quintana Roo).
(998) 880-0760, 0820 y 0965.
Cd. Juárez
Porfirio Díaz, 852, Exhipódromo, 32330,
.)auhauhihC( zeráuJ .dC
(656) 616-0418, 0453 y 0454.
Cd. Victoria
21 Olivia Ramírez, 1333, colonia Pedro
J. Méndez , 87040, Cd. Victoria (Tamaulipas).
(834) 314-4830.
Culiacán
Blvd. E. Zapata, 1585 pte., fraccionamiento
Los Pinos, 80120, Culiacán (Sinaloa).
(667) 717-0353, 0458 y 714-1366.
Chihuahua
Av. Tecnológico, 6107, colonia Lagos, 31110,
Chihuahua (Chihuahua).
(614) 413-7901, 7012 y 3693.
Guadalajara
Av. Inglaterra, 4120, Guadalajara
Technology Park, 45010, Zapopan (Jalisco).
(33) 36-69-3125.
Cabo San Lucas
Villas del Pacífico, manzana 9, l
ote 38,
fraccionamiento Portales, 23473, Cabo
San Lucas (Baja California Sur).
(624) 146-4024.
León
Prolongación Juárez, 2830-B, Plaza de
Toros, 37450, León (Guanajuato).
(477) 770-0003, 06 y 07.
Mérida
Calle 22, 323, x 13 y 13.ª, Ampliación
Cd. Industrial, 97288, Mérida (Yucatán).
(01.999) 946.0275, 0916, 3090,3428 y 3429.
México D. F. norte
Prol. Ingenieros Militares, 156, San
Lorenzo Tlaltenango, 11210, México (D. F.).
(55) 52-27-1000.
México D. F oriente
Oriente 140-A, 189, 1.
piso (esquina con
Norte 21), colonia Moctezuma, 2.ª Sección,
15500, México (D. F.).
(55) 57-85-5997, (55) 26-43-5042.
México D. F. sur
Av. División del Norte, 3281, colonia
La Candelaria, Coyoacán (entre Árbol
del Fuego y Pacífico), 04380, México (D. F.).
(55) 56-27-1033 y 16-74-4886.
Monterrey
Carretera Miguel Alemán, km 5,
Vista Sol, 67130, Cd. Guadalupe (N. L.).
(81) 83-69-7990.
Piedras Negras
Daniel Farías, 220 Nte., Buenavista,
26040, Piedras Negras (Coahuila).
(878) 783-2890.
Puebla
Calle 24 Sur, 3532 (entre 35 y 37 Ote.),
Col. Santa Mónica, 72540, Puebla (Puebla),
(222) 264-3731, 3490 y 3596.
Querétaro
Benito Juárez, 76120, Querétaro
(Querétaro), (442) 211-4741, 4697 y 4731.
Reynosa
Calle Dr. Puig, 406 (entre Dr. Calderón
y Dr. González), colonia Doctores, 88690,
Reynosa (Tamaulipas).
(899) 924-2254 y 924-6220.
San Luis Potosí
Eje 128, s/n. (esquina con av. C. F. E.),
Zona Industrial del Potosí, 78090, San
Luis Potosí (San Luis Potosí).
(444) 826-5688.
Tampico
Venustiano Carranza, 502 Pte., Centro,
.)sapiluamaT( 00498 ,oredaM .dC
(833) 216-4666 y 216-2169.
Tijuana
Calle 17, 217, Libertad, parte alta, 22300,
Tijuana (Baja California).
(664) 682-8217 y 19.
Torreón
Blvd. Torreón-Matamoros, 6301 Ote., Gus-
tavo Díaz Ordaz, 27080, Torreón (Coahuila).
(871) 721-5010 y 5070.
Veracruz
Paseo de Las Américas, 400, (esquina
atnaS azalP laicremoc ortnec ,)onarU .va
Ana, Predio Collado Boticaria, 94
298, Boca
del Río (Veracruz).
(229) 921-1872, 2253, 9931 y 9934.
Villahermosa
Calle Carlos Green, 119-C (casi esquina
con av. Gregorio Méndez),
86100
Villahermosa (Tabasco).
(993) 354-7350, 7382, 7392 y 7397.
Tras haber colocado el refrigerador en el
nuevo lugar, siga las instrucciones de insta-
lación para que el gas refrigerante y el acei-
te del compresor se asienten.
Se considera que el aparato no ha sido
usado de manera normal cuando:
rop sadasuac senoicadixo atneserp—
golpes, raspaduras, ambientes salinos, etc.
(note que nuestros centros de servicio o
talleres autorizados podrán prestar a tiem-
po los servicios de preservación y repara-
ción y que estos serán cobrados a precios
razonables);
solam rop sodanoisaco soñad ebihxe—
manejos del cliente, por ataques de anima-
les (roedores, insectos u otros), por polvo o
por las condiciones ambientales del sitio
en que se haya instalado el producto, tales
como humedad o salinidad excesivas.
ohceh etropsnart nu ne odañad ah es—
por cuenta del comprador.
Si se va a ausentar por más de dos se-
manas, desconecte el refrigerador. Déjelo
limpio y vacío, incluyendo las hieleras.
Conviene que las puertas queden entrea-
biertas, pues eso evitará una concentración
de olores.
Durante las primeras 4 horas, la tempera-
tura no varía mucho. Si el apagón persiste
por más de 6 horas, meta bolsas de hielo
en ambos compartimentos. Evite abrir las
puertas del aparato. Si la tensión eléctrica
fluctúa, desconecte el refrigerador hasta
que el suministro se normalice.
Los daños provocados por descargas
eléctricas, fluctuaciones de voltaje, cone-
xiones a fuentes eléctricas distintas a las
especificadas y las catástrofes no se con-
sideran como condiciones de uso normal
del aparato.
No es necesario deshielar el equipo, ya
que el sistema No Frost lo hace por usted,
además de que reparte el aire frío homogé-
neamente. Esto asegura también la conser-
vación de los alimentos.
El sistema tiene un nivel y un sensor
que mantienen la temperatura adecuada y
activan el flujo del aire automáticamente
cada vez que se necesita.
Al abrir la puerta del refrigerador, las pa-
rrillas y otras superficies pueden empañar-
se debido a la entrada de humedad. Esto
es normal.
Funcionamiento
de las partes
Para el óptimo funcionamiento, la ranura
del regulador debe estar en posición hori-
zontal. Mueva el dial solo si necesita con-
trolar el flujo del aire entre el congelador y
el enfriador. Gírelo a favor de las agujas del
reloj para que el enfriado sea más rápido (el
congelado será más lento), y en contra para
conseguir el efecto opuesto.
El despachador se encuentra en la
puerta.
1 No es necesario que saque el tanque
para rellenarlo. Levante la tapa y sirva
con un vaso o una jarra hasta la marca de
llenado máximo («Max»). Use solo agua
purificada.
2 Limpie el tanque una vez al mes. No
use detergentes.
Nota: No llene de alimentos el refrige-
rador. Deje espacio entre ellos y dis-
tribúyalos bien entre las parrillas. Así
favorecerá la circulación del aire y mejo-
rará el rendimiento.
Importante: Las alteraciones en el
regulador no modifican la temperatu-
ra, sino el tiempo que toma alcanzarla.
Se recomienda no alterar la posición
de fábrica.
Congelado más rápido
Posición sugerida
)samitpó sarutarepmet(
Enfriado más rápido
(Viene del frente)
(Continues from de other side:)
much. If the power outage lasts for more
than six hours, put bags of ice in both the
refrigerator and freezer. Avoid opening the
doors. If the electrical voltage fluctuates,
disconnect the refrigerator until the supply
normalizes.
Damages caused by electric shock, volt-
age fluctuations, different power source
connections other than those specified and
catastrophes are not considered normal
usage for the product.
It is not necessary to defrost the refriger-
ator as the No Frost system does it for you.
It also distributes cold air. This ensures that
food is preserved well.
The system has a sensor that maintains
the appropriate temperature level and
automatically activates the flow of air as
needed.
Faster freezing
Suggested Position
(ideal temperatures)
Faster cooling
Important: The changes to the regula-
tor do not modify the temperature, but
the time that it takes to reach it.
Note: Do not completely fill the fridge
with food. Leave space between items
and distribute them between the shelves.
This will allow air to circulate and im-
prove efficiency.
3 Para retirar el tanque, primero ase-
gúrese de que esté vacío. Tómelo de los
extremos, levántelo ligeramente y tire de él.
Para colocarlo en su posición, móntelo en
los soportes y empújelo hasta el tope. No es
necesario desmontar la válvula.
1 Retire el casete como se ve en la
siguiente ilustración.
2 Ponga el casete en una superficie
plana y llene los moldes de agua hasta
donde se unen los hielos. Use solo agua
purificada.
3 Reinserte el casete en su lugar y em-
pújelo con cuidado para evitar derrames.
4 Cuando los hielos estén listos, gire la
perilla hasta que caigan en el cajón.
El depósito de hielos puede almacenar
hasta dos descargas.
Para limpiar su Ice Factory use solo una
esponja suave, agua y jabón neutro. No use
fibras, detergentes ni objetos filosos o pun-
tiagudos en el equipo.
Las parrillas son de cristal templado.
Para quitar una:
1 retire todo lo que contenga;
2 le er ebil ,sonam sod sal noc aletéjus
tope trasero y tire de ella.
Al colocarla de nuevo, asegúrese de que
descanse sobre los rieles y empújela hasta
el tope trasero.
Nota: Cargue sus alimentos sobre el
cristal, solamente.
Este anaquel le da el espacio justo para el
almacenamiento de botellas altas.
Guarde aquí carnes frías y quesos. El ca-
jón puede desplazarse lateralmente. Para
sacarlo, tire de él y levántelo un poco hasta
que se destrabe.
Para quitarlo, levántelo hasta que se des-
trabe. Al reinstalarlo, empújelo hacia abajo
y asegúrese de que se trabe de nuevo en
sus guías; así evitará que se mueva acci-
dentalmente.
Está diseñado para conservar frescas las
frutas y las verduras. Para desmontarlo,
tire de él. Al llegar al tope, levántelo lige-
ramente.
When the refrigerator door is opened,
the shelves and other surfaces can become
fogged up owing to the entry of humidity.
This is normal.
How Each
Part Works
The water dispenser is on the door.
1 It is not necessary to take out the
or pitcher up to the maximum fill line. Only
use purified water.
2 Clean the tank once per month. Do
not use detergents.
3 To remove the tank, first ensure that
-
ly and pull. To put back into place, set it on
the supports and push to the end. It is not
necessary to dismantle the valve.
For optimal product functioning, the
regulator slot must be in a horizontal posi-
tion. Move the dial only if it is necessary to
control the flow of air between the freezer
and the cooler. Turn it clockwise to cool
faster (the freezer will be slower) and coun-
terclockwise for the opposite effect.
1 Take out the tray as seen in the
following illustration.
2 Put the tray on a flat surface and fill
it up to where the ice connects. Only use
purified water.
3 Reinsert the tray in its place and push
it in carefully to prevent spills.
4 When the ice is ready, pull the handle
until it falls into the tray.
The ice tray can hold up to two loads
of ice.
soap to clean the Ice Factory. Do not use
fibers, detergent or sharp objects on the
refrigerator.
The shelves are made of tempered glass.
To remove:
1 Remove contents
2 Hold with both hands, pop the back
up and pull
To put into place, be sure that it rests
on its guides and push until firmly set at
the end.
This drawer is for meats and cheeses. It
back in, push down and be sure that it rests
on its guides; this will stop it from moving
accidentally.
This self provides space for storing tall
This is designed to maintain fruit and
vegetables fresh. To remove, pull on it.
ELIMINACIÓN ADECUADA
DEL PRODUCTO:
SI EL PRODUCTO CONTIENE AGENTE EXPANSOR
EXPLOSIVO CICLOPENTANO, CONSULTAR CON
EL SERVICIO POST-VENTA AUTORIZADO LA
FORMA DE ELIMINAR EL ARTEFACTO, DE MANERA
DE EVITAR EL RIESGO AMBIENTAL Y DE SU
SEGURIDAD.
Volúmenes y áreas.
Modelo 360. Capacidad: 360 L.
FZ FF total
volumen bruto (L):
volumen de almacenamiento (L):
áreas de almacenamiento (dm²):
FZ = congelador.
FF = enfriador.
Su refrigerador ha sido diseñado para ser
usado en las siguientes condiciones:
clase climática
subtropical (ST),
+18°C
y +38°C
Consumo de energía
Capacidad para
fabricar hielos:
Capacidad de
congelación:
Tiempo de elevación
de temperatura
Instructivo y advertencias
Instructions and Warnings
Costa Rica
(506) 22-77-2100
Guatemala
(502) 66-85-6769, 66-85-6771
El Salvador
(503) 25-27-9301, 22-08-1786
Honduras
(504) 221-0034, 221 -1285
Panamá
(507) 261-3911, 262-3397
Ecuador
1 800 737-847
Brasil
08 800 11-5151
Región metropolitana: 40- 04-0114
Hecho en México por (made in Mexico by):
LEISER S. de R.L. de C.V.
Carretera Federal 51 Km 110
Poblado Ojo Seco. Celaya, Gto. C.P. 38158
No. de parte: 225D8225P022 rev.1

Pièce nº :
221C8395P004,
rév.
0
sur le côté opposé. Pour la fixer, utiliser les vis
qui viennent d’être retirées (étape 5b).
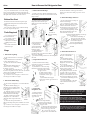
6. Remonter les charnières et les portes
a) Placer la rondelle sur le pivot de la charnière
inférieure.
b) Repérer les deux vis Torx se
trouvant sur la partie centrale de
la cuve. Les enlever et les remon-
ter sur le côté opposé.
c) Monter la porte du réfrigéra-
teur sur la charnière inférieure en
s’assurant que l’axe de la charnière
est aligné avec l’orifice de la porte.
d) Insérer la charnière intermé-
diaire dans l’orifice supérieur de
la porte.
Remarque : Lors du montage sur
le côté opposé, la charnière
centrale doit être tour-
née comme indiqué sur la
figure.
e) Mere les vis restantes et
bien les serrer.
7. Réinstaller la porte du congélateur
a) Placer la rondelle sur
le pivot de la charnière
centrale.
b) Monter la porte du
congélateur sur la char-
nière centrale en s’as-
surant que l’axe de la
charnière est aligné avec
l’orifice de la porte.
c) Repérer la charnière
fournie dans le kit et in-
sérer le pivot dans l’orifice
supérieur de la porte.
d) Avant de serrer les vis de la
charnière supérieure, vérifier que
la partie supérieure de la porte est
nivelée par rapport à la butée de
la cuve. L’espace entre les deux
portes doit être le même tout
le long.
e) Insérer les vis restantes et
bien les serrer.
f) Repérer le cache de la charnière
fourni dans le kit et le monter.
Important : Lors du remontage des char-
nières, s’assurer d’utiliser le même nombre de
vis, d’entretoises et de rondelles.
Une fois le travail terminé, seules les pièces
suivantes doivent être en trop par rapport au
montage de départ : le cache de la charnière
supérieure, la charnière supérieure et la bu-
tée métallique de la porte du réfrigérateur.
Vérifier l’étanchéité des portes. Vérifier qu’il
n’y a pas d'espace entre les joints de porte et
la cuve. Si des interstices existent, essayer
d’étirer le joint de porte.
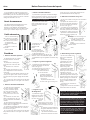
3. Retirer la charnière inférieure
a) Demander à quelqu’un d’incliner le réfrigé-
rateur vers l’arrière jusqu’à ce qu’il soit possible
de manipuler les vis de la charnière inférieure
Ne pas coucher le réfrigérateur.
b) Retirer l’écrou de la char-
nière et démonter le pivot. Le
remonter de l’autre côté de la
charnière.
c) Enlever les
deux pieds ré-
glables.
d) Retirer les trois
vis qui fixent la
charnière infé-
rieure.
e) Enlever aussi
les vis qui fixent l’em-
base des pieds réglables.
f) Monter l’embase et
la charnière inférieure à l’opposé des
endroits où ils se trouvaient à l’origine.
g) Remere les pieds réglables et redresser l’ap-
pareil.
4. Préparer la porte du congélateur
a) Retirer la bague intérieure de
la partie supérieure et la monter
sur le côté opposé.
b) Faire pivoter la porte de façon
à ce que la partie inférieure soit
vers le haut et retirer
les vis de la butée.
c)
Extraire la bague de
l’orifice de la partie infé-
rieure et la monter sur le
côté opposé.
d)
Monter la butée et les
vis sur le côté opposé de la porte.
5. Préparer la porte
du réfrigérateur
a) Extraire la bague
intérieure de la partie
supérieure et la mon-
ter sur le côté opposé.
b) Faire
pivoter
la porte de façon à ce que la
partie inférieure soit vers le
haut et retirer les vis de la
butée.
c) Extraire la bague intérieure
de la partie inférieure et la mon-
ter sur le côté opposé.
d) Chercher la butée inverse
fournie dans le kit et la monter
Notice d’inversion du sens de la porte
Pour une meilleure adaptation aux besoins
de l’utilisateur, la porte de ce réfrigérateur peut
être installée pour une ouverture vers la droite
ou vers la gauche. Cee notice décrit comment
changer les charnières de côté.
Avant de commencer
Lire aentivement l’intégralité de la notice.
Débrancher la prise du réfrigérateur.
Retirer tous les aliments du réfrigérateur.
Demander l’aide d’une personne. Elle sera né-
cessaire pour certaines étapes du processus.
Outils nécessaires
Clé ou tournevis hexago-
nal à embout /″ (7,9 mm).
Clé ou tournevis hexago-
nal à embout ½″ (12,7 mm).
Tournevis plat.
Tournevis cruciforme
(Phillips).
Tournevis ou embout
Torx T20.
Ruban adhésif.
Procédure
1. Retirer la charnière supérieure
a) Fermer la porte du congéla-
teur et la fixer avec du ruban
adhésif.
b) Utiliser le tournevis plat
pour retirer le cache de la char-
nière.
c) Retirer les vis de la char-
nière.
d) Soulever la charnière. Le pivot
doit complètement sortir de l’orifice
de la porte.
e) Décoller le ruban adhésif. Incliner la porte
de façon à la séparer de la cuve et la soulever
avec précaution jusqu’à la dégager de l’axe infé-
rieur.
f) Poser la porte dans un endroit sûr afin d’évi-
ter qu’elle ne tombe, ne soit rayée ou ne subisse
un choc.
2. Retirer la charnière intermédiaire
a) Fixer la porte du réfrigéra-
teur avec du ruban adhésif.
b) Une rondelle de sépara-
tion est logée dans la char-
nière centrale. La retirer et
la conserver avec le reste des
pièces.
c) Enlever les vis de la char-
nière et de l’entretoise qui y est
adossée. Démonter la charnière
centrale.
d) Décoller le ruban adhésif. In-
cliner la porte du réfrigérateur et la démonter
comme celle du congélateur.
e) Enlever la rondelle de séparation qui est lo-
gée dans la charnière inférieure. La conserver
avec le reste des pièces.
f) Poser la porte dans un endroit sûr afin d’évi-
ter qu’elle ne tombe, ne soit rayée ou ne subisse
un choc.
a
c, d, e et f
d et e
b
a
b
b
c
b
a
d et e
b et c
b, c et d
Sirius

Part Number:
221C8395P004,
rev.
0
kit and assemble it on the opposite side. To
aach it, use the screws that you just took out
(step 5b).
6. Reinstall the hinges and doors
a) Place the washer on the post
of the boom hinge.
b) Locate the two Torx screws
that are on the middle part of the
cabinet. Take them out and re-
mount them on the opposite side.
c) Mount the refrigerator door
on the boom hinge being careful
that the middle hinge axis coin-
cides with the door hole.
d) Insert the middle hinge in the up-
per hole of the door.
Note. When assembling on
the opposite side, the mid-
dle hinge must turn as indi-
cated in the diagram.
e) Insert the remaining
screws and tighten firmly.
7. Reinstall the freezer door
a) Place the washer on
the post of the middle
hinge.
b) Mount the freezer
door on the middle hinge
being careful that the
hinge axis coincides with
the door hole.
c) Locate the hinge in
the kit and insert the post
in the top hole of the door.
d) Before tightening
the top hinge screw, be sure the
top part of the door is level in
relation to the cabinet stopper.
The space between the two doors
must be equal all the way down.
e) Insert the remaining screws
and tighten firmly.
f) Locate the hinge cover that
comes with the kit and put it
in place.
Important: When reinstalling the hinges, be
sure to use the same number of screws, spac-
ers and washers as were used originally.
When finished, only the following items
should be let over from the original assembly:
the top hinge cover, the top hinge and the met-
al stopper from the refrigerator door.
Check the door seals. Be sure that there are
no spaces between the seal and the cabinet. If
there is an opening, try stretching the seal.
3. Remove the boom hinge
a) Ask someone to tilt the refrigerator back-
wards until you are able to unscrew the boom
hinge screws.
Do not lay the refrigerator down.
b) Remove the screw from the
hinge and dismount the post.
Remount it on the other side of
the hinge.
c) Remove
the two leveling
screws.
d) Take out the three
screws that hold the
boom hinge on.
e) Remove the
screws that aach
the bracket to the
leveling screws.
f) Assemble the bot-
tom hinge and the
bracket on the opposite side to where
they were originally.
g) Put the leveling screws back and straighten
the unit.
4. Prepare the freezer door
a) Remove the inside bearing
from the top part and assemble it
on the opposite side.
b) Turn the door in such a way
that the boom part is facing up-
wards and take out the
stopper screws.
c) Remove the bearing
from the boom hole and
assemble it on the oppo-
site side.
d) Assemble the stopper
and screws on the opposite side of
the door.
5. Prepare the
refrigerator door
a) Remove the in-
side bearing and re-
assemble it on the
opposite side.
b) Turn
the door
in such a way that the
boom part is facing up-
wards and take out the
stopper screw.
c) Remove the bearing from
the boom part and reassem-
ble it on the opposite side.
d) Look for the opposite
stopper that comes with the
How to Reverse the Refrigerator Door
For your convenience, the door of this refrig-
erator can be installed on either side. These in-
structions explain how to change the hinge from
the right side to the le side or vice versa.
Before You Start
Read the instructions all the way through.
Unplug the refrigerator from the electrical
outlet.
Empty the refrigerator.
Get someone to help you. You will need help
for some steps in the process.
Tools Required
• /″ (7.9 mm) socket or
hex screwdriver bit
• ½″ (1.7 mm) socket or
hex screwdriver bit
• Flat-head screwdriver
• Phillips-head screw-
driver
• Torx T20 screwdriver
• Adhesive tape
Steps
1. Remove the top hinge
a) Close the freezer door and tape
it shut.
b) Use the flat-head screwdriver
to take off the hinge cover.
c) Remove the screws from the
hinge.
d) Li up the hinge. The post
should come out completely
from the door hole.
e) Take off the tape. Tilt the door
in such a way that it comes off of the
cabinet and carefully li it until it is
free of the boom axis.
f) Put the door in a safe place so that it does
not fall, get scratched or banged.
2. Remove the middle hinge
a) Secure the refrigerator door with adhesive
tape.
b) On the middle hinge you
will find a spacer washer. Take
it off and keep it with the rest
of the parts.
c) Take the screws out of the
hinge and the aached spacer.
Dismantle the middle hinge.
d) Take off the tape. Tilt the
refrigerator door and take it
off in the same way as the freez-
er door.
e) Remove the spacer washer of
the boom hinge and put it with the rest of the
parts.
f) Put the door in a safe place so that it does
not fall, get scratched or banged.
a
c, d, e and f
d and e
b
a
b
c
b
a
d and e
b and c
b, c and d
b
Sirius
-
 1
1
-
 2
2
-
 3
3
-
 4
4


Summit BKRF14SS Manuel utilisateur
- Catégorie
- Frigos
- Taper
- Manuel utilisateur
dans d''autres langues
- English: Summit BKRF14SS User manual
- español: Summit BKRF14SS Manual de usuario
Autres documents
-
LG LFC25765SB Le manuel du propriétaire
-
GE GTH21SCWSS Manuel utilisateur
-
-
GE GTS21KCXWW Manuel utilisateur
-
GE Profile GTS18ICSRBB Le manuel du propriétaire
-
-
-
-
-
GE GSHS3KGZSS Manuel utilisateur