CVP
-
609 / CVP-605
EN
Reference Manual
This manual explains about the functions called up by touching each icon shown in the Menu display.
Please read the Owner’s Manual first for basic operations, before reading this Reference Manual.
Using the PDF manual
• To quickly jump to items and topics of interest, click on the desired items in the “Bookmarks” index to the left of
the main display window. (Click the “Bookmarks” tab to open the index if it is not displayed.)
• Click the page numbers that appear in this manual to go directly to the corresponding page.
• Select “Find” or “Search” from the Adobe Reader “Edit” menu and enter a keyword to locate related information
anywhere in the document.
NOTE The names and positions of menu items may vary according to the version of Adobe Reader being used.


CVP-609/605 Reference Manual 3
Adjusting the Tempo........................4
Transposing the Pitch in Semitones 5
Changing the Split Point and
Fingering Type..................................6
Learning How To Play Specific
Chords (Chord Tutor)......................7
Adjusting the Volume Balance.........8
Editing the Volume and Tonal
Balance (Mixer).................................9
Editing Music Notation (Score)
Settings............................................16
Editing Lyrics Display Settings ......18
Editing Text Display Settings.........19
Using Keyboard Harmony .............20
Microphone Settings.......................22
Vocal Harmony Settings.................24
Creating/Editing a Record of the
Music Finder ...................................31
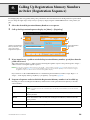
Calling Up Registration Memory
Numbers in Order (Registration
Sequence) ........................................34
Disabling Recall of Specific Items
(Freeze) ...........................................36
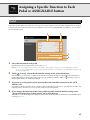
Assigning a Specific Function to Each
Pedal or ASSIGNABLE button...... 37
Editing a Voice (Voice Edit) .......... 41
Editing an Organ Flutes Voice (Voice
Edit)................................................ 45
Creating/Editing Styles (Style
Creator).......................................... 47
Creating/Editing MIDI Songs (Song
Creator).......................................... 59
Voice Settings................................. 71
Style Playback Related Settings ..... 76
Song Settings Related to Playback/
Recording ....................................... 79
Fine Tuning the Pitch .................... 84
Setting the Touch Sensitivity of the
Keyboard ........................................ 86
Metronome Settings....................... 87
MIDI Settings................................. 88
Making Global Settings (Utility) ... 94
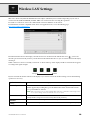
Wireless LAN Settings ................... 98
Index............................................... 99
• Unless indicated otherwise, the illustrations and displays as shown in this manual are based on the CVP-609 (in English). These are
for instructional purposes only, and may appear somewhat different from those on your instrument.
• The explanations in this Owner’s Manual apply to the firmware version 1.10. Yamaha may from time to time update firmware of the
product without notice for improvement. We recommend that you check our website for later releases and upgrade your firmware.
http://download.yamaha.com/
• The company names and product names in this manual are the trademarks or registered trademarks of their respective companies.

CVP-609/605 Reference Manual 4
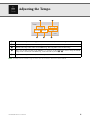
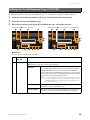
Adjusting the Tempo
NOTE The tempo value of an Audio Song is set via the Time Stretch function. Refer to the Owner’s Manual.
Indicates the tempo value during playback of the metronome, Style and MIDI Song.
Indicates the tempo value of the current Style. The Style will be started at this tempo.
Indicates the tempo value of the current MIDI Song. The Song will be started at this tempo.
These are basically equivalent to the TEMPO [-]/[+] buttons on the panel. If you want to call up the default
tempo of the current Style and MIDI Song, touch and hold any area in – .
Equivalent to the [TAP TEMPO] button on the panel.

CVP-609/605 Reference Manual 5
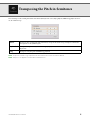
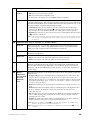
Transposing the Pitch in Semitones
You can transpose the overall pitch of the instrument (the keyboard sound, Style playback, MIDI Song playback, and so
on) in semitone steps.
NOTE The pitch of an Audio Song is adjusted via the Pitch Shift function. Refer to the Owner’s Manual.
NOTE Transpose is not applied to the Drum Kits and SFX Kits Voice.
Master
Transposes the overall pitch of the instrument, except for the Audio Songs and input sound from a
microphone or the [AUX IN] jack.
Keyboard
Transposes the pitch of keyboard including Style playback (controlled via the chord section of the
keyboard).
Song
Transposes only the pitch of MIDI Song playback.

CVP-609/605 Reference Manual 6
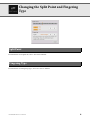
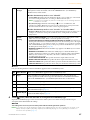
Changing the Split Point and Fingering
Type
For information about Split Point, refer to the Owner’s Manual.
For information about Fingering Types, refer to the Owner’s Manual.
Split Point
Fingering Type

CVP-609/605 Reference Manual 7
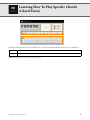
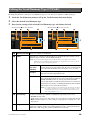
Learning How To Play Specific Chords
(Chord Tutor)
If you know the name of a chord but don’t know how to play it, this function indicates you the notes you should press.
NOTE Depending on the chord, some notes may be omitted.
Root
Lets you select the desired Chord Root.
Type
Lets you select the desired Chord Type.

CVP-609/605 Reference Manual 8
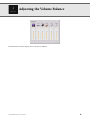
Adjusting the Volume Balance
For information about this display, refer to the Owner’s Manual.

CVP-609/605 Reference Manual 9
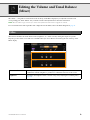
Editing the Volume and Tonal Balance
(Mixer)
The “Panel” – “Song Ch9-16” Part Selection tabs at the top of the Mixer display let you adjust the sound for each
corresponding part, while “Master” lets you make overall sound adjustments for the entire instrument.
NOTE When an Audio Song is selected, you cannot set the parameters related to the Song part or channels.
For a visual indication of the signal flow and configuration of the Mixer, refer to the Block Diagram on page 15.
This function modifies the tonal characteristics (brightness, etc.) of the sound by cutting the output of a specific
frequency portion of the sound. This is not available when you select “Master” from among the tabs at the top of the
Mixer display.
Filter
Harmonic Content
Allows you to adjust the Resonance effect (page 43) for each part. This can be used in
combination with the “Brightness” parameter to add further character to the sound.
Brightness
Determines the brightness of the sound for each part by adjusting the cutoff frequency
(page 43).

Editing the Volume and Tonal Balance (Mixer)
CVP-609/605 Reference Manual
10
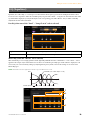
Equalizer (also called “EQ”) is a sound processor that divides the frequency spectrum into multiple bands that can be
boosted or cut as required to tailor the overall frequency response. The “Panel” – “Song Ch9-16” Part Selection tabs at the
top of the Mixer display let you adjust the EQ for each corresponding part, while “Master” lets you make overall EQ
adjustments for the entire instrument.
Part EQ (when one of the “Panel” – “Song Ch 9-16” tabs is selected)
Master EQ (when the “Master” tab is selected)
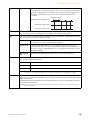
This instrument possesses a high grade five-band digital EQ. With this function, a final effect — tone control — can be
applied to the output of your instrument. You can select one of the five preset EQ types in the “Master” display. You can
even create your own custom EQ settings by adjusting the frequency bands, and save the settings to one of two User
Master EQ types.
NOTE Master EQ cannot be applied to an Audio Song or the Metronome sound.
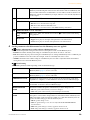
EQ (Equalizer)
High
Boosts or attenuates the high EQ band for each part.
Low
Boosts or attenuates the low EQ band for each part.
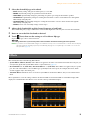
1
2
3
4
0
80Hz 500Hz
1.0kHz 4.0kHz 8.0kHz
Bandwidth (also called “Shape” or “Q”)
Frequency
Gain
5 bands (default)

Editing the Volume and Tonal Balance (Mixer)
CVP-609/605 Reference Manual
11
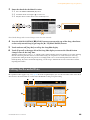
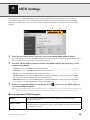
1 Select the desired EQ type to be edited.
• FLAT: Flat EQ settings. The gain of each frequency is set to 0dB.
•
HOME: Standard EQ settings for optimum sound in the home.
•
CONCERT: Optimum EQ settings for performing in a public space using the instrument’s speakers.
•
AUXOUT PA: Optimum EQ settings for sending the instrument's sound to external PA devices through the
AUX OUT [L/L+R]/[R] jacks.
•
AUXOUT HIFI: Optimum EQ settings for sending the instrument's sound to studio monitors through the
AUX OUT [L/L+R]/[R] jacks.
•
USER1/2: Your own custom EQ settings saved in step 4.
2 Adjust the Q (bandwidth) and the Center Frequency of each band.
The available Frequency range is different for each band. The higher the value of Q, the narrower the bandwidth.
3 Boost or cut each of the five bands as desired.
4 Touch (Save) then save the settings as a User Master EQ type.
Up to two EQ types can be created and saved.
NOTICE
The settings will be lost if you turn the power to the instrument off without executing the Save operation.
NOTE If you want to save the Master EQ settings to the USB flash memory, save as a User Effect file. To do this: From the display
called up via [Menu] [Utility] [Factory Reset/Backup] page 2/2, touch [Backup] of “User Effect” to execute the
Save operation (page 97).
This instrument features the following Effect Blocks.
•
System Effect (Chorus, Reverb): These Effects are applied to the entire sound of this instrument. For each part, you
can adjust the depth of the System Effect. Refer to “Chorus/Reverb” (page 13).
•
Insertion Effect 1 – 8 (CVP-609) / Insertion Effect 1 – 3 (CVP-605): These Effects are applied only to a specific
part. For each of these Effects, select an Effect type specifically for the desired part (for example, Distortion, which
would be applied only to the Guitar part).
•
Vari ation Effe ct: This Block can be used both as System Effects and Insertion Effects, and you can switch between
them.
These explanations covers the settings related to the Insertion Effects and Variation Effects on the Effect display. This
display is not available when the “Master” tab is selected at the top of the Mixer display.
Effects

Editing the Volume and Tonal Balance (Mixer)
CVP-609/605 Reference Manual
12
NOTE For details about the Effect types, refer to the Data List.
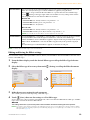
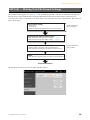
Editing and Saving the Effect settings
You can edit the settings of the System Effects (Chorus, Reverb), Insertion Effects and Variation Effect. The edits can be
saved as a User Effect type.
1 From the Mixer display, touch the desired Effect type to call up the Effect Type Selection
display.
2 Select the Effect type if necessary, then touch (Setting) to call up the Effect Parameter
display.
3 Make the necessary setting for each parameter.
The available parameters differ depending on the Effect type.
4 Touch (Save), then save the settings as a User Effect type.
Up to 3 Effect types can be stored for each of the Reverb, Chorus and Variation Effect Blocks while up to 10 Effect
types can be stored for the Insertion Effect Blocks.
NOTICE
The settings will be lost if you turn the power to the instrument off without executing the Save operation.
NOTE If you want to save the Effect settings to the USB flash memory, save as a User Effect file. To do this: From the display
called up via [Menu] [Utility] [Factory Reset/Backup] page 2/2, touch [Backup] of “User Effect” to execute the
Save operation (page 97).
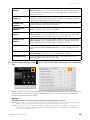
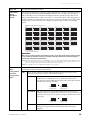
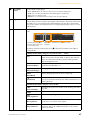
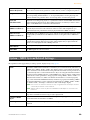
Insertion Effect
Lets you assign the desired Insertion Effect Type for each part by touching the area above each
knob. You can adjust the degree to which each Effect is applied by using the knobs.
If you want to assign each of the Insertion Effects to a specific Part and select an Effect Type,
touch (Setting) at the upper right of this area and make necessary settings in the window.
The assignable Parts for each Insertion Effect are as follows:
CVP-609
• Insertion Effect 1 – 5: Keyboard Parts, Song channels 1 – 16
•Insertion Effect 6: Microphone, Song channels 1 – 16
• Insertion Effect 7 – 8: Style Parts
CVP-605
• Insertion Effect 1 – 2: Keyboard Parts, Song channels 1 – 16
•Insertion Effect 3: Microphone, Keyboard Parts, Song channels 1 – 16
NOTE For CVP-605, the Insertion Effect cannot be applied to the Style part.
Variation E ffect
Touch [INSERTION] or [SYSTEM] to switch the Effect Connection between the Insertion Effect
and System Effect, then touch the right end of this line to select the desired Effect type.
When “SYSTEM” is selected, this Effect is applied to all parts of the Song and Style as the System
Effect. When “INSERTION” is selected, this Effect is applied only to the specified Song/Style
part.
To adjust the degree to which the Effect is applied, use the knob of each part.
3
4
2

Editing the Volume and Tonal Balance (Mixer)
CVP-609/605 Reference Manual
13
As described in the previous section, Chorus and Reverb are System Effects which are applied to the entire sound of the
instrument. They are not available when the “Master” tab is selected at the top of the mixer display.
NOTE For details about the Chorus and Reverb types, refer to the Data List (Effect Type List).
Editing and Saving the Chorus/Reverb settings
Same as the operation on the “Effect” display (page 12).
You can adjust the Pan (stereo position of the sound) and Volume for each Part. This display is not available when the
“Master” tab is selected at the top of the Mixer display.
Chorus/Reverb
Chorus
Touch the Chorus type name at the top right of this row to select the desired Chorus type. After
selecting, return to the Mixer display then use each knob to adjust the Chorus depth for each part.
Reverb
Touch the Reverb type name at the top right of this row to select the desired Reverb type. After
selecting, return to the Mixer display then use each knob to adjust the Reverb depth for each part.
Pan/Volume
Pan
Determines the stereo position of each part (channel).
Vol um e
Determines the level of each part or channel, giving you fine control over the balance of all the
parts.

Editing the Volume and Tonal Balance (Mixer)
CVP-609/605 Reference Manual
14
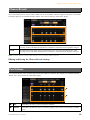
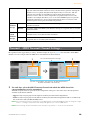
Compressor is an effect commonly used to limit and compress the dynamics (softness/loudness) of an audio signal. For
signals that vary widely in dynamics, such as vocals and guitar parts, it “squeezes” the dynamic range, effectively making
soft sounds louder and loud sounds softer. When used with gain to boost the overall level, this creates a more powerful,
more consistently high-level sound.
This instrument features the Master Compressor applied to the entire sound of this instrument. Although the preset
Master Compressor settings are provided, you can create and save your original Master Compressor by adjusting the
related parameters. This display is available only when the “Master” tab is selected at the top of the Mixer display.
NOTE Master Compressor cannot be applied to an Audio Song or the Metronome sound.
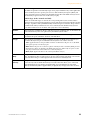
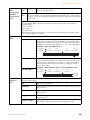
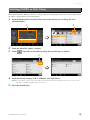
1 Set the Compressor to “On.”
2 Select the Master Compressor type to be edited.
3 Edit the parameters related to the Master Compressor.
The indication “GR” shows the Gain Reduction (compressed level) while “Output” shows the output level according
to the instrument sound in real time.
4 Touch (Save), then save the settings as a User Master Compressor type.
Up to five Master Compressor types can be created and saved.
NOTICE
The settings will be lost if you turn the power to the instrument off without executing the Save operation.
NOTE If you want to save the Master Compressor settings to the USB flash memory, save as a User Effect file. To do this: From
the display called up via [Menu] [Utility] [Factory Reset/Backup] page 2/2, touch [Backup] of “User Effect” to
execute the Save operation (page 97).
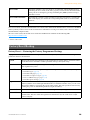
Master Compressor (only for CVP-609)
Threshold
Determines the threshold (minimum level at which compression starts).
Ratio
Determines the ratio of compression (how much the dynamic range is compressed).
Gain
Determines the output level.
12
3
4

Editing the Volume and Tonal Balance (Mixer)
CVP-609/605 Reference Manual
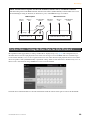
15
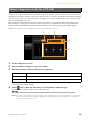
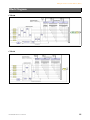
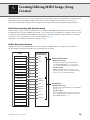
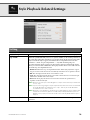
CVP-609
* MIC EFFECT = 3 Band EQ/Noise Gate/Compressor, VH = Vocal Harmony, VE = Vocal Harmony Effect
CVP-605
* MIC EFFECT = 3 Band EQ/Noise Gate/Compressor, VH = Vocal Harmony
Block Diagram

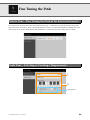
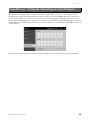
CVP-609/605 Reference Manual 16
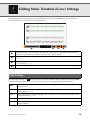
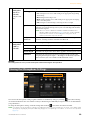
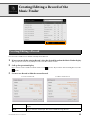
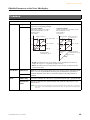
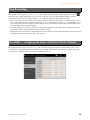
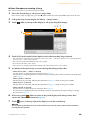
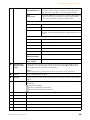
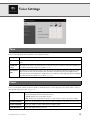
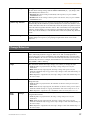
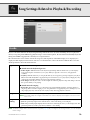
Editing Music Notation (Score) Settings
Select a MIDI Song then touch [Score] to call up the music notation of the current MIDI Song. You can change the
notation indication as desired to suit your personal preferences.
From the display called up via (Play Setting), you can set the parameters related to playback of the current MIDI
Song. The parameters explained here can also be set on the Song area (with expanded) of the Home display.
Indicates the name of the current Song. Also, the tempo value is shown at the right end. If you want to
change the Song, touch the Song name to call up the Song Selection display.
Lets you set the parameters related to playback Parts of the MIDI Song. For details, refer to “Play Setting”
(page 16).
Lets you set the notation indication parameters, including notation size, chord display, etc. For details, refer
to “View Setting” (page 17).
Lets you set more detailed parameters related to the notation indication. Refer to “Detail Setting” (page 17).
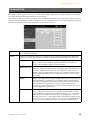
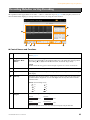
Play Setting
Extra
Turns playback of all Channels on or off, except for those assigned to the Left and Right Hand Parts
described below.
Left
Turns playback on or off for the Left Hand Part, to which you can assign the desired channel on the Song
Setting display (page 80).
Right
Turns playback on or off for the Right Hand Part, to which you can assign the desired channel on the
Song Setting display (page 80).
Guide
Turns the Guide function on or off. For details, refer to the Owner’s Manual.
AB
Turns Repeat playback on or off and lets you specify the Repeat playback range. For details, refer to the
Owner’s Manual.

Editing Music Notation (Score) Settings
CVP-609/605 Reference Manual
17
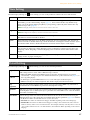
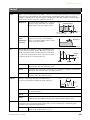
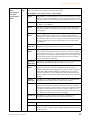
From the display called up via (View Setting), you can set the parameters related to the view of the notation.
From the display called up via (Detail Setting), you can set more detailed parameters.
View Setting
Size
Determines the display resolution (or zoom level) of the notation.
Left
Turns indication of the left-hand notation on or off. If an “-” indication appears at this parameter and is
unavailable, go to the “Detail Setting” display (page 17) , then set the Left Ch to any channel except
“Auto.” Or, on the display called up via [Menu] → [Song Setting] → [Part Ch], then set the Left to any
channel except “Off” (page 80).
NOTE Both Right (below) and Left cannot be turned off at the same time.
Right
Turns indication of the right-hand notation on or off.
NOTE Both Right and Left (above) cannot be turned off at the same time.
Chord
Turns indication of the chords on or off. If the current Song does not contain chord data, no chord
information is shown even if this is checked.
Lyrics
Turns indication of the Lyrics on or off. If the current Song does not contain lyrics data, no lyrics are
shown even if this is checked. If the Song contains Pedal events, touching here switches between “Lyrics”
and “Pedal.” When “Pedal” is checked, Pedal events are shown instead of Lyrics on the display.
Note
Turns indication of the Note names on or off. When this is checked, each note name is shown at the left
side of each note. If the Song contains Fingering events, touching here switches between “Note” and
“Fingering.” When “Fingering” is checked, Fingering events are shown instead of Note names on the
display.
Color
When this is checked, the notes in the display appear in identifying colors (C: red, D: yellow, E: green, F:
orange, G: blue, A: purple, and B: gray).
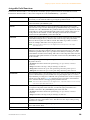
Detail Setting
Right Ch
Determines which MIDI channel in the MIDI Song data is used for the right-hand/left-hand part.
This setting returns to “Auto” when a different Song is selected.
•Auto:
The MIDI channels in the MIDI Song data for the right- and left-hand parts are assigned
automatically — setting each part to the channel which has been specified at the Part Ch (page 80) on
the Song Setting display.
•1–16: Assigns a specified MIDI channel (1–16) to each of the right- and left-hand parts.
•Off (Left Ch only): No channel assignment. This disables display of the left-hand notation.
Left Ch
Key
Signature
Lets you enter the Key Signature at the current stopped position of the MIDI Song. This menu is
useful when the current MIDI Song contains no Key Signature settings.
Quantize
This gives you control over the note resolution in the notation, letting you shift or correct the timing
of all displayed notes so that they line up to a particular note value. Make sure to select the smallest
note value used in the Song.
Note Name
Selects the type of the note name indicated at the left of the note in the notation from among the
following three types. The settings here are available when the Note parameter (page 17) is checked.
•A, B, C:
Note names are indicated as letters (C, D, E, F, G, A, B).
•Fixed Do: Note names are indicated in solfeggio and differ depending on the selected language.
•Movable Do: Note names are indicated in solfeggio according to the scale intervals, and as such are
relative to the key. The root note is indicated as Do. For example, in the key of G major the root note of
“Sol” would be indicated as “Do.” As with “Fixed Do,” the indication differs depending on the selected
language.

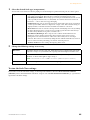
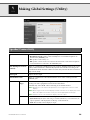
CVP-609/605 Reference Manual 18
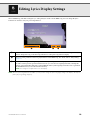
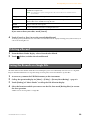
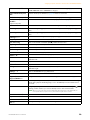
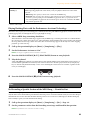
Editing Lyrics Display Settings
Select a MIDI Song, and then touch [Lyrics] to call up the lyrics of the current MIDI Song. You can change the lyrics
indication as desired to suit your personal preferences.
NOTE When the lyrics are garbled or unreadable, you may need to change the Lyrics Language setting on the display called up via
[Menu] [Song Setting] [Lyrics].
Indicates the name of the current Song. Also, the current measure number is shown at the right end. If you
want to change the Song, touch the Song name here to call up the Song Selection display.
Lets you set the parameters related to playback Parts of the MIDI Song. For details, refer to “Play Setting”
(page 16).
Allows you to change the background picture of the Lyrics display and Text display.
As well as various pictures provided in the Preset tab, you can select an original picture file (a bitmap file
with no greater than 800 x 480 pixels) in the USB flash memory. The original picture file can be copied from
the USB flash memory to the internal User memory.
NOTE The setting here is applied also to the Text display.

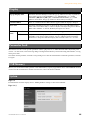
CVP-609/605 Reference Manual 19
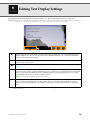
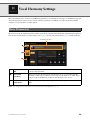
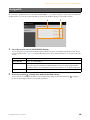
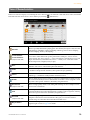
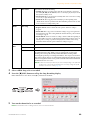
Editing Text Display Settings
The display of this instrument can show text files (extension: .txt and less than 60 KB) created on a computer.
NOTE Line breaks are not automatically entered in the instrument. If a sentence is not displayed in its entirety because of limitations in
the screen space, enter line breaks manually on your computer by using a text editor, etc. beforehand.
NOTE When the text is garbled or unreadable, you may need to change the language setting on the display called up via [Menu]
[Utility] [System].
Indicates the current text file which is shown on the display. Touching here calls up the text File Selection
display which lets you select an original text file in the USB flash memory or copy it from the USB flash
memory to the internal User memory.
Clears the text from the display. This operation does not delete the text file itself, but simply leaves the
display empty of any text file.
Lets you set the parameters related to playback Parts of the MIDI Song. For details, refer to “Play Setting”
(page 16).
Allows you to change the background picture of the Lyrics display and Text display.
As well as various pictures provided in the Preset tab, you can select your original picture file (a bitmap file
with no greater than 800 x 480 pixels) in the USB flash memory. Your original picture file can be copied
from the USB flash memory to the internal User memory.
NOTE The setting here is applied also to the Lyrics display.
Lets you select the font size or type. “Small,” “Medium,” or “Large” keeps each character at the same width,
and is suitable for displaying lyrics with chord names above, etc. “Proportional Small,” “Proportional
Medium,” and “Proportional Large” are suitable for displaying lyrics without chord names or explanatory
notes.

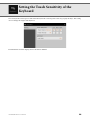
CVP-609/605 Reference Manual 20
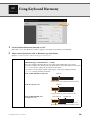
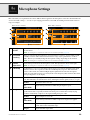
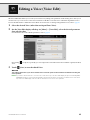
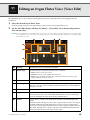
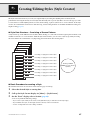
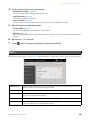
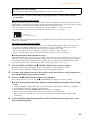
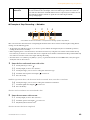
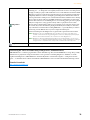
Using Keyboard Harmony
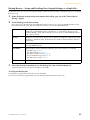
1 Set the Keyboard Harmony function to “On.”
When this is set to “On,” Harmony or Echo is applied to your keyboard performance automatically.
2 Adjust related parameters such as Harmony type and volume.
NOTE The available parameters differ depending on the Harmony type.
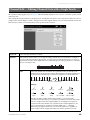
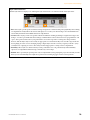
Type
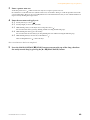
Lets you select one of the Harmony types, which are divided into the following groups.
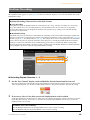
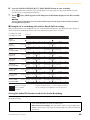
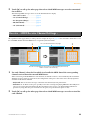
Harmony Type (Standard Duet — Strum)
These types apply the harmony effect to notes played in the right-hand section of the
keyboard according to the chord specified in the left-hand section of the keyboard. (Note that
the “1+5” and “Octave” settings are not affected by the chord.)
If you want to use these Types with the Style stopped, set the “Stop ACMP” parameter
(page 76) to a setting other than “Disabled.”
When [ACMP ON/OFF] is turned on:
When the Left part is on:
When [ACMP ON/OFF] and
the Left part are on:
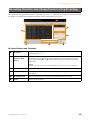
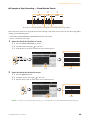
1
Split Point
Chord section for Style playback and Harmony effect
Split Point
Main and Layer Voices
Left Voice and chord section for Harmony effect
Style Split Point Left Split Point
Left Voice
Main and Layer Voices
Chord section for Style playback and Harmony effect
La page est en cours de chargement...
La page est en cours de chargement...
La page est en cours de chargement...
La page est en cours de chargement...
La page est en cours de chargement...
La page est en cours de chargement...
La page est en cours de chargement...
La page est en cours de chargement...
La page est en cours de chargement...
La page est en cours de chargement...
La page est en cours de chargement...
La page est en cours de chargement...
La page est en cours de chargement...
La page est en cours de chargement...
La page est en cours de chargement...
La page est en cours de chargement...
La page est en cours de chargement...
La page est en cours de chargement...
La page est en cours de chargement...
La page est en cours de chargement...
La page est en cours de chargement...
La page est en cours de chargement...
La page est en cours de chargement...
La page est en cours de chargement...
La page est en cours de chargement...
La page est en cours de chargement...
La page est en cours de chargement...
La page est en cours de chargement...
La page est en cours de chargement...
La page est en cours de chargement...
La page est en cours de chargement...
La page est en cours de chargement...
La page est en cours de chargement...
La page est en cours de chargement...
La page est en cours de chargement...
La page est en cours de chargement...
La page est en cours de chargement...
La page est en cours de chargement...
La page est en cours de chargement...
La page est en cours de chargement...
La page est en cours de chargement...
La page est en cours de chargement...
La page est en cours de chargement...
La page est en cours de chargement...
La page est en cours de chargement...
La page est en cours de chargement...
La page est en cours de chargement...
La page est en cours de chargement...
La page est en cours de chargement...
La page est en cours de chargement...
La page est en cours de chargement...
La page est en cours de chargement...
La page est en cours de chargement...
La page est en cours de chargement...
La page est en cours de chargement...
La page est en cours de chargement...
La page est en cours de chargement...
La page est en cours de chargement...
La page est en cours de chargement...
La page est en cours de chargement...
La page est en cours de chargement...
La page est en cours de chargement...
La page est en cours de chargement...
La page est en cours de chargement...
La page est en cours de chargement...
La page est en cours de chargement...
La page est en cours de chargement...
La page est en cours de chargement...
La page est en cours de chargement...
La page est en cours de chargement...
La page est en cours de chargement...
La page est en cours de chargement...
La page est en cours de chargement...
La page est en cours de chargement...
La page est en cours de chargement...
La page est en cours de chargement...
La page est en cours de chargement...
La page est en cours de chargement...
La page est en cours de chargement...
La page est en cours de chargement...
-
 1
1
-
 2
2
-
 3
3
-
 4
4
-
 5
5
-
 6
6
-
 7
7
-
 8
8
-
 9
9
-
 10
10
-
 11
11
-
 12
12
-
 13
13
-
 14
14
-
 15
15
-
 16
16
-
 17
17
-
 18
18
-
 19
19
-
 20
20
-
 21
21
-
 22
22
-
 23
23
-
 24
24
-
 25
25
-
 26
26
-
 27
27
-
 28
28
-
 29
29
-
 30
30
-
 31
31
-
 32
32
-
 33
33
-
 34
34
-
 35
35
-
 36
36
-
 37
37
-
 38
38
-
 39
39
-
 40
40
-
 41
41
-
 42
42
-
 43
43
-
 44
44
-
 45
45
-
 46
46
-
 47
47
-
 48
48
-
 49
49
-
 50
50
-
 51
51
-
 52
52
-
 53
53
-
 54
54
-
 55
55
-
 56
56
-
 57
57
-
 58
58
-
 59
59
-
 60
60
-
 61
61
-
 62
62
-
 63
63
-
 64
64
-
 65
65
-
 66
66
-
 67
67
-
 68
68
-
 69
69
-
 70
70
-
 71
71
-
 72
72
-
 73
73
-
 74
74
-
 75
75
-
 76
76
-
 77
77
-
 78
78
-
 79
79
-
 80
80
-
 81
81
-
 82
82
-
 83
83
-
 84
84
-
 85
85
-
 86
86
-
 87
87
-
 88
88
-
 89
89
-
 90
90
-
 91
91
-
 92
92
-
 93
93
-
 94
94
-
 95
95
-
 96
96
-
 97
97
-
 98
98
-
 99
99
-
 100
100


Yamaha CVP-605 Le manuel du propriétaire
- Catégorie
- Synthétiseur
- Taper
- Le manuel du propriétaire
dans d''autres langues
- italiano: Yamaha CVP-605 Manuale del proprietario
- English: Yamaha CVP-605 Owner's manual
- español: Yamaha CVP-605 El manual del propietario
- Deutsch: Yamaha CVP-605 Bedienungsanleitung
- русский: Yamaha CVP-605 Инструкция по применению
- Nederlands: Yamaha CVP-605 de handleiding
- português: Yamaha CVP-605 Manual do proprietário
- dansk: Yamaha CVP-605 Brugervejledning
- polski: Yamaha CVP-605 Instrukcja obsługi
- čeština: Yamaha CVP-605 Návod k obsluze
- svenska: Yamaha CVP-605 Bruksanvisning
- Türkçe: Yamaha CVP-605 El kitabı
- suomi: Yamaha CVP-605 Omistajan opas
- română: Yamaha CVP-605 Manualul proprietarului
Documents connexes
-
Yamaha CVP-605 Le manuel du propriétaire
-
Yamaha CVP-709GP Le manuel du propriétaire
-
-
Yamaha CVP-600 Le manuel du propriétaire
-
-
Yamaha CVP-409GP Le manuel du propriétaire
-
-
Yamaha CVP-709 Le manuel du propriétaire
-
Yamaha CVP - 403 Manuel utilisateur
-