
©Copyright LOTRONIC 2015 DJ21USB-BT 1
STEREO MIXER
TABLE DE MIXAGE STEREO
STEREOMISCHPULT
STEREO MIKSER
MIXER STEREO
MESA DE MISTURA STEREO
STEREO MENGPANEEL
OWNER’S MANUAL
MANUEL D’UTILISATION
BEDIENUNGSANLEITUNG
NAVODILA ZA UPORABO
MANUAL DE UTILIZARE
INSTRUKCJA OBSŁUGI
MANUAL DE INSTRUÇÕES
HANDLEIDING
Electric products must not be put into household waste. Please bring them to a recycling centre. Ask your local authorities or
your dealer about the way to proceed.
NOTE IMPORTANTE : Les produits électriques ne doivent pas être mis au rebut avec les ordures ménagères. Veuillez les faire
recycler là où il existe des centres pour cela. Consultez les autorités locales ou votre revendeur sur la façon de les recycler.
Elektrogeräte gehören nicht in den Hausmüll. Sie müssen in speziellen Betrieben recycelt werden. Wenden Sie sich hierzu an die
örtlichen Behörden oder Ihren Fachhändler!
Produtos eléctricos não deverão ser postos em contentores de lixo caseiros. Por favor, deposite-os em contentores para reciclagem.
Questione as autoridades locais ou onde adquiriu o produto sobre como deverá proceder.
Produsele electrice nu trebuie reciclate impreuna cu gunoiul menajer. Va rugam sa le transportati la un centru de reciclare.
Adresati-va autoritatilor locale sau furnizorului local despre procedura.
Produkty elektryczne nie mogą być utylizowane wraz z odpadami domowymi, po wyeksploatowaniu urządzenia proszę
skierować je do recyklingu
POMEMBNO:Elektirčni izdelki se ne smejo odlagati v gospodinjske odpadke.Prosimo, da jih pripeljete do centra za
recikliranje.Vprašajte svoje lokalne oblasti ali svojega prodajalca o tem kako se nadaljuje
BELANGRIJK: De elektrische producten mogen niet bij het huisvuil gegooid worden. Gelieve deze te laten recycleren daar waar er
centra’s hiervoor voorzien is. Raadpleeg de plaatselijke autoriteiten of uw verkoper ivm de manier van recycleren
Imported from China by:
Lotronic SA
Avenue Zénobe Gramme 9
1480 SAINTES
Belgium

©Copyright LOTRONIC 2015 DJ21USB-BT 2
U
U
S
S
E
E
R
R
M
M
A
A
N
N
U
U
A
A
L
L
Features
BLUETOOTH
3x Stereo Channels
2x Phono, 3x Line, 1x USB and 2x Mic Inputs
Talkover
Headphone monitor
Master output level meter
Load and play MP3’s into the USB stick with led display
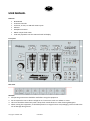
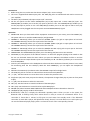
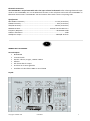
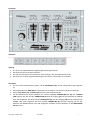
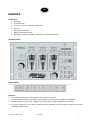
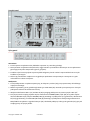
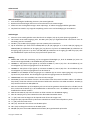
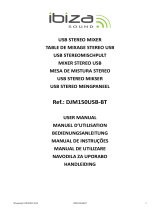
Front panel
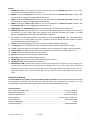
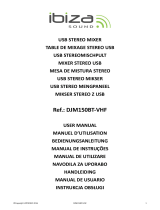
Rear Panel
Cautions
1. All operating instructions should be read before using this equipment.
2. Do not expose this unit to direct sunlight or to a heat source such as a radiator or stove.
3. This unit should be cleaned only with a damp cloth. Avoid solvents or other cleaning detergents.
4. When moving this equipment, it should be placed in its original carton and packaging. This will reduce the
risk of damage during transit.
GB

©Copyright LOTRONIC 2015 DJ21USB-BT 3
Connections
1. Before using this unit, make sure that the AC Adaptor (21) is correct voltage.
2. The unit is supplied with AMP output jacks. The AMP (20) jacks are unbalanced and used to connect to
your amplifier.
3. The MIC L (15) and MIC R (16) input accepts a 1/4” connector.
4. On the rear panel are two stereo PHONO/LINE (17) & (18) inputs and 1 stereo LINE (19) input. The
PHONO/LINE (4) enables you to set the (17) input to phono or Line. The PHONO/LINE (6) enables you to
set the (18) input to phono or Line. The USB/LINE (8) enables you to set the input to USB or Line (19).
Headphones can be plugged into the rear panel mounted HEADPHONE (14) jack.
Operation
1. POWER ON: Once you have made all the equipment connections to your mixer, press the POWER (12).
The power will turn on and the POWER LED (22) will glow RED.
2. CHANNEL 1: SWITCH (4) allows you to select the PHONO 1/LINE 1 (17) jack to input phono or line level.
The CHANNEL SLIDE (5) controls the input level of this channel.
3. CHANNEL 2: SWITCH (6) allows you to select the PHONO 2/LINE 2 (18) jack to input phono or line level.
The CHANNEL SLIDE (7) controls the input level of this channel.
4. CHANNEL 3: SWITCH (8) allows you to select the MP3/BT OR LINE 3 (19) jack to input mp3 or line level.
The CHANNEL SLIDE (9) controls the input level of this channel.
5. CROSSFADER: The CROSSFADER (10) allows you to the Mixing CH1/CH2 source into another.
6. TALKOVER (3): The purpose of the talkover section is to allow the program playing to be muted so that
the mic can be heard above the music. When you press the SWITCH, the talkover will be on and the
volume of all sources except the Mic inputs are lowered by 12 dB. The Micro (2) allows you to control the
level of MIC1/ M I C 2 .
7. Connect your headphones to the headphones socket and select the desired channel (channel 1-3 or MIC)
for monitoring with the Cue switch(1). With this knob PHONE(11), you can adjust the headphones
volume
8. DISPLAY: The DISPLAY (13) indicates either the MASTER output left and right levels.
9. The USB (23) jack can connect to USB stick that contains exclusively MP3 files.
10. |<< (24) : Use this button to re-start the track or to select the previous track.
11. Play/Pause (25): Each time you press this button, the operation changes from play to pause or from pause
to play.
12. >>| (26): Use this button to select the next track.
13. VOL-(27): Use this button to control level down of the MP3 player.
14. VOL+ (28): Use this button to control level UP op the MP3 player.
15. MP 3/ B T (29): Select between MP3 & Bluetooth when MP3/BT has been selected on channel 3.
16. LED DISPLAY (30): Display to MP3's information.
17.
BLUETOOTH LED (31): It displays the Bluetooth operating status. When you turn on the power, the
Bluetooth LED is flashing slowly which means that it is ready to connect to a Bluetooth device. If no
connection is found after 1 minute, le LED goes out and enters into standby mode. If the Bluetooth
connection is made with a player, the light flashes slowly, about 2-3 seconds flicker once. At this point you
can use the Bluetooth player playing music can hear the music of the corresponding channel.

©Copyright LOTRONIC 2015 DJ21USB-BT 4
Bluetooth Connection
The DJ21USB-BT is only discoverable when the input selected is Bluetooth. After selecting Bluetooth input
mode on the DJ21USB-BT, turn on the Bluetooth function on the cell phone and search the DJ21USB-BT. Its
Bluetooth device name is “DJ21USB-BT”. Pair and connect after search. There is no pairing code.
Specifications
MIC L&MIC R sensitivity ........................................................................ 1.5 mV (10 K ohms)
PHONO sensitivity ..................................................................................... 3mV (47 K ohms)
LINE/CD sensitivity ................................................................................ 150 mV (22 K ohms)
MASTER OUTPUT ...................................................................... nominal 775 mV MAX 1.5 V
Frequency Response ................................................................................. 20Hz-20KHz ±2dB
Talkover attenuation .................................................................................................... -12dB
Headphone output .................................................................................. 300mV/8-16 ohms
MANUEL DE L’UTILISATEUR
Caractéristiques
BLUETOOTH
3 canaux stéréo
Entrées: 2 Phono, 3 Ligne, 1 USB et 2 Micro
Talkover
Pré-écoute dans le casque
Vu-mètre sur la sortie générale
Transfère et lit des fichiers MP3 sur une clé USB
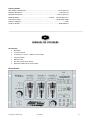
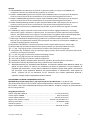
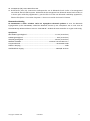
Façade:
F

©Copyright LOTRONIC 2015 DJ21USB-BT 5
Arrière:
Attention
1. Lire attentivement ce manuel avant la première mise en service.
2. Ne pas exposer cet appareil au soleil ou une source de chaleur telle qu’un radiateur ou un poêle.
3. Nettoyer uniquement avec un chiffon humide. Ne pas utiliser de solvants ou autres détergents.
4. Transporter cet appareil dans son emballage d’origine afin d’éviter des dommages pendant le
transport.
Connexions
1. Avant la première utilisation, vérifiez que l’adaptateur secteur (21) est réglé sur la bonne tension.
2. Les fiches de sorties AMP (20) sont asymétriques et destinées au branchement sur un amplificateur.
3. Les entrées MIC L (15) et MIC R (16) sont prévues pour des fiches Jack 6,35mm.
5. Au dos de l’appareil se trouvent 2 entrées PHONO/LIGNE (17 & 18) et 1 entrée STEREO LIGNE (19). Le
commutateur PHONO/LINE (4) en façade vous permet de régler l’entrée (17) sur Phono ou Ligne. Le
commutateur PHONO/LINE (6) vous permet de régler l’entrée (18) sur Phono ou Ligne. Le
commutateur MP3/BT-LINE (8) vous permet de régler l’entrée (19) sur MP3 ou Ligne. Branchez votre
casque sur la fiche HEADPHONE (14) à l’arrière.
Fonctionnement
1. POWER ON: Lorsque vous avez terminé tous les branchements à votre table de mixage, appuyez sur
POWER (12) pour mettre l’appareil sous tension. La LED de tension (22) s’allume en rouge.
2. CANAL 1: Le commutateur (4) vous permet de sélectionner Phono1 ou Ligne1 sur la fiche d’entrée (17)
au dos. Le potentiomètre (5) règle le niveau d’entrée de ce canal.
3. CANAL 2: Le commutateur (6) vous permet de sélectionner Phono2 ou Ligne2 sur la fiche d’entrée (18)
au dos. Le potentiomètre (7) règle le niveau d’entrée de ce canal.
4. CANAL 3: Le commutateur (8) vous permet de régler la fiche jack (19) au dos sur une source MP3 ou
Ligne 2. Le potentiomètre (9) règle le niveau d’entrée de ce canal.
5. CROSSFADER : Le CROSSFADER (10) vous permet de mélanger les canaux 1 & 2.
6. TALKOVER (3): La fonction TALKOVER a pour but de baisser le niveau de la musique afin de pouvoir
entendre le microphone. Lorsque vous appuyez sur le bouton, le volume de toutes les sources est
baissé de 12dB. Le contrôle Micro (2) permet de régler le niveau du microphone 1 ou 2.
7. Branchez votre casque sur la fiche de casque et sélectionnez le canal désiré (canal 1-3 ou MIC) que
vous souhaitez pré-écouter au moyen du commutateur CUE (1). Le bouton PHONE (11) permet de
régler le volume du casque.
8. Echelle à LED: L’afficheur (13) indique les niveaux gauche et droit de la sortie générale MASTER.
9. La fiche USB (23) est prévue pour une clé USB contenant de la musique au format MP3 uniquement.
10. |<<(24) : Cette touche permet de revenir au début du titre en cours ou au début du titre précédent.
11. Play/Pause(25): A chaque pression sur cette touche, le fonctionnement bascule entre lecture et pause.
12. >>|(26): Utilisez cette touche pour sélectionner le titre suivant.
13. VOL- (27) : Baissez le volume du lecteur MP3
14. VOL+ (28) : augmentez le volume du lecteur MP3

©Copyright LOTRONIC 2015 DJ21USB-BT 6
15. MP 3/ B T (29) : Sélectionnez entre MP3 ou BT lorsque le commutateur 8 est placé sur MP3/BT
16. Afficheur à LED : Affiche les informations MP3
17. LED BLUETOOTH (31): Lorsque vous mettez la table de mixage sous tension, le LED clignote lentement
pour indiquer qu’elle est prête à la connexion. En l’absence d’une connexion Bluetooth, elle s’éteint. Si
la table de mixage est connectée à un lecteur, la LED clignote lentement et s’éteint ensuite. Vous
pouvez maintenant écouter de la musique sur le canal 1.
Appairage Bluetooth
Le DJ21USB-BT n’est visible que lorsque l’entrée Bluetooth a été sélectionnée. Après avoir sélectionné le
mode d’entrée Bluetooth sur l’ DJ21USB-BT, activez la fonction Bluetooth sur votre smartphone et lancez la
recherche. Le nom de l’amplificateur est “ DJ21USB-BT ”. Sélectionnez-le. Il n’y a pas de code à saisir.
Caractéristiques techniques
Sensibilité Micro G & Micro D .................................................................................. 1.5 mV (10 K ohms)
Sensibilité PHONO .......................................................................................................... 3mV (47 K ohms)
Sensibilité LINE/CD .................................................................................................... 150 mV (22 K ohms)
Sortie générale............................................................................................. nominale 775 mV MAX 1.5 V
Bande passante .............................................................................................................. 20Hz-20KHz ±2dB
Attenuation Talkover ........................................................................................................................ -12dB
BEDIENUNGSANLEITUNG
Technische Daten
BLUETOOTH
3 Stereokanäle
Eingänge: 2 x Phono, 3x Line, 1x USB & 2 Mikrofone
Talkover
Vorhörfunktion im Kopfhörer
Vu-Meter auf dem Masterausgang
Liest und spielt MP3 Dateien von einem USB Stick
D

©Copyright LOTRONIC 2015 DJ21USB-BT 7
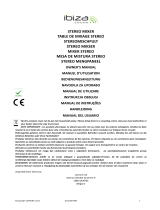
Frontseite:
Rückseite:
Achtung
1. Vor der ersten Inbetriebnahme sorgfältig die Anleitung durchlesen.
2. Das Gerät vor Sonne und Hitze schützen.
3. Nur mit einem feuchten Tuch abwischen. Keine Lösungs- oder Scheuermittel benutzen.
4. Das Gerät nur in seiner Originalverpackung transportieren, um Schäden zu vermeiden.
Anschlüsse
1. Vor der ersten Inbetriebnahme prüfen, ob der Netzadapter (21) auf die richtige Spannung eingestellt
ist.
2. Die Ausgangsbuchsen AMP (20) sind asymmetrisch und dienen zum Anschluss an einen Verstärker.
3. Die Eingänge MIC L (15) und MIC R (16) sind für 6,35mm Klinkenstecker.
5. Auf der Rückseite des Geräts befinden sich 2 Stereo Eingänge PHONO/LINE (17, 18) und 1 STEREO
LINE Eingang. Mit dem Schalter PHONO/LINE (4) wird der Eingang (17) auf der Rückseite auf PHONO
oder LINE eingestellt. Mit dem Schalter PHONO/LINE (6) wird der Eingang (18) auf der Rückseite auf
PHONO oder LINE eingestellt. Mit dem Schalter MP3/BT-LN3 (8) wird der Eingang (19) auf der
Rückseite auf MP3/BLuetooth oder LINE eingestellt. Schließen Sie den Kopfhörer an die HEADPHONE
(14) Buchse an.

©Copyright LOTRONIC 2015 DJ21USB-BT 8
Betrieb
1. POWER ON: Wenn alle Anschlüsse beendet sind, drücken Sie die POWER (12) Taste, um das Gerät
einzuschalten. Die Betriebs-LED (22) leuchtet rot.
2. KANAL 1: Mit dem Schalter (4) die Buchse (17) auf der Rückseite auf Phono1 oder Line1 einstellen. Der
Schieberegler (5) regelt den Eingangspegel dieses Kanals.
3. KANAL 2: Mit dem Schalter (6) die Buchse (18) auf der Rückseite auf Phono2 oder Line2 einstellen. Der
Schieberegler (7) regelt den Eingangspegel dieses Kanals.
4. KANAL 3: Mit dem Schalter (8) die Buchse (19) auf der Rückseite auf MP3 oder Line3 einstellen. Der
Schieberegler (9) stellt den Eingangspegel dieses Kanals ein.
5. CROSSFADER : Der CROSSFADER (10) dient zum Überblenden und Mischen der Kanäle 1 & 3.
6. TALKOVER (3):Diese Funktion dient dazu, die Lautstärke des Musikprogramms zu senken, um die Stimme
im Mikrofon zu hören. Wenn diese Taste gedrückt wird, wird die Lautstärke aller Quellen um 12dB
gesenkt. Mit Micro (2) wird der Pegel von MIC1/MIC2 eingestellt.
7. Den Kopfhörer an die Kopfhörerbuchse anschließen und mit dem CUE Schalter (1) den gewünschten
Kanal (Kanal 1-3 bzw. MIC) wählen, den Sie im Kopfhörer vorhören wollen. Mit dem PHONE (11) Regler
wird die Kopfhörerlautstärke eingestellt.
8. DISPLAY: Das Display (13) zeigt den linken und rechten Pegel des Masterausgangs an.
9. Der USB (23) Port ist zum Anschluss eines USB Sticks, der ausschliesslich MP3 dateinen enthâlt.
10. |<<(24) : Mit dieser Taste zum Anfang des laufenden oder zum Anfang eines vorigen Titels zurückgehen.
11. Play/Pause(25): Bei jedem Druck auf diese Taste schaltet das Gerät zwischen Play und Pause um.
12. >>|(26): Mit dieser Taste den nächsten Titel wählen.
13. VOL- (27): Vermindert die Lautstärke des MP3 Spielers
14. VOL+ (28): Erhöht die Lautstärke des MP3 Spielers
15. MP 3/ B T (29): Wählt zwischen MP3 und Bluetooth Signal für Kanal 3
16. LED DISPLAY (30): Zeigt die MP3 Informationen an
17. BLUETOOTH LED (31): Beim Einschalten des Mischpults blinkt die LED langsam, um anzuzeigen, dass
das Mischpult an ein Bluetooth Gerät angeschlossen werden kann. Wenn nach 1 Minute keine Verbindung
aufgebaut werden konnte, erlischt die LED. Wenn eine Verbindung erstellt wurde, blinkt die LED noch 2-3
Sekunden langsam, flickert auf und erlischt. Nun können Sie Musik von Ihrem Bluetooth Gerät auf Kanal 1
hören.
Bluetooth Verbindung
Der DJ21USB-BT ist nur sichtbar, wenn der Bluetooth Eingang gewählt ist. Nach Wahl des Bluetooth Betriebs
am DJ21USB-BT, aktivieren Sie die Bluetooth Funktion auf Ihrem Smartphone und suchen Sie nach
“ DJ21USB-BT ”. Verbinden Sie die beiden Geräte. Es wird kein Verbindungscode benötigt.
Technische Daten
MIC L & MIC R Empfindlichkeit .................................................................................. 1.5 mV (10 K Ohm)
PHONO Empfindlichkeit ................................................................................................... 3mV (47 K Ohm)
LINE/CD Empfindlichkeit ............................................................................................. 150 mV (22 K Ohm)
Masterausgang .............................................................................................. nominal 775 mV MAX 1.5 V
Frequenzbereich ............................................................................................................ 20Hz-20KHz ±2dB
Übersprechdämpfung .................................................................................................................... -12dB
Kopfhörerausgang .......................................................................................................... 300mV/8/16 Ohm

©Copyright LOTRONIC 2015 DJ21USB-BT 9
N
N
A
A
V
V
O
O
D
D
I
I
L
L
A
A
Predstavitev
Bluetooth
3x Stereo kanali
2x Phono, 3x Line, 1x USB and 2x Mic vhodi
Talkover
Monitoring za slušalke
Master izhod prikaz nivojev
Nalaganje in predvajanje MP3’s z USB ključa z LED prikazovalnikom
Sprednja plošča
Zadnja plošča
Opozorila
1. Vsa navodila za uporabo je treba prebrati pred uporabo te naprave.
2. Ne izpostavljajte naprave neposredni sončni svetlobi ali viru toplote, kot je radiator ali štedilnik.
3. Napravo čistite le z vlažno krpo. Izogibajte se uporabi topil ali drugih detergentov za čiščenje.
4. Pri prevozu naprave, je treba dati v originalni škatli in embalaže. To bo zmanjšalo tveganje za nastanek
poškodb med prevozom.
SLO

©Copyright LOTRONIC 2015 DJ21USB-BT 10
Povezave
1. Pred uporabo te naprave, se prepričajte, da je AC Adapter (21), pravilne napetosti.
2. Naprava je dobavljena s priključki AMP output. AMP (20) priključki so nebalansirani in se uporablja za
povezavo z ojačevalcem.
3. MIC L (15) in MIC R (16) vhod sprejema 1/4 " priključek.
4. Na hrbtni strani sta dva stereo PHONO / LINE (17) in (18) vhoda in 1 stereo LINE (19) vhod.PHONO / LINE
(4) omogoča, da nastavite (17) enoto na Phono ali Line.PHONO / LINE (6) vam omogoča, da nastavite (18)
enoto na Phono ali Line.MP3 / BT - LINE (8) vam omogoča, da nastavite vhod na USB ali Line (19).
Slušalke lahko priključite na zadnji plošči na jack vtičnico (14).
Delovanje
1. POWER ON: Ko ste naredili vse,glede povezave do vašega mikserja, pritisnite tipko POWER
(12).Napajanje se bo vklopilo in POWER LED (22) bo zasvetil RDEČ.
2. CHANNEL 1: PREKLOPNIK (4) vam omogoča, da izberete PHONO 1/LINE 1 (17) priključke za Phono vhod
ali Line. DRSNIK KANALA (5) kontrolira vhodni nivo tega kanala.
3. CHANNEL 2: PREKLOPNIK (6) vam omogoča, da izberete PHONO 2/LINE 2 (18) priključke za Phono vhod
ali Line. DRSNIK KANALA (7) ) kontrolira vhodni nivo tega kanala.
4. CHANNEL 3: PREKLOPNIK (8) vam omogoča, da izberete USB/LINE 3 (19) priključke za USB vhod ali Line. .
DRSNIK KANALA (9) kontrolira vhodni nivo tega kanala.
5. CROSSFADER: CROSSFADER (10) dovoljuje mešanje med kanalima CH1/CH2.
6. TALKOVER (3): Pritisnite ta gumb, če želite uporabljati mikrofon. Ko pritisnete na gumb, vsi ostali viri
signala se zmanjšajo za 12dB, tako da se lahko mikrofon jasno sliši. V položaju OFF, vse signale vrne na
prvotni nivo.
7. Priključite SLUŠALKE na priključek za slušalke in izberite želeni kanal (kanal 1-3 ali MIC) za spremljanje s
CUE STIKALO (1). S tem gumbom PHONO (11), lahko nastavite glasnost slušalk..
8. PRIKAZOVALNIK: PRIKAZOVALNIK (13) prikazuje nivoje levo in desno za MASTER.
9. USB (23) Priključek za priključitev USB ključa.
10. |<< (24): Uporabite ta gumb za ponovni zagon skladbo ali, da izberete prejšnjo skladbo.
11. Play/Pause (25): Vsakič, ko pritisnete na ta gumb, se delovanje spremeni iz predvajanja v začasno
ustavitev ali obratno.
12. >>| (26): Uporabite ta gumb za izbiro naslednje skladbe.
13. VOL-(27): Uporabite ta gumb za zmanjšanje nivoja glasnosti.
14. VOL+ (28): Uporabite ta gumb za zvišanje nivoja glasnosti.
15. MP 3/ B T (29): Izberite med MP3 in Bluetooth, ko MP3 / BT je bil izbran na kanalu 3.
16. LED PRIKAZOVALNIK (30): Prikaz MP3 informacij
.
17. BLUETOOTH LED (31): Prikazuje stanje delovanja Bluetooth. Ko vklopite, Bluetooth LED utripa počasi,
kar pomeni, da je pripravljen za povezavo z napravo Bluetooth. Če se ugotovi, da ni povezave po 1 minuti, se
LED ugasne in preide v stanje pripravljenosti. Če je uspostavljena povezava Bluetooth s predvajalnikom, lučka
utripa počasi, približno 2-3 sekunde enkrat. Lahko uporabite bluetooth predvajalnik za predvajanje glasbe.
Bluetooth povezava
DJ21USB-BT je opazen, ko je izbran Bluetooth vhod. Ko izberete način vhoda Bluetooth na DJ21USB-BT,
vklopite funkcijo Bluetooth na mobilnem telefonu in poiščite DJ21USB-BT. Njegovo ime Bluetooth naprave je
"DJ21USB-BT". Seznanite in povežite po iskanju. Ni kode za seznanjanje.

©Copyright LOTRONIC 2015 DJ21USB-BT 11
Tehnični podatki
MIC L&MIC D občutljivost ............................................................................. 1.5 mV (10 K Ω)
PHONO občutljivost .......................................................................................... 3mV (47 K Ω)
LINE/CD občutljivost .................................................................................... 150 mV (22 K Ω)
MASTER IZHOD ...................................................................... nominal 775 mV MAX 1.5 V
Frekvenčni razpon ..................................................................................... 20Hz-20KHz ±2dB
Talkover slabljenje ....................................................................................................... -12dB
Izhod za slušalke ............................................................................................. 300mV/8-16 Ω
M
M
A
A
N
N
U
U
A
A
L
L
D
D
E
E
U
U
T
T
I
I
L
L
I
I
Z
Z
A
A
R
R
E
E
Caracteristici
Bluetooth
3 x canale stereo
2 x Phono, 3 x Linie, 1 x USB si 2 x intrari Mic
Functie talkover
Monitor casti
VU-metru nivel iesire master
Reda fisiere MP3 de pe stick-ul USB
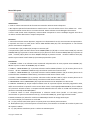
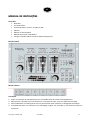
Panoul frontal
RO

©Copyright LOTRONIC 2015 DJ21USB-BT 12
Panoul din spate
Avertismente
1. Cititi cu atentie instructiunile de functionare inainte de utilizarea acestui dispozitiv.
2. Nu expuneti aparatul la lumina directa a soarelui sau la o sursa de caldura cum ar fi un radiator sau soba.
3. Aparatul trebuie curatat doar cu un material umed. Evitati solventii sau alti detergenti de curatare.
4. Atunci cand mutati acest echipament, acesta trebuie transportat in cutia si ambalajul original. Acest lucru
va reduce riscul de deteriorare in timpul transportului.
Conexiuni
1. Inainte de utilizarea acestui dispozitiv, asigurati-va ca alimentatorul AC (21) are tensiunea corespunzatoare.
2. Aparatul este livrat cu mufe pentru iesirea AMP. Mufele AMP (20) sunt necompensate si sunt folosite
pentru conectarea la amplificator.
3. Intrarile MIC L (15) si MIC R (16) accepta un conector 1/4”.
4. Pe panoul din spate sunt doua intrari stereo PHONO/LINIE (17) & (18) si o intrare stereo LINIE (19). Intrarea
PHONO/LINIE (4) va permite sa setati intrarea (17) la phono sau linie. Intrarea PHONO/LINIE (6) va permite sa
setati intrarea (18) la phono sau linie. MP3/BT LINIE (8) va permite sa setati intrarea la USB sau linie (19).
Castile se pot conecta la mufa CASTI (14) montata pe panoul din spate.
Functionare
1. PORNIRE: O data ce ati efectuat toate conexiunile echipamentului la mixer, apasati tasta PORNIRE (12).
Mixerul va porni si LED-ul de PORNIRE (22) va fi ROSU.
2. CANAL 1: COMUTATORUL (4) va permite selectarea mufei PHONO 1/LINIE 1 (17) la intrarea phono sau la
intrarea de linie. CURSORUL CANALULUI (5) controleaza nivelul intrarii acestui canal.
3. CANAL 2: COMUTATORUL (6) va permite selectarea mufei PHONO 1/LINIE 1 (18) la intrarea phono sau la
intrarea de linie. CURSORUL CANALULUI (7) controleaza nivelul intrarii acestui canal.
4. CANAL 3: COMUTATORUL (8) va permite selectarea mufei USB SAU LINIE 2 (19) la intrarea phono sau la
intrarea de linie. CURSORUL CANALULUI (9) controleaza nivelul intrarii acestui canal.
5. CROSSFADER: Functia CROSSFADER (10) va permite asocierea sursei CH1/CH2 cu o alta intrare.
6. FUNCTIA TALKOVER (3): Scopul secțiunii talkover este de a permite oprirea sonorului programului redat,
astfel incat microfonul sa poata fi auzit mai tare decat muzica. Cand apasați COMUTATORUL, functia talkover
va fi pornita si volumul surselor, cu exceptia intrarilor Microfonului va fi redus cu 12 dB. Functia Micro (2) va
permite sa controlați nivelul MIC1/MIC2.
7. Conectati castile la mufa corespunzatoare si selectati canalul dorit (canalul 1-3 sau MIC) pentru
monitorizare cu ajutorul comutatorului Cue (1). Cu butonul PHONE(11), puteti regla volumul castilor.
8. AFISAJ: AFISAJUL (13) indica fie nivelul iesirii MASTER pe canalul din stanga sau dreapta.
9. La mufa USB (23) se conecteaza un stick USB.
10. |<< (24) : Folositi acest buton pentru a reporni piesa sau a selecta piesa anterioara.
11. Redare/Pauza (25): La fiecare apasare a acestui buton, functionarea se schimba de la redare la pauza sau
de la pauza la redare.
12. >>| (26): Folositi acest buton pentru a selecta urmatoarea piesa.

©Copyright LOTRONIC 2015 DJ21USB-BT 13
13. VOL-(27): Folositi acest buton pentru a reduce volumul.
14. VOL+ (28): Folositi acest buton pentru a mari volumul.
15. MP 3/ B T (29): Selectați între MP3 si Bluetooth atunci când MP3 / BT a fost selectat pe canalul 3
16. AFISAJ LED (30): Afisarea informatiilor MP3.
17. BLUETOOTH LED (31): Afiseaza starea functionarii Bluetooth. Cand porniti aparatul, LED-ul de la Bluetooth
palpaie ceea ce inseamna ca este gata de conectare cu un dispozitiv bluetooth. Daca nu este gasita nici o
conexiune timp de 1 minut, LED-ul se stinge si intra in starea de stand-by. Daca conexiunea Bluetooth se
realizeaza cu un player, lumina palpaie incet, 1 palpait la 2-3 secunde. In acest moment puteti utiliza
conexiunea bluetooth.
Conectare Bluetooth
Dispozitivul DJ21USB-BT va putea fi gasit doar daca intrarea selectata este Bluetooth. Dupa selectarea
Bluetooth ca si intrare, porniti functia Bluetooth de pe telefonul dvs. si cautati DJ21USB-BT. Asociati telefonul
cu amplificatorul – nu este necesar nici un cod pentru asociere.
Specificatii
Sensibilitate MIC L&MIC R ...................................................................... 1.5 mV (10 K ohmi)
Sensibilitate PHONO ................................................................................... 3mV (47 K ohmi)
Sensibilitate LINE/CD ............................................................................. 150 mV (22 K ohmi)
IESIRE MASTER ......................................................................... nominala 775 mV MAX 1.5 V
Raspuns in frecventa................................................................................. 20Hz-20KHz ±2dB
Atenuare convorbire .................................................................................................... -12dB
Iesire casti ................................................................................................ 300mV/ 8-16 ohmi
INSTRUKCJA OBSŁUGI
Właściwości
• Bluetooth
• 3x kanał stereofoniczne
• 2x wejście Phono, 3x wejście liniowe, 1x USB and 2x wejście mikrofonowe
• Funkcja talkover
• Regulacji głośności wyjścia słuchawkowego
• Wskaźnik natężenia wyjścia sumy (Master)
• Opcja bezpośredniego odtwarzania plików mp3 z pamięci USB (pendrive) wraz z wyświetlaniem
utworów
PL

©Copyright LOTRONIC 2015 DJ21USB-BT 14
Przedni panel
Tylny panel
Ostrzeżenia
1. Przed użyciem urządzenia należy dokładnie zapoznać się z instrukcją obsługi.
2. Nie wystawiać urządzenia na bezpośredni, ciągły kontakt z promieniami słonecznymi oraz urządzeniami
generującymi wysokie temperatury (piece, grzejniki).
3. Produkt czyścić można jedynie za pomocą lekko wilgotnej ścierki. Unikać rozpuszczalników oraz innych
środków czyszczących.
4. Zaleca się przewożenie urządzenia w oryginalnym opakowaniu transportowym. Zmniejsza to ryzyko
uszkodzenia w trakcie transportu.
Podłączenie
1. Przed podłączeniem urządzenia upewnij się, że dołączony zasilacz (AC) jest przystosowany do lokalnego
napięcia sieciowego.
2. Mikser wyposażony jest w gniazda wyjściowe typu JACK AMP (20). Gniazda są niesymetryczne i służą do
podłączenia miksera do wzmacniacza mocy.
3. Wejścia mikrofonowe MIC L (15) and MIC R (16) wymagają podłączenia za pomocą wtyku JACK 1/4”
4. Na tylnym panelu znajdują się dwa wejścia stereofoniczne PHONO/LINE (17) & (18) oraz jedno wejście
liniowe LINE INPUT (19). Wejścia PHONO/LINE (4) pozwalają na podłączenie (17) gramofonu, odtwarzacza
DJ/CD (sygnał liniowy). Gniazda MP3/BT LINE (8) pozwalają na podłączenie zewnętrznego odtwarzacza
MP3/USB lub urządzenia o sygnale liniowym (19). Słuchawki podłączyć należy przez gniazdo (14) typu jack
znajdujące się na tylnym panelu.

©Copyright LOTRONIC 2015 DJ21USB-BT 15
Obsługa
1. URUCHOMIENIE: Po podłączeniu wszystkich urządzeń do miksera, wciśnij przycisk POWER (12).
Urządzenie uruchomi się a dioda LED (22) zapali się na czerwono.
2. KANAŁ 1: PRZEŁĄCZNIK (4) pozwala na wybór wejścia PHONO 1/LINE 1 (17) wejścia jack do wejścia o
zmiennej czułości phono lub line. Suwak kanału 1 (5) zapewnia kontrolę głośności kanału 1.
3. KANAŁ 2: PRZEŁĄCZNIK (6) pozwala na wybór wejścia PHONO 1/LINE 1 (18) wejścia jack do wejścia o
zmiennej czułości phono lub line. Suwak kanału 2 (7) zapewnia kontrolę głośności kanału 2.
4. KANAŁ 3 PRZEŁĄCZNIK (8) pozwala na wybór wejścia PHONO 1/LINE 1 (19) wejścia jack do wejścia o
zmiennej czułości phono lub line. Suwak kanału 1 (9) zapewnia kontrolę głośności kanału 1.
5. CROSSFADER: Suwak poziomy CROSSFADER (10) pozwala na płynne miksowanie sygnału z kanałów
CH1/CH2.
6. TALKOVER (3): Sekcja ta pozwala na wyciszenie muzyki w trakcie ciągłego odtwarzania, wysuwając
jednocześnie sygnał z mikrofonu na pierwszy plan. Po naciśnięciu przycisku włączona zostanie funkcja
talkover, która jednocześnie ściszy sygnały z wszystkich wejść z wyjątkiem wejścia mikrofonowego (Mic
input) o 12 dB. Potencjometr Micro (2) pozwala na kontrole głośności wejść MIC1/MIC2.
7. Podłączając słuchawki do dedykowanego gniazda mamy możliwość wyboru podsłuchu z kanałów 1-3 lub
MIC). W tym celu odpowiednio ustawić należy przełącznik Cue switch (1). Potencjometr PHONE (11),
umożliwia regulację głośności słuchawek.
8. Wyświetlacz: Wyświetlacz (13) wskazuje poziom zarówno wyjścia Master left jak i master right.
9. Wejście USB (23) umożliwia podłączenie zewnętrznej pamięci typu pendrive/odtwarzacza mp3.
10. |<< (24) : Użyj tego przycisku w celu powrotu do utworu lub przełączenia następnego.
11. Play/Pauza (25): Za każdym razem po naciśnięciu tego przycisku, utwór zostanie zatrzymany (Pauza) lub
wznowiony po kolejnym naciśnięciu.
12. >>| (26): Użyj tego przycisku do przełączenia kolejnego utworu.
13. VOL-(27): Użyj tego przycisku do zmniejszenia głośności.
14. VOL+ (28): Użyj tego przycisku do zwiększenia głośności.
15. MP3/BT (29): Wybierz pomiędzy MP3 i Bluetooth, gdy MP3 / BT został wybrany na kanale 3.
16. Wyświetlacz LED (30): Wyświetla informację o odtwarzanych utworach MP3
17. Wskaźnik Bluetooth (31): Wyświetla status Bluetooth. Po włączeniu zasilania dioda Bluetooth zapala się i
gaśnie w wolnym tempie, co oznacza, że urządzenie jest gotowe do połączenia z innym produktem. W
przypadku gdy przez okres 1 minuty żadne urządzenie nie zostanie wykryte dioda gaśnie i przechodzi w
tryb spoczynku. Kiedy połączenie Bluetooth jest przeprowadzone z odtwarzaczem, dioda zapala się
powoli, migocząc raz po 2-3 sekundach. W tym momencie użyć możesz odtwarzacza bluetooth i
odsłuchać muzykę sterując odpowiednim kanałem miksera.
PROCEDURA ŁĄCZENIA URZĄDZEŃ BLUETOOTH
DJ21USB-BT jest tylko wykrywalne, gdy wejście wybrane jest Bluetooth. Po wybraniu trybu
wprowadzania Bluetooth na DJ21USB-BT, włącz funkcję Bluetooth w telefonie komórkowym i przeszukiwać
DJ21USB-BT. Jego nazwa urządzenia Bluetooth jest "DJ21USB-BT". Powiązać i połączyć po poszukiwaniach.
Nie ma kodu parowania.
Specyfikacja techniczna
Czułość wejść MIC L&MIC R ................................................................. 1.5 mV (10 K ohms)
czułość wejścia PHONO ........................................................................... 3mV (47 K ohms)
czułość wejścia LINE/CD ..................................................................... 150 mV (22 K ohms)
Wyjścia sumy (master outputs) ...............................................nominal 775 mV MAX 1.5 V
Pasmo przenoszenia ............................................................................... 20Hz-20KHz ±2dB
tłumienie Talkover ..................................................................................................... -12dB
Wyjście słuchawkowe ............................................................................ 300mV/8-16 ohms

©Copyright LOTRONIC 2015 DJ21USB-BT 16
M
M
A
A
N
N
U
U
A
A
L
L
D
D
E
E
I
I
N
N
S
S
T
T
R
R
U
U
Ç
Ç
Õ
Õ
E
E
S
S
Conteúdos:
Bluetooth
3x Canais Stereo
2x Entradas Phono, 3x Line, 1x USB e 2x Mic
Talkover
Monitor de auscultadores
Medidor de nível de saída Master
Carrega e reproduz MP3’s através de USB com display led
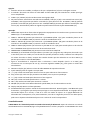
Painel Frontal
Painel Traseiro
Precauções
1. Todas as instruções de operação devem ser consultadas antes de utilizar este equipamento.
2. Não exponha o aparelho à luz solar directa ou a uma fonte de calor, como um aquecedor ou fogão.
3. Esta unidade deve ser limpa apenas com um pano húmido. Evite solventes ou detergentes de limpeza.
4. O equipamento deve ser colocado na sua embalagem original. Isto irá reduzir o risco de danos durante o
transporte.
PT

©Copyright LOTRONIC 2015 DJ21USB-BT 17
Ligações
1. Antes de utilizar esta unidade, certifique-se de que o adaptador AC (21) tem a voltagem correcta.
2. A unidade é fornecida com fichas de saída A MP. As fichas AMP (20) são assimétricas e usadas para ligar
ao seu amplificador.
3. O MIC L (15) e R MIC (16) de entrada aceitam uma ligação de1/4.
4. No painel traseiro existem duas entradas stereo PHONO / LINE (17) e (18) e uma entrada line stereo (19).
O PHONO / LINE (4) permite que defina a entrada (17) para phono ou line. O PHONO / LINE (6) permite
que defina a entrada (18) para phono ou line. A MP 3/ B T LINE (8) permite que defina a entrada para USB
ou line (19). Auscultadores podem ser ligados ao painel traseiro através do jack HEADPHONE (14).
Operação
1. POWER ON: Depois de ter feito todas as ligações dos equipamentos à mesa de mistura, pressione o botão
POWER (12) e o LED POWER (22) ficará vermelho.
2. CANAL 1: SWITCH (4) permite que seleccione o jack PHONO 1/ L I N E 1 (17) para entrada de phono ou de
nível de line. O CHANNEL SLIDE (5) controla o nível de entrada deste canal.
3. CANAL 2: SWITCH (6) permite que seleccione o jack PHONO 1/ L I N E 1 (18) para entrada de phono ou de
nível de line. O CHANNEL SLIDE (7) controla o nível de entrada do canal.
4. CANAL 3: SWITCH (8) permite que seleccione o jack USB ou Line 2 (19) para entrada phono ou de nível de
line. O CHANNEL SLIDE (9) controla o nível de entrada deste canal.
5. CROSSFADER: O CROSSFADER (10) permite a mistura das fontes CH1/CH2.
6. TALKOVER (3): A finalidade da secção talkover é permitir que o programa seja sobreposto, de modo a que
o microfone possa ser ouvido por cima da música. Quando pressiona o botão, o talkover será sobreposto
ao volume de todas as fontes, excepto das entradas de Mic que são reduzidas em 12 dB. O Micro (2)
permite que controle o nível de MIC1/MIC2.
7. Ligue os auscultadores à respectiva ficha e seleccione o canal desejado (canal 1-3 ou MIC) para
monitorizar com o interruptor de Cue (1). Com este regulador PHONE (11), pode ajustar o volume dos
auscultadores.
8. DISPLAY: O display (13) indica os níveis de saída MASTER da esquerda ou direita.
9. O jack USB (23) pode ser ligado a uma pen USB.
10. | << (24): Utilize este botão para reiniciar a faixa ou para seleccionar a faixa anterior.
11. Play / Pause (25): Cada vez que pressionar este botão, inicia ou para a reprodução.
12. >> | (26): Utilize este botão para seleccionar a faixa seguinte.
13. VOL-(27): Utilize este botão para diminuir o volume.
14. VOL + (28): Utilize este botão para aumentar o volume.
15. MP 3/ B T (29):
Escolha entre MP3 e Bluetooth quando MP3 / BT foi selecionado no canal 3.
16. Display LED (30): Mostra a informação MP3.
17. LED BLUETOOTH (31): Exibe o estado de funcionamento Bluetooth. Quando ligado, o LED Bluetooth pisca
lentamente, o que significa que está pronto para ligar-se a um dispositivo Bluetooth. Se a ligação não for
encontrada depois de 1 minuto, o LED sai e entra em modo de espera. Se a ligação Bluetooth for
efectuada com um dispositivo, a luz pisca lentamente, cerca de 2-3 segundos pisca uma vez. Neste ponto,
pode usar o dispositivo de bluetooth para ouvir a música do canal correspondente.
Conexão Bluetooth
O DJ21USB-BT só é detectável quando a entrada selecionada for Bluetooth. Depois de selecionar o modo de
entrada Bluetooth no DJ21USB-BT, ligue a função Bluetooth no celular e pesquisar na DJ21USB-BT. Seu nome

©Copyright LOTRONIC 2015 DJ21USB-BT 18
de dispositivo Bluetooth é "DJ21USB-BT". Emparelhar e ligar depois de pesquisa. Não existe um código de
emparelhamento.
Especificações
Sensibilidade MIC L&MIC R ................................................................... 1.5 mV (10 K ohms)
Sensibilidade PHONO ................................................................................ 3mV (47 K ohms)
Sensibilidade LINE/CD .......................................................................... 150 mV (22 K ohms)
SAÍDA MASTER .......................................................................... nominal 775 mV MAX 1.5 V
Frequência ................................................................................................ 20Hz-20KHz ±2dB
Atenuação Talkover...................................................................................................... -12dB
Saída de Auscultadores ............................................................................ 300mV/8-16 ohms
H
H
A
A
N
N
D
D
L
L
E
E
I
I
D
D
I
I
N
N
G
G
Features
Bluetooth
3x stereo kanalen
2x phono, 3x lijn, 1x USB en 2x microfoon ingangen
Talkover
Hoofdtelefon monitor
Masteruitgang level meter
Laden en afspelen van MP3 bestanden van de USB stick met led display
Front paneel
NL

©Copyright LOTRONIC 2015 DJ21USB-BT 19
Achter Paneel
Waarschuwingen
1. Lees aandachtig de handleiding alvorens u het toestel gebruikt.
2. Bescherm het toestel tegen directe zon of hitte bronnen zoals verwarmingen.
3. Alleen met een vochtig doek reinigen. Geen oplossings- of andere reinigingsmiddelen gebruiken.
4. Verplaats het toestel in zijn originele verpakking om het risico van beschadiging te verminderen.
Aansluitingen
1. Alvorens U het toestel gebruikt wees zeker dat de ac adapter (21) op de juiste spanning ingesteld is.
2. Het toestel omvat AMP uitgangs jacks. De AMP jacks (20) zijn ongebalanceerde connectoren voor de
aansluiting aan een versterker.
3. De MIC L (15) en MIC R (16) ingangen zijn voor 6,35mm jack connectoren.
4. Op de achterkant zijn twee stereo PHONO/LINE (17) & (18) ingangen en 1 stereo LINE (19) ingang. De
PHONO/LINE (4) schakelaar zet de ingang (17) op phono or lijn bron. De PHONO/LINE (6) schakelaar zet
de ingang (18) op phono or lijn bron. De USB/LINE (8) schakelaar zet de ingang op USB of lijn (19). Sluit
een hoofdtelefoon op de connector (14) op het achter paneel aan.
Werking
1. POWER ON: Indien alle aansluiting op het mengpaneel beëindigd zijn, druk de POWER (12) toets. De
toestel wordt ingeschakeld en de POWER LED (22) licht ROOD op.
2. CHANNEL 1: Kies phono of lijn signaal op connector PHONO 1 / LINE 1 (17) d.m.v. de schakelaar (4). De
schuifregelaar (5) stelt het ingangsniveau van dit kanaal in.
3. CHANNEL 2: Kies phono of lijn signaal op connector PHONO 2 / LINE 2 (18) d.m.v. de schakelaar (6). De
schuifregelaar (7) stelt het ingangsniveau van dit kanaal in.
4. CHANNEL 3: Kies MP 3/ B T of LINE 3 ingang d.m.v. schakelaar (8) om tussen mp3 ingang (23) or lijn toestel
op connector (19)te kiezen. De schuifregelaar (9) stelt het ingangsniveau van dit kanaal in
5. CROSSFADER: D.m.v. de crossfader kunt u kanaal 1 &2 mengen.
6. TALKOVER (3): Door de talkover functie is de microfoon boven de muziek hoorbaar. Indien u de talkover
knop drukt, wordt het volume van alle bronnen behalve de microfoon om 12dB vermindert. De MIC (2)
knop stelt het volume van MIC1/MIC2 in.
7. Sluit een hoofdtelefoon op de headphone jack aan et kies het gewenste kanaal (kanaal 1-3 of MIC) om de
bron via de CUE schakelaar (1) in de hoofdtelefoon te beluisteren. D.m.v. de PHONE (11) knop kunt u het
hoofdtelefoon volume instellen.
8. DISPLAY: De DISPLAY (13) toont de rechter en linker niveaus van de MASTER uitgang.
9. Sluit de USB (23) jack op een USB stick aan die alleen MP3 bestanden bevat.
10. |<< (24): Gaat naar het begin van de lopende track of kiest de vorige track.
11. Play/Pauze (25): Bij iedere druk op deze toets schakelt het toestel tussen afspelen en pauze.
12. >>| (26): Kiest de naaste track.
13. VOL-(27): Vermindert het volume van de MP3 speler.
14. VOL+ (28): Verhoogt het volume van de MP3 speler.
15. MP 3/ B T (29): Kies tussen MP3 & Bluetooth als MP3 / BT is geselecteerd op kanaal 3

©Copyright LOTRONIC 2015 DJ21USB-BT 20
16. LED DISPLAY (30): Toont MP3 informatie.
17.
BLUETOOTH LED (31): Vertoont de werkingsmodus van de Bluetooth functie. Indien u het mengpaneel
aanschakelt, flitst de LED langzaam. Dit bedoelt dat het mengpaneel een Bluetooth toestel zoekt. Indien na
1 minuut geen verbinding opgebouwd is, gaat de LED uit. Indien een Bluetooth verbinding opgesteld is,
flitst de LED tijdens 2-3 seconden langzaam. U kunt nu uw muziek via kanaal 1 luisteren.
Bluetooth verbinding
De DJ21USB-BT is alléén zichtbaar indien de ingangsbron Bluetooth gekozen is. Kies de Bluetooth
ingangsmodus op de DJ21USB-BT, schakel de Bluetooth functie op uw smartphone aan en zoek naar de
DJ21USB-BT. Zijn Bluetooth device naam is “DJ21USB-BT”. Verbindt de twee toestellen. Er is geen code nodig.
Specificaties
MIC L&MIC R gevoeligheid .................................................................... 1.5 mV (10 K ohms)
PHONO gevoeligheid ................................................................................. 3mV (47 K ohms)
LINE/CD gevoeligheid ........................................................................... 150 mV (22 K ohms)
MASTER UITGANG ................................................................... nominaal 775 mV MAX 1.5 V
Frequentiebereik ...................................................................................... 20Hz-20KHz ±2dB
Talkover demping......................................................................................................... -12dB
Hoofdtelefoon uitgang ............................................................................. 300mV/8-16 ohms
-
 1
1
-
 2
2
-
 3
3
-
 4
4
-
 5
5
-
 6
6
-
 7
7
-
 8
8
-
 9
9
-
 10
10
-
 11
11
-
 12
12
-
 13
13
-
 14
14
-
 15
15
-
 16
16
-
 17
17
-
 18
18
-
 19
19
-
 20
20


Ibiza 4-KANALEN / 7-INGANGEN MENGPANEEL MET USB & BLUETOOTH (DJ21USB-BT) Le manuel du propriétaire
- Taper
- Le manuel du propriétaire
- Ce manuel convient également à
dans d''autres langues
Documents connexes
-
 Ibiza DJ21USB-MKII Table de mixage Noir Le manuel du propriétaire
-
 Ibiza TABLE DE MIXAGE DJ A 2 CANAUX USB, SD & BLUETOOTH (DJM250BT-MKII) Manuel utilisateur
-
 Ibiza DJM150USB-BT Le manuel du propriétaire
-
 Ibiza DJM150BT-VHF Manuel utilisateur
-
 Ibiza DJM102-BT Le manuel du propriétaire
-
 Ibiza 3-KANAAL STEREO MENGPANEEL MET USB MP3 & SD (DJM200USB) Le manuel du propriétaire


Autres documents
-
Ibiza Sound DJ21USB-BT Le manuel du propriétaire
-
-
 LTC Audio PAA80BT Le manuel du propriétaire
-
-
BST SYMBOL400 Le manuel du propriétaire
-
Ecler HMA120 Manuel utilisateur
-
-
 LTC Audio 95-1003 Le manuel du propriétaire
-
MADISON MAD1305SL Le manuel du propriétaire
-
 Ibiza Light WIFI12A Le manuel du propriétaire


