DTR600/DTR700 Two-Way Radio Quick Reference Guide
This Quick Reference Guide covers the basic operation of the radio.
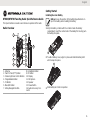
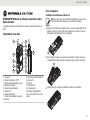
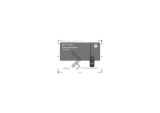
Radio Overview
1
2
3
4
5
13
11
12
10
9
8
7
6
14
1. Antenna
2. Push-To-Talk (PTT) Button
3. Volume Up/Down Control Buttons
4. Programmable Button
5. P1 Button
6. Menu/OK Button
7. 4-Way Navigation Button
8. Home/Back Button
9. P2 Button
10. Display
11. Microphone
12. Speaker
13. Power Button
14. Audio Accessory Con-
nector
Getting Started
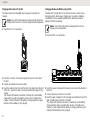
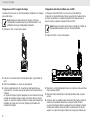
Installing the Li-Ion Battery
Notice: Ensure the position of the battery flap attached is on
top of the battery when installing the battery.
1
Align the battery contacts with the contacts inside the battery
compartment. Insert the contact side of the battery first. Gently push
the battery into place.
1
2
2
To attach battery cover, align it in place and slide the battery latch
until it snaps into place.
2
1
3
Slide battery latch into lock position.
3
English
1

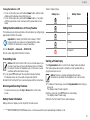
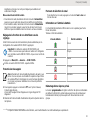
Charging with a Drop-In Tray SUC
The radio comes with a standard power supply and a Single Unit
Charger.
Notice: Turn off the radio before charging and fully charge the
battery before first use. It is best to charge at room temperature.
1
Place the SUC on a flat surface.
2
Insert the connector of the power supply into the port on the side of
the SUC.
3
Plug the AC adapter into a power outlet.
4
Insert the radio into the SUC with the front of the radio facing the LED
of the SUC. Ensure the radio is securely inserted all the way into the
charger.
The charger LED flashes a few times to indicate the current battery
charge when the radio is inserted in the tray rails. The light on the
charger is red to indicate that the battery is charging and turns green
indicates that the battery is fully charged.
Charging a Radio and Battery using a MUC
The Multi-Unit Charger (MUC) is an optional accessory and it has six
charging pockets, which allows charging up to six radios or batteries.
The batteries can be charged together with or without the radios or
placed in the MUC separately.
Notice: Turn off the radios before charging and it is best to
charge at room temperature.
1
Place the MUC on a flat surface.
2
Insert the power cord plug into the dual pin connector at the bottom of
the MUC.
3
Connect the power cord into an AC outlet.
4
Insert the radio or battery into the charging pocket with the front of the
radio or battery facing the LED of the MUC.
The charger LED flashes a few times to indicate the current battery
charge when the radio is inserted in the tray rails. The light on the
charger is red to indicate that the battery is charging and turns green
indicates that the battery is fully charged.
English
2

Turning the Radio On or Off
•
To turn on the radio, press and hold the Power button until the radio
vibrates and the display shows Motorola Logo.
•
To turn off the radio, press and hold the Power button (~3 seconds)
until the power down screen is shown and the power down tone is
heard.
Setting the Non-Interference or Privacy Feature
This feature ensures improved private communications by configuring an
appropriate PROFILE ID number.
Important: By default, the PROFILE ID number is “0000”.
Ensure that all your radios are configured with the same
PROFILE ID number and is easy to remember.
1 Press Menu/OK → Advanced → PROFILE ID .
2
Enter a four-digit radio PROFILE ID number.
Transmitting Calls
Notice: Wait for the Talk Permit Tone to end and speak. If you
receive a busy tone and your radio display shows Call Failed,
the channel is either not available, busy, or there are no users
reachable within transmission range.
1 To call, press PTT button with the selected Channels/Contacts.
The display shows call screen with call type and caller ID.
2
Wait for the Talk Permit Tone to end and speak into the microphone.
Browsing and Selecting Channels
To select a channel, press the Up or Down button on the home
screen.
Battery Status Information
Battery status icon displays on the top left of the radio screen.
Table 1: Battery Status
Battery Icon Battery Status
High
Medium
Low
Critical
Shutdown
1
Starting a Private Reply
The Programmable button is set to Private Reply feature by default.
This feature allows two people to instantly connect privately after a
group transmission is over.
Notice: There is a channel Hangtime after a Private
transmission. By default, the Hangtime is set to 10 seconds.
1 To initiate a Private Reply, press the Programmable button during a
group call.
The display shows Private Reply On.
2 After a group call, press PTT button to call privately.
The display shows Private Reply.
3
Wait for the Talk Permit Tone to end and speak.
1
When the battery is on a Shutdown level, a continuous alert tone and automatically shutdown occurs.
English
3

Advanced Settings
This radio allows for other special features such as Powersave Mode,
PROFILE ID, Home Channel, and Clone Mode through Advanced
Settings mode.
To enter into Advanced Settings, press Menu/OK → Advanced .
Notice to Users (FCC and Industry Canada)
Caution: Before using this product, read the RF Energy
awareness and Acoustic Safety information and operating
instructions contained in the Safety and RF Energy Exposure
Booklet enclosed with your radio package.
This device complies with Part 15 of the FCC rules and Industry
Canada's license-exempt RSS's per the following conditions:
• This device may not cause harmful interference.
• This device must accept any interference received, including
interference that may cause undesired operation.
• Changes or modifications made to this device, not expressly
approved by Motorola Solutions, could void the authority of the user to
operate this equipment.
DTR Series operates in the license-free 900 MHz ISM Band (902–
928 MHz).
The AMBE+2
™
voice compression software included in this product is
protected by intellectual property rights including patent rights,
copyrights and trade secrets of Digital Voice Systems, Inc. This voice
compression technology is licensed solely for use as is within the
Communications Equipment. US Patent Nos.: #8,595,002 B2,
#8,359,197, #8,315,860, #8,200,497, #7,970,606, #6,912,495 B2,
#6,199,037 B1, #5,826,222, #5,754,974, #5,701,390, and #5,715,365.
For more product details, brochures, CPS software, and accessories,
refer to http://www.motorolasolutions.com/DTR600 and http://
www.motorolasolutions.com/DTR700 or call 1-800-448-6686.
MOTOROLA, MOTO, MOTOROLA SOLUTIONS and the Stylized M
logo are trademarks or registered trademarks of Motorola Trademark
Holdings, LLC and are used under license. All other trademarks are the
property of their respective owners.
©
2018 Motorola Solutions, Inc.
All rights reserved.
*MN004870A01*
MN004870A01-AA
English
4

DTR600/DTR700 Guide de référence rapide de la radio
bidirectionnelle
Ce guide de référence rapide décrit le fonctionnement de base de la
radio.
Présentation de la radio
1
2
3
4
5
13
11
12
10
9
8
7
6
14
1. Antenne
2. Bouton d’émission (PTT)
3. Boutons d'augmentation et de
réduction du volume
4. Bouton programmable
5. Bouton P1
6. Bouton Menu/OK
7. Bouton de navigation à quatre
directions
8. Bouton Accueil/Précédent
9. Bouton P2
10. Écran
11. Microphone
12. Haut-parleur
13. Bouton d'alimentation
14. Connecteur d'accessoire
audio
Pour commencer
Installation de la batterie au lithium-ion
Avis: Assurez-vous que le rabat de la batterie se trouve sur le
dessus de la batterie lorsque vous installez la batterie.
1
Alignez les contacts de la batterie avec ceux du compartiment de la
batterie. Insérez le côté contact de la batterie en premier. Poussez
délicatement la batterie dans son logement.
1
2
2
Pour mettre en place le couvercle de la batterie, alignez-le avec le
compartiment et faites glisser le loquet jusqu'à ce qu'il s'enclenche.
2
1
3
Faites glisser le loquet de la batterie en position verrouillée.
3
Français (Canada)
1

Charge avec un SUC à support de charge
La radio est fournie avec un bloc d’alimentation standard et un chargeur
pour unité simple.
Avis: Éteignez la radio avant de la charger, et chargez
complètement la batterie avant la première utilisation. Il est
préférable de charger à température ambiante.
1
Déposez le SUC sur une surface plane.
2
Insérez le connecteur du bloc d’alimentation dans le port latéral du
SUC.
3
Branchez l’adaptateur c.a. dans une prise murale.
4
Insérez la radio dans le SUC, l’avant de la radio faisant face au
voyant du SUC. Assurez-vous que la radio est bien insérée dans le
chargeur.
Le voyant du chargeur clignote quelques fois pour indiquer la charge
actuelle de la batterie lorsque la radio est insérée dans les rails du
support. Le voyant du chargeur s'allume en rouge pour indiquer que
la batterie se charge et en vert pour indiquer que la batterie est
entièrement chargée.
Charge de la radio et de la batterie avec un MUC
Le chargeur multi-unités (MUC) est un accessoire facultatif qui
comprend six compartiments de charge, qui permet de charger jusqu'à
six radios ou batteries. Les batteries peuvent être chargées avec ou
sans les radios ou placées séparément dans le MUC.
Avis: Éteignez les radios avant de les recharger et chargez-les
à température ambiante pour une efficacité optimale.
1
Déposez le MUC sur une surface plane.
2
Branchez le cordon d'alimentation dans le connecteur à deux broches
situé à la base du MUC.
3
Branchez l'autre extrémité du cordon d'alimentation dans une prise
secteur.
4
Insérez la radio ou la batterie dans le logement de charge, l’avant de
la radio ou de la batterie faisant face au voyant à DEL du MUC.
Le voyant du chargeur clignote quelques fois pour indiquer la charge
actuelle de la batterie lorsque la radio est insérée dans les rails du
support. Le voyant du chargeur s'allume en rouge pour indiquer que
Français (Canada)
2

la batterie se charge et en vert pour indiquer que la batterie est
entièrement chargée.
Mise en marche et arrêt de la radio
•
Pour allumer la radio, maintenez enfoncé le bouton d'alimentation
jusqu'à ce que la radio vibre et que l'écran affiche le logo Motorola.
•
Pour éteindre la radio, maintenez enfoncé le bouton d'alimentation
(environ 3 secondes) jusqu'à ce que l'écran de mise hors tension
s'affiche et que la tonalité de mise hors tension se fasse entendre.
Réglage de la fonction de non-interférence ou de
cryptage
Cette fonction assure des communications privées améliorées par la
configuration d'un numéro d'ID DE PROFIL approprié.
Important: Par défaut, le numéro d'ID DE PROFIL est
« 0000 ». Assurez-vous que toutes vos radios sont configurées
avec le même numéro d'ID DE PROFIL et que celui-ci est facile
à retenir.
1 Appuyez sur Menu/OK → Avancés → ID DE PROFIL.
2
Entrez un numéro d'ID DE PROFIL à quatre chiffres.
Transmission des appels
Avis: Attendez la fin de la tonalité d'autorisation de parler, puis
parlez. Si vous recevez une tonalité d'occupation et que l'écran
de la radio affiche Échec d'appel, le canal n'est pas disponible
ou occupé, ou qu'aucun utilisateur ne se trouve à portée de
transmission.
1 Pour appeler, appuyez sur le bouton PTT avec l'option Canaux/
Contacts sélectionnée.
L'écran affiche appel l'écran d'appel avec le type d'appel et l'ID
d'appelant.
2
Attendez la fin de la tonalité d'autorisation de parler et parlez dans le
microphone.
Parcours et sélection de canal
Pour sélectionner un canal, appuyez sur le bouton haut ou bas sur
l'écran d'accueil.
Information sur l'état de la batterie
L'icône d'état de la batterie s'affiche dans le coin supérieur gauche de
l'écran de la radio.
Tableau 1: État de la batterie
Icône de batterie État de la batterie
Élevé
Moyen
Faible
Critique
Éteindre
1
Démarrage d'une réponse privée
Le bouton programmable est réglé à la fonction de réponse individuelle
par défaut. Cette fonction permet à deux personnes de communiquer
instantanément de façon privée après la fin d'une transmission de
groupe.
1
Lorsque le niveau de la batterie est à Éteindre, une tonalité d'alerte et un arrêt automatique se produisent.
Français (Canada)
3

Avis: Un délai se produit sur le canal après une transmission
privée. Par défaut, le délai est réglé à 10 secondes.
1
Pour générer une réponse privée, appuyez sur la touche
programmable pendant un appel de groupe.
L'écran affiche Rép. privée activée.
2 Après un appel de groupe, appuyez sur la touche PTT pour faire un
appel privé.
L'écran affiche Rép. privée.
3
Attendez la fin de la tonalité d'autorisation de parler, puis parlez.
Configuration avancée
Cette radio comporte d'autres fonctions spéciales telles que le mode
d'économie d'énergie, l'ID DE PROFIL, le canal d'accueil et le mode de
clonage à partir du mode des paramètres avancés.
Pour afficher les paramètres avancés, appuyez sur Menu/OK →
Avancés.
Avis aux utilisateurs (FCC et Industrie Canada)
Mise en garde: Avant d'utiliser ce produit, lisez les informations
relatives à l'exposition à l'énergie RF et à la sécurité acoustique
ainsi que le mode d'emploi contenu dans la brochure Normes
de sécurité et exposition à l'énergie RF fournie avec la radio.
Le présent appareil est conforme aux CNR d'Industrie Canada
applicables aux appareils radio exempts de licence et à la partie 15 des
règlements de la FCC :
• Cet appareil ne doit pas causer d'interférence nuisible.
• Cet appareil doit accepter toute interférence reçue, y compris les
interférences pouvant entraîner un fonctionnement indésirable.
• Toute modification effectuée à cet appareil sans l'autorisation explicite
de Motorola Solutions peut annuler l'autorisation d'utiliser cet appareil.
Les radios de série DTR fonctionnent dans la bande sans licence de 900
MHz ISM (902 à 928 MHz).
Le logiciel de compression vocale AMBE+2
™
inclus avec ce produit est
protégé par les droits de propriété intellectuelle, notamment les droits de
brevet, les droits d'auteur et les secrets industriels de Digital Voice
Systems, Inc. La licence d'utilisation de cette technologie de
compression vocale n'est concédée que pour une utilisation telle quelle
dans l'équipement de communication. Brevet US n° : #8,595,002 B2,
#8,359,197, #8,315,860, #8,200,497, #7,970,606, #6,912,495 B2,
#6,199,037 B1, #5,826,222, #5,754,974, #5,701,390 et #5,715,365.
Pour plus de détails sur le produit, les brochures, le logiciel CPS et les
accessoires, reportez-vous à http://www.motorolasolutions.com/
DTR600et à http://www.motorolasolutions.com/DTR700, ou composez le
1 800 448-6686.
MOTOROLA, MOTO, MOTOROLA SOLUTIONS et le logo stylisé M
sont des marques de commerce ou des marques déposées de Motorola
Trademark Holdings, LLC et sont utilisées sous licence. Toutes les
autres marques de commerce sont la propriété de leurs titulaires
respectifs.
©
2018 Motorola Solutions, Inc.
Tous droits réservés.
*MN004870A01*
MN004870A01-AA
Français (Canada)
4
-
 1
1
-
 2
2
-
 3
3
-
 4
4
-
 5
5
-
 6
6
-
 7
7
-
 8
8


Motorola DTR700 Quick Reference Manual
- Taper
- Quick Reference Manual
- Ce manuel convient également à
dans d''autres langues
- English: Motorola DTR700
Documents connexes
-
Motorola DLR Series Quick Reference Manual
-
Motorola CURVE Series Mode d'emploi
-
-
-
Motorola DLR1020 Manuel utilisateur
-
-
 Motorola Solutions RDU4163d Manuel utilisateur
-
 Motorola Solutions RDU4100 Manuel utilisateur
-
-