
1
DGBF
Hinweise zum Gebrauch
Instructions for use
Manuel d'utilisation

2
DGBF
Contents
Please read these instructions carefully
before using the camera.
Parts and functions
»
4
LCD-Monitor
and Viewfinder display
»
10
Using the camera
Attaching the strap
»
12
Loading batteries
»
12
Testing batteries
»
13
Adjusting the eyepiece
»
14
MODE button
»
14
DRIVE button
»
14
Loading film
»
15
Setting the film speed
»
16
Holding the camera
»
17
Focusing
»
17
Procedure
»
18
Framing the picture
»
19
Focus lock
»
20
Manual focusing
»
21
Removing the film
»
22
Sommaire
Veuillez lire attentivement le mode
d’emploi avant d’utiliser l’appareil
Pièces et fonctions
»
4
Ecran ACL et affichages
dans le viseur
»
10
Maniement et emploi
Fixation de la bandoulière
»
12
Mise en place des piles
»
12
Contrôle des piles
»
13
Réglage dioptrique
»
14
Touche de fonction MODE
»
14
Touche de fonction DRIVE
»
14
Mise en place du film
»
15
Réglage sur la sensibilité du film
»
16
Tenue de l’appareil
»
17
Mise au point
»
17
Choix du sujet
»
18
Cadrage
»
19
Mémorisation de la mise au point
(focus-lock)
»
20
Mise au point manuelle
»
21
Retrait du film
»
22
Inhalt
Bitte die Anleitung vor Benutzung der
Kamera aufmerksam durchlesen!
Einzelteile und Funktion
»
4
LCD-Monitor und Sucher
»
10
Handhabung und Gebrauch
Tragriemen anbringen
»
12
Batterien einsetzen
»
12
Batteriespannung prüfen
»
13
Dioptrieneinstellung
»
14
Funktionstaste MODE
»
14
Funktionstaste DRIVE
»
14
Film einlegen
»
15
Filmempfindlichkeit einstellen
»
16
Kamerahaltung
»
17
Fokussieren
»
17
Motiv anwählen
»
18
Bildausschnitt bestimmen
»
19
Schärfenspeicher (Fokus-Lock)
»
20
Manuelle Fokussierung
»
21
Film entnehmen
»
22

3
DGBF
Belichtungsarten wählen
»
23
Programm-/ Zeitautomatik
»
23
Blendenautomatik
»
24
Manueller Betrieb
»
24
Langzeitbelichtung BULB
»
25
Blitzaufnahmen
»
25
Belichtungskorrektur
»
26
ABC-Bracketing
»
27
Selbstauslöser
»
28
Fernauslöser
»
29
Serienaufnahmen
»
30
Mehrfachbelichtungen
»
31
Datenspeicher
»
32
Dateneinbelichtung
»
33
Datum- u. Zeit-Korrektur
»
34
Batteriewechsel Datenrückwand
»
35
Blitzbetrieb
»
36
Leitzahltabelle
»
40
Abhilfe bei Bedienungsfehlern
»
41
Pflege der Kamera
»
43
Technische Daten
»
45
Choosing an exposure mode
»
23
Aperture-priority AE
»
23
Shutter-priority AE
»
24
Manual exposure control
»
24
Time exposure BULB
»
25
Flash photography
»
25
Exposure compensation
»
26
Automatic exposure
bracketing (ABC)
»
27
Self-timer photography
»
28
Remote control
»
29
Continuous film advance
»
30
Multiple exposure
»
31
Data memory
»
32
Imprinting the date
»
33
Correcting the date and hour
»
34
Changing battery of the
data back
»
35
Using flash
»
36
Guide-number table
»
40
Troubleshooting
»
41
Camera care
»
43
Specifications
»
45
Sélection du type d’exposition
»
23
Vitesse automatique
»
23
Diaphragme automatique
»
24
Fonctionnement manuel
»
24
Pose longue BULB
»
25
Prise au flash
»
25
Correction de l’exposition
»
26
Bracketing A,B,C
»
27
Retardateur
»
28
Déclencheur à distance
»
29
Prises en rafale
»
30
Surimpressions
»
31
Mémoire de données
»
32
Insolation de la date
»
33
Correction de la date et de l’heure
»
34
Changement de la pile
du dos dateur
»
35
Fonctionnement avec le flash
»
36
Table des nombres-guides
»
40
Remèdes aux erreurs de
maniement
»
41
Entretien de l’appareil
»
43
Données techniques
»
45

4

5
DGBF
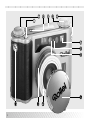
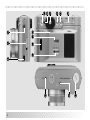
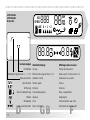
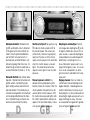
Parts and functionsEinzelteile und Funktionen Pièces et fonctions
! Auslöser
" Einstellrad für Verschlußzeiten (ver-
senkbar)
§ A,B,C-Taste
$ LCD-Monitor
% Einstellrad für Entfernungs-
einstellung (versenkbar)
& Tragriemenhalter, links
/ Sucherfenster
( LED für Selbstauslöser
) IR-Fenster
= Blendeneinstellring
Q Objektiv
W Tragriemenhalter, rechts
M Objektivschutzdeckel,
gleichzeitig IR-Fernauslöser
; Sensor für Belichtungsmessung
: Fenster für Entfernungsmessung
_ IR-Empfänger
! Shutter release
" Shutter-speed dial (retractable)
§ ABC button
$ LCD monitor
% Focusing dial (retractable)
& Left-hand strap lug
/ Eyepiece window
( Self-timer LED
) Remote-control sensor
= Aperture ring
Q Lens
W Right-hand strap lug
M Lens cap, doubling as IR remote
lelease
! Déclencheur
" Molette des vitesses (escamotable)
§ Touche A,B,C
$ Ecran ACL
% Molette de mise au point
(escamotable)
& Attache gauche de bandoulière
/ Fenêtre du viseur
( DEL pour retardateur
) Récepteur pour déclenchement
par IR
= Bague de réglage du diaphragme
Q Objectif
W Attache droite de bandoulière
M Bouchon d’objectif et
télédéclencheur IR

6

7
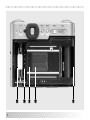
DGBF
E Anschlußbuchse für Blitzgerät
R Rückwandriegel
T Gewindeanschluß für Blitzgerät
Z Taste ON/OFF
U Dioptrieneinstellung
I Sucherokular
O Taste MODE
P Taste DRIVE
A Wipp-Taste für Zoomobjektiv
S Kamerarückwand
D Display für Dateneinbelichtung
F Tasten für Dateneinbelichtung
G Filmfenster
H Knopf für Filmrückspulung
J Stativgewinde 1/4"
K Batteriefachdeckel
E Flash terminal
R Back lock
T Threaded flash socket
Z ON/OFF button
U Eyesight adjustment
I Viewfinder eyepiece
O MODE button
P DRIVE button
A Zoom rocker
S Camera back
D Date display
F Date buttons
G Film-type window
H Rewind button
J 1/4" tripod socket
K Battery-chamber cover
E Prise pour flash
R Verrouillage dos
T Raccord fileté pour flash
Z Touche ON/OFF
U Réglage dioptrique
I Oculaire
O Touche MODE
P Touche DRIVE
A Touche à bascule pour objectif
Zoom
S Dos de l’appareil
D Ecran pour composition de la date
F Touches pour insolation de la date
G Fenêtre du film
H Bouton de rembobinage
J Filetage pour pied 1/4"
K Couvercle du logement des piles

8

9
DGBF
L Filmpatronenfach
Ö DX-Kontakte
Y Film-Gleitbühne
X Schlitzverschluß
C Filmeinlege-Markierung
V * Filmandruckplatte
B * Batteriefach für Dateneinrichtung
N * Fenster für Dateneinbelichtung
L Cartridge chamber
Ö DX contacts
Y Film guides
X Focal-plane shutter
C Film-start marker
V * Film pressure plate
B * Date-imprinting battery chamber
N * Date-imprinting window
L Logement de la cartouche de film
Ö Contacts DX
Y Fenêtre-glissière
X Obturateur focal
C Marque de mise en place du film
V * Presseur de film
B * Logement de la pile pour
dispositif de datage
N * Fenêtre pour insolation de la date
* Teile 34 – 36
in den Einzelabbildungen
* For parts 34 – 36 ,
see detail pictures
* Pièces 34 – 36
dans les illustrations de détail

10
DGBF
888
88
EXP
mm
FNO
ISO
SPEED
ABC 0
•
1 2
•
8.888.8
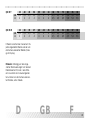
DGBF
LCD-Monitor
LCD-Monitor
Ecran ACL
Viewfinder display
AF area
Minimum focusing distance 1.2 m
Autofocus frame
Shutter speed
Distance
Over/underexposure
Aperture
Flash
Focus indicator
Sucheranzeigen
AF-Meßfeld
Nahbereichsgrenze von 0,7 – 1,2 m
Fokussierrahmen
Verschlußzeit
Entfernung
Über-/Unterbelichtung
Blende
Blitzbetrieb
Fokussierinformation
Affichages dans le viseur
Champ de mesure AF
Mise au point minimum de 1,2 m
Cadre de mise au point
Vitesse
Distance
Sous-/surexposition
Diaphragme
Fonctionnement avec flash
Information de mise au point

11
DGBF
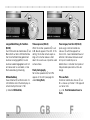
88
EXP
mm
FNO
888
ISO
SPEED
cap
ABC 0
•
1
Objektivdeckel
Verschlußzeit/ISO
Entfernung/Brennweite/
Blende/Bildzähler
Fernauslöser
Selbstauslöser
Serienaufnahmen
Mehrfachbelichtungen
Filmpatronenanzeige
offene Rückwand
Filmrückspulung
Filmlaufanzeige
Film fehlerhaft eingelegt
Batteriezustand
Bracketing (A-B-C)
Information
Lens cap
Shutter speed/ISO
Distance/focal length/frame counter
Remote release
Self-timer
Continuous film advance
Multiple exposure
Film-cartridge symbol
Open camera back
Film rewind
Film advance
Battery status
Bracketing (ABC)
Information
Capuchon d’objectif
Vitesse/ISO
Distance/focale/compteur de vues
Télédéclencheur
Retardateur
Prises en rafale
Surimpressions
Affichage cartouche
Dos ouvert
Rembobinage
Affichage d’avance du film
Etat des piles
Bracketing (A-B-C)
Information

12
DGBF
Tragriemen anbringen
Tragriemen gemäß Abbildung an Halter
& und W befestigen.
Batterien einsetzen
Batteriefachdeckel
K mit Münze links-
drehend öffnen und 2 Lithiumbatterien
(Typ CR2) mit den Plus-Polen nach un-
ten einlegen. Batteriefachdeckel schlie-
ßen.
Attaching the strap
Attach the strap to the lugs
& and W
as illustrated.
Loading batteries
Open battery-chamber cover
K, turn-
ing it counterclockwise with a coin,
and insert two type CR2 lithium batter-
ies with their positive poles (+) facing
down. Replace battery-chamber cover.
Fixation de la bandoulière
Fixer la bandoulière aux attaches
& et
W comme indiqué sur l’illustration.
Mise en place des piles
Ouvrir le couvercle
K du logement
avec une pièce de monnaie en tour-
nant vers la gauche. Y installer 2 piles
au lithium (type CR2), les pôles plus di-
rigés vers le bas. Refermer le couver-
cle.
&
W
&
K

13
DGBF
Batteriespannung prüfen
Die Batterieleistung wird beim Ein-
schalten der Kamera automatisch wie
folgt geprüft:
»
Batteriesymbol im LCD-Monitor
– ausreichende Kapazität
»
Batteriesymbol halb gefüllt
– einige Aufnahmen noch möglich,
Batterien erneuern
»
Batteriesymbol halb gefüllt und blin-
kend
– Batterien erneuern
»
Hinweis: Alte Batterien gehören
nicht in den Hausmüll, sondern sind
entsprechend zu entsorgen.
Testing batteries
Battery voltage is tested automatically
when the camera is switched on:
»
Battery symbol in LCD
– Sufficient battery power
»
Battery symbol half filled
– Keep spare batteries ready
»
Battery symbol half filled
and blinking
– Replace batteries
»
Note: Do not dispose of old
batteries together with your house-
hold waste!
Contrôle des piles
Lors de la mise en circuit, la capacité
des piles est contrôlée
automatiquement comme suit :
»
Le pictogramme de pile apparaît
sur l’écran ACL
– Suffisamment de capacité.
»
Pictogramme à moitié constitué
– Quelques vues encore possibles
mais piles à changer
»
Pictogramme à moitié constitué et
clignotant
– Changer les piles
»
Remarque: Ne pas jeter les piles
usées avec les ordures ménagères
mais les déposer aux rebuts
spéciaux.

14
DGBF
Dioptrieneinstellung
Mit der Dioptrieneinstellung U kann
das Sucherbild der Sehstärke ange-
paßt werden.
(Einstellbereich: -3 bis +1 Dioptrien).
Funktionstaste MODE
O
Mit dieser Taste können folgende
Kamerafunktionen gewählt werden:
»
Selbstauslöser
»
Fernauslöser
»
Serienaufnahmen
»
Mehrfachbelichtungen
Funktionstaste DRIVE
P
Mit dieser Taste können folgende Kor-
rekturen vorgenommen werden:
»
Belichtungskorrektur
»
Filmempfindlichkeit
»
Informationen
Adjusting the eyepiece
The eyesight adjustment
U serves to
adjust the eyepiece to match your
needs. The available range is from -3
to +1 diopters.
MODE button
O
Use this button to choose one of the
following modes:
»
Self-timer
»
Remote control
»
Continuous film advance
»
Multiple exposure
DRIVE button
P
This button controls the following
functions:
»
Exposure compensation
»
Film-speed setting
»
Information
U
EXP
mm
FNO
OP
ISOISO ISO ISO
888
EXP
mm
FNO
ISO
SPEED
ABC 0
•
1 2
•
888
EXP
mm
FNO
ISO
SPEED
ABC 0
•
1 2
•
Réglage dioptrique
Le réglage dioptrique U permet
d’adapter l’image du viseur à l’acuité
visuelle. (Latitude de réglage : -3 à +1
dioptries).
Touche de fonctions MODE
O
Cette touche permet de choisir les
différentes fonctions :
»
Retardateur
»
Déclenchement à distance
»
Prises en rafale
»
Surimpressions
Touche de fonctions DRIVE
P
Cette touche permet d’effectuer les
corrections suivantes:
»
Correction d’exposition
»
Sensibilité du film
»
Informations

15
DGBF
Film einlegen
Kamerarückwand S durch Betätigen
des Riegels R öffnen und aufklappen.
Filmpatrone in Filmfach L einlegen,
festdrücken und Film soweit herauszie-
hen, bis der Filmanfang die orangefar-
bene Vorspannmarkierung C erreicht.
Den Film leicht andrücken, damit er auf
der Filmgleitbahn aufliegt. Kamera-
rückwand schließen und einrasten las-
sen. Der Kameramotor transportiert
den Film automatisch auf Bild 1. Bei
korrekt eingelegtem Film erscheint im
LCD-Monitor die Transportkontroll-
anzeige mit der Bildzahl 1. Ist der Film
nicht richtig eingelegt, erscheint im
Monitor die Anzeige E. Dann die Rück-
wand öffnen und Einlegevorgang wie-
derholen.
»
Hinweis: Der Kameraverschluß ist
ein Präzisionsteil und darf nicht mit
dem Finger oder dem Filmvorspann
in Berührung kommen.
Loading film
Open camera back
S by pressing lock
R. Insert film cartridge in chamber L,
hold it down and pull film leader out
until it reaches the orange start marker.
Make sure the film is in perfect contact
with the film guides. Close the back
until it snaps into place. The camera
will automatically advance the film to
the first frame. If the film has been cor-
rectly loaded, the film-advance display
and the frame number 1 appear in the
LCD. Should the film have been loaded
incorrectly, the LCD will read E. In this
case, open the camera back once
more and repeat the process.
»
Note: Be sure never to touch the
focal-plane shutter with your fingers
or with the film leader!
Mise en place du film
Ouvrir le dos
S en manœuvrant le
verrouillage R. Glisser la cartouche
dans son logement L, appuyez
fermement et tirer le film jusqu’à ce
que l’amorce atteigne la marque oran-
ge C. Appuyer légèrement sur la
pellicule pour qu’elle repose sur la
glissière et bien refermer le dos de
l’appareil jusqu’à encliquetage. Le
moteur transporte alors automatique-
ment le film jusqu’à la vue n
o
1. Si le
film a été correctement mis en place,
l’affichage de contrôle de transport du
film apparaît sur l’écran ACL ainsi que
le nombre 1. Si le film n’a pas été mis
correctement, E apparaît sur l’écran
ACL. Ouvrir alors le dos et renouveler
l’opération.
»
Remarque: L’obturateur est une
pièce de précision et ne doit jamais
entrer en contact avec un doigt ou
avec l’amorce du film.
R
C
L

16
DGBF
Filmempfindlichkeit einstellen
Bei DX-codierten Filmen erfolgt die Ein-
stellung automatisch zwischen ISO 25
und 5000. Bei nicht DX-codierten Fil-
men wird automatisch ISO 100/21°
verrechnet. Wird eine andere Film-
empfindlichkeit gewünscht, so kann
diese auch bei DX-codiertem Film wie
folgt verändert werden:
Taste P DRIVE solange betätigen, bis
das Symbol ISO im LCD-Monitor er-
scheint. Durch Betätigung der Wipp-
Taste A läßt sich der ISO-Wert verän-
dern und durch Drücken des Knopfes
ABC speichern.
WIDE TELE
DX 6-8-10 5000-6400
Die Korrektur erfolgt in 1/3-Stufen und
umfaßt den Bereich von ISO 6–6400.
»
Hinweis: Bei Filmwechsel ist darauf
zu achten, daß der eingestellte ISO-
Wert wieder korrigiert werden muß.
Setting the film speed
With DX-coded film, the camera will set
the film speed automatically between
ISO 25/15° and ISO 5000/38°.
With non-DX-coded film, the camera
defaults to ISO 100/21°. To override
the DX setting or set the film speed
manually with non-DX-coded film,
proceed as follows:
Hold down DRIVE button P until ISO
appears in the LCD. Then press zoom
rocker A to change the ISO setting
and press ABC button for memory.
WIDE TELE
DX 6-8-10 5000-6400
Settings are possible in increments of
1/3 EV over a range of ISO 6 to 6400.
»
Note: Be sure to change the film-
speed setting and, if necessary,
reset to DX when loading a new film!
Réglage sur la sensibilité du film
Avec les films codés DX, le réglage se
fait automatiquement entre ISO 25 et
5000. Avec les films non codés DX, le
réglage se fait automatiquement à la
valeur ISO 100/21°. Si l’on désire un
réglage sur une autre sensibilité,
comme d’ailleurs avec un film codé
DX, procéder comme suit :
Appuyer sur la touche P DRIVE
jusqu’à ce que le symbole ISO
apparaisse sur l’écran ACL. Pour
modifier la valeur ISO, il faut appuyer
sur la touche à bascule A; appuyer
ensuite sur la touche ABC pour
mémoriser la nouvelle valeur.
WIDE TELE
DX 6-8-10 5000-6400
La correction s’effectue par 1/3 de
valeur entre 6 et 6400 ISO.
»
Remarque: Lors d’un changement
de film, penser à réviser le réglage
de la valeur ISO.

17
DGBF
Kamerahaltung
Um Verwackelungen zu vermeiden die
Kamera stets ruhig halten. Das gilt be-
sonders für Aufnahmen mit Tele-Ein-
stellung. Ferner ist darauf zu achten,
daß Objektiv, Belichtungssensor und
Autofokusfenster nicht durch Finger,
Haare oder Kameratasche verdeckt
werden.
Taste ON/OFF Z drücken, Objektiv
fährt heraus und die Kamera ist be-
triebsbereit.
Im LCD-Monitor und im Sucher-Dis-
play blinkt die Information CAP als Hin-
weis auf evtl. aufgesetzten Objektiv-
schutzdeckel M. Sie erlischt bei
Betätigung einer beliebigen Funktions-
taste.
Fokussieren
Die Kamera verfügt sowohl über eine
automatische als auch eine manuelle
Scharfeinstellung. Wird das Einstellrad
%
aus der A-Position herausgedreht,
wird die Schärfe manuell zwischen
0,7 m und ∞ bestimmt. Dazu ist das
Einstellrad durch Antippen zu ent-
rasten. Für die automatische Fokussie-
rung ist das Einstellrad
%
wieder in die
A-Position zu bringen und abzusenken.
Holding the camera
Hold the camera as steady as possible
and press the shutter release very
gently to avoid camera shake. This is
especially important when using a long
focal length. Also, avoid blocking the
lens, the exposure sensor or the
autofocus windows with your fingers,
your hair or the camera case.
Press ON/OFF button Z — the lens
moves out, the camera is ready to fire.
Should the lens cap still be attached,
CAP will blink both in the LCD and the
viewfinder as a warning. It will
disappear as any button is pressed.
Focusing
Focusing is possible both automatically
and manually. With the dial % turned
away from A, the distance can be set
manually between 0.7 m and ∞ (infinity)
after disengaging the dial by slight
pressure. For autofocusing, turn dial %
back to A and push it down.
Tenue de l’appareil
Pour éviter un flou de bougé veiller à
tenir l’appareil immobile, tout parti-
culièrement en réglage télé. Eviter en
outre toute obstruction de l’objectif,
des fenêtres du capteur d’exposition
ou de l’autofocus avec un doigt, les
cheveux ou le sac de l’appareil.
Appuyer sur la touche Z ON/OFF,
l’objectif sort et l’appareil est prêt à
fonctionner.
L’information CAP clignote sur l’écran
ACL et sur la plage d’affichage du viseur
pour signaler que le capuchon de l’ob-
jectif M n’est éventuellement pas ôté.
Pour faire cesser le clignotement, il faut
appuyer sur n’importe quelle touche.
Mise au point
L’appareil laisse le choix entre la mise
au point automatique ou la mise au
point manuelle. Si la bague de réglage
% est dégagée de la position A, la
mise au point se détermine manu-
ellement entre 0,7 m et ∞. Pour ce fai-
re, une simple tape du doigt suffit à fai-
re sauter le cran d’arrêt. Pour revenir
en mise au point automatique, il faut
ramener la bague
%
en position A et
l’enfoncer dans son cran.

18
DGBF
Motiv anwählen
Zum Fokussieren das Fokusfeld auf
das Objekt richten und den Auslöser
! leicht niederdrücken. Die Fokussie-
rung erfolgt so automatisch. Im Sucher
erscheint das Fokussiersymbol. Für
die Aufnahme den Auslöser ganz
durchdrücken, der Film wird nach der
Belichtung automatisch um 1 Bild
weitertransportiert. Ist das Aufnahme-
objekt zu dunkel oder fast ohne Kon-
trastunterschied, projeziert ein AF-Blitz
der Kamera ein Muster auf das Objekt
und erhöht damit die Meßfähigkeit. Bei
Objekten unter 0,7 m kann nicht mehr
fokussiert werden. Der Auslöser wird
automatisch blockiert.
Procedure
To focus, place the AF area over your
subject and lightly press the shutter
release !. The camera will focus on
the detail within the AF area. The focus
indicator appears in the viewfinder. To
take your picture, depress the shutter
release fully — the film is wound on to
the next frame. If your subject is very
dark or lacks contrast, an AF flash will
project a focusing pattern onto the
subject, thus increasing focusing
accuracy. The minimum focusing
distance is 0.7 m. At shorter distances
the shutter will lock.
Choix du sujet
Pour mettre au point, diriger le champ
du viseur sur le sujet et appuyer à mi-
course sur le déclencheur !. La mise
au point se fait automatiquement. Le
pictogramme de mise au point
apparaît dans le viseur. Appuyer à
fond sur le déclencheur pour la prise
de vue. Le film est ensuite transporté
automatiquement à la vue suivante. Si
le sujet est trop sombre ou ne
présente presque aucun contraste,
l’éclair AF de l’appareil assure
l’efficacité de la mesure. Si la distance
du sujet est inférieure à 0,7 m, la mise
au point n’est plus possible et le
déclencheur reste bloqué.

19
DGBF
Bildausschnitt bestimmen
Motiv über Sucher anvisieren und
durch Betätigen der Wipp-Taste A
den Bildausschnitt bestimmen. Im
LCD-Monitor wird die gewählte Brenn-
weite angezeigt.
mm
SPEED
mm
SPEED
Framing the picture
Sight your subject through the view-
finder and frame it pressing the zoom
rocker A. The LCD displays the focal
length selected.
Cadrage
Viser le sujet dans le viseur et cadrer
en appuyant sur la touche à bascule
A. La focale choisie est affichée sur
l’écran ACL.

20
DGBF
Schärfenspeicher (Fokus-Lock)
Liegt das Objekt für eine exakte Fokus-
sierung nicht genau in der Bildmitte,
kann der Schärfenspeicher wie folgt
benutzt werden:
Sucher mit AF-Meßfeld auf das Auf-
nahme-Objekt ausrichten, Auslöser
!
zum Speichern der gemessenen Ent-
fernung leicht niederdrücken und ge-
drückt halten. Mit dem nun fixierten
Fokus den endgültigen Bildausschnitt
festlegen und auslösen. Der automati-
sche Schärfenspeicher hebt sich auf,
sobald der Auslöser wieder losgelas-
sen wird.
Focus lock
If you wish to arrange your subject
outside the center of the frame, you
can still use the autofocusing feature:
Place the AF area over the detail on
which the camera should focus. Then
lightly press shutter release ! and
hold it in this position. The camera now
locks the focus setting, and you may
recompose the picture to suit your
intentions. Focus lock is canceled as
soon as you remove your finger from
the shutter release.
Mémorisation de la mise au point
(focus-lock)
Dans le cas d’un cadrage avec un
sujet excentré amenant des problèmes
de mise au point net, procéder comme
suit pour mémoriser la mise au point
exacte sur le sujet :
Diriger le champ de mesure AF du
viseur sur le sujet, appuyer le
déclencheur ! à mi-course et le
maintenir pour mémoriser la distance
mesurée. Dans cette position, choisir
le cadrage désiré et déclencher. La
mise en mémoire automatique est
supprimée dès que l’on relâche le
déclencheur.
La page est en cours de chargement...
La page est en cours de chargement...
La page est en cours de chargement...
La page est en cours de chargement...
La page est en cours de chargement...
La page est en cours de chargement...
La page est en cours de chargement...
La page est en cours de chargement...
La page est en cours de chargement...
La page est en cours de chargement...
La page est en cours de chargement...
La page est en cours de chargement...
La page est en cours de chargement...
La page est en cours de chargement...
La page est en cours de chargement...
La page est en cours de chargement...
La page est en cours de chargement...
La page est en cours de chargement...
La page est en cours de chargement...
La page est en cours de chargement...
La page est en cours de chargement...
La page est en cours de chargement...
La page est en cours de chargement...
La page est en cours de chargement...
La page est en cours de chargement...
La page est en cours de chargement...
La page est en cours de chargement...
La page est en cours de chargement...
La page est en cours de chargement...
La page est en cours de chargement...
La page est en cours de chargement...
La page est en cours de chargement...
La page est en cours de chargement...
-
 1
1
-
 2
2
-
 3
3
-
 4
4
-
 5
5
-
 6
6
-
 7
7
-
 8
8
-
 9
9
-
 10
10
-
 11
11
-
 12
12
-
 13
13
-
 14
14
-
 15
15
-
 16
16
-
 17
17
-
 18
18
-
 19
19
-
 20
20
-
 21
21
-
 22
22
-
 23
23
-
 24
24
-
 25
25
-
 26
26
-
 27
27
-
 28
28
-
 29
29
-
 30
30
-
 31
31
-
 32
32
-
 33
33
-
 34
34
-
 35
35
-
 36
36
-
 37
37
-
 38
38
-
 39
39
-
 40
40
-
 41
41
-
 42
42
-
 43
43
-
 44
44
-
 45
45
-
 46
46
-
 47
47
-
 48
48
-
 49
49
-
 50
50
-
 51
51
-
 52
52
-
 53
53


Rollei 35 QZ Le manuel du propriétaire
- Taper
- Le manuel du propriétaire
- Ce manuel convient également à
dans d''autres langues
- English: Rollei 35 QZ Owner's manual
- Deutsch: Rollei 35 QZ Bedienungsanleitung
Documents connexes
Autres documents
-
Nikon 140ED Manuel utilisateur
-
-
-
Olympus IS50 Mode d'emploi
-
Fuji GA-645 Manuel utilisateur
-
Minox CD 70 Le manuel du propriétaire
-
-
Pentax 645 Le manuel du propriétaire