
JENN-AIRGASON GLASS
DOWNDRAFT COOKTOP
TABLE OF CONTENTS
Important Safety Instructions .....................................1-4
Ducting Information ...........................................................4
Using Your Cooktop ......................................................5-7
Care & Cleaning ..............................................................8-9
Troubleshooting ................................................................10
Warranty & Service ...........................................................11
Guide de I'utilisation et d'entretien ............................12
Guia de Uso y Cuidado ...................................................26
JENN-AIR
Form No. A/01/08 Part No. 8112P340-60 _c_2006Maytag Appliances Sales Co. All rights reserved. Litho U.S.A.

To ensure proper and safe operation: Appliance
must be properly installed and grounded by a qualified
technician. Do not attempt to adjust, repair, service,
or replace any part of your appliance unless it is
specifically recommended in this guide. All other
servicing should be referred to a qualified servicer.
Have the installer show you the location of the gas
shut off valve and how to shut it off in an emergency.
Always disconnect power to appliance before servicing.
IMPORTANT SAFETY
INSTRUCTIONS
Warning and Important Safety Instructions appearing
in this guide are not meant to cover all possible
conditions and situations that may occur. Common
sense, caution, and care must be exercised when
installing, maintaining, or operating the appliance.
Always contact your manufacturer about problems or
conditions you do not understand.
Recognize Safety Symbols, Words, Labels
Read and follow all instructions before using this
appliance to prevent the potential risk of fire, electric
shock, personal injury or damage to the appliance as a
result of improper usage of the appliance. Use appliance
only for its intended purpose as described in this guide.

IMPORTANT SAFETY INSTRUCTIONS
To Prevent Fire or
Smoke Damage
Child Safety
Be sure all packing materials are removed from the
appliance before operating it.
Keep area around appliance clear and free from
combustible materials, gasoline, and other flammable
vapors and materials.
If appliance is installed near a window, proper
precautions should be taken to prevent curtains from
blowing over burners.
Many aerosol-type spray cans are EXPLOSIVE when
exposed to heat and may be highly flammable. Avoid
their use or storage near an appliance.
Many plastics are vulnerable to heat. Keep plastics
away from parts of the appliance that may become
warm or hot. Do not leave plastic items on the cooktop
as they may melt or soften if left too close to a lighted
surface burner.
To eliminate the hazard of reaching over hot surface
burners, cabinet storage should not be provided directly
above a unit. If storage is provided, it should be limited
to items which are used infrequently and which are
safely stored in an area subjected to heat from an
appliance. Temperatures may be unsafe for some items,
such as volatile liquids, cleaners or aerosol sprays.
A faint gas odor may indicate a gas leak. If a gas odor is
detected, shut off the gas supply to the cooktop. Call
your installer or local gas company to have the possible
leak checked. Never use a match or other flame to
locate a gas leak.
In Case of Fire
Turn off appliance and ventilating hood to avoid
spreading the flame. Extinguish flame then turn on
hood to remove smoke and odor.
• Smother fire or flame in a pan with a lid or cookie
sheet.
• NEVER pick up or move a flaming pan.
Do not use water on grease fires. Use baking soda, a
dry chemical or foam-type extinguisher to smother fire
or flame.
2
NEVER leave children alone or unsupervised near the
appliance when it is in use or is still hot.
NEVER allow children to sit or stand on any part of the
appliance as they could be injured or burned.
Children must be taught that the appliance and utensils
on it can be hot. Let hot utensils cool in a safe place, out
of reach of small children. Children should be taught that
an appliance is not a toy. Children should not be allowed
to play with controls or other parts of the unit.
About Your Appliance
Do not use the cooktop as a storage area for food or
cooking utensils.
Potentially hot surfaces include cooktop, and areas
facing the cooktop.
Cooking Safety
Always place a pan on a surface burner before turning
it on. Be sure you know which knob controls which
surface burner. Make sure the correct burner is turned
on and that the burner has ignited. When cooking is
completed, turn burner off before removing pan to
prevent exposure to burner flame.
Always adjust surface burner flame so that it does
not extend beyond the bottom edge of the pan. An
excessive flame is hazardous, wastes energy and may
damage the appliance, pan or cabinets above the
appliance.

IMPORTANT SAFETY INSTRUCTIONS
NEVER leave a surface cooking operation unattended
especially when using a high heat setting or when deep
fat frying. Boilovers cause smoking and greasy
spillovers may ignite. Clean up greasy spills as soon as
possible. Do not use high heat for extended cooking
operations.
NEVER heat an unopened container on the surface
burner. Pressure build-up may cause container to burst
resulting in serious personal injury or damage to the
appliance.
Use dry, sturdy potholders. Damp potholders may cause
burns from steam. Dishtowels or other substitutes
should never be used as potholders because they can
trail across hot surface burners and ignite or get caught
on appliance parts.
Always let quantities of hot fat used for deep fat frying
cool before attempting to move or handle.
Do not let cooking grease or other flammable materials
accumulate in or near the appliance, hood or vent fan.
Clean hood frequently to prevent grease from accumu-
lating on hood or filter. When flaming foods under the
hood turn the fan on.
NEVER wear garments made of flammable material or
loose fitting or long-sleeved apparel while cooking.
Clothing may ignite or catch utensil handles.
NEVER cover the downdraft opening with a utensil, pot
holder, or other object while the fan in on high or low.
This will seriously reduce the performance of the
cooktop.
Glass-Ceramic Cooktop
NEVER cook on broken cooktop. If cooktop should
break, cleaning solutions and spillovers may penetrate
the broken cooktop and create a risk of electric shock.
Contact a qualified technician immediately.
Clean cooktop with caution. Some cleaners can produce
noxious fumes if applied to a hot surface. If a wet
sponge, cloth, or paper towel is used on a hot cooking
area, be careful to avoid steam burn.
Never stand on the cooktop.
Utensil Safety
Use pans with flat bottoms and handles that are easily
grasped and stay cool. Avoid using unstable, warped,
easily tipped or loose-handled pans. Also avoid using
pans, especially small pans, with heavy handles as they
could be unstable and easily tip. Pans that are heaw to
move when filled with food may also be hazardous.
Be sure utensil is large enough to properly contain food
and avoid boilovers. Pan size is particularly important in
deep fat frying. Be sure pan will accommodate the
volume of food that is to be added as well as the bubble
action of fat.
To minimize burns, ignition of flammable materials and
spillage due to unintentional contact with the utensil, do
not extend handles over adjacent surface burners.
Always turn pan handles toward the side or back of the
appliance, not out into the room where they are easily
hit or reached by small children.
Never let a pan boil dry as this could damage the
utensil and the appliance.
Only certain types of glass, glass/ceramic, ceramic or
glazed utensils are suitable for cooktop usage without
breaking due to the sudden change in temperature.
Follow manufacturer's instructions when using glass.
This appliance has been tested for safe performance
using conventional cookware. Do not use any devices
or accessories that are not specifically recommended
in this guide. Do not use eyelid covers for the surface
units or stovetop grills. The use of devices or
accessories that are not expressly recommended in
this manual can create serious safety hazards, result
in performance problems, and reduce the life of the
components of the appliance.
Cleaning Safety
Turn off all controls and wait for appliance parts to cool
before touching or cleaning them. Do not touch the
burner grates or surrounding areas until they have had
sufficient time to cool.
Clean appliance with caution. Use care to avoid steam
burns if a wet sponge or cloth is used to wipe spills on
a hot surface. Some cleaners can produce noxious
fumes if applied to a hot surface.
3
Important Safety Notice
and Warning
The California Safe Drinking Water and Toxic
Enforcement Act of 1986 (Proposition 65) requires the
Governor of California to publish a list of substances
known to the State of California to cause cancer or
reproductive harm, and requires businesses to warn
customers of potential exposures to such substances.
Users of this appliance are hereby warned that the
burning of gas can result in low-level exposure to
some of the listed substances, including benzene,
formaldehyde and soot, due primarily to the incomplete
combustion of natural gas or liquid petroleum (LP)

IMPORTANT SAFETY INSTRUCTIONS
fuels. Properly adjusted burners will minimize
incomplete combustion. Exposure to these substances
can also be minimized by properly venting the burners
to the outdoors.
IMPORTANT NOTICE REGARDING PET BIRDS:
Never keep pet birds in the kitchen or in rooms where
the fumes from the kitchen could reach. Birds have a
very sensitive respiratory system. Fumes released during
an oven self-cleaning cycle may be harmful or fatal to
birds. Fumes released due to overheated cooking oil,
fat, margarine and overheated non-stick cookware may
be equally harmful.
Electrical Connection
Appliances which require electrical
power are equipped with a three-prong
grounding plug which must be
plugged directly into a properly
grounded three-hole 120 volt
electrical outlet.
Always disconnect power to appliance before servicing.
The three-prong grounding plug offers protection
against shock hazards. DO NOT CUT OR REMOVE
THE THIRD GROUNDING PRONG FROM THE
POWER CORD PLUG.
If an ungrounded, two-hole or other type electrical
outlet is encountered, it is the personal responsibility
of the appliance owner to have the outlet replaced
with a properly grounded three-hole electrical
outlet.
Ducting Information
Jenn-Air's ventilation system is designed to capture
both cooking fumes and smoke from the cooktop
surface. If the system does not, these are some ducting
installation situations to check:
• 6" diameter round or 3 W' x 10" rectangular ducting
should be used for duct lengths 10'-60'.
Note: Use 5" diameter round ducting if the duct
length is 10' or less.
• No more than three 90 ° elbows should be used.
Distance between elbows should be at least 18".
• Recommended Jenn-Air wall cap MUSTbe used.
Make sure damper moves freely when ventilation
system is operating.
• There should be a minimum clearance of 6" for
cooktop installed near a side wall.
• There should be a minimum clearance of 12" between
the bottom of the wall cap and the ground.
If there is not an obvious improper installation, there
may be a concealed problem such as a pinched joint,
obstruction in the pipe, etc. Installation is the responsi-
bility of the installer and questions should be addressed
first by the installer. The installer should very carefully
check the ducting installation instructions.
• Use the Flow Tester Card provided with
your appliance to check the air flow.
FLOW TESTER
t
Save These Instructions for Future Reference
4

USINGYOUR COOKTOP
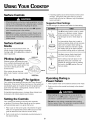
Surface Controls
Surface Control
Knobs •
Use to turn on the surface burners• An
infinite choice of heat settings is available
from I_oto Hi. At the Hi setting a detent or
notch may be felt.
I
BURNER CAP
Pilotless Ignition
Pilotless ignition eliminates the need
for a constant standing pilot light• Each
surface burner has a spark ignitor• Use
care when cleaning around the _ _!i_
surface burner ___,I_. _ t_,
If the surface burner does not :_:_-,_
light, check if ignitor is broken, soiled
or wet. BURNER BASE
Flame-Sensing TMRe-Ignition
Your cooktop has sealed gas burners with Flame-SensingTM
Re-Ignition. If any burner flame should go out, the system will
automatically spark to re-ignite the burner (jail ignitors will
spark when any flame is extinguished, however only the
selected burner will reignite).
If intermittent sparking occurs, increase flame ([rotate knob
clockwise) until clicking ([spark)sound ceases•
A clicking ([spark) sound will be heard and the burner
will light• (jAilignitors will spark when any surface
burner knob isturned on. However, only the selected
burner will light.)
Suggested Heat Settings
The size and type of cookware will affect the heat setting•
• Use Hi to bring liquid to a boil, or reach
pressure in a pressure cooker• Always
reduce setting to a lower heat when
liquids begin to boil or foods begin to
cook.
An intermediate flame size is used to
continue cooking• Food will not cook any
faster when a higher flame setting is
used than needed to maintain a gentle
boil. Water boils at the same tempera-
ture whether boiling gently or vigorously•
Use Lo to simmer foods, keep foods
warm and melt chocolate or butter.
Some cooking may take place on the
Lo setting if the pan is covered• It is
possible to reduce the heat by rotating
the knob to the OFF position• Be sure
flame is stable•
Operating During a
Power Failure
1. Hold a lighted match to the desired surface burner head•
2. Push in and turn the control knob slowly to the desired
setting.
Setting the Controls
Your cooktop has sealed gas burners with automatic
re-ignition. If the burner flame should go out, the system
will automatically spark to re-ignite the burner•
1. Place a pan on the burner grate• (To preserve the grate
finish, do not operate the burners without a pan on the
grate to absorb the heat from the burner flame•)
2. Push in knob and turn immediately counterclockwise to
the desired setting•
5

USINGYOUR COOKTOP
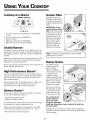
Cooktop at a Glance
MODEL JGD8430
I 234 5
1. Leftfront surface burner (5,000 BTUs on Hi, 900 BTUs
on Lo).
2. Left rear surface burner (10,500 BTUs).
3. Vent fan control
4. Right rear surface burner (9,200 BTUs).
5. Right front surface burner (15,000 BTUs).
Sealed Burners
The sealed burners are secured to the cooktop and are not
designed to be removed. Since the burners are sealed into
the cooktop, boilovers or spills will not seep underneath the
cooktop.
However, the burners should be cleaned after each use. The
head portion of the burner is easily removed for cleaning.
(See page 8 for cleaning directions.)
Burner caps must be correctly placed on the burner base for
proper operation of the burner.
High Performance Burner*
There is one high speed burner on your cooktop, located in
right front position. This burner offers higher speed cooking
that can be used to quickly bring water to a boil and for
large-quantity cooking.
Boil performance with the high speed burner is better with
the downdraft fan off. Once boiling begins, turn the
downdraft fan on to capture steam as necessary.
Simmer Burner*
This burner is located in the left front position. The simmer
burner offers a lower BTU flame for:
• Holding delicate sauces warm.
• Melting chocolate or butter.
The "Melt and Hold" performance of the simmer burner can
be enhanced by turning the downdraft fan on.
Always hold food at proper food temperatures. The USDA
recommends food temperatures between 140° - 170° F.
BTU ratings will vary when using LP gas.
Grease Filter
Install grease filter per
illustration. Unit must not
be operated without first
properly installing filter as
shown.
IMPORTANT: Do not
operate system without
filter. Filter should always
be placed at an angle. As
you face the front of the
cooktop, the top of the
filter should rest against
the left side of the vent
opening. The bottom
should rest against the
right side of the vent
chamber at the bottom.
Note: If the filter is flat against the fan wall, ventilation
effectiveness is reduced.
Burner Grates
The grates must be
properly positioned
before cooking.
Improper installation
of the grates may result
in chipping of the
cooktop. To ensure
proper positioning, insert
the center air grille first.
Make sure the bottom
legs fit into the Iocators
inside the filter cavity.
Next, put the right and
left side grates in place
so that the tab on the
grate fits over the tab
on the center air grille.
Do not operate the
burners without a
pan on the grate.
The grate's porcelain
finish may chip without a pan to absorb the heat from
the burner flame.
Although the burner grates are durable, they will gradually
lose their shine and/or discolor, due to the high temperatures
of the gas flame.
6

USINGYOUR COOKTOP
Notes
• A properly adjusted burner with clean ports will light
within a few seconds. If using natural gas, the flame will
be blue with a deeper blue inner cone.
If the burner flame is yellow or is noisy, the air/gas
mixture may be incorrect. Contact a service technician to
adjust. (:Adjustments are not covered by the warranty.)
With LP gas, some yellow tips on the flames are accept-
able. This is normal and adjustment is not necessary.
• With some types of gas, you may hear a "popping" sound
when the surface burner is turned off. This is a normal
operating sound of the burner.
• To improve cooking efficiency and to prevent possible
damage to the cooktop or pan, the flame must be ad-
justed so it does not extend beyond the edge of the pan.
Ventilation System
The built-in ventilation system
removes cooking vapors, odors and
smoke from foods prepared on your
cooktop.
• To operate the ventilation system,
turn the vent fan knob located at
the center-front of the air grille
clockwise to Low or High.
• The fan can be used to remove
strong odors from the kitchen as
when chopping onions near the fan.
I
• Never cover the downdraft opening when the fan is on.
Glass-Ceramic Surface
Notes
• Cooktop may emit light smoke and odor the first few
times the cooktop is used. This is normal.
• The glass-ceramic surface may appear discolored when
it is hot. This is normal and will disappear when the
surface cools.
• Glass-ceramic cooktops retain heat for a period of time
after the unit is turned off.
• Do not attempt to lift the cooktop.
Tips to Protect the Glass-Ceramic
Surface
• Before first use, clean the cooktop. (:SeeCleaning, page 80
• Do not allow plastic, sugar or foods with high sugar content
to melt onto the hot cooktop. Should this happen, clean
immediately. (:SeeCleaning, page 8.)
• Never use cooktop as a work surface or cutting board.
• Do not slide metal pans across a hot surface. The pans may
leave marks which can be difficult to remove or leave
permanent marks. Any marks should be removed promptly.
(:SeeCleaning, page 8.)
• To prevent scratching or damage to the glass-ceramic top,
do not leave sugar, salt or fats on the cooking area.Wipe
the cooktop surface with a clean cloth or paper towel
before using.
• Never use a soiled dish cloth or sponge to clean the
cooktop surface. A film will remain which may cause stains
on the cooking surface after the area is heated.
• Do not use foil or foil-type containers. Foil may melt onto
the glass. If metal melts on the cooktop, do not use. Call an
authorized Jenn-Air Servicer.
Do not allow spills to remain on the cooking area or the
cooktop trim for a long period of time.
Do not use abrasive cleansing powders or scouring pads
which will scratch the cooktop.
Do not use chlorine bleach, ammonia or other cleansers not
specifically recommended for use on glass-ceramic.
To retain the appearance of the glass-ceramic gas cooktop,
clean after each use.
7

CARE & CLEANING
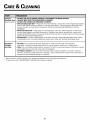
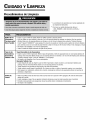
Cleaning Procedures
iiiiiiiiiii i i!i! ! ii ii ii ii ii ii ii ii ii ii ii ii ii ii ii ii ii ii ii ii ii ii ii ii ii ii ii ii ii ii ii ii ii ii ii ii ii ii ii ii ii ii ii i !i! ! i i
Burner Grates -
Porcelain on
Cast Iron
Burner Caps
and Sealed
Gas Burners
Cooktop -
Glass-Ceramic
Control Knobs
* Brand names for cleaning products are registered
trademarks of the respective manufacturers.
** To order direct, call 1-800-JENNAIR
([1-800-536-6247) USA and Canada.
• Allow grates to cool. Remove left and right side grates first.
• Wash grates with warm, soapy water and a nonabrasive, plastic scrubbing pad. For stubborn soils, clean
with a soap-filled, nonabrasive pad or Cooktop Cleaning Creme* (part #20000001)** and a sponge. If soil
remains, reapply Cooktop Cleaning Creme*, cover with a damp paper towel and soak for 30 minutes. Scrub
again, rinse and dry.
• Do not clean in dishwasher or self-cleaning oven.
• Replace grates by placing the air grille first.
Removable Burner Caps
• Allow burner to cool. Remove burner cap and wash in soapy water with a plastic scouring pad. For stub-
born soils, clean with a soap-filled, nonabrasive pad or Cooktop Cleaning Creme* ([Part#20000001)** and
a sponge.
• Do not clean in dishwasher or self-cleaning oven.
Sealed Gas Burner
, Clean after each use.Allow burner to cool. Clean with soap and plastic scouring pad. For stubborn soils,
clean with a soap-filled, nonabrasive pad.
• Be careful not to get water into the center of the burner.
• Use care when cleaning the ignitor. If the ignitor is wet or damaged the surface burner will not light.
• To ensure even cooking performance, keep burner ports free of food soils/debris.
Never use oven cleaners, chlorine bleach, ammonia or glass cleaners with ammonia. NOTE: Callan authorized
servicer ff the glass-ceramic top should crack, break or ff metal or aluminum foil should melt on the cooktop.
• Allow the cooktop to cool before cleaning.
• General - Clean cooktop after each use, with a damp paper towel and Cooktop Cleaning Creme* ([PartNo.
20000001)**. Then, buff with a clean dry cloth.
NOTE: Permanent stains will develop ff soil is allowed to cook on by repeatedly using the cooktop when
soiled.
• Heavy Soils or Metal Marks -- Dampen a "scratchless" or "never scratch" scrubber sponge. Apply
Cooktop Cleaning Creme* ([PartNo. 20000001)** and scrub to remove as much soil as possible. Apply a
thin layer of the creme over the soil, cover with a damp paper towel and let stand 30-45 minutes ([2-3
hours for very heavy soil). Keep moist by covering the paper towel with plastic wrap. Scrub again, then buff
with a clean dry cloth.
NOTE: Only use a CLEAN, DAMP "scratchless" pad that is safe for non-stick cookware. The
glass will be damaged if the pad is not damp, if the pad is soiled, or if another type of pad
is used. j/
i Burned-on or Crusty Soils -- Scrub with a "scratchless" or "never scratch" scouring pad and
Cooktop Cleaning Creme*. Hold a razor blade scraper at 30° angle and scrape any remaining ×<_' ,_
soil. Then, clean as described above. _f_<z z/_,
Melted Sugar or Plastic -- Immediately turn burner OFF and allow to cool. Clean_ _ _S_
residue with razor blade scraper and Cooktop Cleaning Creme*. " !
• Remove knobs inthe OFFposition by pulling up. Do not remove seal under knob.
• Wash, rinse and dry. Do not use abrasive cleaning agents as they may scratch the finish.
• Turn on each burner to be sure the knobs have been correctly replaced.
• Do not clean in the dishwasher.
cont.
8

CARE & CLEANING
Cooktop- • DO NOT USEANY CLEANING PRODUCT CONTAINING CHLORINE BLEACH.
Stainless Steel • ALWAYS WIPE WITH THE GRAIN WHEN CLEANING.
(select models) • DO NOT USE ORANGE OR ABRASIVE CLEANERS.
• Daily Cleaning/Light Soil -- Wipe with one of the following - soapy water, white vinegar/water solution,
Formula 409 Glass and Surface Cleaner* or a similar glass cleaner - using a sponge or soft cloth. Rinse
and dry. To polish and help prevent fingerprints, follow with Stainless Steel Magic Spray* (Part No.
20000008)**.
• Moderate/Heavy Soil -- Wipe with one of the following - Bon Ami*, Smart Cleanser*, or Soft Scrub* -
using a damp sponge or soft cloth. Rinse and dry. Stubborn soils may be removed with a damp multi-
purpose Scotch-Brite* pad; rub evenly with the grain. Rinse and dry. To restore luster and remove streaks,
follow with Stainless Steel Magic Spray*.
° Discoloration -- Using a damp sponge or soft cloth, wipe with Cameo Stainless Steel Cleaner*. Rinse
immediately and dry. To remove streaks and restore luster, follow with Stainless Steel Magic Spray*.
Ventilation
Chamber
and Filter
• Air 6rille: The air grille lifts off easily. Wipe clean or wash in the sink with mild household
detergents. To prevent scratching the surface, do not use abrasive cleaners or scrubbing pads.
° Filter: Turn off ventilation system before removing. The filter is a permanent type and should be cleaned
when soiled. Clean in sink with warm water and detergent.
• Ventilation Chamber: This area, which houses the filter, should be cleaned in the event of spills or
whenever it becomes coated with a film of grease. It can be cleaned with a paper towel, damp cloth, or
sponge and mild household detergent or cleanser.
* Brand names for cleaning products are registered trademarks of the respective manufacturers.
** To order direct, call 1-800-JENNAIR (1-800-536-6247) USA and Canada.
9

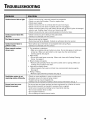
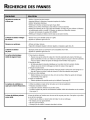
TROUBLESHOOTING
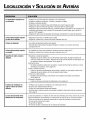
Surface burner fails to light.
• Check
• Check
• Check
• Check
• Check
to be sure plug is securely inserted into receptacle.
or re-set circuit breaker. Check or replace fuse.
power supply.
to be sure burner is correctly rated for your kind of gas.
to be sure burner ports or ignition ports are not clogged.
• Check to be sure ignitor is dry and clicking. Burner will not light if ignitor is damaged,
soiled or wet. If ignitor doesn't click, turn control knob OFF.
• Check to be sure burner cap is correctly seated on the burner base.
Surface burner flame lifts • Check to be sure a pan is sitting on the grate above.
off ports. • Contact an authorized Jenn-Air servicer.
The flame is uneven. • Burner ports may be clogged.
• Flame may need to be adjusted. Contact an authorized Jenn-Air servicer.
• Some yellow tips on the flame are acceptable when using LP gas.
• Contact an authorized Jenn-Air servicer.
Surface burner flame is
yellow in color.
Glass-ceramic surface
shows wear.
Ventilation system is not
capturing smoke efficiently.
Burner base has some
limited movement.
1. Tiny scratches or abrasions.
• Make sure cooktop and pan bottom are clean. Do not slide glass or metal pans
across top. Make sure pan bottom is not rough. Use the recommended
cleaning agents. See page 8.
2. Metal marks.
• Do not slide metal pans across top. When cool, clean with Cooktop Cleaning
Creme. See page 8.
3. Brown streaks and specks.
• Remove spills promptly. Never wipe with a soiled cloth or sponge. Make sure
cooktop and pan bottom are clean.
4. Areas with a metallic sheen.
• Mineral deposits from water and food. Use recommended cleaning agents.
See page 8.
5. Pitting or flaking.
• Remove sugary boilovers promptly. See page 8.
• Check on cross ventilation in room or make up air.
• Excessive amount of smoke is being created.
• Outside wall cap may be trapped shut.
• Cooktop may be improperly installed; check ducting information. See pg. 4.
The burner base and glass interface has been engineered for a lifetime of service.
Some limited movement is intended if excessive force is applied.
• Limit burner movement by holding burner head while cleaning.
• Do not use excessive force to clean.
• Do not tighten fasteners.
• Do not attempt to reorient burner heads.
10

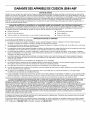
JENN-AIR COOKING APPLIANCEWARRANTY
LIM ITED WARRANTY
For one year from the date of purchase, when this major appliance is operated and maintained according to instructions attached to or
furnished with the product, Jenn-Air brand of Whirlpool Corporation or Whirlpool Canada LP (hereafter "Jenn-Air") will pay for factory
specified parts and repair labor to correct defects in materials or workmanship. Service must be provided by a Jenn-Air designated
service company. This limited warranty is valid only in the United States or Canada and applies only when the major appliance is used
in the country in which it was purchased. Outside the 50 United States and Canada, this limited warranty does not apply. Proof of
original purchase date is required to obtain service under this limited warranty.
SECOND THROUGH FIFTH YEAR LIMITED WARRANTY ON CERTAIN COMPONENT PARTS
In the second through fifth years from the date of purchase, when this appliance is operated and maintained according to instructions
attached to or furnished with the product, Jenn-Air will pay for factory specified parts for the following components (if applicable to the
product) if defective in materials or workmanship:
• Electric element • Electronic controls
• Touch Pad and microprocessor
• Glass ceramic cooktop: if due to thermal breakage
• Magnetron tube
• Sealed gas burners
ITEMS EXCLUDED FROM WARRANTY
This limited warranty does not cover:
1. Service calls to correct the installation of your major appliance, to instruct you on how to use your major appliance, to replace or
repair house fuses, or to correct house wiring or plumbing.
2. Service calls to repair or replace appliance light bulbs, air filters or water filters. Consumable parts are excluded from warranty
coverage.
3. Repairs when your major appliance is used for other than normal, single-family household use or when it is used in a manner that is
contrary to published user or operator instructions and/or installation instructions.
4. Damage resulting from accident, alteration, misuse, abuse, fire, flood, acts of God, improper installation, installation not in
accordance with electrical or plumbing codes, or use of consumables or cleaning products not approved by Jenn-Air.
5. Cosmetic damage, including scratches, dents, chips or other damage to the finish of your major appliance, unless such damage
results from defects in materials or workmanship and is reported to Jenn-Air within 30 days from the date of purchase.
6. Any food loss due to refrigerator or freezer product failures.
7. Costs associated with the removal from your home of your major appliance for repairs. This major appliance is designed to be
repaired in the home and only in-home service is covered by this warranty.
8. Repairs to parts or systems resulting from unauthorized modifications made to the appliance.
9. Expenses for travel and transportation for product service if your major appliance is located in a remote area where service by an
authorized Jenn-Air servicer is not available.
10. The removal and reinstallation of your major appliance if it is installed in an inaccessible location or is not installed in accordance
with published installation instructions.
11. Major appliances with original model/serial numbers that have been removed, altered or cannot be easily determined. This warranty
is void if the factory applied serial number has been altered or removed from your major appliance.
The cost of repair or replacement under these excluded circumstances shall be borne by the customer.
DISCLAIMER OF IMPLIED WARRANTIES; LIMITATION OF REMEDIES
CUSTOMER'S SOLE AND EXCLUSIVE REMEDY UNDER THIS LIMITED WARRANTY SHALL BE PRODUCT REPAIR AS PROVIDED
HEREIN. IMPLIED WARRANTIES, INCLUDING WARRANTIES OF MERCHANTABILITY OR FITNESS FOR A PARTICULAR PURPOSE,
ARE LIMITED TO ONE YEAR OR THE SHORTEST PERIOD ALLOWED BY LAW. JENN-AIR SHALL NOT BE LIABLE FOR INCIDENTAL
OR CONSEQUENTIAL DAMAGES. SOME STATES AND PROVINCES DO NOT ALLOW THE EXCLUSION OR LIMITATION OF
INCIDENTAL OR CONSEQUENTIAL DAMAGES, OR LIMITATIONS ON THE DURATION OF IMPLIED WARRANTIES OF
MERCHANTABILITY OR FITNESS, SO THESE EXCLUSIONS OR LIMITATIONS MAY NOT APPLY TO YOU. THIS WARRANTY GIVES
YOU SPECIFIC LEGAL RIGHTS, AND YOU MAY ALSO HAVE OTHER RIGHTS WHICH VARY FROM STATE TO STATE OR PROVINCE
TO PROVINCE.
If outside the 50 United States and Canada, contact your authorized Jenn-Air dealer to determine if another warranty applies.
If you need service, first see the "Troubleshooting" section of the Use & Care Guide. After checking "Troubleshooting," you may find
additional help by checking the "Assistance or Service" section or by calling Jenn-Air. In the U.S.A., call 1-800-688-1100. In Canada,
call 1-800-807-6777. 9/07

TABLE DE CUISSON A GAZ SUR VERRE
A I_VACUATION DESCENDANTE JENN-AIR
TABLE DES MATIE_RES
Instructions de s_curit_ importantes ..................13-16
Informations sur les conduits .......................................16
Utilisation de la table de cuisson .........................17-20
Entretien et nettoyage ..............................................21-22
Recherche des pannes ...................................................23
Garantie et service ...........................................................25
Guia de Uso y Cuidado ...................................................26
JENN-AIR

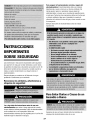
Lisez toutes los instructions avant d'utiliser cot appareil;
observeztoutes les instructions pour 61iminerles risques
d'incendie, choc 61ectrique,dommages mat6riels et corporels
que pourrait susciter une utilisation incorrecte de rappareil.
Utilisez rappareil uniquement pour les fonctions pr6vues,
d6crites dans ce guide.
Pour assurer une utilisation appropri_e et s6curitaire :
Seul un technicien qualifi6 devrait installer I'appareil et le
mettre _ la terre. Ne r6glez pas, r6parez ni remplacez un
composant, _ moins que cela ne soit sp6cifiquement
recommand6 dans ce guide. Toute autre r6paration doit 6tre
effectu6e par un technicien qualifi6. Demandez _ rinstallateur
de montrer o_ se trouve le robinet d'arr6t de gaz et comment le
fermer en cas d'urgence.
D6branchez toujours rappareil avant de faire rentretien.
INSTRUCTIONS DE
SI CURITI
IM PORTANTES
Les instructions de s6curit6 importantes et les paragraphes
<{avertissement _>de ce guide ne sont pas destin6s _ couvrir
toutes les conditions et situations qui pourraient se pr6senter.
II faut faire preuve de bon sens, de prudence et de soin Iors
de I'installation, de I'entretien ou du fonctionnement de
I'appareil.
Prenez toujours contact avec le fabricant en cas de problemes
ou de conditions qui ne seraient pas comprises.
Reconnaissez los etiquettes, phrases ou
symboles sur la securite
13

INSTRUCTIONS DE SI CURITI IMPORTANTES
Pour 6viter un incendie ou des
dommages de fum6e
• NE saisissez ou d@lacez JAMAIS un ustensile de cuisine
enflamm&
Ne projetez pas de I'eau sur un feu de graisse. Utilisez du
bicarbonate de sodium ou un extincteur fl mousse ou produit
chimique sec pour eteindre les flammes.
S6curit6 pour les enfants
Assurez-vous que tous les materiaux de conditionnement
sont retires de I'appareil avant de le mettre en marche.
Gardez les materiaux combustibles, I'essence et autres
matieres et vapeurs inflammables bien eloignes de I'appareil.
Si I'appareil est installe pres d'une fenetre, des precautions
appropriees doivent 8tre prises pour eviter que le vent
entrafne les rideaux au-dessus des brQleurs.
De nombreux flacons d'aerosol peuvent EXPLOSERIorsqu'on
les expose fl la chaleur, et ils peuvent contenir un produit tres
inflammable, levitezd'utiliser ou de remiser un flacon
d'aerosol fl proximite de I'appareil.
De nombreux articles en plastique peuvent etre deteriores par
la chaleur. Gardez les plastiques eloignes des pieces de
I'appareil pouvant devenir chaudes. Ne laissez pas des
articles en plastique sur la table de cuisson; un article en
plastique trop proche de I'event du four ou d'un brQleur
allume pourrait s'amollir ou fondre.
Pour eliminer le besoin d'atteindre quelque chose par-dessus
les brQleurs de surface, il est preferable qu'il n'y ait aucune
armoire de cuisine directement au-dessus de I'appareil. S'il y
a une armoire, vous ne devriez y remiser que des articles peu
frequemment utilises et capables de resister fl la chaleur
Cruisepar I'appareil. La temperature pourrait etre excessive
pour certains articles, comme les liquides volatils, les produits
de nettoyage ou les flacons d'aerosol.
Une faible odeur de gaz peut indiquer une fuite de gaz. Si
vous decellez une odeur de gaz, coupez I'alimentation en gaz
de votre table de cuisson. Appelez votre installateur ou la
compagnie de gaz locale pour verifier la fuite eventuelle.
N'utilisez jamais une allumette ou une autre flamme
pour rep6rer une fuite de gaz 6ventuelle.
En cas d'incendie
Interrompez I'alimentation electrique de I'appareil et de la
hotte de ventilation pour minimiser la propagation des
flammes. I_teignezles flammes, puis mettez la hotte en
marche pour evacuer la fumee et I'air vici&
• Utilisez un couvercle ou une plaque fl biscuits pour etouffer
les flammes d'un feu qui se declare dans un ustensile de
cuisson.
14
NE laissez JAMAIS des enfants seuls ou sans supervision
Iorsque I'appareil est en service ou encore chaud.
NE laissezJAMAIS un enfant s'asseoir ou se tenir sur une
partie quelconque de I'appareil. II pourrait se blesser ou se
brOler.
II est important d'enseigner aux enfants que I'appareil et les
ustensiles places dessus peuvent etre chauds. Laissez
refroidir les ustensiles en un lieu sQr,hors d'atteinte des
enfants. I_esenfants doivent comprendre que I'appareil n'est
pas un jouet et qu'ils ne doivent toucher aucune commande
ou autre composant de I'appareil.
Familiarisation avec I'appareil
Be pas remiser des aliments ou ustensiles de cuisine sur la
surface de cuisson.
Surfaces potentiellement chaudes: surface de cuisson, zones
faisant face fl la surface de cuisson.

INSTRUCTIONS DE SI CURITI IMPORTANTES
Cuisson et s6curit6
Placez toujours un ustensile sur un brOleur de surface avant de
rallumer. Veillez fl bien connakre la correspondance entre les
boutons de commande et les brOleurs. Veillez fl allumer le bon
brOleur et verifiez que le brOleur s'allume effectivement. A la fin
de la periode de cuisson, eteignez le brOleur avant de retirer
I'ustensile, pour eviter une exposition aux flammes du brOleur.
Veillez fl toujours ajuster correctement la taille des flammes
pour qu'elles ne depassent pas sur les cotes de rustensile. Des
flammes de trop grande taille sur un brOleur sont dangereuses,
elles entrafnent un gaspillage d'energie et elles peuvent faire
subir des dommages fl rustensile, fl I'appareil ou au placard
situe au-dessus.
NE laissez JAMAIS un brOleur de surface allume sans surveil-
lance, particulierement avec une puissance de chauffage
elevee ou Iors d'une operation de friture. Un debordement
pourrait provoquer la formation de fumee et des produits gras
pourraient s'enflammer. I_liminezdes que possible les produits
gras renverses. N'utilisez pas une puissance de chauffage
elevee pendant une periode prolongee.
NE chauffez JAM/IllS un contenant non ouvert sur un brQleur
de surface. I_'accumulation de pression dans le recipient
pourrait provoquer son eclatement et de graves dommages
materiels ou corporels.
Utilisez des maniques robusteset seches.Des maniques humides
peuvent provoquer la formation de vapeur brQlante.N'utilisez
jamais un torchon flvaisselleou autre article textile fl la placede
maniques; un tel article pourrait trainer sur un brQleuret
s'enflammer ou accrocher un composant de rappareil.
Laisseztoujours refroidir un recipient d'huile de friture chaude
avant de tenter de le deplacer et le manipuler.
Ne laissez pas la graisse de cuisson ou autre materiau inflam-
mable s'accumuler dans ou pres de rappareil, de la hotte ou
du ventilateur. Nettoyez frequemment la hotte pour empecher
toute accumulation sur la hotte elle-meme ou sur le filtre, l-ors
du flambage d'aliments sous la hotte, mettez le ventilateur en
marche.
NE portez JAMAIS, Iors de I'utilisation de rappareil, des
vetements faits d'un materiau inflammable, amples ou fl
manches Iongues. De tels vetements peuvent s'enflammer ou
accrocher la poignee d'un ustensile.
NE bloquezJAMAIS I'evacuationd'air avec un ustensile, une
manique ou tout autre objet Iorsque leventilateur est en marche.
Cela reduirait grandement I'efficacite de latable de cuisson.
15
Surface de cuisson en
vitroc6ramique
N'utilisezJAMAIS une table de cuisson cassee.Lessolutions de
nettoyageet debordements pourraient penetrer dansla surfacede
cuissonet donc entrainer un risque de choc electrique.Prenez
immediatementcontact avecun technicien qualifie.
Nettoyez prudemment la table de cuisson. Certains produits de
nettoyage peuvent generer des vapeurs nocives Iorsqu'on les
applique sur une surface chaude. Si vous utilisez un linge, une
eponge humide ou du papier essuie-tout sur une surface de
cuisson chaude, faites preuve de prudence afin d'eviter de vous
brQler par la vapeur.
Ne vous mettez jamais debout sur la surface de cuisson.
Ustensiles et s6curit6
Utilisez des ustensiles fl fond plat comportant une poignee que
vous pouvez facilement saisir et qui reste froide. I_vitezd'utiliser
un ustensile instable ou dUorme, qui pourrait facilement
basculer, ou dont la poignee est real fixee. I_vitezegalement
d'utiliser des ustensiles de petite taille comportant une ou des
poignees Iourdes; ces ustensiles sont generalement instables et
peuvent facilement basculer. Un ustensile Iourd Iorsqu'il est
rempli peut egalement etre dangereux Iors des manipulations.
Veillez fl utiliser un ustensiledetaille suffisante pour que le
contenu ne risque pas de deborder.Ceci est particulierement
important pour un ustensile rempli d'huile de friture. Verifiez que la
taille de rustensile est suffisante pour qu'il puisserecevoirles
produits alimentaires fl cuire, et absorber raugmentation de
volume suscitee par %bullition de la graisse.
Pour minimiser les risques de brQlure, d'inflammation de
matieres et de renversement par contact non intentionnel avec
un ustensile, n'orientez pas la poignee d'un ustensile vers un
brQleur adjacent. Orientez toujours la poignee d'un ustensile
vers le cote ou I'arriere de I'appareil; ne laissez pas non plus la
poignee d'un ustensile depasser fl I'avant de I'appareil, o_ un
jeune enfant pourrait facilement la saisir.
Veillez fl ne jamais laisser le contenu liquide d'un ustensile
s'evaporer completement; rustensile et I'appareil pourraient
subir des dommages.
Seuls certains types de verre, vitroceramique, ceramique, ou
certains ustensiles vitrifies/emailles peuvent etre utilises sur la
table de cuisson sans risque de bris sous I'effet du choc
thermique. Observez les instructions du fabricant Iors de
I'utilisation d'un ustensile en verre.
La securite de fonctionnement de cet appareil a ete testee fl
I'aide d'ustensiles de cuisine conventionnels. N'utilisez pas un
ustensile ou accessoire qui n'est pas specifiquement
recommande dans ce guide. Ne mettez pas de couvercles sur

INSTRUCTIONS DE SI CURITI IMPORTANTES
les elements de surface ni de gril. L'utilisation d'un dispositif
ou accessoire qui n'est pas expressement recommande dans
ce guide peut entrafner de graves dangers, degrader la
performance de I'appareil, ou reduire la Iongevite de ses
composants.
Nettoyage et securit6
Arretez toutes les commandes et attendez le refroidissement
de tousles composants avant de lestoucher ou d'entreprendre
le nettoyage. Ne touchez pas la grille d'un brOleur ou la zone
voisine avant que ces composants aient pu refroidir
suffisamment.
Exercez une grande prudence Iors du nettoyage de I'appareil.
Travaillez prudemment pour eviter des brQlures par la vapeur
en cas d'utilisation d'un chiffon ou d'une @onge humide Iors
de I'elimination d'un produit renverse sur une surface chaude.
Certains produits de nettoyage peuvent generer des vapeurs
nocives Iorsqu'on les applique sur une surface chaude.
Avertissement et avis important
pour la s( curit6
En vertu de la California Safe Drinking Water and Toxic
Enforcement Act de 1986 (Proposition 65), le gouverneur de la
Californie doit publier une liste des substances qui, selon I'etat
de la Californie, causent le cancer ou presentent un risque
pour la reproduction. En outre, les entreprises doivent avertir
leurs clients de I'exposition potentielle _ de telles substances.
Les utilisateurs de cet appareil peuvent etre exposes _ une
faible concentration de certaines substances figurant dans la
liste mentionnee ci-dessus, dont benzene, formaldehyde et
suie, du fait de la combustion incomplete du gaz naturel ou du
gaz de petrole liquefi& Pour minimiser la combustion
incomplete, veillez _ ce que les brQleurs soient parfaitement
regles. Pour minimiser I'exposition _ ces substances, veillez
bien evacuer les gaz de combustion _ I'exterieur.
AVIS IMPORTANT - OISEAUX FAMILIERS : Ne gardez pas
un oiseau familier dans la cuisine ou dans une piece o_ il
pourrait etre expose aux fumees. Les oiseaux ont un systeme
respiratoire tres sensible. Lesvapeurs qui s'echappent d'un
four pendant le cycle autonettoyant peuvent leur etre nocives
ou meme fatales. De plus, les vapeurs qui s'echappent
Iorsque I'huile de cuisson, les corps gras, la margarine et les
poeles ou marmites _ revetement antiadhesif sont surchauffes
peuvent egalement etre nocives.
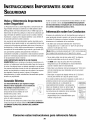
Raccordement 61ectrique
Les apparoils necessitant une alimenta-
tion electrique comportent une
fiche _ trois broches mise _ la terro
qui doit etre branchee directement
dans une prise de 120 volts ) trois
cavites et correctement raise _ laterre.
D4branchez toujours I'appareil avant de faire I'entretien.
Lafiche _ trois broches raise _ la terre fournit une protection
contre les decharges electriques. NE COUPEZ PAS NI
ENLEVEZ LA BROCHE DE TERRE DU CORDON
D'ALIMENTATION.
Si la prise ne comporte que deux cavites, n'est pas raise _ la
terre ou n'est pas appropriee, le propri_taire de I'apparoil a
la responsabilit_ de fairo remplacer la prise par une prise
trois cavites corroctement mise _ la terro.
Informationssur lesconduits
Le systeme de ventilation de Jenn-Air est cowu pour capter les
vapeurs et fumees de cuisson emanant de la surface de cuisson.
Voici cependant quelques precisions sur I'installation _ verifier :
• Conduit rond de 6 pc (15,24cm) de diametre ou rectangulaire
de 3 1/4po(8,26cm) x 10 pc (25,4cm) _ utiliser pour des
Iongueurs de conduit de 10 pi _ 60 pi (3 _ 18m).
Remarque : Utilisez un conduit rond de 5 pc (12,7 cm) de
diametre si ce conduit a moins de 10 pi (3 m) de Iongueur.
N'utilisez pas plus de trois coudes de 90°. La distance entre
ces coudes doit etre au moins de 18 pc (45 cm).
La bouche d'aeration Jenn-Air recommandee DOITetre
utilisee. Assurez-vous que le clapet fonctionne bien Iorsque la
ventilation est en marche.
• IIdoity avoir un degagement minimal de 6 pc (15,24cm)
Iorsque latable de cuisson estinstallee presd'un tour lateral.
• II doit y avoir un degagement minimal de 12 pc (30,5cm)
entre le bas de la bouche d'aeration et le sol.
S'il n'y a aucune evidence d'une installation impropre, il peut
cependant y avoir un probleme dissimule
comme un joint coince, une obstruction dans le
conduit, etc. L'installation est _ la charge de
I'installateur et toute question doit etre d'abord
traitee par I'installateur. L'installateur doit
verifier tres soigneusement les instructions
d'installation des conduits.
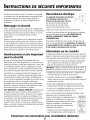
• Utilisez lacarte d'essai d'ecoulement fournie
avec votre appareil pour verifier le debit d'air.
FLOW TESTER
÷
Conservez ces instructions pour consultation ult( rieure
16

UTILISATION DE LA TABLE DE CUISSON
Commandes de la surface
de cuisson
Boutons de commande de
la surface de cuisson
Utilisez cesboutons pour commanderI'allumage
des brOleursde surface.Vouspouvezregler
chaque bouton_ toute positionentre lespositions
extremes Lo (Min.) etHi [Max.). Vouspouvez °
percevoirunedetente de calageb la 3ositionHI (Max.). [
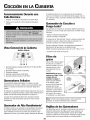
Allumage sans
flamme de veille
Ledispositifd'allumagenefait intervenir
aucuneflammedeveille.ChaquebrOleur
de latabledecuissoncomporteun
allumeurpar6tincelle.Travaillez
prudemmentlotsdu nettoyage
autourdesbrOleursdelatablede
cuisson.
CHAPEAU DE BRI)LEUR
BASE DE BRULEUR
Si un brOleur de la table de cuisson ne s'allume pas, d6terminez
si I'allumeur est bris& souill6oumouill&
Reallumage par detection de
flamme Flame-Sensing Mc
Votretable de cuissoncomportedesbrOleurs_ gazscenes
reallumageautomatique.Si la flammed'un brOleurs'eteint,le
systemeproduitautomatiquementdes6tincellespourreallumerle
brOleur(tous lesallumeursproduisentdes6tincellesquel que soit le
brOleurdont laflammes'est6teinte).Cependant,seulle brOleur
choisi sereallume.Si des6tincellesse produisentparintermittence,
augmentezlaflamme(tournezle boutonvers la droite)jusqu'_ce
que le cliquetis(etincelle)cesse.
R6glagedes commandes
Votretable de cuissoncomportedesbrOleurs_ gazscenes
preallumageautomatique.Si la flammedu brOleurdevaits'eteindre,
le systemeproduirait automatiquementdes6tincelles,pour
reallumerle brOleur.
1. Placezun ustensilesur la grille du brOleur.(Pour preserverle
fini desgrilles, nefaites pasfonctionner lesbrOleurssans
ustensiledessuspour absorberla chaleurdesflammes.)
2. Appuyezsur le boutonet tournez-leimmediatementdansle
sensanti-horaire,jusqu'_ la position desiree.
• Vouspouvezpercevoirlecliquetiscorrespondant_la
productiondes6tincelleset lebrOleurs'allume.(Tousles
allumeursproduisentdes6tincellesquelquesoit lebouton
de brOleurallum6.Cependant,seulle brOleurchoisis'allumera.)
Suggestions pour le r_glage
Lapuissancede chauffage_ employerdepend du type et de la
taille de I'ustensileutilis&
i l_i_N
• Utilisezle reglageHi (Max.) pour porterun
liquide _ ebullition ou atteindre la bonne
• ) • pressiondansun autocuiseur.Reduisez
', ensuite la puissancede chauffageapresle
...... debut de 1'ebullitionou de la cuissondes
° aliments.
i Unepuissancede chauffage intermediaire
est utilisee pour la poursuite de la cuisson.
Lesalimentsne cuisentpasplus rapidement
sivous utilisezune puissancede chauffage
plus 61eveeque necessairepour le maintien
d'une douceebullition.L'eaubout toujours
la memetemperature,que 1'ebullitionsoit
tranquille ou vigoureuse.
• Utilisezle reglageLoI:Min.) pour le
mijotageou le maintien de la temperature
d'un mets,ou pour la fusion de chocolatou
beurre.
• Lorsquele plat ou I'ustensileestcouvert,un
[ debut de cuissonpeutse produireavec la
puissancede chauffageI.o (MinD. Pour
reduire la puissancede chauffage,tournez le
bouton_ la position OFF.Verifiez lastabilit6
-- desflammessur le brOleur.
17

UTILISATION DE I_ATABLE DE CUISSON
Utilisation durant une panne
d'_lectricit6
1. Approchezune allumetteenflammeedu br_leur _ utiliser.
2. Enfoncezetfaitestourner lentementle boutonde commande
jusqu'9 la positionvoulue.
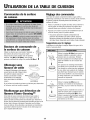
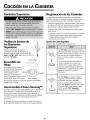
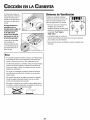
Coup d'oeilsur la table de
cuisson
MODi:LEJGD8430
_--_ _iii ,_ii,;¸_:._ _
i
1234 5
1. Br01euravantgauche(5000BTUsur reglagemax.,900BTUsur
reglage min.).
2. Br01eurarrieregauche(10 500BTU).
3. Commandede ventilateur
4. Br_leur arrieredroit (9 200 BTU).
5. Br_leur avantdroit (15 000BTU).
BrSleurs scell_s
Lesbr_leursscellessont fixes_ latable de cuisson;ils ne sont pas
conguspour etre enleves. Commelesbr_leurssont scellesdansla
table de cuisson,un produit qui deborde d'un ustensilene
s'infiltrera passous la table de cuisson.
Vousdevriezcependantnettoyerlesbr_leursapreschaque
utilisation. Lat_te du br01eurs'enl_vefacilementpour etre
nettoyee.(Voyezlesinstructionsde nettoyage_ la page21.)
Leschapeauxdesbr_leursdoiventetre correctementplacessur la
basede br_leur pour lebon fonctionnementdu br_leur.
BrSleur de haute puissance*
Votre table de cuisson est dotee d'un br01eur_ haute vitesse,
situe 9 I'avant droit. Ce brQleur permet une cuisson 9vitesse
plus rapide, utile pour faire bouillir rapidement de I'eauoucuire
une grandequantited'aliments.
L'ebullitionaveclebr_leurde hauteperformanceest meilleuresi le
ventilateur_ evacuationdescendanteestarrete. Unelois que
I'ebullitioncommence,remettezleventilateuren marchepourcapter
lavapeur,au besoin.
BrSleur de mijotage*
Cebr01eurestsitue_I'avantgauche.Sapuissanceplusfaibleen
BTUpermetde :
• Maintenirauchaudlessaucesdelicates.
• Fairefondredu beurreou du chocolat.
Laperformance<<fusionet maintien>>de cebr_leur peutetre
amelioreeen mettant leventilateuren marche.
Toujoursmaintenirlesalimentsauxtemperaturesappropriees.
L'USDArecommandequelestemperaturessoientsitueesentre60et
77°C(140et 170°F).
La puissance thermique (BTU) des brSleurs est diff#rente /ors
de I'alimentation au gaz de p#trole liqu#fi#.
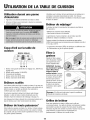
Filtre
graisse
Installezle filtre _ graisse
selonI'illustration.N'utilisez
pasI'appareilsansavoir
d'abordinstallelefiltre.
IMPORTANT: Ne faites
pasfonctionner le syst_me
sanslefiltre. Placez
toujoursle flltre en
positioninclin_e.Lorsque
vous etesenface de latable
de cuisson,le hautdu filtre
doitsetrouvercontre la
gauchede I'event.Lebasdu
filtre doit setrouver contre
la droitede la chambre
d'extraction,danslapartie
inferieure.
Remarque: Si lefiltre estbplat contrela paroi duventilateur,
I'efficacitederextractionestreduite.
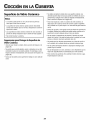
Grilles de brSleur
Avant une operationde cuisson,verifiezque la grille est
correctementplacee. Unegrille de br01eurincorrectementinstallee
peut ecaillerla surfacede cuisson.Pourbien placerlesgrilles,
introduisezla grille d'air centraleen premier.Assurez-vousque les
pieds inferieursse Iogent danslesemplacementsde
positionnementb I'interieur dela cavitedu filtre.
18

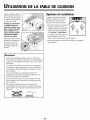
UTILISATION DE LA TABLE DE CUISSON
Ensuite,installezlesgrilles
droiteet gauchede sorte que
le tenonde la grille se place
au-dessusde la languette de
la grille d'air centrale.
Ne fares pasfonctionner
un braleur sansqu'un
ustensilesoit plac6 sur la
grille. L'6mail de la grille
peut s'6cailler s'il n'y a
aucunustensile capable
d'absorber la chaleur
6mise par le braleur.
Memesi lesgrillessont tres
durables,ellesfinissent par
perdre leur eclat ou se
decolorent_ causede la
temperature_lev_edes
flammes.
Systeme de ventilation
Le systemedeventilationincorpor_
enlevelesvapeurs,lesodeurset la
fumeeemanantde la nourriture
pr@areesur lasurfacedecuisson.
• Pourfairefonctionnerlesystemede
ventilation,tournezle boutondu
ventilateursitue aucentreavantde
la grille d'air, dansle senshoraire
versLow (bas) ou High (61ev6).
• Leventilateurpeutetreutilis_pour
extrairelesodeursfortesde la
cuisine commeIorsquevouscoupez lesoignons.
Ne bloquez jamais I'evacuation d'air Iorsque le ventlateur
est en marche.
Remarques
• Un br01eurconvenablementr_gle et dont lesorificessont
propress'allume enquelquessecondes.Lotsde I'alimentation
au gaznaturel,lesflammessont bleues,avecun c6ne interne
bleu intense.
Si lesflammesd'un br01eursontjaunes ou si la combustion
est bruyante,le ratio air/gaz peutetre incorrect. Demandez
un techniciend'effectuer le reglage.(La garantiene couvre
pasce r_glage.)
Lots de I'alimentationau gazde petroleliquefie, il est
acceptableque I'extremitedesflammessoitjaune. Ceciest
normal;aucun reglagen'est necessaire.
• Aveccertainstypesde gaz,vous pouvezpercevoirun petit
bruit d'explosionlotsde I'extinctiond'un br01eurdesurface.
Ceciest normal.
• PourameliorerI'efficacitede la cuissonet pour eviter
d'endommagerlatable decuissonou I'ustensile,vousdevez
regler la flammede sortequ'elle ned@assepasdu bordde
I'ustensile.
19
La page est en cours de chargement...
La page est en cours de chargement...
La page est en cours de chargement...
La page est en cours de chargement...
La page est en cours de chargement...
La page est en cours de chargement...
La page est en cours de chargement...
La page est en cours de chargement...
La page est en cours de chargement...
La page est en cours de chargement...
La page est en cours de chargement...
La page est en cours de chargement...
La page est en cours de chargement...
La page est en cours de chargement...
La page est en cours de chargement...
La page est en cours de chargement...
La page est en cours de chargement...
La page est en cours de chargement...
La page est en cours de chargement...
La page est en cours de chargement...
-
 1
1
-
 2
2
-
 3
3
-
 4
4
-
 5
5
-
 6
6
-
 7
7
-
 8
8
-
 9
9
-
 10
10
-
 11
11
-
 12
12
-
 13
13
-
 14
14
-
 15
15
-
 16
16
-
 17
17
-
 18
18
-
 19
19
-
 20
20
-
 21
21
-
 22
22
-
 23
23
-
 24
24
-
 25
25
-
 26
26
-
 27
27
-
 28
28
-
 29
29
-
 30
30
-
 31
31
-
 32
32
-
 33
33
-
 34
34
-
 35
35
-
 36
36
-
 37
37
-
 38
38
-
 39
39
-
 40
40


Jenn-Air JGD8430ADN15 Le manuel du propriétaire
- Taper
- Le manuel du propriétaire
- Ce manuel convient également à
dans d''autres langues
Documents connexes
-
Jenn-Air JGC9536BDS15 Le manuel du propriétaire
-
Jenn-Air JGA8150ADB12 Manuel utilisateur
-
-
-
Jenn-Air JGD3536WS Manuel utilisateur
-
-
-
-
-