
RACK-MOUNT ACCESSORY
RKH
1
Owner's Manual
Bedienungsanleitung
Mode d’emploi
Manual de instrucciones
Manuale di istruzioni
ZH98670
EN DE FR ES
IT RU ZH JA
English
Caution
• Do not use the brackets for devices other than the
MA2030 and PA2030.
• Carefully read the “Precautions for Rack Mounting”
section in the “MA2030/PA2030 Owner’s Manual”.
• When installing, use the included screws.
• Tighten the screws until the brackets are securely
fixed.
Supplied items (please check)
Screws A x 6
A
Screws B x 4
B
Long bracket
C
Short brackets x 2
D
Joint bracket
E
* Screws for rack mounting are not included.
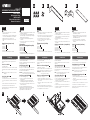
Installing
After installing brackets, mount to EIA standard rack.
Install the brackets while removing cables from the
device.
Case of one device
F
As the figure shown:
Install a short bracket on one side of the device and the
long bracket on the other side of the device with screws
A.
Note
The brackets can be installed in reverse at left
and right.
Case of two devices
G
As the figure shown:
1. Line up the two devices to be installed upside down.
2. Use the joint bracket to join the devices with screws
B.
3. Install short brackets on both sides with screws A.
The illustrations as shown in this manual are for
instructional purposes only, and may appear somewhat
different from your items.
F G
A
D
A
C
A
D
E
B
B
A
D
Deutsch
Vorsicht
• Benutzen Sie die Halterungen nicht für andere Geräte
als MA2030 und PA2030.
• Lesen Sie den Abschnitt „Vorsichtsmaßnahmen für
die Rack-Montage“ in der „Bedienungsanleitung des
MA2030/PA2030“ aufmerksam.
• Verwenden Sie zur Installation die mitgelieferten
Schrauben.
• Ziehen Sie die Schrauben fest, bis die Halterungen
sicher befestigt sind.
Lieferumfang
(bitte auf Vollständigkeit überprüfen)
Schrauben A x 6
A
Schrauben B x 4
B
Lange Halterung
C
Kurze Halterung x 2
D
Verbindungshalterung
E
* Schrauben zur Rack-Montage sind nicht mitgeliefert.
Français
Attention
• N’utilisez pas les supports avec des appareils autres
que le MA2030 et le PA2030.
• Lisez attentivement les « Précautions pour le montage en
rack » dans le « Mode d’emploi du MA2030/PA2030 ».
• Lors de l’installation, utilisez les vis fournies.
• Serrez les vis jusqu’à ce que les supports soient
solidement fixés en place.
Éléments fournis (à vérifier)
Vis A x 6
A
Vis B x 4
B
Support long
C
Supports courts x 2
D
Support de raccord
E
* Les vis pour le montage en rack ne sont pas incluses.
Español
Atención
• No utilice las abrazaderas para dispositivos distintos
al MA2030 y PA2030.
• Lea detenidamente la sección “Precauciones para el
montaje en bastidor” en el “Manual de instrucciones
del MA2030/PA2030”.
• Durante la instalación, utilice los tornillos que se
incluyen.
• Apriete los tornillos hasta que las abrazaderas estén
bien fijadas.
Artículos suministrados (compruébelos)
Tornillos A x 6
A
Tornillos B x 4
B
Abrazadera larga
C
Abrazaderas cortas x 2
D
Abrazadera conjunta
E
* No se incluyen los tornillos para el montaje en bastidor.
A B C D E
Italiano
Attenzione
• Non utilizzare le staffe per dispositivi diversi dai
modelli MA2030 e PA2030.
• Leggere attentamente la sezione “Precauzioni per
il montaggio in rack” nel “Manuale di istruzioni dei
modelli MA2030/PA2030”.
• Per l’installazione utilizzare le viti in dotazione.
• Serrare le viti finche le mensole risultano fissate
saldamente.
Articoli in dotazioni (verificare)
Viti A x 6
A
Viti B x 4
B
Staffa lunga
C
Staffe corte x 2
D
Staffa di raccordo
E
* Le viti per il montaggio in rack non sono incluse.
Einbau
Nach Anbringen der Halterungen erfolgt der Einbau in
ein Rack nach EIA-Standard.
Bringen Sie die Halterungen an, während die Kabel vom
Gerät abgenommen sind.
Im Falles eines Geräts
F
Wie in der Abbildung gezeigt:
Befestigen Sie eine kurze Halterung an einer Seite des
Geräts und die lange Halterung an der anderen Seite
des Geräts mit den Schrauben A.
Hinweis
Die Halterungen können beliebig auf der
linken oder rechten Seite angebracht werden.
Im Falles von zwei Geräten
G
Wie in der Abbildung gezeigt:
1. Richten Sie die beiden einzubauenden Gerät
umgedreht aus.
2. Verbinden Sie die Geräte durch Anbringen der
Verbindungshalterung mithilfe der Schrauben B.
3. Befestigen Sie kurze Halterungen an beiden Seiten
mit den Schrauben A.
Die in dieser Bedienungsanleitung gezeigten
Abbildungen dienen lediglich zur Veranschaulichung
und können vom tatsächlichen Aussehen der
Gegenstände, die Sie haben, abweichen.
Installation
Après avoir installé les supports, montez le rack
conforme à la norme EIA.
Installez les supports tout en retirant les câbles de
l’appareil.
Dans le cas d’un seul appareil
F
Comme illustré sur la figure :
Installez un support court d’un côté de l’appareil et un
support long de l’autre côté de l’appareil avec les vis A.
Remarque
Les supports peuvent être installés à
l’envers à gauche et à droite.
Dans le cas de deux appareils
G
Comme illustré sur la figure :
1. Alignez les deux appareils à installer à l’envers.
2. Utilisez le support de raccord pour relier les appareils
avec les vis B.
3. Installez les supports courts sur les deux côtés avec
les vis A.
Les illustrations figurant dans le présent manuel sont
fournies à titre indicatif et peuvent différer légèrement de
celles qui apparaissent sur vos éléments.
Instalación
Tras la instalación de las abrazaderas, móntelo en un
bastidor estándar EIA.
Instale las abrazaderas mientras extrae los cables del
dispositivo.
Caja de un dispositivo
F
Según la figura que se muestra:
Instale un abrazadera corta en un lado del dispositivo y
la abrazadera larga en el otro lado del dispositivo con
los tornillos A.
Nota
Las abrazaderas pueden instalarse en sentido
inverso a la izquierda y derecha.
Caja de dos dispositivos
G
Según la figura que se muestra:
1.
Alinee los dos dispositivos que van a instalarse al revés.
2. Utilice la abrazadera conjunta para unir los
dispositivos con los tornillos B.
3. Instale las abrazaderas cortas en ambos lados con
tornillos A.
Las ilustraciones que se muestran en este manual solo
son ilustrativas, y pueden presentar alguna diferencia
con las de los artículos.
Installazione
Dopo l’installazione delle staffe, effettuare il montaggio in
un rack standard EIA.
Installare le staffe rimuovendo i cavi dal dispositivo.
Installazione di un dispositivo
F
Come illustrato nella figura:
Installare una staffa corta su un lato del dispositivo e la
staffa lunga sull’altro lato con le viti A.
Nota
Le staffe possono essere installate in posizione
invertita a sinistra e a destra.
Installazione di due dispositivi
G
Come illustrato nella figura:
1. Allineare i due dispositivi da installare in posizione
capovolta.
2. Utilizzare la staffa di raccordo per unire i dispositivi
con le viti B.
3. Installare le staffe corte su entrambi i lati con le viti A.
Le illustrazioni e le schermate presenti in questo
manuale hanno scopo puramente esplicativo e possono
differire da quelle reali.

F G
A
D
A
C
A
D
E
B
B
A
D
Русский
Предупреждение
• Используйте кронштейны только для устройств MA2030 и
PA2030.
• Внимательно прочитайте раздел «Меры предосторожности при
установке в стойку» «Руководства пользователя усилителя
MA2030/PA2030».
• При монтаже используйте поставляемые в комплекте винты.
• Затяните винты, надежно закрепив кронштейны.
Комплект поставки
(проверьте полноту комплектации)
Винты A x 6
A
Винты B x 4
B
Длинный кронштейн
C
Короткие кронштейны x 2
D
Соединительная планка
E
* Винты для монтажа в стойке в комплект не входят.
中文
小心
•
请勿为
MA2030
和
PA2030
以外的设备使用支架。
•
认真阅读
“
MA2030
/
PA2030
使用说明书”中的
章节“托架安装注意事项”。
•
安装时,应使用随附的螺钉。
•
拧紧螺钉,直到支架已经牢固固定。
随附项目(请确认)
螺钉
A x 6
A
螺钉
B x 4
B
长支架
C
短支架
x 2
D
连接支架
E
*
不含用于托架安装的螺钉。
• MA2030 PA2030
• MA2030/PA2030
•
•
A 6
A
B 4
B
C
2
D
E
*
C.S.G., PA Development Division
© 2014 Yamaha Corporation
Published 05/2014
发行
KSHD-A0
Printed in China
Audio Products Sales and Marketing Division, Yamaha Corporation
Nakazawa-cho 10-1, Naka-ku, Hamamatsu, Japan 430-8650
RACK-MOUNT ACCESSORY
RKH
1
Руководство пользователя
使用说明书
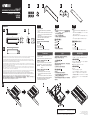
A B C D E
240
43.4
31.8
2-11x6.5
55
55
43.4
25
31.8
2-11x6.5
55
224
37.4
C D
E
Dimensions
Yamaha Pro Audio global web site:
http://www.yamahaproaudio.com/
Yamaha Manual Library
http://www.yamaha.co.jp/manual/
EIA
1
F
A
Note
2
G
1. 2
2. 2 B
3. A 1
安装
支架安装完毕后,安装到
EIA
标准托架上。
安装支架,同时拆下设备电缆。
一台设备的情况
F
如图所示 :
用螺钉
A
将短支架安装到设备一侧,并将长支架安
装到设备的另外一侧。
注
支架可以在左右方向反向安装。
两台设备的情况
G
如图所示 :
1.
把将要安装的两台设备倒置对齐。
2.
使用连接支架用螺钉
B
将设备连接到一起。
3.
用螺钉
A
在两侧安装短支架。
本说明书中的插图仅用作讲解之目的,与实物可能
略有不同。
Установка
После монтажа кронштейнов установите устройство в
стандартной стойке EIA.
Закреплять кронштейны следует, удалив кабели из устройства.
Вариант с одним устройством
F
Как показано на иллюстрации:
Закрепите короткий кронштейн с одной стороны устройства, а
длинный кронштейн — с другой стороны устройства винтами A.
Примечание Кронштейны можно установить слева/справа и
наоборот.
Вариант с двумя устройствами
G
Как показано на иллюстрации:
1. Переверните два устройства и совместите их рядом.
2. С помощью соединительной планки скрепите устройства
винтами B.
3. Закрепите короткие кронштейны с обеих сторон винтами A.
Иллюстрации в данном руководстве приводятся исключительно
в целях разъяснения инструкций и могут не полностью
соответствовать реальным компонентам.
Specifications and descriptions in this owner’s manual are for information purposes only. Yamaha Corp. reserves the right to change or modify products or specifications at
any time without prior notice. Since specifications, equipment or options may not be the same in every locale, please check with your Yamaha dealer.
Die technischen Daten und Beschreibungen in dieser Bedienungsanleitung dienen nur der Information. Yamaha Corp. behält sich das Recht vor, Produkte oder deren
technische Daten jederzeit ohne vorherige Ankündigung zu verändern oder zu modifizieren. Da die technischen Daten, das Gerät selbst oder Sonderzubehör nicht in jedem
Land gleich sind, setzen Sie sich im Zweifel bitte mit Ihrem Yamaha-Händler in Verbindung.
Les caractéristiques techniques et les descriptions du mode d’emploi ne sont données que pour information. Yamaha Corp. se réserve le droit de changer ou modifier les
produits et leurs caractéristiques techniques à tout moment sans aucun avis. Du fait que les caractéristiques techniques, les équipements et les options peuvent différer d’un
pays à l’autre, adressez-vous au distributeur Yamaha le plus proche.
Las especificaciones y descripciones de este manual del propietario tienen sólo el propósito de servir como información. Yamaha Corp. se reserva el derecho a efectuar
cambios o modificaciones en los productos o especificaciones en cualquier momento sin previo aviso. Puesto que las especificaciones, equipos u opciones pueden no ser
las mismas en todos los mercados, solicite información a su distribuidor Yamaha.
Le specifiche e le descrizioni presenti in questo manuale sono fornite a fini puramente informativi. Yamaha Corp. si riserva il diritto di modificare prodotti o specifiche in qualsiasi momento
senza preavviso. Dato che le specifiche, le apparecchiature o le opzioni possono essere diverse da paese a paese, verificarle con il proprio rappresentante Yamaha.
Технические характеристики и их описания в данном руководстве пользователя предназначены только для общего сведения. Корпорация Yamaha сохраняет за
собой право модифицировать свои изделия и менять их технические характеристики без предварительного уведомления. Поскольку технические характеристики,
оборудование и набор возможностей могут зависеть от региона, обращайтесь за информацией к местному представителю корпорации Yamaha.
本使用说明书中的技术规格及介绍仅供参考。
Yamaha
公司保留随时更改或修订产品或技术规格的权利,若确有更改,恕不事先通知。技
术规格、设备或选购件在各个地区可能均会有所不同,因此如有问题,请和当地
Yamaha
经销商确认。
-
 1
1
-
 2
2


dans d''autres langues
- italiano: Yamaha RKH1 Manuale del proprietario
- English: Yamaha RKH1 Owner's manual
- español: Yamaha RKH1 El manual del propietario
- Deutsch: Yamaha RKH1 Bedienungsanleitung
- русский: Yamaha RKH1 Инструкция по применению
- 日本語: Yamaha RKH1 取扱説明書