
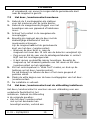
CTC1000DS
DOOR/WINDOW CONTACT FOR CTC1000
DEUR-/VENSTERCONTACT VOOR CTC1000
CONTACT DE PORTE/FENÊTRE POUR CTC1000
CONTACTO DE PUERTA/VENTANA PARA CTC1000
TÜR-/FENSTERKONTAKT FÜR CTC1000
CONTACTO DE PORTA/JANELA PARA O CTC1000
USER MANUAL 3
GEBRUIKERSHANDLEIDING 11
MODE D'EMPLOI 19
MANUAL DEL USUARIO 28
BEDIENUNGSANLEITUNG 36
MANUAL DO UTILIZADOR 45

CTC1000DS
V. 01 – 12/06/2013 2 ©Velleman nv

CTC1000DS
V. 01 – 12/06/2013 3 ©Velleman nv
USER MANUAL
1. Introduction
To all residents of the European Union
Important environmental information about this product
This symbol on the device or the package indicates that
disposal of the device after its lifecycle could harm the
environment. Do not dispose of the unit (or batteries) as
unsorted municipal waste; it should be taken to a
specialized company for recycling. This device should be
returned to your distributor or to a local recycling
service. Respect the local environmental rules.
If in doubt, contact your local waste disposal authorities.
Thank you for choosing Velleman! Please read the manual thoroughly
before bringing this device into service. If the device was damaged in
transit, don't install or use it and contact your dealer.
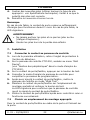
2. Safety Instructions
Keep the device away from children and
unauthorised users.
Indoor use only.
Keep this device away from rain, moisture,
splashing and dripping liquids.
Remove power before opening the cover.
Be very careful, touching live wires can
cause life-threatening electroshocks.
Damage caused by disregard of certain guidelines in this manual
is not covered by the warranty and the dealer will not accept
responsibility for any ensuing defects or problems.
Keep the device away from splashing and dripping liquids.
Note that damage caused by user modifications to the device is
not covered by the warranty.
This system can provide valuable protection for your home and
property if used properly. However, it cannot guarantee complete
protection against burglary or robbery. Therefore, VELLEMAN nv
will not be responsible for any losses or damages which occur
during the use of this product.

CTC1000DS
V. 01 – 12/06/2013 4 ©Velleman nv
3. General Guidelines
Refer to the Velleman® Service and Quality Warranty on the last
pages of this manual.
Have the system installed by a qualified installer.
Respect the legislation in your region when installing an alarm
system. If necessary, refer to local authorities.
Protect this device from shocks and abuse. Avoid brute force when
operating the device.
Protected the device against extreme, dust and moisture.
Familiarise yourself with the functions of the device before actually
using it.
All modifications of the device are forbidden for safety reasons.
The device does not contain any user-serviceable parts except for
the battery.
Only use the device for its intended purpose. Using the device in
an unauthorised way will void the warranty.
4. Features
lithium battery pre-installed for easy installation
compact and unobtrusive design for easy mounting on doorframes
tamper-proof: housing cannot be opened or removed from the
mounting surface
randomized supervision signals for trouble-free system integrity
checking
low battery detection
built-in reed switch and external contact can be used
simultaneously
powerful magnet, 30 mm space between the door/window contact
and magnet
enhanced flexibility: built-in extension terminal to add wired
detectors
LED: error and test mode indicator
works with the control panel CTC1000 (not included)
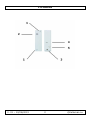
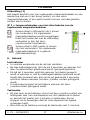
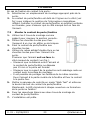
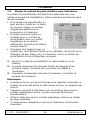
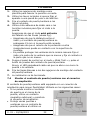
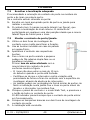
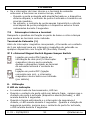
5. Overview
Refer to the illustrations on page 2 of this manual.
1
mounting holes
2
LED / test button

CTC1000DS
V. 01 – 12/06/2013 5 ©Velleman nv
3
fixing screw
4
battery insulator
5
tamper switch
6. Battery
The door contact comes with the battery already installed.
Low battery detection
The door contact has a low battery detection system.
The supervision function on the CTC1000 control panel checks the
battery status every 30 to 50 minutes.
The control panel must detect the low battery signal for at least
10 times with a time interval of 10 minutes.
If battery is low, the control panel will display an error message.
Replacing the battery
1. Put the control panel in configuration mode to avoid triggering
the tamper alarm (tamper alarm is not active in this mode).
2. Remove the screws and the cover.
3. Remove the old batteries.
After removing the old batteries, press the tamper switch twice
to fully discharge before inserting new batteries.
4. Insert new batteries (always use the correct battery type: see
Technical specifications below). Make sure the polarity is correct.
5. Put back the cover and fasten the screws.
Note
Low battery detection operates where the door contact has enough
reserve power to typically operate for 1 month before complete
exhaustion. When the door contact has a low battery, its LED will
flash.
WARNING
Do not puncture or throw batteries in fire as they might
explode.
Keep batteries away from children.

CTC1000DS
V. 01 – 12/06/2013 6 ©Velleman nv
7. Installation
7.1 Set up connection between the contact and the control
panel
1. On first use, pull out the battery protection strip on the back.
2. On the CTC1000 control panel, go to the Add Device menu
(see chapter Managing devices in the CTC1000 manual).
3. On the door/window contact, press the test button.
4. Refer to the control panel user manual to complete the learn-in
process.
5. When the door/window contact is added, put the control panel
into Walk Test mode.
6. Hold the door/window contact in the desired location, and press
the Test button.
The LED will flash to confirm that this location is within signal
range of the control panel.
7. Proceed with mounting and installation once you are satisfied
that the door/window contact location functions properly.
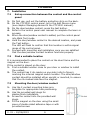
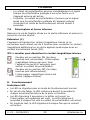
7.2 Find a suitable location
It is recommended to place the contact on the door frame and the
magnet on the door.
If the contact is placed on the door:
1. Find a suitable location close to your door or window to install
the contact.
2. The contact has 2 rib-marks on one side (refer to figure),
marking the internal magnet switch location. The door/window
contact should be installed either upright or inverted, to ensure
that the rib-marked side face the magnet.
7.3 Mounting the door/window contact
1. Use the 2 contact mounting holes as a
template for appropriate hole positioning.
2. Use the provided wall plugs for
plaster/brick installation.
3. Screw the contact into the provided wall
plugs.
4. Fit the magnet on the door using the small
piece of double sided adhesive tape or with
provided screws.

CTC1000DS
V. 01 – 12/06/2013 7 ©Velleman nv
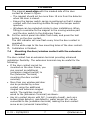
The magnet must align with the marked side of the door
contact as shown in figure.
o The magnet should not be more than 15 mm from the detector
when the door is closed.
o Ensure the tamper switch spring is positioned so that it makes
contact with the mounting surface through the tamper switch
aperture.
o Windows can be protected similar to door installations. When
fitting to a window fix the magnet to the moving window part
and the door switch to the stationary frame.
5. Put the control panel into Walk Test mode, and press the test
button on the door contact.
The LED indicator will now flash every time the door contact is
operated.
6. Fit the white caps to the two mounting holes of the door contact.
7. Installation is finished.
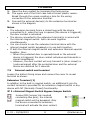
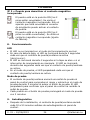
7.4 Mounting the door/window contact with the extension
terminal
The door contact has an extension terminal providing enhanced
installation flexibility. The extension terminal may be useful for the
following:
If the door contact cannot be
mounted on the door frame, you
can connect an additional
(extension magnet switch) to
the (Extension Terminal)
mounting the door contact
remotely.
More than one window and door
can be protected by a door
contact using the additional
magnet and extension magnet
switch. The switches must be
wired to the (Extension Terminal) as shown:
Any dry contact device with N.C. (normally closed), such as a
broken glass detector, gas detector, water sensor etc, can be
connected to the (extension terminal) making the door contact
serve as an (universal transmitter).

CTC1000DS
V. 01 – 12/06/2013 8 ©Velleman nv
1. Open the door contact by loosening the fixing screw.
2. The upper end of the front case has a thinner plastic recess.
Break through the recess creating a hole for the wiring
connection to the extension terminal.
3. Connect the external device(s) to the extension terminal as
shown in the diagram.
Notes
The extension terminal forms a closed loop with the device
connected to it. when the loop is opened (the device is triggered),
the door contact is activated.
The device connected to the extension terminal is in series with
the internal magnet switch: both can work together
simultaneously.
You can choose to use the extension terminal alone with the
internal magnet switch bypassed or to use both together.
If both the internal magnet switch and extension terminal operate
together, then:
o When the protected door is opened/closed or the external
device is triggered, the door contact activates and transmits a
signal immediately.
o However, the door contact will only transmit a (door closed) or
(restored signal) after the protected door and the external
device are restored for 3 seconds.
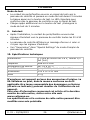
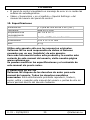
7.5 Internal switch and terminal
Loosen the bottom fixing screw and remove the cover to reveal
terminal as shown.
Extension Terminal (1)
In addition to the built-in magnet switch, an additional 2-pin dry
contact terminal is provided for an extension magnet switch or any
device with NC (Normally Closed) functionality.
JP 2 =Internal Magnet Switch Bypass Jumper Switch
Jumper ON (jumper link inserted
connecting two pins); the internal
magnet switch will be bypassed. Only
the device connected to extension
terminal will activate the door contact.

CTC1000DS
V. 01 – 12/06/2013 9 ©Velleman nv
Jumper off (jumper link removed or
(parked) on one pin), the internal
magnet switch is in use (factory default)
8. Operation
LED Indicator
In normal operation mode, the LED will not light.
When the door contact is in low battery condition, every time the
door contact is activated (device opened/ closed), the LED will
light on for 2 seconds.
When the cover is opened and the tamper switch is violated, the
LED will light on for 2 seconds. When a tamper condition persists,
every time the door contact is activated, the LED will light on for 2
seconds.
When the device contact is in test mode, the LED will flash every
time it is activated.
Test mode
Each press of the test button causes the door contact to transmit
a radio range test signal to the control panel and will enter the
test mode for 3 mins. When the test signal is transmitted, the led
will flash to confirm signal receipt by the control panel.
Each additional test button press will extend test mode another 3
mins.
9. Self test
After installation, the door contact will send self test signals to the
control panel at random intervals of 30 to 50 minutes.
If the control panel does not receive self test signals from the
contact, the panel will display an error message.
Refer to the section Supervision in chapter Special Settings of the
control panel manual.
10. Technical Specifications
power supply
1 x 3.6 V lithium 1/2 AA battery (incl.)
frequency
868.6375 MHz
operating temperature
-20 to 50 °C
humidity
up to 95 % non-condensing

CTC1000DS
V. 01 – 12/06/2013 10 ©Velleman nv
dimensions
103 x 31 x 21 mm
weight
57 g
Use this device with original accessories only. Velleman nv
cannot be held responsible in the event of damage or injury
resulting from (incorrect) use of this device.
For more info concerning this product and the latest version
of this manual, please visit our website www.velleman.eu.
The information in this manual is subject to change without
prior notice.
© COPYRIGHT NOTICE
The copyright to this manual is owned by Velleman nv. All
worldwide rights reserved. No part of this manual may be copied,
reproduced, translated or reduced to any electronic medium or
otherwise without the prior written consent of the copyright holder.

CTC1000DS
V. 01 – 12/06/2013 11 ©Velleman nv
GEBRUIKERSHANDLEIDING
1. Inleiding
Aan alle ingezetenen van de Europese Unie
Belangrijke milieu-informatie betreffende dit product
Dit symbool op het toestel of de verpakking geeft aan
dat, als het na zijn levenscyclus wordt weggeworpen, dit
toestel schade kan toebrengen aan het milieu. Gooi dit
toestel (en eventuele batterijen) niet bij het gewone
huishoudelijke afval; het moet bij een gespecialiseerd
bedrijf terechtkomen voor recyclage. U moet dit toestel
naar uw verdeler of naar een lokaal recyclagepunt
brengen. Respecteer de plaatselijke milieuwetgeving.
Hebt u vragen, contacteer dan de plaatselijke autoriteiten
betreffende de verwijdering.
Dank u voor uw aankoop! Lees deze handleiding grondig voor u het
toestel in gebruik neemt. Werd het toestel beschadigd tijdens het
transport, installeer het dan niet en raadpleeg uw dealer.
2. Veiligheidsinstructies
Houd dit toestel uit de buurt van kinderen
en onbevoegden.
Gebruik het toestel enkel binnenshuis.
Bescherm het toestel tegen regen,
vochtigheid en opspattende vloeistoffen.
Ontkoppel de voeding alvorens de
behuizing te openen. Wees voorzichtig,
raak geen kabels aan die onder stroom
staan om dodelijke elektroshocks te
vermijden.
De garantie geldt niet voor schade door het negeren van bepaalde
richtlijnen in deze handleiding en uw dealer zal de
verantwoordelijkheid afwijzen voor defecten of problemen die hier
rechtstreeks verband mee houden.
Bescherm tegen opspattende vloeistoffen.
Schade door wijzigingen die de gebruiker heeft aangebracht aan
het toestel valt niet onder de garantie.

CTC1000DS
V. 01 – 12/06/2013 12 ©Velleman nv
Dit systeem kan een waardevolle bescherming zijn voor uw huis
en eigendom indien het juist gebruikt wordt. Toch kan dit systeem
geen volledige beveiliging bieden tegen inbraak of roof. Daarom
kan VELLEMAN nv niet verantwoordelijk worden gesteld voor
eventuele verliezen en schade.
3. Algemene richtlijnen
Raadpleeg de Velleman® service- en kwaliteitsgarantie
achteraan deze handleiding.
Laat het systeem installeren door een gekwalificeerde installateur.
Respecteer de plaatselijke wetgeving bij het installeren van een
alarmsysteem. Neem eventueel contact op met de plaatselijke
autoriteiten.
Bescherm het toestel tegen schokken. Vermijd brute kracht
tijdens de bediening van het toestel.
Bescherm het toestel tegen extreme hitte, stof en vochtigheid.
Leer eerst de functies van het toestel kennen voor u het gaat
gebruiken.
Om veiligheidsredenen mag u geen wijzigingen aanbrengen aan
het toestel.
Er zijn geen door de gebruiker vervangbare onderdelen in dit
toestel, behalve de batterij.
Gebruik het toestel enkel waarvoor het gemaakt is. Bij
onoordeelkundig gebruik vervalt de garantie.
4. Eigenschappen
lithiumbatterij reeds geplaatst voor een gemakkelijke installatie
compact en discreet design voor een gemakkelijke montage op
deurkaders
sabotagebestendig: de behuizing kan niet worden geopend of
verwijderd van de montageplaats
willekeurige controlesignalen voor een probleemloze
integriteitcontrole van het systeem
legebatterij-indicator
de ingebouwde reedschakelaar en het externe contact kunnen
gelijktijdig gebruikt worden
krachtige magneet, 30 mm afstand tussen het deur-
/venstercontact en de magneet

CTC1000DS
V. 01 – 12/06/2013 13 ©Velleman nv
verbeterde flexibiliteit: ingebouwde uitbreiding om bekabelde
detectoren aan te sluiten
led: fout en test
werkt met het bedieningspaneel CTC1000 (niet meegelev.)
5. Overzicht
Raadpleeg de afbeeldingen op pagina 2 van deze handleiding.
1
montagegaten
2
led / testknop
3
bevestigingsschroef
4
batterij-isolator
5
sabotageschakelaar
6. Batterij
Het deur-/venstercontact functioneert met batterijen (reeds
geplaatst).
Legebatterij-indicator
Het deur-/venstercontact is uitgerust met legebatterijdetectie.
De supervisiefunctie van de CTC1000 controleert de batterijstatus
om de 30 à 50 minuten.
Om de 10 minuten moet het controlepaneel het legebatterijsignaal
minstens 10 keer detecteren.
Bij lage batterijspanning verschijnt een foutmelding op de display
van het controlepaneel.
De batterij vervangen
1. Zet het controlepaneel in configuratiemodus om te beletten dat
het sabotagealarm ingeschakeld wordt (sabotagealarm is niet
actief in deze modus).
2. Draai de schroeven los en verwijder het deksel.
3. Verwijder de lege batterijen.
Druk tweemaal op de sabotageschakelaar wanneer u een batterij
vervangt. Zo wordt het toestel volledig ontladen.
4. Plaats nieuwe batterijen (gebruik altijd het juiste type
batterijen: zie Technische specificaties). Controleer of de
polariteit correct is.
5. Plaats het deksel terug en draai de schroeven vast.

CTC1000DS
V. 01 – 12/06/2013 14 ©Velleman nv
Opmerking
De legebatterijdetectie werkt zolang het toestel voldoende energie
voor 1 maand heeft. Bij lage batterijspanning knippert de led van het
deur-/venstercontact.
WAARSCHUWING
U mag batterijen nooit doorboren of in het vuur gooien
(explosiegevaar).
Houd batterijen uit het bereik van kinderen.
7. Installatie
7.1 Het deur-/venstercontact met het controlepaneel
verbinden
1. Verwijder bij het eerste gebruik het strookje dat de batterij
beveiligt (aan de achterkant van het toestel).
2. Op het CTC1000 controlepaneel, ga naar het menu "Add Device"
(zie hoofdstuk "Apparaten beheren" in de CTC1000 handleiding).
3. Druk op de testknop van het deur-/venstercontact.
4. Raadpleeg de gebruikershandleiding van het controlepaneel om
het leerproces te voltooien.
5. Wanneer het deur-/venstercontact is aangesloten, zet het
controlepaneel in "Walk Test"-modus.
6. Houd het deur-/venstercontact op de gewenste plaats, en druk
op de testknop.
De led knippert om te bevestigen dat het controlepaneel het
signaal van het deur-/venstercontact ontvangen heeft.
7. Installeer het apparaat nadat u gecontroleerd hebt of alles
correct functioneert.
7.2 Een geschikte montageplaats kiezen
Bevestig het contact aan het deurkader en de magneet aan de deur.
Bevestigt u het contact op de deur:
1. Kies een geschikte plaats dichtbij de deur om het contact te
installeren.
2. De zijkant van het contact is voorzien van 2 lijnen (zie
afbeelding). Hier bevindt zicht de ingebouwde
magneetschakelaar. Installeer het deur-/venstercontact rechtop

CTC1000DS
V. 01 – 12/06/2013 15 ©Velleman nv
of omgekeerd, om ervoor te zorgen dat de gemarkeerde kant
naar de magneet is gericht.
7.3 Het deur-/venstercontact monteren
1. Gebruik de 2 montagegaten als sjabloon
voor het markeren van de juiste positie.
2. Gebruik de meegeleverde pluggen voor het
bevestigen aan een gipswand of bakstenen
muur.
3. Schroef het contact in de meegeleverde
muurpluggen.
4. Bevestig de magneet aan de deur met de
dubbelzijdige kleefband of met de
meeleverde schroeven.
Lijn de magneet uit met de gemarkeerde
kant van het deur-/venstercontact.
o Wanneer de deur dicht is, mag de
magneet niet meer dan 15 mm van de detector verwijderd zijn.
o Zorg ervoor dat de veer van de sabotageschakelaar in contact
blijft met het montageoppervlak.
o U kunt ramen op dezelfde manier beveiligen. Bevestig de
magneet op het draaiend gedeelte van het raam en het deur-
/venstercontact op het raamkader.
5. Zet het controlepaneel in "Walk Test"-modus, en druk op de
testknop op het deur-/venstercontact.
De led knippert nu telkens de deur of het raam geopend of
gesloten wordt.
6. Plaats de witte kapjes over de twee montagegaten van het deur-
/venstercontact.
7. De installatie is voltooid.
7.4 Het deur-/venstercontact met de uitbreiding installeren
Het deur-/venstercontact is voorzien van een uitbreiding voor een
verbeterde flexibiliteit bij het
installeren. Gebruik de uitbreiding
in de volgende gevallen:
Kan het deur-/venstercontact
niet op het deurkader kan
bevestigd worden, verbind een

CTC1000DS
V. 01 – 12/06/2013 16 ©Velleman nv
extra magneetschakelaar met de uitbreiding.
U kunt meerdere deuren en vensters met een deur-
/venstercontact beveiligen wanneer een extra magneet en
magneetschakelaar gebruikt worden. Verbind de kabel als volgt:
Verbind een toestel met een normaal gesloten, droog contact
(bijv. een gebroken glasdetector, gasdetector, waterdetector,
enz.) met de uitbreiding. Zo kunt u het deur-/venstercontact
gebruiken als universele zender.
1. Open het deur-/venstercontact door de bevestigingsschroef los
te draaien.
2. De bovenkant van het frontpaneel heeft een uitsparing. Doorprik
de uitsparing zodat u de kabel met de uitbreiding kunt
verbinden.
3. Verbind het externe toestel (toestellen) met de uitbreiding zoals
weergegeven in het aansluitdiagram.
Opmerkingen
De uitbreiding en het aangesloten toestel vormen een gesloten
lus. Wordt deze lus geopend (toestel wordt getriggerd), dan wordt
het contact ingeschakeld.
Het toestel dat met de uitbreiding verbonden is, is in serie
geplaatst met de ingebouwde magneetschakelaar: beide kunnen
tegelijkertijd functioneren.
U kunt de uitbreiding alleen gebruiken zonder de ingebouwde
magneetschakelaar of samen.
De ingebouwde magneetschakelaar en de uitbreiding functioneren
samen:
o Het deur-/venstercontact stuurt onmiddellijk een signaal
wanneer het deur-/venstercontact geopend/gesloten wordt of
wanneer een extern toestel getriggerd wordt.
o Het deur-/venstercontact zal echter alleen een signaal sturen
wanneer de deur en het externe toestel teruggekeerd zijn in
normale modus.
7.5 Interne schakelaar en aansluiting
Draai de bevestigingsschroef aan de onderkant los en verwijder het
deksel zoals geïllustreerd.

CTC1000DS
V. 01 – 12/06/2013 17 ©Velleman nv
Uitbreiding (1)
Het toestel beschikt over een ingebouwde magneetschakelaar en een
aansluiting met een 2-pin droog contact, om een extra
magneetschakelaar of een ander toestel met een normaal gesloten
contact aan te sluiten.
JP 2 = Jumperschakelaar voor het uitschakelen van de
ingebouwde magneetschakelaar
Jumper staat in ON-positie (de 2 pinnen
zijn verbonden). De ingebouwde
magneetschakelaar wordt overgeslagen.
Enkel het toestel dat met de uitbreiding
verbonden is, kan het deur-
/venstercontact inschakelen.
Jumper staat in OFF-positie (2 pinnen
zijn niet verbonden). De ingebouwde
magneetschakelaar is in gebruik
(fabrieksinstelling).
8. Gebruik
Led-indicator
In normale werkmodus zal de led niet oplichten.
Bij lage batterijspanning, licht de led 2 seconden op wanneer het
deur-/venstercontact geactiveerd wordt (geopend/gesloten).
De led zal 2 seconden oplichten wanneer het deksel geopend
wordt of wanneer er met de sabotageschakelaar geknoeid wordt.
Houdt deze toestand aan, dan zal de led gedurende 2 seconden
oplichten telkens wanneer het deur-/venster contact getriggerd
wordt.
In testmodus knippert de led telkens wanneer het deur-
/venstercontact getriggerd wordt.
Testmodus
Bij elke druk op de testknop, stuurt het deur-/venster contact een
testsignaal naar het controlepaneel om het radiobereik te testen
en bevindt het toestel zich 3 minuten in testmodus. De led
knippert om te bevestigen dat het controlepaneel het signaal
ontvangen heeft.
Elke druk op de testknop verlengt de testmodus met 3 minuten.

CTC1000DS
V. 01 – 12/06/2013 18 ©Velleman nv
9. Zelftest
Na installatie stuurt het deur-/venstercontact alle 30 tot 50
minuten zelftestsignalen naar het controlepaneel.
Ontvangt het controlepaneel geen zelftestsignalen, dan verschijnt
een foutmelding op de display.
Zie "Supervision" in hoofdstuk "Special Settings" in de handleiding
van het controlepaneel.
10. Technische specificaties
voeding
1 x 3.6 V-lithiumbatterij, formaat 1/2 AA
(meegelev.)
frequentie
868.6375 MHz
werktemperatuur
-20 tot 50 °C
vochtigheidsgraad
tot 95%, niet-condenserend
afmetingen
103 x 31 x 21 mm
gewicht
57 g
Gebruik dit toestel enkel met originele accessoires. Velleman
nv is niet aansprakelijk voor schade of kwetsuren bij
(verkeerd) gebruik van dit toestel.
Voor meer informatie over dit product en de laatste versie van
deze handleiding, zie www.velleman.eu.
De informatie in deze handleiding kan te allen tijde worden
gewijzigd zonder voorafgaande kennisgeving.
© AUTEURSRECHT
Velleman nv heeft het auteursrecht voor deze handleiding.
Alle wereldwijde rechten voorbehouden. Het is niet toegestaan
om deze handleiding of gedeelten ervan over te nemen, te kopiëren,
te vertalen, te bewerken en op te slaan op een elektronisch medium
zonder voorafgaande schriftelijke toestemming van de
rechthebbende.

CTC1000DS
V. 01 – 12/06/2013 19 ©Velleman nv
MODE D'EMPLOI
1. Introduction
Aux résidents de l'Union européenne
Informations environnementales importantes concernant ce
produit
Ce symbole sur l'appareil ou l'emballage indique que
l’élimination d’un appareil en fin de vie peut polluer
l'environnement. Ne pas jeter un appareil électrique ou
électronique (et des piles éventuelles) parmi les déchets
municipaux non sujets au tri sélectif ; une déchèterie
traitera l’appareil en question. Renvoyer cet appareil à
votre fournisseur ou à un service de recyclage local. Il
convient de respecter la réglementation locale relative à la protection
de l’environnement.
En cas de questions, contacter les autorités locales pour
élimination.
Nous vous remercions de votre achat ! Lire la présente notice
attentivement avant la mise en service de l’appareil. Si l’appareil a
été endommagé pendant le transport, ne pas l’installer et consulter
votre revendeur.
2. Consignes de sécurité
Garder l'appareil hors de la portée des
enfants et des personnes non autorisées.
Utiliser cet appareil uniquement à
l'intérieur.
Protéger de la pluie, de l’humidité et des
projections d’eau.
Couper l’alimentation avant d’ouvrir le
boîtier. Etre prudent, toucher un câble sous
tension peut causer des électrochocs
mortels.
La garantie ne s’applique pas aux dommages survenus en
négligeant certaines directives de cette notice et votre revendeur
déclinera toute responsabilité pour les problèmes et les défauts
qui en résultent.

CTC1000DS
V. 01 – 12/06/2013 20 ©Velleman nv
Protéger des projections d’eau.
Les dommages occasionnés par des modifications par le client ne
tombent pas sous la garantie.
Ce système peut offrir une protection valable à votre maison et
propriété si on l'utilise correctement. Néanmoins, il ne peut pas
vous garantir une protection complète contre le cambriolage et le
vol. Toutefois, Velleman SA ne peut être tenu responsable pour
des pertes ou endommagements qui pourraient être occasionnés.
3. Directives générales
Se référer à la garantie de service et de qualité Velleman® en
fin de notice.
Confier l'installation du système à un installateur qualifié.
Respecter la législation en vigueur dans votre région lors de
l'installation d'un système d'alarme. Se renseigner auprès des
administrations locales si nécessaire.
Protéger l’appareil des chocs. Traiter l'appareil avec circonspection
pendant l’opération.
Protéger l'appareil contre la chaleur extrême, la poussière et
l'humidité.
Se familiariser avec le fonctionnement de l’appareil avant de
l’utiliser.
Il est interdit de modifier l'appareil pour des raisons de sécurité.
L'appareil ne contient aucune pièce réparable par l'utilisateur sauf
la pile.
N’utiliser l'appareil qu’à sa fonction prévue. Un usage impropre
annule d'office la garantie.
4. Caractéristiques
pile au lithium préinstallée pour une installation facile
design compact et discret pour un montage facile sur des cadres
de portes
protection anti-sabotage : il est impossible d'ouvrir ou d'arracher
le boîtier de la surface de montage
signaux de vérifications aléatoires pour un contrôle efficace de
l'intégrité du système
indication de pile faible
l'interrupteur reed et le contact externe peuvent être utilisés
simultanément
La page est en cours de chargement...
La page est en cours de chargement...
La page est en cours de chargement...
La page est en cours de chargement...
La page est en cours de chargement...
La page est en cours de chargement...
La page est en cours de chargement...
La page est en cours de chargement...
La page est en cours de chargement...
La page est en cours de chargement...
La page est en cours de chargement...
La page est en cours de chargement...
La page est en cours de chargement...
La page est en cours de chargement...
La page est en cours de chargement...
La page est en cours de chargement...
La page est en cours de chargement...
La page est en cours de chargement...
La page est en cours de chargement...
La page est en cours de chargement...
La page est en cours de chargement...
La page est en cours de chargement...
La page est en cours de chargement...
La page est en cours de chargement...
La page est en cours de chargement...
La page est en cours de chargement...
La page est en cours de chargement...
La page est en cours de chargement...
La page est en cours de chargement...
La page est en cours de chargement...
La page est en cours de chargement...
La page est en cours de chargement...
La page est en cours de chargement...
La page est en cours de chargement...
La page est en cours de chargement...
La page est en cours de chargement...
La page est en cours de chargement...
La page est en cours de chargement...
La page est en cours de chargement...
La page est en cours de chargement...
La page est en cours de chargement...
-
 1
1
-
 2
2
-
 3
3
-
 4
4
-
 5
5
-
 6
6
-
 7
7
-
 8
8
-
 9
9
-
 10
10
-
 11
11
-
 12
12
-
 13
13
-
 14
14
-
 15
15
-
 16
16
-
 17
17
-
 18
18
-
 19
19
-
 20
20
-
 21
21
-
 22
22
-
 23
23
-
 24
24
-
 25
25
-
 26
26
-
 27
27
-
 28
28
-
 29
29
-
 30
30
-
 31
31
-
 32
32
-
 33
33
-
 34
34
-
 35
35
-
 36
36
-
 37
37
-
 38
38
-
 39
39
-
 40
40
-
 41
41
-
 42
42
-
 43
43
-
 44
44
-
 45
45
-
 46
46
-
 47
47
-
 48
48
-
 49
49
-
 50
50
-
 51
51
-
 52
52
-
 53
53
-
 54
54
-
 55
55
-
 56
56
-
 57
57
-
 58
58
-
 59
59
-
 60
60
-
 61
61


dans d''autres langues
- español: Velleman CTC1000DS Manual de usuario
- Deutsch: Velleman CTC1000DS Benutzerhandbuch
- Nederlands: Velleman CTC1000DS Handleiding
- português: Velleman CTC1000DS Manual do usuário