
46268AF
Imprimé au Canada 2021-06-16
INSTALLATION DE LA TROUSSE DE
RACCORDEMENT POUR FOURNAISE EN SÉRIE
Approuvée uniquement au Canada
PA08523
WIRING KIT FOR SERIAL INSTALLATION
Allowed only in Canada
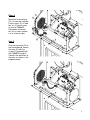
Étape 1
Retirez les vis (B) et les
pièces (A) (C). Conservez-
les.
Step 1
Remove the screws (B) and
parts (A) (C). Keep them.

2
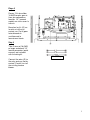
Étape 2
Branchez le connecteur
(D) à la carte de contrôle.
Fixez le relais (E) à l’aide
des vis (F) fournis avec
la trousse PA08523.
Raccordez l’extrémité
des fils au relais comme
sur le schéma ci-bas.
Step 2
Plug the connector (D) to
the control board. Secure
the relay (E) with the
screws (F) provided with
the PA08523 wiring kit.
Connect the wire ends to
the relay as shown in the
diagram below.

3
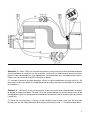
Étape 3
Prenez 2 fils de calibre
18 AWG ou plus gros et
fixez des connecteurs
femelles 1/4'' (raccord
rapide) non inclus avec la
trousse.
Branchez les fils (G) sur
le relais et utilisez le
contact sec (2 et 4) pour
faire démarrer le
ventilateur de la
fournaise existante.
Step 3
Take 2 wires of 18 AWG
or larger and attach 1/4"
female connectors (quick
connect) not included
with the wiring kit.
Connect the wires (G) to
the relay and use the dry
contact (2 and 4) to start
the existing furnace
blower.
Relais/relay

4
Attention! (B*- Relais 120V) Sur la fournaise existante, assurez-vous que la lettre sélectionnée permet
de faire fonctionner le ventilateur à la vitesse désirée. La lettre (G) sur le bornier de la fournaise existante
pourrait ne pas correspondre au signal approprié ou une configuration de sa carte pourrait être requise.
Référez-vous au manuel de la fournaise existante au besoin.
(C*) Lorsque la fournaise existante fonctionne, utilisez le signal humidificateur ou autre signal (ex : W)
pour activer le relais qui indique à la Caddy Advanced de ne pas chauffer en le raccordant sur le bornier
de l’interlock « I ».
Caution! (B*- 120V relay) On the existing furnace, make sure that the letter selected allows the blower
to operate at the desired speed. The letter (G) on the terminal block of the existing furnace may not be
the appropriate signal or a configuration of its board may be required. Refer to the existing furnace manual
if necessary.
(C*) When the existing furnace is running, use the humidifier signal or other signal (e.g. W) to activate
the relay that tells the Caddy Advanced not to heat by connecting it to the « I » interlock terminal block.

5
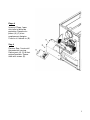
Étape 4
Inversez l’Étape 1 pour
réinstaller le boîtier de
protection. Remettre les
pièces (A) (C) à leur
emplacement d’origine.
Fixez-les à l’aide de vis (B).
Step 4
Reverse Step 1 to reinstall
the protective housing.
Return parts (A) (C) to their
original locations. Secure
them with screws (B).
-
 1
1
-
 2
2
-
 3
3
-
 4
4
-
 5
5


dans d''autres langues
- English: PSG PF01020
Autres documents
-
Emerson White-Rodgers Carrier Integrated Single Stage 120V Hot Surface Ignition Control Kit 50M56D-751 Manuel utilisateur
-
Dettson AMT100B34-SM1 Manuel utilisateur
-
 Hotblast 1500 Le manuel du propriétaire
-
Miller M1 Guide d'installation
-
NAPOLEON WSX060T3AA-N Le manuel du propriétaire
-
-
