Amana UPRIGHT FREEZER User Instructions
- Catégorie
- Cuisinières
- Taper
- User Instructions

THANK YOU for purchasing this high-quality product. If you should experience a problem not covered in TROUBLESHOOTING,
please visit our website at www.amanacanada.ca for additional information. If you still need assistance, call us at 1-800-807-6777.
You will need your model and serial number located on the oven frame behind the storage drawer panel.
ELECTRIC RANGE
USER INSTRUCTIONS
Table of Contents
RANGE SAFETY.......................................................................................2
The Anti-Tip Bracket.............................................................................2
FEATURE GUIDE .....................................................................................4
COOKTOP USE........................................................................................5
OVEN USE ................................................................................................6
Electronic Oven Controls......................................................................6
Sabbath Mode ......................................................................................6
Aluminum Foil........................................................................................7
Positioning Racks and Bakeware.........................................................7
Oven Vent..............................................................................................8
Baking and Roasting.............................................................................8
Broiling ..................................................................................................8
RANGE CARE...........................................................................................8
Self-Cleaning Cycle (on some models) ................................................8
General Cleaning...................................................................................9
Oven Light...........................................................................................10
Appliance Outlets (on some models)..................................................10
TROUBLESHOOTING............................................................................10
ACCESSORIES ......................................................................................11
WARRANTY............................................................................................12
W10558469A

2
RANGE SAFETY
The Anti-Tip Bracket
The range will not tip during normal use. However, the range can tip if you apply too much force or weight to the open door without having
the anti-tip bracket fastened down properly.
You can be killed or seriously injured if you don't immediately
You
can be killed or seriously injured if you don't
follow
All safety messages will tell you what the potential hazard is, tell you how to reduce the chance of injury, and tell you what can
happen if the instructions are not followed.
Your safety and the safety of others are very important.
We have provided many important safety messages in this manual and on your appliance. Always read and obey all safety
messages.
This is the safety alert symbol.
This symbol alerts you to potential hazards that can kill or hurt you and others.
All safety messages will follow the safety alert symbol and either the word “DANGER” or “WARNING.”
These words mean:
follow instructions.
instructions.
DANGER
WARNING
Tip Over Hazard
A child or adult can tip the range and be killed.
Verify the anti-tip bracket has been properly installed and engaged per installation instructions.
Re-engage anti-tip bracket if range is moved.
Do not operate range without anti-tip bracket installed and engaged.
Failure to follow these instructions can result in death or serious burns to children and adults.
To verify the anti-tip bracket is installed and engaged:
• Slide range forward.
• Look for the anti-tip bracket securely attached to floor or wall.
• Slide range back so rear range foot is under anti-tip bracket.
• See installation instructions for details.
WARNING
Anti-Tip
Bracket
Range Foot

3
IMPORTANT SAFETY INSTRUCTIONS
SAVE THESE INSTRUCTIONS
WARNING: To reduce the risk of fire, electrical shock,
injury to persons, or damage when using the range, follow
basic precautions, including the following:
■ WARNING: TO REDUCE THE RISK OF TIPPING OF
THE RANGE, THE RANGE MUST BE SECURED BY
PROPERLY INSTALLED ANTI-TIP DEVICES. TO CHECK
IF THE DEVICES ARE INSTALLED PROPERLY, SLIDE
RANGE FORWARD, LOOK FOR ANTI-TIP BRACKET
SECURELY ATTACHED TO FLOOR OR WALL, AND
SLIDE RANGE BACK SO REAR RANGE FOOT IS
UNDER ANTI-TIP BRACKET.
■ CAUTION: Do not store items of interest to children in
cabinets above a range or on the backguard of a range –
children climbing on the range to reach items could be
seriously injured.
■ Proper Installation – Be sure the range is properly installed
and grounded by a qualified technician.
■ Never Use the Range for Warming or Heating the Room.
■ Do Not Leave Children Alone – Children should not be left
alone or unattended in area where the range is in use.
They should never be allowed to sit or stand on any part of
the range.
■ Wear Proper Apparel – Loose-fitting or hanging garments
should never be worn while using the range.
■ User Servicing – Do not repair or replace any part of the
range unless specifically recommended in the manual. All
other servicing should be referred to a qualified technician.
■ Storage in or on the Range – Flammable materials should
not be stored in an oven or near surface units.
■ Do Not Use Water on Grease Fires – Smother fire or flame
or use dry chemical or foam-type extinguisher.
■ Use Only Dry Potholders – Moist or damp potholders on
hot surfaces may result in burns from steam. Do not let
potholder touch hot heating elements. Do not use a towel
or other bulky cloth.
■ DO NOT TOUCH SURFACE UNITS OR AREAS NEAR
UNITS – Surface units may be hot even though they are
dark in color. Areas near surface units may become hot
enough to cause burns. During and after use, do not touch,
or let clothing or other flammable materials contact surface
units or areas near units until they have had sufficient time
to cool. Among those areas are the cooktop and surfaces
facing the cooktop.
■ Use Proper Pan Size – The range is equipped with one or
more surface units of different size. Select utensils having
flat bottoms large enough to cover the surface unit heating
element. The use of undersized utensils will expose a
portion of the heating element to direct contact and may
result in ignition of clothing. Proper relationship of utensil to
burner will also improve efficiency.
■ Never Leave Surface Units Unattended at High Heat
Settings – Boilover causes smoking and greasy spillovers
that may ignite.
■ Make Sure Reflector Pans or Drip Bowls Are in Place –
Absence of these pans or bowls during cooking may
subject wiring or components underneath to damage.
■ Protective Liners – Do not use aluminum foil to line surface
unit drip bowls or oven bottoms, except as suggested in
the manual. Improper installation of these liners may result
in a risk of electric shock, or fire.
■ Glazed Cooking Utensils – Only certain types of glass,
glass/ceramic, ceramic, earthenware, or other glazed
utensils are suitable for range-top service without breaking
due to the sudden change in temperature.
■ Utensil Handles Should Be Turned Inward and Not Extend
Over Adjacent Surface Units – To reduce the risk of burns,
ignition of flammable materials, and spillage due to
unintentional contact with the utensil, the handle of a
utensil should be positioned so that it is turned inward, and
does not extend over adjacent surface units.
■ Do Not Soak Removable Heating Elements – Heating
elements should never be immersed in water.
■ Do Not Cook on Broken Cooktop – If cooktop should
break, cleaning solutions and spillovers may penetrate the
broken cooktop and create a risk of electric shock. Contact
a qualified technician immediately.
■ Clean Cooktop With Caution – If a wet sponge or cloth is
used to wipe spills on a hot cooking area, be careful to
avoid steam burn. Some cleaners can produce noxious
fumes if applied to a hot surface.
■ Use Care When Opening Door – Let hot air or steam
escape before removing or replacing food.
■ Do Not Heat Unopened Food Containers – Build-up of
pressure may cause container to burst and result in injury.
■ Keep Oven Vent Ducts Unobstructed.
■ Placement of Oven Racks – Always place oven racks in
desired location while oven is cool. If rack must be moved
while oven is hot, do not let potholder contact hot heating
element in oven.
■ DO NOT TOUCH HEATING ELEMENTS OR INTERIOR
SURFACES OF OVEN – Heating elements may be hot even
though they are dark in color. Interior surfaces of an oven
become hot enough to cause burns. During and after use,
do not touch, or let clothing or other flammable materials
contact heating elements or interior surfaces of oven until
they have had sufficient time to cool. Other surfaces of the
appliance may become hot enough to cause burns – among
these surfaces are oven vent openings and surfaces near
these openings, oven doors, and windows of oven doors.
For self-cleaning ranges –
■ Do Not Clean Door Gasket – The door gasket is essential
for a good seal. Care should be taken not to rub, damage,
or move the gasket.
■ Do Not Use Oven Cleaners – No commercial oven cleaner
or oven liner protective coating of any kind should be used
in or around any part of the oven.
■ Clean Only Parts Listed in Manual.
■ Before Self-Cleaning the Oven – Remove broiler pan and
other utensils.
For units with ventilating hood –
■ Clean Ventilating Hoods Frequently – Grease should not
be allowed to accumulate on hood or filter.
■ When flambeing foods under the hood, turn the fan on.

4
FEATURE GUIDE
This manual covers several models. Your model may have some or all of the items listed. Refer to this manual or the Customer Care section
of our website at www.amanacanada.ca for more detailed instructions.
KEYPAD FEATURE INSTRUCTIONS
OVEN LIGHT Oven cavity light While the oven door is closed, press OVEN LIGHT to turn the light on and off. The oven light will
come on when the oven door is opened. The oven light will not come on during the Self-Clean
cycle.
SELF-CLEAN Self-clean cycle
(on some models)
See the “Range Care” section.
CLOCK Clock The Clock uses a 12-hour cycle.
1. Check that the oven is off.
2. Press CLOCK.
3. Press TEMP/TIME “+” or “-” arrow pads to set the time of day.
4. Press CLOCK or START.
TIMER SET/
OFF
Oven timer The Timer can be set in hours or minutes up to 12 hours and 59 minutes.
1. Press TIMER SET/OFF.
2. Press TEMP/TIME “+” or “-” arrow pads to set the length of time.
3. Press START to begin the countdown. If enabled, end-of-cycle tones will sound at end of
countdown.
4. Press TIMER SET/OFF twice to cancel the Timer. Do not press the OFF/CANCEL keypad
because the oven will turn off.
5. If the Timer is running, but not in the display, press TIMER SET/OFF to display the countdown
for 5 seconds.
BAKE Baking and
roasting
1. Press BAKE.
2. Press TEMP/TIME “+” or “-” arrow pads to set a temperature other than 350°F (175°C) in
5° increments between 170°F and 525°F (75°C and 275°C).
3. Press START.
4. To change the temperature repeat Step 2. Press START or wait 5 seconds for the change to
take effect.
5. Press OFF/CANCEL when finished.
BROIL Broiling 1. Position cookware in oven and close door to broil stop position. The door should remain open
approximately 5" (12.7 cm).
2. Press BROIL.
3. Press TEMP/TIME “+” or “-” arrow pads to change the temperature in 5° increments between
300°F and 525°F (150°C and 275°C).
4. Press START.
5. Press OFF/CANCEL when finished.
START Cooking start
Oven control
lockout
The Start pad begins any oven function. If Start is not pressed within 5 seconds, “PUSH?” or
“PSH” appears in the display. If Start is not pressed within 1 minute after pressing a keypad, the
function is canceled and the time of day is displayed.
1. Check that the oven is off.
2. Press and hold the START keypad for 3 seconds.
3. A tone will sound, and “Loc” will be displayed.
4. Repeat to unlock. Only the CLOCK, OVEN LIGHT, and TIMER SET/OFF keypads will function
with the controls locked.
OFF/CANCEL Range function The Off/Cancel keypad stops any function except the Clock, Timer, and Oven Control Lockout.
TEMP/TIME Temperature and
time adjust
The “+” or “-” arrow pads are used to adjust time and temperature settings.

5
COOKTOP USE
The control knobs can be set to anywhere between HI and LO.
Push in and turn to setting.
Ceramic Glass (on some models)
The surface cooking area will glow red when an element is on. It
may cycle on and off to maintain the selected heat level.
Use cookware about the same size as the surface cooking area.
Cookware should not extend more than ½" (1.3 cm) outside the
area.
Cleaning off the cooktop before and after each use will help keep it
free from stains and provide the most even heating.
Cooktop On Indicator Light (on some models)
The Cooktop On indicator light is located on the console panel.
When any control knob on the console panel is turned on, the
Cooktop On indicator light will glow.
Ceramic Glass Cooktop Cleaning
Clean the cooktop after each use to help avoid scratches, pitting,
abrasions and to condition the glass surface. Ceramic glass
cooktop cleaner and a cooktop scraper are also recommended for
stubborn soils. Do not use abrasive cleaners, cleaning pads or
harsh chemicals for cleaning. The Cooktop Care Kit, Part Number
31605B, contains all of the items to clean and condition your
ceramic glass cooktop. Refer to the “Range Care” section for
additional information.
IMPORTANT: To avoid permanent damage to the cooktop surface
and to make soils easier to remove, clean the cooktop after each
use to remove all soils.
Hot Surface Indicator Light (on some models)
On ceramic glass models, the hot surface indicator light is located
on the console panel.
The hot surface indicator light will glow as long as any surface
cooking area is too hot to touch, even after the surface cooking
area is turned off.
Coil Elements and Burner Bowls (on some models)
Coil elements should be level for optimal cooking results. Burner
bowls, when clean, reflect heat back to the cookware. They also
help catch spills.
Cookware should not extend more than ½" (1.3 cm) over the coil
element. If cookware is uneven or too large, it can produce excess
heat, causing the burner bowl to change color.
Dual Cooking Zone (on some models)
The Dual Cooking Zone offers flexibility depending on the size of
the cookware. Single size can be used in the same way as a regular
element. The dual size combines both the single and outer element
and is recommended for larger size cookware.
WARNING
Fire Hazard
Turn off all controls when done cooking.
Failure to do so can result in death or fire.
REMEMBER: When range is in use or (on some models)
during the Self-Cleaning cycle, the entire cooktop area may
become hot.
A. Dual
B. Single
A
B

6
OVEN USE
Odors and smoke are normal when the oven is used the first few
times, or when it is heavily soiled.
IMPORTANT: The health of some birds is extremely sensitive to the
fumes given off. Exposure to the fumes may result in death to
certain birds. Always move birds to another closed and well-
ventilated room.
Electronic Oven Controls
Control Display
The display will flash when powered up or after a power loss. Press
OFF/CANCEL to clear. When oven is not in use, the time of day is
displayed. Indicator lights show functions that are in use.
Tones
Tones are audible signals, indicating the following:
Basic Functions
One tone
■ Valid pad press
■ Oven is preheated (long tone)
■ Function has been entered
■ Reminder, repeating every 20 seconds after the end-of-cycle
tones
Three tones
■ Invalid pad press
Four tones
■ End of cycle
Fahrenheit and Celsius
The temperature is preset at Fahrenheit, but can be changed to
Celsius.
To change: Press and hold BROIL for 5 seconds. A tone will
sound, and “°C” or “°F” will appear on the display. Repeat to
change back.
To exit mode, press OFF/CANCEL.
Oven Temperature Control
IMPORTANT: Do not use a thermometer to measure oven
temperature because opening the oven door may cause element
cycling to give incorrect readings.
The oven provides accurate temperatures; however, it may cook
faster or slower than your previous oven, so the temperature can
be adjusted to personalize it for your cooking needs. It can be
changed in Fahrenheit or Celsius.
To Adjust Oven Temperature:
1. Press and hold BAKE for 5 seconds until the oven display
shows the current temperature, for example “0°F CAL” or “00.”
2. Press the TEMP/TIME “+” or “-” keypads to increase or to
decrease the temperature in 10°F (5° or 6°C) amounts. The
adjustment can be set between 30°F (17°C) and -30°F (-17°C).
3. Press START.
Options Mode
Press and hold TIMER SET/OFF for 5 seconds, and “Opt” will
appear. Use the TEMP/TIME keys to cycle through the following
options. Press OFF/CANCEL to exit the mode.
End of Cycle Tones
“b1” (beep once) or “b” (continue to beep) will be displayed. Press
TIMER SET/OFF to toggle through selection.
12-Hour Shutoff
If “12 Hr” is displayed, the oven will automatically shut off after
12 hours. Press TIMER SET/OFF to toggle to “- Hr” to disable the
12-hour shutoff.
Oven Light with Door Open
“LOn” indicates that the oven light will turn on when the door is
open. If “LOFF” is displayed, the oven light will turn on only with the
oven light switch. Press TIMER SET/OFF to toggle through
selection.
Sabbath Mode
(on some models)
The Sabbath Mode sets the oven to remain on in a Bake setting
until turned off. A Timed Bake can also be set to keep the oven on
for only part of the Sabbath. The Oven Control Lockout Feature (if
present) will be disabled during the Sabbath Mode. After the
Sabbath Mode is set, no tones will sound, the display will not show
the temperature, the Timer Mode will be canceled (if active) and
only the following pads will function:
■ “+” and “-” keypads (if present)
■ “More” and “Less” keypads (if present)
■ Off/Cancel
When the oven door is opened or closed, the oven light will not turn
on or off and the heating elements will not turn on or off
immediately.
When power is restored after a power failure, the oven will return to
Sabbath Mode and remain Sabbath compliant with the bake
elements off until the Off/Cancel keypad is pressed.
Pressing the Off/Cancel keypad at any time returns the oven to the
normal cooking mode (not Sabbath compliant).
Before entering the Sabbath Mode, it must be decided if the oven
light is to be on or off for the entire Sabbath Mode period. If the
light is on when entering Sabbath Mode, it will remain on for the
entire time Sabbath Mode is in use. If the light is off when entering
Sabbath Mode, it will remain off for the entire time Sabbath Mode is
in use. Opening the oven door or pressing the Oven Light keypad
will not affect the oven light once Sabbath Mode has been entered.
If the oven has the Convection Bake feature, the oven light is
controlled by a separate Oven Light switch on the console. If the
oven light is on when entering the Sabbath Mode, it will remain on
for the entire time Sabbath Mode is in use. For the oven light to be
off during the Sabbath Mode, the light bulb must be removed from
the oven prior to entering the Sabbath Mode. Not performing these
steps will cause the oven light to turn on when the oven door is
opened, resulting in the oven being not Sabbath compliant.
On the Holiday, the oven temperature can be changed once the
oven is in Sabbath Mode by pressing the “+” or “-” keypads (if
present) or the “More” or “Less” keypads (if present). The oven
temperature will change 25°F (14°C) each time the keypad is
pressed. The display will not change, and there will be no sounds
during this adjustment.

7
To Bake Using Sabbath Mode:
1. Press BAKE.
2. Press the “+” or “-” keypads (if present) or “MORE” or “LESS”
keypads (if present).
3. Press START.
4. Press and hold the TIMER SET/OFF keypad for 5 seconds.
“SAb” will flash in the display.
5. Press START within 5 seconds to enter Sabbath Mode;
otherwise, the entire cycle cancels out. “SAb” will stop flashing
and remain on in the display. The oven is now in Sabbath Mode
and is Sabbath compliant.
Pressing the Off/Cancel keypad at any time returns the oven to the
normal cooking mode (not Sabbath compliant).
To set a Timed Bake using Sabbath Mode
(on some models):
1. Press BAKE.
2. Press the “+” or “-” keypads (if present) or “MORE” or “LESS”
keypads (if present) to enter a temperature other than the one
displayed.
3. Press COOK TIME. The Cook Time oven indicator light will light
up.
4. Press the “+” or “-” keypads (if present) or “MORE” or “LESS”
keypads (if present) to enter a cook time length.
5. Press START.
6. Press and hold the TIMER SET/OFF keypad for 5 seconds.
“SAb” will flash in the display.
7. Press START within 5 seconds to enter Sabbath Mode;
otherwise, the entire cycle cancels out. “SAb” will stop flashing
and remain on in the display. The oven is now in Sabbath Mode
and is Sabbath compliant. The Bake, On and Cook Time
indicator lights will be displayed.
When the set cook time ends, the oven will shut off automatically
and the indicator lights will turn off, indicating the end of the cycle.
Pressing the Off/Cancel keypad at any time returns the oven to the
normal cooking mode (not Sabbath compliant).
To set a Delayed Timed Bake using Sabbath Mode
(on some models):
1. Press BAKE.
2. Press the “+” or “-” keypads (if present) or “MORE” or “LESS”
keypads (if present) to enter a temperature other than the one
displayed.
3. Press COOK TIME. The Cook Time oven indicator light will light
up.
4. Press the “+” or “-” keypads (if present) or “MORE” or “LESS”
keypads (if present) to enter a cook time length.
5. Press START TIME or DELAY START. The Start Time/Delay
Start indicator light will light up.
6. Press the “+” or “-” keypads (if present) or “MORE” or “LESS”
keypads (if present) to enter a start time.
7. Press START.
8. Press and hold the TIMER SET/OFF keypad for 5 seconds.
“SAb” will flash in the display.
9. Press START within 5 seconds to enter Sabbath Mode;
otherwise, the entire cycle cancels out. “SAb” will stop flashing
and remain on in the display. The oven is now in Sabbath Mode
and is Sabbath compliant. The On and Delay indicator lights
will be displayed.
When the start time is reached, the Bake, On and Cook Time
indicator lights will automatically turn on. When the set cook time
ends, the oven will shut off automatically and the indicator lights
will turn off, indicating the end of the cycle.
Pressing the Off/Cancel keypad at any time returns the oven to the
normal cooking mode (not Sabbath compliant).
Aluminum Foil
IMPORTANT: To avoid permanent damage to the oven bottom
finish, do not line the oven bottom with any type of foil or liner.
For best cooking results, do not cover entire oven rack with foil
because air must be able to move freely.
Positioning Racks and Bakeware
IMPORTANT: To avoid permanent damage to the porcelain finish,
do not place food or bakeware directly on the oven door or bottom.
Bakeware
To cook food evenly, hot air must be able to circulate. Allow
2" (5 cm) of space around bakeware and oven walls. Make sure
that no bakeware piece is directly over another.
Racks
■ Position racks before turning on the oven.
■ Do not move racks with bakeware on them.
■ Make sure racks are level.
To move a rack, pull it out to the stop position, raise the front edge,
and then lift out. Use the following illustration and charts as a
guide.
Rack Positions
Rack 5: Toasting bread or broiling thin, non-fatty foods.
Rack 4: Use for 2-rack baking and broiling.
Rack 3: Most baked goods on a cookie sheet or jelly roll pan, layer
cakes, frozen convenience foods. Broiling chicken pieces.
Rack 2: Roasting small cuts of meat, pies, casseroles, bundt
cakes, and 2-rack baking.
Rack 1: Roasting large cuts of meat and poultry.
Multiple Rack Cooking
2-rack: Use rack positions 2 and 4.
Baking Layer Cakes on 2 Racks
For best results when baking cakes on 2 racks, use racks 2 and 4
for baking. Place the cakes on the racks as shown.
WARNING
Food Poisoning Hazard
Do not let food sit in oven more than one hour before
or after cooking.
Doing so can result in food poisoning or sickness.
1
2
3
4
5

8
Oven Vent
The oven vent releases hot air and moisture from the oven, and
should not be blocked or covered. Blocking or covering the vent
will cause poor air circulation, affecting cooking and cleaning
results. Do not set plastics, paper or other items that could melt or
burn near the oven vent.
On coil element models, the element can be used when the oven is
in use as long as the cookware does not extend more than
½" (1.3 cm) over the element.
Baking and Roasting
The bake and broil burners cycle on and off in intervals. This
feature is automatically activated when the oven is in use.
Before baking and roasting, position racks according to
“Positioning Racks and Bakeware” section. When roasting, it is not
necessary to wait for the oven preheat cycle to end before putting
food in unless it is recommended in the recipe.
Preheating
When START is pressed, the oven will begin preheating. Once
100ºF (38ºC) is reached, the display temperature will increase as
the actual temperature of the oven increases. When the preheat
temperature is reached, a tone will sound, and the selected
temperature will appear on the display.
Broiling
Leave the door open 6" (15 cm) at the broil stop position to ensure
proper broiling temperature. Preheat the oven for 5 minutes before
putting food in unless recommended otherwise in the recipe.
Position food on grid in a broiler pan, then place it in the center of
the oven rack.
NOTE: Odors and smoke are normal the first few times the oven is
used or if the oven is heavily soiled.
Changing the temperature when broiling allows more precise
control when cooking. The lower the broil setting, the slower the
cooking. Thicker cuts and unevenly shaped pieces of meat, fish
and poultry may cook better at lower broil settings. Use racks 6 or
7 for broiling. Refer to the “Positioning Racks and Bakeware”
section for more information.
On lower settings, the broil element will cycle on and off to maintain
the proper temperature.
■ For best results, use a broiler pan and grid. It is designed to
drain juices and help avoid spatter and smoke.
If you would like to purchase a broiler pan, one may be ordered.
Please refer to the “Accessories” section for more information.
RANGE CARE
Self-Cleaning Cycle (on some models)
IMPORTANT: The health of some birds is extremely sensitive to the
fumes given off during the Self-Cleaning cycle. Exposure to the
fumes may result in death to certain birds. Always move birds to
another closed and well-ventilated room.
Do not block the oven vent(s) during the Self-Cleaning cycle. Air
must be able to move freely. Depending on your model, see “Oven
Vent” section.
Do not clean, rub, damage or move the oven door gasket.
Prepare Range
■ Remove the broiler pan, grid, cookware and bakeware, all
cooking utensils, oven racks and aluminum foil and, on some
models, the temperature probe from the oven.
■ Use a damp cloth to clean inside door edge and the
1½" (3.8 cm) area around the inside oven cavity frame, being
certain not to move or bend the gasket.
■ Remove plastic items from the cooktop because they may
melt.
■ Remove all items from the storage drawer.
How the Cycle Works
IMPORTANT: The heating and cooling of porcelain on steel in the
oven may result in discoloring, loss of gloss, hairline cracks and
popping sounds.
Before self-cleaning, make sure the door is completely closed or
the door will not lock and the self-cleaning cycle will not begin.
Once the oven has completely cooled, remove ash with a damp
cloth. To avoid breaking the glass, do not apply a cool damp cloth
to the inner door glass before it has completely cooled.
To stop the self-cleaning cycle at anytime, press the OFF/CANCEL
keypad. If the temperature is too high, the oven door will remain
locked and “cool” and “locked” will be displayed.
The oven light will not function during the self-cleaning cycle.
A. Oven vent (ceramic
glass model)
A. Oven vent (coil
element model)
A
A
WARNING
Burn Hazard
Do not touch the oven during the Self-Cleaning cycle.
Keep children away from oven during
Self-Cleaning cycle.
Failure to follow these instructions can result in burns.

9
Electronic Oven Control with Adjustable Self-Clean (HI - LO)
The self-cleaning cycle can be set at HI self-clean time (4 hours
30 minutes) or LO self-clean time (3 hours 30 minutes). The
suggested clean times are 3 hours 30 minutes for light soil, or
4 hours 30 minutes for heavy soil. The last 30 minutes of the cycles
is for cool down.
To Self-Clean:
1. Press SELF CLEAN to set the clean time to HI (4 hours
30 minutes).
2. Press the TEMP/TIME “+” or “-” arrow pads to cycle between
LO and HI clean time.
3. Press START.
The oven door will automatically lock. The CLEAN indicator
light will be displayed. The time remaining will also be
displayed.
4. When the self-clean cycle is complete and the oven cools, the
CLEAN indicator light will turn off.
5. When the oven is completely cooled, remove ash with a damp
cloth.
General Cleaning
IMPORTANT: Before cleaning, make sure all controls are off and
the oven and cooktop are cool. Always follow label instructions on
cleaning products. For additional information, you can visit the
Customer Care section of our website at www.amanacanada.ca.
Soap, water and a soft cloth or sponge are suggested first unless
otherwise noted.
EXTERIOR PORCELAIN ENAMEL SURFACES (on some
models)
Food spills containing acids, such as vinegar and tomato, should
be cleaned as soon as the entire range is cool. These spills may
affect the finish.
Cleaning Method:
■ Glass cleaner, mild liquid cleaner or nonabrasive scrubbing
pad:
Gently clean around the model and serial number plate
because scrubbing may remove numbers.
■ affresh
®
Kitchen and Appliance Cleaner Part Number
W10355010 (not included):
See cover for contact information.
STAINLESS STEEL (on some models)
NOTE: To avoid damage to stainless steel surfaces, do not use
soap-filled scouring pads, abrasive cleaners, Cooktop Cleaner,
steel-wool pads, gritty washcloths or abrasive paper towels.
Damage may occur to stainless steel surfaces, even with one-time
or limited use.
Cleaning Method:
Rub in direction of grain to avoid damaging.
■ affresh
®
Stainless Steel Cleaner Part Number W10355016:
See cover for contact information.
Liquid detergent or all-purpose cleaner:
Rinse with clean water and dry with soft, lint-free cloth.
METALLIC PAINT (on some models)
Do not use abrasive cleaners, cleaners with bleach, rust removers,
ammonia or sodium hydroxide (lye) because paint surface may
stain.
CERAMIC GLASS (on some models)
Cleaning Method:
Use affresh
®
Cooktop Cleaner Part Number W10355051 and
Cooktop Scraper Part Number WA906B to clean and remove
stains from the cooktop. Use Cooktop Protectant Part Number
31463B regularly to avoid stain buildup, pitting and scratching,
while conditioning the cooktop for easier future cleaning. These
can be ordered as accessories. See cover for contact information.
The Cooktop Scraper uses razor blades. Store razor blades out of
the reach of children.
Do not use steel wool, abrasive powder cleansers, chlorine bleach,
rust remover or ammonia because damage may occur.
Light to moderate soil
■ Can be cleaned with damp paper towels or sponge. Light
stains should be addressed with cleaner and cleaning pad.
Sugary spills (jellies, candy, syrup)
■ Clean with cooktop scraper and cooktop cleaner. Scrape off
sugary spills while the cooktop is still warm. You may want to
wear oven mitts while cleaning the cooktop.
Heavy soil, dark streaks, specks and discoloration
■ Clean with Cooktop Cleaner or nonabrasive cleaner and
cleaning pad.
Burned-on soil
■ Clean with Cooktop Cleaner, cleaning pad and cooktop
scraper.
Metal marks from aluminum and copper
■ Clean with Cooktop Cleaner and Cleaning Pad as soon as
cooktop has cooled down. The marks will not totally disappear,
but after many cleanings they will become less noticeable.
Tiny scratches and abrasions
■ Use Cooktop Cleaner and cleaning pad for scratches.
Scratches and abrasions do not affect cooking performance,
and after many cleanings they will become less noticeable.
COOKTOP CONTROLS
To avoid damage to the cooktop controls, do not use steel wool,
abrasive cleansers or oven cleaner.
To avoid damage, do not soak knobs.
When replacing knobs, make sure knobs are in the OFF position.
On some models, do not remove seals under knobs.
Cleaning Method:
■ Soap and water:
Pull knobs straight away from control panel to remove.
CONTROL PANEL AND OVEN DOOR EXTERIOR
To avoid damage to the control panel, do not use abrasive
cleaners, steel-wool pads, gritty washcloths or abrasive paper
towels.
Cleaning Method:
■ Glass cleaner and soft cloth or sponge:
Apply glass cleaner to soft cloth or sponge, not directly on
panel.
■ affresh
®
Kitchen and Appliance Cleaner Part Number
W10355010 (not included):
See cover for contact information.
COIL ELEMENTS (on some models)
Cleaning Method:
■ Damp cloth: Make sure control knobs are off and elements are
cool.
Do not clean or immerse in water. Soil will burn off when hot.

10
BURNER BOWLS (on some models)
Before removing or replacing coil elements and burner bowls,
make sure they are cool and the control knobs are in the OFF
position.
Remove the coil element by pushing the edge of the coil element
toward the receptacle. Lift it enough to clear the burner bowl. Pull
the coil element straight away from the receptacle to remove. Lift
out the burner bowl.
Cleaning Method:
Chrome burner bowls
Wash frequently in warm, soapy water. (It is not recommended to
wash chrome bowls in a dishwasher.) A mild abrasive cleaner and a
plastic scrubber can be used to remove stubborn stains.
For heavily soiled bowls, place an ammonia soaked paper towel on
the stains and allow to soak for a short time, then gently scrub with
a plastic scrubber.
SURFACE UNDER COOKTOP (on some models)
The coil cooktop will lift up to provide easy access for cleaning
beneath. Lift the cooktop by both front corners until the support
locks into place.
Cleaning Method:
■ Steel-wool pad
To avoid damage to the range, do not remove the cooktop.
OVEN RACKS
Cleaning Method:
■ Steel-wool pad
■ For racks that have discolored and are harder to slide, a light
coating of vegetable oil applied to the rack guides will help
them slide.
STORAGE DRAWER
Check that storage drawer is cool and empty before cleaning.
Cleaning Method:
■ Mild detergent
OVEN CAVITY
Do not use oven cleaners.
Food spills should be cleaned when oven cools. At high
temperatures, foods react with porcelain and staining, etching,
pitting or faint white spots can result.
Cleaning Method:
■ Self-Cleaning cycle: See “Self-Cleaning Cycle” first.
®
affresh is a trademark of Whirlpool, U.S.A.
Oven Light
The oven light is a standard 40-watt appliance bulb. Before
replacing, make sure the oven and cooktop are cool and the
control knobs are in the off position.
To Replace:
1. Unplug range or disconnect power.
2. Turn the glass bulb cover in the back of the oven
counterclockwise to remove.
3. Turn bulb counterclockwise to remove from socket.
4. Replace bulb, then bulb cover by turning clockwise.
5. Plug in range or reconnect power.
Appliance Outlets (on some models)
The 120-volt appliance outlet located on the control console may
be used to run portable appliances placed on countertops beside
the range.
The outlet operates independently and is not affected by range
control settings.
NOTE: Do not place portable appliances on the cooktop. Damage
to the portable appliance could result if the cooktop is hot.
Appliance Outlet Circuit Breaker:
The circuit breaker for the appliance outlet on your range is located
next to the outlet. It is rated for 12 amps.
If the circuit breaker trips, it can be reset by pressing the switch. A
delay of several minutes may be required for the circuit breaker to
cool before it will reset.
TROUBLESHOOTING
First try the solutions suggested here or visit our website and reference the Customer Care section
to possibly avoid the cost of a service call.
www.amanacanada.ca
Nothing will operate
■ Is the power supply cord unplugged?
Plug into a grounded outlet.
■ Has a household fuse blown, or has a circuit breaker
tripped?
Replace the fuse or reset the circuit breaker. If the problem
continues, call an electrician.
■ Does the control display an F9 or F9, E0 error code?
The electrical outlet in the home may be miswired. Contact a
qualified electrician to verify the electrical supply.
Cooktop will not operate
■ Is the control knob set correctly?
Push in knob before turning to a setting.
■ Has a self-clean cycle been selected?
On some ceramic glass models, the cooktop will not operate
during a self-clean cycle.
Excessive heat around cookware on cooktop
■ Is the cookware the proper size?
Use cookware about the same size as the surface cooking
area, element or surface burner. Cookware should not extend
more than ½" (1.3 cm) outside the cooking area.
Cooktop cooking results not what expected
■ Is the control knob set to the proper heat level?
See “Cooktop Use” section.
■ Is the range level?
Level the range. See the Installation Instructions.

11
Oven will not operate
■ Is the electronic oven control set correctly?
See “Electronic Oven Controls” section.
■ Has a delay start been set?
See “Timed Cooking” section.
Oven temperature too high or too low
■ Does the oven temperature calibration need adjustment?
See “Oven Temperature Control” in the “Electronic Oven
Controls” section.
Oven indicator lights flash
■ Do the oven indicator lights flash?
See “Control Display” in the “Electronic Oven Controls”
section. If the indicator light(s) keeps flashing, call for service.
See cover for contact information.
Display shows messages
■ Is the display showing a flashing time?
There has been a power failure. Clear the display. On some
models, reset the clock, if needed. See “Clock” keypad feature
in the “Feature Guide” section.
■ Is the display showing a letter followed by a number?
Press the OFF/CANCEL keypad to clear the display. See
“Control Display” in the “Electronic Oven Controls” section. If it
reappears, call for service. See cover for contact information.
■ Is the display showing a flashing “PUSH?” or “PSH”?
See the “Start” keypad feature in the “Feature Guide” section.
Self-Cleaning cycle will not operate
■ Is the oven door open?
Close the oven door all the way.
■ Has the function been entered?
See “Self-Cleaning Cycle” section.
Oven cooking results not what expected
■ Is the range level?
Level the range. See the Installation Instructions.
■ Is the proper temperature set?
Double-check the recipe in a reliable cookbook.
■ Is the proper oven temperature calibration set?
See “Oven Temperature Control” in the “Electronic Oven
Controls” section.
■ Was the oven preheated?
See “Baking and Roasting” section.
■ Are the racks positioned properly?
See “Positioning Racks and Bakeware” section.
■ Is there proper air circulation around bakeware?
See “Positioning Racks and Bakeware” section.
■ Is the batter evenly distributed in the pan?
Check that batter is level in the pan.
■ Is the proper length of time being used?
Adjust cooking time.
■ Has the oven door been opened while cooking?
Oven peeking releases oven heat and can result in longer
cooking times.
■ Are baked items too brown on the bottom?
Move rack to higher position in the oven.
■ Are pie crust edges browning early?
Use aluminum foil to cover the edge of the crust and/or reduce
baking temperature.
■ Are foods overdone or burnt even at low oven
temperatures?
Check if the temperature scale has been changed from
Fahrenheit to Celsius. See “Fahrenheit and Celsius” in the
“Electronic Oven Controls” section.
ACCESSORIES
Canning Element Kit
(coil element models)
Order Part Number 242905
Cooktop Care Kit
(ceramic glass models)
(includes cleaner, protectant, scraper, and
applicator pads)
Order Part Number 31605
Cooktop Protectant
(ceramic glass models)
Order Part Number 31463
affresh
®
Stainless Steel Cleaning Wipes
(stainless steel models)
Order Part Number W10355049
2-Burner Cooktop Griddle
Order Part Number 4396096RB
affresh
®
Cooktop Cleaner
(ceramic glass models)
Order Part Number W10355051
Cooktop Scraper
(ceramic glass models)
Order Part Number WA906B
Granite Cleaner and Polish
Order Part Number W10275756
affresh
®
Stainless Steel Cleaner
(stainless steel models)
Order Part Number W10355016
affresh
®
Kitchen & Appliance Cleaner
Order Part Number W10355010
Split Oven Rack
Order Part Number 4396927
Porcelain Broiler Pan and Grid
Order Part Number 4396923
Gas Grate and Drip Pan Cleaner
Order Part Number 31617A
Premium Broil Pan and Roasting Rack
Order Part Number W10123240

12
AMANA
®
MAJOR APPLIANCE WARRANTY
LIMITED WARRANTY
For one year from the date of purchase, when this major appliance is operated and maintained according to instructions attached to or
furnished with the product, Amana brand of Whirlpool Corporation or Whirlpool Canada LP (hereafter “Amana”) will pay for factory
specified parts and repair labor to correct defects in materials or workmanship. Service must be provided by an Amana designated
service company. This limited warranty is valid only in the United States or Canada and applies only when the major appliance is used in
the country in which it was purchased. Outside the 50 United States and Canada, this limited warranty does not apply. Proof of original
purchase date is required to obtain service under this limited warranty.
ITEMS EXCLUDED FROM WARRANTY
This limited warranty does not cover:
1. Service calls to correct the installation of your major appliance, to instruct you on how to use your major appliance, to replace or repair
house fuses, or to correct house wiring or plumbing.
2. Service calls to repair or replace appliance light bulbs, air filters or water filters. Consumable parts are excluded from warranty
coverage.
3. Repairs when your major appliance is used for other than normal, single-family household use or when it is used in a manner that is
contrary to published user or operator instructions and/or installation instructions.
4. Damage resulting from accident, alteration, misuse, abuse, fire, flood, acts of God, improper installation, installation not in accordance
with electrical or plumbing codes, or use of consumables or cleaning products not approved by Amana.
5. Cosmetic damage, including scratches, dents, chips or other damage to the finish of your major appliance, unless such damage
results from defects in materials or workmanship and is reported to Amana within 30 days from the date of purchase.
6. Any food loss due to refrigerator or freezer product failures.
7. Costs associated with the removal from your home of your major appliance for repairs. This major appliance is designed to be
repaired in the home and only in-home service is covered by this warranty.
8. Repairs to parts or systems resulting from unauthorized modifications made to the appliance.
9. Expenses for travel and transportation for product service if your major appliance is located in a remote area where service by an
authorized Amana servicer is not available.
10. The removal and reinstallation of your major appliance if it is installed in an inaccessible location or is not installed in accordance with
published installation instructions.
11. Major appliances with original model/serial numbers that have been removed, altered or cannot be easily determined. This warranty is
void if the factory applied serial number has been altered or removed from your major appliance.
The cost of repair or replacement under these excluded circumstances shall be borne by the customer.
DISCLAIMER OF IMPLIED WARRANTIES; LIMITATION OF REMEDIES
CUSTOMER'S SOLE AND EXCLUSIVE REMEDY UNDER THIS LIMITED WARRANTY SHALL BE PRODUCT REPAIR AS PROVIDED
HEREIN. IMPLIED WARRANTIES, INCLUDING WARRANTIES OF MERCHANTABILITY OR FITNESS FOR A PARTICULAR PURPOSE,
ARE LIMITED TO ONE YEAR OR THE SHORTEST PERIOD ALLOWED BY LAW. AMANA SHALL NOT BE LIABLE FOR INCIDENTAL OR
CONSEQUENTIAL DAMAGES. SOME STATES AND PROVINCES DO NOT ALLOW THE EXCLUSION OR LIMITATION OF INCIDENTAL OR
CONSEQUENTIAL DAMAGES, OR LIMITATIONS ON THE DURATION OF IMPLIED WARRANTIES OF MERCHANTABILITY OR FITNESS,
SO THESE EXCLUSIONS OR LIMITATIONS MAY NOT APPLY TO YOU. THIS WARRANTY GIVES YOU SPECIFIC LEGAL RIGHTS, AND
YOU MAY ALSO HAVE OTHER RIGHTS WHICH VARY FROM STATE TO STATE OR PROVINCE TO PROVINCE.
If outside the 50 United States and Canada, contact your authorized Amana dealer to determine if another warranty applies. 9/07
For additional product information, visit www.amanacanada.ca
If you do not have access to the Internet and you need assistance using your product or you would like to schedule service, you may
contact Amana at the number below.
Have your complete model number ready. You can find your model number and serial number on the oven frame behind the storage
drawer panel.
For assistance or service, call 1-800-807-6777.
If you need further assistance, you can write to Amana with any questions or concerns at the address below:
Amana Brand Home Appliances
Customer eXperience Centre
200 - 6750 Century Ave.
Mississauga, ON L5N 0B7
Please include a daytime phone number in your correspondence.
Please keep these User Instructions and model number information for future reference.

13
MERCI d'avoir acheté ce produit de grande qualité. Si vous rencontrez un problème non abordé à la section DÉPANNAGE, veuillez
visiter notre site Web à www.amanacanada.ca pour obtenir des informations supplémentaires. Si vous avez toujours besoin d'aide,
composez le 1-800-807-6777.
Vous devrez connaître les numéros de modèle et de série qui se trouvent sur le châssis du four, derrière le panneau du tiroir de
remisage.
INSTRUCTIONS D'UTILISATION
DE LA CUISINIÈRE ÉLECTRIQUE
Table des matières
SÉCURITÉ DE LA CUISINIÈRE............................................................ 14
La bride antibasculement................................................................... 14
GUIDE DES CARACTÉRISTIQUES ..................................................... 17
UTILISATION DE LA TABLE DE CUISSON ........................................ 18
UTILISATION DU FOUR ....................................................................... 19
Commandes électroniques du four ................................................... 19
Mode Sabbat...................................................................................... 19
Papier d’aluminium............................................................................. 20
Positionnement des grilles et des ustensiles de cuisson au four...... 20
Évent du four ...................................................................................... 21
Cuisson au four et rôtissage .............................................................. 21
Cuisson au gril.................................................................................... 21
ENTRETIEN DE LA CUISINIÈRE ......................................................... 22
Programme d’autonettoyage (sur certains modèles) ........................ 22
Nettoyage général.............................................................................. 22
Lampe du four.................................................................................... 24
Prises pour appareils électroménagers (sur certains modèles) ........ 24
DÉPANNAGE......................................................................................... 25
ACCESSOIRES...................................................................................... 26
GARANTIE ............................................................................................. 27

14
SÉCURITÉ DE LA CUISINIÈRE
La bride antibasculement
Dans les conditions de service normales, la cuisinière ne bascule pas. Elle peut cependant basculer si une force ou un poids excessif est
appliqué(e) sur la porte ouverte alors que la bride antibasculement n’est pas convenablement fixée.
Risque possible de décès ou de blessure grave si vous ne
suivez pas immédiatement les instructions.
Risque possible de décès ou de blessure grave si vous
ne suivez pas les instructions.
Tous les messages de sécurité vous diront quel est le danger potentiel et vous disent comment réduire le risque de blessure et
ce qui peut se produire en cas de non-respect des instructions.
Votre sécurité et celle des autres est très importante.
Nous donnons de nombreux messages de sécurité importants dans ce manuel et sur votre appareil ménager. Assurez-vous de
toujours lire tous les messages de sécurité et de vous y conformer.
AVERTISSEMENT
DANGER
Voici le symbole d’alerte de sécurité.
Ce symbole d’alerte de sécurité vous signale les dangers potentiels de décès et de blessures graves à vous
et à d’autres.
Tous les messages de sécurité suivront le symbole d’alerte de sécurité et le mot “DANGER” ou
“AVERTISSEMENT”. Ces mots signifient :
Risque de basculement
Un enfant ou une personne adulte peut faire basculer la cuisinière, ce qui peut causer un
décès.
Vérifier que la bride antibasculement est bien installée et engagée, conformément aux
instructions d'installation.
Réengager la bride antibasculement si la cuisinière a été déplacée.
Ne pas faire fonctionner la cuisinière si la bride antibasculement n'est pas installée et engagée.
Le non-respect de ces instructions peut causer un décès ou des brûlures graves aux enfants et
aux adultes.
Pour vérifier que la bride antibasculement est bien installée et engagée :
• Faire glisser la cuisinière vers l'avant.
• Vérifier que la bride antibasculement est bien fixée au plancher ou au mur.
• Faire de nouveau glisser la cuisinière vers l'arrière de sorte que le pied de la cuisinière
se trouve sous la bride antibasculement.
• Voir les instructions d'installation pour plus de détails.
AVERTISSEMENT
Bride
antibasculement
Pied de la cuisinière

15
IMPORTANTES INSTRUCTIONS DE SÉCURITÉ
CONSERVEZ CES INSTRUCTIONS
AVERTISSEMENT :
Pour réduire le risque d’incendie, de
choc électrique, de blessures ou de dommages lors de
l’utilisation de la cuisinière, il convient d’observer certaines
précautions élémentaires dont les suivantes :
■
AVERTISSEMENT :
POUR MINIMISER LE RISQUE
DE BASCULEMENT DE LA CUISINIÈRE, ELLE DOIT
ÊTRE BIEN IMMOBILISÉE PAR DES DISPOSITIFS
ANTIBASCULEMENT CORRECTEMENT INSTALLÉS.
POUR VÉRIFIER SI LES DISPOSITIFS SONT
CORRECTEMENT INSTALLÉS, GLISSER LA CUISINIÈRE
VERS L’AVANT ET VÉRIFIER SI LA BRIDE
ANTIBASCULEMENT EST BIEN FIXÉE AU PLANCHER
OU AU MUR, ET GLISSER LA CUISINIÈRE VERS
L’ARRIÈRE POUR QUE LE PIED ARRIÈRE DE LA
CUISINIÈRE SOIT SOUS LA BRIDE
ANTIBASCULEMENT.
■
MISE EN GARDE :
Ne pas remiser dans des armoires
au-dessus de la cuisinière ou sur le dosseret d’une
cuisinière, des objets que des enfants pourraient vouloir
atteindre. Les enfants pourraient se brûler ou se blesser en
grimpant sur la cuisinière.
■ Installation appropriée – S’assurer que la cuisinière est
correctement installée et reliée à la terre par un technicien
qualifié.
■ Ne jamais utiliser la cuisinière pour réchauffer ou chauffer
la pièce.
■ Ne pas laisser les enfants seuls – Les enfants ne doivent
pas être laissés seuls ou sans surveillance dans la pièce
où la cuisinière est en service. Ne jamais laisser les
enfants s’asseoir ou se tenir sur une partie quelconque de
la cuisinière.
■ Porter des vêtements appropriés – Des vêtements amples
ou détachés ne doivent jamais être portés pendant
l’utilisation de la cuisinière.
■ Entretien par l’utilisateur – Ne pas réparer ni remplacer
toute pièce de la cuisinière si ce n’est pas spécifiquement
recommandé dans le manuel. Toute autre opération
d’entretien ou de réparation doit être confiée à un
technicien qualifié.
■ Remisage dans ou sur la cuisinière – Des matériaux
inflammables ne doivent pas être remisés dans un four ou
près des éléments de surface.
■ Ne pas utiliser d’eau pour éteindre un feu de graisse –
Étouffer le feu ou les flammes ou utiliser un extincteur à
produits chimiques secs, ou un extincteur à mousse.
■ N’utiliser que des mitaines sèches de four – Des mitaines
de four mouillées ou humides sur des surfaces chaudes
peuvent provoquer des brûlures provenant de la vapeur.
Ne pas laisser les mitaines de four toucher les éléments
chauffants. Ne pas utiliser une serviette ou un tissu épais.
■ NE PAS TOUCHER LES ÉLÉMENTS DE SURFACE OU
L’ESPACE PRÈS DES ÉLÉMENTS – Les éléments de
surface peuvent être chauds même lorsqu’ils ont une teinte
foncée. Les endroits près des éléments de surface peuvent
devenir assez chauds pour causer des brûlures. Pendant
et après l’utilisation, ne pas toucher les éléments
chauffants et ne pas laisser les vêtements ou autres
matériaux inflammables entrer en contact avec ces
éléments de surface ou les endroits près des éléments,
avant qu’ils soient suffisamment refroidis. Ces endroits
comprennent la table de cuisson et les surfaces près de la
table de la cuisson.
■ Utiliser des ustensiles de dimension appropriée – La
cuisinière est munie d’un ou de plusieurs éléments
chauffants de différentes grandeurs. Choisir les ustensiles
qui ont un fond plat assez grand pour couvrir l’élément
chauffant de la surface de cuisson. L’utilisation d’ustensiles
trop petits exposera une partie de l’élément chauffant, ce
qui peut provoquer l’inflammation des vêtements.
L’utilisation d’un récipient de dimension correcte améliore
aussi l’efficacité de la cuisson.
■ Ne jamais laisser les éléments de la table de cuisson sans
surveillance alors qu’ils chauffent à la puissance maximale.
Il pourrait en résulter une ébullition qui cause de la fumée
et des renversements de corps gras qui peuvent
s’enflammer.
■ S’assurer que les cuvettes réfléchissantes ou les bols de
renversement sont en place – L’absence de ces cuvettes
ou bols au cours de la cuisson peut causer des dommages
aux fils ou aux composants en dessous des éléments.
■ Garnissages protecteurs – Ne pas recouvrir les cuvettes
ou le fond du four de papier d’aluminium sauf tel que
suggéré dans le manuel. L’installation incorrecte de papier
d’aluminium ou d’autre matériau peut causer un risque de
choc électrique ou d’incendie.
■ Ustensiles de cuisson vitrifiés – Seulement certains types
d’ustensiles de verre, vitrocéramique, céramique, faïence
ou autres surfaces vitrifiées conviennent pour le service
sur une table de cuisson, sans bris attribuables aux
changements soudains de température.
■ Les poignées des ustensiles doivent être tournées vers
l’intérieur et non vers le dessus des éléments adjacents –
Pour réduire le risque de brûlures, d’inflammation de
produits inflammables et de renversements dus à
l’entrechoquement non intentionnel des ustensiles, la
poignée d’un ustensile doit être positionnée de sorte
qu’elle est tournée vers l’intérieur et non au-dessus des
éléments de surface adjacents.
■ Ne pas tremper les éléments de chauffage amovibles –
Les éléments de chauffage ne doivent jamais être
immergés dans l’eau.
■ Ne pas faire cuire sur une table de cuisson endommagée –
Si la table de cuisson est brisée, les solutions de nettoyage
et les renversements peuvent pénétrer dans la table de
cuisson brisée et créer un risque d’un choc électrique.
Contacter immédiatement un technicien qualifié.

16
IMPORTANTES INSTRUCTIONS DE SÉCURITÉ
CONSERVEZ CES INSTRUCTIONS
■ Nettoyer la table de cuisson avec prudence – Si une
éponge ou un chiffon mouillé est utilisé pour essuyer les
renversements sur une surface de cuisson chaude, éviter
les brûlures causées par la vapeur chaude. Certains
nettoyants peuvent produire des émanations désagréables
lorsqu’ils sont utilisés sur une surface chaude.
■ Exercer une grande prudence lors de l’ouverture de la
porte – Laisser l’air chaud ou la vapeur s’échapper avant
d’enlever ou de replacer un plat.
■ Ne pas faire chauffer des contenants fermés –
L’accumulation de pression peut causer une explosion du
contenant et des blessures.
■ Ne jamais obstruer les ouvertures des évents.
■ Positionnement des grilles du four – Toujours placer les
grilles du four en position désirée pendant que le four est
froid. Si la grille doit être déplacée pendant que le four est
chaud, ne pas laisser les mitaines de four toucher l’élément
chaud du four.
■ NE PAS TOUCHER LES ÉLÉMENTS CHAUFFANTS OU
LES SURFACES INTÉRIEURES DU FOUR – Les
éléments chauffants peuvent être chauds même s’ils ont
une teinte foncée. Les surfaces intérieures d’un four
deviennent assez chaudes pour causer des brûlures.
Pendant et après l’utilisation, ne pas toucher ou laisser des
vêtements ou autres matériaux inflammables venir en
contact avec les éléments chauds ou les surfaces
intérieures chaudes du four avant qu’ils aient eu assez de
temps pour refroidir. D’autres surfaces de l’appareil
peuvent devenir assez chaudes pour causer des brûlures.
Ces surfaces comprennent les ouvertures de l’évent du
four et les surfaces près de ces ouvertures, les portes du
four, et les hublots des portes du four.
Pour les cuisinières avec programme d’autonettoyage –
■ Ne pas nettoyer le joint de la porte – Le joint de la porte
est essentiel pour l’étanchéité. Veiller à ne pas frotter,
endommager ou déplacer le joint.
■ Ne pas utiliser des produits commerciaux de nettoyage du
four – On ne doit pas utiliser un produit commercial de
nettoyage de four ou un enduit de protection des surfaces
internes du four quel qu’en soit le type, sur les surfaces du
four ou les surfaces voisines.
■ Nettoyer uniquement les pièces indiquées dans le manuel.
■ Avant d’exécuter le programme d’autonettoyage du four –
Ôter la lèchefrite et son plat et les autres ustensiles.
Pour les appareils avec hotte de ventilation –
■ Nettoyer les hottes de ventilation fréquemment – La
graisse ne doit pas s’accumuler sur la hotte ou le filtre.
■ Lorsque vous flambez des aliments sous la hotte, mettre le
ventilateur en marche.

17
GUIDE DES CARACTÉRISTIQUES
Ce manuel couvre différents modèles. Il est possible que votre modèle ne comporte pas toutes les caractéristiques décrites. Consulter ce
manuel ou la section service à la clientèle de notre site Web sur www.amanacanada.ca pour des instructions plus détaillées.
CLAVIER CARACTÉRISTIQUE INSTRUCTIONS
OVEN LIGHT
(lampe du four)
Lampe de la cavité
du four
Alors que la porte du four est fermée, appuyer sur OVEN LIGHT (lampe du four) pour allumer
ou éteindre la lampe. La lampe du four s'allume à l'ouverture de la porte. La lampe du four
ne s’allume pas durant le programme d’autonettoyage.
SELF-CLEAN
(autonettoyage)
Programme
d’autonettoyage (sur
certains modèles)
Voir la section “Entretien de la cuisinière”.
CLOCK (horloge) Horloge L'horloge utilise un cycle de 12 heures.
1. Vérifier que le four est éteint.
2. Appuyer sur CLOCK (horloge).
3. Appuyer sur les touches à flèche TEMP/TIME (température/durée) “+” ou “-”, pour régler
l'heure.
4. Appuyer sur CLOCK (horloge) ou START (mise en marche).
TIMER SET/OFF
(réglage/arrêt de
la minuterie)
Minuterie du four La minuterie peut être réglée en heures ou en minutes jusqu'à concurrence de 12 heures et
59 minutes.
1. Appuyer sur TIMER SET/OFF (réglage/arrêt de la minuterie).
2. Appuyer sur les touches à flèche TEMP/TIME “+” ou “-”, pour régler la durée de cuisson.
3. Appuyer sur START (mise en marche) pour commencer le compte à rebours. Si activés,
les signaux sonores de fin de programme se font entendre à la fin du compte à rebours.
4. Appuyer deux fois sur TIMER SET/OFF (réglage/arrêt de la minuterie) pour annuler la
minuterie. Ne pas appuyer sur la touche OFF/CANCEL (arrêt/annulation) sinon le four
s’éteindra.
5. Si la minuterie est activée mais n'apparaît pas sur l'affichage, appuyer sur TIMER SET/
OFF (réglage/arrêt de la minuterie) pour faire apparaître le compte à rebours pendant
5 secondes.
BAKE (cuisson
au four)
Cuisson au four et
rôtissage
1. Appuyer sur BAKE (cuisson au four).
2. Appuyer sur les touches à flèche TEMP/TIME “+” ou “-”, pour régler une température
autre que 350°F (175°C) par tranches de 5°, entre 170°F et 525°F (75°C et 275°C).
3. Appuyer sur START (mise en marche).
4. Pour modifier la température, répéter l'étape 2. Appuyer sur START ou attendre pendant
5 secondes pour que le changement puisse s'effectuer.
5. Appuyer sur OFF/CANCEL (arrêt/annulation) après avoir terminé.
BROIL (cuisson
au gril)
Cuisson au gril 1. Placer l'ustensile de cuisson dans le four et fermer la porte à la position adéquate de
cuisson au gril. La porte doit rester ouverte d'environ 5" (12,7 cm).
2. Appuyer sur BROIL (cuisson au gril).
3. Appuyer sur les touches à flèche TEMP/TIME “+” ou “-”, pour modifier la température
par tranches de 5°, entre 300°F et 525°F (150°C et 275°C).
4. Appuyer sur START (mise en marche).
5. Appuyer sur OFF/CANCEL (arrêt/annulation) après avoir terminé.
START (mise en
marche)
Mise en marche de
la cuisson
Verrouillage des
commandes du four
La touche Start active toutes les fonctions du four. Si l'on n'appuie pas sur Start (mise en
marche) dans les 5 secondes, “PUSH?” ou “PSH” (appuyer) apparaît sur l'affichage. Si,
après avoir appuyé sur une touche, on n'appuie pas sur Start dans la minute qui suit, la
fonction est annulée et l'heure s'affiche.
1. Vérifier que le four est éteint.
2. Appuyer sur la touche START (mise en marche) pendant 3 secondes.
3. Un signal sonore se fait entendre et "Loc" apparaît sur l'afficheur.
4. Répéter pour déverrouiller. Seules les touches CLOCK, OVEN LIGHT, et TIMER SET/
OFF (horloge, lampe du four et réglage/arrêt de la minuterie) fonctionnent lorsque les
commandes sont verrouillées.

18
UTILISATION DE LA TABLE DE CUISSON
Les boutons de commande peuvent être réglés à n’importe quelle
position entre HI et LO. Pousser et tourner le bouton au réglage.
Vitrocéramique (sur certains modèles)
La surface de cuisson rougeoie lorsqu’un élément est allumé. Il
s’allume et s’éteint par intermittence pour maintenir le niveau de
chaleur sélectionné.
Utiliser des ustensiles de cuisson environ de la même taille que la
surface de cuisson. L'ustensile de cuisson ne doit pas dépasser de
plus de ½" (1,3 cm) hors de la zone de cuisson.
Le fait de nettoyer la table de cuisson avant et après chaque
utilisation permettra d'éviter la présence de taches et d'assurer la
meilleure répartition de chaleur possible.
Témoin lumineux d'allumage de la table de cuisson (sur
certains modèles)
Le témoin lumineux de table de cuisson allumée se trouve sur le
panneau de la console. Lorsqu'un bouton de commande sur le
panneau de la console est activé, le témoin lumineux de table de
cuisson allumée s'allume.
Nettoyage de la table de cuisson en vitrocéramique
Nettoyer la table de cuisson après chaque utilisation afin d'éviter
les éraflures, les piqûres et les abrasions, et pour entretenir la
surface en verre. L’utilisation d’un nettoyant pour table de cuisson
en vitrocéramique et d’un grattoir pour table de cuisson est
également recommandée pour les saletés tenaces. Ne pas utiliser
de nettoyants abrasifs, de tampons de nettoyage ni de produits
chimiques puissants pour le nettoyage. L’ensemble de matériel
d'entretien pour table de cuisson - pièce numéro 31605B - contient
tous les articles nécessaires au nettoyage et à l’entretien de la table
de cuisson en vitrocéramique. Consulter la section “Entretien de la
cuisinière” pour plus de renseignements.
IMPORTANT : Pour éviter d’endommager la surface de la table de
cuisson de façon permanente et pour faciliter l’élimination des
saletés, nettoyer la table de cuisson après chaque utilisation pour
éliminer toutes les saletés.
Témoin lumineux de surface chaude (sur certains modèles)
Sur les modèles avec vitrocéramique, le témoin lumineux de
surface chaude est situé sur le panneau de commande.
Le témoin de surface chaude reste allumé tant qu’une surface de
cuisson est trop chaude pour être touchée, même après que la
surface de cuisson soit éteinte.
Éléments à spirale et cuvettes de brûleurs (sur certains
modèles)
Pour des résultats de cuisson idéaux, les éléments en spirale
doivent être d'aplomb. Lorsqu'elles sont propres, les cuvettes de
brûleur réfléchissent la chaleur et la redirigent vers le plat. Elles
permettent de récupérer les renversements.
L’ustensile de cuisson ne doit pas dépasser de plus de ½" (1,3 cm)
hors de l'élément en spirale. Si l'ustensile de cuisson n'est pas
régulier ou qu'il est trop grand, il peut produire une chaleur
excessive et entraîner la décoloration du brûleur.
Zone de cuisson à double fonction (sur certains modèles)
La zone de cuisson à double fonction offre une souplesse
d'utilisation en fonction de la taille de l'ustensile de cuisson. La
dimension simple peut être utilisée de la même manière qu'un
élément ordinaire. La dimension double combine l'élément simple
et l'élément externe; elle est recommandée pour les ustensiles de
cuisson de plus grande dimension.
OFF/CANCEL
(arrêt/annulation)
Fonction de la
cuisinière
La touche Off/Cancel (arrêt/annulation) désactive toutes les fonctions à l'exception de
l'horloge, de la minuterie et du verrouillage des commandes du four.
TEMP/TIME
(température/
durée)
Réglage de
température et
durée
Les touches à flèche “+” ou “-” servent à régler la durée et la température.
CLAVIER CARACTÉRISTIQUE INSTRUCTIONS
Risque d'incendie
Fermer tous les réglages lorsque la cuisson est
terminée.
Le non-respect de cette instruction peut causer un
décès ou un incendie.
AVERTISSEMENT
N’OUBLIEZ PAS : Quand l’appareil est utilisé ou (sur
certains modèles) durant le programme d’autonettoyage,
toute la surface de la table de cuisson peut devenir chaude.
A. Double
B. Simple
A
B

19
UTILISATION DU FOUR
Des odeurs et de la fumée sont normales lorsque le four est utilisé
les premières fois, ou lorsqu'il est très sale.
IMPORTANT : La santé de certains oiseaux est très sensible aux
émanations de fumée. L’exposition aux émanations peut entraîner
la mort de certains oiseaux. Toujours déplacer les oiseaux dans
une autre pièce fermée et bien aérée.
Commandes électroniques du four
Afficheur des commandes
L’afficheur clignote lorsqu’il est mis sous tension ou après une
coupure de courant. Appuyer sur OFF/CANCEL (arrêt/annulation)
pour l’effacer. Lorsque le four n’est pas en marche, l’heure
s’affiche. Les témoins lumineux indiquent les fonctions qui sont
activées.
Signaux sonores
Les signaux sonores indiquent ce qui suit :
Fonctions de base
Un signal sonore unique
■ Appui sur une touche valide
■ Four préchauffé (signal sonore long)
■ Fonction entrée
■ Rappel signal se répétant à intervalles de 20 secondes après
les signaux sonores de fin de programme
Trois signaux sonores
■ Appui sur une touche non valide
Quatre signaux sonores
■ Fin de programme
Fahrenheit et Celsius
Le four est préréglé pour un affichage de la température en degrés
Fahrenheit, mais on peut permuter en degrés Celsius.
Modification : Appuyer sur la touche BROIL (cuisson au gril)
pendant 5 secondes. Un signal sonore se fait entendre et “°C” ou
“°F” s’affichera. Répéter pour retourner à l'affichage précédent.
Pour sortir de ce mode, appuyer sur OFF/CANCEL (arrêt/
annulation).
Commande de température du four
IMPORTANT : Ne pas utiliser de thermomètre pour mesurer la
température du four car l'ouverture de la porte du four peut
provoquer des mesures incorrectes du brûleur à fonctionnement
par intermittence.
Le four fournit des températures précises; toutefois, il peut cuire
plus rapidement ou plus lentement que votre ancien four, c’est
pourquoi le calibrage de la température peut être ajusté pour
l'adapter à vos besoins. Il peut être changé en degrés Fahrenheit
ou en Celsius.
Ajustement du calibrage de la température du four :
1. Appuyer sur BAKE pendant 5 secondes jusqu’à ce que
l’afficheur du four indique le calibrage actuel, par exemple
“0°F CAL” ou “00”.
2. Appuyer sur les touches TEMP/TIME “+” ou “-” (température/
durée “+” ou “-”) pour augmenter ou réduire la température par
tranches de 10°F (5°C ou 6°C). L’ajustement peut être réglé
entre 30°F (17°C) et -30°F (-17°C).
3. Appuyer sur START (mise en marche).
Mode Options
Appuyer sur TIMER SET/OFF (réglage/arrêt de la minuterie)
pendant 5 secondes et “Opt” s'affiche. Utiliser les touches TEMP/
TIME (température/durée) pour faire défiler les options suivantes.
Appuyer sur OFF/CANCEL (arrêt/annulation) pour sortir de ce
mode.
Signaux sonores de fin de programme
“b1” (n'émet qu'un seul bip) ou “b” (continue à émettre des bips)
s'affiche. Appuyer sur TIMER SET/OFF (réglage/arrêt de la
minuterie) pour passer d'une sélection à l'autre.
Arrêt au bout de 12 heures
Si “12 Hr” (12 heures) s'affiche, le four s'éteint automatiquement au
bout de 12 heures.
Appuyer sur TIMER SET/OFF (réglage/arrêt de la minuterie) pour
faire passer l'affichage à “- Hr”, afin de désactiver l'arrêt du four au
bout de 12 heures.
Lumière du four avec porte ouverte
“LOn” indique que la lumière du four s'allume lorsque la porte est
ouverte. Si “LOFF” est affiché, la lumière du four ne peut être
allumée qu'au moyen de l'interrupteur. Appuyer sur TIMER SET/
OFF (réglage/arrêt de la minuterie) pour passer d'une sélection à
l'autre.
Mode Sabbat
(sur certains modèles)
Le mode Sabbat permet au four de continuer à fonctionner sur un
réglage de cuisson au four jusqu’à ce qu’on l’éteigne. Une cuisson
au four minutée peut également être programmée pour garder le
four allumé seulement pendant une partie du mode Sabbat. La
caractéristique de verrouillage des commandes du four (si
présente) est désactivée pendant le mode Sabbat. Une fois le
mode Sabbat réglé, aucun signal sonore ne retentit, l'affichage
n'indique pas la température, le mode de minuterie est annulé (si
activé) et seules les touches suivantes fonctionnent :
■ touches “+” ou “-” (si présentes)
■ touches “More” (plus) ou “Less” (moins) (si présentes)
■ Off/Cancel (arrêt/annulation)
Lorsque la porte du four est ouverte ou fermée, la lampe du four ne
s’allume et ne s’éteint pas et les éléments de chauffage ne
s’allument et ne s’éteignent pas immédiatement.
Lorsque le courant est rétabli après une panne de courant, le four
retourne au mode Sabbat et conserve les modalités du mode
Sabbat avec les éléments de cuisson au four désactivés jusqu'à ce
que l'on appuie sur la touche Off/Cancel (arrêt/annulation).
Si l'on appuie sur la touche Off/Cancel (arrêt/annulation) à tout
moment, le four revient au mode de cuisson normal (ne présente
plus les modalités du mode Sabbat).
Avant d'entrer au mode Sabbat, l'utilisateur doit décider s'il
souhaite que la lampe du four soit allumée ou éteinte pendant toute
la période du mode Sabbat. Si la lampe est allumée au moment où
le four entre au mode Sabbat, elle restera allumée durant toute la
période d'utilisation du mode Sabbat. Si la lampe est éteinte au
moment où le four entre au mode Sabbat, elle restera éteinte
durant toute la période d'utilisation du mode Sabbat. Le fait
d'ouvrir la porte du four ou d'appuyer sur la touche Oven Light
(lampe du four) n'affecte pas le statut de la lampe du four une fois
que le four est entré au mode Sabbat.

20
Si le four est doté de la caractéristique de cuisson au four par
convection, la lampe du four est contrôlée par un commutateur de
lampe indépendant situé sur la console. Si la lampe du four est
allumée au moment où le four entre au mode Sabbat, elle restera
allumée durant toute la période d'utilisation du mode Sabbat. Pour
que la lampe du four soit éteinte durant le mode Sabbat, il faut
retirer l'ampoule du four avant d'entrer au mode Sabbat. Si l'on
n'effectue pas ces étapes, la lampe du four s'allumera à l'ouverture
de la porte du four et le four ne respectera donc pas les modalités
du mode Sabbat.
Au mode de vacances, la température peut être modifiée une fois
que le four est au mode Sabbat en appuyant sur les touches “+” ou
“-” (si présentes) ou les touches “More” (plus) ou “Less” (moins) (si
présentes). La température du four est modifiée de 25°F (14°C) à
chaque pression sur une touche. L'affichage ne change pas et
aucun signal sonore ne retentit durant cet ajustement.
Cuisson au four avec le mode Sabbat :
1. Appuyer sur BAKE (cuisson au four).
2. Appuyer sur les touches “+” ou “-” (si présentes) ou les touches
“MORE” (plus) ou “LESS” (moins) (si présentes).
3. Appuyer sur START (mise en marche).
4. Appuyer sur la touche TIMER SET/OFF (réglage/arrêt de la
minuterie) pendant 5 secondes, “SAb” clignote sur s'affichage.
5. Appuyer sur START (mise en marche) pendant 5 secondes pour
entrer au mode Sabbat, sans quoi le programme tout entier est
annulé. “SAb” cesse de clignoter et reste affiché. Le four est à
présent au mode Sabbat et respecte les modalités du mode
Sabbat.
Si l'on appuie sur la touche Off/Cancel (arrêt/annulation) à tout
moment, le four revient au mode de cuisson normal (ne présente
pas les modalités du mode Sabbat).
Pour régler une cuisson au four minutée avec le mode
Sabbat (sur certains modèles) :
1. Appuyer sur BAKE (cuisson au four).
2. Appuyer sur les touches “+” ou “-” (si présentes) ou les touches
“MORE” (plus) ou “LESS” (moins) (si présentes) pour entrer une
température différente de la température affichée.
3. Appuyer sur COOK TIME (durée de cuisson). Le témoin
lumineux de la durée de cuisson du four s’allume.
4. Appuyer sur les touches “+” ou “-” (si présentes) ou les touches
“MORE” (plus) ou “LESS” (moins) (si présentes) pour entrer une
durée de cuisson.
5. Appuyer sur START (mise en marche).
6. Appuyer sur la touche TIMER SET/OFF (réglage/arrêt de la
minuterie) pendant 5 secondes. “SAb” clignote sur l'affichage.
7. Appuyer sur START (mise en marche) pendant 5 secondes pour
entrer au mode Sabbat, sans quoi le programme tout entier est
annulé. “SAb” cesse de clignoter et reste affiché. Le four est à
présent au mode Sabbat et respecte les modalités du mode
Sabbat. Les témoins lumineux Bake (cuisson au four), On
(marche) et Cook Time (durée de cuisson) s'affichent.
Lorsque la durée de cuisson réglée est écoulée, le four s'éteint
automatiquement et les témoins lumineux s'éteignent, indiquant la
fin du programme.
Si l'on appuie sur la touche Off/Cancel (arrêt/annulation) à tout
moment, le four revient au mode de cuisson normal (ne présente
pas les modalités du mode Sabbat).
Pour régler une cuisson au four minutée avec mise en
marche différée en utilisant le mode Sabbat
(sur certains modèles) :
1. Appuyer sur BAKE (cuisson au four).
2. Appuyer sur les touches “+” ou “-” (si présentes) ou les touches
“MORE” (plus) ou “LESS” (moins) (si présentes) pour entrer une
température différente de la température affichée.
3. Appuyer sur COOK TIME (durée de cuisson). Le témoin
lumineux de la durée de cuisson du four s’allume.
4. Appuyer sur les touches “+” ou “-” (si présentes) ou les touches
“MORE” (plus) ou “LESS” (moins) (si présentes) pour entrer une
durée de cuisson.
5. Appuyer sur START TIME (heure de mise en marche) ou DELAY
START (mise en marche différée). Le témoin lumineux de
l’heure de mise en marche/mise en marche différée s’allume.
6. Appuyer sur les touches “+” ou “-” (si présentes) ou les touches
“MORE” (plus) ou “LESS” (moins) (si présentes) pour entrer
l'heure de démarrage de la cuisson.
7. Appuyer sur START (mise en marche).
8. Appuyer sur la touche TIMER SET/OFF (réglage/arrêt de la
minuterie) pendant 5 secondes. “SAb” clignote sur l'affichage.
9. Appuyer sur START (mise en marche) pendant 5 secondes pour
entrer au mode Sabbat, sans quoi le programme tout entier est
annulé. “SAb” cesse de clignoter et reste affiché. Le four est à
présent au mode Sabbat et respecte les modalités du mode
Sabbat. Les témoins lumineux de On (marche) et Delay (mise
en marche différée) s'affichent.
Lorsque l’heure de mise en marche est atteinte, les témoins
lumineux de Bake (cuisson au four), On (marche) et Cook Time
(durée de cuisson) s’allument automatiquement. Lorsque la durée
de cuisson réglée est écoulée, le four s'éteint automatiquement et
les témoins lumineux s'éteignent, indiquant la fin du programme.
Si l'on appuie sur la touche Off/Cancel (arrêt/annulation) à tout
moment, le four revient au mode de cuisson normal (ne présente
pas les modalités du mode Sabbat).
Papier d’aluminium
IMPORTANT : Pour éviter des dommages permanents au fini du
fond du four, ne pas recouvrir le fond du four avec du papier
d’aluminium ou un revêtement quelconque.
Pour assurer une bonne circulation de l’air et des résultats de
cuisson optimaux, ne pas recouvrir la grille entière de papier
d’aluminium.
Positionnement des grilles et des ustensiles de cuisson au four
IMPORTANT : Afin d’éviter des dommages permanents au fini en
porcelaine, ne pas placer d'aliments ou d'ustensiles de cuisson
directement sur la porte ou sur le fond du four.
Ustensiles de cuisson au four
L’air chaud doit pouvoir circuler autour de l’aliment pour le cuire
uniformément. Laisser un espace de 2" (5 cm) entre les ustensiles
de cuisson et les parois du four. S’assurer qu’aucun ustensile de
cuisson au four ne se trouve directement au-dessus d’un autre.
Grilles
■ Placer les grilles avant d’allumer le four.
■ Ne pas déplacer les grilles lorsque des ustensiles de cuisson
au four se trouvent dessus.
■ S’assurer que les grilles sont d'aplomb.
AVERTISSEMENT
Risque d'empoisonnement alimentaire
Ne pas laisser des aliments dans un four plus d'une
heure avant ou après la cuisson.
Le non-respect de cette instruction peut causer un
empoisonnement alimentaire ou une maladie.
La page charge ...
La page charge ...
La page charge ...
La page charge ...
La page charge ...
La page charge ...
La page charge ...
La page charge ...
La page charge ...
La page charge ...
La page charge ...
La page charge ...
-
 1
1
-
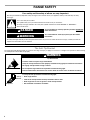 2
2
-
 3
3
-
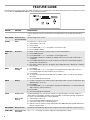 4
4
-
 5
5
-
 6
6
-
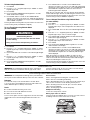 7
7
-
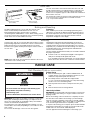 8
8
-
 9
9
-
 10
10
-
 11
11
-
 12
12
-
 13
13
-
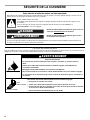 14
14
-
 15
15
-
 16
16
-
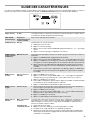 17
17
-
 18
18
-
 19
19
-
 20
20
-
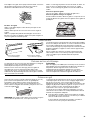 21
21
-
 22
22
-
 23
23
-
 24
24
-
 25
25
-
 26
26
-
 27
27
-
 28
28
-
 29
29
-
 30
30
-
 31
31
-
 32
32


Amana UPRIGHT FREEZER User Instructions
- Catégorie
- Cuisinières
- Taper
- User Instructions
dans d''autres langues
- English: Amana UPRIGHT FREEZER
Documents connexes
Autres documents
-
Maytag ELECTRIC RANGE User Instructions
-
Maytag MGR8670AW Manuel utilisateur
-
-
Maytag MET8720DS Manuel utilisateur
-
Maytag MGR8650FZ MGR8650FZ Use and Care EN
-
Whirlpool WGE745C0FH Le manuel du propriétaire
-
KitchenAid YKER507 Manuel utilisateur
-
Inglis IVE30101 Le manuel du propriétaire