
1
M656480100 / Revision: 8, 22-11-12 G.L.
SWIVEL STOOL
TABOURET PIVOTANT
41421 / 41441 / 41492
Thank you for choosing an Amisco product
Merci d’avoir choisi un produit Amisco
www.amisco.com
1 800 361-6360
Ne contactez
pas le magasin,
ne retournez pas
votre produit
Do not
contact or return
your product to
the store
Problèmes ou information?
Problems or information?
Amisco product number/Numéro du produit Amisco
Contact us within 30 days from your
purchase date. Monday to Friday, from
8:30 a.m. to 12 p.m., 1 p.m. to 4:30 p.m.
(Eastern standard time). Keep handy
your proof of purchase and the Amisco
product number when calling.
Contactez-nous dans les 30 jours suivant
votre achat. Du lundi au vendredi, de 8h30
à 12h00, 13h00 à 16h30 (heure de l’Est). Ayez
sous la main votre preuve d’achat et le nu-
méro de produit Amisco au moment d’ap-
peler.
IMPORTANT
Dealer or installer: Leave all documents to the consumer.
Détaillant ou installateur: Laissez tous les documents au consommateur.
Consumer: Keep this document and the warranty sheet with your proof of purchase for reference.
Consommateur: Conservez ce document et la feuille de garantie avec votre preuve d’achat pour référence.
UNLEVEL PRODUCT ?
( May happen during shipping. )
1) Verify your product on several floor locations to confirm that the
product is not level.
2) Put the unassembled product (no seat nor gliders) on a hard level
surface and find which 2 legs are longer.
3) Take the product by one of the longer legs, and hit strongly the
opposite leg on the ground. Protect the floor surface or do this on
a rough floor. The metal is flexible, so this operation will not
damage your product.
4) Verify your product on the same level surface. Repeat step 3 as
necessary.
PRODUIT PAS DE NIVEAU ?
( Peut survenir durant le transport. )
1) Vérifiez votre produit à différents endroits sur le plancher pour
confirmer que le produit n’est pas de niveau.
2) Mettez le produit non assemblé (pas de siège ni glisseur) sur une
surface dure et de niveau, et trouvez les 2 pattes les plus longues.
3) Prenez le produit par l’une des pattes longues, et frappez forte-
ment la patte opposée contre le sol. Protégez la surface du plan-
cher ou faites cette opération sur un plancher non fini. Puisque le
métal est flexible, cette opération n’endommagera pas votre pro-
duit.
4) Vérifiez votre produit sur la même surface de niveau. Répétez
l’étape 3 aussi souvent que nécessaire.
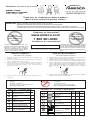
1 Stool base
Base de tabouret 1
2 Backrest
Dossier 1
3 Seat
Siège 1
4 Swivel plate
Plaque pivotante 1
5 Upholstered backrest front 1
Dossier rembourré avant
6 Upholstered backrest back 1
Dossier rembourré arrière
7 Hardware bag
Sac de quincaillerie 1
PARTS LIST / LISTE DES PIÈCES
ITEM DESCRIPTION QTY
Locknut 4 4 4
Écrou de blocage
Glide 4 4 4
Glisseur
Metal screw 1/2” 2 0 3
Vis à métal 1/2”
Metal screw 3/4” 0 2 0
Visà métal 3/4”
HARDWARE LIST / LISTE DE LA QUINCAILLERIE
ITEM DESCRIPTION QTY QTY QTY
A
Bolt 1/2” 0 4 4
Boulon 1/2”
Bolt 7/8” 4 4 4
Boulon 7/8”
C
D
E
E
B
B
Bolt 7/8” 4 0 0
Boulon 7/8”
41492
41441
1/4-20NC
1/4-20NC
1/4-20NC
1/4-20NC
10-24NC
41421
10-24NC
LIST OF TOOLS REQUIRED :
- A mallet.
- A phillips screwdriver.
- An 7/16” wrench or adjustable wrench.
- Do not use power tools.
LISTE DES OUTILS NÉCESSAIRES :
- Un maillet.
- Un tournevis étoile.
- Une clé 7/16” ou une clé à molette.
- Ne pas utiliser d’outils électriques.

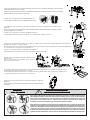
7) Screw on 5 upholstered backrest (front part) to 2 backrest frame
with E screws.
Visser le dossier rembourré (partie avant) 5 avec le dossier de
tabouret 2 à l’aide des vis E .
2
8) Install the rear part of the 6 upholstered backrest by inserting the plastic fastener into the holes of the plate on the backrest frame
2 and/or into the front part of the backrest 5 . Press firmly.
Installer la partie arrière du dossier rembourré 6 en insérant les attaches de plastique dans les trous de la tôle du dossier du tabouret 2
et /ou la partie avant du dossier rembourré 5 . Presser fermement.
5
6
2
1)Remove and discard the two nuts and bolts maintaining together the base, the swivel plate and the backrest for transportation .
This hardware will not be used for assembly.
Enlever et disposer des 2 boulons et écrous qui maintiennent ensemble la base, la plaque pivotante et le dossier pour le transport.
Cette quincaillerie ne sera pas utilisée pour le montage.
2) Rotate the 4 swivel plate about 45° while putting weigth on it.
Tourner la plaque pivotante 4 de 45° en appliquant un poids dessus.
3) Insert D glides under 1 stool base.In order to protect certain floor coverings, we suggest you to use self-adhesive felts
under legs.
Insérer les glisseurs D sous la base de tabouret 1 . Afin de protéger certains revêtement de plancher, nous suggérons d’utiliser
des feutres autocollants sous les pattes.
4) Bolts-on 4 swivel plate on 1 stool base with B bolts and C nuts.
Visser la plaque pivotante 4 sur la base de tabouret 1 à l’aide des boulons B et des écrous C .
5) Place the 3 seat upside down on a stable surface, put the 2 welded backrest over it, then bolt-on lightly together the 4 swivel plate, the 2
welded backrest and the 3 seat with the A bolt .
Placer le siège 3 à l’envers sur une surface stable, mettre le dossier soudé 2 par dessus puis visser légèrement ensemble la plaque pivotante
4 , le dossier soudé 2 et le siège 3 avec les boulons A .
6) Center 3 seat on belt of 2 backrest and tighten firmly all A bolts.
Centrer le siège 3 sur la ceinture du dossier 2 et visser fermement tous les boulons A .
Due to their height and to the movement of the swivel, barstools must be used with caution to prevent
falls and injuries. Children should not be left unsupervised sitting on stools or near stools. Periodically
inspect your stool and tighten all screws, nuts and bolts.If you find a broken weld or a bent leg, stop
using your stool and contact Amisco customer service. Failure to follow the basic safety and
maintenance instructions listed here may cause product damage or injuries.
Étant données leur hauteur et le mouvement de la plaque pivotante, les tabourets doivent être
utilisées avec précaution, pour prévenir des chutes et des blessures. Les enfants ne doivent pas être
laissés sans surveillance sur ou près des tabourets. Inspectez périodiquement votre tabouret et
resserrer les vis, boulons et écrous. Si vous trouvez une soudure brisée ou une patte croche, cessez
d’utiliser votre tabouret et appelez le service à la clientèle d’Amisco. Le non respect des quelques
règles de sécurité énumérées ici peut occasionner des dommages aux produits ou des blessures.
WARNING WARNING
WARNING WARNING
WARNING
SAFETY INSTRUCTIONS SAFETY INSTRUCTIONS
SAFETY INSTRUCTIONS SAFETY INSTRUCTIONS
SAFETY INSTRUCTIONS
MISE EN GARDEMISE EN GARDE
MISE EN GARDEMISE EN GARDE
MISE EN GARDE
INSTRUCTIONS DE SÉCURITÉINSTRUCTIONS DE SÉCURITÉ
INSTRUCTIONS DE SÉCURITÉINSTRUCTIONS DE SÉCURITÉ
INSTRUCTIONS DE SÉCURITÉ
!
5
2
9) Place a rag on top of the plastic fasteners and hammer them down to complete the
installation.
Placer un chiffon vis à vis les attaches de plastique et à l’aide d’un maillet finir l’insertion
des attaches .
-
 1
1
-
 2
2


dans d''autres langues
- English: Amisco 41421 User manual
Documents connexes
-
Amisco Horton 60506 Assembly Guide
-
-
-
-
-
-
-
Amisco Wilbur 41570 Assembly
-
-