Panasonic EY47A1 Mode d'emploi
- Catégorie
- Outils électroportatifs
- Taper
- Mode d'emploi

Operating Instructions
Bedienungsanleitung
Instructions d’utilisation
Istruzioni per l’uso
Gebruiksaanwijzing
Manual de instrucciones
Brugsvejledning
Driftsföreskrifter
Bruksanvisning
Käyttöohjeet
Provozní pokyny
Használati utasítás
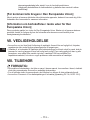
Cordless Reciprocating Saw
Akku-Stichsäge
Scie Sabre Sans Fil
Sega Alternativa Senza Fili
Snoerloze reciprozaag
Ledningsfri bajonetsav
Sladdlös växelverkande såg
Ladattava pistosaha
Model No: EY47A1
Before operating this unit, please read these instructions completely and save this manual for future use.
Vor Inbetriebnahme des Gerätes die Betriebsanleitung bitte gründlich durchlesen und diese
Broschüre zum späteren Nachschlagen sorgfältig aufbewahren.
Lire entièrement les instructions suivantes avant de faire fonctionner l’appareil et conserver ce
Prima di usare questa unità, leggere completamente queste istruzioni e conservare il manuale per usi futuri.
Lees deze gebruiksaanwijzing aandachtig door voor u het apparaat in gebruik neemt en bewaar
de gebruiksaanwijzing voor eventuele naslag.
Antes de usar este aparato por primera vez, lea todas las instrucciones de este manual y guarde
el manual para poderlo consultar en el futuro.
Gennemlæs denne betjeningsvejledning før brugen og gem den til fremtidig brug.
Läs igenom hela bruksanvisningen innan verktyget tas i bruk. Spara bruksanvisningen för senare användning.
Før enheten tas i bruk, vennligst les disse alle anvisningene og oppbevar deretter bruksanvisningen for senere bruk.
Lue ohjeet huolella ennen laitteen käyttöönottoa ja säilytä tämä käyttöohje tallessa tulevaa tarvetta varten.

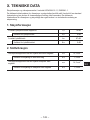
– 2 –
English: Page 9 Svenska: Sid 115
Deutsch: Seite 25 Norsk: Side 130
Page 40 Suomi: Sivu 144
Italiano: Pagina 55 Sayfa 158
Nederlands: Bladzijde 70 Polski: Strona 173
Español: 85 Strana 188
Dansk: Side 100 Magyar: Oldal 202
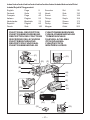
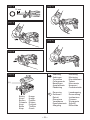
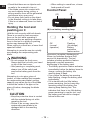
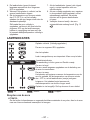
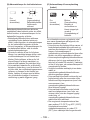
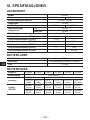
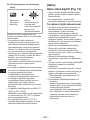
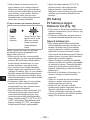
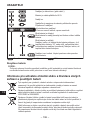
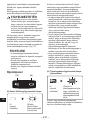
DESCRIZIONE DELLE FUNZIONI
DESCRIPCIÓN FUNCIONAL
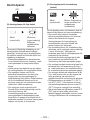
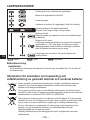
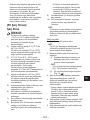
V
(G)
(H)
(I)
(A)
(J)
(K)
(F)(E)
(S)
(M)
(D)
(B)
(C)
(L)
(N)(O)
(P)
(Q)
(R)

– 3 –
(A)
Metal blade
Metallsägeblatt
Lama per metallo
Metaalzaagblad
Cuchilla de metal
Metalsavblad
Metallsågblad
Metallblad
Metalliterä
Metalowe ostrze
Kovový list
(B)
Protective shoe
Sicherheitsbacke
Sabot de protection
Protezione
Beschermende schoen
Zapata protectora
Beskyttende sko
Skyddssko
Beskyttelsessko
Suojakenkä
Stopka ochronna
(C)
Blade clamp
Sägeblatthalterung
Blocage de lame
Morsetto lama
Zaagbladkap
Abrazadera de cuchilla
Savbladsholder
Sågbladshållare
Bladklemme
Terän kiinnitin
Zacisk ostrza
(D)
Locking sleeve
Verriegelungsmuffe
Manchon de verrouillage
Manicotto di bloccaggio
Vergrendelingshuls
Casquillo de cierre
Låsebøsning
Låshylsa
Låsehylse
Lukitusholkki
(E)
LED light
LED-Leuchte
Lumière DEL
Luce LED
LED-lampje
Luz indicadora
LED-lys
LED-ljus
LED-lys
LED-valo
Lampka LED
Lampa LED
(F)
Vent hole
Entlüftungsöffnung
Ventilatiegat
Ventilationshul
Ventilhål
Ventilasjonsåpning
Tuuletusaukko
(G)
Handle lock release lever
Griffsperre-Entriegelungshebel
Levetta di blocco/sblocco impugnatura
Handvatdeblokkeertoets
empuñadura
Udløser til håndtagslås
Reglage för bortkoppling av
handtagsspärr
Låsutløserspake for håndtak
Kahvalukon vapautusvipu
(H)
Switch lock release lever
Schaltersperre-Entriegelungshebel
verrou
Levetta di blocco/sblocco interruttore
Schakelaardeblokkeertoets
interruptor
Udløser til kontaktlås
Reglage för bortkoppling av brytarspärr
Låsutløserspake for bryter
Käyttökytkimen lukon vapautusvipu

– 4 –
(I)
Power switch
Netzschalter
Interrupteur d’alimentation
Interruttore di accensione
Hoofdschakelaar
Afbryder
Strömbrytare
Strømbryter
Käyttökytkin
Przycisk zasilania
(J)
Handle
Griff
Impugnatura
Handvat
Empuñadura
Håndtag
Handtag
Håndtak
Kahva
Tutamak
Uchwyt
Markolat
(K)
Battery pack
Akku
Batterie autonome
Pacco batteria
Accu
Batteripakning
Batteri
Batteripakke
Akku
Akumulator
Blok baterie
(L)
Alignment marks
Ausrichtmarkierungen
Marques d’alignement
Marcature allineamento
Uitlijntekens
Flugtemærker
Anpassningsmärken
Innrettingsmerker
Sovitusmerkit
Znaczniki
(M)
Display
Display
Display
Scherm
Display
Display
Skjerm
Näyttö
Ekran
Displej
(N)
Low battery warning lamp
Akku-Schwach-Warnlampe
Spia di avvertimento batteria scarica
Waarschuwingslampje laag accuvermogen
Advarselslampe for lavt batteriniveau
Varningslampa för lågt batteri
Varsellampe for lavt batteri
Akun alhaisen varaustilan varoitusvalo
Lampka ostrzegawcza niskiego poziomu
(O)
Overheat warning lamp (battery)
Überhitzungs-Warnlampe (Akku)
(batterie)
Spia avvertenza surriscaldamento
(batteria)
Oververhitting-waarschuwingslampje
(accu)
Luz de advertencia de
Advarselslamp til overophedning
(batteri)
Varningslampa för överhettning (batteri)
Varsellampe for overoppheting (batteri)
Ylikuumenemisen varoituslamppu
(akku)
Lampka ostrzegawcza przegrzania
(akumulator)

– 5 –
(P)
Hex Wrench
Sechskantschlüssel
Chiave esagonale
Inbussleutel
Llave hexagonal
Sekskantnøgle
Insexnyckel
Unbrakonøkkel
Kuusiokoloavain
Klucz imbusowy
Imbuszkulcs
(Q)
Shoe adjustment screw
Backeneinstellschraube
Vite di regolazione del piedino
Stelschroef voor schoen
Tornillo de ajuste de la zapata
Justeringsskrue til sko
Skojusteringsskruv
Skojusteringsskrue
Kengän säätöruuvi
(R)
Battery charger
Ladegerät
Chargeur de batterie
Caricabatterie
Acculader
Batterioplader
Batteriladdare
Batterilader
Akkulaturi
(S)
Battery pack cover
Akkuabdeckung
Couvercle de la batterie autonome
Coperchio batterie
Accudeksel
Akkuafdækning
Batteriskydd
Batteripakkedeksel
Akun liitinsuoja
Pokrywa akumulatora

– 6 –
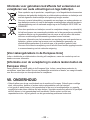
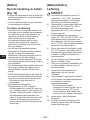
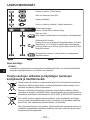
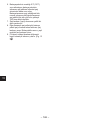
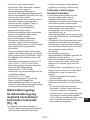
[Fig. 1]
14 mm
[Fig. 2]
[Fig. 5]
[Fig. 3]
[Fig. 6]
(L)
Button
Knopf
Bouton
Pulsante
Knop
Knap
Knapp
Knapp
Painike
Przycisk
Gomb
Attaching
Anbringen
Connexion
Collegamento
Bevestigen
Acoplamiento
Påsætning
Montering
Montering
Kiinnittäminen
Takma
Mocowanie
Removing
Entfernen
Retrait
Rimozione
Verwijderen
Desacoplamiento
Aftagning
Lossdragning
Demontering
Irrottaminen
[Fig. 4]

– 7 –
[Fig. 11]
[Fig. 10]
[Fig. 7]
(G)
[Fig. 8]
[Fig. 9]
(Q) (P)

– 8 –
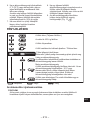
[Fig. 12]
Pack cover
Akkuabdeckung
Couvercle de la
batterie autonome
Coperchio pacco
Accudeksel
Cubierta de
Pakningsdæksel
Batteriskydd
Pakkedeksel
Akkukotelon kansi
Kryt bloku
-
Terminals
Anschlüsse
Bornes
Terminali
Aansluitpunten
Terminales
Terminaler
Poler
Ender
Liittimet
Terminaller
Styki
Konektory
Label (red or yellow)
Etikett (rot oder gelb)
Etiquette (rouge ou jaune)
Etichetta (rossa o gialla)
Label (rood of geel)
Etiqueta (roja o amarilla)
Label (rødt eller gult)
Etikett (röd eller gul)
Etikett (rød eller gul)
Tarra (punainen tai keltainen)
[Fig. 13]
(L)
Battery pack release
button
Akku-Entriegelungsk-
nopf
de batterie autonome
Tasto di rilascio pacco
batteria
Accu-ontgrendeltoets
Udløserknap til
batteripakning
Frigöringsknapp för
batteri
Utløserknapp for
batteripakke
Akkupaketin irrotus-
painike
Przycisk zwolnienia
blokady akumulatora
bloku baterie
Attaching
Anbringen
Connexion
Collegamento
Bevestigen
Acoplamiento
Påsætning
Montering
Montering
Kiinnittäminen
Takma
Mocowanie
Csatlakoz-
Removing
Entfernen
Retrait
Rimozione
Verwijderen
Desaco-
plamiento
Aftagning
Lossdragning
Demontering
Irrottaminen

Original instructions: English
instructions: Other languages
I.
Thank you for purchasing the
Panasonic Reciprocating Saw. This
product can be used with Panasonic
rechargeable batteries to provide
excellent cutting performance. This
product is for cutting metal, wood,
plastic and drywall only.
II.
WARNINGS
WARNING
Read all safety warnings,
instructions, illustrations and
power tool.
Failure to follow all instructions listed
and/or serious injury.
The term “power tool” in the warnings
refers to your mains-operated (corded)
power tool or battery-operated (cordless)
power tool.
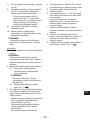
1) Work Area Safety
a) Keep work area clean and well lit.
Cluttered or dark areas invite
accidents.
b)
Do not operate power tools in
liquids, gases or dust.
Power tools create sparks which
may ignite the dust or fumes.
c) Keep children and bystanders
away while operating a power
tool.
Distractions can cause you to lose
control.
2) Electrical Safety
any way. Do not use any adapter
plugs with earthed (grounded)
power tools.
outlets will reduce risk of electric
shock.
b) Avoid body contact with earthed
or grounded surfaces such as
pipes, radiators, ranges and
refrigerators.
There is an increased risk of electric
shock if your body is earthed or
grounded.
c) Do not expose power tools to rain
or wet conditions.
Water entering a power tool will
increase the risk of electric shock.
d) Do not abuse the cord. Never use
the cord for carrying, pulling or
unplugging the power tool. Keep
Damaged or entangled cords
increase the risk of electric shock.
e) When operating a power tool
outdoors, use an extension cord
suitable for outdoor use.
Use of a cord suitable for outdoor
use reduces the risk of electric
shock.
f) If operating a power tool in a
a residual current device (RCD)
protected supply.
Use of RCD reduces the risk of
electrical shock.
3) Personal Safety
a) Stay alert, watch what you are
when operating a power tool. Do
not use a power tool while you
A moment of inattention while
operating power tools may result in
serious personal injury.
b) Use personal protective equip-
-
tion.
– 9 –
EN

Protective equipment such as dust
mask, non-skid safety shoes, hard
hat, or hearing protection used for
appropriate conditions will reduce
personal injuries.
c) Prevent unintentional starting.
Ensure the switch is in the off-po-
sition before connecting to power
source and/or battery pack,
picking up or carrying the tool.
on the switch or energising power
tools that have the switch on invites
accidents.
wrench before turning the power
tool on.
A wrench or a key left attached to a
rotating part of the power tool may
result in personal injury.
e)
Do not overreach. Keep proper
This enables better control of the
power tool in unexpected situations.
f) Dress properly. Do not wear loose
clothing or jewellery. Keep your
Loose clothes, jewellery or long hair
can be caught in moving parts.
g) If devices are provided for the
connection of dust extraction and
collection facilities, ensure these
are connected and properly used.
Use of dust collection can reduce
dust-related hazards.
frequent use of tools allow you to
tool safety principles.
A careless action can cause severe
injury within a fraction of a second.
4)
a) Do not force the power tool. Use
the correct power tool for your
application.
The correct power tool will do the job
better and safer at the rate for which
it was designed.
b) Do not use the power tool if the
switch does not turn it on and off.
Any power tool that cannot be
controlled with the switch is danger-
ous and must be repaired.
-
ries, or storing power tools.
Such preventive safety measures
reduce the risk of starting the power
tool accidentally.
d) Store idle power tools out of the
reach of children and do not
power tool or these instructions
to operate the power tool.
Power tools are dangerous in the
hands of untrained users.
e) Maintain power tools and acces-
-
age of parts and any other condi-
the power tool repaired before
use.
Many accidents are caused by
poorly maintained power tools.
f) Keep cutting tools sharp and
clean.
Properly maintained cutting tools
with sharp cutting edges are less
likely to bind and are easier to
control.
g) Use the power tool, accessories
and tool bits etc., in accordance
with these instructions, taking
into account the working condi-
tions and the work to be
Use of the power tool for operations
different from those intended could
result in a hazardous situation.
h) Keep handles and grasping
oil and grease.
Slippery handles and grasping
surfaces do not allow for safe
handling and control of the tool in
unexpected situations.
– 10 –
EN

5)
a) Recharge only with the charger
A charger that is suitable for one
type of battery pack may create a
risk of fire when used with another
battery pack.
-
cally designated battery packs.
Use of any other battery packs may
create a risk of injury and fire.
c) When battery pack is not in use,
objects, like paper clips, coins,
another.
Shorting the battery terminals
together may cause burns or a fire.
d) Under abusive conditions, liquid
avoid contact. If contact acciden-
liquid contacts eyes, additionally
Liquid ejected from the battery may
cause irritation or burns.
e) Do not use a battery pack or tool
Damaged or modified batteries may
exhibit unpredictable behaviour
resulting in fire, explosion or risk of
injury.
f)
Do not expose a battery pack or tool
Exposure to fire or temperature
above 130°C may cause explosion.
g)
Follow all charging instructions
and do not charge the battery pack
Charging improperly or at temperatures
outside the specified range may
damage the battery and increase the
risk of fire.
6) Service
a) Have your power tool serviced by
This will ensure that the safety of
power tool is maintained.
packs.
Service of battery packs should only
be performed by the manufacturer or
authorized service providers.
1.
This manual contains important
safety instructions for battery charger
and battery pack.
2. Before using battery charger, read all
instructions and cautionary markings
on battery charger, battery pack.
3. The charger and battery pack are
together. Do not attempt to charge
any other cordless tool or battery
pack with this charger. Do not
attempt to charge the battery pack
with any other charger.
4. Do not expose charger and battery
pack to rain or snow or use in damp
location.
5. Use of an attachment not
recommended may result in a risk of
persons.
6. Do not abuse cord. Never carry
charger by cord or yank it to
disconnect from outlet. Keep cord
away from heat, oil and sharp edges.
7. An extension cord should not be
used.
8. Do not operate charger with
damaged cord or plug; take it to a
them.
9. Do not operate charger if it has
received a sharp blow, been dropped,
or otherwise damaged in any way;
personnel.
10. Do not attempt to disassemble
charger and battery pack, take it to a
service or repair is required. Incorrect
reassembly may result in a risk of
– 11 –
EN

11. To reduce risk of electric shock,
unplug charger from outlet before
attempting any maintenance or
cleaning.
12. Make sure cord is located so that it
will not be stepped on, tripped over,
or otherwise subjected to damage or
stress.
13. Do not store battery pack in locations
where the temperature may reach or
exceed 50°C (such as metal tool
shed, or a car in the summer), which
can lead to deterioration of the
storage battery.
14. Do not incinerate the battery pack. It
15. The charger is designed to operate
on standard household electrical
power only. Charge only on the
voltage indicated on the nameplate.
Do not attempt to use it on any other
voltage !
16. Charge the battery pack in a well
ventilated place, do not cover the
charger and battery pack with a cloth,
etc., while charging.
17. Do not short the battery pack. A
battery short can cause a large
18. If the supply cord of this
appliance is damaged, it must only
be replaced by a repair shop
appointed by the manufacturer,
because special purpose tools are
required.
19. This appliance is not intended for use
by persons (including children) with
reduced physical, sensory or mental
capabilities, or lack of experience
and knowledge, unless they have
been given supervision or instruction
concerning use of the appliance by a
person responsible for their safety.
20. Children shall not play with the
appliance. Cleaning and user
maintenance shall not be made by
children without supervision.
III.
1) Wear ear protectors.
Exposure to noise can cause
hearing loss.
2) Keep hands away from cutting area
and blade. Keep your insulated
gripping surfaces. If both hands are
holding the tool, they cannot be cut
by the blade.
3) Never hold piece being cut in your
hands or across your leg. It is
important to support the work
properly to minimize body exposure
or loss of control.
4) Be aware that this tool is always in
an operating condition, since it does
not have to be plugged into an
electrical outlet.
5) Always use safety goggles or
glasses with side shields. Ordinary
eye or sun glasses are NOT safety
glasses.
6) When this tool is used for
(e.g. indoors), wear dust mask.
7) Avoid cutting nails. Inspect
workpiece for any nails and remove
them before operation.
8) Do not cut oversized workpiece.
9) Check for the proper clearance
beyond the workpiece before
cutting so that the blade will not
10)
11) Make sure the blade is not
contacting the workpiece before the
switch is turned on.
12) Keep hands away from moving
parts.
13) Do not touch the blade or
workpiece immediately after
operation; they may be extremely
hot and could burn your skin.
14) Never swing tool.
15) Do not use blades which are
deformed or cracked.
– 12 –
EN

16) Do not use blades which do not
comply with the characteristics
17) Remove the battery pack from the
tool body before replacement of the
blade, making adjustments, or other
maintenance work.
18) Wear ear protectors when using the
tool for extended periods.
19) During charging, the charger may
become slightly warm. This is
normal. Do NOT charge the battery
for a long period.
20) Do not store the tool and battery
pack in locations where the
temperature may reach or exceed
50°C (122°F) (such as a metal tool
shed, or a car in the summer),
which can lead to deterioration of
the storage battery.
21) The ambient temperature range is
between 0°C (32°F) and 40°C
(104°F).
FOR RECIPRO-
1) Hold the power tool by insulated
gripping surfaces, when
contact hidden wiring.
Cutting accessory contacting a
“live” wire may make exposed metal
parts of the power tool “live” and
could give the operator an electric
shock.
2)
way to secure and support the
Holding the workpiece by hand or
against your body leaves it unstable
and may lead to loss of control.
WARNING
• Do not use other than the Panasonic
battery packs that are designed for
use with this rechargeable tool.
• Panasonic is not responsible for any
damage or accident caused by the
use of recycled or counterfeit battery
pack.
• Do not dispose of the battery pack in
• Do not allow metal objects to touch
the battery pack terminals.
• Do not carry or store the battery pack
in the same container as nails or
similar metal objects.
• Do not charge the battery pack in a
high-temperature location, such as
Otherwise, the battery may overheat,
• After removing the battery pack from
the tool or the charger, always
reattach the pack cover. Otherwise,
the battery contacts could be
• When the Battery Pack Has
Deteriorated, Replace It with a New
One. Continued use of a damaged
battery pack may result in heat
generation, ignition or battery
rupture.
• To prevent leakage, overheating,
from occurring, follow these
instructions when handling our
rechargeable power tools (tool main
body/battery pack/charger).
- Do not allow material cuttings or
dust to fall onto the battery pack.
- Before storing, remove any material
cuttings and dust from the battery
then place separately from metal
objects (screws, nails, etc.) in tool
case. Damage caused by loose
objects in the case will not be
covered by warranty.
– 13 –
EN

WARNING
• Do not handle the rechargeable
power tools in the following way.
(There is a hazard of smoke
- Use or leave in places exposed to
rain or moisture
- Use submerging in water
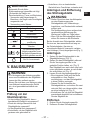
Meaning
Volts
Direct current
No load speed
Revolutions or
reciprocations per
minutes
Electrical capacity of
battery pack
To reduce the risk of
injury, user must read
and understand
instruction manual.
For indoor use only.
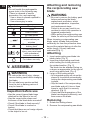
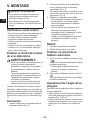
ASSEMBLY
WARNING
• To reduce the risk of injury, always
remove battery pack before changing
the blade.
• Do not inhale any smoke emitted
from the tool or battery pack as it
may be harmful.
Inspection before use
• Has the correct jigsaw blade been
attached for the object to be cut?
• Has the correct stem shape and
thickness of the blade been mounted?
•
• Check if the blade is cracked or
broken.
• Check that there are no foreign objects
in the object to be cut.
the reciprocating saw
blade
WARNING
• Be sure to remove the battery pack
before performing the blade
replacement procedure, which
includes preparation, inspection,
and replacement steps.
Failure to do so may result in an
accident in which tool operation is
triggered inadvertently.
• When pulling the reciprocating saw
blade, be sure to pull the back side.
When choosing a reciprocating saw
blade, select a blade that protrudes
beyond the material being cut after the
stroke length (14 mm) has been
subtracted [Fig. 1].
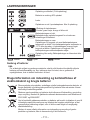
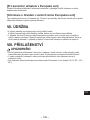
Attaching
1. Insert reciprocating saw blade into
blade clamp. [Fig. 2]
2. Insert the reciprocating saw blade
while holding the locking sleeve in
the rotated position. [Fig. 3]
The blade can be attached facing up
or down as appropriate for the type of
work being performed. [Fig. 4]
3. Let go of the locking sleeve.
• An integrated spring will return the
sleeve to its position automatically,
locking the reciprocating saw blade
in place.
• Grip the back of the reciprocating
saw blade and pull it two or three
times to verify that it is securely
attached. [Fig. 5]
• Check that the temperature of the
then remove the blade.
1. Rotate the locking sleeve.
2. Remove the reciprocating saw blade.
– 14 –
EN

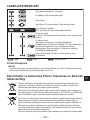
Battery Pack
1. To connect the battery pack: [Fig. 6
]
Line up the alignment marks and
attach the battery pack.
• Slide the battery pack until it locks
into position.
2. To remove the battery pack: [Fig. 6
]
Pull the button from the front to
release the battery pack.
Adjusting handle angle
The handle position can be set to 4
different angles.
• Slide the handle lock release lever to
set the handle angle. [Fig. 7] [Fig. 8]
• Before working, be sure to move the
handle up and down to make sure the
Adjusting the position of
the protect shoe
You can adjust the shoe position by
inserting a hexagon wrench at the
bottom of the main unit as shown in the
adjustment screw about one turn. [Fig.
9]
• If the blade sharpness becomes poor
due to the use of the same part of the
blade, the unused part can be used by
adjusting the position of the shoe, and
the life of the reciprocating saw blade
can be extended.
• After adjustment, be sure to tighten the
adjustment screw.
• The shoe cannot be removed.
• Do not loosen the shoe adjusting
screw more than 2 turns as it may
cause a malfunction.
• While working, press the protect
be cut.
• Do not apply excessive force when
cutting.
• When cutting into a small arc,
reduce the feed rate.
1. While pushing down the switch lock
release lever, pull the power switch.
[Fig. 10]
• The switch lock can be disengaged
by pushing in the switch lock
release lever from either side.
• The speed increases with the
amount of depression of the power
switch.
• While you are on the power switch,
the tool will continue to operate
from the switch lock release lever.
power switch.
3. Check that the temperature of the
then remove the blade.
When operating the tool by pulling
the trigger, there may be a
momentary lag before rotation starts.
This does not signal a malfunction.
* This lag occurs as the tool’s circuitry
starts up when the trigger is pulled
battery pack or after the tool has not
been used for at least 1 minute.
Rotation will start without any lag
during second and subsequent
operations.
Cutting
• Hold the protective shoe against the
material being cut, taking care to align
the reciprocating saw blade with the
desired cut position, and pull the
switch.
• The blade may vibrate occasionally,
which is a normal phenomenon.
• If cuttings accumulate on the uneven
surfaces near where the reciprocating
saw blade is attached, clean them off
before resuming work.
• Check that there are no obstacles to
cut underneath workpiece.
– 15 –
EN

• Check that there are no objects such
as nails in the material to be cut.
If the blade comes into contact with
any such objects during cutting, a
strong reaction force will be generated
and severe injury may occur.
• Do not place your hand on the object
in the direction cutting is to take place.
If this is not observed, there is a risk of
injury.
Holding the tool and
pushing on it
Hold the tool securely with both hands.
There is no need to exert excessive
force on the tool while operating it.
Exercise caution as applying excessive
force to the tool in a prying or pushing
motion may damage the tool.
When cutting in a small arc, a lower feed
speed will result.
Attempting to move the saw too quickly
may damage the reciprocating saw
blade.
WARNING
• Do not remove the front cover.
Always hold the tool with your hand
on top of the front cover.
• After pausing or completing work,
always turn off the switch and
remove the battery pack from the
tool.
Attempting to cut a pipe, piece of
lumber, or other material that exceeds
the reciprocating saw blade’s cutting
capacity may cause the tip of the blade
to strike the inside of the pipe or the
piece of lumber, damaging the blade
[Fig. 11].
• Keep the protective shoe in contact
with the material being cut while
operating the tool.
• Failure to do so may cause the
reciprocating saw blade to be
damaged due to the resulting
vibrations.
• When cutting in a small arc, a lower
feed speed will result.
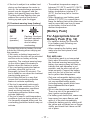
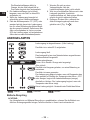
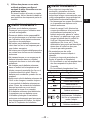
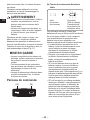
Control Panel
(O) (N)
Off
(normal
operation)
Flashing
(No charge)
Battery
protection
feature active
Excessive (complete) discharging of
lithium ion batteries shortens their
service life dramatically. The tool
includes a battery protection feature
designed to prevent excessive
discharging of the battery pack.
• The battery protection feature activates
immediately before the battery loses its
charge, causing the battery low
• If you notice the battery low warning
immediately.
• If it is started with too little battery
power remaining, the tool may stop
operating without the battery low
indicates that there is too little battery
power remaining to use the tool, and
the battery pack should be charged
before further use.
– 16 –
EN

• If the tool is subject to a sudden load
during use that causes the motor to
lock up, the overdischarge prevention
sensor may be triggered, and the
address the cause of the motor’s
locking up and cycle the trigger.
Off
(normal
operation)
Flashing: Overheat
Indicates operation
has been halted
due to battery
overheating.
To protect the motor or battery, be sure
to note the following when carrying out
this operation.
• If the motor or battery becomes hot,
the protection function will be activated
and the motor or battery will stop
operating. The overheat warning lamp
on the control panel illuminates or
• If the overheating protection feature
activates, allow the tool to cool
thoroughly (at least 30 minutes). The
tool is ready for use when the overheat
warning lamp goes out.
• Avoid using the tool in a way that
causes the overheating protection
feature to activate repeatedly.
• If the tool is operated continuously
under high-load conditions or if it is
used in hot-temperature conditions
(such as during summer), the
overheating protection feature may
activate frequently.
• If the tool is used in cold-temperature
conditions (such as during winter) or if
it is frequently stopped during use, the
overheating protection feature may not
activate.
• The ambient temperature range is
between 0°C (32°F) and 40°C (104°F).
If the battery pack is used when the
battery temperature is below 0°C
(32°F), the tool may fail to function
properly.
• When charging a cool battery pack
(below 0°C (32°F)) in a warm place,
leave the battery pack at the place and
wait for more than one hour to warm
up the battery to the level of the
ambient temperature.
[Battery Pack]
For Appropriate Use of
Battery Pack [Fig. 12]
• For optimum battery life, store the
Li-ion battery pack following use
without charging it.
• When operating the battery pack,
make sure the work place is well
ventilated.
For safe use
• If the battery pack is not connected
the overheat warning lamp and the
indicate that safe operation is not
possible, and the main unit will not
rotate normally. Connect the battery
pack into the unit of the tool until the
red or yellow label disappears.
• Only use rechargeable battery packs
for Panasonic rechargeable tools. Do
(including battery packs which have
been disassembled and parts
replaced).
• Do not use deteriorated battery packs.
There is a risk of the generation of
heat, ignition and explosion.
•
return it to the store immediately.
• Attach the battery pack by sliding until
the yellow and red labels are no longer
visible, and check that it does not fall
out of place.
– 17 –
EN

- Failure to do so may result in
scalding.
• The usage temperature range for
lithium ion battery packs is 0 to 40
degrees.
- Use of battery packs cooled to below
zero, such as in colder northern
areas, may result in abnormal
operation of the device. In such
cases, leave the battery pack in a
location of 10 degrees or more for
one hour or more before use, and
only use the device after the battery
pack has warmed up.
[Battery Charger]
Charging
1) If the temperature of the battery
pack falls approximately below
automatically stop to prevent
degradation of the battery.
2) The ambient temperature range is
between 0°C (32°F) and 40°C
(104°F).
If the battery pack is used when the
battery temperature is below 0°C
(32°F), the tool may fail to function
properly.
3) Use the charger at temperatures
between 0°C (32°F) and 40°C
(104°F), and charge the battery at a
temperature similar to that of the
battery itself. (There should be no
more than a 15°C (59°F) difference
between the temperatures of the
battery and the charging location.)
4) When charging a cool battery pack
(below 0°C (32°F)) in a warm place,
leave the battery pack at the place
and wait for more than one hour to
warm up the battery to the level of
the ambient temperature.
5) Cool down the charger when
charging more than two battery
packs consecutively.
6)
contact hole, when holding charger
or any other occasions.
7) Unplug the charger when not in
use.
8) Store the charger between 0 and 40
degrees, and charge the battery
pack at a temperature close to the
storage temperature.
• If the battery pack is charged
while at a temperature below 0
degrees, a full charge will give
only around 50% of a normal
charge. Commence charging
after 1 hour or more at the
prescribed temperature.
9) Do not charge in a poorly ventilated
place.
10) Do not cover the battery pack or
charger with a cloth or the like while
charing is in progrress.
Your battery pack is not fully charged
at the time of purchase. Be sure to
charge the battery before use.
How to charge
1. Plug the charger into the AC outlet.
Sparks may be produced when the
plug is inserted into the AC power
supply, but this is not a problem in
terms of safety.
the charger.
(1) Line up the alignment marks and
place the battery onto the dock
on the charger.
Not all battery packs display the
alignment mark [Fig. 13] (on page
8).
(2) Slide forward in the direction of
the arrow. [Fig. 13
]
3. During charging, the charging lamp
will be lit. When charging is
completed, an internal electronic
switch will automatically be triggered
to prevent overcharging.
– 18 –
EN

• Charging will not start if the battery
pack is hot (for example,
immediately after heavy-duty
operation).
The orange standby lamp will be
down.
Charging will then begin
automatically.
slowly once the battery is
approximately 80% charged.
5. When charging is completed, the
charging lamp in green color will turn
off.
6. If the temperature of the battery pack
is 0°C (32°F) or less, charging takes
longer to fully charge the battery pack
than the standard charging time.
Even when the battery is fully
charged, it will have approximately
50% of the power of a fully charged
battery at normal operating
temperature.
7. Consult an authorized dealer if the
charging lamp (green) does not turn
off.
8. If a fully charged battery pack is
inserted into the charger again, the
charging lamp lights up. After several
minutes, the charging lamp in green
color will turn off.
9. Remove the battery pack while the
battery pack release button is held
up. [Fig. 13 ]
– 19 –
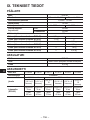
EN

Charging is completed. (Full charge.)
Battery is approximately 80% charged.
Now charging.
Turn off Illuminated Flashing
Charger is plugged into the AC outlet. Ready to charge.
Charging Status Lamp.
Left: green Right: orange will be displayed.
Battery pack is cool.
The battery pack is being charged slowly to reduce
the load on the battery.
Battery pack is warm.
Charging will begin when temperature of battery
pack drops. If the temperature of the battery pack is
-10° or less, the charging status lamp (orange) will
temperature of the battery pack goes up.
Charging is not possible. Clogged with dust or
malfunction of the battery pack.
(Green) (Orange)
Battery Recycling
For environmental protection and recycling of materials, be sure that it is disposed
These symbols on the products, packaging, and/or accompanying
documents mean that used electrical and electronic products and
batteries should not be mixed with general household waste.
For proper treatment, recovery and recycling of old products and used
batteries, please take them to applicable collection points, in accordance
with your national legislation and the Directives 2012/19/EC and 2006/66/
EC.
By disposing of these products and batteries correctly, you will help to
save valuable resources and prevent any potential negative effects on
human health and the environment which could otherwise arise from
inappropriate waste handling.
For more information about collection and recycling of old products and
batteries, please contact your local municipality, your waste disposal
– 20 –
EN
La page charge ...
La page charge ...
La page charge ...
La page charge ...
La page charge ...
La page charge ...
La page charge ...
La page charge ...
La page charge ...
La page charge ...
La page charge ...
La page charge ...
La page charge ...
La page charge ...
La page charge ...
La page charge ...
La page charge ...
La page charge ...
La page charge ...
La page charge ...
La page charge ...
La page charge ...
La page charge ...
La page charge ...
La page charge ...
La page charge ...
La page charge ...
La page charge ...
La page charge ...
La page charge ...
La page charge ...
La page charge ...
La page charge ...
La page charge ...
La page charge ...
La page charge ...
La page charge ...
La page charge ...
La page charge ...
La page charge ...
La page charge ...
La page charge ...
La page charge ...
La page charge ...
La page charge ...
La page charge ...
La page charge ...
La page charge ...
La page charge ...
La page charge ...
La page charge ...
La page charge ...
La page charge ...
La page charge ...
La page charge ...
La page charge ...
La page charge ...
La page charge ...
La page charge ...
La page charge ...
La page charge ...
La page charge ...
La page charge ...
La page charge ...
La page charge ...
La page charge ...
La page charge ...
La page charge ...
La page charge ...
La page charge ...
La page charge ...
La page charge ...
La page charge ...
La page charge ...
La page charge ...
La page charge ...
La page charge ...
La page charge ...
La page charge ...
La page charge ...
La page charge ...
La page charge ...
La page charge ...
La page charge ...
La page charge ...
La page charge ...
La page charge ...
La page charge ...
La page charge ...
La page charge ...
La page charge ...
La page charge ...
La page charge ...
La page charge ...
La page charge ...
La page charge ...
La page charge ...
La page charge ...
La page charge ...
La page charge ...
La page charge ...
La page charge ...
La page charge ...
La page charge ...
La page charge ...
La page charge ...
La page charge ...
La page charge ...
La page charge ...
La page charge ...
La page charge ...
La page charge ...
La page charge ...
La page charge ...
La page charge ...
La page charge ...
La page charge ...
La page charge ...
La page charge ...
La page charge ...
La page charge ...
La page charge ...
La page charge ...
La page charge ...
La page charge ...
La page charge ...
La page charge ...
La page charge ...
La page charge ...
La page charge ...
La page charge ...
La page charge ...
La page charge ...
La page charge ...
La page charge ...
La page charge ...
La page charge ...
La page charge ...
La page charge ...
La page charge ...
La page charge ...
La page charge ...
La page charge ...
La page charge ...
La page charge ...
La page charge ...
La page charge ...
La page charge ...
La page charge ...
La page charge ...
La page charge ...
La page charge ...
La page charge ...
La page charge ...
La page charge ...
La page charge ...
La page charge ...
La page charge ...
La page charge ...
La page charge ...
La page charge ...
La page charge ...
La page charge ...
La page charge ...
La page charge ...
La page charge ...
La page charge ...
La page charge ...
La page charge ...
La page charge ...
La page charge ...
La page charge ...
La page charge ...
La page charge ...
La page charge ...
La page charge ...
La page charge ...
La page charge ...
La page charge ...
La page charge ...
La page charge ...
La page charge ...
La page charge ...
La page charge ...
La page charge ...
La page charge ...
La page charge ...
La page charge ...
La page charge ...
La page charge ...
La page charge ...
La page charge ...
La page charge ...
La page charge ...
La page charge ...
La page charge ...
La page charge ...
La page charge ...
La page charge ...
La page charge ...
-
 1
1
-
 2
2
-
 3
3
-
 4
4
-
 5
5
-
 6
6
-
 7
7
-
 8
8
-
 9
9
-
 10
10
-
 11
11
-
 12
12
-
 13
13
-
 14
14
-
 15
15
-
 16
16
-
 17
17
-
 18
18
-
 19
19
-
 20
20
-
 21
21
-
 22
22
-
 23
23
-
 24
24
-
 25
25
-
 26
26
-
 27
27
-
 28
28
-
 29
29
-
 30
30
-
 31
31
-
 32
32
-
 33
33
-
 34
34
-
 35
35
-
 36
36
-
 37
37
-
 38
38
-
 39
39
-
 40
40
-
 41
41
-
 42
42
-
 43
43
-
 44
44
-
 45
45
-
 46
46
-
 47
47
-
 48
48
-
 49
49
-
 50
50
-
 51
51
-
 52
52
-
 53
53
-
 54
54
-
 55
55
-
 56
56
-
 57
57
-
 58
58
-
 59
59
-
 60
60
-
 61
61
-
 62
62
-
 63
63
-
 64
64
-
 65
65
-
 66
66
-
 67
67
-
 68
68
-
 69
69
-
 70
70
-
 71
71
-
 72
72
-
 73
73
-
 74
74
-
 75
75
-
 76
76
-
 77
77
-
 78
78
-
 79
79
-
 80
80
-
 81
81
-
 82
82
-
 83
83
-
 84
84
-
 85
85
-
 86
86
-
 87
87
-
 88
88
-
 89
89
-
 90
90
-
 91
91
-
 92
92
-
 93
93
-
 94
94
-
 95
95
-
 96
96
-
 97
97
-
 98
98
-
 99
99
-
 100
100
-
 101
101
-
 102
102
-
 103
103
-
 104
104
-
 105
105
-
 106
106
-
 107
107
-
 108
108
-
 109
109
-
 110
110
-
 111
111
-
 112
112
-
 113
113
-
 114
114
-
 115
115
-
 116
116
-
 117
117
-
 118
118
-
 119
119
-
 120
120
-
 121
121
-
 122
122
-
 123
123
-
 124
124
-
 125
125
-
 126
126
-
 127
127
-
 128
128
-
 129
129
-
 130
130
-
 131
131
-
 132
132
-
 133
133
-
 134
134
-
 135
135
-
 136
136
-
 137
137
-
 138
138
-
 139
139
-
 140
140
-
 141
141
-
 142
142
-
 143
143
-
 144
144
-
 145
145
-
 146
146
-
 147
147
-
 148
148
-
 149
149
-
 150
150
-
 151
151
-
 152
152
-
 153
153
-
 154
154
-
 155
155
-
 156
156
-
 157
157
-
 158
158
-
 159
159
-
 160
160
-
 161
161
-
 162
162
-
 163
163
-
 164
164
-
 165
165
-
 166
166
-
 167
167
-
 168
168
-
 169
169
-
 170
170
-
 171
171
-
 172
172
-
 173
173
-
 174
174
-
 175
175
-
 176
176
-
 177
177
-
 178
178
-
 179
179
-
 180
180
-
 181
181
-
 182
182
-
 183
183
-
 184
184
-
 185
185
-
 186
186
-
 187
187
-
 188
188
-
 189
189
-
 190
190
-
 191
191
-
 192
192
-
 193
193
-
 194
194
-
 195
195
-
 196
196
-
 197
197
-
 198
198
-
 199
199
-
 200
200
-
 201
201
-
 202
202
-
 203
203
-
 204
204
-
 205
205
-
 206
206
-
 207
207
-
 208
208
-
 209
209
-
 210
210
-
 211
211
-
 212
212
-
 213
213
-
 214
214
-
 215
215
-
 216
216
-
 217
217
-
 218
218
-
 219
219
-
 220
220


Panasonic EY47A1 Mode d'emploi
- Catégorie
- Outils électroportatifs
- Taper
- Mode d'emploi
dans d''autres langues
- italiano: Panasonic EY47A1 Istruzioni per l'uso
- English: Panasonic EY47A1 Operating instructions
- español: Panasonic EY47A1 Instrucciones de operación
- Deutsch: Panasonic EY47A1 Bedienungsanleitung
- Nederlands: Panasonic EY47A1 Handleiding
- dansk: Panasonic EY47A1 Betjeningsvejledning
- polski: Panasonic EY47A1 Instrukcja obsługi
- čeština: Panasonic EY47A1 Operativní instrukce
- svenska: Panasonic EY47A1 Bruksanvisningar
- Türkçe: Panasonic EY47A1 Kullanma talimatları
- suomi: Panasonic EY47A1 Käyttö ohjeet
Documents connexes
Autres documents
-
Worx WO7120 Le manuel du propriétaire
-
Skil RS582902 Le manuel du propriétaire
-
Genesis GLRS20A Manuel utilisateur
-
Skil RS5825B-10 Le manuel du propriétaire
-
DeWalt DCS380 Manuel utilisateur
-
Skil PWRCORE 20 RS5825B-00 Le manuel du propriétaire
-
-