StoreBound M400 Manuel utilisateur
- Catégorie
- Fers
- Taper
- Manuel utilisateur

3-WAY AUTO SHUT OFF
2-YEAR WARRANTY
BUILT TO LAST
M400
With over 50 years of dependability,
Maytag has become synonymous with quality
and lasting products. This Maytag Smart Fill™
Iron + Steamer delivers our best commercial
performance right in your home.

!
1!
MAYTAG&Classic&Iron&–&Model&#&M400&
Table&of&Contents:&
!
1.!SAFETY!GUIDELINES!......................................................................................................................................................!2!
2.!MEET!YOUR!IRON!............................................................................................................................................................!3!
3.!OPERATING!YOUR!IRON!...............................................................................................................................................!4!
4.!CLEANING!YOUR!IRON !...............................................................................................................................................!10!
5.!DRAINING!THE!WATER!..............................................................................................................................................!11!
6.!AUTO!SHUT!OFF!.............................................................................................................................................................!12!
7.!TROUBLESHOOTING!...................................................................................................................................................!13!
!
!
!
!
!
!
!
!
!
!
!
!
!
!
!
!
!
!
!
!
!
!
!
!
!
!
!
!
!

!
2!
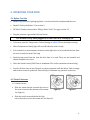
1.!SAFETY!GUIDELINES!
&
IMPORTANT SAFETY INSTRUCTIONS.
When using an iron, basic precautions should always be followed, including the following:
READ ALL INSTRUCTIONS BEFORE USING
1. Only use an iron for its intended use.
2. To avoid the risk of electric shock, do not immerse the iron in water or other liquids.
3. Always turn the iron OFF before plugging or unplugging the iron from the electrical outlet. Never pull on
the cord to disconnect the iron from the electrical outlet; instead, grasp the plug and pull on the plug to
disconnect the iron.
4. Do not let the cord touch hot surfaces. Let the iron cool completely before putting the iron away. Coil
the cord loosely around the iron when storing.
5. Always disconnect the iron from the electrical outlet before filling the iron with water, emptying the
water from the iron, and when the iron is not in use.
6. Do not operate the iron with a damaged cord or in the event the iron has been dropped or
damaged. To avoid the risk of electric shock, do not disassemble the iron. Take it to a qualified
serviceman for examination and repair. Incorrect assembly might result in a risk of electric shock
when the iron is used after reassembly.
7. Close supervision is required for any appliance used by or near children. Do not leave the iron
unattended while the iron is connected or on an ironing board.
8. Burns can occur from touching hot metal parts, hot water, or steam. Use caution when you turn a
STEAM IRON upside down - there might be hot water in the reservoir.
9. To avoid a circuit overload, do not operate an iron on the same circuit with another high wattage
appliance.
10. If an extension cord is absolutely necessary, a cord with an ampere rating equal to or greater
than the maximum rating of the iron shall be used. A cord rated for less amperage can result in a risk
of fire or electric shock due to overheating. Care shall be taken to arrange the cord so that it cannot
be pulled or be tripped over.
!
! The!iron!must!not!be!left!unattended!while!it!is!connected!to!the!supply!mains.!
! The!plug!must!be!removed!from!the!socketUoutlet!before!the!water!reservoir!is!filled!
with!water.!!
! The!iron!must!be!used!and!rested!on!a!stable!surface.!
! When! placing! the! iron! on! its! stand,! ensure! that! the! surface! on! which!the!stand!is!
placed!is!stable.!
! !!!The!iron!is!not!to!be!used!if!it!has!been!dropped,!if!there!are!visible!signs!of!damage!
or!if!it!is!!!leaking.!
! !!!Remove!all!packaging!and!labels!from!appliance!prior!to!use.!
! !!!Cord!must!not!hang!over!edge!of!table,!edge!of!counter,!over!the!sink,!or!touch!hot!
surfaces.!
! !!!To!turn! off!your!iron,! press!down!on! the!Temperature!Control! Setting!for!about! 3!
seconds.!
! !!!When!cleaning!external!iron,!use!a!soft!wet!cloth!to!wipe!down.!!
! !!!Be!certain!water!fill!cover!is!securely!locked!in!place!before!engaging!appliance.!!
!
SAVE THESE INSTRUCTIONS&

!
3!
!
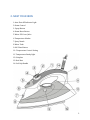
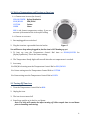
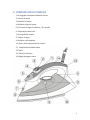
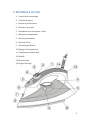
2.!MEET!YOUR!IRON!
!
1. Auto!ShutUOff!Indicator!Light!
2. Steam!Control!
3. !Spray!Button!!
4. Steam!Burst!Button!
5. Water!Fill!Cover/Inlet!
6. Temperature!Marker!
7. Spray!Nozzle!
8. Water!Tank!!
9. SelfUClean!Button!!
10. !Temperature!Control!Setting!!
11. Temperature!Ready!Light!
12. Soleplate!
13. Heel!Rest!
14. Soft!Grip!Handle!
!
!
!
!
!
!
!
& & & & & ! ! ! ! ! !
!
!
!
!
!
!
!
!

!
4!
3.!OPERATING!YOUR!IRON!
3.1$Before$First$Use$$
! Remove!any!protective!packaging,!films,!or!stickers!from!the!soleplate!and!the!iron.!
!
! Read!all!“Safety!Guidelines.”!See!section!1.!
!
! Fill!Water!Tank!as!instructed!in!“Filling!!Water!Tank.”!See!page!section!3.3.!
!
! Plug!the!iron!into!a!grounded!electrical!outlet.!
You$will$hear$a$beep$when$plugged$in,$but$the$iron$is$NOT$heating$up$yet.$
! To!heat!up,!turn!the!Temperature!Control!Setting!to!LINEN.!This!is!the!highest!setting.!!!!
!
! When!Temperature!Ready!light!will!turn!off!when!the!iron!is!ready.!!
!
! It!is!normal!for!a!smal l!amount!of!smoke!and!a!light!odor!to!be!produced!the!first!time!
the!iron!is!used;!this!won’t!last!long.!
&
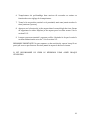
! Particles! may! emit! from! the! iron! the! first! time! it! is! used.! They! are! not! harmful! and!
should!dissipate!once!used.!
!
! Move!the!Steam!Control/SelfUClean!to!maximum.!This!is!the!continuous!steam!setting.!
!
! Iron!for!the!first!time!on!an!old!towel!or!a!heavy!material!until!the!Water!Tank!is!empty!
and!no!more!steam!is!produced.!This!will!help!to!eliminate!any!particles!in!the!iron.!!
&
3.2$Control$Features$
&
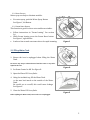
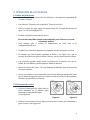
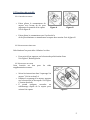
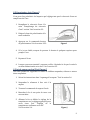
3.2.1!STEAM!CONTROL!
!
! Slide!the! steam! switch!towards! the!front! of!
the!iron!to!increase!the!amount!of!the!steam.!! !!!!!Figure&A& & Figure&B!
! !See!Figure'A.!
!
! Slide!the!switch!towards!the!back!of!the!!
! iron!to!decrease!or!turn!the!steam!off.!See!Figure'B.!!
!
!
!

!
5!
!
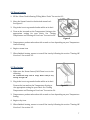
3.2.2!SPRAY!BUTTON!
Water'spray'can'help'to'eliminate'wrinkles.'
!
! For!water!spray,!push!the!Water!Spray!Button.!!
See!Figure'C,'left!Button.'
'
3.2.3!STEAM!BURST!BUTTON!
This!function!is!good!for!those!extra!stubborn!wrinkles.!
'
! Follow! instructions! in! “Steam! Ironing.”! See! section!
3.6.!
! While! Steam! Ironing,! press! the! Steam! Burst! button.!
See!Figure'C,!right!button.!
! It!takes!a!few!seconds!on!steam!reboot!for!rapid!steaming.!! ! Figure&C!
'
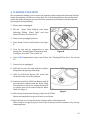
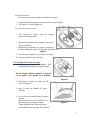
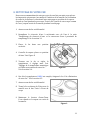
3.3$Filling$Water$Tank$
! !
! !
1. Ensure! the! iron! is! unplugged! when! filling! the! Water!
Tank.!!
!
Do$ not$use$ any$soap$or$chemical$mixed$with$ the$water$ or$any$other$
liquid$in$the $iro n .$ $ $ $ $ $ $ $ $ $ $
$ $ $ $ $ $ $ $ $ $ $ $ $ Figure&D!
2. Set!Steam!Control!to!Off.!See!Figure'D.!!
!
3. Open!the!Water!Fill!Cover/Inlet.!!
!
4. Using!the!included!cup,!fill!the!Water!Tank!
!to! the! max! level! mark! on! the! outside! of! the! Water!
Tank.!!
Be! careful! not! to! overfill,! this! could! cause! leakage.!
See!Figure'E.!! !
!
5. Close!the!Water!Fill!Cover/Inlet! ! ! ! ! ! ! !
$ $ $ $ $ $ $ $ $ $ $ ! ! Figure&E$
When$refilling$the$Water$Tank,$ensure $the$iron$is $u n p l u g g e d .! ! !
!
! $

!
6!
3.4$Setting$Temperatures$and$Turning$on$Your$Iron$
$
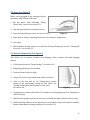
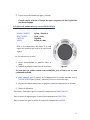
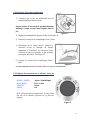
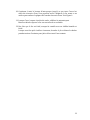
3.4.1!TEMPERATURE!SETTINGS!(SEE!FIGU RE 'F)! ! !
NYLON/SYNTH& Nylon/Synthetics&&
SILK/WOOL& Silk/Wool&
COTTON& & Cotton&&
LINEN&& & Linen&&
!
MIN' is' the' lowest' temperature' setting.' If' you' are'
not'sure'of'the'material'this'is'the'safest'setting.'
'
3.4.2!TURNING!ON!YOUR!IRON!
!
1. Rest!unplugged!iron!on!its!heel.!!
!
2. Plug!the!iron!into!a!grounded!electrical!outlet.! ! ! !!!Figure&F!
$
You$will$hear$a$beep$when$plugged$in,$but$the$iron$is$NOT$heating$up$yet.$
3. To! heat! up,! turn! the! Temperature! Control! Dial! time! to! NYLON/SYNTH! for!
(Nylon/Synthetics).!This!is!the!lowest!setting.!
!
4. The!Temperature!Ready!Light!will!turn!off!when!the!set!temperature!is!reached.!!!!
!
5. Iron!away.!
For!Silk/Wool!setting!turn!the!Temperature!Control!Dial!to!SILK/WOOL!
!
For!Cotton!setting!turn!the!Temperature!Control!Dial!to!COTTON!
!
For!Linen!setting!turn!the!Temperature!Control!Dial!to!LINEN!
!
3.5$Turning$Off$Your$Iron$
!
1. Turn!the!Temperature!Control!Dial!to!MIN.!
!
2. Unplug!the!iron.!
!
3. The!iron!is!now!turned!off.!
!
4. Stand!iron!upright!on!its!heel!to!cool!down.!
Note:$ The$ iron$ will$ remain$ hot$ after$turning$ off.$ Allow$ample$ time$ to$cool$ down$
prior$to$handling$and$storing.$

!
7!
3.6$Steam$Ironing$
!
1. Fill!the!!Water!Tank!following!“Filling!Water!Tank.”!See!section!3.3.!
!
2. Move!the!Steam!Control!to!the!desired!steam!level.!!
See!Figure'G.!
!
3. Plug!in!the!iron!to!a!grounded!outlet!while!on!its!heel.!
!
4. Turn!on!the!iron!and!set!the!Temperature!Setting!to!the!
appropriate! setting! for! your! fabric.! See! “Setting!
Temperature!and!Turning!on!Your!Iron.”!See!section!3.4.!
! ! ! ! ! ! ! ! ! ! ! ! ! Figure&G!
!
5. Temperatures!preheat!takes!about!60!seconds!or!less!depending!on!your!Temperature!
Control!Setting.!
!
6. Begin!to!steam!iron.!
!
7. When!finished!ironing,!ensure!to!turn!off!the!iron!by!following!the!section!“Turning!Off!
Your!Iron”.!See!section!3.5.!
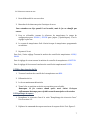
3.7$Dry$Ironing$
!
1. Make!sure!the!Steam!Cont rol/SelfUCl ean!is!set!to!the!
offsetting.!!
We$ recommend$ using$ with$ an$ empty$ Water$ Tank$ for$ Dry$
Ironing.$See$Figure$H.$ &
!
2. Plug!in!the!iron!to!a!grounded!outlet!while!on!its!heel.!
!
Turn!on!the!iron!and!set!the!Temperature!Setting!to! ! !!Figure&H!
!the!appropriate!setting!for!your!fabric.!See!“Setting!!
Temperature!and!Turning!on!Your!Iron.”!See!section!3.4.!!! ! ! ! ! $
! ! ! ! ! ! ! ! ! ! ! ! !
3. Temperatures!preheat!takes!about!60!seconds!or!less!depending!on!your!Temperature!
Setting.!
!
4. Begin!to!dry!iron.!
!
5. When!finished!ironing,!ensure!to!turn!off!the!iron!by!following!the!section!“Turning!Off!
Your!Iron”.!See!section!3.5.!

!
8!
3.8$Spray$(see$Figure$I)$
!
Water!can!be!sprayed!at!any!setting!as!long!as!
the!Water!Tank!is!filled!with!water.!
&
1. Fill! the! Water! Tank! following! “Fil l ing!
Water!Tank”!section.!See!section!3.3.!
!! ! ! ! ! ! ! ! ! ! ! ! ! &!
2. Aim!the!spray!nozzle!at!your!desired!area.! ! ! ! ! ! !
! ! ! ! ! ! ! ! ! ! !
3. Press!the!Spray!Button!control.!See!section!3.2.2.! ! ! !Figure&I! ! !
!
4. If!the!spray!is!weak,!try!pushing!the!button!a!few!times!to!pump!water.!
!
5. Iron!away.!
!
6. When!finished!ironing,!ensure!to!turn!off!the!iron!by!following!the!section!“Turning!Off!
Your!Iron”.!See!section!3.5.!
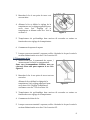
3.9$Vertical$Steam$Burst$(See$Fig u re $J)$
&
This! allows! you! to! remove! wrinkles! from! hanging! cloths,! curtains! and! other! hanging!
fabrics.!
!
1. !Follow!instructions!in!“Steam!Ironing.”!See!section!3.6.!
!
2. Hang!the!garment!up!to!be!steamed.!
!
3. Turn!the!Steam!Control!to!high.! ! ! ! ! ! ! ! !
!
4. !Plug!in!the!iron!to!a!grounded!outlet!while!on!its!heel.! ! ! ! !
!
5. !Turn! on! the! iron! and! set! the! Temperature! Control!
Setting! to! the! appropriate! setting! for! your! fabric.! See!
“Setting!Temperature!and!Turning!on!Your!Iron.”!! !
See!section!3.4.! ! ! ! ! ! ! ! ! ! Figure&J!
!
6. !Temperatures!preheat!takes!about!60!seconds!or!less!depending!on!your!Temperature!
Control!Setting.!
!
7. Hold!the!iron!upright!and!close!to,!but!never!touching!the!fabric!(about!6!inches!away).!!
!
8. Push!Steam!Burst!Button!at!the!directed!area!of!the!fabric.!Steam!will!remove!wrinkles.!
Repeat!Steam!Burst!for!stingy!wrinkles.!See!section!3.2.3.!
!

!
9!
9. When!finished!ironing,!ensure!to!turn!off!the!iron!by!following!the!section!“Turning!Off!
Your!Iron.”!See!section!3.5.!
!
IMPORTANT!NOTE:!Do!not!iron!or!steam!articles! w hen!being!worn!by!you!or!others.!Never!
aim!steam!at!living!beings.!
!
IT!IS!RECOMMENDED!TO!EMPTY!THE!WATER!TANK!AFTER!EVERY!USE.!
!
!
!
!
!
!
!
!
!
!
!
!
!
!
!
!
!
!
!
!
!
!

!
10!
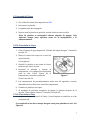
4.!CLEANING!YOUR!IRON!
We!recommend!cleaning!your!iron!once!per!month!to!remove!impurities!that!may!build!up!
inside!the!soleplate!over!the!use!of!your!iron.!The!selfUcleaning!function!does!produce!hot!
steam!and!water!during!the!process;!hold!iron!away!from!your!body!as!water/steam!exit!
the!soleplate!during!cleaning.!
!
1. Ensure!iron!is!unplugged.!
!
2. Fill! the! ! Water! Tank! halfway! with! water!
following! “Filling! ! Water! Tank”! and! close!
Water!Fill!Cover.!See!section!3.1.!
!
3. Place!iron!in!an!upright!position.!!
!
4. Place!Steam!Control!in!off!position.!See!Figure'
K.!
!
5. Turn! on! iron! and! set! temperature! to! max!
setting.!See!“Setting!Digital!Temperature!and!!! ! !!!!F igur e&K!
Turning!on!Your!Iron.”!See!section!3.4.! ! !
!
6. !Once!LINEN!temperature!is!met,!turn!off!iron.!See!“ Turning!Off!Your!Iron.”!See!section!
3.5.!
!
7. !Ensure!iron!is!unplugged.!
!
8. Hold!the!iron!over!the!sink!with!the!soleplate!
facing!down.!Keep!away!from!body.!!
!
9. Hold! the! SelfUClean! Button.! Hot! w ater! and!
steam!will!come!out!of!the!soleplate.!
!
10. Continue!to!hold!the!SelfUClean!Button!until!all!
the! water! has! emptied! from! the! Water! Tank.!
You!may!have!to!move!the!iron!back!and!forth!
to! remove! most! of! the! water! from! the! Water!
Tank.!See!Figure'L.!
! ! ! ! ! ! ! ! ! ! ! ! Figure&L&
11. When!water/steam!stops!flowing,!release!the!SelfUClean!!
Button!and!stand!the!iron!up!on!its!heel!to!cool!down.!
!
12. Once!the!iron!is!cool,!wipe!down!the!soleplate!with!a!cold!damp!cloth.!
When'ready'to'use'again,'plug'the'iron'in'an d'let'heat'for'about'2'minutes'to'dry'out'any'
remaining'water.'
'

!
11!
'
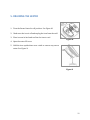
5.!DRAINING!THE!WATER!
$
1. Turn!the!Steam!Control!to!off!position.!!See!Figure'M.!
!
2. !Make!sure!the!iron!is!off!and!unplug!the!iron!from!the!wall.! ! ! !
!!
3. Place!iron!on!its!heel!and!to!allow!the!iron!to!cool.!
! ! ! ! ! ! ! ! ! ! ! ! ! !!!!!!!Figure&M! &
4. Open!the!water!fill!cover.!
!
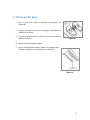
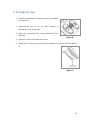
5. Hold!the!iron!upside!down!over!a!sink!to!remove!any!excess!
water.!See!Figure'N.!!
!
! ! ! ! ! ! ! ! ! ! ! ! ! !
!
!
!
!
!
!
!
! ! ! ! ! ! ! ! ! ! ! ! ! !!!!!!Figure&N!
!
!
!
!
!
!
!
!
!
!
!
!
!
!
!
!

!
12!
6.!AUTO!SHUT!OFF!
The!Auto!ShutUOff!feature!will!operate!automatically!when!the!iron!is!unattended!and!it!is!
connected!to!a!main!supply!outlet.!!
6.1$Horizontal$Auto$Shut$Off$
! The! iron! will! shut! off! automatically! after! 30! seconds! of!sitting! in! the!ironing! position!
(horizontal).!
!!
! Auto!shutUoff!indicator!light!blinks!RED,!indicating!the!iron!is!in!Auto!Shut!Off!mode.&
&&
! Moving!the!iron!will!turn!it!back!on.!
6.2$Vertical$Auto$Shut$Off$
! The!iron!will!switch!off!automatically!between!7!to!10!minutes!if!t he!iron!is!left!on!its!
heel!rest!position!(vertical).!
!!
! Auto!shutUoff!indicator!light!blinks!RED,!indicating!the!iron!is!in!Auto!Shut!Off!mode.! &
&&
! Moving!the!iron!will!turn!it!back!on.!
&
NOTE:& After& Auto! ShutUOff,! the! iron! will! take! about! 60! seconds! to! reach! its! previous!
soleplate!temperature.!
&
&
&
&
&
&
&
!
!
!
!
!

!
"#!
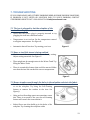
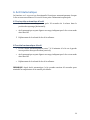
7.!TROUBLESHOOTING!
$%!&'(!)'*+!,)-'..!,/&!'%!01+.+!2-'34+*.!1+-+!,-+!.'*+!2'..$34+!.'4(0$'/.5!
$%! 2-'34+*! $.! /'0! 4$.0+6! '-! .'4(0$'/! %,$4.! 0'! .'47+! 2-'34+*8! )'/0,)0!
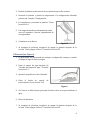
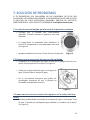
7.1$The$iron$is$plugged$in,$but$the$soleplate$of$the$
iron$isn’t$heatin g $u p . $
• )?@AB! C?DC! C?@! EFG@H! EIJK! LM! EHFE@HIN! LOM@HC@P! FH! CHN!
EIJKKLOK!C?@!LHFO!LOCF!D!PLQQ@H@OC!FJCI@C5!
!
• 0@RE@HDCJH@!LM!M@C! CFF!IFG5!.@C! C?@! C@RE@HDCJH@!AFOCHFI!
CF!D!?LK?@H!C@RE@HDCJH@5!.@@!Figure'O.&!
! ! ! ! ! ! ! ! ! ! ! ! &
• ,JCFRDCLA!M?JC9FQQ!LM!DACLS@5!0HN!RFSLOK!NFJH!LHFO5! ! ! !!!!!Figure&O!
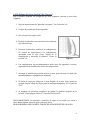
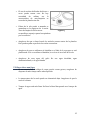
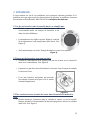
7.2$None$or$too$little$steam$is$being$emitted.$
• )?@AB!CF!M@@!LQ!C?@!MC@DR!MGLCA?!LMOTC!FO!C?@!PHN!M@CCLOK5!
,PUJMC!M@CCLOK!FO!MGLCA?5!.@@!Figure'P.!
!
• 0?@H@!RLK?C!OFC!V@!@OFJK?!GDC@H!LO!C?@!WDC@H!0DOB5!0HN!
QLIILOK!C?@!WDC@H!0DOB5!
!
• 0?@H@!LM!DO!DOCL9PHLE!Q@DC JH@!C?DC!AFJIP!V@!@ODAC@P5!*DB@!
MJH@!C?DC!C?@!LHFO!?DM!H@DA?@P!C?@!AFHH@AC!C@RE@HDCJH@5!
!
! ! ! ! ! ! ! ! ! ! ! !
! ! ! ! ! ! ! ! ! ! ! ! !!!!!!!Figure&P&
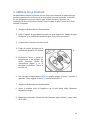
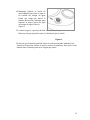
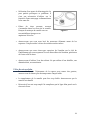
7.3$Brown$streaks$come$through$the$holes$in$the$soleplate$and$stain$the$fabric.$
• -@MLPJ@!AFJIP! ?DS@!VJLIC! JE! LO!C?@! MC@DR!A?DRV@H!
FH! FO! C?@! MFI@EIDC@5! 0HN! JMLOK! C?@! .@IQ9)I@DOLOK!
Q@DCJH@! CF! H@RFS@! C?@! H@MLPJ@! LO! C?@! LHFO5! .@@!
Figure'Q.!!
!
• (MLOK!DO!$HFO!6@MADILOK!DK@OC!ADO!MFR@CLR@M!ADJM@!
C?LM5!0?@H@!LM!OF!O@@P!CF!JM@!FO@X!C?@! M@IQ9AI@DOLOK!
Q@DCJH@!GLII!H@MADI@!C?@!LHFO!GLC?FJC!LC5! ! ! ! ! ! !
!
• %DVHLA!QLV@HM!ADO!FQC@O! VJLIP!JE!LO!C?@!?FI@M! FQ!C?@!
MFI@EIDC@5!0HN!AI@DOLOK!C?@!MFI@EIDC@!GLC?! D !!

!
14!
nonUmetallic!sponge!or!vacuuming!out!the!holes.!! ! ! !!!!Figure&Q!
!
• Make!sure!you!have!washed!any!new!items!before!ironing!them.!This!can!help!prevent!
streaks!or!stains.!
!
• Make!sure!you!didn’t!spray!starch!on!the!side!of!the!clothing!you!are!ironing.!If!you!are!
going!to!use!starch,!spray!it!on!the!other!side!of!the!fabric.!
!
• Make!sure!to!use!regular!tap!water.!Do!not!use!distilled!water,!dematerialized!water,!or!
softened!water.!
7.4$Iron$is$leaking.$
• Overuse!of!the!steam!burst!can!cause!drips,!make!sure!to!allow!more!time!between!each!
burst.!
!
• The!soleplate!temperature!could!be!too!low.!Check!to!make!sure!the!soleplate!is!heated!
up.!
!
• Water!Tank!is!over!filled.!Do!not!fill!past!Max!line!on!Water!Tank.!
!
!
!

!
1!
MAYTAG&Classic&Iron&1&Modelo&#M400&!
Tabla&de&Contenidos:!
!
1.!NORMAS!DE!SEGURIDAD!…………………………………………………………………………………………2 !
2.!CUMPLIR!CON!LA!PLANCHA………..……………………………………………………………………………3!
3.!OPERACIÓN!DE!LA!PLANCHA……………………………………………………………………………………4!
4.!LIMPIEZA!DE!LA!PLANCHA……………………………………………………………………………………..10!
5.!DRENAR!EL!AGUA…………………………………………………………………………………………………..12!
6.!APAGADO!AUTOMÁTICO………………………………………………………………………………………...13!
7.!SOLUCIÓN!DE!PROBLEMAS…………………………………………………………………………………….14!
!
!
!
!
!
!
!
!
!
!
!
!
!
!
!
!
!

!
2!
1.#NORMAS#DE#SEGURIDAD#
INSTRUCCIONES IMPORTANTES DE SEGURIDAD.!!
!
Cuando se utiliza una plancha, hay ciertas precauciones que deben seguirse, incluyendo las
siguientes:
LEA TODAS LAS INSTRUCCIONES ANTES DE USAR!
1.!Utilice sólo una voluntad de hierro para su uso previsto.!
2.!Para evitar el riesgo de choque eléctrico, no sumerja la plancha en agua u otros líquidos.!
3.!Siempre apague la plancha antes de enchufar o desenchufar la plancha de la toma eléctrica.!No tire
nunca del cable para desconectar la plancha de la toma de corriente eléctrica, sino que agarre el
enchufe y tire del enchufe para desconectar la plancha.!
4.!No deje que el cable toque superficies calientes.!Deje que la plancha se enfríe completamente
antes de poner el hierro de distancia.!Enrolle el cable holgadamente alrededor de la plancha.!
5.!Siempre desconecte la plancha de la toma eléctrica antes de llenar la plancha con agua, vaciar el
agua de la plancha, y cuando la plancha no está en uso.!
6.!No haga funcionar la plancha con un cordón dañado o en el caso de que la plancha se ha caído o
dañado.!Para evitar el riesgo de descarga eléctrica, no desarme la plancha.!Llévelo a un técnico
cualificado para su revisión y reparación.!Un montaje incorrecto puede resultar en un riesgo de
choque eléctrico cuando la plancha se usa después de volver a montar.!
7.!Se requiere una estrecha supervisión para cualquier aparato usado por o cerca de niños.!No deje la
plancha sin vigilancia mientras el hierro está conectada o sobre una tabla de planchar.!
8.!Pueden ocurrir quemaduras al tocar partes metálicas calientes, agua caliente o vapor.!Tenga
cuidado cuando coloque la plancha boca abajo - que podría haber agua caliente en el depósito.!
9.!Para evitar una sobrecarga eléctrica, no utilice una plancha en el mismo circuito con otro aparato de
alto voltaje.!
10.!Si un cable de extensión es absolutamente necesario, un cable con un amperaje igual o mayor
que el rango máximo de la plancha se usa.!Un cable clasificado para menos amperaje puede resultar
en un riesgo de incendio o una descarga eléctrica debido a un sobrecalentamiento.!Se debe tener
cuidado de colocar el cable para que no pueda ser arrancado o se tropiece con ellos.!
• El!hierro!no!debe!quedar!sin!vigilancia!mientras!está!conectado!a!la!red!de!
suministro.!
• El!tapón!debe!ser!retirado!de!la!toma!de!corriente!antes!de!que!el!depósito!de!
agua!se!llena!con!agua.!!
• La!plancha!debe!ser!utilizada!y!apoya da !sobre!una!superficie!estable.!
• Al!colocar!la!plancha!sobre!su!soporte,!asegúrese!de!que!la!superficie!sobre!la!
cual!se!colocará!el!soporte!sea!estable.!
• El!hierro!no!se!debe!utilizar!si!se!ha!caído,!si!hay!signos!visibles!de!daños!o!si!
tiene!una!fuga.!
• Quite!todo!el!embalaje!y!las!etiquetas!de!los!aparatos!antes!de!usarlos.!
• El!cable!no!debe!colgar!sobre!el!borde!de!la!mesa,!al!borde!de!mostrador,!sobre!
el!fregadero,!o!contacto!con!superficies!calientes.!
• Para!apagar!la!plancha,!presione!hacia!abajo!en!el!Marco!de!control!de!
temperatura!durante!unos!3!segundos.!
• Durante!la!limpieza!de!hierro!exterior,!utilice!un!paño!suave!y!húmedo!para!
limpiar.!
• Asegúrese!que!la!tapa!de!llenado!de!agua!esté!bien!trabada!en!su!lugar!antes!de!
iniciar!aparato.!
GUARDE ESTAS INSTRUCCIONES!

!
"!
2.#CUMPLIR#CON#LA#PLANCHA#
#$ %&!'(')'*+!',-+./-01+!23*01'*+4!*&!5,6!
7$ 8+3-4+5 !*&!9'(+4!
"$ :+-;3!*&5!4+10'*+4!
<$ :+-;3!*&!4/=')'!*&!9'(+4!
>$ %&!55 &3'*+!*&!'),'!5'!1,?0&4-'!@!*&!&3-4'*'!
A$ B&.(&4'-,4'!.'41'*+4!
C$ D'!? +E,055'!*&!4+10'*+!
F$ B'3E,&!*&!G),'!
H$ :+-;3!*&!',-+I50.(0&6'!
#J$ GK,L-&!*&!5'!-&.(&4'-,4'!*&!1+3-4+5!
##$ !B&.(&4'-,4'!5,6!03*01'*+4'!
#7$ M,&5'!
#"$ B'5;3!*&!*&L1'3L+!
#<$ N'3)+!*&!')'44&!L,'9&!
!
!
!
!
!
!
!
!
!
#
#

!
"!
3.#OPERACIÓN#DE#LA#PLANCHA#
3.1$Antes$del$primer$uso$
• #$%&'$!$(!$)*+(+,$!-$!.'/%$00&123!(+4!.$(506(+43!/!(+4!$%&76$%+4!$28/)+-+4!-$!
(+!46$(+!9!$(!:&$''/;!
!
• <$+!%/-+4!(+4!=>&'$0%'&0$4!-$!4$86'&-+-;=!?@+4$!(+! 4$00&12 !A;!
!
• <($2$! $(! %+276$! -$! +86+! 4$8B2! (+4! &24%'600&/2$4! -$! =<($2+-/! -$(! %+276$! -$!
+86+=;!?$+!(+!4$00&12!.C8&2+!D;D;!
!
• E20:6F$!(+!.(+20:+!+!62+!%/)+!-$!%&$''+;!
!
Se!escuchará!un!pitido!cuando!está!enchufado,!pero!el!hierro!no!se!está!
calentando!todavía.!
• G+'+! 0+($2%+'3! 8&'$! $(! 0/2%'/(! -$! % $).$'+%6'+ ! $2! LINO.! E4%+! $4! (+!
0/2F&86'+0&12!)C4!+(%+;!
!
• H6+2-/!(+!(6I!<&4%+!-$!%$).$'+%6'+!4$!+.+8+'C!06+2-/!(+!.(+20:+!$4%C!(&4%+;!
!
• E4! 2/')+(! 76$! 62+! .$76$J+! 0+2%&-+-! -$! :6)/! 9! 62! (&8$'/! /(/'! 76$! 4$!
.'/-6,/!(+!.'&)$'+!K$I!76$!4$!6%&(&I+!$(!:&$''/L!$4%/!2/!-6'+'C!)60:/!%&$)./;!
!
• <+4! .+'%506(+4! .6$-$2! $)&%&'! -$4-$! (+! .(+20:+! -$! (+! .'&)$'+! K$I! 76$! 4$!
6%&(&I+;!M/!4/2!-+J&2+4!9!-$*$!-&4&.+'4$!6%&(&I+'4$!62+!K$I;!
!
• N6$K+!$(!0/2%'/(!-$(!K+./'!O!-$!+6%/P(&).&$I+!+(!)CQ&)/;!E4%+ !$4!(+!./4&0&12!
-$!K+./'!0/2%&26/;!
!
• R&$''/3!./'!.'&)$'+!K$I!$2!62+!%/+((+!K&$,+!/!-$!62!)+%$'&+(!)C4!.$4+-/!:+4%+!
76$!$(!%+276$!-$!+86+!$4%C!K+05/!9!$(!K+./'!2/!)C4!4$!.'/-60$;!E4%/!+96-+'C!+!
$(&)&2+'!(+4!.+'%506(+4!$2!$(!:&$''/;!
$
3.2$Funciones$de$control$
D;S;A!HTMU#T<!>E!?VGT#!
• >$4(&0$!$(!&2%$''6.%/'!-$!K+./'!:+0&+!(+!
.+'%$! -$(+2%$'+! -$! (+! .(+20:+! .+'+!
+6)$2%+'!(+!0+2%&-+-!-$(!K+./';!! !
! ?$+!(+!Figura'A.! !!! !
! ! ! ! ! ! ! !!!!!!Figura&A!&& &&&&&&&&&&&&&&&&&&&&&&!Figura&B!
!
• >$4(&0$!$(!&2%$''6. %/'!:+0&+!(+! .+'%$!./4%$'&/'! -$! (+!:&$''/!.+'+! -&4)&26&'! /!
8&'+'!$(!K+./';!?$+!(+!figura'B.!
!

!
5!
!
!
3.2.2!BOTÓN!DE!SPRAY!
El'rocío'de'agua'puede'ayudar'a'eliminar'las'arrugas.'
!
• Para!aspersión!de!agua,!presione!el!botón!de!spray!de!agua.!
• Ver!Figura'C,'el!botón!izquierdo.!
!
3.2.3!BOTÓN!DE!RÁFAGA!DE!VAPOR!
!
• Esta! función! es! bueno! para! las! arrugas!
persistentes!adicionales.!
!
• Siga!las!instrucciones!de!"planchar!con!vapor."!
Ver!la!sección!3.6.!
• Mientras! que! planchar!con! vapor,! presione!el!
botón!de!ráfaga!de!vapor.!Ver!Figura'C,!botón!derecho.' ' ' '
' ' ' ' Figura&C!
• Se!tarda!unos!segundos!en!el!reinicio!de!vapor!'
• para!una!rápida!cocción!al!vapor.!! '
'
3.3$Llenado$del$tanque$de$agua$
1. Asegúrese! de! que! la! plancha! esté!
desenchufada!al!llenar!el!tanque!de!agua .!
!
No! use! ningún! jabón! o! químico! se! mezcla!
con! el! agua! u! otro! líquido! en! la! p lancha.!
!!!!!!!!!!!
Figura&D!
2. Establezca! el! control! de! vapor! en! Off.!
Véase!la!figura'D.!
!
3. Abra! la! tapa! de! llenado! de! agua! /!
entrada.!
!
4. Uso!de!la!copa!incluida,!llenar!el!tanque!
de!agua!
hasta! la! marca! de! nivel! máximo! en! la!
parte!exterior!del!tanque!de!agua.! ! ! ! Figura&E!
Tenga!cuidado!de!no!llenar!en!exceso,!!
esto!podría!causar!una!fuga.!Ver!Figura'E.!
La page est en cours de chargement...
La page est en cours de chargement...
La page est en cours de chargement...
La page est en cours de chargement...
La page est en cours de chargement...
La page est en cours de chargement...
La page est en cours de chargement...
La page est en cours de chargement...
La page est en cours de chargement...
La page est en cours de chargement...
La page est en cours de chargement...
La page est en cours de chargement...
La page est en cours de chargement...
La page est en cours de chargement...
La page est en cours de chargement...
La page est en cours de chargement...
La page est en cours de chargement...
La page est en cours de chargement...
La page est en cours de chargement...
La page est en cours de chargement...
La page est en cours de chargement...
La page est en cours de chargement...
La page est en cours de chargement...
La page est en cours de chargement...
La page est en cours de chargement...
La page est en cours de chargement...
-
 1
1
-
 2
2
-
 3
3
-
 4
4
-
 5
5
-
 6
6
-
 7
7
-
 8
8
-
 9
9
-
 10
10
-
 11
11
-
 12
12
-
 13
13
-
 14
14
-
 15
15
-
 16
16
-
 17
17
-
 18
18
-
 19
19
-
 20
20
-
 21
21
-
 22
22
-
 23
23
-
 24
24
-
 25
25
-
 26
26
-
 27
27
-
 28
28
-
 29
29
-
 30
30
-
 31
31
-
 32
32
-
 33
33
-
 34
34
-
 35
35
-
 36
36
-
 37
37
-
 38
38
-
 39
39
-
 40
40
-
 41
41
-
 42
42
-
 43
43
-
 44
44
-
 45
45
-
 46
46


StoreBound M400 Manuel utilisateur
- Catégorie
- Fers
- Taper
- Manuel utilisateur
dans d''autres langues
- English: StoreBound M400 User manual
- español: StoreBound M400 Manual de usuario
Autres documents
-
Maytag Smart Fill M1200 Manuel utilisateur
-
-
UFESA PV0500 Le manuel du propriétaire
-
Mellerware Blaze 23240 Manuel utilisateur
-
-
Black & Decker F225 Mode d'emploi
-
-
Black & Decker Impact IR3000 Mode d'emploi
-
Black & Decker IR2050 Le manuel du propriétaire
-