VADDIO DocCAM 20 HDBT Configuration And Administration Manual
- Taper
- Configuration And Administration Manual

Configuration and Administration Guide for the
DocCAM 20 HDBT
Ceiling-Mounted Document Camera
Document 411-0017-32 Rev C
May 2018

ii
Contents
Overview 1
What's in this Guide 1
Features 1
A Quick Look at the Camera 2
Features of Interest During Operation 3
Status Light 4
Using the IR Remote 5
IR Remote Cheat Sheet 5
IR Remote Details 6
Storing a Preset Using the Remote 6
Clearing a Preset Using the Remote 6
Web Interface 7
Getting the Camera's IP Address 7
Accessing the Web Interface 7
Browser Support 7
Administrative Access 8
Compact Menu View 8
Web Interface Cheat Sheet 9
System Administration 10
Configuring Network Settings 11
Specifying Time Zone and NTP Server 12
Managing Access and Passwords 13
Configuring IP Streaming 14
Editing IP Streaming Settings 14
Protocol and Streaming URL 16
Adding Room Information to the Web Interface 17
Rebooting the Camera 17
Saving (Exporting) or Restoring (Importing)a Configuration 18
Installing a Firmware Update 19
Contacting Vaddio Technical Support 20
Accessing the Diagnostic Logs 20
Configuring Camera Behavior 21
Setting Video Output Resolution 21
Enabling or Disabling the Laser Pointer 22
Software Switch Settings 23
Adjusting for the Lighting in the Room 24
Setting the Home Zoom Level and Other Zoom Presets 26
Operating the Camera from the Web Interface 28
Troubleshooting and Care 30
Check the Status Light First 30

Identify the Issue 30
Operation, Storage, and Care 31
Compliance Statements and Declarations of Conformity 32
FCC Part 15 Compliance 32
ICES-003 Compliance 33
European Compliance 33
Warranty Information 34
Index 35
iii
Configuration and Administration Guide for the DocCAM 20 HDBT Ceiling-Mounted Document Camera

1
Overview
This guide describes installation and related information for the DocCAM 20 HDBTceiling-mounted
document camera:
n Camera only, worldwide – 999-9968-000
n Camera with OneLINK HDMI camera extension, North America – 999-9968-
200
n Camera with OneLINK HDMI camera extension, Europe/UK – 999-9968-201
n Camera with OneLINK Bridge A/V interface, North America – 999-9968-300
n Camera with OneLINK BridgeA/V interface, Europe/UK – 999-9968-301
What's in this Guide
This guide covers:
n Unpacking the camera
n Tips for a successful installation
n Information on mounting and connecting the camera
n Camera power-on
Complete product information is available in the Integrator's Complete Guide to the DocCAM 20 HDBT
Ceiling-Mounted Document Camera.
Download manuals, dimensional drawings, and other information from www.vaddio.com/support.
Features
n Exmor® 1/2.8 type, high-speed, low-noise image sensor for 2.38 megapixels total, full HD (native
1080p/60)
n 20x optical zoom with horizontal field of view from 60° (wide end) to 3.3° (tele end)
n Low-power laser pointer for centering
n Superior low-light performance (0.4 Lux)
n Web interface for remote administration and operation, integration-ready Telnet and serial RS-232
control, presenter-friendly IR remote control
n Use with a OneLINK device for power, video, and control:
o
OneLINKHDMI – uncompressed HDMI video, bidirectional RS-232 connectivity for camera control
via third-party equipment, passes IP stream from the camera
o
OneLINK Bridge – OneLINKHDMIcapabiliities plus uncompressed USB 3.0 streaming, HD-SDI
output, and audio routed up to the camera and injected into the IP stream
Camera assembly numbers 998-9968-001 and 998-9968-100:
Class 1 Laser Product (IEC 60825-1:2014)
Produit Laser de la Classe 1 (IEC 60825-1:2014)
Klass 1 Laserprodukt (IEC 60825-1:2014)
Camera assembly number 998-9968-000 only:
This product contains a Class 3 laser.

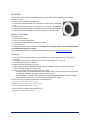
A Quick Look at the Camera
The DocCAM 20 HDBT ceiling-mounted document camera is designed for recessed mounting. The
features of interest during installation are not visible after the installation is complete.
Camera assembly numbers 998-9968-001 and 998-9968-100:
Class 1 Laser Product (IEC 60825-1:2014)
Produit Laser de la Classe 1 (IEC 60825-1:2014)
Klass 1 Laserprodukt (IEC 60825-1:2014)
Camera assembly numbers 998-9968-001 and 998-9968-100:
Note
This product contains a Class 1, 650 nm red laser pointer.
Cet appareil contient un pointeur laser de la Classe 1, à lumière rouge de 650 nm.
Camera assembly number 998-9968-000 only:
Caution
This product contains a Class 3 (5 mw) 650 nm red laser which produces visible laser radiation. Avoid
direct eye exposure. Do not look at the laser aperture during camera operation.
All DocCAM 20 HDBT part numbers:
Caution | Avertissement
Laser light – Avoid direct eye exposure. Do not look at the laser aperture during camera operation.
Lumière de laser – Ne regardez pas directement dans le faisceau laser. Ne regardez pas directement dans
l'ouverture laser lorsque la caméra est en marche.
Caution | Avertissement
Use of controls or adjustments or performance of procedures other than those specified herein may result
in hazardous laser radiation exposure.
L'utilisation de commandes, réglages ou instructions autres que ceux spécifiés présente un risque
d'exposition dangereuse aux radiations laser.
2
Configuration and Administration Guide for the DocCAM 20 HDBT Ceiling-Mounted Document Camera

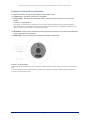
Features of Interest During Operation
In a typical installation, only the items inside the bezel ring are visible.
n Camera lens – 20x optical zoom lens for crisp detail.
n Laser pointer – Shows where the camera image is centered. Use the remote to turn on the laser
pointer.
Caution | Avertissement
Laser light – Avoid direct eye exposure. Do not look at the laser aperture during camera operation.
Lumière de laser – Ne regardez pas directement dans le faisceau laser. Ne regardez pas directement
dans l'ouverture laser lorsque la caméra est en marche.
n IR window – Sensors in the camera face receive signals from the remote. Point the remote toward the
camera; precision is not necessary.
n Status light – The multicolored LED indicates the camera's current state.
Caution | Avertissement
Laser controls are available to remote operators using the web interface. Keep your eyes out of the beam
path.
Les commandes laser sont disponibles aux opérateurs à distance utilisant l'interface Web. Gardez les
yeux hors du trajet du faisceau.
3
Configuration and Administration Guide for the DocCAM 20 HDBT Ceiling-Mounted Document Camera

Status Light
The light in the camera's face indicates its current state.
Note
By default, the camera's status light is active during normal operation; however, it can be configured to
remain off when the camera is powered up. The camera may be sending video even if the indicator light is
off.
n Blue: Normal operation (blinks off momentarily when the camera receives a command from the remote)
n Purple: In standby mode or booting
n Yellow: Firmware update in progress – overrides status light configuration
Camera assembly numbers 998-9968-001 and 998-9968-100:
Note
This product contains a Class 1, 650 nm red laser pointer.
Cet appareil contient un pointeur laser de la Classe 1, à lumière rouge de 650 nm.
Camera assembly number 998-9968-000 only:
Caution
This product contains a Class 3 (5 mw) 650 nm red laser which produces visible laser radiation. Avoid
direct eye exposure. Do not look at the laser aperture during camera operation.
All DocCAM 20 HDBT part numbers:
Caution | Avertissement
Laser light – Avoid direct eye exposure. Do not look at the laser aperture during camera operation.
Lumière de laser – Ne regardez pas directement dans le faisceau laser. Ne regardez pas directement dans
l'ouverture laser lorsque la caméra est en marche.
4
Configuration and Administration Guide for the DocCAM 20 HDBT Ceiling-Mounted Document Camera

Using the IR Remote
The IR remote provides basic camera control for end users.
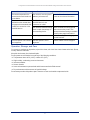
IR Remote Cheat Sheet
What do you need to do? Button(s)
Power on or standby Power (green button at top right)
Select the camera to control (if this
remote controls more than one)
Camera Select buttons 1 through 3 (second row of
buttons)
Discover the camera's IP address Data Screen button (top left) – press and hold for 3
seconds.
Center the camera's subject Laser buttons – The laser pointer is aligned at the factory
to point slightly above the center of the camera's subject.
Move the camera to a zoom preset Position Preset buttons 1 through 6 (bottom two rows)
Focus the camera Auto Focus button (near arrow buttons)
Manual Focus buttons Near and Far (below Zoom
Speed buttons)
Control zoom speed Zoom Speed buttons - Slow T and W, Fast T and W for
telephoto and wide-angle modes (light gray)
Adjust for excess light behind the
camera's subject
Back Light button (top center)
5
Configuration and Administration Guide for the DocCAM 20 HDBT Ceiling-Mounted Document Camera

IR Remote Details
The Vaddio remote provides the following functions:
Power – Switch the selected camera on or off.
Power indicator – Lights momentarily when you press a button.
Back Light – Use or turn off Back Light Compensation.
Data Screen – Display the camera’s IP address and MAC address. Press this
button again to dismiss the display.
Camera Select – In multi-camera installations, selects the camera to be
controlled. See Camera Settings for information on configuring the camera as
camera 1, 2, or 3.
Home button – Returns the camera to its home zoom level.
Laser On – Toggles the laser pointer on and off.
Laser MOM – Turns on the laser pointer momentarily, and forbids it to go out with
its friends if it doesn't turn off again after 5 seconds.
Camera assembly numbers 998-9968-001 and 998-9968-100:
Note
This product contains a Class 1, 650 nm red laser pointer.
Cet appareil contient un pointeur laser de la Classe 1, à lumière rouge de 650 nm.
Caution | Avertissement
Laser light – Avoid direct eye exposure. Do not look at the laser aperture during
camera operation.
Lumière de laser – Ne regardez pas directement dans le faisceau laser. Ne
regardez pas directement dans l'ouverture laser lorsque la caméra est en
marche.
Auto Focus – Switch the camera to Auto-Focus mode.
Zoom Speed – Select Slow or Fast movements for telephoto and wide-angle shots.
n T (slow and fast) – Telephoto
n W (slow and fast) – Wide-angle
Manual Focus – Switch the camera to Manual Focus mode.
Near (-) adjustment – Moves the focus nearer when in manual focus mode.
Far (+) adjustment – Moves the focus farther when in manual focus mode.
Preset – Save the camera’s current zoom level as one of the numbered presets.
Reset – Clear a saved preset.
Position Presets 1 through 6 – Move the camera to a predefined zoom level, or specify the preset to
save or clear.
Storing a Preset Using the Remote
Zoom to the desired level. Then hold down the Preset button and press one of the numbered preset buttons.
Clearing a Preset Using the Remote
Press and hold the Reset button while pressing the preset number you want to clear.
6
Configuration and Administration Guide for the DocCAM 20 HDBT Ceiling-Mounted Document Camera

Web Interface
The camera's web interface allows control via a network connection, using a browser. Password-protected
pages provide administrative access to tasks such as setting passwords, changing the IP address,
viewing diagnostics, and installing firmware updates. The user login (or guest access, if it is
enabled)provides access to camera controls similar to those available from the IR remote.
You will need to know the camera's IP address to use the web interface. If the LAN has a DHCP server,
the camera will get its IP address, gateway and routing information automatically and you will be able to
browse to it. If not, you will need to configure the camera to use a static IP address.
Getting the Camera's IP Address
You will need to be able to view the camera's video output on an HDMI display.
1. Press the Data Screen button on the remote. The room display presents the camera's IP address and
MAC address.
2. Press the Data Screen button again to dismiss the information.
If the address is 169.254.1.1, the camera is using its default IP address and you will need to configure it for
your network. You can configure the camera’s static IP address either through the network or from a
computer connected directly to its Ethernet port. You may need a crossover cable.
Note
For static addressing, work with your ITdepartment to determine the correct IP address, subnet mask, and
gateway information.
Accessing the Web Interface
Enter the IP address or hostname in your browser's address bar. If you use the hostname, you may need to
enter http:// or https:// as a prefix to keep the browser from treating it as a search query.
Browser Support
We have tested this product with these web browsers:
n Chrome®
n Microsoft® Internet Explorer®
n Safari®
n Firefox®
We test using the browser version available from the vendor at that time. Older versions of these browsers
are likely to work, and other browsers may also work.
7
Configuration and Administration Guide for the DocCAM 20 HDBT Ceiling-Mounted Document Camera

Administrative Access
If you are on the Controls screen and no other screens are available, you’re logged in at the user level, or
guest access is enabled and you’re not logged on at all. Use the Admin button to open the login screen.
When you log in as Admin, all the admin menu buttons appear on the left side of the screen. In addition to
Camera Controls, you also have access to:
n Camera Settings – Additional control over camera behavior related to camera movement and color
management.
n Streaming – Set up IP (H.264) streaming.
n Room Labels – Add helpful information the web interface screens, such as conference room name and
the in-house number for AV assistance.
n Networking – Ethernet configuration.
n Security – Set passwords and manage guest access.
n Diagnostics – Access to logs for troubleshooting.
n System – Reboot, restore defaults, view switch settings, and run updates.
n Help – Tech support contact information.
Compact Menu View
By default, the navigation buttons in the administrative interface display an icon and a text label. You can
also select the compact view of the menu buttons along with the standard view. The button at the bottom of
the menu toggles between the two views.
8
Configuration and Administration Guide for the DocCAM 20 HDBT Ceiling-Mounted Document Camera

Web Interface Cheat Sheet
Where to find the camera controls you need right now.
What do you need? Go to this screen
Camera operation
n Stop sending video (video mute)
n Enter or exit standby mode
(any page)
Camera operation
n Zoom the camera
n Set the speed for zoom motions
n Focus the camera (Focus button reveals the focus control)
n Zoom to a camera preset
Camera
Camera behavior
n Set or clear presets
n Select the appropriate lighting adjustments (CCU Scenes section)
Camera
Camera behavior
n Define custom lighting adjustments (CCU scenes)
n Specify whether to use automated adjustments (auto-iris, auto white
balance, backlight compensation)
Camera
Camera adjustments
n Color settings (Iris, iris gain, red gain, blue gain, detail, chroma,
gamma)
n Store and label custom color settings as CCU scenes
Camera
Access management
n Guest access
n Account passwords
n Idle session time-out
Security
IP streaming settings
n Quality
n Resolution
n Frame rate
n Streaming URL and path
Streaming
IP settings
n Hostname
n DHCP or static addressing
n Static: IP address, subnet mask, gateway
Networking
Access to the camera's soft DIP switch settings System
Time zone and NTP server (source for system time/date) Networking
Diagnostic logs Diagnostics
Information about the camera location Room Labels
Helpdesk phone number for end users Room Labels
Vaddio Technical Support contact information Help
9
Configuration and Administration Guide for the DocCAM 20 HDBT Ceiling-Mounted Document Camera

System Administration
Administrative tasks are on these pages of the web interface:
n Networking – Ethernet configuration.
n Security – Passwords, guest access, other IT security-related settings
n Room Labels – Helpful information to display in the web interface.
n System – Controls to reboot, reset to factory defaults, and run firmware updates, access to soft DIP
switches.
n Help – Contact information for Vaddio Technical Support and a link to the documentation for this
product.
n Diagnostics – Logs to help Vaddio Technical Support troubleshoot issues.
10
Configuration and Administration Guide for the DocCAM 20 HDBT Ceiling-Mounted Document Camera

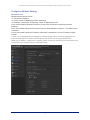
Configuring Network Settings
NETWORKING PAGE
Editable network settings include:
n The camera’s hostname
n Choice of static IP addressing or DHCP addressing
n IP address, subnet mask, and gateway, if static IP addressing is used
If your network supports hostname resolution, you may find it convenient to change the camera's
hostname.
DHCP is the default setting, but the camera will use the default address of 169.254.1.1 if no DHCP server
is available.
You will only be able to enter the IP address, subnet mask, and gateway if you set IP Address to Static.
Caution
Consult your IT department before changing any network settings. Errors in network configuration can
make the camera and its IP stream inaccessible from the network. Do not change DHCP/Static
addressing, IP address, subnet mask, or gateway unless you are very familiar with the characteristics and
configuration of the network where you install the camera.
11
Configuration and Administration Guide for the DocCAM 20 HDBT Ceiling-Mounted Document Camera

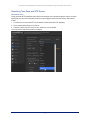
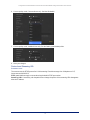
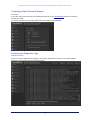
Specifying Time Zone and NTP Server
NETWORKING PAGE
Using automatic NTP updating ensures that the timestamps in the camera's diagnostic log are accurate.
Specifying your time zone may make it easier to match logged events with other actions and external
events.
1. To make the time zone and NTP server editable, enable Automatic NTP Updating.
2. Select the desired time zone from the list.
3. If desired, specify the NTP server to use. Otherwise, use the default.
You may need to refresh the system time display.
12
Configuration and Administration Guide for the DocCAM 20 HDBT Ceiling-Mounted Document Camera

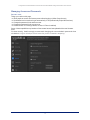
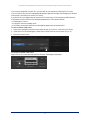
Managing Access and Passwords
SECURITY PAGE
Things you can do on this page:
n Allow people to access the Camera screen without logging on (Allow Guest Access)
n Set whether inactive sessionslog off automatically or not (Automatically Expire Idle Sessions)
n Change the password for the admin account
n Change the password for the user account
n Disable access via Telnet (by default, access via Telnet is enabled)
Some of these capabilities may be absent if the camera has not been updated with recent firmware.
Note
For best security, Vaddio strongly recommends changing the user and admin passwords from
the default. Using the default passwords leaves the product vulnerable to tampering.
13
Configuration and Administration Guide for the DocCAM 20 HDBT Ceiling-Mounted Document Camera

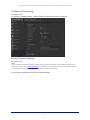
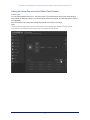
Configuring IP Streaming
STREAMING PAGE
IP streaming is enabled by default. Use the Enable IP Streaming checkbox to change this.
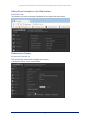
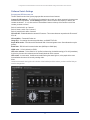
Editing IP Streaming Settings
STREAMING PAGE
Note
The IP streaming resolution cannot be higher than the value set with the video resolution switch on the
back of the camera. (See Video Resolution for information on setting the switch.) If the selected value is
out of range, the camera will automatically adjust the streaming resolution.
If you are not sure about these settings, start with the defaults.
14
Configuration and Administration Guide for the DocCAM 20 HDBT Ceiling-Mounted Document Camera

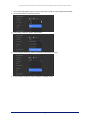
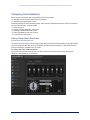
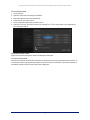
1. Select the Quality Mode: Easy or Custom. Easy mode configures most settings automatically.
2. Select the desired IP streaming resolution.
3. Easy quality mode only: Select Video Quality.
4. Custom quality mode only: Select the desired IP streaming frame rate.
5. Custom quality mode only: Select Constant or Variable bit rate.
15
Configuration and Administration Guide for the DocCAM 20 HDBT Ceiling-Mounted Document Camera

6. Custom quality mode, Constant bit rate only: Set Max Bandwidth.
7. Custom quality mode, Variable bit rate only: Set the Quality (Quantization) slider.
8. Save your changes.
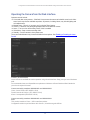
Protocol and Streaming URL
STREAMING PAGE
The camera uses the RTSP protocol for H.264 streaming. Resolutions range from 1080p down to CIF;
frame rates are 60/30/25/15.
RTSP port: Vaddio strongly recommends using the default RTSP port number.
Streaming URL: If necessary, edit the path name to change the portion of the streaming URL that appears
after the IP address.
16
Configuration and Administration Guide for the DocCAM 20 HDBT Ceiling-Mounted Document Camera

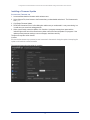
Adding Room Information to the Web Interface
ROOM LABELS PAGE
The information you enter on this page is displayed on every page of the web interface.
Rebooting the Camera
SYSTEM PAGE, FIRMWARE TAB
This can help if the camera stops responding as you expect.
In the System Utilities section, select Reboot.
17
Configuration and Administration Guide for the DocCAM 20 HDBT Ceiling-Mounted Document Camera
La page est en cours de chargement...
La page est en cours de chargement...
La page est en cours de chargement...
La page est en cours de chargement...
La page est en cours de chargement...
La page est en cours de chargement...
La page est en cours de chargement...
La page est en cours de chargement...
La page est en cours de chargement...
La page est en cours de chargement...
La page est en cours de chargement...
La page est en cours de chargement...
La page est en cours de chargement...
La page est en cours de chargement...
La page est en cours de chargement...
La page est en cours de chargement...
La page est en cours de chargement...
La page est en cours de chargement...
La page est en cours de chargement...
La page est en cours de chargement...
La page est en cours de chargement...
-
 1
1
-
 2
2
-
 3
3
-
 4
4
-
 5
5
-
 6
6
-
 7
7
-
 8
8
-
 9
9
-
 10
10
-
 11
11
-
 12
12
-
 13
13
-
 14
14
-
 15
15
-
 16
16
-
 17
17
-
 18
18
-
 19
19
-
 20
20
-
 21
21
-
 22
22
-
 23
23
-
 24
24
-
 25
25
-
 26
26
-
 27
27
-
 28
28
-
 29
29
-
 30
30
-
 31
31
-
 32
32
-
 33
33
-
 34
34
-
 35
35
-
 36
36
-
 37
37
-
 38
38
-
 39
39
-
 40
40
-
 41
41


VADDIO DocCAM 20 HDBT Configuration And Administration Manual
- Taper
- Configuration And Administration Manual
dans d''autres langues
- English: VADDIO DocCAM 20 HDBT
Documents connexes
Autres documents
-
Mad Catz GameShark 2 Manuel utilisateur
-
Yamaha CS-700 Mode d'emploi
-
-
Videotec NXPTZR SERIES2 Manuel utilisateur
-
Abus TVIP21551 Manuel utilisateur
-
Abus TVIP51500 Manuel utilisateur
-
Videotec MAXIMUS MVXHD Manuel utilisateur
-
Risco RVCM52E Le manuel du propriétaire
-
LevelOne GTL-2881 Quick Installation Manual