Vulcan VC44EC Le manuel du propriétaire
- Catégorie
- Fours
- Taper
- Le manuel du propriétaire

MODELS
VC4ED
VC4EC
VC6ED
VC6EC
HEC5
HEC5D
HEC5X
HEC5DX
WKE
WKED
WKEC
ELECTRIC CONVECTION OVENS
INST
ALLATION &
OPERATION MANUAL
ITW FOOD EQUIPMENT GROUP, LLC P.O. BOX 696, LOUISVILLE, KY 40201-0696
TEL: 502-778-2791
www.hobartcorp.com
FORM 31159 Rev. F (89/201)
www.vulcanhart.com

– 2 –
Table of Content
GENERAL. . . . . . . . . . . . . . . . . . . . . . . . . . . . . . . . . . . . . . . . . . . . . . . . . . . . . . . . . . . . . . . . . . 3
INSTALLATION. . . . . . . . . . . . . . . . . . . . . . . . . . . . . . . . . . . . . . . . . . . . . . . . . . . . . . . . . . . . . . 4
Unpacking
. . . . . . . . . . . . . . . . . . . . . . . . . . . . . . . . . . . . . . . . . . . . . . . . . . . . . . . . . . . . . 4
Location
. . . . . . . . . . . . . . . . . . . . . . . . . . . . . . . . . . . . . . . . . . . . . . . . . . . . . . . . . . . . . . . 4
Installation Codes and Standards
. . . . . . . . . . . . . . . . . . . . . . . . . . . . . . . . . . . . . . . . . . . 4
Installing Basic Oven
. . . . . . . . . . . . . . . . . . . . . . . . . . . . . . . . . . . . . . . . . . . . . . . . . . . . . 4
Assembling the Legs to the Single Oven
. . . . . . . . . . . . . . . . . . . . . . . . . . . . . . . . . . . . . . 4
Leveling
. . . . . . . . . . . . . . . . . . . . . . . . . . . . . . . . . . . . . . . . . . . . . . . . . . . . . . . . . . . . . . . 4
Casters
. . . . . . . . . . . . . . . . . . . . . . . . . . . . . . . . . . . . . . . . . . . . . . . . . . . . . . . . . . . . . . . . 4
Assembling the Stand to the Oven
. . . . . . . . . . . . . . . . . . . . . . . . . . . . . . . . . . . . . . . . . . . 5
Electrical Connections
. . . . . . . . . . . . . . . . . . . . . . . . . . . . . . . . . . . . . . . . . . . . . . . . . . . . 5
Assembling Stacked Ovens
. . . . . . . . . . . . . . . . . . . . . . . . . . . . . . . . . . . . . . . . . . . . . . . . 6
Electrical Connections (Stacked Ovens)
. . . . . . . . . . . . . . . . . . . . . . . . . . . . . . . . . . . . . . 7
OPERATION
. . . . . . . . . . . . . . . . . . . . . . . . . . . . . . . . . . . . . . . . . . . . . . . . . . . . . . . . . . . . . . . . 8
Controls
. . . . . . . . . . . . . . . . . . . . . . . . . . . . . . . . . . . . . . . . . . . . . . . . . . . . . . . . . . . . . . 8
Before First Use (All Models)
. . . . . . . . . . . . . . . . . . . . . . . . . . . . . . . . . . . . . . . . . . . . . . . 9
Using Electric Models
. . . . . . . . . . . . . . . . . . . . . . . . . . . . . . . . . . . . . . . . . . . . . . . . . . . . . 9
Controls
. . . . . . . . . . . . . . . . . . . . . . . . . . . . . . . . . . . . . . . . . . . . . . . . . . . . . . . . . . . . . . 10
Manually Setting the Temperature and Cook Time . . . . . . . . . . . . . . . . . . . . . . . . . . . . . 10
To Program Menu Item and Rack Number Cook Times . . . . . . . . . . . . . . . . . . . . . . . . . . 10
Setting the Oven for Roast & Hold . . . . . . . . . . . . . . . . . . . . . . . . . . . . . . . . . . . . . . . . . . 10
Roast & Hold Operation . . . . . . . . . . . . . . . . . . . . . . . . . . . . . . . . . . . . . . . . . . . . . . . . . 11
Proper Utensils . . . . . . . . . . . . . . . . . . . . . . . . . . . . . . . . . . . . . . . . . . . . . . . . . . . . . . . . . 11
Operating Hints . . . . . . . . . . . . . . . . . . . . . . . . . . . . . . . . . . . . . . . . . . . . . . . . . . . . . . . . 11
Cooking Guidelines . . . . . . . . . . . . . . . . . . . . . . . . . . . . . . . . . . . . . . . . . . . . . . . . . . . . . 12
Standard Cooking Time Chart . . . . . . . . . . . . . . . . . . . . . . . . . . . . . . . . . . . . . . . . . . . . . 13
Power Outage . . . . . . . . . . . . . . . . . . . . . . . . . . . . . . . . . . . . . . . . . . . . . . . . . . . . . . . . . 13
Cleaning . . . . . . . . . . . . . . . . . . . . . . . . . . . . . . . . . . . . . . . . . . . . . . . . . . . . . . . . . . . . . . 13
MAINTENANCE . . . . . . . . . . . . . . . . . . . . . . . . . . . . . . . . . . . . . . . . . . . . . . . . . . . . . . . . . . . . 14
Replacing Lamps . . . . . . . . . . . . . . . . . . . . . . . . . . . . . . . . . . . . . . . . . . . . . . . . . . . . . . . 14
Service and Parts Information . . . . . . . . . . . . . . . . . . . . . . . . . . . . . . . . . . . . . . . . . . . . . 14

– 3 –
Installation, Operation and Care of
ELECTRIC CONVECTION OVENS
KEEP
THESE INSTRUCTIONS FOR FUTURE USE
Your Electric Convection Oven is produced with quality workmanship and material. Proper installation,
usage and maintenance of your oven will result in many years of satisfactory performance.
The manufacturer suggests that you thoroughly read this entire manual and carefully follow all of the
instructions provided.
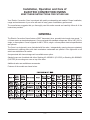
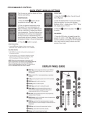
GENERAL
The Electric Convection Ovens feature a 500°F thermostat, timer, porcelain
interior and a two -speed,
1
/2
HP blower motor as standard equipment. Ovens equipped with standard voltages are 208 or 240 V, 60 Hz,
single- or three-phase. Ovens equipped for 480 V, 60 Hz, single- or three-phase electrical speciflcations
are optional.
The Oven is a single cavity oven furnished with flve racks. Independently opening doors are standard;
simultaneously opening doors with chain mechanism underneath are optional. Oven lights with on-off
switch are standard on all models.
An open stand with lower storage rack is available as an option.
Stacked ovens are furnished with either Stacking Kit 426983G1 (8" LEGS) or Stacking Kit 426984G1
(CASTER) for mounting one oven on top of the other.
Additional racks are available as accessories.
Features of the models are shown below:

– 4 –
INSTALLATION
UNPACKING
I
mmediately
after unpacking the oven, check for possible shipping damage. If the oven is found to be
damaged, save the packaging material and contact the carrier within 15 days of delivery.
Prior to installation, verify that the electrical service agrees with the speciflcations on the oven data plate,
located on the inside of the top front cover.
Do not use the doors or their handles to lift the oven.
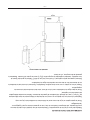
LOCATION
The installation location must allow adequate clearances for servicing and proper operation. For solid
state and digitally controlled models, there must be 18" (45 cm) of clearance on the right side of the oven
from any open ‡ame.
INSTALLATION CODES AND STANDARDS
In the United States, install the oven in accordance with: 1) State and local codes; 2) National Electrical
Code, NFPA-70 (latest edition) and 3) NFPA Standard #96, Vapor Removal from Cooking Equipment
(latest edition), available from National Fire Protection Association, Batterymarch Park, Quincy, MA 02269.
In Canada, install the oven in accordance with: 1) Local codes; 2) Canadian Electrical Code, CSA
Standard C22.2 No. 1 (latest edition) and 3) Canadian Standard for Commercial Cooking Equipment CSA
Standard C22.2 No.109 (latest edition).
INSTALLING BASIC OVEN
The basic oven must be installed on legs or mounted on a modular stand. Installations on concrete bases
or other supports restricting air circulation underneath the oven is not advisable and may void the warranty.
If using the modular stand, set the oven on the stand after unpacking.
ASSEMBLING THE LEGS TO THE SINGLE OVEN
The legs must be installed on the bottom of the oven. Gently position the oven on its left side, taking care
not to cause scratches or damage.
Attach each of the four leg assemblies to the bottom of the oven with the 24 bolts and lockwashers
(six bolts and lockwashers per leg). Carefully raise the oven to its normal position.
LEVELING
Adjust the legs to ensure that the oven racks are level in the flnal installed position.
CASTERS
If the oven is to be installed on casters, assemble the casters to the legs provided. Then attach the caster-
leg units to the oven at each corner using the 24 bolts and lockwashers (six bolts and lockwashers per
leg). Place the locking casters on the front legs and nonlocking casters on the rear legs.

– 5 –
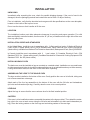
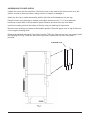
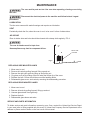
ASSEMBLING THE STAND TO THE OVEN
Attach each of the four leg assemblies to the bottom of the
oven with the 24 bolts and lockwashers (six per leg). Carefully
raise the oven to the normal position.
Attach the undershelf to the legs with eight bolts and
lockwashers (two per leg).
Install the rack guides into the shelf at the desired locations
(for pan or ‡at rack), then attach the rack supports to the
top end of the rack guides. Attach rack supports to the leg
assembly by removing one middle bolt and reattaching the
back through the end holes in the rack support (Fig. 2).
Fig. 2
ELECTRICAL CONNECTIONS
BACK
FRONT
PL-53274
ELECTRICAL AND GROUNDING CONNECTIONS MUST COMPLY WITH THE APPLI
CABLE PORTIONS OF THE NATIONAL ELECTRICAL CODE ANSI/NFPA70 (LATEST EDITION) AND/OR
OTHER LOCAL ELECTRICAL CODES.
DISCONNECT ELECTRICAL POWER SUPPLY AND PLACE A TAG AT THE
DISCONNECT SWITCH TO INDICATE THAT YOU ARE WORKING ON THE CIRCUIT.
Remove the wiring compartment cover on the front of the oven. Remove the appropriate knockout on the
bottom of the oven and attach the power supply conduit to the bottom of the oven.
Comply with the appropriate wiring diagram (located inside the right side panel) when making connections
to the electrical supply lines.
Replace the wiring compartment cover and right side panel. Turn on the power supply.
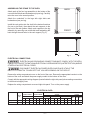
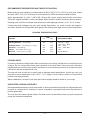
ELECTRICAL DATA
TOTAL
KW
208-240 V
3-PHASE LOADING
480 V
3-PHASE LOADING
NOMINAL AMPERES PER LINE WIRE
3-PHASE 1-PHASE
KW PER PHASE KW PER PHASE 208 V 240 V 480 V
208 V 240 V 480 V
L1-L2 L2-L3 L1-L3 L1-L2 L2-L3 L1-L3
L1 L2 L3 L1 L2 L3 L1 L2 L3
Single Oven 12.5 4 4 4.5 4 4 4.5 35 33 35 33 29 33 14.4 15.3 15.3 60 52 26
Stacked Oven 25 8 8 9 8 8 9 70 66 70 66 58 66 28.8 30.6 30.6 120 104 52

– 6 –
ASSEMBLING STACKED OVENS
Unpack the ovens and the stack kitV. Position the oven to be used as the bottom oven on its left
sidefor access to the oven bottom, taking care not to scratch or damage it.
Attach the four leg RUFDVWHUassemblies with the 24 bolts and lockwashers (six per leg).
Place the lower oven (with legsRUFDVWHUV) on the floor and remove two
7
/16" (11 mm) diameter
knockouts on eachside of the top H[WHULRUSDQHO.5HPRYHNQRFNRXWIURPWRSRYHQEDVH
Install two locating studs to the bottom of the top oven per stacking kit instructions.
Move the oven with legs RUFDVWHUVto the installed position. Place the upper oven on top of the lower
oven usingthe locating studs.
Remove the optional rear panel, if provided, from the TOP oven. 5HPRYHWRSRYHQYHQWJXDUGInstall
the Stacking Flue (Fig. 3) withthe four screws provided. Replace the top oven rear panel, if
provided.
STACKING FLUE

– 7 –
ELECTRICAL CONNECTIONS (Stacked Ovens)
ELECTRICAL AND GROUNDING CONNECTIONS MUST COMPLY WITH THE APPLI
CABLE PORTIONS OF THE NATIONAL ELECTRICAL CODE AND/OR OTHER LOCAL ELECTRICAL
CODES.
DISCONNECT ELECTRICAL POWER SUPPLY AND PLACE A TAG AT THE
DISCONNECT SWITCH TO INDICATE THAT YOU ARE WORKING ON THE CIRCUIT.
Make sure that the electrical power supply agrees with the speci ications on the oven data plate, the wiring
diagram on the oven and Electrical Data, page 5.
Wires to connect both ovens are provided with DVHSDUDWHZLULQJNLWIRUVWDFNHGHOHFWULF ovenV.
Carefully route these leads from the topoven through the bushing (supplied with DQRWKHU
stacking kit) through the electrical access knockoutholes common to both ovens.
Connect wires X, Y and Z from the upper oven to the lower oven per the wiring diagram. Attach the
power supply conduit to the bottom of the lower oven. Connect the powersupply leads to the line
side of the terminal block on the bottom oven.
Finally, inspect and check all wiring and terminal connections for tightness or pinch points (cover on
oven frame).
Refer to reference drawing 426986 supplied with the stacking kit for electrical connection instructions.
Refer to instructions supplied with the stacking kit for marking the combined electrical load information
to the electrical data plate of the bottom oven.

– 8 –
OPERATION
T
HE OVEN
AND ITS PARTS ARE HOT. USE CARE WHEN OPERATING, CLEANING
OR PERFORMING ANY MAINTENANCE.
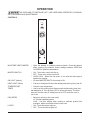
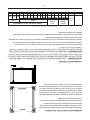
CONTROLS
MOVE TO VENT
MASTER SWITCH
ON
HEAT
OFF
TEMPERATURE
TIMER
LOW
HI
FAN SPEED
OVEN COOL
OFF
OFF
ON
LIGHTS
0
5
10
15
20
25
30
35
40
45
50
55
60
150
150
225
250
275
300
325
350
375
200
400
425
450
250
475
500
F
100
C
PL-53491
MOISTURE VENT DAMPER – Open the damper to exhaust excess moisture. Close the damper
when cooking dry products. Select settings between OPEN and
CLOSED for optimum performance.
MASTER SWITCH – ON - Turns oven control circuits on.
– OFF - Turns oven control circuits off.
– OVEN COOL - Allows the fan motor to run with the doors ajar to
speed oven cooling.
ON LIGHT (Amber) – Lit when MASTER SWITCH is turned to ON.
HEAT LIGHT (White) – Comes on and goes off when the heating elements cycle on and off.
TEMPERATURE – Controls oven temperature.
TIMER – Use to set the cooking time. Alarm sounds continuously when time
has elapsed to 0. Turn the timer OFF to silence the alarm. The timer
does not turn the oven off. Keep timer set to OFF when the oven is
not in use.
FAN SPEED – Adjust air velocity in the oven cavity.
HI - Normal operating speed.
LOW - Use this setting when cooking a delicate product like
meringue, which could blow around in the oven.
LIGHTS – ON - Turns the interior lights on.
– OFF - Turns the interior lights off.

– 9 –
BEFORE FIRST USE (All Models)
Before using the oven for the flrst time, it must be burned off to release any odors that might result from
heating the new surfaces in the chamber.
1. Using a clean damp cloth, wipe the inside of the oven, including the racks.
2. Close the oven doors, turn the MASTER SWITCH to ON, turn the Thermostat to 300°F (149°C) and
allow the oven to cycle for 6 to 8 hours before turning the MASTER SWITCH to OFF.
USING ELECTRICAL MODELS
Preheating
1. Turn MASTER SWITCH to ON. Amber ON light will come on, indicating that power to oven is on.
2. Set Thermostat as desired. Refer to COOKING GUIDELINES for suggested temperatures and times
for various products.
3. Prepare product and place in suitable pans. When white HEAT light goes off, oven has reached
desired preheat temperature.
Cooking
1. Open doors and load the product into the oven. Place pans in the center of the racks. Close doors.
2. Set the Timer. After the preset time lapses, turn Timer to OFF position to stop alarm.
3. When product is done, open doors and carefully remove cooked product from the oven. Care should
be taken when wiping up any spills, as oven is still hot.
End of Day
1. Turn Thermostat to lowest setting.
2. Turn MASTER SWITCH to OVEN COOL. Leave doors open while the fan is on to cool the oven.
3. When oven has cooled sufflciently, turn MASTER SWITCH to OFF and clean the oven.

– 10 –
PROGRAMMABLE CONTROLS
QUICK START / MANUAL SETTINGS

– 11 –
RECOMMENDED TEMPERATURES AND TIMES FOR ROASTING
0HDWURDVWLQJLVPRVWVDWLVIDFWRU\DWWHPSHUDWXUHVRIWR)WR&IRUEHHIODPESRXOWU\
DQGKDP)&IRUIUHVKSRUNDVUHFRPPHQGHGE\86'$DQG$PHULFDQ0HDW,QVWLWXWH
$SDQDSSUR[LPDWHO\[[µ[[PPIXOORIZDWHUPD\EHSODFHGLQWKHRYHQERWWRP
7KLVZDWHUVXSSOLHVKXPLGLW\WRUHGXFHVKULQNDJH:DWHUVKRXOGEHDGGHGLIQHFHVVDU\GXULQJURDVWLQJ
5RDVWLQJSDQVVKRXOGEHQRGHHSHUWKDQQHFHVVDU\WRKROGGULSSLQJVXVXDOO\WR
1
/2µWRPP
&RRNLQJ WLPH DQG VKULQNDJH PD\ YDU\ ZLWK URDVWLQJ WHPSHUDWXUH FXW JUDGH RI PHDW DQG GHJUHH RI
GRQHQHVV6PDOOHUFXWVZLOOJHQHUDOO\VKRZJUHDWHUWLPHVDYLQJVWKDQODUJHUFXWVDWDJLYHQWHPSHUDWXUH
ROASTING TEMPERATURE CHART
TEMP
PRODUCT °F
(°C) APPROXIMATE TIMES
Standing Rib Roast ³2YHQ5HDG\
Rolled Rib Roasts³WROEWRNJ
Veal Roast ³OENJ
Turkeys³WROEWRNJ
Meat Loaf ³WROEWRNJ
WR+UV³5DUH
4 to 4
1
/2 Hrs. — Med.
+UV³0HG
+UV³0HG:HOO
+UV
WR0LQXWHV
COOKING HINTS
)RUFHGDLUFRQYHFWLRQFRRNLQJLVIDVWHUWKDQFRQYHQWLRQDORYHQFRRNLQJDQGWKHUHIRUHRYHUFRRNLQJLVPRUH
common. Do not cook products faster than is practical for the best results. Since forced air convection
supplies heat to the surface of the product, the thicker or more massive a product is for its type, the longer
LWZLOOWDNHWRDEVRUEHQRXJKKHDWWRFRRN
7KHRYHQZLOOFRRNRUEDNHIXOORUSDUWLDOORDGVDWVWDQGDUGUHFLSHWHPSHUDWXUHV$VZLWKDQ\RYHQ\RX
PD\ZLVKWRXVHDWHPSHUDWXUHRIXSWR)&KLJKHURUORZHUWKDQWKHUHFLSHIRUWKHSDUWLFXODU
product result that you prefer.
When established, convection oven times and control settings should be noted on your recipe.
SUGGESTED COOKING GUIDELINES
5HFRPPHQGHGWHPSHUDWXUHVWLPHVDQGQXPEHURIUDFNVDUHLQWHQGHGDVDJXLGHRQO\$GMXVWPHQWVPXVW
be made to compensate for variations in recipes, ingredients, preparation and personal preference in
product appearance.
7KHRYHQGRHVQRWUHTXLUHVSHFLDOUHFLSHV([FHOOHQWUHVXOWVFDQEHREWDLQHGIURPDQ\JRRGFRPPHUFLDO
UHFLSHZLWKUHGXFHGFRRNLQJWLPHV

– 12 –
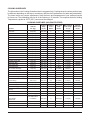
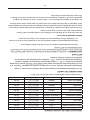
COOKING GUIDELINES
The information in
the Cooking Guidelines chart is suggested only. Cooking times for various products may
be different depending on the brand, consistency and the chef’s preferences for taste and presentation.
The times below may require adjustments. Note the times and temperatures of your preferred results
for future use. The preheating time for all of the following is 15 minutes. The computer control's Holding
Temperature is preset at 150°F (66°C) and cannot be changed.
COOKING GUIDELINES (HOLDING FEATURE)
Cooking Cooking Min. Hold Max. Internal Internal
Amount Temp.
Time Time Cook Temp. Hold Temp.
Product lbs. (kg) °F (°C) Hours Hours °F (°C) °F (°C)
Prime Rib 20 (9.06) 225 (107) 5 4 140 (60)
Rib Eye Boneless 12 (5.43) 225 (107) 3 4 140 (60)
Top Round 20 (9.06) 225 (107) 5 4 140 (60)
Steamship Round 20 (9.06) 225 (107) 7 2 140 (60)
Bottom Round 20 (9.06) 225 (107) 5 8 140 (60)
Boneless Strip Loin 12 (5.43) 225 (107) 3 4 140 (60)
Whole Tenderloin 6 (2.71) 225 (107) 2 2 140 (60)
Top Sirloin Butt 14 (6.34) 225 (107) 3 4 140 (60)
Beef Short Ribs 10 (4.53) 225 (107) 4 4 165 (74)
Cube Steaks 10 (5.43) 225 (107) 3 3 180 (82)
Beef Back Ribs 30 (13.6) 225 (107) 5 4 175 (79)
Beef Stew 10 (5.43) 225 (107) 4 6 175 (79) 150 (66)
Corned Beef 12 (5.43) 250 (121) 4 4 165 (74) 150 (66)
Fresh Ham 12 (5.43) 250 (121) 6 4 165 (74)
Cooked Cured Ham 12 (5.43) 250 (121) 4 4 135 (57)
Pork Back Ribs 10 (4.53) 250 (121) 5 3 175 (79) 150 (66)
Pork Spare Ribs 30 (13.6) 250 (121) 5 4 175 (79) 150 (66)
Fresh Sausages 10 (4.53) 225 (107) 2 5 (Max) 175 (79)
Pre-Cooked Sausage 10 (4.53) 250 (121) 1
3
/4 5
1
/2 (Max) 160 (71)
Roast Suckling Pig 30 (13.6) 250 (121) 6 3
170 (77) 155 (68)
Bacon 350 (177) 40 min. N/A
Roasted Chicken 10 (4.56) 350 (177) 45 min. N/A 165 (74)
Chicken Pieces (per tray) 10 (4.56) 250 (121) 2
1
/2
1
/2 (Max) 170 (77) 150 (66)
Whole Chickens
(per chicken) 3.25 (1.47) 250 (121) 2
1
/2 4
1
/2 (Max) 170 (77) 140 (60)
Whole Turkeys 20 (9.06) 230 (110) 6
1
/2 12 (Max) 170 (77) 160 (71)
Bone In Turkey Breast 10 (4.53) 250 (121) 5 1 160 (71) 150 (66)
Roast Duckling (per duck) 4 (1.81) 350 (177) 1
1
/2 3 (Max) 170 (77) 150 (66)
Rack of Lamb 15 racks 250 (121) 3
1
/2 2
1
/2 160 (71)
per tray
Lamb Shanks, Braised 250 (121) 4 4 180 (82) 150 (66)
Fish Filets 4-6 oz. (23g) 225 (107) 40 min. 4 160 (71)
1/1 Gastronome
Clear Soups or 12x20x4" 225 (107) 3 Overnight 175 (79) 150 (66)
Steam Pan
Frozen Pizza (2) 18” Pies 350 (177) 15 min. 2 175 (79) 160 (71)
Rice 1 Qt. dry 250 (121) 2 18 160 (171) N/A
Baked Potatoes 90 CT. 350 (177) 1 1
1
/2 200 (93) 170 (77)

– 13 –
POWER OUTAGE
In case of a power outage, the oven will automatically shut down. When power is restored to the lines, the
oven will resume its normal operation. However, if the oven is to be left unattended during a power outage,
push the MASTER SWITCH to the OFF position. When power is restored to the lines, push MASTER
SWITCH to the ON position, wait for the oven to preheat, then resume normal cooking operations.
CLEANING
WARNING: DISCONNECT ELECTRICAL SUPPLY AND PLACE A TAG AT THE DISCONNECT SWITCH
TO INDICATING THAT YOU ARE WORKING ON THE OVEN BEFORE CLEANING.
• Clean outside of the oven daily by wiping with a clean, damp cloth.
• Clean porcelain oven interior daily with soap or detergent and water. Rinse thoroughly and wipe dry
with a soft, clean cloth.
Optional Stainless Steel Oven Interior
Soap or detergent and water usually handle routine cleaning. Rinse thoroughly and dry with a soft, clean
cloth.
For burned-on foods and grease which resist simple soap and water cleaning, an abrasive cleanser
(scouring powder) mixed into a paste may be used. Apply with stainless steel wool or sponge, always
rubbing with the grain.
This treatment is equally effective for "heat tint" (slightly darkened areas caused by oxidation). Again,
remember to rub in the direction of the polish lines. Rinse with clear water and dry with a soft cloth.
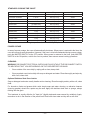
STANDARD COOKING TIME CHART
Product Amount Temp. Time
Frozen Croissant Dough 1.75 oz. 350°F (177°C) 25 Min
Cinnamon Croissant 1.75 oz. 350°F (177°C) 35 Min.
Small Bread Loaves 1
Tray 350°F (177°C) 30 Min.
Large Bread Loaves 1.5 lbs. 350°F (177°C) 60 Min.
Sheet Cake (1) 18x26" Tray 300°F (149°C) 25 Min.
Scone Mix 1 Tray 350°F (177°C) 30 Min.
Muffln Mix 1 Tray 350°F (177°C) 30 Min.
Kaiser Rolls 1 Tray 350°F (177°C) 16 Min.
Italian Bread 1 Tray 350°F (177°C) 40 Min.
Danish Rounds* 1 Tray 350°F (177°C) 30 Min.
Cream Cake* 1 Tray 350°F (177°C) 60 Min.
Cookies 1 Tray 325°F (163°C) 16 Min.
*The maximum internal cooking temperature should be 190°F (88°C).

– 14 –
SERVICE AND PARTS INFORMATION
To obtain service and parts information concerning your Oven, contact the Vulcan-Hart Service Depot
in your area (refer to listing supplied with this oven) or Vulcan-Hart Company Service Department at the
address or phone number shown on the front cover of this manual.
FORM 31159 Rev. ( (/201) PRINTED IN U.S.A.
MAINTENANCE
the oven.
5(3/$&,1*6,'(02817('/$036
procedures.
LUBRICATION
The fan motor comes with sealed bearings and requires no lubrication.
VENT
Periodically check the flue, when the oven is cool, to be sure it is free of obstructions.
$,5,17$.(
5HDUDLULQWDNHVORWVDQGKROHVVKRXOGEHFOHDQHGZLWKDGDPSFORWKUHJXODUO\),*
The
UHDUDLULQWDNHVPXVWEHNHSWFOHDU
1RQFRPSOLDQFHPD\OHDGWRFRPSRQHQWIDLOXUH
Fig.
5($5$,5
,17$.(
1.
Allow oven to cool.
2.Remove all racks by pulling forward, lifting up and out.
3.
U
nscrew glass dome from light body.
4.Replace the bulb.
5.Reassemble glass dome and racks.
$OORZRYHQWRFRRO
5HPRYHDOOUDFNVE\SXOOLQJIRUZDUGOLIWLQJXSDQGRXW
5HPRYHWKHULJKWUDFNJXLGHE\OLIWLQJXSDQGSXOOLQJRXW
3U\JODVVFRYHURIIE\VOLGLQJDIODWWRROXQGHUWKHERWWRPOLSRIWKHFRYHU
5HSODFHWKHEXOE*ORYHVVKRXOGEHZRUQZKLOHKDQGOLQJEXOEV
5HDVVHPEOHJODVVFRYHUDQGUDFNVE\UHYHUVLQJWKHGLVDVVHPEO\SURFHGXUH
5(3/$&,1*5($502817('/$036
The oven and its parts are hot. Use care when operating, cleaning or servicing
Disconnect the electrical power to the machine and follow lockout / tagout

–
14 –
F-31159 Rév. E (03/05/2019) IMPRIMÉ AUX É.-U.
RENSEIGNEMENTS SUR LES PIÈCES ET L'ENTRETIEN
Pour obtenir plus de renseignements sur les pièces et l'entretien de votre four de la série VC, contactez
le centre de service autorisé de Vulcan-Hart de votre région (consultez la liste fournie avec votre four),
ou contactez directement le service de l'entretien de la compagnie Vulcan-Hart, à l'adresse ou au
numéro de téléphone indiqué sur la couverture de ce manuel.
ENTRETIEN
!
AVERTISSEMENT : Le four et ses composants sont chauds. Exercer une extrême prudence
lors de l’exploitation, du nettoyage et de l’entretien de cet appareil.
!
AVERTISSEMENT : Couper l’alimentation électrique de l’appareil et suivre les procédures de
verrouillage et d’étiquetage.
LUBRIFICATION :
Le moteur du ventilateur est pourvu de roulements scellés ne nécessitant aucune lubrication.
VENTILATION :
Une fois l’an, il faut vérier le conduit d’évacuation lorsqu’il est froid pour s’assurer qu’il n’est pas
obstrué.
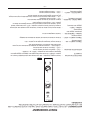
ENTRÉE D’AIR
Les fentes et les trous de l’entrée d’air arrière devraient être nettoyés régulièrement avec un chiffon
humide. FIG. 4.
!
AVERTISSEMENT :
Les entrées d’air arrière doivent rester dégagées.
Le non-respect de cette procédure peut entraîner le
non-fonctionnement du composant.
REMPLACEMENT DES AMPOULES LATÉRALES :
1. Laissez refroidir le four.
2. Retirez toutes les grilles en les tirant vers l’avant et en les soulevant pour les sortir.
3. Retirez le guide de la grille de droite en le soulevant et en le tirant vers l’extérieur.
4. Soulevez le couvercle en verre en glissant un outil plat sous la lèvre inférieure du couvercle.
5. Remplacez l’ampoule. Vous devriez porter des gants quand vous travaillez sur des ampoules.
6. Remettez le couvercle de verre et les grilles en place en inversant la méthode de démontage.
REMPLACEMENT DES AMPOULES ARRIÈRES :
1. Laisser refroidir le four.
2. Enlever toutes les grilles en les tirant vers soi et en les soulevant.
3. Dévisser le dôme de la lampe.
4. Remplacer l’ampoule.
5. Remettre le dôme et les grilles en place.
ENTRÉE D’AIR
ARRIÈRE
Fig.

–
13 –
TABLEAU DES TEMPS DE CUISSON STANDARD
Produit Qté Temp. Durée
Pâte à croissant congelée 1,75 oz 350
o
F (177
o
C) 25 min.
Croissant à la cannelle 1,75 oz 350
o
F (177
o
C) 35 min.
Pain, petit 1 plateau 350
o
F (177
o
C) 30 min.
Pain, grand 1,5 lb 350
o
F (177
o
C) 60 min.
Gâteau rectangulaire (1) plateau de 18x26 po 300
o
F (177
o
C) 25 min.
Mélange à scone 1 plateau 350
o
F (177
o
C) 30 min.
Mélange à mufn 1 plateau 350
o
F (177
o
C) 30 min.
Pain mollet Kaiser 1 plateau 350
o
F (177
o
C) 16 min.
Pain italien 1 plateau 350
o
F (177
o
C) 40 min.
Danoises* 1 plateau 350
o
F (177
o
C) 30 min.
Gâteau à la crème* 1 plateau 350
o
F (177
o
C) 60 min.
Biscuits 1 plateau 325
o
F (177
o
C) 16 min.
* La température interne maximale de cuisson doit être de 190
o
F (88
o
C).
REMPLACEMENT DES LAMPES
Le four s'éteint automatiquement lorsque survient une interruption de courant. Lorsque
l'alimentation électrique reprend, le four se remettra en marche normalement. Toutefois, si le
four doit être laissé sans surveillance durant une PANNE ÉLECTRIQUE, placez l'interrupteur
principal à la position « OFF ». Lorsque l'alimentation électrique est rétablie, remettez
l'interrupteur principal en position « ON », attendez le préchauffage, puis continuez les
opérations de cuisson de façon normale.
NETTOYAGE
AVERTISSEMENT : COUPEZ L'ALIMENTATION ÉLECTRIQUE ET PLACEZ UNE ÉTIQUETTE DE
SÉCURITÉ SUR L'INTERRUPTEUR INDIQUANT QUE VOUS TRAVAILLEZ SUR LE FOUR AVANT
D'ENTREPRENDRE LE NETTOYAGE.
• Nettoyez quotidiennement l'extérieur du four à l'aide d'un chiffon humide propre.
• Nettoyez quotidiennement la chambre intérieure du four en porcelaine avec de l'eau et du savon
ou du détergent. Rincez soigneusement, puis séchez avec un linge doux et propre.
Intérieur optionnel en acier inox
De l'eau et du savon ou du détergent sont sufsants pour les nettoyages de routine. Rincez
soigneusement, puis séchez avec un linge doux et propre.
Pour les aliments collés par la chaleur et la graisse, qui résistent aux nettoyages simples à l'eau et au
savon, un nettoyant abrasif (comme la poudre à récurer) mélangé à de l'eau pour former une pâte peut être
utilisé. Appliquez à l'aide d'une laine d'acier ou d'une éponge, et frottez toujours dans le sens du grain.
Ce traitement est également efcace pour les « décolorations » dues à la chaleur (les endroits
légèrement noircis par l'oxydation). Souvenez-vous ici encore de frotter dans le sens du poli. Rincez à
l'eau claire, et essuyez avec un chiffon doux.

– 12 –
DIRECTIVES DE CUISSON
Les renseignements de ce tableau de directives de cuisson sont fournis à titre indicatif seulement. Les temps
de cuisson peuvent être différents pour divers produits, selon la marque, la consistance et la préférence du
chef quant au goût et à la présentation. Les durées ici-bas sont sujettes à des ajustements. Prenez en note
les durées et les températures de cuisson de vos résultats les plus probants pour usage futur. Le temps de
préchauffage pour tous les aliments ci-dessous est de 15 minutes. La température de maintien de l'ordinateur
de contrôle est xée à 150
o
F (66
o
C), et ne peut être changée.
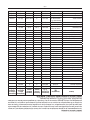
DIRECTIVES DE CUISSON (MODE CUISSON ET MAINTIEN)
Produit
Quantité lbs
(kg)
Température
de cuisson
o
F (
o
C)
Durée de
cuisson
Heures
Temps de
maintien
Heures
Température
interne
maximale
o
F (
o
C)
Température
interne de
maintien
o
F (
o
C)
Roti de côte 20 (9,06) 225 (107) 5 4 140 (60)
Faux-let, désossé 12 (5,43) 225 (107) 3 4 140 (60)
Intérieur de ronde 20 (9,06) 225 (107) 5 4 140 (60)
Ronde « steamship » 20 (9,06) 225 (107) 7 2 140 (60)
Extérieur de ronde 20 (9,06) 225 (107) 5 8 140 (60)
Contre-let, désossé 12 (5,43) 225 (107) 3 4 140 (60)
Filet entier 6 (2,71) 225 (107) 2 2 140 (60)
Haut de surlonge 14 (6,34) 225 (107) 3 4 140 (60)
Bouts de côtes, boeuf 10 (4,53) 225 (107) 4 4 165 (74)
Bifteck attendri 10 (5,43) 225 (107) 3 3 180 (82)
Côtes levées de dos, boeuf 30 (13,6) 225 (107) 5 4 175 (79)
Ragoût, boeuf 10 (5,43) 225 (107) 4 6 175 (79) 150 (66)
Boeuf salé 12 (5,43) 250 (121) 4 4 165 (74) 150 (66)
Jambon frais 12 (5,43) 250 (121) 6 4 165 (74)
Jambon salé, cuit 12 (5,43) 250 (121) 4 4 135 (57)
Côtes levées de dos, porc 10 (4,53) 250 (121) 5 3 175 (79) 150 (66)
Côtes levées, porc 30 (13,6)
250 (121) 5 4 175 (79) 150 (66)
Saucisses fraîches 10 (4,53) 225 (107) 2 5 (max) 175 (79)
Saucisses pré-cuites 10 (4,53) 250 (121) 1 3/4 5 1/2 (max) 160 (71)
Cochon de lait rôti 30 (13,6) 250 (121) 6 3 170 (77) 155 (68)
Bacon 350 (177)
40 min. N/D
Poulet rôti 10 (4,56) 350 (177)
45 min. N/D 165 (74)
Morceaux de poulet (par plateau) 10 (4,56) 250 (121) 2 1/2 1/2 (max) 170 (77) 150 (66)
Poulets entiers (par poulet)
3,25 (1,47) 250 (121) 2
1/2
4
1/2
(max) 170 (77) 140 (60)
Dindes entières
20 (9,06) 230 (110) 6
1/2
12 (max) 170 (77) 160 (71)
Poitrine de dinde, avec os
10 (4,53) 250 (121) 5 1 160 (71) 150 (66)
Canardeau rôti (par canard)
4 (1,81) 350 (177) 1
1/2
3 (max) 170 (77) 150 (66)
Carré d'agneau
Carré de 15 par
plateau
250 (121) 3 1/2 2 1/2 160 (71)
Jarrets d'agneau, braisés 250 (121) 4 4 180 (82) 150 (66)
Filets de poisson 4-6 oz (23 g) 225 (107)
40 min. 4 160 (71)
Soupes claires
Gastronome 1/1 ou
plat à pocher de
12x20x4 po
225 (107) 3 toute la nuit 175 (79) 150 (66)
Pizza congelée (2) pizzas de 18 po 350 (177)
15 min. 2 175 (79) 160 (71)
Riz 1 pinte à sec 250 (121) 2 18 160 (171) N/D
Pommes de terre au four
90 CT. 350 (177) 1 1
1/2
200 (93) 170 (77)

– 11 –
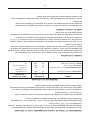
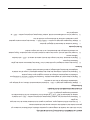
TEMPÉRATURES ET TEMPS DE CUISSON RECOMMANDÉS POUR LE RÔTISSAGE
Selon le ministère de l’Agriculture des États-Unis et l’American Meat Institute, les températures de
rôtissage doivent varier idéalement entre 107 et 163 °C (225 et 325 °F) pour le bœuf, l’agneau, la volaille
et le jambon et à 163 °C (325 °F) pour le porc.
Placer un plat rempli d’eau (environ 305 x 508 x 25 mm [12 x 20 x 1 po]) dans le four. L’eau dégage de
l’humidité et réduit le étrissement. En ajouter pendant le rôtissage, au besoin.
Les plats à rôtir ne doivent pas excéder la profondeur requise pour contenir la graisse, soit de
51 à 64 mm (2 à 2 1/2 po) en général.
Le temps de cuisson et la perte de poids varient selon la température de rôtissage, la coupe et la
catégorie de viande ainsi que le degré de cuisson. À une même température, les petits morceaux de
viande cuisent en général plus rapidement que les gros morceaux.
TEMPÉRATURE DE RÔTISSAGE
PRODUIT TEMPERATURE
°C (°F)
TEMPS DE CUISSON
APPROXIMATIF
121 (250)
135 (275)
149 (300)
149 (300)
Côtes de bœuf – Prêtes pour la cuisson
Côtes de bœuf désossées – 9,1 À 10 kg (20 à 22 lb)
Rôti de veau – 6,8 kg (15 lb)
Dindes – 6,8 à 9,1 kg (15 à 20 lb)
Pain de viande – 3,6 à 4,5 kg (8 à 10 lb) 177 (350)
3 à 4 h (saignant)
4 à 4 h 30 (à point)
4 h (à point)
3 h (à point à bien cuit)
3 h
45 à 60 min
CONSEILS D’UTILISATION
La cuisson à circulation d’air forcé est plus rapide que la cuisson dans un four traditionnel, par
conséquent, la surcuisson est plus commune. Pour obtenir de bons résultats, ne pas cuire les produits
plus rapidement qu’il ne le faut. Comme la circulation d’air forcé fournit de la chaleur à la surface du
produit, si le produit est plus épais ou plus massif, il prendra plus de temps pour absorber assez de
chaleur pour la cuisson.
Le four cuira des charges entières ou partielles aux températures standards des recettes. Comme
tout autre four, vous voudrez peut-être utiliser une température de cuisson variant de -4 °C (25 °F)
au-dessus ou en bas de la recette pour obtenir les résultats d’un produit que vous préférez.
Lorsque ceci sera établi, les temps de cuisson du four à convection et les réglages des commandes
devraient être notés sur votre recette.
GUIDE DE CUISSON SUGGÉRÉ
Les températures, les temps de cuisson, le nombre de grilles sont suggérés à titre d’exemple
seulement. Ils devront être adaptés aux recettes, aux ingrédients, à l’installation et aux goûts
personnels.
Le four ne requiert pas de recettes spéciales. Vous pouvez obtenir d’excellents résultats pour toute
bonne recette commerciale avec des temps de cuisson réduits.

– 10 –
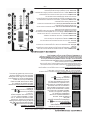
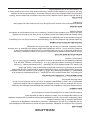
COMMANDES PROGRAMMABLES
GUIDE DE DÉMARRAGE / RÉGLAGES MANUELS
Mettez le four en marche et l’afcheur
indiquera le dernier réglage utilisé.
TEMPÉRATURE :
1. Appuyez sur la touche TEMP . La
température programmée clignotera.
(Fig. 1,2).
2. À l’aide du clavier, entrez la
température désirée. La nouvelle
température va clignoter. (Si
nécessaire, appuyez sur la touche
TEMP et retenez-là 3 secondes pour
afcher la température interne du four.
Celle-ci continuera de s’afcher aussi
longtemps que la touche demeurera
enfoncée et pendant 3 secondes après
l’avoir relâchée. La température par
défaut qui est afchée est celle que
vous avez programmée.)
3. Appuyez sur la touche pour
l’accepter
TEMPS DE CUISSON :
1. Appuyez sur la touche TIME et le
temps programmé clignotera. (Fig. 2,2).
2.
3.
À l’aide du clavier entrez le temps désiré
en heures et en minutes. Le nouveau
temps va clignoter. (Exemple : si vous
entrez 1, l’afcheur indique « 00 :01 ».
Si vous entrez 120, l’afcheur indique
« 01 :20 »).
Appuyez sur la touche pour
acceptation ou sur la touche pour
annulation.
VITESSE DU VENTILATEUR :
1. Appuyez sur le bouton FAN pour basculer
entre les vitesses de ventilation : HI,
LOW ou OFF (Haute, Basse ou Arrêt).
(Fig. 3,2) (Si la source de chaleur
sélectionnée est le gaz, le chauffage sera
désactivé si vous avez choisi OFF [Arrêt].
Assurez-vous que ce réglage concorde
avec la source de chaleur de votre four.)
POUR DÉMARRER UN CYCLE DE CUISSON :
1. Appuyez sur la touche (Démarrer). L’afcheur indiquera le compte à rebours.
(Plus d’une heure = H : MIN.; moins d’une heure = MIN : SEC.)
FONCTION AJOUT DE TEMPS :
1. Ajouter du temps au cycle de cuisson en cours en appuyant sur n’importe quelle
touche du pavé numérique.
2. Vous pouvez ajouter de 1 à 10 minutes en appuyant sur une des touches du
pavé numérique pendant tout cycle de cuisson minuté. (À noter que la touche
du « 0 » représente 10 minutes de temps ajouté).
REMARQUE : si la température en cours est de plus de 10°F (5°C) sous la
température xée, l’afcheur indiquera HEATING (Chauffage) [Fig. 4,2] en
même temps qu’une barre de progression sous le mot HEATING (Chauffage).
Lorsque la température sera moins de 10°F (5°C) sous le point de consigne,
le mot HEATING (Chauffage) afché changera à READY (Prêt).
Touche SHELF (Grille) : elle sert à affecter des articles de menu à 6 grilles
différentes. L’ordinateur peut suivre jusqu’à 6 articles du menu sur 6 positions
de grilles.
Touche X : sert à QUITTER ou annuler une programmation ou des fonctions
opérationnelles.
Touche % : sert à xer le niveau de puissance par incrément de 10%.
Touche MENU : utilisée pour sélectionner un article du menu.
Touche FAN (Ventilateur) : sert à xer la vitesse du ventilateur.
Touche START (Démarrage) : sert à démarrer un cycle de cuisson minuté.
Touche PROG. PORT : utilisée avec une clé USB standard pour importer des
mises à jour logicielles et pour télécharger des menus de cuisson préparés à
l’externe avec l’éditeur de menus C3700.
Touche de déplacement vers le haut : sert au déroulement vers le haut du
menu et des fonctions de programmation.
Touche de déplacement vers le bas : sert au déroulement vers le bas du
menu et des fonctions de programmation.
Touche TEMP (Température) : utilisée pour programmer la température de
cuisson manuellement. Appuyez et maintenez la touche enfoncée pendant 3
secondes pour afcher la température interne réelle du four.
Touche PROG : donne accès à toutes les fonctions de programmation.
Touche TIME (Temps) : sert à programmer le temps de cuisson manuellement.
Touche OK : sert à l’acceptation des données programmées.
GUIDE DE L’AFFICHEUR

– 9 –
AVANT LA PREMIÈRE UTILISATION (TOUS LES MODÈLES)
Le four doit subir une chauffe de rodage avant sa première utilisation, an d’éliminer les odeurs qui
peuvent résulter de la chauffe des surfaces neuves de la chambre interne.
1. À l’aide d’un chiffon humide propre, essuyez les parois de la chambre interne du four ainsi que
les grilles.
2. Refermez les portes du four, mettez l’interrupteur principal en position « ON », puis réglez le
cadran du thermostat à 300
o
F (150
o
C) et laissez le four fonctionner de 6 à 8 heures avant de
remettre l’interrupteur principal à « OFF ».
UTILISATION DES MODÈLES ÉLECTRIQUES
Préchauffage
1. Mettez l’interrupteur principal à « ON ». Le témoin lumineux ambré s’allume, ce qui indique que
l’alimentation électrique du four est en marche.
2. Réglez le thermostat à la température désirée. Consultez les DIRECTIVES DE CUISSON pour
connaître les températures et temps de cuisson suggérés pour divers produits.
3. Préparez les produits, et déposez-les dans des plateaux adéquats. Lorsque le four atteint la
température désirée de préchauffage, le témoin lumineux blanc s’éteint.
Cuisson
6. Ouvrez les portes et chargez le produit dans le four. Placez les plateaux au centre des grilles.
Refermez les portes.
7. Réglez la minuterie. Une fois le temps xé écoulé, mettez le cadran à « OFF » an d’arrêter
l’alarme sonore.
8. Lorsque le produit est cuit, ouvrez les portes et retirez-le du four avec précaution. Soyez prudent
au moment de nettoyer des déversements, car le four est toujours chaud.
Fin de la journée
1. Placez le cadran du thermostat à réglage le plus bas.
2. Mettez l’interrupteur principal en position « OVEN COOL ». Laissez les portes ouvertes pendant
que le ventilateur continue de fonctionner pour refroidir le four.
3. Lorsque le four est sufsamment refroidi, mettez l’interrupteur principal en position « OFF » et
nettoyez le four.
La page charge ...
La page charge ...
La page charge ...
La page charge ...
La page charge ...
La page charge ...
La page charge ...
La page charge ...
-
 1
1
-
 2
2
-
 3
3
-
 4
4
-
 5
5
-
 6
6
-
 7
7
-
 8
8
-
 9
9
-
 10
10
-
 11
11
-
 12
12
-
 13
13
-
 14
14
-
 15
15
-
 16
16
-
 17
17
-
 18
18
-
 19
19
-
 20
20
-
 21
21
-
 22
22
-
 23
23
-
 24
24
-
 25
25
-
 26
26
-
 27
27
-
 28
28


Vulcan VC44EC Le manuel du propriétaire
- Catégorie
- Fours
- Taper
- Le manuel du propriétaire
dans d''autres langues
- English: Vulcan VC44EC Owner's manual
Documents connexes
Autres documents
-
Wolf WC4E Convection Oven Mode d'emploi
-
Vulcan-Hart SG6C ML-114878 Manuel utilisateur
-
Vulcan-Hart VCH8 Mode d'emploi
-
-
 VULCAN & WOLF PreciPan™ Mode d'emploi
-
-
Vulcan Hart SG4C-ML-114876 Mode d'emploi
-
Southbend S36 Series Le manuel du propriétaire
-
GE ZMB9032SNSS Mode d'emploi
-
