Jensen Car Video System VM9313 Manuel utilisateur
- Catégorie
- Récepteurs multimédia de voiture
- Taper
- Manuel utilisateur

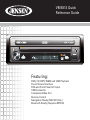
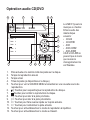
Featuring:
DVD, CD, MP3, WMA and USB Playback
Touch Screen Interface
RCA and Front Panel A/V Input
USB Connector
Composite Video Out
Remote Control
Navigation Ready (NAV102 Only)
Bluetooth Ready (Requires BTM10)
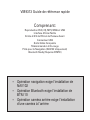
VM9313 Quick
Reference Guide
VM9313
A
/
V
INPUT
DISP


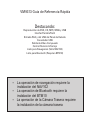
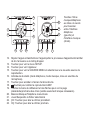
Navigation operation requires NAV102
installation
Bluetooth operation requires BTM10
installation
Rear Camera operation requires rear camera
installation

VM9313
A / V
INPUT
DISP
3
13
4
8
1
2
12 11
10
7
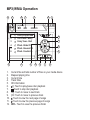
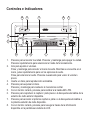
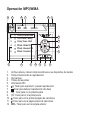
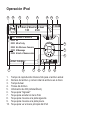
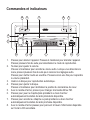
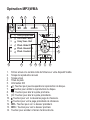
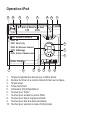
Controls and Indicators
7
6
14
5
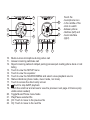
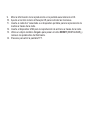
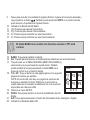
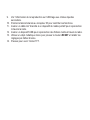
1. Press to turn the unit on. Press and hold to turn the unit off.
Press repeatedly to select playing mode.
2. Tournez pour ajuster le volume.
Press and hold to access audio menu. While in menu, press repeatedly to view
audio settings.
Press to mute audio. Press again to resume previous volume.
3. Insert disc for automatic playback.
4. Press to eject disc.
Press and hold to reset core mechanism position.
5. With the monitor closed, press to change the AM or FM band.
6. Press to play the previous chapter/track or auto-search the previous available
radio station.
7. Press to access the next chapter or track or auto-search the next available radio
station.
8. With the monitor closed, press to cycle through information available on the
secondary LCD screen.
9. View playback information on secondary LCD.

10. Point remote control at IR Receiver to control functions.
11. Insert A/V cable connected to a portable media device for playback through the
radio.
12. Insert USB device for playback of media files through the radio.
13. Use thin metallic object to depress RESET button and restore factory default
settings.
14. Press to open TFT screen.

VM9313
A / V
INPUT
DISP
CLOSE
PIC
WIDE TILT
160
WATTS
Multimedia Receiver
15
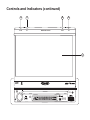
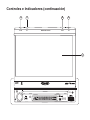
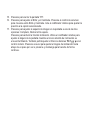
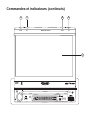
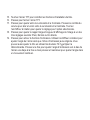
Controls and Indicators (continued)
19
18
16
17

15. Touch the TFT screen to control head unit functions.
16. Press to close the TFT screen.
17. Press to adjust the Brightness and Contrast. Press the volume control to move
between Brightness and Contrast. Turn the rotary encoder to adjust the setting
for the selected option.
18. Press to adjust the display aspect ratio of the picture to one of three settings:
Full, Normal or Standby.
19. Press to activate the tilt function. Use the rotary encoder to adjust the angle of
the screen while the yellow tilt icon is flashing. You can also adjust the title using
the TILT and buttons on the remote control. Press once to adjust the
downward tilt angle of the screen one step at a time or press and hold to adjust
the angle in a continuous motion.

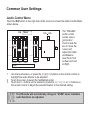
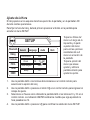
Common User Settings
Audio Control Menu
Touch the EQ button on the right side of the screen to access the Audio Control Menu,
shown below.
1. Use the touchscreen, or press the (>>|)/(|<<) buttons on the remote control to
highlight the audio feature to be adjusted.
2. Touch the screen to select the highlighted option.
3. Touch the +/– buttons on the screen or press the |<<, >>|, >>, or << buttons on
the remote control to adjust the selected feature to the desired setting.
+14 — 0 —
0 — —
–14 — –14 —
EQ
User
FAD BAL
BASS MID TREB SUB
User
F
R
R
L
The "FAD-BAL"
portion of the
screen uses a
grid control.
Touch inside the
box to move the
cursor and
adjust the Fader
and Balance
level from Front
to Rear and Left
to Right.
NOTE
The EQ mode will automatically change to “USER” when individual
audio functions are adjusted.

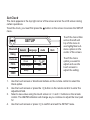
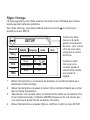
Set Clock
The clock appears in the top right corner of the screen and on the LCD screen during
certain operations.
To set the clock, you must first press the button on the screen to access the SETUP
menu.
1. Use the touch screen or directional buttons on the remote control to select the
Clock option.
2. Use the touch screen or press the >/|| button on the remote control to enter the
adjustment field.
3. Select a new value using the touch screen or >> and << buttons on the remote
control. The AM/PM indication will change as you continue to adjust the hour past
12.
4. Use the touch screen or press >/|| to confirm and exit the SETUP menu.
RADIO
SETUP
Rating
Bluetooth
Hardware
DEMO
P.VOL
TS Cal
General Language
Audio Back
Clock Mode 12Hr
Clock 04 : 31 AM
Tuner Region USA
Beep On
Touch the menu titles
across the left and
top of the menu to
see highlighted sub-
menu options in the
center of the screen.
Touch the menu
option you want to
adjust and use the
touch screen to
adjust the setting.

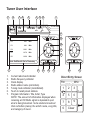
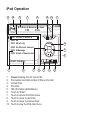
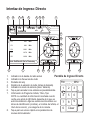
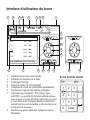
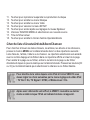
1. Current radio band indicator
2. Radio frequency indicator
3. Clock display
4. Radio station name (call letters)
5. Tuning mode indicator (local/distant)
6. Touch to recall preset stations.
7. Program Information: Title, Artist, Type
NOTE: The amount of information displayed when
receiving an HD Radio signal is dependent upon
what is being broadcast. Some stations broadcast
their call letters (name), the artist's name, song title,
and category of music.
Tuner User Interface
9
11
13
FM: _ _ _ . _ MHz
1
2
3
4
5
6
7
8
9
0
Clear
Exit
Direct Entry Screen
4
1
2
7
8
3
6
16
RADIO
FM 101.9 MHz HD-1
01:02 PM
E
Q
P1 87.5 MHz
P2 90.1 MHz
P3 98.1 MHz
P4 106.1 MHz
P5 107.9 MHz
P6 102.9 MHz
Info: Soft Rock & Roll of Yesterday
WJHM-FM
Auto HD
5
10
22
12
14
15
BAND
1/2
MEM
18
17
19
20
PROG
2/2
A/D
21

8. Touch for quick access to Equalizer level settings.
9. Touch to access the Direct Entry Screen. Enter the desired frequency and then
touch the button. You can also press GOTO on the remote control to access
the Direct Entry Screen.
10. HD Radio band indicator
11. |<<: Touch to seek backward.
12. >>|: Touch to seek forward.
13. <<: Touch to tune backward one step.
14. >>: Touch to tune forward one step.
15. BAND: Touch to change bands.
16. Touch to view the SOURCE MENU and select a new playback source. You can
also change the source by pressing the SRC button on the control panel or
remote control.
17. MEM: View screen used to enter current channel into preset memory. Touch P1 -
P6 to store or Exit to leave the screen.
18. 1/2 or 2/2: Touch this page button to view a second page of on-screen buttons.
NOTE: In AM mode, there is only one page of on-screen button options. The
PROG button is not visible since Multicast channels are not available for AM
stations.
19. View SETUP menu.
20. PROG: Touch to view the HD Radio Multicast channel display
21. A/D: Touch to select Auto, Analog or Digital tuning mode.
22. HD Radio Signal Indicator.
NOTE
The BAND button on the unit only works when the TFT is closed.

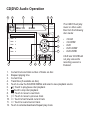
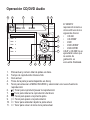
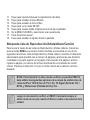
CD/DVD Audio Operation
1. Current track and total number of tracks on disc
2. Elapsed playing time
3. Current time
4. Track titles (if available on disc)
5. Touch to view the SOURCE MENU and select a new playback source
6. /||: Touch to play/pause disc playback
7. : Touch to stop disc playback
8. >>|: Touch to move to next track
9. |<<: Touch to move to previous track
10. >>: Touch to fast forward current track
11. <<: Touch to rewind current track
12. Touch to activate/deactivate Repeat play mode
15
1
7
2
13
16
12
3
5
DISC
CDDA 1/10 00:00:23
01:02
E
Q
Track 1
Track 2
Track 3
Track 4
Track 5
Track 6
14
4
9
11
10
8
6
The VM9313 will play
music or other audio
files from the following
disc media:
CD-DA
CD-R/RW
DVD
DVD+R/RW
DVD-R/RW
CD-R and CD-RW will
not play unless the
recording session is
finalized.

13. Touch to activate/deactivate Random mode
14. Touch to access the direct entry screen
15. : Touch to view the SETUP menu
16. Touch for quick access to Equalizer level settings
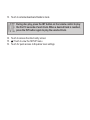
NOTE
During disc play, press the INT button on the remote control to play
the first 10 seconds of each track. When a desired track is reached,
press the INT button again to play the selected track.

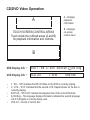
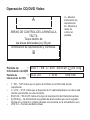
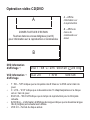
CD/DVD Video Operation
A
B
A – Displays
playback
information
B – Displays
on-screen
control menu
TOUCH SCREEN CONTROL AREAS
Touch inside the outlined areas (A and B)
for playback information and controls.
DVD T : 5/8 C : 2/16 00:41:28 2/6 Eng
VCD 2.0 T : 6/18 00:41:28
DVD Display Info "
VCD Display Info "
T : 5/8 – “5/8" indicates the fifth of 8 titles on the DVD is currently playing.
C : 2/16 – “2/16" indicates that the second of 16 chapters/tracks on the disc is
currently playing.
00:41:28 – “00:41:28” indicates the playback time of the current title/track.
2/6 Eng – The language display information indicates the second language
out of 6 (English) is currently being used.
VCD 2.0 – Format of current disc.

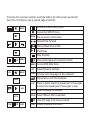
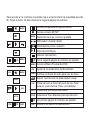
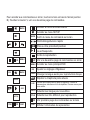
To access the on-screen controls, touch the bottom 1/3 of the screen (section B).
Touch the 1/2 button to view a second page of controls.
1/2
1/2
BACK
BACK
MENU
MENU
2/2
2/2
BACK
DISP
DISP
EQ
EQ
AUDIO
AUDIO
A-B
A-B
TITLE
TITLE
SUBTITLE
SUBTITLE
Access the direct entry screen
Access the SETUP menu
Exit on-screen control menu
Rewind/Fast Forward
Previous/Next track or title
Play/Pause
Stop playback
View second page of on-screen controls
Access DVD Main Menu
Adjust Equalizer settings
Change audio language for disc playback
Repeat play current track/chapter
Press to select beginning repeat point. Press again
to select end repeat point. Press again to stop.
Select language for subtitles
Select different title for playback
View first page of on-screen controls
Display playback information

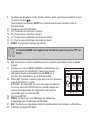
1. Current file and total number of files on your media device
2. Elapsed playing time
3. Current time
4. Track titles
5. ID3 information
6. /||: Touch to play/pause disc playback
7. : Touch to stop disc playback
8. >>|: Touch to move to next track
9. |<<: Touch to move to previous track
10. : Touch to view the next page of songs
11. : Touch to view the previous page of songs
12. DIR -: Touch to view the previous folder
MP3/WMA Operation
15
1
7
2
13
5
16
12
3
17
DISC
MP3 4/84 00:00:23
01:02 AM
E
Q
1 Cherry Poppin Dad
2 Chris Isaak - Baby
3 Crazy Town - Butt
4 Phish - Birds Of A
5 Phish - Bouncin' R
6 Phish - Freebird (L
14
4
9
11
10
8
6
DIR - DIR +
(Root)
18

13. DIR +: Touch to view the next folder
14. Touch to access the direct entry screen
15. : Touch to view the SETUP menu
16. Touch for quick access to Equalizer level settings
17. Touch to view the SOURCE MENU and select a new playback source
18. Folder name
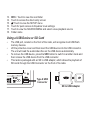
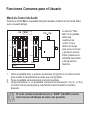
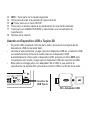
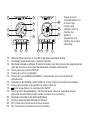
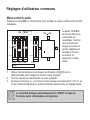
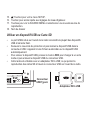
Using a USB Device or SD Card
The USB port, located on the front of the radio, will recognize most USB flash
memory devices.
Lift the protective cover and then insert the USB device into the USB connector.
The unit will read the audio/video files on the USB device automatically.
To remove the USB device, press the SRC button to switch to another mode and
then remove the USB device from the USB connector.
This radio is packaged with an SD to USB adaptor, which allows the playback of
SD cards through the USB Connector on the front of the radio.
A / V
INPUT
SD to USB Adaptor
Type A USB
Connector

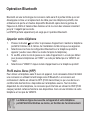
Bluetooth Operation
The line-of-sight distance between this unit and your cellular phone
must be 8 meters or less, depending on the environment.
Bluetooth is a short-range wireless radio connectivity technology that is developed as
a cable replacement for mobile phones, handheld PCs and other devices. Bluetooth
operates in 2.4 GHz frequency range and transmits voice and data at speeds up to 1
megabit per second.
The BTM10 (purchased separately) is required for Bluetooth operation.
Pairing your Phone
1. Press the button to initiate the pairing process. Keep the mobile phone within 2
meters of the head unit when pairing.
2. Select the Bluetooth setup option on the mobile phone to be paired (please refer
to the phone’s instruction manual).
3. If prompted, enter the “pass key” or pairing code. The dafault code for many
phones is “0000”. The default code for the VM9313 is “1234”.
4. Select “VM9313” from the pairing list on the mobile phone.
Hands Free Profile (HFP)
To use a phone wirelessly with this unit, it is necessary to first establish a connection
using Bluetooth wireless technology. Connection is normally established using HFP
(Hands Free Profile), which gives you full control of functions available on the
telephone source. However, depending on your phone, the connection may be made
using HSP (Head Set Profile), making some functions unavailable. This is a limitation
of your phone, not the VM9313.

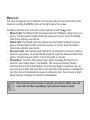
Menu List
The menu list appears on the left side of the screen and can be accessed from other
modes by touching the MENU button on the right side of the screen.
To make a call from a list, touch the number and then touch the button.
Missed Calls: The Missed Calls list retrieves the list of Missed numbers from your
phone. The last missed number is the first number on the list. Touch the Missed
Calls menu option to view the list.
Dialed Calls: The Dialed Calls list retrieves the list of dialed numbers from your
phone. The last dialed number is the first number on the list. Touch the Dialed
Calls menu option to view the list.
Received Calls: Use the Received Calls list to view the last 10 received numbers
stored on your phone. To access the Received list, touch the Received Calls menu
option. The last received number is the first number on the list.
Phone Book: Touch the Phone Book menu option to display the phone book
stored on your mobile phone, if compatible. The screen will display “Ready...”
while the phone book is downloading. Once the download is completed, you can
use the arrow buttons and scroll bar on the right side of the window to navigate the
list. Since the unit downloads one page of entries at a time, there may be a slight
delay while the next page of numbers is downloaded.
Not all phones allow access to missed, received or dialed calls and
some will not allow uploading of your phone’s address book.

1
4
14
2
15
BT
Disconnected
01:02 AM
1 Missed Calls
2 Received Calls
3 Dialed Calls
4 Phone Book
3
16
MENU
Menu List
E
Q
19
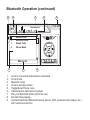
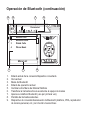
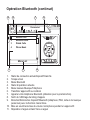
Bluetooth Operation (continued)
1. Current connection status/device connected
2. Current time
3. Bluetooth menu
4. Current operation status
5. Toggle Music/Phone menu
6. Transfer active call back to handset
7. Pair your Bluetooth phone (first time use)
8. Exit call listing display
9. Connect/disconnect Bluetooth device (phone, PDA, personal music player, etc.)
with hands-free function
La page est en cours de chargement...
La page est en cours de chargement...
La page est en cours de chargement...
La page est en cours de chargement...
La page est en cours de chargement...
La page est en cours de chargement...
La page est en cours de chargement...
La page est en cours de chargement...
La page est en cours de chargement...
La page est en cours de chargement...
La page est en cours de chargement...
La page est en cours de chargement...
La page est en cours de chargement...
La page est en cours de chargement...
La page est en cours de chargement...
La page est en cours de chargement...
La page est en cours de chargement...
La page est en cours de chargement...
La page est en cours de chargement...
La page est en cours de chargement...
La page est en cours de chargement...
La page est en cours de chargement...
La page est en cours de chargement...
La page est en cours de chargement...
La page est en cours de chargement...
La page est en cours de chargement...
La page est en cours de chargement...
La page est en cours de chargement...
La page est en cours de chargement...
La page est en cours de chargement...
La page est en cours de chargement...
La page est en cours de chargement...
La page est en cours de chargement...
La page est en cours de chargement...
La page est en cours de chargement...
La page est en cours de chargement...
La page est en cours de chargement...
La page est en cours de chargement...
La page est en cours de chargement...
La page est en cours de chargement...
La page est en cours de chargement...
La page est en cours de chargement...
La page est en cours de chargement...
La page est en cours de chargement...
La page est en cours de chargement...
La page est en cours de chargement...
La page est en cours de chargement...
La page est en cours de chargement...
-
 1
1
-
 2
2
-
 3
3
-
 4
4
-
 5
5
-
 6
6
-
 7
7
-
 8
8
-
 9
9
-
 10
10
-
 11
11
-
 12
12
-
 13
13
-
 14
14
-
 15
15
-
 16
16
-
 17
17
-
 18
18
-
 19
19
-
 20
20
-
 21
21
-
 22
22
-
 23
23
-
 24
24
-
 25
25
-
 26
26
-
 27
27
-
 28
28
-
 29
29
-
 30
30
-
 31
31
-
 32
32
-
 33
33
-
 34
34
-
 35
35
-
 36
36
-
 37
37
-
 38
38
-
 39
39
-
 40
40
-
 41
41
-
 42
42
-
 43
43
-
 44
44
-
 45
45
-
 46
46
-
 47
47
-
 48
48
-
 49
49
-
 50
50
-
 51
51
-
 52
52
-
 53
53
-
 54
54
-
 55
55
-
 56
56
-
 57
57
-
 58
58
-
 59
59
-
 60
60
-
 61
61
-
 62
62
-
 63
63
-
 64
64
-
 65
65
-
 66
66
-
 67
67
-
 68
68


Jensen Car Video System VM9313 Manuel utilisateur
- Catégorie
- Récepteurs multimédia de voiture
- Taper
- Manuel utilisateur
dans d''autres langues
Documents connexes
-
Jensen Car Video System VM9413 Manuel utilisateur
-
-
-
-
-
-