LG LPC53 Le manuel du propriétaire
- Catégorie
- Lecteur CD
- Taper
- Le manuel du propriétaire
Ce manuel convient également à

LPC53_LGEMC_ENG_MFL41698446
LPC53 (LPC53-A0)
PORTUGUÊS
FRANÇAIS
ENGLISH

2
PORTABLE MP3/CD CASSETTE RECORDER ] OWNER’S MANUAL
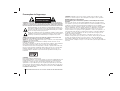
CAUTION: TO REDUCE THE RISK OF ELECTRIC SHOCK DO NOT REMOVE
COVER (OR BACK) NO USER-SERVICEABLE PARTS INSIDE REFER SERVICING
TO QUALIFIED SERVICE PERSONNEL.
This lightning flash with arrowhead symbol within an equilateral triangle is
intended to alert the user to the presence of uninsulated dangerous voltage
within the product’s enclosure that may be of sufficient magnitude to constitute
a risk of electric shock to persons.
The exclamation point within an equilateral triangle is intended to alert the
user to the presence of important operating and maintenance (servicing)
instructions in the literature accompanying the product.
WARNING: TO PREVENT FIRE OR ELECTRIC SHOCK HAZARD, DO NOT
EXPOSE THIS PRODUCT TO RAIN OR MOISTURE.
WARNING: Do not install this equipment in a confined space such as a book case or
similar unit.
CAUTION: Do not block any ventilation openings. Install in accordance with the
manufacturer's instructions.
Slots and openings in the cabinet are provided for ventilation and to ensure reliable
operation of the product and to protect it from over heating. The openings should be
never be blocked by placing the product on a bed, sofa, rug or other similar surface.
This product should not be placed in a built-in installation such as a bookcase or rack
unless proper ventilation is provided or the manufacturer's instruction has been
adhered to.
CAUTION:
This product employs a Laser System.
To ensure proper use of this product, please read this owner’s manual carefully and
retain it for future reference. Should the unit require maintenance, contact an authorized
service center. Use of controls, adjustments or the performance of procedures other than
those specified herein may result in hazardous radiation exposure.
To prevent direct exposure to laser beam, do not try to open the enclosure. Visible
laser radiation when open. DO NOT STARE INTO BEAM.
CAUTION: The apparatus should not be exposed to water (dripping or splashing) and
no objects filled with liquids, such as vases, should be placed on the apparatus.
CAUTION concerning the Power Cord
Most appliances recommend they be placed upon a dedicated circuit;
That is, a single outlet circuit which powers only that appliance and has no additional
outlets or branch circuits. Check the specification page of this owner's manual to be
certain.
Do not overload wall outlets. Overloaded wall outlets, loose or damaged wall outlets,
extension cords, frayed power cords, or damaged or cracked wire insulation are
dangerous. Any of these conditions could result in electric shock or fire. Periodically
examine the cord of your appliance, and if its appearance indicates damage or
deterioration, unplug it, discontinue use of the appliance, and have the cord replaced
with an exact replacement part by an authorized service.
Protect the power cord from physical or mechanical abuse, such as being twisted,
kinked, pinched, closed in a door, or walked upon. Pay particular attention to plugs,
wall outlets, and the point where the cord exits the appliance.
To disconnect power from the mains, pull out the mains cord plug. When installing the
product, ensure that the plug is easily accessible.
Safety Precaution
CAUTION
RISK OF ELECTRIC SHOCK
DO NOT OPEN
POWER: This unit operates on a mains supply of 200-240V, 50/60Hz.
WIRING : This unit is supplied with a BSI 1363 approved 13 amp mains plug, fused at 3
amp. When replacing the fuse always use a 3 amp BS 1362, BSI or ASTA approved type.
Never use this plug with the fuse cover omitted. To obtain a replacement fuse cover contact
your dealer. If the type of plug supplied is not suitable for the mains sockets in your home,
then the plug should be removed and a suitable type fitted. Please refer to the wiring instruc-
tions below:
WARNING: A mains plug removed from the mains lead of this unit must be destroyed. A
mains plug with bared wires is hazardous if inserted in a mains socket.
Do not connect either wire to the earth pin, marked with the letter E or with the earth sym-
bol or coloured green or green and yellow.
If any other plug is fitted, use a 3 amp fuse, either in the plug, or at the distribution board.
IMPORTANT: The wires in this mains lead are coloured in accordance with the following
codes:
- BLUE: NEUTRAL, BROWN: LIVE - As the colours of the wires in the mains lead of
this unit may not correspond with the coloured marking identifying the terminals in your plug,
proceed as follows: The wire which is coloured blue must be connected to the terminal which
is marked with the letter N or coloured black. The wire which is coloured brown must be
connected to the terminal which is marked with the letter L or coloured red.
in NIGERIA

PORTABLE MP3/CD CASSETTE RECORDER ] OWNER’S MANUAL
3
Contents
Power Source 4
About Remote control 5
Listening to CDs 6
Listening to cassette tapes 6
Listening to the radio 7
Listening to music from your portable player 8
Playing music using USB 8
Recording 9
Setting the Clock 10
Troubleshooting 11
Specifications 11
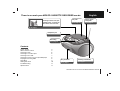
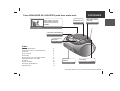
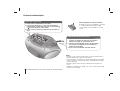
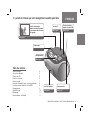
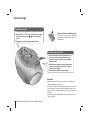
There is so much your MP3/CD CASSETTE RECORDER can do
Recording
Go to page 9
Listening to the Radio
Go to page 7
Play CDs
Go to page 6
Play cassettes
Go to page 6
Playing music
using USB
Go to page 8
Listening to music from your
portable player - Connect the
cable to the rear of the unit.
Go to page 8
Headphone jack
English

4
PORTABLE MP3/CD CASSETTE RECORDER ] OWNER’S MANUAL
Note:
• Unplug the AC power cord from the wall outlet if you do not to use for
an extended period of time.
• To avoid damage from possible battery leakage, remove the batteries
if you do not plan to use the unit for an extended period of time.
• When the batteries are weak, replace all the batteries with new ones.
• During the AC power cord connect to the wall outlet, the batteries are
not worn out.
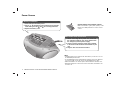
1. Before connecting the AC power cord, check that
the operating voltage of your unit is identical with
the voltage of your local power supply.
2. Connect one end of the AC power cord (included)
to the AC IN socket located at the backside of your
unit.
3. Plug the other end into the wall outlet.
1. Press and open the battery cover.
2. Put six “C” (R14) batteries (not included) into the compart-
ment making sure the
33
and
##
are correctly positioned.
3. Replace the battery cover.
Battery Installation
AC Power Cord Connection
Power Source
Put the battery in the remote control
Make sure that the + (plus) and - (minus) on the
battery (size AAA) match those on the remote
control.

PORTABLE MP3/CD CASSETTE RECORDER ] OWNER’S MANUAL
5
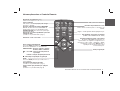
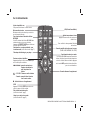
About Remote control
Sound quality adjustment
You can choose sound impressions.
Turn on or off
To enter power save mode press and hold.
Search for a folder of MP3/WMA files
When a CD containing MP3/WMA files in several
folders is being played, press PRESET/FOLDER
to select the folder you want to play.
Choose a ‘preset number’ for a radio
station (see Listening to the radio / page 7)
Listen to your tracks again and again
Press MODE repeatedly, You can enjoy the music
repeatedly or randomly.
.bb/BB> : Search / Skip the radio sta-
tion, music and file.
BB
/
[]
: • CD / USB - Starts or pauses playback
• TAPE - Forward / Reverse Play
x
: Stops playback or recording
XDSS
Press XDSS to reinforce treble, bass and the sur-
round effect.
For storing radio stations
(see Listening to the radio / page 7)
Listen to your tracks in any order
(see Listening to CDs / page 6)
Fall asleep while listening to your player.
VSM (Virtual Sound Matrix)
Temporarily stop the sound
Press the button again to return to the sound.
Control the volume when using any function.
To change the functions or input
(TUNER, USB, PORTABLE, CD, TAPE)
See information about your music
MP3/WMA files often come with tags. The tag
gives the Title, Artist, Album or Time information.
Press INFO while a file is playing to see this
information.
Starts recording

6
PORTABLE MP3/CD CASSETTE RECORDER ] OWNER’S MANUAL
Listening to cassette tapes
1. Select the TAPE function
2. Open the tape door
3. Insert the tape
4. Close the tape door
5. Start the tape playing
6. To stop a tape playing
Cassette deck will automatically
stop at the end of the tape
FUNCTION
PUSH EJECT
b / B
x
FUNCTION
BB
/
[]
x
Listening to cassette tapes - more you can do
To play during fast backward or Forward
After pressing .bb/BB> during playback, or stop, press b / B at a
point you want.
AUTO REVERSE MODE
You can set the tape to play one side , until the end of the tape or
both sides, by pressing MODE on the remote one or more times.
Listening to CDs
Listening to CDs - more you can do
Pause or restart a CD
Press
CD PAUSE
on the unit or
BB
/
[]
on the remote control during playback.
Press
BB
on the unit or
BB
/
[]
on the remote control to resume play.
Search for a section within a track
Press and hold .bb/BB>
during playback
.
Speed search for tracks
Press and hold .bb/BB>
only in stop status. Track skips continuous-
ly in turn.
Skip to another track
Press .bb/BB>
only in stop status
.
Listen to your tracks in any order
Up to 40 tracks on a CD can be listened to in the order of your choice.
Insert a CD and wait for it to be read. Press
and hold
PROG then use
.bb/BB> to select the track. Press PROG again to save and select
the next track. Press
BB
/
[]
. To clear your selection, press
xx
twice. Playing
music using USB, you can also adjust this program.
Audio CD and MP3/WMA CD can be played back in this player.
1. Open the CD door:
2. Insert the CD: Label facing up.
3. Close the CD door:
4. Select the CD function:
5. Start the CD playing:
6. To stop a CD playing:
ON PLAYER ON REMOTE
Z CD OPEN
Z CD OPEN
FUNCTION
BB
xx
FUNCTION
BB
/
[]
xx
ON PLAYER ON REMOTE

PORTABLE MP3/CD CASSETTE RECORDER ] OWNER’S MANUAL
7
Listening to the radio
Listening to the radio - more you can do
Look for radio stations automatically
Press and hold TUNING (-)/TUNING (+)
on
the player o
r
TUN.- /TUN.+
on
the remote control
. The tuner will scan automatically and stop when it finds
a radio station.
Delete all the saved stations
Press and hold
xx
for two seconds. “CLEAR” shows. Press
xx
on the unit
to erase all the saved stations.
1. Select either FM or AM:
2. Select the radio station:
3. To save a radio station:
A preset number will show in the
display.
4. To select a ‘saved’ station:
5. To confirm press: Up to 50 radio sta-
tions can be saved.(AM:20, FM:30)
ON PLAYER ON REMOTE
FUNCTION
TUNING (-)/
TUNING (+)
Press and hold
PROG
b / B
PROG
FUNCTION
TUN.- / TUN.+
Press and hold
PROG
PRESET/FOLDER
PROG

8
PORTABLE MP3/CD CASSETTE RECORDER ] OWNER’S MANUAL
Listening to music from your
portable player
The player can be used to play the music from many types of portable
player.
1. Connect the portable player by
plugging the unit into
PORTABLE IN on the player.
2. Turn the power on:
3. Select the PORTABLE function:
4. Turn the portable player on and
start it playing:
ON PLAYER ON REMOTE
11
/
]]
FUNCTION
POWER
INPUT
Playing music using USB
NOTES :
• Some portable devices are not compatible with this system.
• When various cards are connected to the Memory Card Reader, the first
detected card is recognized.
• Do not extract the USB device in operating.
• A back up demands to prevent a data damage.
• If you use a USB extension cable or USB hub, the USB device might not
be recognized.
• A device using NTFS file system is not supported (Only the FAT (16/32)
file system is supported.).
• Digital camera and mobile phones are not supported.
• USB port of the unit can not be connected to PC. The unit can not be
used as a storage device.
• HDD type USBs may not work when power is not supported in it by itself.
• To play from the first song, press
xx
twice during CD/USB playback.
1. Connect the portable player to
the system using a USB cable
(not supplied).
2. Select the USB function: The dis-
play will show CHECKING, followed
by the number of files displayed:
3. Start the USB playing:
4. To stop a USB playing:
5. Before disconnecting the
portable USB player, change to
any other function by pressing:
6. Remove the USB player:
FUNCTION
BB
xx
FUNCTION
INPUT
BB
/
[]
xx
FUNCTION
or
INPUT
ON PLAYER ON REMOTE

PORTABLE MP3/CD CASSETTE RECORDER ] OWNER’S MANUAL
9
The making of unauthorized copies of copy-protected material,
including computer programs, files, broadcasts and sound
recordings, may be an infringement of copyrights and constitute
a criminal offense. This equipment should not be used for such
purposes.
Be responsible
Respect copyrights
Recording
Recording to USB or Cassette.
Connect USB to or put the blank cassette tape into the player before record-
ing.
1. Select the mode in which you
want to record and play:
2. Start the Recording:
3. Select the USB / TAPE
ON PLAYER ON REMOTE
FUNCTION
zz //
[]
.bb/BB>
t
zz //
[]
.bb/BB>
t
zz //
[]
xx
FUNCTION
or
INPUT
zz //
REC
.bb/BB>
t
zz //
REC
.bb/BB>
t
zz //
REC
xx
5. To stop recording
Recording - more you can do
To pause the recording
Press
zz //
[]
when recording to cassette tape.
Adjusting the recording speed
Normal speed - Press
zz //
[]
at play status to record the CD to the USB at
normal speed.i.e,real time playback and recording
High speed - Press
zz //
[]
at stop status to record the CD to USB at high
speed. During high speed recording, there will be no speaker sound output.
Recording your voice
In the TAPE function, press
zz //
[]
. Then "MIC REC" will be dis-
played. And record your voice. To stop the recording press
xx
.
NOTES
• During MP3 / WMA recording, display will show the percentage of
recording progress “XX [ 100 ]” after each recorded file.
• During MP3 / WMA recording, there will be no speaker sound output.
• You cannot record radio broadcasting to USB.
4. Recording to USB,
Select One / All

10
PORTABLE MP3/CD CASSETTE RECORDER ] OWNER’S MANUAL
Use your player as an alarm clock
Press and hold TIMER on the player for two seconds. Each function,
TUNER, CD, USB, TAPE flashes for two seconds. Press CD PAUSE/SET
on the player when the function you want to be woken by is showing.
If you choose TUNER you will be shown the stations you have saved as
presets. Use .bb/BB> on the player to select the station you want,
then press CD PAUSE/SET.
You will be shown the ON TIME display. This is where you set the time you
want the alarm to go off. Use .bb/BB> on the player to change the
hours and minutes and CD PAUSE/SET to save.
You will then be shown the OFF TIME display. This is where you set the
time you want the function to stop. Use .bb/BB> on the player to
change the hours and minutes and press CD PAUSE/SET to save.
Next you will be shown the volume (VOL) you want to be woken by. Use
V / v on the player to change the volume and CD PAUSE/SET to save.
Switch the system off. The clock icon shows that the alarm is set.
When the system is turned off you can check the time the alarm is set for
by pressing TIMER. You can also turn the alarm on and off by pressing
TIMER. To set the alarm to go off at a different time, switch the system on
and reprogrammed following the same steps as initially.
Setting the Clock
1. Press for at least 2 seconds:
2. Choose from either: AM 12:00 (for an am and pm
display) or 00:00 (for a 24 hour display)
3. Confirm your selection:
4. Select the hours:
5. Press:
6. Select the minutes:
7. Press:
ON PLAYER
CLOCK
.bb/BB>
CD PAUSE/SET
.bb/BB>
CD PAUSE/SET
.bb/BB>
CD PAUSE/SET
Fall asleep while listening to your player
Press SLEEP on the remote control one or more times to select delay time,
after the player will turn off. Press SLEEP on the remote control repeatedly,
You can adjust the time from 90 to 10 minutes.
Sound quality adjustment
You can choose sound impressions. Press EQ on the remote control
repeatedly, the display changes in the following order, FLAT
→
POP
→
ROCK
→
CLASSIC
VSM (Virtual Sound Matrix)
You can select the Virtual sound. Press VSM on the remote control to set
the virtual sound.
About MP3/WMA
MP3/WMA Disc compatibility with this unit is limited as follows:
• Sampling Frequency : 8 - 48 kHz (MP3), 32 - 48 kHz (WMA)
• Bit rate : 8 - 320 kbps (MP3), 48 - 320 kbps (WMA)
• CD-R physical format should be “ISO 9660”
• If you record MP3/WMA files using the software which cannot create a
FILE SYSTEM, for example “Direct-CD” etc., it is impossible to playback
MP3 files. We recommend that you use “Easy-CD Creator”, which creates
an ISO 9660 file system.
• Do not use special letters such as “/ : * ? “ < >”etc.
• Support files up to 99 files, each file can contents up 999 sound tracks.
• You have to set the disc format option to [Mastered] in order to make the
discs compatible with the LG players when formatting rewritable discs.
When setting the option to Live File System, you cannot use it on LG
players.
(Mastered/Live File System : Disc format system for Windows Vista)

PORTABLE MP3/CD CASSETTE RECORDER ] OWNER’S MANUAL
11
Troubleshooting
Designs and specifications are subject to change without notice.
Symptom Cause Correction
Specifications
General
Power supply Refer to the back panel of the unit.
Power consumption Refer to the back panel of the unit.
Net Weight 2.61 kg
External dimensions (W x H x D) 391 x 162 x 280 mm
Output Power (T.H.D 10%) 2.5 W X 2 Ch
Speakers 3 Ohm X 2
Battery Operation DC 9 V
Tuner
FM
Tuning Range 65 - 108 MHz, 87.5 - 108.0 MHz
Intermediate Frequency 10.7 MHz
Antenna Telescopic antenna
AM
Tuning Range 522 - 1620 kHz or 520 - 1720 kHz
Antenna Ferrite bar antenna
CD
Frequency response 100 - 18000 Hz
Signal-to-noise ratio 55 dB
T.H.D 0.5 %
Cassette tape player
Recording System AC Bias Magnet Erase
Frequency Response 125 - 8000 Hz
Signal to Noise Ratio 40 dB
USB
Version 1.1
No power
POWER
The power cord is not plugged in.
The battery is not remaining.
Plug in the power cord.
Change the battery with a new
one.
No sound
Some noise
occurs.
RADIO
The function switch is not set to
the Radio mode.
There are electronic devices near
the player.
Set the switch to the Radio mode.
Set the player far from the
devices.
The unit does not
start playback
CD
An unplayable disc is inserted.
The disc is placed upside down.
The disc is not placed within the
guide.
The disc is dirty.
Insert a playable disc.
Place the disc with the playback
side down.
Place the disc on the disc tray
correctly inside the guide.
Clean the disc.
Unable to record
TAPE
Record protect tabs are removed. Cover holes on back edge of tape
with tap.
Remote control
The remote control
does not work
properly.
The remote control is too far from
the unit.
There is an obstacle in the path of
the remote control and the unit.
The battery in the remote control is
exhausted.
Operate the remote control within
about 23 ft (7 m).
Remove the obstacle.
Replace the battery with new one.

2
GRAVADOR PORTÁTIL DE CD/ CASSETE ] MANUAL DO PROPRIETÁRIO
CUIDADO : PARA REDUZIR O RISCO DE CHOQUE ELÉCTRICO, NÃO RETIRE A
TAMPA OU A PARTE DE TRÁS DESTE PRODUTO. NÃO EXISTEM COMPONENTES
PRONTAS A UTILIZAR PELO UTILIZADOR NO INTERIOR. CONSULTE O SERVIÇO
DE MANUTENÇÃO PARA REQUISITAR PESSOAL DE ASSISTÊNCIA QUALIFICADO.
Esta luz intermitente com um símbolo de seta num triângulo equilátero pre-
tende alertar o utilizador para a presença de voltagem perigosa não isolada
no interior do produto, que pode ser de magnitude suficiente para constituir
um risco de choque eléctrico para pessoas.
O ponto de exclamação dentro de um triângulo equilátero pretende alertar
o utilizador para a presença de importantes instruções de funcionamento e
manutenção (assistência) na literatura que acompanha este produto.
AVISO: PARA REDUZIR O RISCO DE FOGO OU CHOQUE ELÉCTRICO, NÃO
EXPONHA ESTE PRODUTO A CHUVA OU A HUMIDADE.
AVISO: Não instale este equipamento num espaço confinado, como uma prateleira
de livros ou uma unidade similar.
CUIDADO: Não bloqueie as aberturas de ventilação. Instale de acordo com as
instruções do fabricante.
As ranhuras e aberturas na caixa são fornecidas para a ventilação, para garantir um
funcionamento fiável do produto e para o proteger do sobreaquecimento.
As aberturas nunca devem ser bloqueadas, colocando o produto numa cama, sofá,
tapete ou noutra superfície semelhante. Este produto não deve ser colocado numa
instalação embutida, como uma estante ou uma prateleira, a menos que seja
fornecida ventilação adequada ou que tenham sido respeitadas as instruções do
fa-bricante.
CUIDADO:
Este produto utiliza um Sistema Laser.
Para garantir a utilização correcta deste produto, por favor leia cuidadosamente este
manual de instruções e conserve-o para futura referência. Se a unidade requerer
manutenção, contacte um centro de assistência autorizado. O uso de controlos,
ajustamentos ou procedimentos que não estejam aqui especificados pode resultar
numa exposição perigosa à radiação. Para evitar a exposição directa ao feixe laser,
não tente abrir o invólucro do aparelho. Radiação laser visível ao abrir. NÃO OLHE
FIXAMENTE PARA O FEIXE.
CUIDADO: O aparelho não deve ser exposto a água (gotas ou salpicos), nem
deverão ser colocados objectos cheios de líquido, como jarras, sobre o aparelho.
PRECAUÇÕES com o Cabo Eléctrico
É recomendável para a maioria dos aparelhos a sua instalação num circuito
dedicado;
Trata-se de um circuito com uma tomada individual que fornece energia apenas a
esse aparelho e que não possui saídas adicionais ou circuitos ramificados. Consulte
a página de especificações deste manual do proprietário em caso de dúvidas.
Não sobrecarregue as tomadas de parede. As tomadas de parede sobrecarregadas,
soltas ou danificadas, cabos de extensão fissurados ou danificados e isolamentos
rachados dos fios são perigosos. Qualquer uma destas situações pode causar
choques eléctricos ou fogo. Inspeccione regularmente o cabo do seu aparelho e, se
este apresentar sinais de danos ou deterioração, desligue-o, suspenda a utilização
do aparelho e proceda à substituição do cabo por outro cabo de origem, por um
agente de reparação autorizado.
Proteja o cabo eléctrico contra danos físicos ou mecânicos, tais como ao ser
dobrado, torcido, pisado, preso por uma porta ou calcado. Preste atenção sobretudo
às fichas, às tomadas de parede e ao ponto em que o cabo sai da aplicação.
Para desligar a alimentação da tomada eléctrica, puxe o cabo eléctrico. Quando
instalar o produto, certifique-se de que o coloca de forma a que ficha fique facilmente
acessível.
Precauções de Segurança
CUIDADO
RISCO DE CHOQUE
ELÉCTRICO NÃO ABRIR

GRAVADOR PORTÁTIL DE CD/ CASSETE ] MANUAL DO PROPRIETÁRIO
3
Índice
Fonte de alimentação 4
Informações sobre o Controlo Remoto 5
Ouvir CD 6
Ouvir cassetes 6
Ouvir rádio 7
Ouvir música com o seu leitor portátil 8
Reproduzir música com USB 8
Gravação 9
Acertar o relógio 10
Resolução de Problemas 11
Especificações 11
O seu GRAVADOR DE CASSETES pode fazer muito mais
Gravação
Consulte a página 9
Ouvir rádio
Consulte a página 7
Reproduzir CD
Consulte a página 6
Reproduzir
cassetes
Consulte a página 6
Reproduzir música
com USB
Consulte a página 8
Ouvir música com o seu
leitor portátil - Conecte o
cabo á parte traseira da
unidade.
Consulte a página 8
Ficha dos auscultadores
PORTUGUÊS

4
GRAVADOR PORTÁTIL DE CD/ CASSETE ] MANUAL DO PROPRIETÁRIO
NOTA:
• Desligue o cabo eléctrico AC da tomada, se não pretender utilizar o
aparelho durante um longo período de tempo.
• Para evitar danos causados por possíveis derramamentos das pilhas,
remova as pilhas se não pretender utilizar a unidade durante longos
períodos de tempo.
• Quando as pilhas estiverem fracas, substitua todas as pilhas por
novas.
• Enquanto a unidade estiver ligada com o cabo eléctrico AC à tomada,
as pilhas não se gastam.
1. Antes de conectar o cabo de alimentação AC,
verifique se voltagem em utilização da unidade é
idêntica á voltagem do seu provedor local.
2. Conecte uma extremidade do cabo de alimentação
AC (incluído) ao Adaptador AC IN localizado na
traseira da sua unidade.
3. Ligue a outra extremidade à tomada eléctrica.
1. Prima e abra o compartimento das pilhas.
2. Coloque seis pilhas tipo “C” (R14) (não fornecidas) no
compartimento, certificando-se de que as polaridades
33
e
##
ficam devidamente posicionadas.
3. Volte a colocar a tampa do compartimento das pilhas no
lugar.
Colocação das Pilhas
Ligação do Cabo Eléctrico AC
Fonte de alimentação
Insira as pilhas no controlo remoto
Certifique-se de que as polaridades + (positiva)
e - (negativa) das pilhas (tamanho AAA)
correspondem com as indicadas no controlo
remoto.

GRAVADOR PORTÁTIL DE CD/ CASSETE ] MANUAL DO PROPRIETÁRIO
5
Informações sobre o Controlo Remoto
Regulação da qualidade de som
Pode escolher impressões de som.
Ligar ou desligar
Para entrar no modo de poupança de energia
pressione e aguarde.
Procurar uma pasta de ficheiros MP3/WMA
Quando um CD com ficheiros MP3/WMA em
várias pastas estiver a ser reproduzido, prima
PRESET/FOLDER para seleccionar a pasta que
pretende reproduzir.
Seleccione um ‘número predefinido’ para uma
estação de rádio
(consulte a secção Ouvir rádio / page 7)
Ouvir as faixas repetidamente
Pressione MODE repetidamente, pode desfrutar
da música repetidamente ou aleatoriamente.
.bb/BB> : Procurar / Ignorar a estação
de rádio, música e ficheiros.
BB
/
[]
: • CD / USB - Inicia ou faz uma pausa na
reprodução
• Cassete - Avançar / Reprodução inversa
x
: Interrompe a reprodução ou gravação
XDSS
Pressione XDSS para reforçar o treble, bass e o
efeito ambiente.
Para memorizar estações de rádio
(consulte a secção Ouvir rádio / page 7)
Ouça as faixas que pretender por qualquer
ordem
(Consulte a secção Ouvir CD / page 6)
Adormecer a ouvir o seu leitor
VSM (Virtual Sound Matrix)
Emudece temporariamente o som
Prima o botão novamente para o som voltar a ser
emitido.
Regule o volume quando utilizar qualquer função.
Para modificar as funções ou entradas
(TUNER, USB, PORTABLE, CD, TAPE)
Consulte informações sobre a sua música
Os ficheiros MP3/WMA normalmente são
apresentados com etiquetas. A etiqueta fornece
informações sobre o Título, o Intérprete, o Álbum
ou a Duração. Prima a tecla INFO durante a
reprodução de um ficheiro para aceder
a estas informações.
Começa a gravação

6
GRAVADOR PORTÁTIL DE CD/ CASSETE ] MANUAL DO PROPRIETÁRIO
Ouvir cassetes
1. Seleccione a função CASSETE
2. Abra a porta do compartimento
para cassetes
3. Introduza a cassete
4. Feche a porta do compartimento
para cassetes
5. Inicie a reprodução da cassete
6. Como interromper a reprodução
da cassete
O leitor de cassetes detém-se
automaticamente no fim da cassete.
FUNCTION
PUSH EJECT
b / B
x
FUNCTION
BB
/
[]
x
Ouvir cassetes - o que mais pode fazer
Reproduzir durante Avanço ou Retrocesso
Após pressionar .bb/BB> durante a reprodução, ou parado,
pressione b / B quando quiser.
MODO INVERSÃO AUTOMÁTICO
Pode definir a cassete para reproduzir apenas 1 lado , até ao final da
cassete ou ambos os lados , pressionando MODE no controlo
remoto uma ou mais vezes.
Ouvir CD
Ouvir um CD - o que mais pode fazer
Fazer uma pausa na reprodução ou reiniciar o CD
Pressione CD PAUSE na unidade ou
BB
/
[]
no controlo remoto durante a
reprodução. Pressione
BB
na unidade ou
BB
/
[]
no controlo remoto para
continuar a reprodução.
Procurar uma determinada secção numa faixa
Pressione e aguarde .bb/BB>
durante a reprodução
.
Procura rápida de faixas
Pressione e aguarde .bb/BB>
apenas com o estado parado. A faixa
salta continuamente de cada vez.
Saltar para outra faixa
Pressione .bb/BB>
apenas no estado parado.
Ouvir as suas faixas por qualquer ordem
Pode ouvir até 40 faixas num CD pela ordem que escolher. Insert a CD
and wait for it to be read. Pressione e aguarde PROG e utilize
.bb/BB> para seleccionar a faixa. Prima PROG novamente para
guardar e seleccionar a faixa seguinte. Prima
BB
/
[]
. Para apagar a sua
selecção, prima
xx
duas vezes. Reproduzir musica utilizando USB, pode
igualmente ajustar este programa.
O CD de áudio e o CD de MP3/WMA podem ser reproduzidos neste leitor.
1. Abra a porta do compartimento
do CD:
2. Introduza o CD: Com a etiqueta
voltada para cima.
3. Feche a porta do compartimento
do CD:
4. Seleccione a função de CD:
5. Inicie a reprodução do CD:
6.
Como terminar a reprodução do CD
:
NO LEITOR
NO CONTROLO
REMOTO
Z CD OPEN
Z CD OPEN
FUNCTION
BB
xx
FUNCTION
BB
/
[]
xx
NO LEITOR
NO CONTROLO
REMOTO

GRAVADOR PORTÁTIL DE CD/ CASSETE ] MANUAL DO PROPRIETÁRIO
7
Ouvir rádio
O que mais pode fazer quando ouve rádio
Procurar automaticamente estações de rádio
Pressione e aguarde TUNING (-)/TUNING (+) no reprodutor ou
TUN - /TUN + no controlo remoto. O sintonizador faz automaticamente a
pesquisa e pára ao encontrar uma estação de rádio.
Elimina todas as estações memorizadas
Pressione e aguarde
xx
dois segundos. “CLEAR” aparecerá. Pressione
xx
na unidade para apagar todas as estações guardadas.
1. Seleccione FM ou AM:
2. Seleccione a estação de rádio:
3. Para ‘memorizar’ uma estação
de rádio: Será apresentado no
visor um número predefinido.
4. Como seleccionar uma estação
‘memorizada’:
5. Para confirmar, prima: Podem
ser memorizadas até 50 estações
de rádio. (AM:20, FM:30)
NO LEITOR
NO CONTROLO
REMOTO
FUNCTION
TUNING (-)/
TUNING (+)
Pressione e
aguarde
PROG
b / B
PROG
FUNCTION
TUN.- / TUN.+
Pressione e
aguarde
PROG
PRESET/FOLDER
PROG

8
GRAVADOR PORTÁTIL DE CD/ CASSETE ] MANUAL DO PROPRIETÁRIO
Ouvir música com o seu leitor
portátil
O leitor pode ser utilizado para reproduzir música a partir de diversos
tipos de leitores portáteis.
1. Conecte o reprodutor portátil
ligando a unidade em
PORTABLE IN no reprodutor.
2.
Ligue o fornecimento de energia:
3.
Seleccione a função PORTABLE:
4. Ligue o leitor portátil e inicie a
reprodução:
NO LEITOR
NO CONTROLO
REMOTO
11
/
]]
FUNCTION
POWER
INPUT
Reproduzir música com USB
NOTAS :
• Alguns dispositivos portáteis não são compatíveis com este sistema.
• Quando vários cartões estão ligados ao leitor de cartões de memória,
é reconhecido o primeiro cartão detectado.
• Não remova o dispositivo USB durante o funcionamento.
• É necessário efectuar uma cópia de segurança para prevenir danos nos
dados.
• Se utilizar uma extensão USB ou um hub USB, o dispositivo USB pode
não ser reconhecido.
• Um dispositivo que utilize um sistema de ficheiros NTFS não será
suportado (Só são admitidos sistemas de ficheiros FAT (16/32)).
• Câmaras digitais e telemóveis não são suportados.
• A porta USB da unidade não pode ser ligada ao PC. A unidade não pode
ser utilizada como dispositivo de armazenamento.
• USBs do tipo HDD poderão não funcionar correctamente quando não
tiverem energia independente.
• Para reproduzir a partir da primeira faixa, pressione
xx
duas vezes
durante a reprodução CD/USB.
1.
Ligue o leitor portátil ao sistema
com um cabo USB (não fornecido).
2. Seleccionar a função USB:
O visor apresentará a mensagem
CHECKING, seguida pelo número
de ficheiros apresentados:
3. Comece a reprodução do USB:
4.
Para parar a reprodução do USB:
5. Antes de desligar o leitor
portátil de USB, passe para
outra função, premindo:
6. Remova o leitor USB:
FUNCTION
BB
xx
FUNCTION
INPUT
BB
/
[]
xx
FUNCTION
ou
INPUT
NO LEITOR
NO CONTROLO
REMOTO

GRAVADOR PORTÁTIL DE CD/ CASSETE ] MANUAL DO PROPRIETÁRIO
9
A realização de cópias não autorizadas de material protegido por
direitos de autor, incluindo programas de computador, ficheiros,
difusões e gravações de som, pode ser considerada uma
infracção dos direitos de autor e constituir uma ofensa criminal.
Este equipamento não deve ser utilizado para estes fins.
Seja responsável
Respeite os direitos de autor
Gravação
Gravar para USB ou Cassete.
Conecte USB ou introduza a cassete virgem no reprodutor antes de
iniciar a gravação.
1. Seleccione o modo em que
quer gravar e reproduzir
2. Para iniciar a Gravação:
3. Seleccione USB/ TAPE
NO LEITOR
NO CONTROLO
REMOTO
FUNCTION
zz //
[]
.bb/BB>
t
zz //
[]
.bb/BB>
t
zz //
[]
xx
FUNCTION
or
INPUT
zz //
REC
.bb/BB>
t
zz //
REC
.bb/BB>
t
zz //
REC
xx
5. Parar a gravação
Gravação - o que mais pode fazer
Pausar a gravação
Pressione
zz //
[]
quando esta a gravar para uma cassete.
Ajuste a velocidade de gravação
Velocidade normal - Pressione
zz //
[]
no estado de reprodução para
gravar o CD para o USB a uma velocidade normal ex: Reprodução e
gravação em tempo real.
Alta velocidade - Pressione
zz //
[]
no estado parado para gravar de CD
para USB a alta velocidade. Durante a gravação a alta velocidade não
existirá saída de som da coluna.
Gravar a sua voz
Na função TAPE, pressione
zz //
[]
. Depois “MIC REC” irá aparecer.
Grave a sua voz. Para terminar a gravação pressione
xx
.
NOTAS
• Durante a gravação de MP3 / WMA, o visor mostrará a percentagem do
progresso de gravação “XX [ 100 ]” após cada ficheiro gravado.
• Durante a gravação de MP3 / WMA não existirá saída de som da coluna.
• Não pode gravar emissões de rádio para USB.
4. Gravação para USB
Seleccione ONE (Um) / ALL (Todos)

10
GRAVADOR PORTÁTIL DE CD/ CASSETE ] MANUAL DO PROPRIETÁRIO
Utilizar o seu leitor como um despertador
Prima e mantenha premido TIMER no leitor durante dois segundos. Cada
function, TUNER, CD, USB, TAPE pisca durante dois segundos. Prima
CD PAUSE/SET no leitor quando aparecer a função com que desejar
despertar.
Se seleccionar TUNER, serão apresentadas as estações que tem
memorizadas como predefinições. Use .bb/BB> no leitor para
seleccionar a estação que deseja, e depois prima CD PAUSE/SET.
Será apresentada a informação da ON TIME. É neste momento que pode
programar a hora a que pretende que o alarme se desligue. Use
.bb/BB> no leitor para alterar as horas e os minutos, e prima
CD PAUSE/SET para guardar.
Será apresentada a informação da OFF TIME. É aqui que regula a hora
em que pretende desligar a função. Use .bb/BB> no leitor para
alterar as horas e os minutos, e prima CD PAUSE/SET para guardar.
A seguir, será apresentado o nível de volume (VOL) com o qual pretende
ser acordado. Use V / v no leitor para alterar o volume, e prima
CD PAUSE/SET para guardar. Desligue o sistema. O ícone do relógio
demonstra que o alarme está programado.
Quando o sistema estiver desligado, pode verificar a hora para a qual o
alarme está programado, premindo TIMER. Pode também ligar e desligar
o alarme, premindo TIMER. Para programar o alarme para desligar a uma
hora diferente, ligue o sistema e reprograme o alarme, seguindo os
mesmos passos indicados inicialmente.
Acertar o relógio
1. Prima pelo menos durante 2 segundos:
2. Seleccione entre: AM 12:00 (para apresentação de
am e pm) ou 0:00 (para apresentação de 24 horas).
3. Confirme a sua selecção:
4. Seleccione as horas:
5. Prima:
6. Seleccione os minutos:
7. Prima:
NO LEITOR
CLOCK
.bb/BB>
CD PAUSE/SET
.bb/BB>
CD PAUSE/SET
.bb/BB>
CD PAUSE/SET
Adormecer a ouvir o seu leitor
Pressione SLEEP no controlo remoto uma ou mais vezes para seleccionar
o tempo de atraso e o leitor apagar-se-á. Pressione SLEEP no controlo
remoto repetidamente, pode ajustar o tempo de 90 a 10 minutos.
Regulação da qualidade de som
Pode escolher impressões de som. Prima EQ no controlo
remotorepetidamente. O ecrã muda pela ordem seguinte:
FLAT
→
POP
→
ROCK
→
CLASSIC
VSM (Virtual Sound Matrix)
Pode seleccionar o som Virtual. Prima VSM no controlo remoto para definir
o som virtual.
Informações sobre MP3/WMA
A compatibilidade do Disco MP3/WMA com esta unidade é limitada
como se ilustra a seguir:
• Frequência de Amostragem 8 - 48kHz(MP3), 32 - 48kHz(WMA)
• Taxa de Bits 8 - 320kbps(MP3), 48 - 320kbps(WMA)
• O formato físico do CD-R deve ser “ISO 9660”
• Se gravar ficheiros MP3/WMA, utilizando o software que não consegue
criar um FILE SYSTEM (SISTEMA DE FICHEIROS), como por exemplo
“Direct-CD” etc., será impossível reproduzir ficheiros MP3.
Recomenda-se a utilização de “Easy-CD Creator”, o qual cria um sistema
de ficheiros ISO 9660.
• Não utilize caracteres especiais como “/ : * ? “ < >”etc.
• Suporta até 99 ficheiro, e cada um pode conter até 999 faixas de som.
• Tem de definir a opção de formato de disco (Mastered) para que os dis-
cos sejam compatíveis com reprodutores LG quando formatando discos
regraváveis.
Quando é definida a opção de Live File System, não pode utiliza-lo em
reprodutores LG.
(Mastered/Live File System: Sistemas de formato de disco para Windows
Vista)
La page est en cours de chargement...
La page est en cours de chargement...
La page est en cours de chargement...
La page est en cours de chargement...
La page est en cours de chargement...
La page est en cours de chargement...
La page est en cours de chargement...
La page est en cours de chargement...
La page est en cours de chargement...
La page est en cours de chargement...
La page est en cours de chargement...
La page est en cours de chargement...
-
 1
1
-
 2
2
-
 3
3
-
 4
4
-
 5
5
-
 6
6
-
 7
7
-
 8
8
-
 9
9
-
 10
10
-
 11
11
-
 12
12
-
 13
13
-
 14
14
-
 15
15
-
 16
16
-
 17
17
-
 18
18
-
 19
19
-
 20
20
-
 21
21
-
 22
22
-
 23
23
-
 24
24
-
 25
25
-
 26
26
-
 27
27
-
 28
28
-
 29
29
-
 30
30
-
 31
31
-
 32
32


LG LPC53 Le manuel du propriétaire
- Catégorie
- Lecteur CD
- Taper
- Le manuel du propriétaire
- Ce manuel convient également à
dans d''autres langues
- English: LG LPC53 Owner's manual
- português: LG LPC53 Manual do proprietário
Documents connexes
-
LG MDS714 Le manuel du propriétaire
-
-
LG MCD23 Le manuel du propriétaire
-
-
-
LG XB64 Le manuel du propriétaire
-
-
-
-
Autres documents
-
Sanyo MCD-UB685M Manuel utilisateur
-
Muse M-182RDC Le manuel du propriétaire
-
Muse M-182 RDC Le manuel du propriétaire
-
-
TEAC DR-H300 Le manuel du propriétaire
-
-
-
Sunstech RPS411 Mode d'emploi
-
 MATRIX Labs MATRIX.C1.EU Manuel utilisateur
-
 MATRIX Labs MATRIX.C1.US Manuel utilisateur

