Bosch HBN756AUC/01 Manuel utilisateur
- Catégorie
- Fours
- Taper
- Manuel utilisateur

BOSCH 700 SERIES WALL OVENS
Use and Car
e Manual

Table of Contents
Important Safety Instructions
.....................................................................................
1
Getting Started
.............................................................................................................
2
To Set the Clock
........................................................................................................................................
To Set the Clock ........................................................................................................................................To Set the Clock
2
T
o Use the Oven Lights
To Use the Oven Lights T
..............................................................................................................................
2
Oven Parts and Accessories
........................................................................................................................
3
Oven Control Panel
....................................................................................................................................
4
Command buttons
.....................................................................................................................................
4
Display
.....................................................................................................................................................
4
Other Features
..........................................................................................................................................
4
General Oven Tips
........................................................................................................
5
Suggestions for Use
...................................................................................................................................
5
About Convection Cooking
.........................................................................................................................
5
Oven Operation Overview
..........................................................................................................................
5
Preheating the Oven
..................................................................................................................................
5
Bakeware
.................................................................................................................................................
5
Oven Racks
...............................................................................................................................................
6
Selecting the Rack Position
........................................................................................................................
6
Using Multiple Racks
..................................................................................................................................
8
Condensation
............................................................................................................................................
8
Temperature Sensor
..................................................................................................................................
8
High Altitude Baking
..................................................................................................................................
8
Food Serving Temperature Guidelines from FSIS
..........................................................................................
8
Setting the Oven
..........................................................................................................
9
To Select Upper or Lower Oven
..................................................................................................................
9
To Set the Cooking Mode
...........................................................................................................................
9
To Set the Timer
.......................................................................................................................................
9
To Set the Cooking Mode
..........................................................................................................................
9
Timed Cooking Modes
...............................................................................................................................
9
Oven Modes
..................................................................................................................
1
0
Bake
.........................................................................................................................................................
1
0
Warm
.......................................................................................................................................................
1
0
Convection Bake
........................................................................................................................................
1
1
Broil
.........................................................................................................................................................
1
2
Convection Broil
........................................................................................................................................
1
3
Dehydrate
.................................................................................................................................................
1
4
Convection Roast
......................................................................................................................................
1
5
T
he Probe
.................................................................................................................................................
1
6
Care
..............................................................................................................................
17
Self-Cleaning
.............................................................................................................................................
1
7
Cleaning Oven Surfaces
............................................................................................................................
1
9
Maintenance
.................................................................................................................
19
Replacing the Oven Light
...........................................................................................................................
1
9
Removing the Oven Door
...........................................................................................................................
2
0
Do-It-Yourself Procedures
...........................................................................................
2
1
To Lock Keys:
............................................................................................................................................
2
1
To Activate Sabbath Mode:
.........................................................................................................................
2
1
To Change Temperature Calibration
............................................................................................................
2
1
To Change Display Language
......................................................................................................................
2
1
To Change Temperature Format
................................................................................................................
2
1
To Change Clock Format
............................................................................................................................
2
2
To Change Beep Volume
............................................................................................................................
2
2
To Hide Clock:
...........................................................................................................................................
2
2
To Change Back to Default Settings
............................................................................................................
2
2
To Change Operating Voltage
.....................................................................................................................
2
2
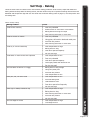
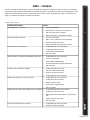
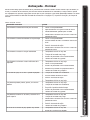
Self Help - Baking
......................................................................................................................................
2
3
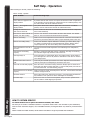
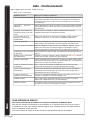
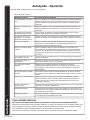
Self Help - Operation
.................................................................................................................................
2
4
Service
..........................................................................................................................
2
4
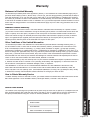
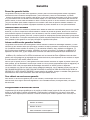
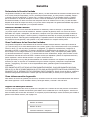
Warranty
..................................................................................................................................................
2
5

English • 1
Operating the Oven
Care and Maintenance
Self Help
Getting Started
Operating the Oven
Operating the Oven
Care and Maintenance
Self Help
Self Help
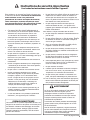
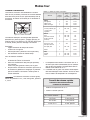
When properly cared for, your new Bosch oven
has been designed to be a safe, reliable appliance.
Read all instructions carefully before using this
oven. These precautions will reduce the risk of
burns, electric shock, fi re and injury to persons.
When using kitchen appliances, basic safety
precautions must be followed, including the
following:
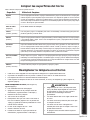
Important Safety Instructions
Please read all instructions before using this appliance.
Continued on next page
• Do not allow children to use this appliance unless
closely supervised by an adult. Children and pets
should not be left alone or unattended in the area
where the appliance is in use. Never allow children
to sit or stand on any part of the oven.
• Do not store items of interest to children above the
oven. If children should climb onto the appliance to
reach these items, they could be seriously injured.
To reduce the risk of fi re in the oven cavity:
1. Do not store fl ammable materials in or near the
oven.
2. Do not use water on a grease fi re. Smother fi re or
use a dry chemical or foam-type extinguisher.
3. Have a fi re extinguisher readily available and highly
visible next to any cooking appliance. Be sure you
know how to use it.
4. Do not overcook food. Carefully attend oven if
paper, plastic or other combustible materials are
placed inside the oven.
5. Do not use the cavity for storage purposes. Do not
leave paper products, cooking utensils or food in
the cavity when not being used.
6. If materials inside the oven should ignite, keep
oven door closed. Turn oven off and disconnect the
circuit at the circuit breaker box.
7. Do not block any vent openings.
8. Be sure the blower fan runs when the oven is in
operation. If the fan does not operate, do not use
the oven. Call an authorized service center.
9. Never use the oven to warm or heat a room. This
can damage the oven parts.
10. For personal safety, wear proper clothing. Loose
fi tting garments or garments with hanging sleeves
should never be worn while using this appliance.
• This appliance must be properly installed and
grounded by a qualifi ed technician. Connect only to
properly grounded outlet. See electric preparation
and connection instructions in the Installation
Instructions.
• This appliance should be serviced only by a
qualifi ed service technician. Contact the nearest
authorized service center for examination, repair or
adjustment.
• Do not repair or replace any part of the oven
unless specifi cally recommended. Refer service to
an authorized service center.
• Do not operate this appliance if it is not working
properly or if it has been damaged, until an
authorized technician has examined it.
• Install or locate this appliance only in accordance
with the Installation Instructions.
• Use this oven only as intended by the
manufacturer. If you have any questions, contact
the manufacturer.
• Do not cover or block any openings on this
appliance.
• Use this appliance only for its intended use as
described in this manual. Do not use corrosive
chemicals, vapors, or nonfood products in this
appliance. This type of oven is specifi cally designed
to heat or cook. It is not designed for industrial or
laboratory use. The use of corrosive chemicals in
heating or cleaning will damage the appliance.
• In the event that personal clothing or hair catches
fi re, DROP AND ROLL IMMEDIATELY to extinguish
fl ames.
• This oven is intended for residential use only. It is
not approved for outdoor use.
The California Safe Drinking Water and Toxic
Enforcement Act requires businesses to warn
customers of potential exposure to substances
which are known by the State of California to
cause cancer or reproductive harm.
The elimination of soil during self-cleaning
generates some by-products which are on this list
of substances.
To minimize exposure to these substances, always
operate this oven according to the instructions in
this manual and provide good ventilation to the
room during and immediately after self-cleaning
the oven.
WARNING
REGARDING PET BIRDS
Birds have very sensitive respiratory systems. Keep
pet birds out of the kitchen or other rooms where
kitchen fumes could reach them. During Self-
Clean mode, fumes that may be harmful to birds
are released. Other kitchen fumes, such as from
overheating margarines and cooking oils, may also
be harmful.

2 • English
Operating the Oven
Care and Maintenance
Self Help
Getting Started
Operating the Oven
Care and Maintenance
Self Help
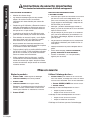
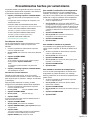
SAFETY PRECAUTIONS
• Tie long hair so that it doesn’t hang loose.
• The heating elements may be hot even though
they are dark in color. Interior surfaces of an oven
become hot enough to cause burns.
• During and after use, do not press or let clothing
or other fl ammable materials contact the heating
elements or the interior surfaces of the oven until
they have had suffi cient time to cool.
• The trim on the top and sides of the oven door
may become hot enough to cause burns.
• Use care when opening the door. Open the door
slightly to let hot air or steam escape before
removing or replacing food.
• Do not heat unopened food containers. Buildup
of pressure may cause the container to burst and
result in injury.
• Always place oven racks in desired location while
oven is cool. If a rack must be moved while oven
is hot, do not let potholder contact the heating
elements.
• Use only dry potholders. Moist or damp potholders
on hot surfaces may result in burns from steam. Do
not let potholders touch hot heating elements. Do
not use a towel or other bulky cloth.
SAFETY PRECAUTIONS WITH SELF-CLEANING
OVEN
• Confi rm that the door locks and will not open once
the door lock icon appears.
If door does not lock,
press OVEN OFF and do not run Self-Clean.
Phone
800-944-2904 for service.
• Note: During a normal Self-Clean and a Delayed
Self-Clean cycle, the door locks within 25 to 30
seconds after start is pressed.
• Do not clean the door gasket. It is essential for
a good seal. Care should be taken not to rub,
damage, move or remove the door gasket.
• Do not use commercial oven cleaners or oven liner
protective coatings of any kind in or around any
part of the oven.
• Clean only oven parts listed in this manual.
• Before self-cleaning the oven,
remove the
broiler pan, all oven racks, other utensils and
excess soft spillage.
• Listen for fan. If no fan is heard, call for service.
Important Safety Instructions
Please read all instructions before using this appliance.
To Use the Oven Lights:
1.
Press LIGHT
to turn the oven lights on or off.
In double ovens, the lights in both ovens will turn
on or off together. To control the lights in one oven
only:
1.
Press UPPER/LOWER
to select the oven
Press UPPER/LOWER to select the ovenPress UPPER/LOWER
2.
Press LIGHT
to turn lights on or off.
Oven lights turn on automatically when:
•
the door is opened.
•
the oven is turned on.
Oven lights will turn off automatically when:
•
the oven is turned off.
•
the oven mode is cancelled.
The lights do not operate in the Self-Clean mode.
Getting Started
To Set the Clock:
1.
Press
TIME
. TIMER fl ashes in the display.
2.
Tu
rn knob
to select CLOCK.
3.
Press TIME.
4.
Turn knob
to set TIME.
Note: Clock advances in ten minute increments.
Turn knob back (counterclockwise) once to switch
to one minute increments.
5.
Press
S
TART.

English • 3
Operating the Oven
Care and Maintenance
Self Help
Getting Started
Operating the Oven
Operating the Oven
Care and Maintenance
Self Help
Self Help
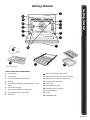
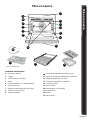
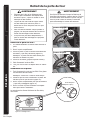
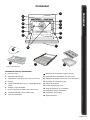
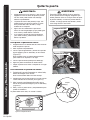
10
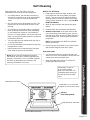
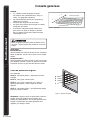
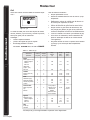
Oven Cooling Vents (both ovens)
11
Automatic Door Lock Latch (one per oven)
12
Halogen Oven Lights (2 in each oven)
13
Convection Fan and Cover
14
Door Hinge
15
Removable Oven Door
16.
Literature Pack (not shown)
17.
Probe Receptacle
18.
Probe
19.
Extendable Rack
1
Control Panel
2
Door Handle
3
Oven Door Gasket (one per oven)
4
Window
5
Removable Oven Racks; 3-6 depending on oven
model
6
Broiler Pan and Grid
7
Rack Position Guides (4 in each oven)
8
Broil Element (one in each oven)
9
Data Plate
Getting Started
8
2
7
9
4
10
11
12
13
14
15
1
3
Oven Parts and Accessories:
Figure 1: Oven Parts
17
18
5
19
6

4 • English
Operating the Oven
Care and Maintenance
Self Help
Getting Started
Operating the Oven
Care and Maintenance
Self Help
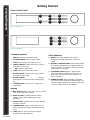
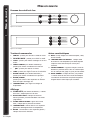
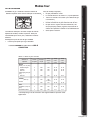
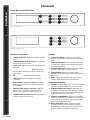
Oven Control Panel
S t
ar
S tarS t
t
artar
Up
pe
r/
Lo
we
r
Te
mp
er
at
erater
ur
aturat
e
C
ook
in
g
Mo
de
Ti
me
Li
gh
t
+
–
Lo
we
r
C a
nc
el
U
ppe
r
C a
nc
el
Figure 3: Single Ovens
S t
ar
S tarS t
t
artar
Cancel
Te
mp
er
at
erater
ur
aturat
e
C
ook
in
g
Mo
de
Ti
me
Li
gh
t
+
–
Command buttons
1.
C
ANCEL
: Press to end current mode.
2.
C
OOKING MODE
: Press to select mode.
3.
L
IGHT
: Press to turn oven lights on or off.
4.
LOWER CANCEL
(double ovens only)
:
Press to
end mode in lower oven.
5.
ST
ART
STARTST
: Press to begin mode.
6.
TIM
E:
Press to set time of day, timer.
7.
UPPER CANCEL
(double ovens only)
:
Press to
end mode in upper oven
8.
UPPER/LOWER
(double ovens only)
UPPER/LOWER (double ovens only)UPPER/LOWER
:
Press to
select upper or lower oven before setting lights,
etc.
9.
TEMPERATURE:
Press to set or change oven
temperature.
Display
10.
BOX ICONS
(double ovens only): Icons to right of
time. Show which oven is active.
11.
DISPLAY TEXT:
Indicates active functions
(steady) and functions awaiting user input
(blinking).
12.
LOCK ICONS:
Display below box icons. Indicate
that door is locked.
13.
TEMPERATURE:
Digits in upper left corner of
display. Displays the chosen temperature for the
oven.
14.
TIME:
Digits in lower left corner of display.
Displays time of day and timer.
Other Features
15.
BEEPS:
One beep signals that the entry is
accepted, two beeps signals that the entry is
invalid.
16.
DEFAULT TEMPERATURES:
Each cooking mode
has a default temperature that appears when the
mode is selected. The default is the most common
temperature for the mode.
17.
F NUMBER CODES
:
Appear in display when
the control detects a problem in the oven or its
electronics. See Self Help section, page 24, for
more information.
18.
SABBATH MODE:
When activated, oven bakes
for 72 hours before shutting off automatically. The
mode is Sabbath compliant for religious faiths with
“no work” requirements on the Sabbath.
Getting Started
7
Figure 2: Double Ovens
1
2
2
3
3
4
5
5
6
6
8
9
9

English • 5
Operating the Oven
Care and Maintenance
Self Help
Getting Started
Operating the Oven
Operating the Oven
Care and Maintenance
Self Help
Self Help
Preheating the Oven
• Preheat the oven when using the bake and
convection bake modes unless the recipe
recommends otherwise.
• Use fast preheat mode to shorten preheat time.
• Selecting a higher temperature does not shorten
the preheat time.
• Preheating is necessary for good results when
baking cakes, cookies, pastries and breads.
• Place oven racks in their proper position before
preheating.
• During preheat, the selected cooking temperature
is displayed.
• A beep will confi rm that the oven is preheated and
PREHEAT disappears from display.
• When operating on 208 V, preheat time may be
slightly longer.
General Oven Tips
Bakeware
• Glass baking dishes absorb heat. Reduce oven
temperature 25° F when baking in glass.
• Use pans that give the desired browning. The type
of fi nish on the pan will help determine the amount
of browning that will occur.
• Shiny, smooth metal or light nonstick/anodized
pans refl ect heat, resulting in lighter, more delicate
browning. Cakes and cookies require this type of
bakeware.
• Dark, rough or dull pans will absorb heat resulting
in a browner, crisper crust. Use this type for pies.
• For brown, crisp crusts, use dark nonstick/anodized
or dark, dull metal utensils or glass bakeware
• Insulated baking pans may increase the length of
cooking time.
• Do not cook with the empty broiler pan in the oven
as this could change cooking performance. Store
the broil pan outside of the oven.
• Use baking sheets that are 19”x14” or smaller for
best results.
About Convection Cooking
Standard cooking modes (bake, broil, etc.) use heat
radiated from one or more elements to cook food.
Convection modes use both heat from the elements
and a fan in the back of the oven to continuously
circulate the heated air throughout the oven.
The result is faster, more even cooking. Convection
modes seal in natural moisture and fl avors and can also
save time and energy since most foods can be cooked
at lower temperatures and in less time (never reduce
temperature when cooking meat).
Cook time is also reduced because multiple racks can
be used at one time. Cook several sheets of cookies or
several different dishes at the same time.
The oven also uses convection to dehydrate. The low
heat from the elements is circulated through the oven
by the convection fan to slowly remove moisture.
Refer to “Oven Modes” in this manual for further
information on each convection mode.
Note:
Convection features vary by model.
Suggestions for Use
• Use the cooking charts as a guide.
• Do not set pans on an open oven door.
• Use the interior oven light to view the food through
the oven door window rather than opening the
door frequently.
• Place pans in center of oven.
Advantages of Convection Cooking
• Even baking.
• Juices and fl avors are sealed in.
• Air-leavened foods such as cream puffs, souffl es,
meringues and yeast breads are higher and lighter.
• Multiple rack cooking with no fl avor transfer.
• No special bakeware required.
• Broiling thicker cuts of meat is possible with
convection broil.
• Saves time and energy.
Use the knob to set the mode, time or temperature.
See the Control Panel/Display and Oven Operation
sections for further details.
Operation of the oven is through multiple command
buttons and one knob.
Press the command button to select the function
(Cooking mode, time, etc).
Oven Operation Overview:
Operating the Oven

6 • English
Operating the Oven
Care and Maintenance
Self Help
Getting Familiar...
Care and Maintenance
Self Help
Getting Familiar...
Getting Familiar...
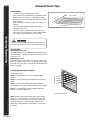
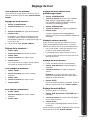
Oven Racks
• The oven has rack guides at four levels.
Rack positions are numbered from the bottom rack
guide (#1) to the top (#4). (See graphic below).
• Check cooking charts for best rack positions to use
when cooking.
• Make sure that the racks are level once they are in
position.
• The racks are designed to stop when pulled
forward to their limit.
• CAUTION! Never use aluminum foil to cover the
oven racks or to line the oven. Heat trapped under
the foil can cause damage to the oven liner.
To avoid possible burns,
place oven racks in desired positions before turning
the oven on. Always use oven mitts when the oven is
warm.
CAUTION:
To avoid possible burns,
CAUTION:
To avoid possible burns,
General Oven Tips
Back of Rack
Front of Rack
Figure 4: The Flat Rack
Insert rack with back of rack
toward back wall
2
4
3
1
Selecting the Rack Position
See graphic below.
Rack 4
- Highest position. Use for melting cheese
quickly.
Rack 3
- Use for broiling most meats and for toasting
bread.
Rack 2
- Use for pies, casseroles, breads, bundt or
pound cakes. Also use for broiling thicker cuts of meat.
Rack 1
- Lowest Position. Use for angel food cake,
large roasts, turkey and poultry.
Figure 5: Rack Positions
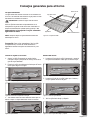
The Flat Rack
Removing from oven:
Grasp rack fi rmly on both sides and pull rack toward you.
When the stop is reached, tilt rack up and pull the rest
of the way out.
Replacing in oven:
Grasp rack fi rmly on both sides. Tilt rack up to allow stop
into rack holder. Bring rack to a horizontal position and
push the rest of the way in. Rack should be straight and
fl at, not crooked.
Note:
Always remove oven racks before self-cleaning
the oven. If racks are left in the oven during the self-
clean mode, they will lose their shiny fi nish and may
not glide smoothly. To improve glide, wipe the rack
edges with a small amount of vegetable oil, then wipe
off excess.

English • 7
Operating the Oven
Care and Maintenance
Self Help
Getting Familiar...
Care and Maintenance
Self Help
Self Help
Getting Familiar...
Getting Familiar...
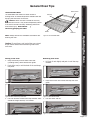
The Extendable Rack
The extendable rack allows for easier access to
cooking foods. It extends beyond the standard fl at rack
bringing the food closer to the user.
Caution:
When the rack is outside of the oven,
slide arms do not lock. They could unexpectedly extend
if the rack is carried incorrectly. Extending slide arms
could cause injury.
Rack should
only
be held or
only be held or only
carried by grasping the sides
.
Slide Arm
Handle
Pan Stop
Bottom Frame
Stop
Figure 6: The Extendable Rack
General Oven Tips
Removing from oven:
1.
Lift front of rack slightly and push in until the stop
releases.
Placing
in the oven:
1. Grasp rack fi rmly on both sides. Place rack
(including frame) above desired rack guide.
2. Push all the way in until the back of the rack drops
into place.
3. Pull both sections forward until stop activates. Rack
should be straight and fl at, not crooked.
2. Raise back of rack until frame and stop clear rack
guide.
3. Pull rack down and out.
Note:
Always remove the extendable rack before self-
cleaning the oven.
Stop Activated
Stop Activated
Stop Activated
Stop Activated
Stop Released
Stop Released
Stop Released
Stop Released
Ca
ution:
To avoid burns,
pull rack all the way out and
lift pan above handle when transferring food to and
from oven.
Figure 7: Place Rack Above Desired Rack Guide
Figure 8: Back of Rack Drops Into Place
Figure 9: Stop Activated
Figure 10: Stop Released
Figure 11: Rack Guide Cleared
Figure 12: Pull Rack Down and Out

8 • English
Operating the Oven
Care and Maintenance
Self Help
Getting Familiar...
Care and Maintenance
Self Help
Getting Familiar...
Getting Familiar...
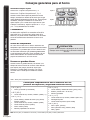
Condensation
The oven vent is located above the oven door. It is
normal to see steam escaping from the vent and
condensation may collect on areas above the vent such
as the display.
High Altitude Baking
When cooking at high altitude, recipes and cooking
time will vary from the standard. For accurate
information, write the Extension Service, Colorado
State University, Fort Collins, Colorado 80521. There
may be a charge for the bulletins.
Temperature Sensor
Your new oven has an electronic temperature sensor
that accurately maintains the temperature selected.
Your previous oven may have had a mechanical
thermostat that drifted gradually to a higher
temperature. As a result, you may need to adjust your
favorite recipes when cooking in your new oven.
140° F (60° C)
• Ham, precooked (to reheat)
145° F (63° C)
• Fresh Beef, Veal, Lamb (medium rare)
160° F (71° C)
• Ground Meat & Meat Mixtures (Beef, Pork, Veal,
Lamb)
• Fresh Beef, Veal, Lamb (medium)
• Fresh Pork (medium)
• Fresh Ham (raw)
• Egg Dishes
Food Serving Temperature Guidelines from FSIS
(USDA Food Safety & Inspection Service)
165° F (74° C)
• Ground Meat & Meat Mixtures (Turkey, Chicken)
• Stuffi ng (cooked alone or in bird)
• Leftovers & Casseroles
170° F (77° C)
• Fresh Beef, Veal, Lamb (well done)
• Poultry breasts
• Fresh Pork (well done)
180° F (82° C)
• Chicken and Turkey, (whole)
• Poultry (thighs and wings)
• Duck and Goose
Note: Eggs (alone, not used in a recipe) - cook until yolk & white are fi rm.
Table 1: Food Temperature Guidelines
General Oven Tips
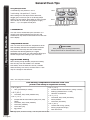
Using Multiple Racks
2 Rack baking: Use positions 1 and 3.
3 rack baking: Use positions 2, 3 and 4.
When baking four cake layers at the same time,
stagger pans so that one pan is not directly above
another. For best results, place cakes on front of upper
rack and back of lower rack (See graphic at right).
Allow 1” -1 1/2” air space around pans.
Figure 13: Multiple Rack Pan Placement
CAUTION
:
Many factors affect cooking performance.
Always check food for doneness before serving.
Rack 3
Rack 1

English • 9
Operating the Oven
Care and Maintenance
Self Help
Getting Familiar...
Care and Maintenance
Self Help
Self Help
Getting Familiar...
Getting Familiar...
To Set the Timer:
1.
Press
TIME
.
2.
Turn knob
to select timer.
3.
Press
TIME
.
4.
Turn knob
to set time.
5.
Press START
.
Beeps sound and END appears in the display when
the time ends. Press CANCEL to turn timer off.
To Set the Cooking Mode:
1.
Press
COOKING MODE.
2.
Turn knob
to select mode.
3.
Press
TEMPERATURE
.
4.
T
urn knob
to set temperature.
5.
Press START.
Oven light and oven fan turn on and PREHEAT
appears in display. When the preheat temperature
is reached, the cooking mode appears in the
display and the oven beeps.
6. To end the mode,
press CANCEL
.
Timed Cooking Modes
To Set the Timed Mode:
1. Select the cooking mode and temperature.
2.
Press
TIME
twice
. COOKTIME appears in the
display.
3.
Turn knob
to set cooking time.
Note:
Time required for the oven to reach
temperature must be included in the set cooking
time.
4.
Press START.
At the end of the programmed cooking time, the
oven turns off and beeps.
Press CANCEL.
Use timed cook to turn the oven off automatically
after cooking. Delayed cook also turns the oven on
automatically.
• In double oven models, both ovens can be set to
operate on independent timed modes.
• The clock must be set to the correct time of day.
• The timed mode turns off the oven at the end of
the cook time.
To Set the Delayed Mode:
1. Follow steps 1 through 3 above.
2.
Press
T
IME
aga
in
.
STOPTIME
appears in the
display.
3.
Turn knob
to enter the time of day for the oven
to stop cooking.
4.
P
ress
START.
The oven automatically calculates the time of day
to start.
At the end of the programmed cooking time, the oven
turns off and beeps.
Press CANC
EL.
To Set the Cooking Mode using Fast
Preheat:
1.
Press COOKING MODE.
2.
Turn knob
to select FAST PREHEAT BAKE or FAST
PREHEAT CONV BAKE.
3.
Press
TEMPERATURE
.
4.
Turn knob
to set temperature.
5.
Press START
.
When the preheat temperature is reached, the
oven beeps once and PREHEAT disappears from
the display.
Setting the Oven
To Change the Timer:
1.
Press
TIMER
.
2.
Turn knob
to select change timer.
3.
Press
TIME
.
4.
Turn knob
to set time.
5.
Press START
.
To Cancel the Timer:
1.
Press
TIMER
.
2.
Turn knob
to select clear timer.
3.
Press
TIME
.
To Select Upper or Lower Oven:
The default oven is the upper oven. To select the
lower oven or to switch between the two,
press
UPPER/LOWER.

10 • English
Operating the Oven
Care and Maintenance
Self Help
Getting Familiar...
Care and Maintenance
Self Help
Getting Familiar...
Getting Familiar...
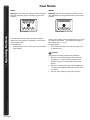
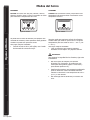
Bake
Baking
is cooking with dry, heated air. Both the upper
and lower elements cycle to maintain the oven tem-
perature:
The bake mode can be used to prepare a variety of
food items, from pastries to casseroles. It can also be
used to roast meats.
For Best Results:
• When baking on two or more racks, use convection
bake instead.
Oven Modes
Figure 14: Bake
Warm
Warming
uses the
lower element to maintain a low
oven temperature to keep cooked food at serving tem-
perature:
Use the warm mode to keep cooked foods hot until you
are ready to serve them. The
temperature range for
this mode is 100° F - 210° F.
For Best Results:
• Cover foods that need to be kept moist with a lid
or aluminum foil.
Caution
To maintain food safety, follow these guidelines:
• DO NOT use the warm mode to heat cold food
(exception: it is safe to use this mode to crisp
crackers, chips or dry cereal and to warm cold
plates).
• Be sure to maintain the proper food temperature.
The USDA recommends holding hot food at 140° F
or warmer.
• DO NOT warm food for longer than one hour.
Figure 15: Warm

English • 11
Operating the Oven
Care and Maintenance
Self Help
Getting Familiar...
Care and Maintenance
Self Help
Self Help
Getting Familiar...
Getting Familiar...
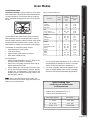
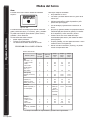
Convection Bake
Convection baking
is similar to baking. In this case,
heat comes from
a third element behind the backwall.
The main difference in convection baking is that the
heat is circulated throughout the oven by the convec-
tion fan:
The benefi ts of convection baking include:
•
Slight decrease in cooking time
•
Three rack cooking
•
Higher volume (yeast items rise higher)
•
More items cooked at once
For Best Results:
•
Reduce recipe temperature by 25
°
F. Refer to the
convection baking chart for examples.
•
Place food in low-sided, uncovered pans such as
cookie sheets without sides.
•
Center baking pans side to side on the oven rack.
• Do not use convection bake for custards, quiches,
pumpkin pie, or cheesecakes. These items do not
benefi t from the convection-heating process. Use
standard bake instead.
The convection bake mode is well-suited for baking
large quantities of food on multiple racks. It can be
used to prepare cookies, pastries, breads, snack foods
and appetizers among other items. DO NOT use con-
vection bake for meats. Use convection roast instead.
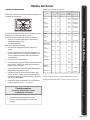
* The convection bake temperature is 25° F less than
recommended on packages or recipes. The temp-
erature in this chart has been reduced 25° F.
** This chart is a guide. Actual times depend on the
mixes or recipes baked. Follow recipe or package
directions and reduce temperature appropriately.
Quick Cooking Tips:
Converting from standard bake
to convection bake
•
Reduce recipe temperature by 25° F.
•
Check food for doneness early:
Figure 16: Convection Bake
Table 2: Convection Bake Chart
Note:
When convection baking on two racks, use
positions one and three. When using three racks, use
positions two, three and four.
Oven Modes
If the recipe calls for
...
Check food ...
1 - 15 min.
3 min. early
16 - 30 min.
5 min.
early
31 min. - 1 hr.
10 min.
early
Food Item
Rack
Position
Temp.*
(preheated
oven)
(F°)
Convection
Bake Time**
(min)
Cake
Cupcakes
Bundt Cake
Angel Food
2
1
1
325
325
325
17-19
37-43
35-39
P
ie
2 curst, fresh 9”
2 crust, frozen fruit 9”
2
2
350 - 400
350
45-55
68-78
Cookies
Sugar
Chocolate Chip
Brownies
2
2
2
325 - 350
325 - 350
325
6-11
8-13
29-36
Breads
Yeast bread, loaf, 9x5
Yeast rolls
Quick bread, loaf, 8x4
Biscuits
Muffi ns
2
2
2
2
2
350
350 - 375
325 - 350
350 - 375
400
18-22
12-15
45-55
11-15
15-19
Pizza
Frozen
Fresh
2
2
375 - 425
400 - 425
23-26
12-15

12 • English
Operating the Oven
Care and Maintenance
Self Help
Getting Familiar...
Care and Maintenance
Self Help
Getting Familiar...
Getting Familiar...
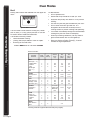
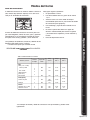
Broil
Broiling uses intense heat radiated from the upper ele-
ment:
ALWAYS
BROIL
WITH THE DOOR
CLOSED
The broil mode is best suited to cooking thin, tender
cuts of meat (1” or less), poultry and fi sh. It can also
be used to brown breads and casseroles.
The benefi ts of Broiling include:
•
Fast and effi cient cooking.
•
Cooking without the addition of fats or liquids.
•
Browning as the food cooks.
For Best Results:
• Do not preheat oven.
• Steaks and chops should be at least 3/4” thick.
• Brush fi sh and poultry with butter or oil to prevent
sticking.
• Use the broil pan and grid included with your oven.
• Do not cover the broiler grid with foil. It is
designed to drain fats and oils away from the
cooking surface to prevent smoking and spattering.
•
Turn meats once halfway through the recommended
cooking time (see broil chart for examples).
• When top browning casseroles, use only metal or
glass ceramic dishes such as Corningware®.
• Never use heat-proof glass (Pyrex®); it cannot
tolerate the high temperature.
Oven Modes
Figure 17: Broil
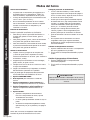
Table 3: Broil Chart
*Broiling times are approximate and may vary slightly.
Food and
Thickness
Rack
Position
Broil
Setting
Internal
Temp
(°F)
Time
Side 1
(min)*
Time
Side 2
(min)*
Beef
Steak (3/4” - 1”)
Medium Rare
Medium
Well
Hamburgers
(3/4” - 1”)
Well
3
3
3
3
5
5
5
5
145
160
170
160
5-7
6-8
8-10
7-9
4-6
5-7
7-9
5-7
Poultry
Breast (bone-in
Thigh
3
3
3
3
170
180
14-16
14-16
14-16
11-13
Pork
Pork Chops (1”)
Sausage - fresh
Ham Slice (1/2”)
3
3
3
5
5
5
160
160
160
7-9
5-7
3-5
5-7
3-5
4-6
Seafood
Fish Filets, 1”
Buttered
3
4
Cook until
opaque and
fl akes with
fork
10-14
Do not
turn
Lamb
Chops (1”)
Medium Rare
Medium
Well
3
3
3
5
5
5
145
160
170
5-7
6-8
8-10
4-6
5-7
7-9
Bread
Garlic Bread 1”
slices
3
5
4-6

English • 13
Operating the Oven
Care and Maintenance
Self Help
Getting Familiar...
Care and Maintenance
Self Help
Self Help
Getting Familiar...
Getting Familiar...
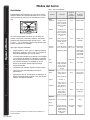
Convection Broil
Convection broil is similar to broil. It combines the in-
tense heat from the upper element with heat circulated
by the convection fan:
The convection broil mode is well suited for cooking
thicker, tender cuts of meat, poultry and fi sh. Convec-
tion Broil is typically not recommended for browning
breads, casseroles and other foods.
The benefi ts of Convection Broiling, in addition to the
benefi ts of standard broiling, include:
•
Faster cooking than standard Broiling.
For Best Results:
• Do not preheat oven.
• Meats should be at least 1 1/2” thick.
• Turn meats once halfway through the cooking time
(See Convection Broil Chart for examples).
• Use the broil pan and grid included with your oven.
• Do not cover the broiler grid with foil. It is
designed to drain fats and oils away from the
cooking surface to prevent smoking and spattering.
• Salt after cooking.
ALWAYS
CONVECTION BROIL
WITH THE DOOR
CONVECTION BROIL WITH THE DOORCONVECTION BROIL
CLOSED
*Broiling and convection broiling times are approximate and may vary slightly.
Figure 18: Convection Broil
Table 4: Convection Broil Chart
Oven Modes
Food and
Thickness
Rack
Position
Broil
Setting
Internal
Temp
(°F)
Time
Side 1
(min)*
Time
Side 2
(min)*
Bee
f
Steak (1-½” or more)
Medium Rare
Medium
Well
Hamburgers
(more than 1”)
Well
2
2
2
3
450
450
450
550
145
160
170
160
12-14
15-17
18-20
11-13
11-13
13-15
16-17
8-10
Pou
ltry
Chicken Quarters
Chicken Breasts
3
3
450
450
180
(thigh)
170
13-15
14-16
10-12
12-14
Por
k
Pork Chops (1¼” or
more)
Sausage - fresh
2
3
450
450
160
160
12-14
4-6
13-15
3-5

14 • English
Operating the Oven
Care and Maintenance
Self Help
Getting Familiar...
Care and Maintenance
Self Help
Getting Familiar...
Getting Familiar...
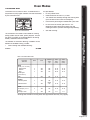
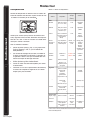
Dehydrate
Dehydrating is used to dry and/or preserve foods such
as fruits, vegetables and herbs. This mode holds an
optimum low temperature (120° F - 160° F) while cir-
culating the heated air to slowly remove moisture.
Dehydrate dries foods with heat from a third element
behind the back wall of the oven. The heat is circulated
throughout the oven by the convection fan.
For Best Results:
• Dry herbs at 120° F. Dry most fruits and vegetables
at 140° F. (Refer to the dehydrate chart for
examples).
• Drying times vary depending on the moisture and
sugar content of the food, the size of the pieces,
the amount being dried and the humidity in the
air. Check food at the minimum drying time.
• Multiple racks can be used simultaneously.
• Treat fruits with antioxidants to avoid discoloration.
• Consult a food preservation book, county
Cooperative Extension Offi ce or library for
additional information.
Oven will stay on for 48 hours before shutting off automatically.
Oven Modes
Figure 19: Dehydrate
Table 5: Dehydrate Chart
Food
Preparation
Approximate
Drying Time
(hours)
Test for
Doneness
Fru
it
Apples
Bananas
Cherries
Orange Peels
and slices
Pineapple
rings
Strawberries
Dipped in
¼ cup
lemon juice and
2 cups water, ¼”
slices
Dipped in
¼ cup
lemon juice and
2 cups water, ¼”
slices
Wash and towel dry
For fresh cherries,
remove pits
¼” slices of orange,
orange part of skin
thinly peeled from
oranges
Towel dried
Wash and towel dry
Sliced ½”
thick
Sliced ½” thickSliced ½”
,
skin (outside) down
on rack
11-15
11-15
10-15
Peels
: 2-4
Slices: 12-16
Canned
:
9-
13
Fresh: 8-12
12-17
Slightly
pliable
Slightly pliableSlightly
Slightly
pliable
Slightly pliableSlightly
Plia
ble, leathery,
chewy
Orange part dry
and brittle
Orange slices:
skins are dry and
brittle, fruit is
slightly moist
soft and pliable
Dry, brittle
Vegetables
Peppers
Mushrooms
Tomatoes
Wash and towel dry
Remove membrane
of pepper, coarsely
chopped about 1”
pieces
Wash and towel dry
Cut off stem and
cut into
⅛”
slices
⅛” slices⅛”
Wash and towel dry
Cut thin slices,
⅛
”
thick, drain well
16-20
7-12
16-23
Leathery, with
no moisture
inside
Tough and
leathery, dry
Dry, brick red
color
Herbs
Oregano,
sage, parsley
and thyme,
and fennel
Basil
Rinse and dry with
paper towel
Use basil leaves 3 to
4 inches from top
spray with water,
shake off moisture
and pat dry
Dry at
120°F
3-5 h
rs
Dr
y at
Dry atDr
120°F
y at 120°Fy at
3-5
hrs
Crisp and brittle
Cr
isp
and bri
ttle

English • 15
Operating the Oven
Care and Maintenance
Self Help
Getting Familiar...
Care and Maintenance
Self Help
Self Help
Getting Familiar...
Getting Familiar...
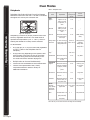
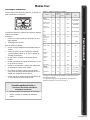
Convection roast uses heat from the top and bottom
elements as well as heat circulated by the convection
fan:
The convection roast mode is well suited to preparing
tender cuts of meat and poultry.
The benefi ts of convection roasting, include:
•
As much as 25% faster cooking than standard
Roasting/ Baking
•
Rich, golden browning
*Roasting times are approximate and may vary depending on the
shape of the meat. They are based on thawed meats.
**Stuffed turkey requires additional roasting time. The minimum safe
temperature for stuffi ng in poultry is 165° F.
Convection Roast
Quick and Easy Cooking Tips:
Converting from standard bake
to convection roast
• DO NOT change recipe temperature.
• Use roasting times in chart at right.
Oven Modes
Figure 20: Convection Roast
Table 6: Convection Roast Chart
For Best Results:
• Use the same temperature as indicated in the
recipe.
• Check doneness early as roasting time may
decrease by as much as 25%. Refer to convection
roast chart for examples.
• Do not cover meat or use cooking bags.
• Use the broil pan and grid provided with the oven
for roasting. A low-sided, uncovered pan can also
be used.
• Use a meat thermometer to determine the internal
temperature of the meat.
• If the meat is browned to your liking, but is not yet
done, a small strip of foil can be placed over the
meat to prevent overbrowning.
• Let meat stand covered with foil 10-15 minutes
after removing from the oven.
Meats
Weight
(lb)
Oven
Temp
(°F)
Rack
Position
R
oasting
RoastingR
Time
*
(min
per
lb
per lb per
)
Internal
Temp
(°F)
Beef
Rib Roast
Rib Eye Roast,
(boneless)
Rump. Eye,
Tip, Sirloin
(boneless)
Tenderloin
Roast
4-6
4-6
3-6
2-3
325
325
325
425
1
1
1
1
24-30
27-33
24-30
27-33
30-36
38-44
15-25
145 (med rare)
160 (medium)
145 (med rare)
160 (medium)
145 (med rare)
160 (medium)
145
(med rare)
Pork
Loin Roast
(boneless or
bone-in)
Shoulder
5-8
3-6
350
350
2
2
20-30
25-35
160 (medium)
160 (medium)
Poultry
Chicken - whole
Turkey,
unstuffed**
Turkey,
unstuffed**
Turkey,
unstuffed**
Turkey Breast
Cornish Hen
3-4
12-15
16-20
21-25
3-8
1-1½
375
3
25
325
325
325
350
1
1
1
1
1
2
12-18
10-14
9-11
6-10
15-20
45-75
total
180
180
180
180
170
180
Lamb
Half Leg
Whole Leg
3-4
6-8
325
325
1
1
25-30
30-35
25-30
30-35
160 (medium)
170 (well)
160 (medium)
170 (well)

16 • English
Operating the Oven
Care and Maintenance
Self Help
Getting Familiar...
Care and Maintenance
Self Help
Getting Familiar...
Getting Familiar...
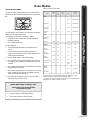
About the Probe
• The probe can be used to determine the internal
doneness or the “END” temperature of many foods,
especially meats and poultry.
• The temperature range for the probe is 130°F to
210°F (55°C to 100°C).
• Preheating the oven is not recommended when
using the probe. A hot oven will impair your ability
to easily connect the probe to the receptacle and
to insert it into the meat.
Inserting the Probe
Insert the probe tip into the food item.
• For meats, insert the probe tip into the thickest
part and do not touch bone, fat, or gristle.
• For large poultry products and turkeys, insert the
probe in the thickest part of the inner thigh.
• For other foods, such as a meatloaf, the probe tip
should be located in the center of the thickest part
of the food.
Using the Probe
1. Prepare meat and place in roasting pan (or on
rack in roasting pan as recipe specifi es). Insert the
probe into the meat (See “Inserting the Probe”,
above).
2. Make sure the probe is not touching gristle, fat,
bone, the roast rack or the pan.
3. Place roasting pan with meat in cold oven on
recommended oven rack.
4. Plug probe into the probe receptacle. The probe
symbol will appear in display.
Note: The probe temperature can only be set when the
probe is installed in the oven.
5.
Press COOKING MODE.
6.
Turn knob
to select cooking mode.
7.
Press Temperature
and
turn knob
to change
oven temperature if necessary.
8.
Press Temperature
and
turn knob
to change
probe temperature if necessary.
9.
Press START.
• The probe temperature is displayed. To view
the oven temperature, press TEMPERATURE
twice.
• The oven is preheated when the beep signals
once.
• When the set probe temperature is reached,
END appears in display and oven turns off.
NOTE: DO NOT connect to probe receptacle until probe
tip is properly inserted into meat.
Probe Use Tips
• The oven is well insulated and the retained heat
will continue to cook the meat after the oven has
shut off. For this reason, remove the meat from the
oven as soon as the control beeps.
• Since meat continues to cook after being removed
from the oven, set the internal (probe) temperature
5 - 10 degrees below the desired fi nal internal
temperature (exception: poultry). Allow “standing
time” (10 -20 minutes) before carving the meat.
• Always use the handle of the probe for inserting
and removing. Use a potholder to remove since
the probe becomes hot.
• Remove the probe from the oven when it is not
being used.
• The probe cannot be used with frozen meats. For
best results, completely thaw meats before using
the probe.
Changing the Oven Temperature
1. Press TEMPERATURE twice. Oven temperature will
fl ash in the display.
2. Turn the knob to desired temperature and press
START.
Changing the Probe Temperature
1. Press TEMPERATURE. The probe temperature will
fl ash.
2. Turn the knob to desired temperature and press
START.
Oven Modes
CAUTION
:
Many factors affect cooking performance.
Always check food for doneness before serving

English • 17
Operating the Oven
Care and Maintenance
Self Help
Getting Familiar...
Self Help
Self Help
Operating the Oven
Operating the Oven
Getting Familiar...
Getting Familiar...
During self-clean, the oven uses a very high
temperature to burn away food soil and grease.
• As a safety feature, the oven door locks during
self-clean to protect from very high temperatures.
Do not try to open the oven during self-clean
mode.
• Only one oven can be self-cleaned at a time. The
second oven can be used while the other is self-
cleaning.
• It is common to see smoke and/or an occasional
fl ame-up during the self-clean mode, depending
on the content and amount of soil remaining in
the oven. If a fl ame persists, turn off the oven and
allow it to cool before opening the door to wipe up
the excessive food soil.
•
The oven light does not operate when the oven is
in the self-clean mode.
• Do not use commercial oven cleaners as they may
damage fi nish or parts.
• Heat and odors are normal during the self-clean
cycle. Keep the kitchen well ventilated.
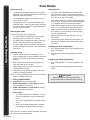
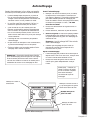
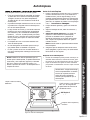
Self-Cleaning
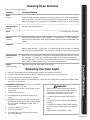
Before You Self-Clean
1. Hand clean the oven door edge, window, oven
front frame and oven cavity edges (see fi gures
below). They do not get hot enough during the
cleaning cycle for soil to burn away. Use a soapy
sponge, plastic scrubber or S.O.S.
®
pad.
DO NOT
RUB THE GASKET.
2 . Wipe up large overspills and grease with paper
towels.
3. Remove broiler pan, all utensils and bakeware.
4.
Remove oven racks.
If the oven racks are left
in the oven during a self-cleaning cycle, they will
lose their shiny fi nish and will not glide smoothly in
the rack guides. See “Cleaning Oven Surfaces for
proper care.
Note:
The extendable rack MUST be removed
before self-cleaning
.
5. Be sure the light is turned off on the control panel
and the bulb and glass cover are in place.
After Self-Clean
• The self-clean mode may produce ash which will
settle in the oven. If this happens, remove ash with
a damp cloth before using the oven.
• Wipe rack edges with cooking oil to allow for
proper glide. Wipe off excess.
Hand clean 1-1/2” from rack
support to front of oven cavity
Hand clean door and frame
DO NOT
hand clean gasket
Hand clean front frame
IMPORTANT: Be sure to
let the inside window
glass in the oven door cool
completely before wiping up
any ash left from the clean
cycle.
NOTE:
Due to the high temperatures used for
self-cleaning, fi ne lines or surface roughness may
develop in oven cavity. This is a common condition
and does not affect either the cooking or the
cleaning performance of the oven.
Figure 21: Before Self-Cleaning

18 • English
Operating the Oven
Care and Maintenance
Self Help
Getting Familiar...
Self Help
Operating the Oven
Getting Familiar...
Getting Familiar...
Operating the Oven
Operating the Oven
To Set the Self-Clean Mode:
1.
Press COOKING MODE
.
2.
Turn knob
to select
CLEAN
.
3.
Press
START.
Remove racks and close oven door.
4.
Press
START
again.
CLEAN
and
TIME
appear in the display.
The oven will clean for three hours. At the end of the
programmed cleaning time the oven will automatically
turn off.
Self-Cleaning
To Change the Clean Time
The preset clean time is three hours. For light soil, use
two hours, for heavy soil use four hours.
1.
Press COOKING MODE
.
2.
Turn knob
to select
CLEAN
3.
Press TIME
twice.
4.
Turn knob
to change the number of hours.
5.
Touch START.
Remove racks and close oven door.
6.
Touch START
.
To Delay the Start of the Clean
Note:
The time of day must be accurate for the delay
function to work properly.
1.
Press COOKING MODE
.
2.
Turn knob
to select
CLEAN
3. Set the time the oven will stop self-cleaning:
Press TIME twice
.
Turn knob
to change the cleaning time (if
necessary).
4.
Press TIME
.
Turn knob
to select STOP TIME.
Press
TIME
.
Turn knob
to set the stop time.
5.
Press START.
Remove racks and close oven door.
6.
Press
START
again.
The oven door locks and
DELAY
appears in the
DELAY appears in the DELAY
display.
When the delay time ends, self-clean starts.
At the end of the programmed cleaning time, the
oven will automatically turn off.
TO CANCEL:
To cancel the self-clean,
press CANCEL
. The oven
door will remain locked until the oven has reached a
safe temperature.
About the Door Lock:
Do not attempt to open the door while the door is
locking.
When the lock symbol is displayed, the door cannot be
opened.
Caution:
Check that the door has been locked and will not open
before starting self-clean mode.
If door does not lock, turn the mode knob to OFF
position and do not start self-clean; phone 800-944-
2904 for service.
NOTE:
The self-clean cycle will not start until the door is
closed.
La page est en cours de chargement...
La page est en cours de chargement...
La page est en cours de chargement...
La page est en cours de chargement...
La page est en cours de chargement...
La page est en cours de chargement...
La page est en cours de chargement...
La page est en cours de chargement...
La page est en cours de chargement...
La page est en cours de chargement...
La page est en cours de chargement...
La page est en cours de chargement...
La page est en cours de chargement...
La page est en cours de chargement...
La page est en cours de chargement...
La page est en cours de chargement...
La page est en cours de chargement...
La page est en cours de chargement...
La page est en cours de chargement...
La page est en cours de chargement...
La page est en cours de chargement...
La page est en cours de chargement...
La page est en cours de chargement...
La page est en cours de chargement...
La page est en cours de chargement...
La page est en cours de chargement...
La page est en cours de chargement...
La page est en cours de chargement...
La page est en cours de chargement...
La page est en cours de chargement...
La page est en cours de chargement...
La page est en cours de chargement...
La page est en cours de chargement...
La page est en cours de chargement...
La page est en cours de chargement...
La page est en cours de chargement...
La page est en cours de chargement...
La page est en cours de chargement...
La page est en cours de chargement...
La page est en cours de chargement...
La page est en cours de chargement...
La page est en cours de chargement...
La page est en cours de chargement...
La page est en cours de chargement...
La page est en cours de chargement...
La page est en cours de chargement...
La page est en cours de chargement...
La page est en cours de chargement...
La page est en cours de chargement...
La page est en cours de chargement...
La page est en cours de chargement...
La page est en cours de chargement...
La page est en cours de chargement...
La page est en cours de chargement...
La page est en cours de chargement...
La page est en cours de chargement...
La page est en cours de chargement...
La page est en cours de chargement...
La page est en cours de chargement...
La page est en cours de chargement...
-
 1
1
-
 2
2
-
 3
3
-
 4
4
-
 5
5
-
 6
6
-
 7
7
-
 8
8
-
 9
9
-
 10
10
-
 11
11
-
 12
12
-
 13
13
-
 14
14
-
 15
15
-
 16
16
-
 17
17
-
 18
18
-
 19
19
-
 20
20
-
 21
21
-
 22
22
-
 23
23
-
 24
24
-
 25
25
-
 26
26
-
 27
27
-
 28
28
-
 29
29
-
 30
30
-
 31
31
-
 32
32
-
 33
33
-
 34
34
-
 35
35
-
 36
36
-
 37
37
-
 38
38
-
 39
39
-
 40
40
-
 41
41
-
 42
42
-
 43
43
-
 44
44
-
 45
45
-
 46
46
-
 47
47
-
 48
48
-
 49
49
-
 50
50
-
 51
51
-
 52
52
-
 53
53
-
 54
54
-
 55
55
-
 56
56
-
 57
57
-
 58
58
-
 59
59
-
 60
60
-
 61
61
-
 62
62
-
 63
63
-
 64
64
-
 65
65
-
 66
66
-
 67
67
-
 68
68
-
 69
69
-
 70
70
-
 71
71
-
 72
72
-
 73
73
-
 74
74
-
 75
75
-
 76
76
-
 77
77
-
 78
78
-
 79
79
-
 80
80


Bosch HBN756AUC/01 Manuel utilisateur
- Catégorie
- Fours
- Taper
- Manuel utilisateur
dans d''autres langues
- English: Bosch HBN756AUC/01 User manual
- español: Bosch HBN756AUC/01 Manual de usuario