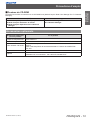
Christie LX1750 Manuel utilisateur
- Catégorie
- Projecteurs
- Taper
- Manuel utilisateur


This manual is an excerpted version of the full User Manual. For more information, please
refer to the PDF manual provided on the supplied CD-ROM.
Thank you for purchasing this Christie product.
■Before operating this product, please read the instructions carefully and save this manual
for future use.
For information on using the product via a network, refer to “User Manual–Network
Operations”.
TQBJ0658
ENGLISH
Important Information
Read this rst! ................................................. 2
Precautions for use ...................................... 11
Cautions when transporting ....................................... 11
Cautions when installing ............................................ 11
Security .......................................................................12
Disposal ......................................................................12
Cautions on use .........................................................12
Accessories ................................................................14
Optional accessories ..................................................15
Preparation
Connections ................................................... 16
Connecting example: Computers ..............................16
Connecting example: AV equipment .........................16
Powering on/off ............................................. 17
Notes on attaching the lens ......................... 17
User Manual
✽ Projection lens not included.
Basic Guide
020-000641-01 Rev.1 (11-2013)

Read this rst!
2 - ENGLISH
Important
Information
020-000641-01 Rev.1 (11-2013)
Read this rst!
Information
WARNING: THIS APPARATUS MUST BE GROUNDED.
WARNING: To prevent damage which may result in re or shock hazard, do not expose this appliance to rain
or moisture.
Machine Noise Information Ordinance 3. GSGV, January 18, 1991: The sound pressure level at the operator
position is equal or less than 70 dB (A) according to ISO 7779.
WARNING:
1. Remove the plug from the mains socket when this unit is not in use for a prolonged period of time.
2. To prevent electric shock, do not remove cover. No user serviceable parts inside. Refer servicing to qualied
service personnel.
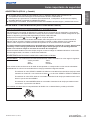
3. Do not remove the grounding pin on the mains plug. This apparatus is equipped with a three prong
grounding-type mains plug. This plug will only t an grounding-type mains socket. This is a safety feature. If
you are unable to insert the plug into the mains socket, contact an electrician. Do not defeat the purpose of
the grounding plug.
WARNING:
This is a class A product. In a domestic environment this product may cause radio interference in which case
the user may be required to take adequate measures.
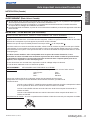
CAUTION: To assure continued compliance, follow the attached installation instructions, which include using
the provided power cord and shielded interface cables when connecting to computer or peripheral
device. If you use serial port to connect PC for external control of projector, you must use optional
RS-232C serial interface cable with ferrite core. Any unauthorized changes or modications to
this equipment will void the user’s authority to operate.
This is a device to project images onto a screen, etc., and is not intended for use as indoor lighting in a
domestic environment. Directive 2009/125/EC
EEE Yönetmeliğine Uygundur.
EEE Complies with Directive of Turkey.
WARNING:
TURN OFF THE UV LAMP BEFORE OPENING THE LAMP COVER.
WARNING: TO REDUCE THE RISK OF FIRE OR ELECTRIC SHOCK, DO NOT EXPOSE THIS PRODUCT
TO RAIN OR MOISTURE.
WARNING: RISK OF ELECTRIC SHOCK, DO NOT OPEN.
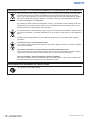
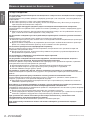
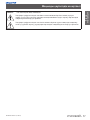
The lightning ash with arrowhead symbol, within an equilateral triangle, is intended to alert the
user to the presence of uninsulated “dangerous voltage” within the product’s enclosure that may
be of sufcient magnitude to constitute a risk of electric shock to persons.
The exclamation point within an equilateral triangle is intended to alert the user to the presence of
important operating and maintenance (servicing) instructions in the literature accompanying the
product.
CAUTION (USA and Canada)
CAUTION: This equipment is equipped with a three-pin grounding-type power
plug. Do not remove the grounding pin on the power plug. This plug
will only t a grounding-type power outlet. This is a safety feature. If
you are unable to insert the plug into the outlet, contact an electrician.
Do not defeat the purpose of the grounding plug. Do not remove

Read this rst!
ENGLISH - 3
Important
Information
020-000641-01 Rev.1 (11-2013)
IMPORTANT: THE MOULDED PLUG (U.K. only)
FOR YOUR SAFETY, PLEASE READ THE FOLLOWING TEXT CAREFULLY.
This appliance is supplied with a moulded three pin mains plug for your safety and convenience. A 13 amp fuse
is tted in this plug. Should the fuse need to be replaced, please ensure that the replacement fuse has a rating
of 13 amps and that it is approved by ASTA or BSI to BS1362.
Check for the ASTA mark or the BSI mark on the body of the fuse.
If the plug contains a removable fuse cover, you must ensure that it is retted when the fuse is replaced. If you
lose the fuse cover, the plug must not be used until a replacement cover is obtained. A replacement fuse cover
can be purchased from an Authorized Service Center.
If the tted moulded plug is unsuitable for the mains socket in your home, then the fuse should be
removed and the plug cut off and disposed of safely. There is a danger of severe electrical shock if the
cut off plug is inserted into any 13 amp socket.
If a new plug is to be tted, please observe the wiring code as shown below.
If in any doubt, please consult a qualied electrician.
WARNING: THIS APPLIANCE MUST BE GROUNDED.
IMPORTANT: The wires in this mains lead are colored in accordance with the following code:
Green - and - Yellow: Earth
Blue: Neutral
Brown: Live
As the colors of the wire in the mains lead of this appliance may not correspond with the colored markings
identifying the terminals in your plug, proceed as follows.
The wire which is colored GREEN - AND - YELLOW must be connected to the terminal in the plug
which is marked with the letter E or by the Earth symbol or colored GREEN or GREEN - AND -
YELLOW.
The wire which is colored BLUE must be connected to the terminal in the plug which is marked
with the letter N or colored BLACK.
The wire which is colored BROWN must be connected to the terminal in the plug which is marked
with the letter L or colored RED.
How to replace the fuse: Open the fuse compartment with a screwdriver and replace the fuse.
13A250V BS1363/A
HE-8
N
ASA
L

Read this rst!
4 - ENGLISH
Important
Information
020-000641-01 Rev.1 (11-2013)
FCC NOTICE (USA)
Declaration of Conformity
This device complies with Part 15 of the FCC Rules.
Operation is subject to the following two conditions:
(1) This device may not cause harmful interference, and (2) this device must accept any interference received,
including interference that may cause undesired operation.
To assure continued compliance, follow the attached installation instructions and do not make any unauthorized
modications.
CAUTION:
This equipment has been tested and found to comply with the limits for a Class A digital device, pursuant
to part 15 of the FCC Rules. These limits are designed to provide reasonable protection against harmful
interference when the equipment is operated in a commercial environment. This equipment generates, uses,
and can radiate radio frequency energy and, if not installed and used in accordance with the instruction
manual, may cause harmful interference to radio communications. Operation of this equipment in a residential
area is likely to cause harmful interference in which case the user will be required to correct the interference at
his own expense.
Model Number: LX1750
Trade Name: Christie
Responsible Party: Christie Digital Systems USA, Inc.
Address: 10550 Camden Drive Cypress CA 90630
Telephone number: 714-236-8610
NOTIFICATION (Canada)
This class A digital apparatus complies with Canadian ICES-003.
WARNING (USA and Canada)
z
zNot for use in a computer room as dened in the Standard for the Protection of Electronic Computer/Data
Processing Equipment, ANSI/NFPA 75.
z
zFor permanently connected equipment, a readily accessible disconnect device shall be incorporated in the
building installation wiring.
z
zFor pluggable equipment, the socket-outlet shall be installed near the equipment and shall be easily
accessible.
NOTICE U.S.A. only:
z
zThis product has a High Intensity Discharge (HID) lamp that contains mercury. Disposal may be regulated in
your community due to environmental considerations. For disposal or recycling information, please visit
Christie website: http://www.christiedigital.com/

Read this rst!
ENGLISH - 5
Important
Information
020-000641-01 Rev.1 (11-2013)
WARNING:
z
POWER
The wall outlet or the circuit breaker shall be installed near the equipment and shall be easily
accessible when problems occur. If the following problems occur, cut off the power supply
immediately.
Continued use of the projector in these conditions will result in re or electric shock.
z
zIf foreign objects or water get inside the projector, cut off the power supply.
z
zIf the projector is dropped or the cabinet is broken, cut off the power supply.
z
zIf you notice smoke, strange smells or noise coming from the projector, cut off the power supply.
Please contact an Authorized Service Center for repairs, and do not attempt to repair the projector yourself.
During a thunderstorm, do not touch the projector or the cable.
Electric shocks can result.
Do not do anything that might damage the power cord or the power plug.
If the power cord is used while damaged, electric shocks, short-circuits or re will result.
z
zDo not damage the power cord, make any modications to it, place it near any hot objects, bend it
excessively, twist it, pull it, place heavy objects on top of it or wrap it into a bundle.
Ask an Authorized Service Center to carry out any repairs to the power cord that might be necessary.
Completely insert the power plug into the wall outlet and the power connector into the projector terminal.
If the plug is not inserted correctly, electric shocks or overheating will result.
z
zDo not use plugs which are damaged or wall outlets which are coming loose from the wall.
Do not use anything other than the provided power cord.
Failure to observe this will result in re or electric shocks.
Clean the power plug regularly to prevent it from becoming covered in dust.
Failure to observe this will cause a re.
z
zIf dust builds up on the power plug, the resulting humidity can damage the insulation.
z
zIf not using the projector for an extended period of time, pull the power plug out from the wall outlet.
Pull the power plug out from the wall outlet and wipe it with a dry cloth regularly.
Do not handle the power plug with wet hands.
Failure to observe this will result in electric shocks.
Do not overload the wall outlet.
If the power supply is overloaded (for example, by using too many adapters), overheating may occur and re
will result.
z
ON USE/INSTALLATION
Do not place the projector on soft materials such as carpets or sponge mats.
Doing so will cause the projector to overheat, which can cause burns, re or damage to the projector.
Do not set up the projector in humid or dusty places or in places where the projector may come into
contact with oily smoke or steam, for example a bathroom.
Using the projector under such conditions will result in re, electric shocks or deterioration of components.
Deterioration of components (such as ceiling mount brackets) may cause the projector which is mounted on
the ceiling to fall down.
Do not install this projector in a place which is not strong enough to take the full weight of the
projector or on top of a surface which is sloped or unstable.
Failure to observe this will cause projector to fall down or tip over the projector, and severe injury or damage
could result.

Read this rst!
6 - ENGLISH
Important
Information
020-000641-01 Rev.1 (11-2013)
WARNING:
Do not cover the air intake/exhaust ports or place anything within 1 m (39”) of them.
Doing so will cause the projector to overheat, which can cause re or damage to the projector.
z
zDo not place the projector in narrow, badly ventilated places.
z
zDo not place the projector on cloth or papers, as these materials could be drawn into the air intake port.
Do not place your hands or other objects close to the air exhaust port.
Doing so will cause burns or damage your hands or other objects.
z
zHeated air comes out of the air exhaust port. Do not place your hands or face, or objects which cannot
withstand heat close to this port.
Do not look and place your skin into the lights emitted from the lens while the projector is being used.
Doing so can cause burns or loss of sight.
z
zStrong light is emitted from the projector’s lens. Do not look or place your hands directly into this light.
z
zBe especially careful not to let young children look into the lens. In addition, turn off the power and
disconnect the power plug when you are away from the projector.
Never attempt to remodel or disassemble the projector.
High voltages can cause re or electric shocks.
z
zFor any inspection, adjustment and repair work, please contact an Authorized Service Center.
Do not project an image with the lens cover attached.
Doing so can cause re.
Do not allow metal objects, ammable objects, or liquids to enter inside of the projector. Do not allow
the projector to get wet.
Doing so may cause short circuits or overheating, and result in re, electric shock, or malfunction of the
projector.
z
zDo not place containers of liquid or metal objects near the projector.
z
zIf liquid enters inside of the projector, consult your dealer.
z
zParticular attention must be paid to children.
Do not touch other than the specied portion or remove the components.
Doing so may impair the performance or safety.
Use the ceiling mount bracket specied by Christie.
Using the ceiling mount bracket other than the specied one will result in falling accidents.
z
zAttach the supplied safety cable to the ceiling mount bracket to prevent the projector from falling down.
Installation work (such as ceiling mount bracket) should only be carried out by a qualied technician.
If installation is not carried out and secured correctly it can cause injury or accidents, such as electric shocks.
z
zDo not use anything other than an authorized ceiling mount bracket.
z
zBe sure to use the provided accessory wire with an eye bolt as an extra safety measure to prevent the
projector from falling down. (Install in a different location to the ceiling mount bracket.)
When attaching or replacing a lens, consult the technical staff or service personnel at a specialist
dealer.
Replacing a lens in the wrong way might damage the product.
When attaching or replacing a lens, observe related procedures in order to perform this properly.

Read this rst!
ENGLISH - 7
Important
Information
020-000641-01 Rev.1 (11-2013)
WARNING:
z
ACCESSORIES
Do not use or handle the batteries improperly, and refer to the following.
Failure to observe this will cause burns, batteries to leak, overheat, explode or catch re.
z
zDo not use unspecied batteries.
z
zUse manganese or alkaline batteries but not rechargeable batteries.
z
zDo not disassemble dry cell batteries.
z
zDo not heat the batteries or place them into water or re.
z
zDo not allow the + and
-
terminals of the batteries to come into contact with metallic objects such as
necklaces or hairpins.
z
zDo not store batteries together with metallic objects.
z
zStore the batteries in a plastic bag and keep them away from metallic objects.
z
zMake sure the polarities (+ and
-
) are correct when inserting the batteries.
z
zDo not use a new battery together with an old battery or mix different types of batteries.
z
zDo not use batteries with the outer cover peeling away or removed.
Do not allow children near the batteries (AAA/R03/LR03).
z
zThe battery can cause personal injury if swallowed.
z
zIf swallowed, seek medical advice immediately.
If the battery uid leaks, do not touch it with bare hands, and take the following measures if necessary.
z
zBattery uid on your skin or clothing could result in skin inammation or injury.
Rinse with clean water and seek medical advice immediately.
z
zBattery uid coming in contact with your eyes could result in loss of sight.
In this case, do not rub your eyes. Rinse with clean water and seek medical advice immediately.
Do not disassemble the lamp unit.
If the lamp breaks, it could cause injury.
Lamp replacement
The lamp has high internal pressure. If improperly handled, an explosion and severe injury or accidents will result.
z
zThe lamp can easily explode if struck against hard objects or dropped.
z
zBefore replacing the lamp, be sure to disconnect the power plug from the wall outlet.
Electric shocks or explosions can result if this is not done.
z
zWhen replacing the lamp, turn the power off and allow it to cool for at least 60 minutes before handling it
otherwise it can cause burns.
Do not allow infants or pets to touch the remote control unit.
z
zKeep the remote control unit out of the reach of infants and pets after using it.
Do not use the supplied power cord with devices other than this projector.
z
zUsing the supplied power cord with devices other than this projector may cause short circuits or
overheating, and result in electric shock or re.
Remove the depleted batteries from the remote control promptly.
z
zLeaving them in the unit may result in uid leakage, overheating, or explosion of the batteries.

Read this rst!
8 - ENGLISH
Important
Information
020-000641-01 Rev.1 (11-2013)
CAUTION:
z
POWER
When disconnecting the power cord, be sure to hold the power plug and power connector.
If the power cord itself is pulled, the lead will become damaged, and re, short-circuits or serious electric
shocks will result.
When not using the projector for an extended period of time, disconnect the power plug from the wall
outlet and remove the batteries from the remote control.
Disconnect the power plug from the wall outlet before carrying out any cleaning and replacing the unit.
Electric shocks can result if this is not done.
z
ON USE/INSTALLATION
Do not place heavy objects on top of the projector.
Failure to observe this will cause the projector to become unbalanced and fall, which could result in damage or
injury. The projector will be damaged or deformed.
Do not put your weight on this projector.
You could fall or the projector could break, and injury will result.
z
zBe especially careful not to let young children stand or sit on the projector.
Do not place the projector in extremely hot locations.
Doing so will cause the outer casing or internal components to deteriorate, or result in re.
z
zTake particular care in locations exposed to direct sunlight or near stoves.
Do not place your hands in the openings beside the optical lens, while shifting the lens.
Failure to observe this could cause injury.
When lifting or carrying the projector, do not hold the lens hood and lens.
Doing so may damage the projector.
Always disconnect all cables before moving the projector.
Moving the projector with cables still attached can damage the cables, which will cause re or electric shocks
to occur.
Use the lens specied by Christie.
Using the lens other than the specied one will result in malfunctions.
z
zBefore attaching the lens, check the projector model no. and optional lens model no. and use the lens
suitable for the projector.
z
zFor details, consult your dealer.
z
ACCESSORIES
Do not use the old lamp unit.
If used it could cause lamp explosion.
If the lamp has broken, ventilate the room immediately. Do not touch or bring your face close to the
broken pieces.
Failure to observe this will cause the user to absorb the gas which was released when the lamp broke and
which contains nearly the same amount of mercury as uorescent lamps, and the broken pieces will cause
injury.
z
zIf you believe that you have absorbed the gas or that the gas has got into your eyes or mouth, seek
medical advice immediately.
z
zAsk your dealer about replacing the lamp unit and check the inside of the projector.
Do not reuse the air lter unit.
Doing so may result in malfunctions.
Do not clean the air lter unit with water.
Doing so may result in malfunctions.
z
zBe careful not to wet the air lter unit.
Ask your dealer about cleaning the inside the projector once a year.
Continuous use while dust is accumulated inside the projector may result in re.
z
zFor cleaning fee, ask your dealer.

Read this rst!
ENGLISH - 9
Important
Information
020-000641-01 Rev.1 (11-2013)
Brazil Only
Brasil Apenas
z
Manuseio de baterias usadas
BRASIL
Após o uso, as pilhas e/ou baterias deverão
ser entregues ao estabelecimento comercial
ou rede de assistência técnica autorizada.
Cobrir os terminais positivo (+) e negativo (-) com uma ta isolante adesiva, antes de depositar numa caixa
destinada para o recolhimento. O contato entre partes metálicas pode causar vazamentos, gerar calor, romper
a blindagem e produzir fogo. (Fig. 1)
Fig. 1
Como isolar os terminais
Não desmonte, não remova o invólucro, nem amasse a bateria. O gás liberado pela bateria pode irritar a
garganta, danicar o lacre do invólucro ou o vazamento provocar calor, ruptura da blindagem e produzir fogo
devido ao curto circuito dos terminais. Não incinere nem aqueça as baterias, elas não podem car expostas
a temperaturas superiores a 100 °C (212 °F). O gás liberado pela bateria pode irritar a garganta, danicar
o lacre do invólucro ou o vazamento provocar calor, ruptura da blindagem e produzir fogo devido ao curto
circuito dos terminais provocado internamente.
Evite o contato com o liquido que vazar das baterias. Caso isto ocorra, lave bem a parte afetada com bastante
água. Caso haja irritação, consulte um médico.
z
Remoção das baterias
1. Pressione a guia e levante a tampa.
(ii)
(i)
2. Remova as baterias.
Fita Isolante
Fita Isolante
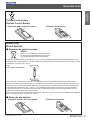
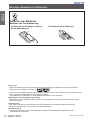
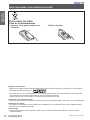
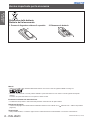
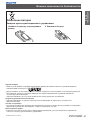
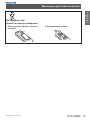
To remove the battery
Remote Control Battery
1. Press the guide and lift the cover.
(ii)
(i)
2. Remove the batteries.

Read this rst!
10 - ENGLISH
Important
Information
020-000641-01 Rev.1 (11-2013)
Trademarks
•zHDMI, the HDMI logo and High-Denition Multimedia Interface are trademarks or registered trademarks of HDMI Licensing LLC.
•zOther names, company names or product names used in these user manual are the trademarks or registered trademarks of their
respective holders.
Please note that the user manual do not include the ® and TM symbols.
Illustrations in these user manual
•zNote that illustrations of the projector and screens may differ from the ones you actually see.
Page references
•zPage references to the PDF manual on the supplied CD-ROM are indicated as ( User Manual-Projector Operations page 00).
Term
•z
In these instructions, the “Wireless/wired remote control unit” accessories are referred to as the “Remote control”.

Precautions for use
ENGLISH - 11
Important
Information
020-000641-01 Rev.1 (11-2013)
Precautions for use
Cautions when transporting
zWhen transporting the projector, hold it securely by its carry handle and avoid excessive vibration and impacts
by such handling as dragging it on the oor. Failure to do so may damage the internal parts and result in
malfunctions.
zDo not transport the projector with the adjustable feet extended. Doing so may damage the adjustable feet.
Cautions when installing
z■Do not set up the projector outdoors.
The projector is designed for indoor use only.
z■Do not use in the following places.
z
zPlaces where vibration and impacts occur such as in a vehicle or vessel: Doing so may damage the
internal parts and result in malfunctions.
z
zNear the exhaust of an air conditioner or near lights (studio lamps, etc.) where there are large swings in
temperature (“Operating environment” ( User Manual-Projector Operations page 103)): Doing so may
shorten the life of the lamp or result in deformation of the outer case, which may in turn cause malfunctions.
z
zNear high-voltage power lines or near motors: Interference may occur.
z■Be sure to ask a qualied technician or your dealer before installing the
product on a ceiling.
If the product is to be installed hanging from the ceiling, purchase the optional ceiling mount bracket.
z■Do not install the projector at elevations of 2 700 m (8 858 ft) or higher
above sea level.
Failure to do so may shorten the life of the internal parts and result in malfunctions.
z■Do not use the projector while it is tilted ( User Manual-Projector
Operations page 24).
Using the projector while tilted may shorten the life of the internal parts.
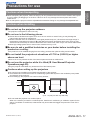
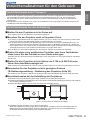
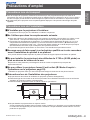
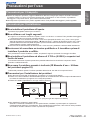
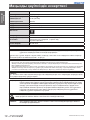
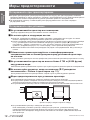
z■Cautions when setting up the projectors
z
zDo not block the ventilation ports (intake and exhaust) of the projector.
z
zAvoid heated and cooled air from the air conditioning system directly blow to the ventilation ports (intake
and exhaust) of the projector.
z
zAvoid setting up the projector in a humid or dusty location.
(over 1 m (39") for each top and side)
1 m (39")
1 m (39")
1 m (39") 1 m (39")
z
zDo not install the projector in a conned space.
When it is necessary to install in a conned space, install an air conditioning or ventilation system for the
space. If ventilation is insufcient, exhaust heat may accumulate and trigger the protection circuit of the
projector.

Precautions for use
12 - ENGLISH
Important
Information
020-000641-01 Rev.1 (11-2013)
Security
When using this product, implement appropriate security measures to prevent the following:
z
zPersonal information being leaked via this product
z
zUnauthorized operation of this product by a malicious third party
z
zInterference or stopping of this product by a malicious third party
Take sufcient security measures. ( User Manual-Projector Operations page 69)
z
zMake your PIN code as difcult to guess as possible.
z
zChange your PIN code periodically.
z
zChristie Digital Systems and its afliate companies will never ask you directly for your PIN code. If you are
asked directly, do not give your PIN code.
z
zBe sure to use a secure network with a rewall etc.
z
zSet a PIN code and set restrictions on the users who can log in.
Disposal
When disposing of the product, ask your local authority or dealer about the correct methods of disposal.
The lamp contains mercury. When disposing of the used lamp unit, ask your nearest local authorities or dealer
about proper disposal of the unit.
Dispose of used batteries according to the instructions or your local disposal rules or guidelines.
Cautions on use
z■To achieve a high picture quality
z
zYou achieve a high picture quality by drawing curtains or blinds over windows and turning off any lights
near the screen to prevent outside light or light from indoor lamps from shining onto the screen.
z
zDepending on the conditions, the picture may wobble due to the heated air from the air exhaust port or
heated or cooled air from the air conditioner.
Take care to ensure that neither the exhaust from the projector or other equipment, nor air from any air
conditioner blows on the front of the projector.
z
zThe projection lens is heated by the light from the luminous source, making the focus unstable in the period
just after switching on. The focus will stabilize after 30 minutes elapsed with the image being projected.
z■Do not touch the surface of the projection lens with your bare hands.
If the surface of the lens is contaminated by ngerprints or dirt, this will be magnied and projected onto the
screen, degrading the picture.
z■LCD panel
The LCD panel is precision-made. Note that in rare cases, pixels of high precision could be missing or always
lit. This is not a malfunction.
When a still image is projected for a long period, the image may burn in to the LCD panel. In this case, project
the white screen from the test patterns ( User Manual-Projector Operations page 74) for at least one hour.
Note, however, that it may not always be possible to fully eradicate the burned-in image.

Precautions for use
ENGLISH - 13
Important
Information
020-000641-01 Rev.1 (11-2013)
z■Optical components
If you are using the projector at a high-temperature environment or an environment which is dusty or full of
cigarette smoke etc., the replacement cycle for optical components such as the the LCD panel and polarizer
may reduce to as little as a year. For more information, please consult your dealer.
z■Lamp
The projector luminous source is a mercury lamp with high internal pressure.
A high-pressure mercury lamp has the following characteristics.
z
zThe brightness of the lamp will decrease with usage time.
z
zAn impact, scratch, or deterioration with usage may cause the bulb to burst loudly or reduce the service
life.
z
zThe service life of the lamp varies greatly depending on the individual lamp and usage conditions. In
particular, continuous use for periods of 24 hours or longer and frequent on/off switching of the power
accelerate deterioration in the lamp and affect the lamp life.
z
zIn rare cases, the lamp can burst shortly after starting the projection.
z
zThe risk of bursting increases when the lamp is used beyond its replacement cycle. Make sure to replace
the lamp unit consistently. “When to replace the lamp unit” ( User Manual-Projector Operations page 85)
z
zIf the lamp bursts, gas contained in the lamp is released in a form of smoke.
z
zIt is recommend that you store replacement lamp units for contingency.
z
zIt is recommended that you request a qualied technician to replace the lamp unit. Consult your dealer.

Precautions for use
14 - ENGLISH
Important
Information
020-000641-01 Rev.1 (11-2013)
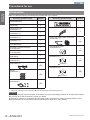
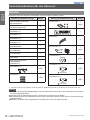
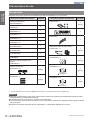
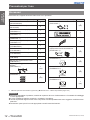
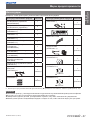
Accessories
Make sure that the following accessories are provided with your projector.
Accessory (product name) Number
Wireless/wired remote control unit
(N2QAYA000066) 1
AAA/R03/LR03 battery (for remote
control unit) 2
Power cord for (E)
(T0K3K0003--1) 1
Power cord for (U)
(T0K3K0001--1) 1
Power cord for (UK)
(T0K3K0004--1) 1
Computer cable (for D-sub)
(T0K3K0013--1) 1
CD-ROM User Manual
(TXFQB02ZHC2) 1
CD-ROM PJ Network Manager
(T1U13B27601) 1
CD-ROM Real Color Manager Pro
(T1U13B58100) 1
User Manual–Basic Guide
(TQBJ0658) 1
Color Management Manual
(TQBH0270-1) 1
Lens lock lever xing bracket*1
(T0STF0039--1)
1
(set)
Spacer*1
(T0SAS0001--) 1
(set)
Lens attachment*1
(T0HLA0045--)
1
(set)
Accessory (product name) Number
PIN code label
1
Cable tie
3
Power cord holder, power cord cover
(T0STF0037--1) 1
(set)
Light-shielding plate-1*1
(T0CRS0008--1) 1
(set)
Light-shielding plate-2*1
(T0CRM0014--1)
is inscribed
1
(set)
Light-shielding plate-3*1
(T0CRM0013--1)
is inscribed
1
(set)
*1: Used when attaching the lens (optional). ( User Manual-Projector Operations page 106)
Attention
zAfter unpacking the projector, dispose of the power cord cap and packaging material in an appropriate manner.
zIf you lose any of the accessories, consult your dealer.
zThe product numbers of accessories and separately sold components are subject to change without notice.
zStore small parts in an appropriate manner, and keep them away from young children.

Precautions for use
ENGLISH - 15
Important
Information
020-000641-01 Rev.1 (11-2013)
z■Contents of CD-ROM
The following contents are stored on the supplied CD-ROM (User Manual / Real Color Manager Pro / PJ Network
Manager).
Manual/Index (PDF) Software
z
zUser Manual–Projector Operations
z
zUser Manual–Network Operations
z
zUser Manual–PJ Network Manager Operations
z
zReal Color Manager Pro
z
zPJ Network Manager
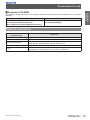
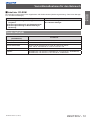
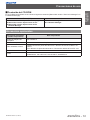
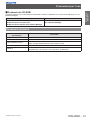
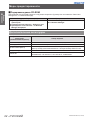
Optional accessories
Optional accessories
(product name) Product No.
Replacement lamp unit 002-120599-01
Replacement lter 003-004738-01 / Service Parts No.: T1FTX0069--
Smoke resistant lter Unit: Part No. 003-004739-01 / Ref No. NOP-FTU-61EFS
Filter: Part No. 003-003705-01 / Ref No. POA-FIL-160
Input module 103-132107-02
Lens 38-809037-52, 103-135100-01, 38-809094-51, 103-103101-01, 38-809039-52,
38-809044-52, 103-129103-01, 103-130105-01, 38-809070-51

Connections
16 - ENGLISH
Preparation
020-000641-01 Rev.1 (11-2013)
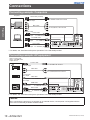
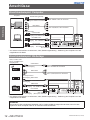
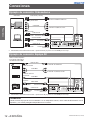
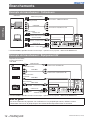
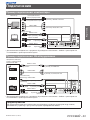
Connections
Connecting example: Computers
To <SERIAL PORT IN> terminal
To <G,B,R,H/V,V IN> terminal
To <ANALOG IN> terminal
To <HDMI IN> terminal
To <DIGITAL (DVI-D) IN>
terminal
Serial cable (crossed)
BNC cable
D-sub cable
DVI/HDMI cable
DVI-D cable
To serial port output
To monitor output
To monitor output
To monitor output
To monitor output
Computer
* For details, see “User Manual-Projector Operations” in the CD-ROM provided.
Connecting example: AV equipment
Video, S-video, DVD
player, and HDMI video
output devices
To HDMI output
To AV HDCP
DVI video output
To <DIGITAL (DVI-D) IN>
terminal
To <HDMI IN> terminal
To <VIDEO IN> terminal
To <Y,Pb/Cb,Pr/Cr IN> terminal
To <S-VIDEO IN> terminal
To composite
video output
To component
video output
To S-video output
DVI-D cable
HDMI cable
BNC cable
BNC cable
S-video cable
* For details, see “User Manual-Projector Operations” in the CD-ROM provided.
Caution
When connecting the projector to a computer or an external device, use the power cord supplied with the
device and commercially available shielded cables.

Powering on/off
ENGLISH - 17
Preparation
020-000641-01 Rev.1 (11-2013)
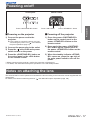
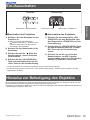
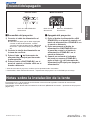
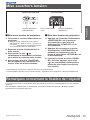
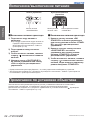
Powering on/off
* Before powering up the projector, conrm the connection of the devices.
* For details, see “User Manual-Projector Operations” in the CD-ROM provided.
Notes on attaching the lens
The technical staff or service personnel must attach the lens according to the instruction manual supplied with the
optional lens.
For details, see “Notes on attaching the lens” ( User Manual-Projector Operations page 106).
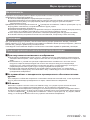
z■Powering on the projector
1) Connect the power cord to the
projector.
z
zFor the steps to connect the power cord, see
“Connecting the power cord” ( User Manual-
Projector Operations page 31).
2) Connect the power plug to the outlet.
3) Press the
< >
side of the main power
switch to turn on the power.
4) Press the <ON/STAND-BY> button on
the control panel or the <ON> button
on the remote control.
z■Powering off the projector
1) Press the power <ON/STAND-BY>
button on the control panel or the
power <STAND-BY> button on the
remote control.
2) Press again the power <ON/STAND-
BY> button on the control panel or
the power <STAND-BY> button on the
remote control.
3) When the standby indicator <STAND-
BY> comes on, press the
< >
side of
the main power switch to turn off the
power.
Power <ON/STAND-BY> button
Control panel Remote control
Power <ON> button Power <STAND-BY> button

18 - ENGLISH 020-000641-01 Rev.1 (11-2013)
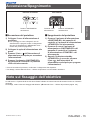
Information for Users on Collection and Disposal of Old Equipment and used Batteries
These symbols on the products, packaging, and/or accompanying documents mean that used
electrical and electronic products and batteries should not be mixed with general household
waste. For proper treatment, recovery and recycling of old products and used batteries, please
take them to applicable collection points, in accordance with your national legislation and the
Directives 2002/96/EC and 2006/66/EC.
By disposing of these products and batteries correctly, you will help to save valuable resources
and prevent any potential negative effects on human health and the environment which could
otherwise arise from inappropriate waste handling.
For more information about collection and recycling of old products and batteries, please contact
your local municipality, your waste disposal service or the point of sale where you purchased the
items.
Penalties may be applicable for incorrect disposal of this waste, in accordance with national
legislation.
For business users in the European Union
If you wish to discard electrical and electronic equipment, please contact your dealer or supplier
for further information.
Information on Disposal in other Countries outside the European Union
These symbols are only valid in the European Union. If you wish to discard these items, please
contact your local authorities or dealer and ask for the correct method of disposal.
Note for the battery symbol (bottom two symbol examples):
This symbol might be used in combination with a chemical symbol. In this case it complies with
the requirement set by the Directive for the chemical involved.
Environment care information for users in China
This symbol is only valid in China.

TQBJ0658
GERMAN
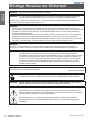
Wichtige Hinweise
Wichtige Hinweise zur Sicherheit ................. 2
Vorsichtsmaßnahmen für den Gebrauch .... 9
Vorsichtshinweise beim Transport ............................... 9
Vorsichtshinweise bei der Aufstellung ......................... 9
Sicherheit ....................................................................10
Entsorgung .................................................................10
Vorsichtshinweise zum Betrieb ..................................10
Zubehör ......................................................................12
Sonderzubehör ...........................................................13
Vorbereitung
Anschlüsse .................................................... 14
Anschlussbeispiel: Computer ....................................14
Anschlussbeispiel: AV-Anlage ...................................14
Ein-/Ausschalten ........................................... 15
Hinweise zur Befestigung des Objektivs ... 15
Dieses Handbuch stellt eine Kurzversion der vollstandigen Bedienungsanleitung dar.
WeitereInformationen siehe PDF-Datei mit der Bedienungsanleitung auf der mitgelieferten CD-ROM.
Vielen Dank, dass Sie dieses Produkt von Christie gekauft haben.
■Lesen Sie vor der Nutzung dieses Produkts die Bedienungsanleitung sorgfältig durch.
Bewahren Sie dieses Handbuch auf.
Informationen zur Verwendung des Produkts über ein Netzwerk nden Sie unter
„Bedienungsanleitung für den Netzwerkbetrieb“.
Bedienungsanleitung
✽ Das Projektionsobjektiv wird getrennt verkauft.
Anwendung
020-000641-01 Rev.1 (11-2013)
La page est en cours de chargement...
La page est en cours de chargement...
La page est en cours de chargement...
La page est en cours de chargement...
La page est en cours de chargement...
La page est en cours de chargement...
La page est en cours de chargement...
La page est en cours de chargement...
La page est en cours de chargement...
La page est en cours de chargement...
La page est en cours de chargement...
La page est en cours de chargement...
La page est en cours de chargement...
La page est en cours de chargement...
La page est en cours de chargement...
La page est en cours de chargement...
La page est en cours de chargement...
La page est en cours de chargement...
La page est en cours de chargement...
La page est en cours de chargement...
La page est en cours de chargement...
La page est en cours de chargement...
La page est en cours de chargement...
La page est en cours de chargement...
La page est en cours de chargement...
La page est en cours de chargement...
La page est en cours de chargement...
La page est en cours de chargement...
La page est en cours de chargement...
La page est en cours de chargement...
La page est en cours de chargement...
La page est en cours de chargement...
La page est en cours de chargement...
La page est en cours de chargement...
La page est en cours de chargement...
La page est en cours de chargement...
La page est en cours de chargement...
La page est en cours de chargement...
La page est en cours de chargement...
La page est en cours de chargement...
La page est en cours de chargement...
La page est en cours de chargement...
La page est en cours de chargement...
La page est en cours de chargement...
La page est en cours de chargement...
La page est en cours de chargement...
La page est en cours de chargement...
La page est en cours de chargement...
La page est en cours de chargement...
La page est en cours de chargement...
La page est en cours de chargement...
La page est en cours de chargement...
La page est en cours de chargement...
La page est en cours de chargement...
La page est en cours de chargement...
La page est en cours de chargement...
La page est en cours de chargement...
La page est en cours de chargement...
La page est en cours de chargement...
La page est en cours de chargement...
La page est en cours de chargement...
La page est en cours de chargement...
La page est en cours de chargement...
La page est en cours de chargement...
La page est en cours de chargement...
La page est en cours de chargement...
La page est en cours de chargement...
La page est en cours de chargement...
La page est en cours de chargement...
La page est en cours de chargement...
La page est en cours de chargement...
La page est en cours de chargement...
La page est en cours de chargement...
La page est en cours de chargement...
La page est en cours de chargement...
La page est en cours de chargement...
La page est en cours de chargement...
La page est en cours de chargement...
La page est en cours de chargement...
La page est en cours de chargement...
La page est en cours de chargement...
La page est en cours de chargement...
La page est en cours de chargement...
La page est en cours de chargement...
La page est en cours de chargement...
La page est en cours de chargement...
La page est en cours de chargement...
La page est en cours de chargement...
La page est en cours de chargement...
-
 1
1
-
 2
2
-
 3
3
-
 4
4
-
 5
5
-
 6
6
-
 7
7
-
 8
8
-
 9
9
-
 10
10
-
 11
11
-
 12
12
-
 13
13
-
 14
14
-
 15
15
-
 16
16
-
 17
17
-
 18
18
-
 19
19
-
 20
20
-
 21
21
-
 22
22
-
 23
23
-
 24
24
-
 25
25
-
 26
26
-
 27
27
-
 28
28
-
 29
29
-
 30
30
-
 31
31
-
 32
32
-
 33
33
-
 34
34
-
 35
35
-
 36
36
-
 37
37
-
 38
38
-
 39
39
-
 40
40
-
 41
41
-
 42
42
-
 43
43
-
 44
44
-
 45
45
-
 46
46
-
 47
47
-
 48
48
-
 49
49
-
 50
50
-
 51
51
-
 52
52
-
 53
53
-
 54
54
-
 55
55
-
 56
56
-
 57
57
-
 58
58
-
 59
59
-
 60
60
-
 61
61
-
 62
62
-
 63
63
-
 64
64
-
 65
65
-
 66
66
-
 67
67
-
 68
68
-
 69
69
-
 70
70
-
 71
71
-
 72
72
-
 73
73
-
 74
74
-
 75
75
-
 76
76
-
 77
77
-
 78
78
-
 79
79
-
 80
80
-
 81
81
-
 82
82
-
 83
83
-
 84
84
-
 85
85
-
 86
86
-
 87
87
-
 88
88
-
 89
89
-
 90
90
-
 91
91
-
 92
92
-
 93
93
-
 94
94
-
 95
95
-
 96
96
-
 97
97
-
 98
98
-
 99
99
-
 100
100
-
 101
101
-
 102
102
-
 103
103
-
 104
104
-
 105
105
-
 106
106
-
 107
107
-
 108
108
-
 109
109


Christie LX1750 Manuel utilisateur
- Catégorie
- Projecteurs
- Taper
- Manuel utilisateur
dans d''autres langues
- italiano: Christie LX1750 Manuale utente
- español: Christie LX1750 Manual de usuario
- Deutsch: Christie LX1750 Benutzerhandbuch