
P/N UM597KL_KG 599KL_KG 752KL_KG REV20210107_Web 1
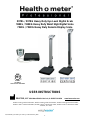
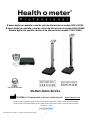
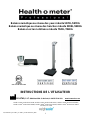
597KL / 597KG Heavy Duty Eye Level Digital Scale
599KL / 599KG Heavy Duty Waist High Digital Scale
752KL / 752KG Heavy Duty Remote Display Scale
USER INSTRUCTIONS
PELSTAR, LLC 9500 West 55th St. McCook, IL 60525-7110 USA www.homscales.com
Health o meter® Professional 597KL; Health o meter® Professional 597KG; Health o meter® Professional 599KL;
Health o meter® Professional 599KG; Health o meter® Professional 752KL; Health o meter® Professional 752KG
© Pelstar, LLC 2021
E112697
UL 60601-1
CSA C22.2 No. 601.1-M90

P/N UM597KL_KG 599KL_KG 752KL_KG REV20210107_Web 2
Health o meter® Professional 597KL; Health o meter® Professional 597KG; Health o meter® Professional 599KL;
Health o meter® Professional 599KG; Health o meter® Professional 752KL; Health o meter® Professional 752KG
Thank you for purchasing this Health o meter® Professional scale. Please read this manual carefully and
keep it for easy reference or training.
TABLE OF CONTENTS
CAUTIONS AND WARNINGS ................................................................................................. 3
SPECIFICATIONS FOR THIS SCALE .................................................................................... 4
CERTIFICATIONS / CONNECTIVITY / DISPOSAL ................................................................ 5
597KL/597KG/599KL/599KG ASSEMBLY INSTRUCTIONS ................................................... 6
752KL/752KG ASSEMBLY INSTRUCTIONS FOR TABLE TOP USE…………………………..10
752KL/752KG DISPLAY ASSEMBLY WALL MOUNT INSTRUCTIONS …………………… 11
SET-UP INSTRUCTIONS........................................................................................................ 12
OPERATING INSTRUCTIONS ................................................................................................ 13
597KL/597KG HEIGHT MEASUREMENT INSTRUCTIONS .................................................... 15
MAINTENANCE AND CLEANING ........................................................................................... 17
CALIBRATION ........................................................................................................................ 18
TROUBLESHOOTING ............................................................................................................ 19
WARRANTY ............................................................................................................................ 20
Note: This scale has been factory calibrated, and does not require
calibration prior to use.
Please register your scale for warranty coverage at:
www.homscales.com
For User Instructions updates and revisions please go to:
www.homscales.com

P/N UM597KL_KG 599KL_KG 752KL_KG REV20210107_Web 3
CAUTIONS AND WARNINGS
INTENDED USE
This Health o meter® Professional platform scale is intended to be used in a professional medical environment by trained
medical staff. This product was designed to weigh patients who are safely positioned and standing on the platform. If a height
rod is attached to the scale, the intended use of the height rod is to measure patient height. Do not modify the product or use it
for anything other than its intended purpose.
To prevent patient/caregiver injury or damage to your scale, please follow the instructions in this user manual very
carefully.
• Do not exceed the weight capacity specified for this scale.
• For accurate weighing, this scale must be placed on a flat, stable surface.
• For accurate weighing, verify before each use the proper operation according to the procedure described in this manual.
• Do not use in the presence of flammable or explosive materials.
• If the scale becomes damaged, it should not be operated until properly serviced.
• Do not wheel or pull the scale down stairs, doing so may damage internal parts.
• Ensure that the AC adapter and scale do not come in contact with liquids, excessive temperature, or excessive
humidity.
Patient/caregiver safety
• This scale is designed for static weighing of patients only. No scale should be used for patient transfer.
• To prevent patient injury, the patient must be attended throughout the entire weighing event. Caregivers should ensure
that the patient is stable and provide support as needed when getting onto and off of the scale.
• Patient should wear socks or other form of lightweight foot covering during weighing event.
When operating the scale with the AC adapter:
• Operate this scale exclusively with the AC adapter that is provided (ADPT50). Use of an unspecified adapter will void the
warranty, and can pose a serious safety hazard.
• Prior to using this scale, inspect the AC adapter cord for cracking / fraying, or for broken / bent plug prongs.
• Prior to using this scale, ensure that the AC adapter is plugged into an outlet with the rated voltage appropriate for
operation.
• Ensure that the AC adapter outlet is wired to a circuit breaker or other protected power source.
• Unplug the AC adapter, and carefully store both the adapter and adapter cord before moving the scale.
• Operating this scale at voltages and frequencies other than specified can damage the equipment and will void the
warranty.
When operating the scale with batteries:
• If the scale’s display indicates that the batteries are low replace the batteries or switch to the AC adapter as soon as
possible.
• When replacing / inserting batteries, be sure to use all new batteries.
This equipment has been tested and found to comply with the EMC limits for the Medical Device Directive 93/42/EEC (EN
55011 Class A and EN 60601-1-2). These limits are designed to provide reasonable protection against harmful interference in
a typical medical installation. The equipment generates, uses and may radiate radio frequency energy and, if not installed and
used in accordance with these instructions, may cause harmful interference to other devices in the vicinity. There is no
guarantee that interference will not occur in a particular installation. If this equipment does cause harmful interference with
other devices, which can be determined by turning the equipment off and on, the user is encouraged to try to eliminate the
interference by one or more of the following measures:
• Reorient or relocate the receiving device.
• Increase the separation between the equipment.
• Connect the equipment into an outlet on a circuit different from that to which the other device(s) is connected.
• Consult Customer Service or a field service technician for help.
In no event whatsoever shall Pelstar, LLC be liable for damages or injuries whatsoever arising out of or connected
with the assembly, use, or misuse of its products.

P/N UM597KL_KG 599KL_KG 752KL_KG REV20210107_Web 4
SPECIFICATIONS
General
Health o meter® Professional’s Digital Physician Scales, models 597KL/597KG, 599KL/599KG, 752KL/752KG
use sophisticated microprocessor technology. Each precision instrument is designed to provide accurate,
reliable and repeatable weight measurements and features that make the weighing process simple, fast and
convenient.
The scale is set up to determine the weight of a stationary patient. The weight can be displayed in pounds or in
kilograms. The scale features a swivel display module which allows for viewing from either side of the scale.
Also included with the 599KL/599KG and 597KL/597KG models are wheels for easy mobility.
The unit can be operated using its AC adapter or with 6-C cell batteries (not included).
Specifications
Capacity and
resolution
597KL/599KL/752KL: 660 lb x 0.2 lb (300 kg x 0.1 kg)
597KG/599KG/752KG: 300 kg x 0.1 kg
Power
Requirements:
Adapter Model UES06W0CP-060050SPA or UE15WCP-060050SPA
(Health o meter Professional Model ADPT50) (INCLUDED),
Input: 100-240V – 50/60Hz, 500mA
Output: 6.0V 0.5A
or 6 C-cell 1.5V batteries (not included)
Environmental:
Operating Temperature: 10°C to 40° C (50°F to 104°F)
Storage Temperature: 0°c to 50°C (32ºF to 122ºF)
Maximum Humidity: 85% RH in use or in storage
Platform
Dimensions:
14 ¼” x 14 ¼” x 2 5/8”
(36cm x 36cm x 6.8cm)
Assembled
Dimensions:
14 ¾” x 24 1/8” x 54 3/8”
(37.5cm x 61.3cm x 138cm)
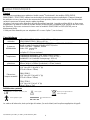
Definition of Symbols
The scale surface, along with the height rod, (if provided) are the Type B applied parts.
Caution
Attention: Consult Accompanying Documents
Type B Applied Parts
DC Power Supply
Do not dispose of this device in
the domestic waste stream.

P/N UM597KL_KG 599KL_KG 752KL_KG REV20210107_Web 5
CERTIFICATIONS / CONNECTIVITY / DISPOSAL
Certification Descriptions:
E112697
UL 60601-1
CSA C22.2 No. 601.1-M90
Complies with ANSI/AAMI ES60601-1 (2005) + AMD 1 (2012,
CAN/CSA-C22.2 No. 60601-1 (2014)
Pelstar, LLC has been officially certified as a manufacturer of Health o
compliance with stringent Professional medical devices to be in
®
meter
ISO requirements. The Pelstar, LLC quality assurance system covers
the development, production, sales and service of medical scales and
measuring systems.
All Health o meter® Professional scales are manufactured in FDA-registered factories.
Scale Connectivity Information:
To enable reliable transmission of weight, height, and Body Mass Index (BMI) data, this scale is designed to connect
to a computer, monitor, or other electronic device via USB or Pelstar wireless technology. This connectivity helps
minimize a source of potential medical errors caused by incorrectly copying and then recording patient data. For
more information regarding how to connect the scale to other electronic devices, please contact Health o meter®
Professional Scales Technical Support, available during normal business hours at 1-800-638-3722.
Scale Disposal:
Do not dispose of this device in domestic waste. This Health o meter® Professional scale must be disposed of
properly as electronic waste. Follow the national, regional or local regulations which apply to you for disposal. For
scale assistance or telephone support, please call Health o meter® Professional Customer Service (available on
normal business days) at (+1) 800-815-6615 or (+1) 708-377-0600.

P/N UM597KL_KG 599KL_KG 752KL_KG REV20210107_Web 6
ASSEMBLY INSTRUCTIONS
Before Assembly
Each scale is shipped disassembled in one carton. Carefully inspect the carton for shipping damage before
unpacking. If damage is found, contact your shipper or a Health o meter® Professional representative immediately
at 1-800-815-6615. Claims must be filed with the shipper as soon as possible after receipt of the package. The
following information details what you will find inside the main carton as you unpack the parts for assembly.
To prevent scratching any components, carefully remove each assembly from the carton and unwrap the packing
materials. Set the carton aside for storage. To avoid damaging the scale parts when unpacking, do not use a box
cutter, knife, scissors, or any sharp object to open the protective inner packaging.
597KL/597KG and 599KL/599KG Carton
(1) Large brown box, containing:
• (1) Scale platform
(1) Long brown box, containing:
• (1) Pillar
(1) Medium brown box, containing:
• (1) Display assembly
(1) Small brown box, containing:
• (1) Small white box containing the AC adapter (ADPT 50)
• (1) Plastic bag containing:
o (1) 5mm Allen wrench
o (4) 5mm hex screws (Allen screws)
Tools Required
5mm Allen Wrench (included), Phillips Head Screwdriver (not included)
752KL/752KG Carton
(1) Large brown box, containing:
• (1) Scale platform
(1) Medium brown box, containing:
• (1) Display assembly
(1) Small brown box, containing:
• (1) Small white box containing the AC adapter (ADPT 50)
• (1) Load cell cable
If wall mounting the 752KL/752KG display head, the following tools/parts are required and not included:
(1) Drill
(1) Phillips Head Screwdriver
(2) #8 Anchoring screws (4.2 mm nominal OD)
(2) Mounting anchors, compatible with wall construction

P/N UM597KL_KG 599KL_KG 752KL_KG REV20210107_Web 7
597KL/597KG/599KL/599KG ASSEMBLY INSTRUCTIONS
Prior to assembly, remove all brown cardboard in and around pillar, base, and display head.
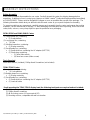
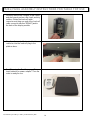
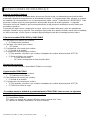
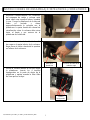
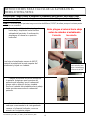
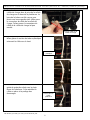
1. Carefully remove the contents of the carton
and place each part on a flat, level, and dry
surface. Place the scale platform on its side
and align the pillar perpendicular to the
platform. The front of the display head on
the pillar should be facing forward and
above the scale platform.
2. Locate the load cell cable connector at the
bottom of the pillar. Feed the cable through
the circular opening at the base of the
platform.
3. Insert the pillar into the pillar base on the
platform. Insert the 4 hex screws on the
underside of the platform and tighten using
the supplied 5mm Allen wrench.
Hex screws
Load Cell Cable Connector
Platform Base

P/N UM597KL_KG 599KL_KG 752KL_KG REV20210107_Web 8
597KL/597KG/599KL/599KG ASSEMBLY INSTRUCTIONS (CONT.)
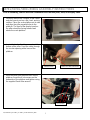
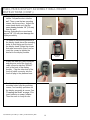
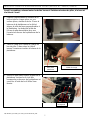
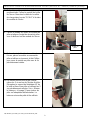
4. Plug the load cell cable connector into the
load cell plug in the platform base. The
base of the scale has been designed to
provide wire management for the load cell
cable connector. Route the load cell cable
connector as shown.
5. After plugging in the load cell cable, slide
the section of plastic tubing surrounding the
cable upwards.
6. Tuck the cable and tubing into the
protective guide in the underside of the
scale platform. This holds the cable in place
and protects it from being damaged.
Load cell cable port
plastic tubing
tuck into
protective
guide

P/N UM597KL_KG 599KL_KG 752KL_KG REV20210107_Web 9
597KL/597KG/599KL/599KG ASSEMBLY INSTRUCTIONS (CONT.)
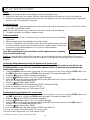
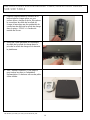
7. Set the base/pillar assembly upright. Obtain
the display head module. Plug the load cell
cable into the “SCALE” jack in the back of
the display module.
8. Place the display module on top of the pillar
and align the tab on the front of the pillar
with the slot at the bottom of the display
module.
9. Remove the screw from the back of the
display module, place the module on top of
the pillar and use a Phillips head screw
driver to tighten the module to the pillar with
the screw that was previously removed.
10. Using a Phillips head screwdriver, remove
the 2 screws at the rear bottom of the pillar.
Obtain the AC adapter bracket from the
carton and attach it to the pillar using the 2
screws previously removed. See “Powering
the Scale” on page 13 to insert batteries or
power adapter. Then the scale is ready for
use.
Pillar tab

P/N UM597KL_KG 599KL_KG 752KL_KG REV20210107_Web 10
752KL/752KG ASSEMBLY INSTRUCTIONS FOR TABLE TOP USE
1. Carefully remove the contents of the carton
and place each part on a flat, level, and dry
surface. Obtain the load cell cable
connector and plug one end of the load cell
cable connector into the “SCALE” jack in
the back of the display module.
2. Plug the other end of the load cell cable
connector into the load cell plug in the
platform base.
3. See “Powering the Scale” on page 13 to
insert batteries or power adapter. Then the
scale is ready for use.

P/N UM597KL_KG 599KL_KG 752KL_KG REV20210107_Web 11
752KL/752KG DISPLAY ASSEMBLY WALL MOUNT
INSTRUCTIONS
Required Parts and Tools (Not Included)
(1) Drill
(1) Phillips head Screwdriver
(2) #8 Anchoring screws (4.2 mm nominal OD)
(2) Mounting anchors, compatible with wall construction
Caution: When wall mounting the display assembly, ensure that the mounting location
is free of electrical lines, gas pipes, and other safety hazards. Ensure that the wall is of
construction that can support the display assembly.
Note: Remote head can be mounted to a wall up to 6 feet (1.83 m) from the base or it can be mounted on
the display bracket (included) for placement on a table up to 6 feet (1.83 m) from the base.
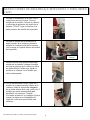
1. Use a Phillips head screwdriver to
remove the 2 screws securing the
bracket to the display module.
Retain the screws.Position the
display assembly bracket against the
wall, and mark the wall at the center
of each mounting hole.
2.
- If mounting to drywall or
plasterboard, use a 5mm (3/16”)
drill bit to drill a lead hole into the
marked location.
- If mounting to wood, wood studs
or metal, use a 1.5mm (1/16”)
drill bit to drill a lead hole into the
marked location.
5mm (3/16”) drill bit
for mounting on
drywall or
plasterboard
1.5mm (1/16”) drill bit
for mounting on wood,
wood studs or metal

P/N UM597KL_KG 599KL_KG 752KL_KG REV20210107_Web 12
752KL/752KG DISPLAY ASSEMBLY WALL MOUNT
INSTRUCTIONS (CONT.)
3. Use a Phillips head screwdriver to
set the 2 drywall anchors into the
wall. Then screw the two mounting
screws into the anchors. Adjust the
screw head depth such that the
screw heads protrude 1/8” (3.2 mm)
from the wall.
Warning: Extending the screw heads
beyond 1/8” (3.2 mm) can damage the
display assembly.
4. To reattach the mounting bracket to
the display head, place the mounting
holes so that they are at the top of
the display head. Obtain the screws
that were removed in Step 1 and re-
insert the screws to tighten the
bracket to the display module.
5. Obtain the load cell cable connector
and plug one end of the load cell
cable connector into the “SCALE”
jack in the back of the display
module. Plug the other end of the
load cell cable connector into the
load cell plug in the platform base.
6. Position the display assembly
mounting holes onto the mounting
screws, and carefully pull down on
the display assembly to secure. See
“Powering the Scale” on page 13 to
insert batteries or power adapter.
Then the scale is ready for use.
Mounting
Holes

P/N UM597KL_KG 599KL_KG 752KL_KG REV20210107_Web 13
SET-UP INSTRUCTIONS
Set-Up
1. Remove the protective film from the display window on the display head.
2. Ensure the scale base is on a stable, flat surface and that the sides of the base are clear of any obstacles.
3. Utilizing the leveling bubble located at the top of the scale platform, level the scale by adjusting the leveling feet
at each corner of the underside of the base.
Powering the Scale
1. For AC operation – plug the adapter into the base of the scale and into the power source, or use the DC IN plug
on the back of the display module.
Note: The Auto Off function is only active when the scale is being used with batteries.
2. For battery operation, see Battery Installation below.
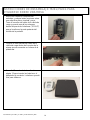
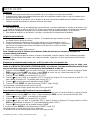
Battery Installation
1. Place the scale on its side. The battery holder is located in the center of the bottom
of the base.
2. Slide the battery cover in the direction of the “open” arrow.
3. Place 6 C-cell batteries into the battery holder. Note the orientation that is shown and
ensure the batteries are placed in the proper direction. Health o meter® Professional
recommends using Alkaline batteries. Do not use zinc-carbon batteries.
4. Replace the battery cover.
Note: When powering the scale via batteries, the AC adapter must be completely
disconnected from the scale.
Warning: If the scale will not be used for some time, remove all batteries to avoid a safety hazard. Disposal of
batteries should be done according to the national, regional or local regulations which apply to you for disposal of
batteries.
Locking the Weight Measuring Unit in KG (Applies to KL models only)
Caution: Please make sure you carefully and precisely follow the directions below as you will be in the
PROGRAM MODE of your scale. Any modification outside of what is listed below may greatly affect the
functionality of your scale.
1. Press the ON/OFF button to power on the scale. As soon as you turn on the scale, press the ZERO button once,
the UNIT* button twice, and then the ZERO button once again. The scale will display “CAL”.
2. Press the once and “PROG” will show on the display.
3. Press the ENTER button and OP1-0 or OP1-1 will be displayed.
4. Press the once and the display will read “OP2-0”for the KG lock function, then press the UNIT button to enable
KG lock. Your display should read “OP2-1”.
5. Press the until display reads “DONE”
6. Press the ENTER button, the scale will read “START”, then read “0.0 Kg”
You have successfully locked your scale into KG Only.
*Previous version keypad may say KG/LB instead of UNIT
Deactivating KG Lock (Applies to KL models only)
1. Press the ON/OFF button to power on the scale. As soon as you turn on the scale, press the ZERO button once,
the UNIT* button twice, and then the ZERO button once again. The scale will display “CAL”.
2. Press the once and “PROG” will show on the display.
3. Press the ENTER button and OP1-0 or OP1-1 will be displayed.
4. Press the once and the display will read “OP2-1”for the KG lock function, then press the UNIT button to
disable KG lock. Your display should read “OP2-0”.
5. Press the until display reads “DONE”
6. Press the ENTER button, the scale will read “START”, then read “0.0”
You have successfully deactivated the KG lock on your scale.
*Previous version keypad may say KG/LB instead of UNIT
Battery compartment

P/N UM597KL_KG 599KL_KG 752KL_KG REV20210107_Web 14
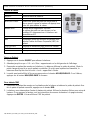
OPERATING INSTRUCTIONS
Using the Keypad
KEY
FUNCTION
ON/OFF
Turns scale ON and OFF.
ZERO
Zeroes the scale prior to weighing.
HOLD/RELEASE
Holds the value of the weighed object on the display until the
button is pressed again to clear the value.
UNIT button
Toggles between kilograms or pounds. Weight measurement unit
will not toggle on KG only models or if the scale is locked into KG.
UP ARROW
Scrolling method for entering height
BMI
Prompts entry of height to calculate the patient’s Body Mass Index
(BMI).
DOWN ARROW
Scrolling method for entering height
CLEAR
Functions as menu escape in BMI mode
ENTER
Used to accept height in BMI mode
Weighing a Patient
1. Press the ON/OFF button to turn the scale on.
2. Wait until ‘0.0’ and ‘Zero’ on the left side of the display appear.
3. Ask the patient to step on the scale. The scale will display the patient’s weight. (Note: the weight will change until
the patient is stable). Once the patient is standing still, the scale will beep three times and the word Lock will
appear on the display along with patient weight.
4. Weight may remain displayed on the scale by pressing the HOLD/RELEASE button. To release, press the
HOLD/RELEASE button again.
To Obtain BMI
1. Ask the patient to step on the scale platform and obtain the patient’s weight. Once the patient’s weight is locked,
press the BMI button.
2. The scale will prompt you to enter the patient’s height. Use the arrow (scroll) keys to enter the correct height. (If
using a 597KL/597KG scale, see Height Measuring Instructions on the following page.) Press ENTER. Display
will read the patient’s BMI.

P/N UM597KL_KG 599KL_KG 752KL_KG REV20210107_Web 15
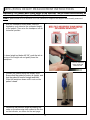
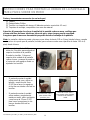
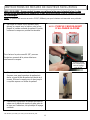
597KL/597KG HEIGHT MEASUREMENT INSTRUCTIONS
WARNINGS: Use caution when sliding height rod up and down. The rod should move smoothly, do
not move the rod in a jerking motion. Fold headpiece down when not in use.
Note: A patient needs to be a minimum of 23-5/8” (600mm) in height for the height to be accurately measured.
1. With the headpiece folded down, slide the
headpiece up or down to the estimated height
of the patient. Then raise the headpiece into its
horizontal position.
To lower height rod below 46 3/8”, push the tab at
the top of the height rod and gently lower the
headpiece.
2. Position the patient facing the display head.
Ensure that the patient’s posture is upright, and
that the patient’s head is straight and level.
Slide the headpiece down until it rests on the
patient’s head.
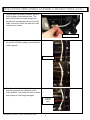
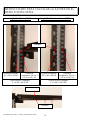
3. Determine the patient’s height by reading the
value on the measuring strip nearest to the line
on the indicator, as shown on the next page.
Push tab inward to
lower height rod
below 46 3/8”

P/N UM597KL_KG 599KL_KG 752KL_KG REV20210107_Web 16
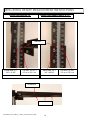
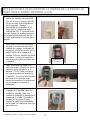
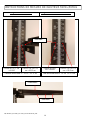
597KL/597KG HEIGHT MEASUREMENT INSTRUCTIONS
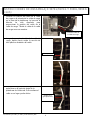
Height Rod Below 46 3/8”
ded Above 46 3/8”Height Rod Exten
Headpiece
Cm read: 176 cm +
0.2 cm = 176.2 cm
Cm read: 105 cm +
0.2 cm = 105.2 cm
Inches read: 41” +
3/8” = 41 3/8”
Inches read: 69” +
3/8” = 69 3/8”
Indicator
Feet and Inches read: 5’ + 9 3/8” = 5 ft. 9 3/8”
Feet and Inches read: 3’ + 5 3/8” = 3 ft. 5 3/8”
Indicator

P/N UM597KL_KG 599KL_KG 752KL_KG REV20210107_Web 17
MAINTENANCE AND CLEANING
General
This section provides instructions for maintenance, cleaning, calibration, and troubleshooting. Maintenance
operations other than those described in this section should be performed by qualified service personnel.
1. This scale contains electronic parts. Use it carefully. Do not drop, kick or jump on it.
2. Do not store near chemicals, heaters or radiators.
3. Do not store the scale on its side.
Before first use and after periods of non-use, check the scale for proper operation. If the scale does not
operate correctly, contact qualified service personnel.
1. Check overall appearance of the scale for any obvious damage, abuse, etc.
2. Inspect condition of AC adapter cord and prongs, replace if needed.
Cleaning and Disinfecting
Proper care and cleaning is essential to ensure a long life of accurate and effective weighing.
Caution: Disconnect the scale from the AC adapter power source prior to cleaning the unit.
1. Health o meter® Professional recommends using one of the following solutions on a soft cloth or disposable wipe:
● mild soap and water solution
● 70% isopropyl alcohol
● solution with 1-5% hydrogen peroxide concentration
After cleaning/disinfecting, wipe with a cloth dampened with water and then with a clean dry cloth. To avoid
residue build-up or damp surfaces, ensure the screen and scale parts are completely dry after cleaning.
2. Never use rough or abrasive materials to clean the scale, as these will damage the scale’s finish.
3. Do not submerge the scale in water or any other liquid.
4. Do not pour or spray fluids directly on the scale.
Replacement Parts
Part #
Description
T16-087011-00
RUBBER FEET 597KL/KG, 599KL/KG, 752KL/KG
T16-087311-00
BATTERY DOOR 597KL/KG, 599KL/KG, 752KL/KG
T16-088411-00
RUBBER FOOT FOR PILLAR BASE 597KL/KG, 599KL/KG
T18-004700-00
LOAD CELL CABLE 597KL/KG, 599KL/KG
T18-004800-00
LOAD CELL CABLE 752KL/KG
T42-014900-00
KEYPAD FOR 597KL/KG, 599KL/KG, 752KL/KG
T46-087411-00
WHEEL ASSEMBLY 597KL/KG, 599KL/KG
T597NECK
NECK/SWIVEL ASSEMBLY 597KL/KG
T599NECK
NECK/SWIVEL ASSEMBLY 599KL/KG
402KLROD
HEIGHT ROD, 597KL/KG
499KLROD
HEIGHT ROD, 599KL/KG
ADPT50
POWER ADAPTER 597KL/KG, 599KL/KG, 752KL/KG

P/N UM597KL_KG 599KL_KG 752KL_KG REV20210107_Web 18
CALIBRATION
This scale has been factory calibrated, and does not require calibration prior to use. If required, the scale can be
calibrated following the procedure below.
Note: Only weights certified and traceable to national standards are to be used for calibration procedures.
KL Model Calibration
KL model scales can be calibrated in pounds or kilograms. The default calibration weight unit is pounds. If you prefer
to calibrate in kilograms you must first follow this procedure to change the calibration weight unit.
Caution: Please make sure you carefully and precisely follow the directions below as you will be in the
PROGRAM MODE of your scale. Any modification outside of what is listed below may greatly affect the
functionality of your scale.
To Change the Calibration Weight Mode to KG
1. Press the ON/OFF button to power on the scale. As soon as you turn on the scale, press the ZERO button once,
the UNIT* button twice, and then the ZERO button once again. The scale will display “CAL”.
2. Press the once and “PROG” will show on the display.
3. Press the ENTER button and OP1-0 or OP1-1 will be displayed.
4. Press the UNITS button to toggle between OP1-0 and OP1-1. Select OP1-0 to set your calibration weight in
pounds. Select OP1-1 to set your calibration weight to kilograms.
5. After making your selection, press the until display reads “DONE”
6. Press the ENTER button, the scale will read “START”, followed by a version code and then return to zero.
7. Turn the scale off. Then begin the calibration procedure below.
*Previous version keypad may say KG/LB instead of UNIT
KG Model Calibration
KG models can only be calibrated in kilograms. Follow the calibration procedure below.
Calibration Procedure for KL and KG Models
The calibration weight must be no less than 60 lb (28 kg) and no more than 300 lb /150 kg. For optimum accuracy,
Health o meter Professional Scales recommends calibrating at 300 lb / 150 kg.
OPERATOR ACTION
DISPLAY
Turn on the scale and while “START’ is displayed, press the following keys in this
sequence:
ZERO, UNIT*, UNIT, ZERO
Note: You must press these keys while “START” is displayed, before the display
shows zero.
*Previous version keypad may say KG/LB instead of UNIT
“CAL”
Press ENTER. “Load” and “300.0” or “150.0” will appear on the display
“Load/300.0” or
“Load/150.0”
Press ENTER to calibrate with 300 lb or 150 kg. To calibrate with a different amount,
press BMI. Use the arrows to change the flashing digit, BMI to move to the next
digit, until you reach the required weight (no less than 60lb and no more than 300lb).
When the required calibration weight is reached, press ENTER. “Clear” will appear
on the display.
“CLEAR”
Clear the platform of any weight and press ENTER. Dashes will appear while the
scale calibrates zero.
“-----------”
Wait without touching or shaking the scale until the zero calibration process is
finished. The display will then prompt for the calibration weight to be loaded.
“Put XXX.X”
Load the platform with the required weight and press ENTER. Dashes will appear on
the display as the scale calibrates.
“-----------”
When calibration is complete “DONE/CLEAR/XXX” will appear on the display.
“DONE/CLEAR/XXX”
Remove all weight from the platform. When all weight is cleared the scale will reboot
and “StArt” will appear on the display followed by the software version and then
return to “0.0”.
“StArt”; numbers; “0.0”
Refer to the next page should you experience any errors during the calibration procedure.

P/N UM597KL_KG 599KL_KG 752KL_KG REV20210107_Web 19
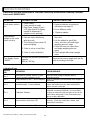
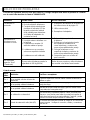
TROUBLESHOOTING
Refer to the following instructions to check and correct any failure before contacting Customer
Service at 1-800-815-6615
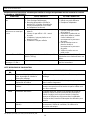
SYMPTOM
POSSIBLE CAUSE
CORRECTIVE ACTION
Scale does not turn
on
1. Dead Battery
2. Faulty electrical outlet
3. Bad Power Supply (Check
LED light at back of display
module to determine if
adapter cord is working)
1. Replace batteries according to
instructions on page 13.
2. Use a different outlet
3. Replace adapter
Questionable
weight or the scale
does not zero
1. External object interfering
with the scale
2. The display did not show 0.0
before weighing
3. Scale is not on a level floor
4. Scale is out of calibration
1. Remove interfering object from
the scale
2. Ask the patient to get off the
scale, zero the scale and begin
weighing process again
3. Place the scale on a level floor
and begin weighing process
again
4. Check weight with known weight
value
The display shows
“OVER”
The load on the scale exceeds the
capacity
(660 lb / 300 kg)
Remove the excess weight and use the
scale according to its limits
Calibration Errors
ERROR
NO.
DEFINITION
CHECK/REPLACE
Err 1
Mathematical mistake; division by zero.
Cannot calculate calibration factor
Will show when trying to calibrate with no
calibration weight.
Err 2
Weight loaded too low. Cannot calibrate
While in calibration procedure add more weight in
load mode
Err 3
Unstable weight. Cannot calibrate
Check the load cells mechanical surroundings and
ensure that nothing touches them and that the
cables are well connected
Err 5
Calibration disabled
On the back of the display, locate the silver
extended screw and plastic tab. Use a nut driver
or pliers to remove the tab and gain access to the
push button underneath. Press and release one
time to enable calibration.
Err 6
High saturation state (high A/D)
The load cell cable connector is not connected
correctly. Check the connection, cables, and
mechanical connection.
Err 7
Low saturation state (low A/D)
See Err 6

P/N UM597KL_KG 599KL_KG 752KL_KG REV20210107_Web 20
WARRANTY
What does the Warranty Cover?
These Health o meter® Professional scales are warranted from date of purchase against defects of materials or in workmanship
for a period of two (2) years. If product fails to function properly, return the product, freight prepaid and properly packed to
Pelstar, LLC (see “To Get Warranty Service”, below, for instructions). If the manufacturer determines that a defect of material or
in workmanship exists, the customer’s sole remedy will be replacement of the scale at no charge. Replacement will be made with
a new or remanufactured product or component. If the product is no longer available, replacement may be made with a similar
product of equal or greater value. All replaced parts are covered only for the original warranty period.
Who is Covered?
The original purchaser of the product must have proof of purchase to receive warranty service. Please save your invoice or
receipt. Pelstar dealers or retail stores selling Pelstar products do not have the right to alter, or modify or any way change the
terms and conditions of this warranty.
What is Excluded?
Your warranty does not cover normal wear of parts or damage resulting from any of the following: negligent use or
misuse of the product, use on improper voltage or current, use contrary to the operating instructions, abuse including tampering,
damage in transit, or unauthorized repair or alternations. Further, the warranty does not cover natural disasters, such as fire,
flood, hurricanes and tornadoes. This warranty gives you specific legal rights, and you may also have other rights that vary from
country to country, state to state, province to province or jurisdiction to jurisdiction.
To get Warranty Service make sure you keep your sales receipt or document showing proof of purchase. Call (+1) 800-
638-3722 or (+1) 708-377-0600 to receive a return authorization (RA) number, which must be included on the return label. Attach
your proof of purchase to your defective product along with your name, address, daytime telephone number and description of
the problem. Carefully package the product and send with shipping and insurance prepaid to:
Pelstar, LLC
Attention R/A#_____________
Return Department
9500 West 55th Street
McCook, IL 60525
Extended Warranty Available
These scales are eligible for Health o meter® Professional ScaleSurance Extended Warranty Program. ScaleSurance extends
the warranty period for an additional two years. This extension to the standard Limited Warranty can be purchased with new
scales or for a facility’s existing scale before its current warranty has expired.
*Not available in all countries.
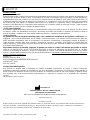
PELSTAR, LLC
9500 West 55th St. McCook, IL 60525-7110 USA
1-800-638-3722 or 1-708-377-0600
PLEASE REGISTER YOUR SCALE FOR WARRANTY COVERAGE AT:
www.homscales.com
Health o meter® is a registered trademark of Sunbeam Products, Inc. used under license. Health o meter® Professional products are
manufactured, designed, and owned by Pelstar, LLC. We reserve the right to improve, enhance, or modify Health o meter® Professional
product features or specifications without notice.
© Pelstar, LLC 2021
La page est en cours de chargement...
La page est en cours de chargement...
La page est en cours de chargement...
La page est en cours de chargement...
La page est en cours de chargement...
La page est en cours de chargement...
La page est en cours de chargement...
La page est en cours de chargement...
La page est en cours de chargement...
La page est en cours de chargement...
La page est en cours de chargement...
La page est en cours de chargement...
La page est en cours de chargement...
La page est en cours de chargement...
La page est en cours de chargement...
La page est en cours de chargement...
La page est en cours de chargement...
La page est en cours de chargement...
La page est en cours de chargement...
La page est en cours de chargement...
La page est en cours de chargement...
La page est en cours de chargement...
La page est en cours de chargement...
La page est en cours de chargement...
La page est en cours de chargement...
La page est en cours de chargement...
La page est en cours de chargement...
La page est en cours de chargement...
La page est en cours de chargement...
La page est en cours de chargement...
La page est en cours de chargement...
La page est en cours de chargement...
La page est en cours de chargement...
La page est en cours de chargement...
La page est en cours de chargement...
La page est en cours de chargement...
La page est en cours de chargement...
La page est en cours de chargement...
La page est en cours de chargement...
La page est en cours de chargement...
-
 1
1
-
 2
2
-
 3
3
-
 4
4
-
 5
5
-
 6
6
-
 7
7
-
 8
8
-
 9
9
-
 10
10
-
 11
11
-
 12
12
-
 13
13
-
 14
14
-
 15
15
-
 16
16
-
 17
17
-
 18
18
-
 19
19
-
 20
20
-
 21
21
-
 22
22
-
 23
23
-
 24
24
-
 25
25
-
 26
26
-
 27
27
-
 28
28
-
 29
29
-
 30
30
-
 31
31
-
 32
32
-
 33
33
-
 34
34
-
 35
35
-
 36
36
-
 37
37
-
 38
38
-
 39
39
-
 40
40
-
 41
41
-
 42
42
-
 43
43
-
 44
44
-
 45
45
-
 46
46
-
 47
47
-
 48
48
-
 49
49
-
 50
50
-
 51
51
-
 52
52
-
 53
53
-
 54
54
-
 55
55
-
 56
56
-
 57
57
-
 58
58
-
 59
59
-
 60
60


Health O Meter 597KL Manuel utilisateur
- Taper
- Manuel utilisateur
- Ce manuel convient également à
dans d''autres langues
- English: Health O Meter 597KL User manual
- español: Health O Meter 597KL Manual de usuario
Documents connexes
-
Health O Meter 597KL Manuel utilisateur
-
-
-
-
Health O Meter 498KL Manuel utilisateur
-
-
-