Krups XP344C51 Manuel utilisateur
- Catégorie
- Cafetières
- Taper
- Manuel utilisateur

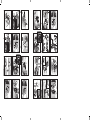
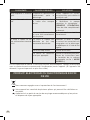
A
D.1-3
D.1-2
D.1
D.1-1
D.1-4
D.2
B
E
D
F
I
H
C
K
F1
G
J
F2
EN .......... P.2 - 14
FR .......... P.15 - 28
ES .......... P.29 - 41
CALVI XP344
www.krups.com
ENFRES
8020000364-03

1
2
2
1
17 oz
mini
1
x 4
x1
x2
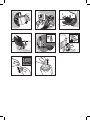
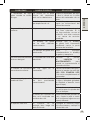
fig. 18
fig. 13 fig. 14 fig. 15
fig. 17fig. 16
fig. 21fig. 20fig. 19
fig. 24fig. 23fig. 22
2
x 1
x 2
1
x2
2
1
1
2
1
2
17 oz
mini
1
2
20 sec
fig. 6
fig. 1 fig. 2
fig. 3
fig. 5fig. 4
fig. 9fig. 8fig. 7
fig. 12fig. 11fig. 10
!!

2
1
!!
fig. 30
fig. 25 fig. 26 fig. 27
fig. 29fig. 28
fig. 31
fig. 32

2
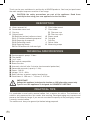
IMPORTANT SAFEGUARDS
When using electrical appliances, basic safety precautions should always be
followed to reduce the risk of re, electric shock, and/or injury to persons including
the following :
Read all instructions prior to rst use.
Do not touch hot surfaces. Use handles or knobs.
To protect against re, electric shock and injury to persons, do not immerse
cord, plugs or machine in water or other liquid.
Not intented for use by children.
Close supervision is necessary when any machine is used near children. Keep
machine out of reach of children.
This appliance is not designed to be used by people (including children) with
a physical, sensory or mental impairment, or people without knowledge or
experience, unless they are supervised or given prior instructions concerning
the use of the appliance by someone responsible for their safety.
Children must be supervised to ensure that they do not play with the appliance.
Burns can occur from touching a hot plate, hot water or steam.
Exercise caution when using the steam nozzle as steam can cause scalding.
Unplug machine from outlet when not in use and when cleaning. Allow to cool before
putting on or taking off parts, before cleaning the machine, and before storing.
All machines are subject to stringent quality control. Practical tests using
machines taken at random are conducted and this may explain any slight marks
or coffee residue prior to use.
Do not operate any machine with a damaged cord or plug or after the machine
malfunctions, or has been damaged in any manner. Return machine to the
nearest Krups Service Center for examination, repair or adjustment or your
respective countries Consumer Service Department.
To reduce the risk of injury do not drape cord over the counter top or table top
where it can be pulled on by children or tripped over accidentally.
Do not let cord hang over edge of table or counter, or touch hot surfaces.
The use of accessory attachments not recommended by Krups may result in
re, electric shock or injury to persons.
Do not use outdoors.
Do not place on or near a hot gas or electric burner, or in a heated oven.
To disconnect the machine, turn the control to “off” then remove plug from wall
outlet. Do not yank cord, instead grasp plug and pull to disconnect.
Do not use the machine for other than intended use.
Do not pour liquids other than water and descaling solutions specied in this
manual into the water tank.
Protect the machine against humidity and freezing.
This machine is for household use only.
The appliance shall not be placed in a cabinet when in use.
SAFETY INSTRUCTIONS

3
ENGLISH
SAVE THESE INSTRUCTIONS
CAUTION
This machine is intended for household use only. Any servicing other than cleaning
and user maintenance should be performed by the nearest authorized Krups
Service Center. Visit our website at www.krupsusa.com in the USA or www.krups.
ca in Canada or contact your respective countries Consumer Service department
for the service center nearest to you.
To reduce the risk of re or electric shock, do not attempt to disassemble the
machine. Repair should be done by an authorized Krups Service Center only.
SHORT CORD INSTRUCTIONS
A. A short power cord or a detachable power cord is provided to reduce the risks
of becoming entangled in or tripping over a longer cord accidentally.
B. Longer detachable power cords or extension cords are available and may be
used if care is exercised in their use.
C. If a long detachable power cord or an extension cord is used:
1) the marked electrical rating of the detachable power cord or extension cord
should be at least as great as the electrical rating of the appliance.
2) If the appliance is of the grounded type, the extension cord should be a
grounding type 3-wire cord.
3) the longer cord should be arranged so that it will not drape over the counter
where it can be pulled on by children or tripped over accidentally.
The appliance may have a polarized plug (one blade is wider than the other).
To reduce the risk of electric shock, this plug is intended to t into a polarized
outlet only one way. If the plug does not t fully into the outlet, reverse the plug.
If it still does not t, contact a qualied electrician. Do not attempt to modify the
plug in anyway.
In the interest of improving products, Krups reserves the right to change
specications without prior notice.

4
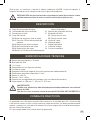
Thank you for your condence in and loyalty to KRUPS products. You have just purchased
the most compact espresso machine in our range.
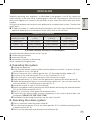
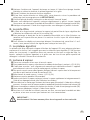
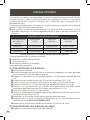
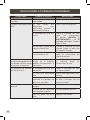
A Water reservoir lid
B Removable water tank
C Cup tray
D Control panel:
D1 Selection button (coffee or steam)
D1-1 O Position/preheating espresso
D1-2 Preparing an espresso
D1-3 Preheating steam
D1-4 Preparing steam
D2 On/Off button with indicator light
E Filter holder mount
F Filter holder
F1 Filter one cup
F2 Filter two cups
G Steam wand
H Drip grid
I Drip tray
J Power cable
K Measuring scoop
TECHNICAL SPECIFICATIONS
DESCRIPTION
Electromagnetic pump: 15 bars
Filter holder
1 or 2 cups
Soft capsule compatible
Steam function
Automatic shut-off after 5 minutes (environmental protection)
Removable reservoir (capacity: 1 liter)
Power: 1460 W
Voltage: 120 V - 60Hz
Safety devices to protect against overheating
Dimensions: H. 286 mm, L. 145 mm, D. 315 mm
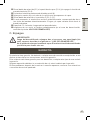
IMPORTANT!
Voltage: this appliance is designed to function on 120V alternating current only.
Type of use: this appliance is designed for DOMESTIC USE ONLY
PRACTICAL TIPS
It is preferable to use freshly roasted coffee. Ask a roaster for advice. The freshness of
coffee is only preserved for a few weeks after roasting. Good packaging may improve and
preserve the coffee for longer. If you are not sure about the quality of the packaging, choose
a recently roasted coffee.
The coffee must always be ground just before being prepared.
CAUTION: the safety precautions are part of the appliance. Read them
carefully before using your new appliance for the rst time.

5
ENGLISH
What type of coffee should I choose?
For a coffee rich in aroma
Choose pure Arabica beans or those made from a majority of Arabica beans.
Artisan roasted beans are the best as they offer more complex and rened aromas. To vary
the avors, try pure origin beans.
For a full-bodied coffee
Choose Robusta blended coffees - Italian roasted coffees, or those specied as Italian.
Do not ll your lter holder to the top, but use the measuring scoop (1 scoop for a
1.7oz cup, 2 scoops for two 1.7oz cups). Remove excess coffee from the rim of the
lter holder.
If you have not used the appliance for longer than 5 days, empty and rinse the water
tank.
Before removing the tank to ll or empty it, always ensure that the appliance is switched
off.
Always place the appliance on a at, stable surface.
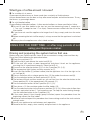
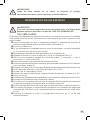
USING FOR THE FIRST TIME - or after long periods of not
using your Espresso maker.
Rinsing and preparing the system before rst use.
Before using your coffee machine, clean all the accessories in soapy water and then dry.
Rinse the system following the procedure below:
Plug your machine in (1).
Open the lid (A) and remove the water tank (B) (2).
Fill the tank with water at room temperature and place it back on the appliance,
ensuring that it is positioned correctly. Close the lid (3-4).
Ensure that the selection button (D1) is in the O position (D1-1) (5).
The temperature light ashes and then remains on (7).
Insert the lter holder (F) (without coffee) into the appliance: turn it to the right as far
as it will go (8).
Place a container with a volume greater than 1/2 liter under the steam wand (9).
Turn the selection button to Steam preheat (D1-3) (10).
The button will ash and then remain on: you can now turn the selection button to the
Steam position (D1-4) for approximately 20 seconds (11).
Turn the selection button to the O position (D1-1) (12).
Then place a 1/2 liter container under the lter holder (13).
Turn the selection button to the Espresso position (D1-2) (14). Allow water to ow from
the tank, equivalent to four 1.7oz espresso cups. To stop the water owing through,
turn the selection button to the O position (15).
If the water doesn't ow through (pump initiation) repeat the procedure from the
beginning without the lter holder.
Leave to cool and repeat this procedure four times making sure that the tank contains
enough water.
Leave your appliance to cool between each operation.
Remove the tank, empty, rinse carefully and place back in the appliance.

6
IMPORTANT!
After ve minute of non-use, your appliance will switch off automatically in
order to help protect the environment.
PREPARING ESPRESSO
IMPORTANT!
If the espresso machine is being used for the rst time, the appliance must
be cleaned as described in the paragraph "USING FOR THE FIRST TIME".
With ground coffee
The type of ground coffee you choose will determine the strength and avor of your
espresso: Coffee should be ground to a ne consistency for espresso so that you get a
greater extraction of avor.
Fill the tank with water at room temperature and place it back on the appliance,
ensuring that it is positioned correctly (3-4).
Plug your machine in (1).
The temperature light ashes while it is heating up and then remains on (7). The
appliance is now ready to use.
Unlock the lter holder by turning it to the left (16).
Add the lter for 1 cup or the lter for 2 cups to the lter holder (17).
Using the measuring scoop, add your freshly ground coffee. (1 scoop = 1 cup, 2
scoops = 2 cups) to the lter (18).
Remove excess coffee from the rim of the lter holder.
Insert the lter holder into the appliance, pushing it rmly to the right as far as it will
go (8).
Place one or two cups on the drip tray grid under the lter holder (19).
Turn the selection button to the espresso position (D1-2) (19).
After a few moments, the coffee will ow through.
When the cup(s) is/are full, return the selection button to the O position (15).
Remove the cup(s).
Unlock the lter holder by turning it to the left. Remove it from the appliance (16).
Do not touch the lter holder when it is hot.
To discard the grounds, turn the lter holder over while holding the lter in place using
the tab to allow just the coffee grounds to fall out (20).
Wash the lter holder and lter under running water to remove any remaining grounds
(21).
For best results, we recommend that you preheat the accessories in advance (lter
holder, lter and cup) following the steps below without adding coffee.
Leave your appliance to cool if you have made ve 1.7oz coffees consecutively.

7
ENGLISH
CLEANING AND SERVICING
A. The appliance
Unplug the appliance from the power outlet each time you clean it, and leave to cool.
Clean the outside of the appliance from time to time with a damp sponge. Clean and
dry the tank, drip tray and grid regularly.
Rinse the inside of the tank regularly.
STEAM FUNCTION
Steam is used to foam milk (to prepare cappuccinos, for example).
To produce steam, turn the selection button to the Preheat position (D1-3). (10).
The on/off light will ash again and then remain on. The appliance is now ready to use
(7).
Add 2 to 3oz milk to a container. For best results, we recommend that you use a
narrow, fairly short container to t under the steam wand. The milk and its container
must be very cold for optimal results.
As soon as the light stays on, plunge the steam wand into the milk without touching
the bottom of the container (23).
Turn the selection button to the steam position (D1-4) (24).
For best results, foam the milk from the bottom of the container but without touching
the bottom, for about 10 seconds. Next, tilt and move the container up progressively
so that the wand comes to the surface of the milk. Ensure that the wand does not
come out of the milk. For best foaming results, make circular movements (25).
In order to obtain good quality milk froth, we recommend that you use pasteurized or
UHT milk and avoid using unpasteurized or skimmed milk.
Once you have foamed the milk, turn the selection button to the O position (12). At
this time the appliance will cool automatically, starting two to three pump cycles
intermittently. Once this automatic operation has nished, you can prepare an espresso.
After turning off the steam, quickly and carefully clean the steam wand using a damp
sponge (to ensure that residues do not remain stuck).
Place a container containing water under the steam wand and repeat the milk foaming
procedure exactly, in order to clean the wand.
To avoid overheating the milk, do not foam for longer than 60 seconds.
The steam wand is limited to 75 second of use in order to avoid overheating.
IMPORTANT!
Warning! To avoid splashing milk, do not let the wand move above the surface
of the milk when using the steam function.
IMPORTANT!
Warning! The steam wand is still hot! Take care not to burn yourself!
IMPORTANT! After switching off the steam, immediately and carefully clean
the steam wand as described in the paragraph on: CLEANING AND
SERVICING.

8
When a ne white layer clouds your tank, follow the descaling process (see paragraph
DESCALING).
Do not use alcohol-based cleaning products or solvents.
After you have unplugged the appliance, regularly clean the grid through which the
water passes, as well as the watertight seal, using a damp sponge (26).
Clean using only a damp cloth without any detergent or scourer.
B. The lter holder
Using a damp cloth, clean the lter holder mount regularly in order to remove possible
coffee residues stuck to the surface (26).
In order to prolong the useful life of the watertight seal on the brewing head, do not put
the lter holder back in place if the coffee machine has not been used for extended
periods.
To remove any deposits that could block the ow of your 1 or 2 cup lter, you may use
a needle to clean the holes (32).
C. The drip tray
This must be emptied each time the appliance is used. If several espressos are prepared
consecutively, it is recommended that you empty it regularly (27-28) (approximately every
ve cups). The presence of water is normal and is not a sign of leakage. If necessary, clean
the drip tray and the grid with water and a small amount of mild dishwashing liquid. Rinse
and dry.
D. The steam wand
Place a container containing water under the steam wand.
To produce steam, turn the selection button to the Preheat position (D1-3) (10).
The on/off light will ash again and then remain on. The appliance is now ready to
follow the steam cleaning cycle.
As soon as the light stays on, plunge the steam wand into the water without touching
the bottom of the container.
Turn the selection button to the steam position (D1-4) (24).
Turn on for 20 seconds.
After turning off the steam, quickly and carefully clean the steam wand using a damp
sponge (in order to remove any residue).
The end of the wand can be removed using the measuring scoop for a deeper clean.
Take care not to lose the watertight seal on this end piece (29).
Rinse it under the tap and then remove any residues using a damp sponge (30).
You can unblock the wand outlet using a needle.
Screw it back on using the measuring scoop, checking that the seal is still there, and
making sure that the end piece is screwed on correctly (31).
IMPORTANT!
Warning! Do not clean any parts of this appliance in a dishwasher.

9
ENGLISH
DESCALING
Regularly descaling your appliance, as described in paragraphs A and B for coffee and
steam function, is the main factor in prolonging its useful life. The frequency with which you
descale the appliance is related to the hardness of your water. Get advice from your water
supplier.
During this procedure, do not place your appliance on a marble work surface. The descaler
might alter it.
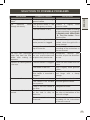
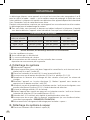
To help you, below is a table indicating the frequency with which you should descale the
appliance depending on the hardness of the water used in the machine:
DESCALING FREQUENCY
Average number of
coffees per week
Soft water
(<19°f)
Hard water
(19-30°f)
Very hard water
(30-30°f)
Fewer than 7 Once a year Every 8 months Every 6 months
From 7 - 20 Every 4 months Every 3 months Every 2 months
More than 20 Every 3 months Every 2 months Every month
If in doubt, monthly descaling is recommended.
No repairs on the coffee machine in the case of:
no descaling carried out,
limescale build-up,
accessories cleaned in a dishwasher,
will be covered by the guarantee.
A. Descaling the system
Unplug the appliance.
Insert the lter holder (without coffee) into the appliance and lock it in place, turning it
to the right as far as it will go (8).
Place a container with a volume greater than 1/2 liter under the lter holder (13).
Ensure that the selection button (D1) is in the O position (D1-1) (5).
Fill the tank with a mixture of three parts water to one part vinegar.
Plug the appliance in (1). Switch on the appliance by pressing the on/off button (6).
When the temperature light on the on/off button remains on, you can then move the
selection button (D1) to the Espresso position (D1-2).
Leave the mixture to cool (1/4 of the volume).
Switch the appliance off by pressing the on/off button and leaving the selection button
(D1) in the Espresso position (D1-2).
Wait 5 to 10 minutes, then repeat the procedure twice.
Ensure that you do not empty the tank completely (in the case of deactivation, see
paragraph: USING FOR THE FIRST TIME).
Now follow the descaling instructions for the steam function.
B. Descaling the steam system
Place a container under the steam wand (9).
Turn the selection button (D1) to the steam position (D1-4) (without switching off the
preheat function (D1-3).
Switch on the appliance by pressing the on/off button (6).

10
Leave the mixture to ow through the wand until steam appears.
Turn the selection button to the O position (D1-1) (12).
At this time the appliance will cool automatically, starting two to three pump cycles
intermittently. Hot water and/or steam will ow into the drip tray.
Wait 2 to 4 minutes, then repeat the procedure.
Ensure that you do not empty the tank completely (in the case of deactivation, see
paragraph: USING FOR THE FIRST TIME).
C. Rinsing
IMPORTANT!
After descaling, rinse two or three times with clean water (without coffee), as
described in the paragraph on " USING FOR THE FIRST TIME".
Do not forget to rinse the steam wand. The appliance has been descaled and
is ready to use again.
GUARANTEE
Your appliance is guaranteed, however, any connection or handling error, or use other that
that described in the instructions will render the guarantee void.
This appliance is guaranteed for domestic use only, any other type of use will render the
guarantee void.
No repairs due to a build-up of limescale shall be covered by the guarantee.
For any after-sales problem or for spare parts, please contact your retailer or an approved
service center.

11
ENGLISH
SOLUTIONS TO POSSIBLE PROBLEMS
PROBLEMS POSSIBLE CAUSES SOLUTIONS
The grounds are very
damp.
You haven't added enough
ground coffee.
Add more coffee.
The espresso ows
through too slowly.
The ground coffee is too
ne, too greasy or oury.
Choose a slightly more
granular coffee.
The lter holder is dirty. Clean the lter holder according
to the instructions in paragraph
CLEANING AND SERVICING
- B. The lter holder. Clean
also the lter.
The grid through which the
water passes is clogged.
When the appliance has
cooled, clean the grid with a
damp sponge.
Your appliance has a build-
up of limescale.
Descale your machine
according to the instructions in
the user manual.
The user sees prolonged
water ow from the lter
holder after making an
espresso.
Scale build-up is occurring
on your machine because
of particularly hard water.
Immediately descale your
machine as per the directions
for use.
Presence of coffee grounds
in the cup.
The lter holder is clogged. Clean the lter holder with hot
water.
The coffee is too ne. Use a slightly more granular
coffee.
The hinge on which the
lter holder is mounted is
clogged.
Clean the lter holder mount
and hinge with a damp
sponge.
No crema on the espresso. The coffee is too old. Use freshly ground coffee.
The coffee is not suitable
for espresso.
Use ner ground coffee.
There is too little coffee in
the lter.
Add ground coffee.
The water tank leaks when
carried.
The valve at the bottom
of the tank is dirty or
defective.
Clean the water tank and open
the valve at the bottom of the
tank with a nger.
The valve is blocked by
limescale.
Descale your machine
according to the instructions
in the user manual.

12
PROBLEMS POSSIBLE CAUSES SOLUTIONS
Water is leaking under the
appliance.
There's an internal leak. Check that the tank is tted
correctly. If the leak continues,
do not use the appliance,
contact an approved service
center.
The drip tray has not been
tted correctly.
Check that the drip tray is
pushed to the back of the
appliance.
The drip tray is overowing. Empty and carefully rinse the
drip tray and replace.
The cups have been lled
unequally.
The lter holder is clogged. Please refer to the paragraph
on CLEANING AND
SERVICING for servicing your
lter holder.
The pump is abnormally
hot.
There is no water in the
tank.
Fill the tank with water and
re-initiate the pump (see
paragraph: USING FOR THE
FIRST TIME). Avoid emptying
the tank completely.
The espresso leaks over
the edges of the lter.
The lter holder is not
positioned correctly.
Put the lter holder in place and
lock it (turning it from left to right
as far as it will go).
Remove excessive coffee
grounds that prevent the lter
holder to be locked.
The rim of the lter holder
is encrusted with coffee
grounds.
Remove excessive coffee
grounds and clean the grid
through which water passes
with a damp sponge.
Your espresso tastes bad. The appliance was not
rinsed correctly after
descaling.
Rinse the appliance according
to the instructions and check
the quality of the coffee.

13
ENGLISH
PROBLEMS POSSIBLE CAUSES SOLUTIONS
The appliance doesn't
work
The pump has been
deactivated due to a lack
of water.
Fill the tank with water and
re-initiate the pump (see
paragraph: USING FOR THE
FIRST TIME). Avoid emptying
the tank completely.
The removable water tank
has been tted incorrectly.
Position the water tank
correctly.
The steam wand does not
foam the milk.
The steam wand is
blocked or has an excess
of limescale.
Descale the steam wand
according to the paragraph on
Descaling or unblock it using
a needle.
The milk is too hot. Use fresh milk.
The shape of the container
is not suitable.
Use a small jug.
Follow the milk foaming
instructions (paragraph on
STEAM FUNCTION).
If it is not possible to identify the cause of a malfunction, please contact an approved
service center. Never disassemble the appliance. (if the appliance has been disassembled,
the guarantee may no longer be valid).
We participate in the protection of the environment!
Your appliance contains a number of materials that can be reused or recycled.
Take it to a collection point or an approved service center so that it can be dealt
with appropriately.
ELECTRIC OR ELECTRONIC PRODUCT AT END OF
LIFE

14
KRUPS INTERNATIONAL LIMITED GUARANTEE
: www.krups.com
This product is repairable by KRUPS during and after the guarantee period.
Accessories, consumables and end-user replaceable parts can be purchased, if locally available, as described on the KRUPS
internet site www.krups.com
The Guarantee:
This product is guaranteed by KRUPS (company address and details included in the country list of the KRUPS International
Guarantee) against any manufacturing defect in materials or workmanship for a period of 2 years starting from the initial date
of purchase or delivery date.
The international manufacturer’s guarantee by KRUPS is an extra benet which does not affect consumer’s Statutory Rights.
The international manufacturer’s guarantee covers all costs related to restoring the proven defective product so that it conforms
to its original specications, through the repair or replacement of any defective part and the necessary labour. At KRUPS’s
choice, a replacement product may be provided instead of repairing a defective product. KRUPS’s sole obligation and your
exclusive resolution under this guarantee are limited to such repair or replacement.
Conditions & Exclusions:
The international KRUPS guarantee only applies within the guarantee period and for those countries listed in the country
list attached and is valid only on presentation of a proof of purchase. The product can be taken directly in person to an
authorised service centre or must be adequately packaged and returned, by recorded delivery (or equivalent method of
postage), to a KRUPS authorised service centre. Full address details for each country’s authorised service centres are listed
on KRUPS website (www.krups.com) or by calling the appropriate telephone number as set out in the country list to request
the appropriate postal address.
KRUPS shall not be obliged to repair or replace any product which is not accompanied by a valid proof of purchase.
This guarantee will not cover any damage which occurs as a result of misuse, negligence, failure to follow KRUPS instructions,
use on current or voltage other than as stamped on the product, or a modication or unauthorised repair of the product. It also
does not cover normal wear and tear, maintenance or replacement of consumable parts, or the following:
– using the wrong type of water or consumable
– ingress of water, dust or insects into the product (excluding
appliances with features specically designed for insects)
– damage as a result of lightning or power surges – mechanical damages, overloading
– scaling (any de-scaling must be carried out according to
the instructions for use)
– accidents including re, ood, thunderbolt, etc
– damages or poor results due to wrong voltage or frequency – damage to any glass or porcelain ware in the product
– professional or commercial use
This guarantee does not apply to any product that has been tampered with, or to damages incurred through improper use and
care, faulty packaging by the owner or mishandling by any carrier.
In order to offer the best possible after-sales service and constantly improve customer satisfaction, KRUPS may send a
satisfaction survey to all customers who have had their product repaired or exchanged in a KRUPS authorised service centre.
The international KRUPS guarantee applies only for products purchased in one of the countries listed, and used for domestic
purposes only in one of the countries listed on the Country List. Where a product purchased in one listed country and then
used in another listed country:
a. The international KRUPS guarantee does not apply in case of non conformity of the purchased product with the local
standards, such as voltage, frequency, power plugs, or other local technical specications
b. The repair process for products purchased outside the country of use may require a longer time if the product is not
locally sold by KRUPS
c. In cases where the product is not repairable in the new country, the international KRUPS guarantee is limited to a
replacement by a similar product or an alternative product at similar cost, where possible.
Consumer Statutory Rights :
This international KRUPS guarantee does not affect the statutory rights a consumer may have or those rights that cannot be
excluded or limited, nor rights against the retailer from which the consumer purchased the product. This guarantee gives a
consumer specic legal rights, and the consumer may also have other legal rights which vary from State to State or Country to
Country. The consumer may assert any such rights at his sole discretion.
For Australia only: Our goods come with guarantees that cannot be excluded under the Australian Consumer Law. You are
entitled to a replacement or refund for a major failure and compensation for any other reasonably foreseeable loss or damage.
You are also entitled to have the goods repaired or replaced if the goods fail to be of acceptable quality and the failure does
not amount to a major failure.
*** Please keep this document for your reference should you wish to make a claim under the guarantee

15
FRANÇAIS
MISES EN GARDE IMPORTANTES
Lorsque vous utilisez un appareil électrique, an de réduire les risques de feu,
de décharge électrique et de blessure, des consignes de sécurité élémentaires
doivent toujours être observées et en particulier les suivantes :
Lire le mode d’emploi en entier avant la première utilisation.
Ne pas toucher les surfaces chaudes. Utiliser les poignées ou les boutons.
Pour se protéger d’un feu, d’une décharge électrique ou d’une blessure, ne pas
immerger le cordon d’alimentation, les prises de courant ou la machine dans
l’eau ni dans tout autre liquide.
Cet appareil n’est pas conçu pour être utilisé par des enfants.
Une surveillance étroite est nécessaire lorsque l’appareil électrique est utilisé à
proximité des enfants. Garder hors de la portée des enfants.
Cet appareil n’est pas conçu pour être utilisé par des personnes (y compris les
enfants) dont les capacités physiques, sensorielles ou mentales sont réduites,
ou des personnes ne possédant pas d’expérience ou de connaissances, sauf si
elles ont pu bénécier, par l’intermédiaire d’une personne responsable de leur
sécurité, d’une surveillance ou d’instructions préalables concernant l’utilisation
de l’appareil.
Il convient de surveiller les enfants pour s’assurer qu’ils ne jouent pas avec
l’appareil.
Tout contact avec les surfaces chaudes, l’eau chaude ou la vapeur peut causer
des brûlures. Faire preuve de prudence.
Faire preuve de prudence lorsque la buse à vapeur est utilisée car la vapeur
peut causer des brûlures.
Débrancher l’appareil de la prise murale si vous ne l’utilisez pas et avant de le
nettoyer. Laisser l’appareil refroidir avant d’installer ou d’enlever les accessoires
et avant de le nettoyer ou de le ranger.
Tous les appareils sont soumis à des contrôles rigoureux de la qualité. Des tests
pratiques sont effectués sur des appareils sélectionnés au hasard, ce qui peut
expliquer des petites marques ou des résidus de café dans l’appareil avant sa
première utilisation.
Ne pas utiliser un appareil électrique dont le cordon d’alimentation ou ou la prise
est endommagé, si l’appareil prise endommagé, l’appareil fonctionne mal ou
s’il a été endommagé de quelque manière que ce soit. Retourner tout appareil
défectueux au Centre de service Krups le plus près an qu’il soit examiné, ou
réparé.
Pour diminuer les risques de blessures, ne pas laisser le cordon pendre de la
table ou du comptoir, où il pourrait être tiré par un enfant ou faire trébucher
quelqu’un.
Le cordon ne doit pas pendre de la table ou du comptoir, ni entrer en contact
avec des surfaces chaudes.
CONSIGNES DE SÉCURITÉ

16
L’utilisation d’accessoires non recommandés par Krups peut causer causer un
feu, une décharge électrique ou une blessure.
Ne pas utiliser à l’extérieur.
Ne pas placer sur ou près d’un brûleur à gaz, d’une plaque électrique ou dans
un four chaud.
Pour débrancher l’appareil, tourner le bouton de commande à « off » puis
débrancher de la prise murale. Ne pas tirer sur le cordon mais plutôt sur la che.
Utiliser cet appareil uniquement pour l’usage auquel il est destiné.
Ne pas verser des liquides autres que de l’eau et la solution de détartrage
précisée dans ce manuel dans le réservoir d’eau.
Protéger l’appareil de l’humidité et du gel.
Pour usage domestique seulement.
L’appareil n’est pas destiné à la préparation de boissons pour les nourrissons.
La machine ne doit pas être placée à l’intérieur d’un meuble lorsqu’il est en
cours d’utilisation.
CONSERVER CES INSTRUCTIONS
ATTENTION
Cet appareil est conçu pour une utilisation domestique seulement. Tout entretien autre que
le nettoyage et l’entretien normal de l’appareil par son propriétaire doit être effectué par
le centre de service agréé de Krups uniquement. Visiter notre site Web www.krups.ca au
Canada ou communiquer avec le service à la clientèle pour connaître le centre de service le
plus près de chez vous. An de réduire les risques de feu et de décharge électrique, ne pas
démonter la base de l’appareil. Toute réparation doit être effectuée par un centre de service
agréé de Krups uniquement.
INSTRUCTIONS POUR LE CORDON COURT
A. Un cordon d’alimentation court ou amovible est fourni avec l’appareil pour
éviter qu’il ne s’emmêle ou qu’on trébuche dessus.
B. Des rallonges et des cordons plus longs peuvent être utilisés, mais l’utilisateur
doit prendre les précautions nécessaires.
C. Si vous utilisez une rallonge ou un cordon d’alimentation plus long :
1) Le calibre spécié sur le cordon ou la rallonge doit être égal ou supérieur à
celui indiqué sur l’appareil.
2) Si l’appareil est mis à la terre, le cordon ou la rallonge doit être du type mis
à la terre (à 3 ls).
3) Le cordon d’alimentation doit être placé de façon qu’il ne pende pas du
plan de travail ou du haut de la table car un enfant pourrait tirer dessus ou
trébucher accidentellement.
L’appareil peut être équipé d’une prise polarisée (une lame est plus large que l’autre). Pour
réduire les risques de chocs électriques, cette che ne peut se brancher que dans un sens.
Si la che ne rentre pas correctement dans la prise murale, mettez-la dans l’autre sens. Si
elle ne rentre toujours pas, contactez un électricien. N’essayez en aucune façon de modier
la che.
Dans le but d’améliorer ses produits, Krups se réserve le droit de modier les
spécications sans avis préalable.

17
FRANÇAIS
Merci de votre conance et de votre loyauté envers les produits KRUPS. Vous venez
d'acheter la machine à expresso la plus compacte de sa catégorie.
A Couvercle du réservoir d'eau
B Réservoir d'eau amovible
C Plateau à tasse
D Tableau de commande:
D1 Bouton de sélection (café ou vapeur)
D1-1 Position O/réchauffage de
l'expresso
D1-2 Préparation d'un expresso
D1-3 Préchauffage de la vapeur
D1-4 Préparation de la vapeur
D2 Bouton Marche/Arrêt avec voyant
E Support pour le porte-ltre
F Porte-ltre
F1 Filtre à une tasse
F2 Filtre à deux tasses
G Buse à vapeur
H Grille
I Plateau égouttoir
J Cordon d’alimentation
K Tasse à mesurer
SPÉCIFICATIONS TECHNIQUES
DESCRIPTION
Pompe électromagnétique: 15 bars
Porte-ltre
1 à 2 tasses
Compatible avec les capsules souples
Mode «vapeur»
Mise hors tension automatique après 5 minutes (protection environnementale)
Réservoir amovible (capacité: 1 litre)
Alimentation: 1 460 W
Voltage: 120 V - 60Hz
Dispositifs de sécurité pour protéger contre la surchauffe
Dimensions: H. 286mm, L. 5mm, P. 315mm
IMPORTANT!
Voltage: cet appareil est conçu pour fonctionner à l’aide d’un courant alternatif de
120V uniquement.
Type d’usage : cet appareil est conçu UNIQUEMENT À DES FINS
DOMESTIQUES
CONSEILS PRATIQUES
Il est préférable d’utiliser des grains de café fraîchement torréés. Demandez l'avis d’un
torréfacteur. La fraîcheur du café ne se conserve que pendant quelques semaines après
la torréfaction. Un bon emballage peut améliorer et conserver la qualité du café plus
longuement. Si vous n’êtes pas certain(e) de la qualité de l’emballage, choisissez un café
récemment torréé.
Le café devrait être moulu juste avant sa préparation.
MISE EN GARDE: les mesures de sécurité font partie de l’appareil. Lisez
toutes les instructions avant la première utilisation de votre nouveau produit.

18
Quel type de café devrais-je choisir?
Pour un café à l’arôme riche
Choisissez des grains Arabica purs ou un mélange principalement composé de grains Arabica.
Les grains torréés à la main sont meilleurs puisqu’ils offrent des arômes plus complexes et
plus rafnés. Pour varier les saveurs, essayez des grains purs et authentiques.
Pour un café corsé
Choisissez des mélanges de café Robusta - cafés italiens torréés, ou autres appellations
italiennes.
Ne remplissez pas votre porte-ltre jusqu’au bord; utilisez plutôt la cuillère à mesurer (1
cuillère pour une tasse de 50ml; 2 cuillères pour deux tasses de 50ml). Enlevez le surplus
de café qui couvre le bord du porte-ltre.
Si vous n'avez pas utilisé l'appareil depuis plus de 5 jours, videz puis rincez le réservoir
d'eau.
Avant d’enlever le réservoir pour le remplir ou le vider, assurez-vous que l’appareil est hors
tension.
Déposez toujours l’appareil sur une surface plate et stable.
PREMIÈRE UTILISATION, ou suivant une longue période
de non-utilisation de la machine à expresso.
Rincez et préparez le système avant la première utilisation.
Avant d’utiliser votre machine à café, nettoyez tous les accessoires dans une eau
savonneuse, puis séchez-les.
Rincez le système en suivant les directives ci-dessous:
Branchez votre machine (g. 1).
Soulevez le couvercle (a) puis prenez le réservoir d'eau (B) (2).
Remplissez le réservoir avec de l’eau à température de la pièce puis replacez-le sur
l’appareil, en vous assurant qu’il est correctement placé. Abaissez le couvercle (3-4).
Assurez-vous que le bouton de sélection (D1) est à la position (D1-1) (5).
Le voyant de température clignotera, puis demeurera allumé (7).
Insérez le porte-ltre (F) (sans café) dans l'appareil: tournez-le vers la droite autant que
vous le pouvez (8).
Placez un contenant d’au moins un demi-litre sous la buse à vapeur (9).
Sélectionnez Préchauffage à la vapeur (« steam preheat ») à l'aide du bouton de
sélection (D1-3) (10).
Le bouton clignotera puis demeurera allumé: vous pouvez alors sélectionner Vapeur
(«steam») (D1-4) pendant environ 20 secondes (11).
Sélectionnez la position O (D1-1) (12).
Ensuite, placez le contenant de 0,5L sous le porte-ltre (13).
Sélectionnez ensuite le mode Expresso (D1-2) (14). Laissez l’eau couler du réservoir ,
soit l'équivalent de quatre tasses d'expresso de 50ml. Pour arrêter l’écoulement de
l'eau, remettez le bouton de sélection à la position O (15).
Si l'eau ne s’écoule pas (initialisation de la pompe), reprenez la consigne à partir du
début, sans le porte-ltre.
Laissez refroidir et répétez la procédure quatre fois, vous assurant que le réservoir est
sufsamment rempli.
Laissez refroidir l'appareil entre chaque opération.
Enlevez le réservoir, videz-le, rincez-le soigneusement puis replacez-le dans la machine.
La page est en cours de chargement...
La page est en cours de chargement...
La page est en cours de chargement...
La page est en cours de chargement...
La page est en cours de chargement...
La page est en cours de chargement...
La page est en cours de chargement...
La page est en cours de chargement...
La page est en cours de chargement...
La page est en cours de chargement...
La page est en cours de chargement...
La page est en cours de chargement...
La page est en cours de chargement...
La page est en cours de chargement...
La page est en cours de chargement...
La page est en cours de chargement...
La page est en cours de chargement...
La page est en cours de chargement...
La page est en cours de chargement...
La page est en cours de chargement...
La page est en cours de chargement...
La page est en cours de chargement...
La page est en cours de chargement...
-
 1
1
-
 2
2
-
 3
3
-
 4
4
-
 5
5
-
 6
6
-
 7
7
-
 8
8
-
 9
9
-
 10
10
-
 11
11
-
 12
12
-
 13
13
-
 14
14
-
 15
15
-
 16
16
-
 17
17
-
 18
18
-
 19
19
-
 20
20
-
 21
21
-
 22
22
-
 23
23
-
 24
24
-
 25
25
-
 26
26
-
 27
27
-
 28
28
-
 29
29
-
 30
30
-
 31
31
-
 32
32
-
 33
33
-
 34
34
-
 35
35
-
 36
36
-
 37
37
-
 38
38
-
 39
39
-
 40
40
-
 41
41
-
 42
42
-
 43
43


Krups XP344C51 Manuel utilisateur
- Catégorie
- Cafetières
- Taper
- Manuel utilisateur
dans d''autres langues
- English: Krups XP344C51 User manual
- español: Krups XP344C51 Manual de usuario