Regent Sheffield FCTWL65 Manuel utilisateur
- Catégorie
- Projecteurs de travail
- Taper
- Manuel utilisateur

12
Cette garantie ne couvre que les défaillances du produit dues àdes défauts de
matériau ou de fabrication qui se produisent lors d’une utilisation normale du pro-
duit. Elle ne couvre pas les ampoules, ni les défaillances du produit causées par
un accident, un usage impropre ou abusif, le manque d’attention, la transformation
du dispositif, ou une installation défectueuse, soumettant le produit à n’importe
quel service électrique autre que celui qui est spécifié, ni toute autre défaillance
ne résultant pas d’un défaut de matériau ou de fabrication. Les dégâts sur le pro-
duit causés par des ampoules de rechange achetées séparément et provenant de
marques autres que celle de la Société, et ceux causés par la corrosion ou la
décoloration des composants en laiton, ne sont pas couverts par cette garantie.
Il n’existe aucune garantie explicite autre que celle décrite ci-dessus.
LA SOCIETE NE SERA PAS RESPONSABLE DES DOMMAGES-INTERETS
ACCESSOIRES, SPECIAUX OU INDIRECTS RESULTANT DE L’UTILISATION DU
PRODUIT OU PROVENANT DE N’IMPORTE QUELLE RUPTURE DE CETTE
GARANTIE. TOUTES LES GARANTIES TACITES, S’IL Y EN A, Y COMPRIS LES
GARANTIES IMPLICITES DE QUALITE MARCHANDE ET DE CONVENANCE A
UNE FIN PARTICULIERE, SONT LIMITEES EN DUREE A LA DUREE DE CETTE
GARANTIE EXPLICITE. Certains états ne permettant pas l’exclusion ou la limita-
tion des dommages-intérêts accessoires ou indirects, ni les restrictions sur la
durée d’une garantie implicite, les exclusions ou restrictions précédentes peuvent
ne pas s’appliquer à votre cas.
Aucune autre garantie, écrite ou verbale, n’est autorisée par la Société. Cette
garantie vous donne des droits légaux spécifiques et vous pouvez également avoir
d’autres droits qui varieront d’un état à l’autre.
Pour recevoir le service de garantie veuillez écrire à Cooper Lighting, 2611 La
Vista Drive, Burlington, NC 27215. Veuillez inclure le numéro de modèle du pro-
duit, les problèmes que vous avez rencontrés ainsi que votre adresse et votre
numéro de téléphone. Vous serez contacté avec une solution ou un numéro d’au-
torisation de retour de marchandise avec des instructions sur la façon de retourn-
er le produit. Tous les produits retournés doivent être accompagnés d’un numéro
d’Autorisation pour produits retournés émis par la Société et doivent être renvoyés
port prépayé. Tout produit reçu sans un numéro d’Autorisation pour produits
retournés émis par la Société sera refusé.
Cooper Lighting n’est pas responsable des marchandises endommagées lors de
l’expédition. Les produits réparés ou remplacés seront soumis aux conditions de
cette garantie et seront inspectés lors de leur emballage. Tout dégât manifeste ou
dissimulé survenu pendant l’expédition doit être immédiatement signalé à la com-
pagnie de transport en charge de la livraison, et une réclamation doit être enreg-
istrée auprès de cette compagnie.
2611 La Vista Drive, Burlington, NC 27215 Etats-Unis
1-800-666-2714
www.cooperlighting.com
Brevets en Cours d’Homologation
© 2000 Cooper Lighting .
La reproduction de ce document est strictement
interdite sans l’autorisation préalable par écrit de
Cooper Lighting. 11/00 325-0961
Instruction Manual
Instrucciones
Directives
FCTWL65

11
Etape 3 : Glissez l’extrémité du pied en “S” ayant un trou pour vis
dans l’autre bout ouvert du tube sur le support en U qui est
situé en bas du caisson de l’appareil.
Etape 4 : Alignez le trou fileté pour vissage du pied avec le trou dans
le tube et bloquez avec le bouton fourni. REMARQUE :
Glissez d’abord l’entretoise sur la vis qui sort du bouton de
façon à ce que le côté plat de l’entretoise repose contre le
bouton lui-même. Le côté bombé de l’entretoise va reposer
contre la courbure du pied quand le bouton sera serré.
Etape 1 : Desserrez la molette (tournez en sens inverse des aiguilles
d’une montre) situé à l’arrière en haut de l’appareil (C).
Etape 2 : Le cadre de porte et l’ensemble de lentilles vont s’abaisser
en basculant en donnant accès à l’ampoule. Ôtez
l’am poule nouveau fluorescente de son emballage.
Etape 3 : Poussez pour ouvrir une des attaches plastique de
l’ampoule et insérez soigneusement l’ampoule dessous;
Répétez le processus du côté opposé. Puis poussez
l’ampoule vers le bas dans sa douille (D).
REMARQUE : Faites attention de ne pas endommager
l’ampoule.
Etape 4 : Refermez le cadre de porte et l’ensemble de lentilles et
fixez-les en place en resserrant la
molette qui avait été desserrée
précédemment.
Alimentez l’éclairage en branchant son cordon
secteur dans une sortie 120 Volt standard.
L’interrupteur est placé à l’arrière de l’appareil près
de la sortie du cordon secteur. Appuyez une fois
sur l’interrupteur de l’appareil pour l’allumer. Appuyez sur l’interrup-
teur une seconde fois pour l’éteindre.
Desserrez la molette sous l’appareil et en maintenant la prise mousse
de la poignée tournez la tête de l’appareil dans la position voulue.
Resserrez la molette.
Cooper Lighting (“la Société”) garantit ce produit (“le produit”) contre tout
défaut de matériau ou de fabrication pendant une période de cinq ans à partir
de la date d’achat original, et s’engage, pendant ces cinq années, à réparer
ou, au choix de la Société, à remplacer un produit défectueux sans frais pour
les pièces de rechange ou la main-d’œuvre. Ceci ne couvre pas la main-
d’œuvre pour retirer ou installer un dispositif.
Cette garantie n’est valable que pour l’acheteur original du produit. Une fac-
ture d’achat ou une preuve équivalente de la date d’achat original acceptable
par la Société est requise avant qu’un quelconque travail de réparation ou de
remplacement puisse être exécuté suivant les conditions de la garantie.
Garantie limitée de cinq ans
Ajuster la lumière
Notice d’utilisation
Installation de l’ampoule
(suite)
12
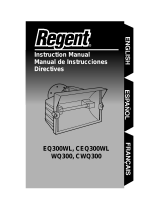
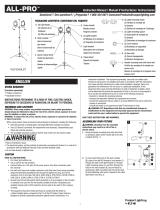
Congratulations! You have purchased a Regent Cool Touch™ 65 watt heavy-
duty fluorescent worklight. This worklight operates cooler, safer, and is more ener-
gy efficient than conventional halogen worklights. It has a durable, die-cast alu-
minum housing and a tubular-steel stand for heavy-duty use. The fixture includes a
c o m fo rt a ble fo a m - grip handle and non-skid ru bber grips on the base of the stand.
• Phillips head screwdriver
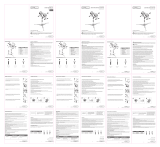
• Fluorescent worklight (A)
• 65 watt fluorescent bulb (B)
IMPORTANT READ ALL SAFETY INSTRUCTIONS.
WARNING: When using outdoor portable lamps, basic
safety instructions should always be followed to reduce
the risk of fire, electric shock, and personal injury, includ-
ing the following:
• Use only three wire outdoor extension cords that have three-prong gr o u n d i n g
plugs and grounding receptacles that accept the appliance’s plug.
• Ground Fault Circuit Interrupter (GFCI) protection should be provided on the
circuit(s) or outlet(s) to be used for the wet location portable lamp.
Receptacles are available having built-in GFCI protection and are able to be
used for this measure of safety.
• Use only with an extension cord for outdoor use, such as an extension cor d
type SW, SW-A, SOW, SOW-A, STW, STW-A, STOW, STOW-A, SJW,
S J W-A, SJOW, SJOW-A, SJTW, SJTW-A, SJTOW, or SJTOW- A .
• For indoor and outdoor use.
• UL LISTED for wet locations.
• This device complies with Part 18 of the FCC Rules. Any changes or modifi-
cations to the product described in this instruction sheet that are not expressly
approved by Cooper Lighting could void the user’s authority to operate the
equipment.
NOTE: This equipment has been tested and found to comply with the limits
pursuant to Part 18 of the FCC Rules. These limits are designed to provide
reasonable protection against harmful interference in a residential installation.
This equipment generates, uses, and can radiate radio frequency energy and, if
not installed and used in accordance with the instructions, may cause harmful
interference to radio communications. However, there is no guarantee that
interference will not occur in a particular installation. If this equipment does
cause harmful interference to radio or television reception, which can be deter-
mined by turning the equiment off and on, the user is encouraged to try to cor-
rect the inteference by one or more of the following measures:
- Reorient or relocate the receiving antenna.
- Increase the separation between the equipment and receiver.
- Connect the equipment into an outlet on a circuit different from that to
which the receiver is connected.
- Consult the dealer or an ex p e rienced radio/TV technician for help.
What to know
What’s included
What you need
FCTWL65
B
A
(D)
™

• Fixture must be connected to a 120 Volt, 60 Hz power source. Any other
connection voids the warranty.
• Keep away from flammable objects.
• The e l e c t rical system, and the method of electrically connecting the fixture to it,
must be in accordance with the National Electric Code and local building codes.
• Disassembly of the fixture will void the warranty.
• Use only a 65 watt, PL type fluorescent bulb. Use of any other bulb will
damage the fixture and void the warranty.
• Fixture must be connected to a 120 Volt, 60 Hz power source. Any other
connection voids the warranty.
• Keep away from flammable objects.
• The electrical system, and the method of electrically connecting the fixture to
it, must be in accordance with the National Electric Code and local building
codes.
• Disassembly of the fixture will void the warranty.
• Use only a 65 watt, PL type fluorescent bulb. Use of any other bulb will
damage the fixture and void the warranty.
WARNING: Deviation from the assembly instructions may result in a risk of fire
or electric shock.
SAVE THESE INSTRUCTIONS
Important: Read Before Using!
Remove cardboard insert that is protecting bulb before use.
Step 1: Loosen the knob (turn counter-clockwise) located
on the back and top of the fixture (C).
Step 2: The doorframe and lens assembly will swing down
allowing access to the bulb. Remove the card-
board insert.
Step 3: Replace the door frame and lens assembly and
secure it by tightening the knob that was loosened
in Step 1.
Step 1: Slide the upper handle with foam grip into the tube on the U-bracket
which is located on the bottom of the fixture housing.
Step 2: Align the threaded screw holes in the handle with the two holes in the
tube and secure with the two screws provided.
Step 3: Slide the end of the “S” stand, with the screw hole in it, into the
remaining open end of the tube on the U-bracket located on the bot-
tom of the fixture housing.
Step 4: Align the threaded screw hole in the stand with the slotted hole in the
tube and secure with the knob provided. NOTE: First, slip the plastic
spacer over the screw that extends from the knob, making sure that
the flat side of the spacer rests against the knob itself. The curved
side of the spacer will rest against the curvature of the stand as the
knob is tightened down.
Step 1: Loosen the knob (turn counter-clockwise) located on the back and top
of the fixture (C).
Step 2 The doorframe and lens assembly will swing down allowing access to the
bu l b. R e m o ve the new fluorescent bulb from its pack a g e.
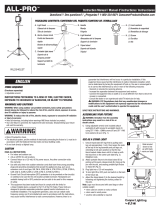
Step 3: Push one of the plastic bulb retainer clips open and carefully insert
the bulb under this retainer clip. Repeat the process on the opposite
side, then push the bulb into the bulb socket. (D) NOTE: Be careful
not to damage the bulb.
Installing the bulb
Assembling the fixture
10
férences nuisibles dans une installation résidentielle. Cet équipement
produit, utilise et peut émettre de l’énergie en fréquence radio. S’il
n’est pas installé et utilisé conformément aux instructions, il peut
provoquer des interférences nuisibles aux communications radio.
Cependant, il n’existe aucune garantie qu’une installation quelconque
ne produira pas d’interférence. Si cet équipement cause des inter-
férences nuisant au fonctionnement d’un appareil radio ou d’un
téléviseur (ce qui peut être déterminé en activant/désactivant
l’équipement), l’utilisateur est encouragé à éliminer les interférences
en appliquant l’une des mesures suivantes :
- Réorientez ou déplacez l’antenne réceptrice.
- Augmentez l'espace entre l'équipement et le poste récepteur.
- Branchez l'équipement sur une prise ou un circuit ne servant pas
au poste récepteur.
- Demandez l'aide de votre marchand ou d'un technicien expéri-
menté en radio/télévision.
• Le dispositif doit être branché à une source d’énergie de 120 Volts,
60 Hertz. Tout autre branchement que celui-ci annule la garantie.
• Gardez éloigné de tout objet inflammable.
• Le système électrique et la méthode de raccordement électrique de
l’appareil doivent obéir au code national de l’électricité ainsi qu’aux
règlements de construction locaux.
• Le démontage de cet ensemble annulera la garantie.
• Utiliser uniquement une ampoule fluorescente de type PL, ayant une
puissance de 65 watts. L’utilisation d’une autre ampoule endom-
magerait l’appareil et annulerait sa garantie.
AVERTISSEMENT : Ne pas appliquer les instructions d’assemblage
peut causer un incendie ou un choc électrique.
CONSERVER CES INSTRUCTIONS.
Important : À Lire Avant L’Utilisation !
E n l evez le manchon en carton qui protège l’ampoule avant son utilisation.
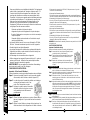
Etape 1 : Desserrez la molette (tournez en sens inverse des aiguilles
d’une montre) situé à l’arrière en haut de l’appareil (C).
Etape 2 : Le cadre de porte et l’ensemble de lentilles vont s’abaisser
en basculant en donnant accès à l’am-
poule. Ôtez l’intercalaire en carton.
Etape 3 : Refermez le cadre de porte et l’ensemble
de lentilles et fixez-les en place en resser-
rant la molette qui avait été desserrée
précédemment.
Etape 1 : Glissez la poignée supérieure avec prise en mousse dans le
tube sur le support en U qui est situé en bas du caisson de
l’appareil.
Etape 2 : Alignez les trous filetés pour vissage de la poignée avec les
deux trous dans le tube et bloquez avec les deux vis fournies.
Assemblage de l’appareil
13
(C)
(C)

9
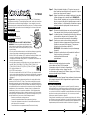
Félicitations! Vous avez acheté un éclairage de plateau fluorescent
65 watts Regent Cool Touch™. Cet éclairage fonctionne avec moins
d’échauffement, plus de sécurité et moins de consommation que les
éclairages halogènes conventionnels. Il est équipé d’un caisson
durable en aluminium moulé et d’un support acier tubulaire pour la
robustesse à l’utilisation. L’appareil inclut une poignée en mousse
confortable pour l’accessoiriste et deux poignées avec caoutchouc
non glissant à la base du support.
• Tournevis cruciforme Phillipsble
• Éclairage de plateau fluorescent (A)
• Ampoule fluorescente de 65 watts (B)
IMPORTANT : LISEZ TOUTES LES
INSTRUCTIONS DE SÉCURITÉ.
AVERTISSEMENT : En utilisation des éclairages portables à l’ex-
térieur, les instructions de sécurité fondamentales doivent toujours être
respectées pour réduire les risques d’inflammation, commotion élec-
trique et dommages corporels, dont :
• N’utilisez que des cordons de prolongation à trois conducteurs avec
prises trois broches et prises de sortie secteur avec mise à la terre
compatibles avec la prise de l’appareil.
• Une protection par disjoncteur différentiel (interruption de circuit par
défaut d’isolement par rapport à la terre) doit être installée sur le
secteur ou sur les sorties d’alimentation en cas d’utilisation de
l’éclairage en milieu humide. Il existe des prises de courant avec
une protection CFCI intégrée dont l’usage est recommandé par
mesure de sécurité.
• N’utilisez qu’un cordon rallonge prévu pour l’extérieur, tel que les
rallonges type SW, SW-A, SOW, SOW-A, STW, STW-A, STOW,
STOW-A, SJW, SJW-A, SJOW, SJOW-A, SJTW, SJTW-A, SJTOW,
ou SJTOW-A.
• Pour utilisation à l’intérieur ou à l’extérieur.
• Agréé UL pour les endroits humides.
• Cet appareil est conforme à la partie 18 des règles FCC. Cualquier
cambio o modificación que se le haga al producto descrito en ésta
hoja de instrucciónes no aprovada por Cooper Lighting, puede
can celar la autoridad del usuario a operar el equipo.
REMARQUE: Este equipo ha sido probado cumpliendo con los lim-
ites de acuerdo a la Parte 18 de las reglas FCC. Ces limites sont
conçues pour offrir une protection raisonnable contre les inter-
Ce qu’il faut savoir
Ce qui est compris dans cet
Ce dont vous avez besoin
FCTWL65
Step 4: Replace the door frame and lens assembly and
secure it by tightening the knob that was loosened in
Step 1.
Plug the light into any standard 120 Volt receptacle. T h e
switch is located on the back of the fixture near the powe r
c o r d . Depress the switch once to turn the light on; d e p r e s s
the switch again to turn the light off.
Loosen the knob under the fixture, and holding the foam-grip handle, tilt
the fixture head to the desired position. Retighten knob.
Cooper Lighting (“the Company”) wa r rants this product (“the product”) against defects in
m a t e rial or wo rkmanship for a period of five years from date of original purchase, and
a grees to repair or, at the Company ’s option, replace a defe c t i ve product without charge fo r
either replacement parts or labor during such time. This does not include labor to remove
or install fixtures.
This wa r ranty is extended only to the original purchaser of the product. A purchaser’s
receipt or other proof of date of original purchase acceptable to the Company is required
b e fore wa r ranty perfo rmance shall be rendered.
This wa r ranty only covers product failure due to defects in materials or wo rkmanship which
occurs in normal use. It does not cover the bulb or failure of the product caused by acci-
dent, misuse, abu s e, lack of reasonable care, alteration, faulty installation, subjecting the
product to any but the specified electrical service or any other failure not resulting from
d e fects in materials or wo rk m a n s h i p. Damage to the product caused by separately pur-
chased, non-Company brand replacement bulbs and corrosion or discoloration of bra s s
components are not covered by this wa r ra n t y.
There are no express wa r ranties except as described above.
THE COMPANY SHALL NOT BE LIABLE FOR INCIDENTAL, SPECIAL OR CONSEQU E N-
TIAL DA M AGES RESULTING FROM THE USE OF THE PRODUCT OR ARISING OUT OF
ANY BREACH OF THIS WA R R A N T Y. A L L I M P L I E D WA R R A N T I E S , IF ANY, INCLUDING
IMPLIED WARRANTIES OF MERCHANTABILITY AND FITNESS FOR A PA RT I C U L A R
PURPOSE, ARE LIMITED IN DURATION TO THE DURATION OF THIS EXPRESS WA R-
R A N T Y. Some states do not allow the exclusion or limitation of incidental or consequential
d a m a g e s, or limitations on how long an implied wa r ranty lasts, so the above exclusions or
limitations may not apply to yo u .
No other wa r ra n t y, written or verbal, is authori zed by the Company. This wa r ranty gives yo u
specific legal rights and you may also have other rights which va ry from state to state.
To obtain wa r ranty serv i c e, please write to Cooper Lighting, 2611 La Vista Dri ve, Burl i n g t o n ,
NC 27215. Enclose product model number and problems you are ex p e riencing, along with
your address and telephone nu m b e r. You will then be contacted with a solution or a Return
Goods Au t h o rization number and full instructions for returning the product. All return e d
products must be accompanied by a Return Goods Au t h o rization Number issued by the
C o m p a ny and must be returned freight prepaid. A ny product received without a Return
Goods Authorization Number from the Company will be refused.
Cooper Lighting is not responsible for merchandise damaged in tra n s i t . Repaired or
replaced products shall be subject to the terms of this wa r ranty and are inspected when
p a cke d . Evident or concealed damage that is made in transit should be reported at once to
the carrier making the delive ry and a claim filed with them.
Five-Year Limited Warranty
Aiming the light
How to use
2611 La Vista Drive, Burlington, NC 27215 USA
1-800-334-6871
www.cooperlighting.com
Patents Pending
Reproductions of this document without prior written approval of Cooper Lighting are strictly prohibited.
14
B
A
™
(D)
La page est en cours de chargement...
La page est en cours de chargement...
La page est en cours de chargement...
La page est en cours de chargement...

9
Félicitations! Vous avez acheté un éclairage de plateau fluorescent
65 watts Regent Cool Touch™. Cet éclairage fonctionne avec moins
d’échauffement, plus de sécurité et moins de consommation que les
éclairages halogènes conventionnels. Il est équipé d’un caisson
durable en aluminium moulé et d’un support acier tubulaire pour la
robustesse à l’utilisation. L’appareil inclut une poignée en mousse
confortable pour l’accessoiriste et deux poignées avec caoutchouc
non glissant à la base du support.
• Tournevis cruciforme Phillipsble
• Éclairage de plateau fluorescent (A)
• Ampoule fluorescente de 65 watts (B)
IMPORTANT : LISEZ TOUTES LES
INSTRUCTIONS DE SÉCURITÉ.
AVERTISSEMENT : En utilisation des éclairages portables à l’ex-
térieur, les instructions de sécurité fondamentales doivent toujours être
respectées pour réduire les risques d’inflammation, commotion élec-
trique et dommages corporels, dont :
• N’utilisez que des cordons de prolongation à trois conducteurs avec
prises trois broches et prises de sortie secteur avec mise à la terre
compatibles avec la prise de l’appareil.
• Une protection par disjoncteur différentiel (interruption de circuit par
défaut d’isolement par rapport à la terre) doit être installée sur le
secteur ou sur les sorties d’alimentation en cas d’utilisation de
l’éclairage en milieu humide. Il existe des prises de courant avec
une protection CFCI intégrée dont l’usage est recommandé par
mesure de sécurité.
• N’utilisez qu’un cordon rallonge prévu pour l’extérieur, tel que les
rallonges type SW, SW-A, SOW, SOW-A, STW, STW-A, STOW,
STOW-A, SJW, SJW-A, SJOW, SJOW-A, SJTW, SJTW-A, SJTOW,
ou SJTOW-A.
• Pour utilisation à l’intérieur ou à l’extérieur.
• Agréé UL pour les endroits humides.
• Cet appareil est conforme à la partie 18 des règles FCC. Cualquier
cambio o modificación que se le haga al producto descrito en ésta
hoja de instrucciónes no aprovada por Cooper Lighting, puede
can celar la autoridad del usuario a operar el equipo.
REMARQUE: Este equipo ha sido probado cumpliendo con los lim-
ites de acuerdo a la Parte 18 de las reglas FCC. Ces limites sont
conçues pour offrir une protection raisonnable contre les inter-
Ce qu’il faut savoir
Ce qui est compris dans cet
Ce dont vous avez besoin
FCTWL65
Step 4: Replace the door frame and lens assembly and
secure it by tightening the knob that was loosened in
Step 1.
Plug the light into any standard 120 Volt receptacle. T h e
switch is located on the back of the fixture near the powe r
c o r d . Depress the switch once to turn the light on; d e p r e s s
the switch again to turn the light off.
Loosen the knob under the fixture, and holding the foam-grip handle, tilt
the fixture head to the desired position. Retighten knob.
Cooper Lighting (“the Company”) wa r rants this product (“the product”) against defects in
m a t e rial or wo rkmanship for a period of five years from date of original purchase, and
a grees to repair or, at the Company ’s option, replace a defe c t i ve product without charge fo r
either replacement parts or labor during such time. This does not include labor to remove
or install fixtures.
This wa r ranty is extended only to the original purchaser of the product. A purchaser’s
receipt or other proof of date of original purchase acceptable to the Company is required
b e fore wa r ranty perfo rmance shall be rendered.
This wa r ranty only covers product failure due to defects in materials or wo rkmanship which
occurs in normal use. It does not cover the bulb or failure of the product caused by acci-
dent, misuse, abu s e, lack of reasonable care, alteration, faulty installation, subjecting the
product to any but the specified electrical service or any other failure not resulting from
d e fects in materials or wo rk m a n s h i p. Damage to the product caused by separately pur-
chased, non-Company brand replacement bulbs and corrosion or discoloration of bra s s
components are not covered by this wa r ra n t y.
There are no express wa r ranties except as described above.
THE COMPANY SHALL NOT BE LIABLE FOR INCIDENTAL, SPECIAL OR CONSEQU E N-
TIAL DA M AGES RESULTING FROM THE USE OF THE PRODUCT OR ARISING OUT OF
ANY BREACH OF THIS WA R R A N T Y. A L L I M P L I E D WA R R A N T I E S , IF ANY, INCLUDING
IMPLIED WARRANTIES OF MERCHANTABILITY AND FITNESS FOR A PA RT I C U L A R
PURPOSE, ARE LIMITED IN DURATION TO THE DURATION OF THIS EXPRESS WA R-
R A N T Y. Some states do not allow the exclusion or limitation of incidental or consequential
d a m a g e s, or limitations on how long an implied wa r ranty lasts, so the above exclusions or
limitations may not apply to yo u .
No other wa r ra n t y, written or verbal, is authori zed by the Company. This wa r ranty gives yo u
specific legal rights and you may also have other rights which va ry from state to state.
To obtain wa r ranty serv i c e, please write to Cooper Lighting, 2611 La Vista Dri ve, Burl i n g t o n ,
NC 27215. Enclose product model number and problems you are ex p e riencing, along with
your address and telephone nu m b e r. You will then be contacted with a solution or a Return
Goods Au t h o rization number and full instructions for returning the product. All return e d
products must be accompanied by a Return Goods Au t h o rization Number issued by the
C o m p a ny and must be returned freight prepaid. A ny product received without a Return
Goods Authorization Number from the Company will be refused.
Cooper Lighting is not responsible for merchandise damaged in tra n s i t . Repaired or
replaced products shall be subject to the terms of this wa r ranty and are inspected when
p a cke d . Evident or concealed damage that is made in transit should be reported at once to
the carrier making the delive ry and a claim filed with them.
Five-Year Limited Warranty
Aiming the light
How to use
2611 La Vista Drive, Burlington, NC 27215 USA
1-800-666-2714
www.cooperlighting.com
Patents Pending
Reproductions of this document without prior written approval of Cooper Lighting are strictly prohibited.
14
B
A
™
(D)

• Fixture must be connected to a 120 Volt, 60 Hz power source. Any other
connection voids the warranty.
• Keep away from flammable objects.
• The e l e c t rical system, and the method of electrically connecting the fixture to it,
must be in accordance with the National Electric Code and local building codes.
• Disassembly of the fixture will void the warranty.
• Use only a 65 watt, PL type fluorescent bulb. Use of any other bulb will
damage the fixture and void the warranty.
• Fixture must be connected to a 120 Volt, 60 Hz power source. Any other
connection voids the warranty.
• Keep away from flammable objects.
• The electrical system, and the method of electrically connecting the fixture to
it, must be in accordance with the National Electric Code and local building
codes.
• Disassembly of the fixture will void the warranty.
• Use only a 65 watt, PL type fluorescent bulb. Use of any other bulb will
damage the fixture and void the warranty.
WARNING: Deviation from the assembly instructions may result in a risk of fire
or electric shock.
SAVE THESE INSTRUCTIONS
Important: Read Before Using!
Remove cardboard insert that is protecting bulb before use.
Step 1: Loosen the knob (turn counter-clockwise) located
on the back and top of the fixture (C).
Step 2: The doorframe and lens assembly will swing down
allowing access to the bulb. Remove the card-
board insert.
Step 3: Replace the door frame and lens assembly and
secure it by tightening the knob that was loosened
in Step 1.
Step 1: Slide the upper handle with foam grip into the tube on the U-bracket
which is located on the bottom of the fixture housing.
Step 2: Align the threaded screw holes in the handle with the two holes in the
tube and secure with the two screws provided.
Step 3: Slide the end of the “S” stand, with the screw hole in it, into the
remaining open end of the tube on the U-bracket located on the bot-
tom of the fixture housing.
Step 4: Align the threaded screw hole in the stand with the slotted hole in the
tube and secure with the knob provided. NOTE: First, slip the plastic
spacer over the screw that extends from the knob, making sure that
the flat side of the spacer rests against the knob itself. The curved
side of the spacer will rest against the curvature of the stand as the
knob is tightened down.
Step 1: Loosen the knob (turn counter-clockwise) located on the back and top
of the fixture (C).
Step 2 The doorframe and lens assembly will swing down allowing access to the
bu l b. R e m o ve the new fluorescent bulb from its pack a g e.
Step 3: Push one of the plastic bulb retainer clips open and carefully insert
the bulb under this retainer clip. Repeat the process on the opposite
side, then push the bulb into the bulb socket. (D) NOTE: Be careful
not to damage the bulb.
Installing the bulb
Assembling the fixture
10
férences nuisibles dans une installation résidentielle. Cet équipement
produit, utilise et peut émettre de l’énergie en fréquence radio. S’il
n’est pas installé et utilisé conformément aux instructions, il peut
provoquer des interférences nuisibles aux communications radio.
Cependant, il n’existe aucune garantie qu’une installation quelconque
ne produira pas d’interférence. Si cet équipement cause des inter-
férences nuisant au fonctionnement d’un appareil radio ou d’un
téléviseur (ce qui peut être déterminé en activant/désactivant
l’équipement), l’utilisateur est encouragé à éliminer les interférences
en appliquant l’une des mesures suivantes :
- Réorientez ou déplacez l’antenne réceptrice.
- Augmentez l'espace entre l'équipement et le poste récepteur.
- Branchez l'équipement sur une prise ou un circuit ne servant pas
au poste récepteur.
- Demandez l'aide de votre marchand ou d'un technicien expéri-
menté en radio/télévision.
• Le dispositif doit être branché à une source d’énergie de 120 Volts,
60 Hertz. Tout autre branchement que celui-ci annule la garantie.
• Gardez éloigné de tout objet inflammable.
• Le système électrique et la méthode de raccordement électrique de
l’appareil doivent obéir au code national de l’électricité ainsi qu’aux
règlements de construction locaux.
• Le démontage de cet ensemble annulera la garantie.
• Utiliser uniquement une ampoule fluorescente de type PL, ayant une
puissance de 65 watts. L’utilisation d’une autre ampoule endom-
magerait l’appareil et annulerait sa garantie.
AVERTISSEMENT : Ne pas appliquer les instructions d’assemblage
peut causer un incendie ou un choc électrique.
CONSERVER CES INSTRUCTIONS.
Important : À Lire Avant L’Utilisation !
E n l evez le manchon en carton qui protège l’ampoule avant son utilisation.
Etape 1 : Desserrez la molette (tournez en sens inverse des aiguilles
d’une montre) situé à l’arrière en haut de l’appareil (C).
Etape 2 : Le cadre de porte et l’ensemble de lentilles vont s’abaisser
en basculant en donnant accès à l’am-
poule. Ôtez l’intercalaire en carton.
Etape 3 : Refermez le cadre de porte et l’ensemble
de lentilles et fixez-les en place en resser-
rant la molette qui avait été desserrée
précédemment.
Etape 1 : Glissez la poignée supérieure avec prise en mousse dans le
tube sur le support en U qui est situé en bas du caisson de
l’appareil.
Etape 2 : Alignez les trous filetés pour vissage de la poignée avec les
deux trous dans le tube et bloquez avec les deux vis fournies.
Assemblage de l’appareil
13
(C)
(C)

11
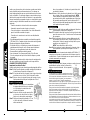
Etape 3 : Glissez l’extrémité du pied en “S” ayant un trou pour vis
dans l’autre bout ouvert du tube sur le support en U qui est
situé en bas du caisson de l’appareil.
Etape 4 : Alignez le trou fileté pour vissage du pied avec le trou dans
le tube et bloquez avec le bouton fourni. REMARQUE :
Glissez d’abord l’entretoise sur la vis qui sort du bouton de
façon à ce que le côté plat de l’entretoise repose contre le
bouton lui-même. Le côté bombé de l’entretoise va reposer
contre la courbure du pied quand le bouton sera serré.
Etape 1 : Desserrez la molette (tournez en sens inverse des aiguilles
d’une montre) situé à l’arrière en haut de l’appareil (C).
Etape 2 : Le cadre de porte et l’ensemble de lentilles vont s’abaisser
en basculant en donnant accès à l’ampoule. Ôtez
l’am poule nouveau fluorescente de son emballage.
Etape 3 : Poussez pour ouvrir une des attaches plastique de
l’ampoule et insérez soigneusement l’ampoule dessous;
Répétez le processus du côté opposé. Puis poussez
l’ampoule vers le bas dans sa douille (D).
REMARQUE : Faites attention de ne pas endommager
l’ampoule.
Etape 4 : Refermez le cadre de porte et l’ensemble de lentilles et
fixez-les en place en resserrant la
molette qui avait été desserrée
précédemment.
Alimentez l’éclairage en branchant son cordon
secteur dans une sortie 120 Volt standard.
L’interrupteur est placé à l’arrière de l’appareil près
de la sortie du cordon secteur. Appuyez une fois
sur l’interrupteur de l’appareil pour l’allumer. Appuyez sur l’interrup-
teur une seconde fois pour l’éteindre.
Desserrez la molette sous l’appareil et en maintenant la prise mousse
de la poignée tournez la tête de l’appareil dans la position voulue.
Resserrez la molette.
Cooper Lighting (“la Société”) garantit ce produit (“le produit”) contre tout
défaut de matériau ou de fabrication pendant une période de cinq ans à partir
de la date d’achat original, et s’engage, pendant ces cinq années, à réparer
ou, au choix de la Société, à remplacer un produit défectueux sans frais pour
les pièces de rechange ou la main-d’œuvre. Ceci ne couvre pas la main-
d’œuvre pour retirer ou installer un dispositif.
Cette garantie n’est valable que pour l’acheteur original du produit. Une fac-
ture d’achat ou une preuve équivalente de la date d’achat original acceptable
par la Société est requise avant qu’un quelconque travail de réparation ou de
remplacement puisse être exécuté suivant les conditions de la garantie.
Garantie limitée de cinq ans
Ajuster la lumière
Notice d’utilisation
Installation de l’ampoule
(suite)
12
Congratulations! You have purchased a Regent Cool Touch™ 65 watt heavy-
duty fluorescent worklight. This worklight operates cooler, safer, and is more ener-
gy efficient than conventional halogen worklights. It has a durable, die-cast alu-
minum housing and a tubular-steel stand for heavy-duty use. The fixture includes a
c o m fo rt a ble fo a m - grip handle and non-skid ru bber grips on the base of the stand.
• Phillips head screwdriver
• Fluorescent worklight (A)
• 65 watt fluorescent bulb (B)
IMPORTANT READ ALL SAFETY INSTRUCTIONS.
WARNING: When using outdoor portable lamps, basic
safety instructions should always be followed to reduce
the risk of fire, electric shock, and personal injury, includ-
ing the following:
• Use only three wire outdoor extension cords that have three-prong gr o u n d i n g
plugs and grounding receptacles that accept the appliance’s plug.
• Ground Fault Circuit Interrupter (GFCI) protection should be provided on the
circuit(s) or outlet(s) to be used for the wet location portable lamp.
Receptacles are available having built-in GFCI protection and are able to be
used for this measure of safety.
• Use only with an extension cord for outdoor use, such as an extension cor d
type SW, SW-A, SOW, SOW-A, STW, STW-A, STOW, STOW-A, SJW,
S J W-A, SJOW, SJOW-A, SJTW, SJTW-A, SJTOW, or SJTOW- A .
• For indoor and outdoor use.
• UL LISTED for wet locations.
• This device complies with Part 18 of the FCC Rules. Any changes or modifi-
cations to the product described in this instruction sheet that are not expressly
approved by Cooper Lighting could void the user’s authority to operate the
equipment.
NOTE: This equipment has been tested and found to comply with the limits
pursuant to Part 18 of the FCC Rules. These limits are designed to provide
reasonable protection against harmful interference in a residential installation.
This equipment generates, uses, and can radiate radio frequency energy and, if
not installed and used in accordance with the instructions, may cause harmful
interference to radio communications. However, there is no guarantee that
interference will not occur in a particular installation. If this equipment does
cause harmful interference to radio or television reception, which can be deter-
mined by turning the equiment off and on, the user is encouraged to try to cor-
rect the inteference by one or more of the following measures:
- Reorient or relocate the receiving antenna.
- Increase the separation between the equipment and receiver.
- Connect the equipment into an outlet on a circuit different from that to
which the receiver is connected.
- Consult the dealer or an ex p e rienced radio/TV technician for help.
What to know
What’s included
What you need
FCTWL65
B
A
(D)
™

12
Cette garantie ne couvre que les défaillances du produit dues àdes défauts de
matériau ou de fabrication qui se produisent lors d’une utilisation normale du pro-
duit. Elle ne couvre pas les ampoules, ni les défaillances du produit causées par
un accident, un usage impropre ou abusif, le manque d’attention, la transformation
du dispositif, ou une installation défectueuse, soumettant le produit à n’importe
quel service électrique autre que celui qui est spécifié, ni toute autre défaillance
ne résultant pas d’un défaut de matériau ou de fabrication. Les dégâts sur le pro-
duit causés par des ampoules de rechange achetées séparément et provenant de
marques autres que celle de la Société, et ceux causés par la corrosion ou la
décoloration des composants en laiton, ne sont pas couverts par cette garantie.
Il n’existe aucune garantie explicite autre que celle décrite ci-dessus.
LA SOCIETE NE SERA PAS RESPONSABLE DES DOMMAGES-INTERETS
ACCESSOIRES, SPECIAUX OU INDIRECTS RESULTANT DE L’UTILISATION DU
PRODUIT OU PROVENANT DE N’IMPORTE QUELLE RUPTURE DE CETTE
GARANTIE. TOUTES LES GARANTIES TACITES, S’IL Y EN A, Y COMPRIS LES
GARANTIES IMPLICITES DE QUALITE MARCHANDE ET DE CONVENANCE A
UNE FIN PARTICULIERE, SONT LIMITEES EN DUREE A LA DUREE DE CETTE
GARANTIE EXPLICITE. Certains états ne permettant pas l’exclusion ou la limita-
tion des dommages-intérêts accessoires ou indirects, ni les restrictions sur la
durée d’une garantie implicite, les exclusions ou restrictions précédentes peuvent
ne pas s’appliquer à votre cas.
Aucune autre garantie, écrite ou verbale, n’est autorisée par la Société. Cette
garantie vous donne des droits légaux spécifiques et vous pouvez également avoir
d’autres droits qui varieront d’un état à l’autre.
Pour recevoir le service de garantie veuillez écrire à Cooper Lighting, 2611 La
Vista Drive, Burlington, NC 27215. Veuillez inclure le numéro de modèle du pro-
duit, les problèmes que vous avez rencontrés ainsi que votre adresse et votre
numéro de téléphone. Vous serez contacté avec une solution ou un numéro d’au-
torisation de retour de marchandise avec des instructions sur la façon de retourn-
er le produit. Tous les produits retournés doivent être accompagnés d’un numéro
d’Autorisation pour produits retournés émis par la Société et doivent être renvoyés
port prépayé. Tout produit reçu sans un numéro d’Autorisation pour produits
retournés émis par la Société sera refusé.
Cooper Lighting n’est pas responsable des marchandises endommagées lors de
l’expédition. Les produits réparés ou remplacés seront soumis aux conditions de
cette garantie et seront inspectés lors de leur emballage. Tout dégât manifeste ou
dissimulé survenu pendant l’expédition doit être immédiatement signalé à la com-
pagnie de transport en charge de la livraison, et une réclamation doit être enreg-
istrée auprès de cette compagnie.
2611 La Vista Drive, Burlington, NC 27215 Etats-Unis
1-800-334-6871
www.cooperlighting.com
Brevets en Cours d’Homologation
© 2000 Cooper Lighting .
La reproduction de ce document est strictement
interdite sans l’autorisation préalable par écrit de
Cooper Lighting. 11/00 325-0961
Instruction Manual
Instrucciones
Directives
FCTWL65
-
 1
1
-
 2
2
-
 3
3
-
 4
4
-
 5
5
-
 6
6
-
 7
7
-
 8
8
-
 9
9
-
 10
10
-
 11
11
-
 12
12


Regent Sheffield FCTWL65 Manuel utilisateur
- Catégorie
- Projecteurs de travail
- Taper
- Manuel utilisateur
dans d''autres langues
Documents connexes
Autres documents
-
Cooper Lighting FCTS130 Manuel utilisateur
-
-
 All-Pro EQ-300-WL Guide d'installation
-
-
 Utilitech HW-GZ001 Guide d'installation
-
-
-
-
 All-Pro WL2540LST Mode d'emploi
-
 All-Pro WLT5040LST Mode d'emploi


