Dacor IF36BNDF Manuel utilisateur
- Catégorie
- Congélateurs
- Taper
- Manuel utilisateur
Ce manuel convient également à

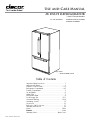
Use and Care Manual
36 Inch Refrigerator
2 and 3 Door Models
Part No. 106080 Rev. B/W10171467
Table of Contents
Important Safety Instructions ............................................1
Important Information .....................................................2
Electronic Control Center ............................................. 2-3
Refrigerator Compartment ............................................ 4-5
Freezer Compartment .....................................................5
Ice and Water ...............................................................6
Water Filter ...................................................................7
Performance Data ..........................................................8
Food Storage Tips ..................................................... 9-11
Care and Cleaning ................................................. 12-14
Operating Sounds ........................................................15
Accessories .................................................................16
Before You Call for Service ...........................................17
Warranty and Service ..................................................18
Notes .................................................................... 19-20
Francis ................................................................. 21-44
Warranty Card ................................................Back Cover
For Use with Models: EF36BNF, EF36LNF, EF36RNF,
IF36BNDF, PF36BNDF
Style Varies
Model EF36BNF Shown

1

1
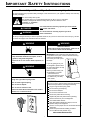
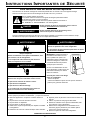
Im p o r t a n t Sa f e t y In S t r u c t I o n S
Your safety and the safety of others are very important.
We have provided many important safety messages in this manual and on your appliance. Always read and obey
all safety messages.
DANGER
This is the safety alert symbol.
This symbol alerts you to potential hazards that can kill or hurt you and others.
All safety messages will follow the safety alert symbol and either the word
“DANGER” or “WARNING.”
These words mean:
You can be killed or seriously injured if you don’t immedi-
ately follow instructions.
You can be killed or seriously injured if you don’t
follow instructions.
All safety messages will tell you what the potential hazard is, tell you how to reduce the chance of injury, and tell
you what can happen if the instructions are not followed.
WARNING
To reduce the risk of fire, electric
shock, or injury to persons when using the refrigerator,
follow basic precautions, including the following:
WARNING:
Plug into a grounded 3 prong outlet.
Do not remove ground prong.
Do not use an adapter.
Do not use an extension cord.
Disconnect power before servicing.
Replace all parts and panels before operating.
Remove doors from your old refrigerator.
Use nonflammable cleaner.
Keep flammable materials and vapors, such as
gasoline,
away from refrigerator.
Use two or more people to move and install refrigerator.
Disconnect power before installing ice maker
(on ice maker
kit ready models only).
WARNING
Explosion Hazard
Keep flammable materials and vapors, such as
gasoline, away from refrigerator.
Failure to do so can result in death, explosion, or
fire.
WARNING
Electric Shock Hazard
Plug into a grounded 3 prong outlet.
Do not remove ground prong.
Do not use an adapter.
Do not use an extension cord.
Failure to follow these instructions can result in
death, fire, or electrical shock.
WARNING
Suffocation Hazard
Remove doors from old refrigerator. Failure to do
so can result in death or brain damage.
IMPORTANT: Child entrapment and suffocation are
not problems of the past. Junked or abandoned refrig-
erators are still dangerous,
even if they sit out for “just a
few days.”
If you are getting rid of your
old refrigerator, please follow
the instructions below to help
prevent accidents.
Before you throw away your
old refrigerator or freezer:
Take off the doors.•
Leave the shelves in place •
so children may not easily
climb inside.
refrigerator.
SAVE THESE INSTRUCTIONS

2
3
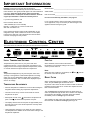
Im p o r t a n t In f o r m a t I o n
InIt I a l te m p e r a t u r e Se t t I n g S
Temperatures are preset at 37°F (3°C) in the fresh food
compartment and 0°F (-18°C) in the freezer compartment. The
display will show the average compartment temperatures, based
on several measurement points within the compartment.
Note:
Temperatures displayed may vary from set point due to door
openings or during defrost. Thermometers placed in the refrig-
erator may record a temperature slightly above or below the
displayed temperature. This is normal as the displayed temper-
ature is an average.
te m p e r a t u r e ad j u S t m e n t S
• Allowthetemperaturetostabilizefor24hoursafterloadingthe
refrigerator before making any temperature adjustments.
• Thefirsttouchoftheupordownarrowshowsthecurrent
temperature set point.
• Subsequenttouchesofthe
pad raise the temperature set
point or the pad lowers the temperature set point.
• Thedisplaywillshowthenewsetpointforapproximatelythree
seconds, then return to the actual temperature currently within
that compartment.
• Limittemperaturechangestoonedegreeatatime.Allowthe
new temperatures to stabilize for 24 hours before making a new
temperature adjustment.
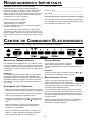
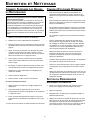
The control center is located at the top front of the fresh food compartment.
fa S t Ic e
When activated, Fast Ice reduces the freezer
temperature to the optimum setting for 24 hours in
order to produce more ice.
Note:
When the Fast Ice feature is in operation, the and pads for
the freezer control will not operate.
re S e t fI l t e r
When a water filter has been installed in the refrig-
erator, the yellow Alert light will illuminate when
90 percent of the volume of water for which the filter is rated has
passed through the filter OR 11 months have elapsed since the
filter has been installed.
The red Change light will illuminate when the rated volume of
water has passed through the filter OR 12 months have elapsed
since the filter was installed. A new filter should be installed
immediately when the Change light is illuminated.
After replacing the filter, press and hold the Reset Filter pad for
three seconds. The Alert and Change lights will go off.
Installer: Please leave this guide with this appliance.
Consumer: Please read and keep this Use & Care Manual for
future reference. This guide provides proper use and maintenance
information. Keep this guide and the sales receipt and/or
cancelled check in a safe place for future reference. Proof of
original purchase date is needed for warranty service.
Ifyouhaveanyquestions,call:
DacorCustomerServiceTeam
1-800-793-0093(U.S.A.andCanada)
Monday — Friday 6:00
a m to 5:00 p m Pacific Time
Web site: www.Dacor.com
Have complete model and serial number identification of your
refrigerator ready. These numbers are found on a serial plate,
located on the right side of the refrigerator liner. Record these
numbers on this page for easy access.
Model Number ________________________________________
SerialNumber________________________________________
Date of Purchase______________________________________
For service and warranty information, see page 18.
Inourcontinuingefforttoimprovethequalityandperformance
of our appliances, it may be necessary to make changes to the
appliance without revising this guide.
el e c t r o n I c co n t r o l ce n t e r

2
3
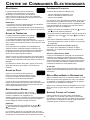
ab S e n t mo d e
The Absent Mode feature causes the freezer to
defrostlessfrequently,conservingenergy.The
Absent Mode indicator light will illuminate when the feature is
activated. To deactivate, press the Absent Mode pad again OR
open either door. The indicator light will go out.
Notes:
• DooropeningswillnotdeactivateAbsenceModeforapproxi-
mately one hour after activation.
• Ifvacationingformorethanafewdays,seethePreparingfor
Vacation/Absence section on page 14.
te m p al a r m
The Temp Alarm system will alert you if the
freezer or fresh food temperatures exceed normal
operating temperatures due to a power outage or other event.
When activated, the Temp Alarm light will illuminate.
If the freezer or fresh food temperatures have exceeded these
limits, the display will alternately show the current compartment
temperatures and the highest compartment temperatures reached
when the power was out. An audible alarm will sound repeatedly.
Press the Temp Alarm pad once to stop the audible alarm. The
Temp Alarm light will continue to flash and the temperatures will
alternate until the temperatures have stabilized.
To turn off Temp Alarm, press and hold the Temp Alarm pad for
three seconds. The indicator light will go off.
do o r al a r m
Press the Door Alarm pad to activate or deactivate
the door alarm. The Door Alarm is active when the
indicator above the Door Alarm pad is lit.
The Door Alarm alerts you when one of the doors has been left
open for five continuous minutes. An audible alarm will sound
every few seconds until the door is closed, or the Door Alarm is
deactivated .
ma x co o l
When activated, Max Cool causes the fresh food
and freezer temperatures to drop to the minimum
settings on the control. This cools down the refrigerator and
freezer after extended door openings or when loading the refrig-
erator or freezer with warm food.
Note:
When the Max Cool feature is in operation, the and pads
for the refrigerator and freezer controls will not operate.
To activate, press the Max Cool pad. Max Cool will deactivate
automatically after 12 hours, OR press the Max Cool pad to
deactivate the feature.
el e c t r o n I c co n t r o l ce n t e r
uS e r pr e f e r e n c e S
Access the User Preferences menu to:
• Changethetemperaturedisplayfrom°Fto°C
• Enableordisableaudiblealarms.
• ActivatetheSabbathmode
To access the user preferences menu, press and hold the Door
Alarm pad for three seconds. When in the user preferences mode,
a short title for the feature will appear in the freezer temperature
display and the feature status will appear in the fresh food display.
1. Use the freezer up
and down control to scroll through
the preferences.
2. When the desired preference is displayed, use the fresh food
up
and down control to change the status.
3. When changes are complete, press and hold the Door Alarm
pad for three seconds or close the fresh food door(s).
ab o u t t h e te m p e r a t u r e dI S p l a y (f_c)
“F” indicates that the temperature is displayed in degrees
Fahrenheit. “C” indicates that the temperature is displayed in
degrees Celsius.
ab o u t Sa b b a t h mo d e (Sab)
WhentheSabbathModeisON,allcontrollightsandthenight
lightaredisableduntiltheSabbathfeatureisturnedOFF.This
feature does not disable the interior lights. Press any pad on the
controlcentertorestorethecontrollightsandturnSabbathmode
to OFF.
al a r m (al)
When Alarm mode is OFF, all audible alarms will be disabled until
the feature is turned ON.
to tu r n yo u re f r I g e r a t o r of f /on
Press the freezer Up Arrow control repeatedly until “OFF”
appears in the freezer display. Allow a few seconds for the
refrigerator to shut off. Neither compartment will cool.
Press either the refrigerator or freezer Up Arrow or Down
Arrow control to turn on the refrigerator.
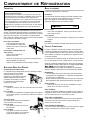
Wa r m ca b I n e t Su r f a c e S
At times, the front of the refrigerator cabinet may be warm to the
touch. This is a normal occurrence that helps prevent moisture
from condensing on the cabinet. This condition will be more
noticeable when the refrigerator is first started, during hot weather
and after excessive or lengthy door openings.

4
5
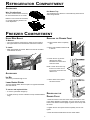
re f r I g e r a t o r co m p a r t m e n t
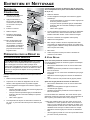
Sh e l v e S
Important information to know about glass shelves and
covers:
Do not clean glass shelves or covers with warm water when
theyarecold.Shelvesandcoversmaybreakifexposedto
sudden temperature changes or impact, such as bumping.
For your protection, tempered glass is designed to shatter into
many small, pebble-size pieces. This is normal. Glass shelves
and covers are heavy. Use special care when removing them to
avoid impact from dropping.
YourrefrigeratorhasSpill-proofGlassShelves.The Spill-proof
shelves have a spill retainer edge which allows for easier clean up
andareequippedwitha slide out feature. To slide out, grasp the
front of the shelf and pull forward. Push in the shelf to return to
the original position.
To Remove a Shelf:
• Slightlytiltupthefrontandliftup the rear of the shelf, then pull
the shelf straight out.
To Lock the Shelf Into Another
Position:
• Tilt up the front edge of the shelf.
• Insert the hook into the desired
frame openings and let the shelf
settle into place.
• Be sure the shelf is securely locked at the rear.
do o r St o r a g e
Dairy Center
The Dairy Center provides convenient door storage for spreadable
items such as butter and margarine. This compartment can be
moved to different locations to accom-
modate storage needs. To use the dairy
center, raise the cover.
To Remove:
• Raisethecover,pullupwardandtilt
out.
To Install:
• SlidetheDairyCenterinanddownuntilfirmlyseatedinthe
door liner.
Door Buckets
Door Buckets can be moved to meet
storage needs.
To Remove:
• Slidebucketupandpullstraightout.
To Install:
• Slidebucketinanddownuntilfirmly
seated in the door liner.
Crisper Drawers
The Crisper Drawers provide a higher humidity environment for
fresh fruit and vegetable storage.
Controls
The Crisper Controls regulate the amount of humidity in the
crisperdrawer.SlidethecontroltowardtheFruitsettingfor
producewithouterskins.SlidethecontroltowardtheVegetables
setting for leafy produce.
To Remove:
• Pulldrawerouttofullextension.Tiltupfrontofdrawerandpull
straight out.
To Install:
• Insertdrawerintoframerailsandpushbackintoplace.
Note:
For best results, keep the crisper drawers tightly closed.
de l I dr a W e r
The Deli Drawer is a full-width drawer with adjustable temperature
control. This drawer can be used for large party trays, deli items,
beverages or miscellaneous items. There is a divider to organize
the drawer into sections if desired.
There is a temperature control which adjusts the amount of cold
air allowed into the Deli Drawer. The control is located on the right
of the drawer, under the lid.
Setthecontroltocold
to provide a normal refrigerator temper-
ature.Setthedraweronthecoldest
setting when
a temperature colder than the main refrigerator compartment is
desired. Use the coldest setting when storing meats.
Notes:
•ColdairdirectedtotheDeli Drawer can decrease refrigerator
temperature. Refrigerator control may need to be adjusted.
• DonotplaceleafyvegetablesintheDeliDrawer.Colder
temperatures could damage leafy produce.
To Remove:
• Liftlid.Pulldrawerouttofullextension.Tiltthedrawerfrontup
and pull straight out.
To Install:
• Pushmetalgliderailstothebackoftherefrigerator.Place
drawer onto rails and slide drawer back until it falls into place.
To Remove Divider:
• Pulldrawercompletelyoutandraisethefrontofthedividerto
unhook it from the rear wall of the pantry and lift it out.
To Install Divider:
• Hookbackofdivideroverrearwallofpantryandlowerinto
place.

4
5
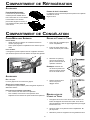
re m o v I n g t h e dr a W e r fr o n t
1. Pull the freezer drawer completely
open.
2. Tilt the lower basket forward and lift
to remove.
3. Loosen the four (4) screws
attaching the drawer
brackets to the drawer front
as shown below.
NOTE: Loosen the screws only
three to four turns. Do not
remove the screws from the
drawer front.
4. Lift the drawer front upward
and off the screws.
re I n S t a l l I n g t h e
dr a W e r fr o n t
1.Slidethescrewsonthebackofthedrawerfrontintotheslots
in the drawer brackets on both sides. You may need to move the
bottom of the bracket around slightly to get the slot to line up with
the screw.
2. Tighten the four front panel screws completely. Do not over-
tighten.
3. Place the freezer basket back onto the drawer slides.
To Remove:
• Turn off ice maker by rasing the ice maker arm (see page 6).
• Pullupperbasketouttofullextensionandliftouttoremove.
To Install:
• Slideupperbasketintofreezer.Makesurethatrearofbasket
hooks behind rail catch.
ac c e S S o r I e S
Ice Bin
The ice bin provides storage for ice.
Lower Basket Divider
The lower basket divider allows the option to organize the basket
area into sections.
To remove and replace divider:
• Toremove,pulldividerstraightup.
• Toinstall,hooktopcornersofdividerovertophorizontalbasket
rungs.
re f r I g e r a t o r co m p a r t m e n t
fr e e z e r co m p a r t m e n t
ac c e S S o r I e S
Wine Trivet/Can Rack
The Wine Trivet/Can Rack accessory
fits in the Deli Drawer or on a shelf.
Bottles or cans can be laid crosswise,
or a single bottle may be laid in the
center depression.
up p e r WI r e ba S k e t
Deli Drawer Tray
The Deli Drawer tray allows for a removable tray within the full-
width storage drawer.

6
7
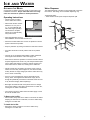
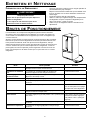
Ic e a n d Wa t e r
au t o m a t I c Ic e ma k e r
Connect the ice maker to the water supply as instructed in the
installation instructions. Proper water flow and a level refrig-
erator are essential for optimal ice maker performance.
Operating Instructions
• Confirmicebinisinplace
and ice maker arm is down.
• Afterfreezersectionreaches
between 0° to 2°F (-18° to
-17° C), ice maker fills with
water and begins operating.
You will have a complete
harvest of ice approximately
every three hours.
• Allowapproximately24hours
after installation to receive first harvest of ice.
• Discardicecreatedwithinfirst12hoursofoperationtoassure
system is flushed of impurities.
• Stopiceproductionbyraisingicemakerarmuntilclickisheard.
• Icemakerwillremainintheoffpositionuntilarmispushed
down.
• Thefirstoneortwobatcheswillprobablycontainundersized
and irregular cubes because of air in the supply line.
• Whentheicecubesareejecteditisnormalforseveralcubesto
be joined together at the ends. They can easily be broken apart.
The ice maker will continue to make ice until the supply of ice
cubes raises the ice maker arm, shutting the ice maker off.
• Certainsoundsmayaccompanythevariouscyclesoftheice
maker. The motor may have a slight hum, the cubes will rattle
as they fall into an empty storage pan and the water valve may
click or “buzz” occasionally.
• Iftheiceisnotusedfrequently,theicecubeswillbecome
cloudy, shrink, stick together and taste stale. Empty the ice
storage bin periodically and wash it in lukewarm water. Be sure
to dry the bin thoroughly before replacing it.
• Beveragesandfoodsshouldnotbeplacedintheicestorage
binforquickchilling.Theseitemscanblocktheicemakerarm,
causing the ice maker to malfunction.
• Turnoff(armup)theicemakerwhenthewatersupplyistobe
shut off for several hours.
To Remove the Ice Bin:
• Pullitforward,awayfromtheicemaker.Toavoidtheicemaker
dumping ice while the bin is removed, turn the ice maker off by
raising the ice maker arm.
To Install the Ice Bin:
• Reversetheaboveprocedure.Turntheicemakeronby
lowering the ice maker arm.
Water Dispenser
The Water Dispenser is located on the left side wall of the fresh
food section. This design is for cold water dispensing only.
To Dispense Water:
• Holdcontainerunderspoutandpressdispenserpad.

6
7
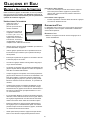
Wa t e r fI l t e r
re m o v a l a n d In S t a l l a t I o n
Do not use with water that is microbiologically unsafe or of
unknownqualitywithoutadequatedisinfectionbeforeorafter
thesystem.Systemscertifiedforcystreductionmaybeusedon
disinfected waters that may contain filterable cysts.
Initial Installation
The water filter is located in the upper right hand corner of the
fresh food compartment.
1. Remove blue bypass cap and retain for later use.
2. Remove sealing label from end of filter and insert into filter
head.
3.Rotategentlyclockwiseuntilfilterstops.Snapfiltercover
closed.
4. Reduce water spurts by flushing air from system. Run water
continuously for two minutes through dispenser until water runs
steady. During initial use, allow about a one- to two-minute
delay in water dispersal to allow internal water tank to fill.
• Additionalflushingmayberequiredinsomehouseholds
wherewaterisofpoorquality.
Replacing the Water Filter
IMPORTANT:
Air trapped in system may cause water and
cartridge to eject. Always dispense water for two minutes
before removing the filter for any reason. Use caution when
removing.
1. Turn filter counterclockwise until it releases from filter head.
2. Drain water from filter into sink, and dispose of filter in normal
household trash.
3. Wipe up excess water in filter cover and continue with Initial
Installation, steps 2 through 4.
The filter should be changed at least every 12 months.
Important: Condition of water and amount used determines life
span of water filter cartridge. If water use is high, or if water is of
poorquality,replacementmayneedtotakeplacemoreoften.
To replacement filter cartridges or for service, contact your local
dealerorDacorCustomerService,1-800-793-0093.(U.S.A.and
Canada)
The dispenser feature may be used without a water filter cartridge.
If you choose this option, replace filter with blue bypass cap.

8
9
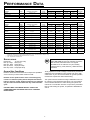
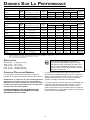
pe r f o r m a n c e da t a
Standard No. 42: Aesthetic Effects
Parameter
USEPA
MCL
Influent
Challenge Concentration
Influent
Average
Effluent % Reduction
Min. Required
ReductionAverage Maximum Average Minimum
Chlorine – 2.0 mg/L ± 10% 1.88 mg/L <0.05136364 mg/L 0.06 mg/L >97.26 96.84 50%
Taste and Odor – – – – – – – –
Particulate** – at least 10,000 particles/ml 5,700,000 #/ml 30,583 #/ml 69,000 #/ml 99.52 98.94 85%
Standard No. 53: Health Effects
Parameter
USEPA
MCL
Influent
Challenge Concentration
Influent
Average
Effluent % Reduction
Min. Required
ReductionAverage Maximum Average Minimum
Turbidity 1 NTU** 11 ± 1 NTU*** 10.7 NTU 0.31 NTU .049 NTU 97.09 95.20 0.5 NTU
Cysts
99.5%
Reduction Minimum 50,000/L 166,500 #/L <1 #/L <1 #/L >99.99 >99.99 >99.99%
Asbestos
99%
Reduction
10
7
10
8
fibers/L; fibers > micrometers
in length 155 MF/L <1 MF/L <1 MF/L >99.99 >99.99 99%
Lead at pH 6.5 0.015 mg/L 0.15 mg/L +10% 0.153 mg/L <.001 mg/L <.001 mg/L >99.35 >99.29 0.10 mg/L
Lead at pH 8.5 0.015 mg/L 0.15 mg/L +10% 0.150 mg/L <.001 mg/L <.001 mg/L >99.33 >99.29 0.10 mg/L
Mercury at pH 6.5 0.002 mg/L .006 mg/L ± 10% 0.006 mg/L 0.0003 mg/L 0.0005 mg/L 95.70 90.91 0.002 mg/L
Mercury at pH 8.5 0.002 mg/L .006 mg/L ± 10% 0.006 mg/L 0.0008 mg/L 0.0015 mg/L 86.22 75.93 0.002 mg/L
Atrazine 0.003 mg/L 0.009 mg/L + 10% 0.009 mg/L <0.002 mg/L 0.002 mg/L 76.99 75.31 0.003 mg/L
Benzene 0.005 mg/L 0.015 mg/L ± 10% 0.014 mg/L 0.0006 mg/L 0.0011 mg/L 95.71 92.14 0.005 mg/L
Carbofuran 0.04 mg/L 0.08 mg/L ± 10% 0.081 mg/L <0.001 mg/L <0.001 mg/L 98.74 98.46 0.04 mg/L
p-Dichlorobenzene 0.075 mg/L .225 mg/L ± 10% 0.208 mg/L <0.0005 mg/L <0.0005 mg/L 99.76 99.74 0.075 mg/L
Lindane
0.0002
mg/L 0.002 mg/L ± 10% 0.002 mg/L 0.000 mg/L <0.0001 mg/L 98.72 96.50 0.0002 mg/L
Toxaphene 0.003 mg/L 0.015 ± 10% 0.015 mg/L <0.001 mg/L <0.001 mg/L 92.97 91.67 0.003 mg/L
* Tested using a flow rate of 0.78 gpm; pressure of 60 psig; pH of 7.5 + 0.5; temp. of 68° + 5°F (20° + 3°C)
** Measurement in particules/ml. Particules used were 0.5 - 1 microns
*** NTU - Nephelometric Turbidity Units
Timely replacement of filter cartridge is essential for performance
satisfaction from this filtration system. Please refer to the appli-
cable section of your Use and Care Guide for general operation,
maintenancerequirementsandtroubleshooting.
ThissystemhasbeentestedaccordingtoANSI/NSF42and53
for reduction of the substances listed above. The concentration
of the indicated substances in water entering the system was
reducedtoaconcentrationlessthanorequaltothepermissible
limitforwaterleavingthesystem,asspecifiedinANSI/NSF42
and 53.
Sp e c I f I c a t I o n S
Rated Flow: .78 gpm (2.9 L/min)
Min. Op. Temp: 33°F (.6°C)
Max. Op. Temp: 100°F (38°C)
Min. Op. Press: 35 psi (241 kPA)
Max. Op. Press: 120 psi (827 kPA)
SystemtestedandcertifiedbyNSFInternational
againstNSF/ANSIStd42forthereductionofChlorine
Taste and Odor, Particulate Class I and against
NSF/ANSI53forthereductionofCysts,Turbidity,
Asbestos, Mercury, Lead, Benzene, p-Diclorobenzene,
Carbofuran
General Use Conditions
ReadthisPerformanceDataSheetandcomparethecapabilities
of this unit with your actual water treatment needs.
DO NOT use this product where water is microbiologically
unsafe or of unknown quality without adequate disinfection
before or after the system. System certified for cyst reduction
may be used on disinfected water that may contain filterable
cysts.
USE ONLY WITH COLD WATER SUPPLY. CHECK FOR
COMPLIANCE WITH THE STATE AND LOCAL LAWS AND
REGULATIONS.

8
9
fo o d St o r a g e tI p S
fr e S h fo o d St o r a g e
• Thefreshfoodcompartmentofarefrigeratorshouldbekept
between 34°-40°F (1°-4°C) with an optimum temperature of
37°F (3°C). To check the temperature, place an appliance
thermometer in a glass of water and place in the center of the
refrigerator. Check after 24 hours. If the temperature is above
40°F (4°C) adjust the controls as explained on page 2.
• Avoidovercrowdingtherefrigeratorshelves.Thisreduces
the circulation of air around the food and results in uneven
cooling.
Fruits and Vegetables
• Storageinthecrisperdrawerstrapshumiditytohelppreserve
thefruitandvegetablequalityforlongertimeperiods(see
page 4).
• Sortfruitsandvegetablesbeforestorageandusebruisedor
soft items first. Discard those showing signs of decay.
• Alwayswrapodorousfoodssuchasonionsandcabbageso
the odor does not transfer to other foods.
• Whilevegetablesneedacertainamountofhumidityto
remain fresh, too much humidity can shorten storage times
(especially leafy vegetables). Drain vegetables well before
storing.
• Waittowashfreshproduceuntilrightbeforeuse.
Meat and Cheese
• Rawmeatandpoultryshouldbewrappedsecurelyso
leakage and contamination of other foods or surfaces does
not occur.
• Occasionallymoldwilldeveloponthesurfaceofhard
cheeses(Swiss,Cheddar,Parmesan).Cutoffatleastan
inch around and below the moldy area. Keep your knife or
instrument out of the mold itself. Do not try to save individual
cheese slices, soft cheese, cottage cheese, cream, sour
cream or yogurt when mold appears.
Dairy Food
• Mostdairyfoodssuchasmilk,yogurt,sourcreamand
cottage cheese have freshness dates on their cartons for
appropriatelengthofstorage.Storethesefoodsinthe
original carton and refrigerate immediately after purchasing
and after each use.
fr o z e n fo o d St o r a g e
• Thefreezercompartmentofarefrigeratorshouldbekeptat
approximately 0°F (-18°C). To check the temperature, place
an appliance thermometer between the frozen packages and
check after 24 hours. If the temperature is above 0°F (-18°C),
adjust the control as described on pages.
• Afreezeroperatesmoreefficientlywhenitisatleast
two-thirds full.
Packaging Foods for Freezing
• Tominimizedehydrationandqualitydeteriorationuse
aluminum foil, freezer wrap, freezer bags or airtight
containers. Force as much air out of the packages as
possible and be sure they are tightly sealed. Trapped air
can cause the food to dry out, change color and develop an
off-flavor (freezer burn).
• Wrapfreshmeatsandpoultrywithsuitablefreezerwrapprior
to freezing.
• Donotrefreezemeatthathascompletelythawed.
Loading the Freezer
• Avoidaddingtoomuchwarmfoodtothefreezeratonetime.
This overloads the freezer, slows the rate of freezing and can
raise the temperature of frozen foods.
• Leavespacebetweenthepackagessocoldaircancirculate
freely,allowingfoodtofreezeasquicklyaspossible.
• Avoidstoringhard-to-freezefoodssuchasicecreamand
orange juice on the freezer door shelves. These foods are
best stored in the freezer interior where the temperature
varies less with door openings.
RefertotheFoodStorageChartonpages10-11forapproximate
storage times.

10
11
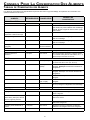
fo o d St o r a g e tI p S
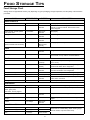
Food Storage Chart
Storagetimesareapproximateandmayvarydependingontypeofpackaging,storagetemperature,andthequalityofthefoodwhen
purchased.
FOODS REFRIGERATOR FREEZER STORAGE TIPS
DAIRY PRODUCTS
Butter 1 month 6 to 9 months Wrap tightly or cover.
Milk and cream 1 week Not recom-
mended
Check carton date. Close tightly. Don’t return unused
portions to original container. Don’t freeze cream
unless whipped.
Cream cheese, cheese spread
and cheese food
1 to 2 weeks Not recom-
mended
Wrap tightly.
Cottage cheese 3 to 5 days Not recom-
mended
Storeinoriginalcarton.Checkcartondate.
Sourcream 10 days Not recom-
mended
Storeinoriginalcarton.Checkcartondate.
Hard cheese
(Swiss,CheddarandParmesan)
1 to 2 months 4 to 6 months
May become
crumbly
Wrap tightly. Cut off any mold.
EGGS
Eggs in the shell 3 weeks Not recom-
mended
Refrigerate small ends down.
Leftover yolks or whites 2 to 4 days 9 to 12 months For each cup of yolks to be frozen, add 1 tsp. sugar for
use in sweet, or 1 tsp. salt for non-sweet dishes.
FRUITS
Apples 1 month 8 months
(cooked)
May also store unripe or hard apples at 60° to 70°F
(16° to 21°C).
Bananas 2 to 4 days 6 months (whole/
peeled)
Ripen at room temperature before refrigerating. Note:
Bananas will darken when refrigerated.
Pears, plums, avocados 3 to 4 days Not recom-
mended
Ripen at room temperature before refrigerating. Note:
Avocados will darken when refrigerated.
Berries, cherries, apricots 2 to 3 days 6 months Ripen at room temperature before refrigerating.
Grapes 3 to 5 days 1 month (whole) Ripen at room temperature before refrigerating.
Citrus fruits 1 to 2 weeks Not recom-
mended
May also store at 60° to 70°F (16° to 21°C). If refrig-
erated, store uncovered.
Pineapples, cut 2 to 3 days 6 to 12 months Willnotripenafterpurchase.Usequickly.
VEGETABLES
Asparagus 1 to 2 days 8 to 10 months Donotwashbeforerefrigerating.Storeincrisper.
Brussels sprouts, broccoli, cauli-
flower, green peas,
lima beans, onions, peppers
3 to 5 days 8 to 10 months Wrap odorous foods. Leave peas in pods.
Cabbage, celery 1 to 2 weeks Not recom-
mended
Wrap odorous foods and refrigerate in crisper.
Carrots, parsnips, beets and
turnips
7 to 10 days 8 to 10 months Remove tops. Wrap odorous foods and refrigerate in
crisper.
Lettuce 7 to 10 days Not recom-
mended
POULTRY and FISH
Chicken and Turkey, whole 1 to 2 days 12 months Keep in original packaging for refrigeration. Place in the
Deli Drawer on coldest setting. When freezing longer
than two weeks, wrap with freezer wrap.
Chicken and Turkey, pieces 1 to 2 days 9 months
Fish 1 to 2 days 2 to 6 months
Continued...

10
11
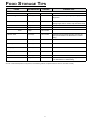
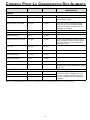
fo o d St o r a g e tI p S
FOODS REFRIGERATOR FREEZER STORAGE TIPS
MEATS
Bacon 7 days 1 month
Beef or lamb, ground 1 to 2 days 3 to 4 months Fresh meats can be kept in original packaging for
refrigeration.
Beef or lamb, roast and steak 3 to 5 days 6 to 9 months Place in the Deli Drawer on coldest setting. When
freezing longer than two weeks, wrap with freezer wrap
Ham, full cooked, whole 7 days 1 to 2 months
half 5 days 1 to 2 months
slices 3 days 1 to 2 months
Luncheon meat 3 to 5 days 1 to 2 months Unopened, vacuum-packed luncheon meat may be
kept up to two weeks in the Deli Drawer on coldest
setting.
Pork, roasts 3 to 5 days 4 to 6 months
Pork, chops 3 to 5 days 4 months
Sausage,ground 1 to 2 days 1 to 2 months
Sausage,chops 7 days 1 to 2 months
Veal 3 to 5 days 4 to 6 months
Frankfurters 7 days 1 month Processed meats should be tightly wrapped and stored
in the Deli Drawer on coldest setting.
Sources:UnitedStatesDepartmentofAgriculture;FoodMarketingInstitute;CooperativeExtensionService,IowaStateUniversity

12
13
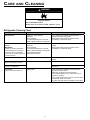
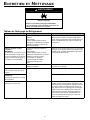
ca r e a n d cl e a n I n g
WARNING
Explosion Hazard
Use nonflammable cleaner.
Failure to do so can result in death, explosion, or fire.
Refrigerator Cleaning Chart
PART DO NOT USE DO
Cabinet Interior Abrasive or harsh cleaners
Ammonia
Chlorine bleach
Concentrated detergents or solvents
Metal or plastic-textured scouring pads
Use 4 tablespoons of baking soda dissolved in 1
quart(1liter)warmsoapywater.
Rinse surfaces with clean warm water and dry
immediately to avoid water spots.
Stainless Steel Doors and
Exterior
IMPORTANT:
Damage to stainless steel finish
due to improper use of cleaning
products or non-recommended
products is not covered under this
product’s warranty.
Abrasive or harsh cleaners
Ammonia
Chlorine bleach
Concentrated detergents or solvents
Metal or plastic-textured scouring pads
Vinegar-based products
Citrus-based cleaners
Use warm, soapy water and a soft, clean cloth or
sponge.
Rinse surfaces with clean warm water and dry
immediately to avoid water spots.
Door Gaskets Metal or plastic-textured scouring pads Use warm, soapy water and a soft, clean cloth or
sponge.
Condenser Coil
Remove base grille to access.
Anything other than a vacuum cleaner Use a vacuum cleaner hose nozzle.
Condenser Fan Outlet Grille
See back of refrigerator.
Use a vacuum cleaner hose nozzle with brush
attachment.
Accessories
Shelves, buckets, drawers, etc.
A dishwasher Follow removal and installation instructions from
appropriate feature section.
Allow items to adjust to room temperature.
Dilute mild detergent and use a soft clean cloth or
sponge for cleaning.
Use a plastic bristle brush to get into crevices. Rinse
surfaces with clean warm water.
Dry glass and clear items immediately to avoid spots.

12
13
ca r e a n d cl e a n I n g
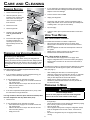
re m o v I n g od o r S f r o m t h e
re f r I g e r a t o r
Important information to know about glass shelves and
covers:
Do not clean glass shelves or covers with warm water when
theyarecold.Shelvesandcoversmaybreakifexposedto
sudden temperature changes or impact, such as bumping.
For your protection, tempered glass is designed to shatter into
many small, pebble-size pieces. This is normal. Glass shelves
and covers are heavy. Use special care when removing them to
avoid impact from dropping.
1. Remove all food and turn the refrigerator OFF.
2. Disconnect power to the refrigerator.
3. Clean the walls, floor, ceiling of cabinet interior, drawers,
shelves and gaskets according to the instructions on page
12.
4. Dilute mild detergent and brush solution into crevices using a
plastic bristle brush. Let stand for 5 minutes. Rinse surfaces
with warm water. Dry surfaces with a soft, clean cloth.
5. Wash and dry all bottles, containers and jars. Discard spoiled
or expired items.
6. Wrap or store odor-causing foods in tightly sealed containers
to prevent recurring odors.
7. Reconnect power to refrigerator and return food to refrig-
erator.
8. Allow the refrigerator to cool.
9. After 24 hours, check if odor has been eliminated.
If odor is still present:
1. Remove drawers and place on top shelf of refrigerator.
2. Pack refrigerator and freezer sections – including doors –
with crumpled sheets of black and white newspaper.
3. Placecharcoalbriquettesrandomlyoncrumplednewspaper
in both freezer and refrigerator compartments.
4. Close doors and let stand 24 to 48 hours.
en e r g y Sa v I n g tI p S
• Avoidovercrowdingrefrigeratorshelves.Overcrowding
reduces air circulation around food and causes refrigerator to
run longer.
• Avoidaddingtoomuchwarmfoodtorefrigeratoratonetime.
This overloads compartments and slows rate of cooling.
• Donotusealuminumfoil,waxpaper,orpapertowelingas
shelf liners. This decreases air flow and causes refrigerator to
run less efficiently.
• Afreezerthatistwo-thirdsfullrunsmostefficiently.
• Locaterefrigeratorincoolestpartofroom.Avoidareasof
direct sunlight, or near heating ducts, registers or other heat
producing appliances. If this is not possible, isolate exterior
by using a section of cabinet or an added layer of insulation.
• Cleandoorgasketseverythreemonthsaccordingtocleaning
instructions. This will assure that the door seals properly and
refrigerator runs efficiently.
• Taketimetoorganizeitemsinrefrigeratortoreducetimethat
door is open.
• Besureyourdoorsareclosingsecurelybylevelingrefrig-
erator as instructed in your installation instructions.
• Cleancondensercoilsasindicatedinthecleaninginstruc-
tions every three months. This will increase energy efficiency
and cooling performance.
fr e S h fo o d Se c t I o n
re p l a c I n g lI g h t bu l b S
1. Slideclearlightshieldtowardbackofcompartmenttorelease
from light assembly.
2. Remove light bulbs.
3. Replace with appliance bulbs no greater than 40 watts.
4. Replace light bulb cover by inserting tabs on light shield into
linerholesoneachsideoflightassembly.Slideshieldtoward
front of refrigerator until it locks into place. Do not force shield
beyond locking point. Doing so may damage light shield.

14
15
ca r e a n d cl e a n I n g
fr e e z e r Se c t I o n
1. Reach behind the light cover.
2. With firm pressure, press
forward on the notches at the
back of the cover and pull
down. The cover will open
from the back.
3. Remove the cover.
4. Remove light bulb.
5. Replace bulb with appliance
bulb no greater than 40
watts.
6. Insert front tabs of light cover
into slots in freezer liner
and snap rear portion over
light assembly until rear tab
engages.
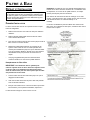
pr e p a r I n g f o r va c a t I o n /ab S e n c e
When Moving Your Refrigerator:
Your refrigerator is heavy. When moving the refrigerator for
cleaning or service, be sure to protect the floor. Always pull the
refrigerator straight out when moving it. Do not wiggle or “walk”
the refrigerator when trying to move it, as floor damage could
occur.
For short vacations or absences (three months or less):
1. Remove all perishables.
2. If no one will be checking in on the refrigerator during your
absence, remove all frozen items also.
3. If your refrigerator has an automatic ice maker:
• Shutoffthewatersupplytotheicemakeratleastone
day ahead of time.
• Afterthelastloadoficedrops,raisethewireshutoff
arm to the OFF position.
• Emptytheicebin.
4. If the room temperature will drop below 55°F (13°C), follow
the instructions for longer absences.
For long vacations, absences (more than three months) OR if
the room temperature will drop below 55ºF (13°C):
1. Remove food.
2. If your refrigerator has an automatic ice maker:
• Shutoffthewatersupplytotheicemakeratleastone
day ahead of time.
• Afterthelastloadoficedrops,raisethewireshutoff
arm to the OFF position.
• Emptytheicebin.
3. If your refrigerator has a dispenser system with water filter,
remove the water filter cartridge and install the filter bypass.
Dispose of the used cartridge.
4. Turn the freezer control to OFF.
5. Unplug the refrigerator.
6. Thoroughly clean the interior of both compartments with a
baking soda solution and a clean soft cloth (four tablespoons
ofbakingsodainonequartofwarmwater).
7. Dry thoroughly.
8. Leave the doors open to prevent the formation of mold and
mildew.
up o n yo u r re t u r n
After a short vacation or absence:
For models with automatic ice makers or dispensers:
• Reconnectthewatersupplyandturnonsupplyvalve.
• Monitorwaterconnectionfor24hoursandcorrectleaksif
necessary.
• Run10-15glassesofwaterfromthedispensertoflushout
the system.
• Restarttheicemakerbyloweringtheicemakerarm.
• Discardatleastthefirstthreeiceharvests.
After a long vacation or absence:
• Reconnectthewatersupplyandturnonsupplyvalve.
• Plugtherefrigeratorbackinandresetcontrols(seepage2).
• Monitorwaterconnectionfor24hoursandcorrectleaks,if
necessary.
For dispenser models, run water through the dispenser for at least
three minutes with the filter bypass in place, then install water
filter (see page 7).
• Afterinstallingthewaterfilter,runwaterthroughthe
dispenser continuously for at least two minutes, or until water
runs steady. Initially you may notice a one to two minute
delay in water dispersal as the internal tank fills.
• Restarttheicemakerbyloweringtheicemakerarm.
• Discardiceproducedwithinthefirst12hours(atleastthe
first three harvests).
pr e p a r I n g t o mo v e
WARNING
Excessive Weight Hazard
Use two or more people to move and install refrigerator.
Failure to do so can result in back or other injury.
• Followtheaboveinstructionsforlongvacations/absences,
through step 7.
• Securealllooseitemssuchasshelvesanddrawersbytaping
them securely in place to prevent damage.
• Tapethedoorsshut.
• Useanappliancedollywhenmovingtherefrigerator.Always
truck the refrigerator from its side or back - never from its
front.
• Besuretherefrigeratorstaysinanuprightpositionduring
moving.

14
15
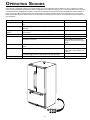
op e r a t I n g So u n d S
Improvements in refrigeration design may produce sounds in your new refrigerator that are different or were not present in an older
model.Theseimprovementsweremadetocreatearefrigeratorthatisbetteratpreservingfood,ismoreenergyefficient,andisquieter
overall.Becausenewrefrigeratorsrunquieter,soundsmaybedetectedthatwerepresentinolderrefrigerators,butweremaskedby
higher sound levels. Many of these sounds are normal. Please note that the surfaces adjacent to a refrigerator, such as hard walls,
floors and cabinets may make these sounds seem even louder. The following are some of the normal sounds that may be noticed in a
new refrigerator.
K
E
A
F
F
H
D
I
CB
G
Sound Possible Cause Solution
Clicking
Motorized device
(A) sounds like an electric clock and snaps in and
out.
Normal operation
Air rushing or whirring
Freezer fan
(B) and condenser fan (C) make this noise while
operating.
Normal operation
Gurgling or boiling
sound
Evaporator
(D) and heat exchanger (E) refrigerant makes this noise
when flowing.
Normal operation
Thumping
Ice cubes from ice maker drop into ice bucket
(F).
Normal operation
Vibrating noise
Compressor
(G) makes a pulsating sound while running.
Normal operation
Refrigerator is not level. SeeInstallation Instructions for
details on how to level your refrig-
erator
Buzzing
Ice maker water valve
(H) hookup buzzes when ice maker fills with
water.
Normal operation
Humming
Ice maker
(I) is in the ‘ON’ position without water connection.
Stopsoundbyraisingtheice
maker arm to ‘OFF’ position (see
page 6).
Compressor
(G) can make a high-pitched hum while operating.
Normal operation
Hissing or popping
Defrost heater
(K) hisses, sizzles or pops when operational.
Normal operation

16
17
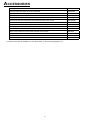
ac c e S S o r I e S
Description Part Number
Vertical stainless steel panel trim kit for model PF36 AFM36VSP
Epicure black chrome trim style handle kit for Dacor EF36 and PF36 2 door models AFE36H2BC
Epicure black chrome trim style handle kit for Dacor EF36 and PF36 3 door models AFE36H3BC
Epicure brass trim style handle kit for Dacor EF36 and PF36 2 door models AFE36H2BR
Epicure brass trim style handle kit for Dacor EF36 and PF36 3 door models AFE36H3BR
Epicure chrome trim style handle kit for Dacor EF36 and PF36 2 door models AFE36H2CH
Epicure chrome trim style handle kit for Dacor EF36 and PF36 3 door models AFE36H3CH
Epicure copper trim style handle kit for Dacor EF36 and PF36 2 door models AFE36H2CP
Epicure copper trim style handle kit for Dacor EF36 and PF36 3 door models AFE36H3CP
Millennia style handle kit for Dacor EF36 and PF36 2 door models AFM36H2
Millennia style handle kit for Dacor EF36 and PF36 3 door models AFM36H3
Preference style handle kit for Dacor EF36 and PF36 2 door models AFP36H2
Preference style handle kit for Dacor EF36 and PF36 3 door models AFP36H3
The above accessories are available from your Dacor dealer, or visit www.everythingdacor.com.

16
17
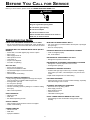
be f o r e yo u ca l l f o r Se r v I c e
FRESH FOOD OR FREEZER DOOR DIFFICULT TO OPEN.
• Duetoairflowbetweenthecompartments,itmaybedifficultto
open the doors for several seconds after one of them is closed.
DISPENSER WILL NOT DISPENSE WATER OR ICE (SELECT
MODELS).
• Awaterfilter,orthefilterbypassplugmustbeinplace.
• Doorisopen.
• Watersupplyturnedoff.
• Waterpressuretoolow.
• Lockswitchon.
• Icejaminthedispenser.
• Icemakernotoperating.
WILL NOT RUN.
• Powercordnotpluggedin.
• Nopowerattheelectricaloutlet.
• Circuitbreakertrippedorhousefuseblown.
• Resetcontrol.
• CheckSabbathmodesetting.
RUNS TOO LONG/TOO FREQUENTLY.
• Today’senergyefficientrefrigeratorsarelargerandrequire
more running time to maintain stable temperatures.
• Prolongeddooropenings.
• Toomanydooropenings.
• Condenserneedscleaning.
• Thedoornotsealing(duetoapackageoracontainerholding
door open).
• Warmroomtemperature.
NOISY OPERATION.
• Cabinetnotlevel.
• Weakfloor.
• SeeNormalOperatingSounds
ODOR IN CABINET.
• Odorproducingfoodsshouldbecoveredorwrapped.
• Interiorneedscleaning.
CABINET VIBRATES.
• Cabinetnotlevel.
• Weakfloor.
• Improperinstallation.
MOISTURE ON INSIDE CABINET WALLS.
• Canoccurduringhot,humidweatherwithfrequentorprolonged
door openings.
• Doornotclosedproperly.
EXCESSIVE MOISTURE IN OR AROUND DELI DRAWER.
• Foodnotwrappedproperly.
• Hot,humidweather.
REFRIGERATOR COMPARTMENT TOO COLD.
• Refrigeratortemperaturesettoocold.
REFRIGERATOR OR FREEZER COMPARTMENT TOO WARM.
• Refrigeratororfreezertemperaturesettoowarm.
• Prolongeddooropenings.
FREEZER NOT FREEZING PROPERLY.
• Productswithhighsugarcontentmaynothardencompletely
when frozen (ice cream, concentrated juice, etc.) Do not store
in door.
•Adjustfreezertemperaturetoacoldersetting.
ICE CUBES EVAPORATE.
• Coldairmovingovertheicecubescausesshrinkage,especially
with limited usage. This is normal.
AUTOMATIC ICE MAKER NOT OPERATING.
• Wireleverarminup(OFF)position.
• Watersupplyturnedoff.
• Waterpressuretoolow.
• Freezertoowarm.
• Installfilterorfilterbypass.
FRONT CABINET SURFACE WARM TO THE TOUCH.
• Specialdesigntolimitcondensationduringperiodsofhigh
humidity.
Before you call for service, please consult the TROUBLESHOOTING GUIDE below.
WARNING
Electric Shock Hazard
Plug into a grounded 3 prong outlet.
Do not remove ground prong.
Do not use an adapter.
Do not use an extension cord.
Failure to follow these instructions can result in
death, fire, or electrical shock.
tr o u b l e S h o o t I n g gu I d e

18
19
Wa r r a n t y a n d Se r v I c e
Product Maintenance
No maintenance, other than the CARE AND CLEANING
INSTRUCTIONS identified in this use and care manual, should be
attempted by the owner/operator. All other maintenance and ser-
vicemustbeperformedbyaqualifiedappliancetechnician.
If You Need Service...
First, review the recommended checks listed in the preceding
Before You Call for Service section. Then, be certain that the
appliance has been installed properly and is being operated cor-
rectly. Familiarize yourself with the warranty terms and conditions
listed in the PRODUCT WARRANTY section.
If the above checks have been completed and the problem has
not yet been remedied, call your local authorized DACOR service
representative. Your dealer can normally provide the name and
telephone number of the nearest service company.
DACOR works diligently to ensure your satisfaction when service
is necessary. However, if you are not completely satisfied with the
service provided, contact the company that performed the service
and express why you are not pleased. Normally, they will be willing
and able to resolve the problem.
If the service agency is not able to respond effectively, call or write
theDACORCustomerService.
DacorCustomerServiceTeam
1440 Bridge Gate Drive
Diamond Bar CA 91765
Telephone: 800-793-0093
Fax: 626-403-3130
Hours of Operation: Monday through Friday
6:00
a m - 5:00 p m Pacific Time
WebSite: www.Dacor.com
Please include your telephone number if you choose to write. We
will then do our utmost to assure your happiness and satisfaction.
What is Covered
CERTIFICATEOFWARRANTIES
DACORREFRIGERATORS
WITHIN THE FIFTY STATES OF THE U.S.A., THE DISTRICT OF
COLUMBIA AND CANADA*:
FULL ONE YEAR WARRANTY
One (1) year - From the date of original retail purchase, any art
that fails in normal home use will be repaired or replaced free of
charge. Ice Maker - When purchased with the refrigerator and
installed by the dealer the ice maker will be considered part of the
refrigerator for warranty purposes.
LIMITED WARRANTY
Major Refrigeration Components
SecondThroughFifthYear-Afterthefirstyearfromthedate
of original purchase, through the fifth year, Dacor will repair or
replace, at its option, free of charge for parts and labor only,
any part of the sealed refrigeration system (consisting of the
compressor, evaporator, condenser, drier and connecting tubing)
and the cabinet liner (exclusive of the door liner) which fail in
normal home use. All other costs, including mileage, transpor-
tation,tripchargeanddiagnosticcharge,ifrequired,shallbethe
responsibility of the owner.
LIMITED WARRANTY
AquaCleanWaterFilter,ifequipped
30 days - From the original retail purchase date, any part of the
water filter cartridge which fails due to a defect in workmanship or
materials will be replaced free of charge.
LIMITED WARRANTY
Other Parts
SecondYear-Partsotherthanmajorrefrigerationcomponents
which fail in normal home use during the second year following
the date of original retail purchase will be repaired or provided
free of charge for the part itself, with the owner paying all other
costs, including labor, mileage, transportation, trip charge and
diagnosticcharge,ifrequired.
NOTE
The full warranty and the limited warranties apply when the refrig-
eratorislocatedintheUnitedStatesorCanada.Refrigerators
located elsewhere are covered by the limited warranties only
including parts that fail during the first year.
CANADIANRESIDENTS
The above warranties only cover an appliance installed in Canada
that has been certified or listed by appropriate test agencies
forcompliancetoaNationalStandardofCanadaunlessthe
appliance was brought into Canada due to transfer of residence
fromtheUnitedStatestoCanada.
LIMITATIONSOFLIABILITY
The warrantor shall not be liable for any incidental or conse-
quentialdamages,includingfoodloss.Somestatesdonotallow
theexclusionorlimitationofconsequentialdamages,sothe
above limitation or exclusion may not apply to you.
What is Not Covered
1. Conditions and damages resulting from any of the following:
a. Improper installation, delivery, or maintenance.
b. Any repair, modification, alteration, or adjustment not
authorized by the manufacturer or an authorized servicer.
c. Misuse, abuse, accidents, or unreasonable use.
d. Incorrect electric current, voltage, or supply.
e. Improper setting of any control.
2. Warranties are void if the original serial numbers have been
removed, altered or cannot be readily determined.
3. Light bulbs.
4. Products purchased for commercial or industrial use.
5. The cost of service or service call to:
a. Correct installation errors.
b. Instruct the user on the proper use of the product.
c. Transport the appliance to the servicer.
6. Consequentialorincidentaldamagessustainedbyany
personasaresultofanybreachofthesewarranties.Some
statesdonotallowtheexclusionorlimitationofconsequential
or incidental damages, so the above exclusion may not apply.
La page est en cours de chargement...
La page est en cours de chargement...
La page est en cours de chargement...
La page est en cours de chargement...
La page est en cours de chargement...
La page est en cours de chargement...
La page est en cours de chargement...
La page est en cours de chargement...
La page est en cours de chargement...
La page est en cours de chargement...
La page est en cours de chargement...
La page est en cours de chargement...
La page est en cours de chargement...
La page est en cours de chargement...
La page est en cours de chargement...
La page est en cours de chargement...
La page est en cours de chargement...
La page est en cours de chargement...
La page est en cours de chargement...
La page est en cours de chargement...
La page est en cours de chargement...
La page est en cours de chargement...
La page est en cours de chargement...
La page est en cours de chargement...
La page est en cours de chargement...
La page est en cours de chargement...
La page est en cours de chargement...
La page est en cours de chargement...
-
 1
1
-
 2
2
-
 3
3
-
 4
4
-
 5
5
-
 6
6
-
 7
7
-
 8
8
-
 9
9
-
 10
10
-
 11
11
-
 12
12
-
 13
13
-
 14
14
-
 15
15
-
 16
16
-
 17
17
-
 18
18
-
 19
19
-
 20
20
-
 21
21
-
 22
22
-
 23
23
-
 24
24
-
 25
25
-
 26
26
-
 27
27
-
 28
28
-
 29
29
-
 30
30
-
 31
31
-
 32
32
-
 33
33
-
 34
34
-
 35
35
-
 36
36
-
 37
37
-
 38
38
-
 39
39
-
 40
40
-
 41
41
-
 42
42
-
 43
43
-
 44
44
-
 45
45
-
 46
46
-
 47
47
-
 48
48


Dacor IF36BNDF Manuel utilisateur
- Catégorie
- Congélateurs
- Taper
- Manuel utilisateur
- Ce manuel convient également à
dans d''autres langues
- English: Dacor IF36BNDF User manual
Documents connexes
Autres documents
-
KitchenAid KBFA25ERSS01 Manuel utilisateur
-
Jenn-Air JFC2089HPF Le manuel du propriétaire
-
Marvel 36" PRO+ Manuel utilisateur
-
-
-
-
-
-
-