
User Manual
8336851
79 pc Rotary
Tool and
Accessory Kit
V 2.
7
Please read and understand all instructions before use.
Retain this manual for future reference.
LISTED


3
8336851V 2.
7
Visit www.princessauto.com for more information
79 pc Rotary
Tool and
Accessory Kit
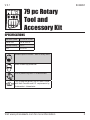
SPECIFICATIONS
No Load Speed 10,000 to 35,000
Collet Size 1/8 to 3/32 in.
Voltage Rating 120 V
CUL E213739
Airborne particle hazard - Wear a safety mask
Wear suitable eye protection
Use of protective gloves is recommended
This symbol designates that this tool is listed
with both Canadian and U.S. requirements by
Underwriter's Laboratories
CUL# E213739
LISTED

79 pc Rotary Tool and Accessory Kit
4
For technical questions call: 1-800-665-8685
8336851V 2.
7
SYMBOLS
IMPORTANT SAFETY PRECAUTIONS
WARNING! Read and understand all instructions before using this tool. The operator must follow basic
precautions to reduce the risk of personal injury and / or damage to the equipment. Before allowing
someone else to use this tool, make sure they are aware of all safety information.
WARNING! The warnings, cautions and instructions discussed in this instruction manual cannot cover
all possible conditions and situations that may occur. Common sense and caution are factors that
cannot be built into this product, but must be supplied by the operator.
NOTE: Keep this manual for the safety warnings, precautions and operating, inspection and maintenance
instructions. When this manual refers to a part number, it refers to the included parts list.
WORK AREA
1. Operate in a safe work environment. Keep your work area clean and well lit.
2. Keep anyone not wearing the appropriate safety equipment away from the work area.
NOTE: Minimize distractions in the work environment. Distractions can cause you to lose
control of the tool.
3. Always lock up tools and keep them out of the reach of children.
PERSONAL SAFETY
CAUTION! Wear protective equipment approved by the Canadian Standards Association (CSA) or
American National Standards Institute (ANSI) when using the rotary tool.
1. Dress properly, wear protective equipment. Use breathing, ear, eye, face, foot, hand and head
protection. Always wear ANSI approved impact safety goggles, which must provide both frontal
and side protection. Protect your hands with suitable gloves. Wear a full face shield if your
work creates metal filings or wood chips. Protect your head from falling objects by wearing a
hard hat. Wear an ANSI approved dust mask or respirator when working around metal, wood
and chemical dusts and mists. Wear ANSI approved earplugs. Protective, electrically non-
conductive clothes and non-skid footwear are recommended when working. Wear steel-toed
boots to prevent injury from falling objects.
2. Control the tool, personal movement and the work environment to avoid personal injury or
damage to the tool. Stay alert, watch what you are doing and use your common sense.
3. Keep articles of clothing, jewellery, hair, etc., away from moving parts to avoid entanglement
with tool.
4. Do not operate any machine / tool when tired or under the influence of drugs, alcohol
or medications.
5. Do not overreach when operating a tool. Proper footing and balance enables better control of a
tool in unexpected situations.
6. Use clamps or other practical ways to support or secure the work piece to a stable platform.
Holding the work piece by hand or against your body is not stable and may lead to loss of

79 pc Rotary Tool and Accessory Kit
5
Visit www.princessauto.com for more information
8336851 V 2.
7
control and injury.
SPECIFIC SAFETY PRECAUTIONS
1. Keep hands and fingers away from grinding area. Any part of body coming in contact with
moving parts could cause injury.
2. When operating the rotary tool, use proper eye and hearing protection as well as
protective gloves.
3. To maintain complete control, firmly hold your rotary tool with both hands. Do not place hands
over air vents. Proper cooling of the motor is necessary to ensure normal life of the tool.
4. Never point the cutter towards yourself. If it should slip, part of your body could come in
contact with moving parts.
5. Never force the tool. Excessive pressure could bend or break the mandrel, resulting in damage
to the tool, your work piece or serious personal injury. If your rotary tool runs smoothly under
no load, but does not run smoothly under load, then excessive pressure is being used.
6. This tool will not stop moving immediately. Do not lay the tool down or leave it unattended
until it has come to a complete stop. A part that is moving could make the tool jump or grab a
surface and pull the tool out of your control.
7. Hold the tool by the insulated gripping surfaces when performing an operation where the
cutting tool may contact hidden wiring or its own cord. Contact with a “live” wire will make
exposed metal parts of the tool “live” and shock the operator.
8. Use an appropriate dust respirator when working for an extended period of time. This will help
prevent breathing in the fine dust created while working.
9. Always make sure the work surface is free from nails and other foreign objects. Cutting into a
nail can cause the bit and tool to jump and damage the bit.
10. After changing the bits and accessories or making adjustments, make sure the collet nut
and any other adjustment devices are securely tightened. Loose adjustment devices will be
violently thrown.
11. Always use the correct collet size. If the collet size is larger than the accessory shank size it will
not grip the shank properly, leading to possible injury to the operator, damage to the tool or
work piece.
12. Always check accessory bits, grinding stones, cut-off wheels etc. for damage before each use.
Damaged accessories can break during use and cause serious injury.
13. Never use dull or damaged bits. Sharp bits must be handled with care. Damaged bits can snap
during use. Dull bits require more force to push the tool, possibly causing the bit to break.
14. Never touch the bit during or immediately after use. After use, the bit will be too hot to be

79 pc Rotary Tool and Accessory Kit
6
For technical questions call: 1-800-665-8685
8336851V 2.
7
touched by bare hands.
ELECTRICAL SAFETY
1. Disconnect power supply. Disconnect the tool from the power supply when not in use, before
cleaning, servicing or changing any parts or accessories.
2. Protect yourself against electric shocks when working on electrical equipment. Avoid body
contact with grounded surfaces such as pipes, radiators, cooking stoves and refrigerators.
There is an increased chance of electrical shock if your body is grounded.
3. Double insulated tools are equipped with a polarized plug (one blade is wider than the other.)
This plug will fit in a polarized outlet only one way. If the plug does not fit fully in the outlet,
reverse the plug. If it still does not fit, contact a qualified electrician to install a polarized outlet.
Do not change the plug in any way. Double insulation eliminates the need for a three wire
grounded power cord and grounded power supply system.
4. Grounded tools must be plugged into an outlet that is properly installed and grounded in
accordance with all codes and ordinances. Never remove the grounding prong or modify the
plug in any way. Do not use any adapter plugs. Check with a qualified electrician if you are in
doubt as to whether the outlet is properly grounded. If the tool should electronically malfunction
or break down, grounding provides a low resistance path to carry electricity away from the user.
5. Do not abuse the cord. Never use the cord to carry tools or pull the plug from an outlet. Keep
the cord away from heat, oil, sharp edges or moving parts. Do not operate this tool if the power
cord is frayed or damaged. Replace damaged cords immediately. Damaged cords increase the
risk of electric shock. Do not modify the plug in any way.
6. When operating a power tool outside, use an outdoor extension cord marked "W-A" or "W".
These cords are rated for outdoor use and reduce the risk of electric shock. Use in conjunction
with a Ground Fault Circuit Interrupter (GFCI). If operating a power tool in a damp location is
unavoidable, the use of a GFCI reduces the risk of electric shock. It is recommended that the
GFCI should have a rated residual current of 30 mA or less.
7. Avoid using an unnecessarily long extension cord. Choose a cord that is appropriate for the
situation, as a cord that is too long and running across the floor can be more dangerous
than helpful. Using a cord that is too long or too thin could damage the tool. Unroll the cord
completely to prevent it from overheating.
8. Place the electrical cord in a position that prevents it from coming into contact with the tool and
from getting caught by the work piece. The cord should always stay behind the tool.

79 pc Rotary Tool and Accessory Kit
7
Visit www.princessauto.com for more information
8336851 V 2.
7
VIBRATION PRECAUTIONS
This tool vibrates during use. Repeated or long-term exposure to vibration may cause temporary or
permanent physical injury, particularly to the hands, arms and shoulders.
1. Anyone using vibrating tools regularly or for an extended period should first be examined by
a doctor and then have regular medical check-ups to ensure medical problems are not being
caused by or worsened from tool use. Pregnant women or people who have impaired blood
circulation to the hands, past hand injuries, nervous system disorders, diabetes or Raynaud’s
Disease should not use this tool. If you feel any medical symptoms related to vibrations (such
as tingling, numbness, and white or blue fingers), seek medical attention as soon as possible.
2. Do not smoke during use. Nicotine reduces the blood flow to the hands and fingers, increasing
the risk of vibration-related injury.
3. Wear suitable gloves to reduce the vibration effects on the user.
4. Use tools with the lowest amount of vibration when there is a choice between
different processes.
5. Do not use for extended periods. Take frequent breaks when using this tool.
6. Let the tool do the work. Grip the tool as lightly as possible (while still keeping safe
control of it).
7. To reduce vibrations, maintain the tool as explained in this manual. If abnormal vibrations
occur, stop using this tool immediately.
TOOL USE AND CARE
WARNING! Do not use the tool if the throttle does not function properly. Any tool that cannot be
controlled with the ON / OFF switch is dangerous and must be repaired.
1. Use the correct tool for the job. Maximise performance and safety by using the tool for its
intended task.
2. Do not modify this tool or use for a purpose for which it was not designed.
3. This tool was designed for a specific function.
Do Not:
a. Modify or alter the rotary tool, all parts and accessories are designed with built-in safety
features that may be compromised if altered.
b. Use the rotary tool in a way for which it was not designed.
4. Avoid unintentional starts. Be sure the throttle is in the OFF position when not in use and before
connecting it to any power source.
5. Remove adjusting keys and wrenches. Check that keys and adjusting wrenches are removed
from the tool before connecting it. A wrench or key that is left attached to a rotating part of the
tool increases the risk of personal injury.

79 pc Rotary Tool and Accessory Kit
8
For technical questions call: 1-800-665-8685
8336851V 2.
7
D
E
F
G
H
I
J
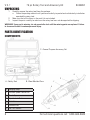
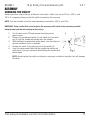
UNPACKING
1. Carefully remove the rotary tool from the package.
a. Retain the packing material until you have carefully inspected and satisfactorily installed or
operated the rotary tool.
2. Make sure that all the items in the parts list are included.
3. Inspect the parts carefully to make sure the rotary tool was not damaged while shipping.
WARNING! If any part is missing, do not operate the tool until the missing parts are replaced. Failure
to do so could result in serious personal injury.
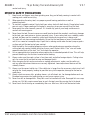
PARTS IDENTIFICATION
D Hanging Loop
E Variable Speed Control Dial
F Brush Cap
G Spindle Lock Button
H Collet Nut
I Umbrella Nut
J ON / OFF Switch
COMPONENTS
A - Rotary Tool B - Blow Moulded Case
C - General Purpose Accessory Set

79 pc Rotary Tool and Accessory Kit
9
Visit www.princessauto.com for more information
8336851 V 2.
7
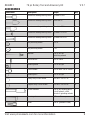
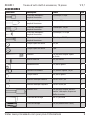
ACCESSORIES
Illustration Description Shape Qty.
Aluminum oxide grinding stone Cylinder 3/8 in. 1
Aluminum oxide grinding stone Cone 5/8 in. 1
Aluminum oxide grinding stone Parabolic 3/8 in. 1
Aluminum oxide grinding stone Cylinder 13/32 in. 1
Aluminum oxide grinding stone Cylinder 25/32 in. 1
Felt polishing wheel 1/2 in. 2
Felt polishing wheel 1 in. 2
Mandrel 1/8 in. for felt
polishing wheels
1
Bristle Brush 3/4 in. radial 1
Sanding band 1/2 in. 60-grit 3
Drum sander 1/2 in. with 1/8 in. shank 1
Sanding disc 3/4 in. 60-grit 3
Heavy duty cut-off wheel 15/16 in. x 0.031 in. 6
Regular duty cut-off wheel 15/16 in. x 0.025 in. 6
Screw mandrel 1/8 in. for sanding discs,
cut-off wheels, cloth
wheels & grinding wheels
1
Dressing stone 3/8 in. x 1 in. square 1
Collet 1/8 in. (packed in tool) 1

79 pc Rotary Tool and Accessory Kit
10
For technical questions call: 1-800-665-8685
8336851V 2.
7
Illustration Description Shape Qty.
Collet 3/32 in. 1
Wrench For collet nut, drum
sander & screw mandrel
1
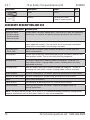
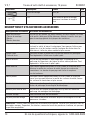
ACCESSORY DESCRIPTION AND USE
Accessory Description Accessory Use
Aluminum oxide
- Grinding stones
- Grinding wheels
- Abrasive wheels
Use on metals, castings, welded joints, rivets and rust. Ideal for sharpening,
de-burring, rust removal and general-purpose grinding of most materials.
Cut-off wheel Ideal for cutting, grooving and trimming all kinds of materials – including
metal, wood and ceramics. You can use it to cut screws and rusted bolts,
make slots in screw heads, trim castings, and more.
Polishing wheel
- Felt & cloth
Ideal for polishing most metal surfaces and plastics. Can be used with
polishing compound.
Bristle brush Use for light de-burring, cleaning and polishing of silverware, jewellery and
other precious metals. Can be used with polishing compound.
Sanding Band For rough shaping and smoothing wood and fibreglass; removing rust
from metal surfaces; shaping rubber surfaces. Sanding bands are easily
replaceable on drums.
Sanding wheel Ideal for rough-shaping and smoothing wood and fibreglass – as well as
removing rust from metal surfaces, shaping rubber surfaces and more.
Screw mandrel Use with sanding discs, felt wheels, polishing, grinding and cut-off wheels.
Mandrel for cloth wheel Use with sanding discs and polishing, grinding and cut-off wheels.
Collet For use with accessories.
Collet Wrench For tightening & loosening collet nut, screw of drum sanders
Dressing stone Cleans grinding wheels and stones. Shapes or reshapes stones for
desired applications.
NOTE: This rotary tool will accept 1/8 in. and 3/32 in. shanked accessories offered by leading brands,
however, attachments such as drill press stands etc. may not be compatible.

79 pc Rotary Tool and Accessory Kit
11
Visit www.princessauto.com for more information
8336851 V 2.
7
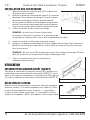
ASSEMBLY
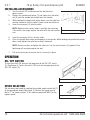
CHANGING THE COLLET
Some accessories require the use of different sized collets. Collet sizes can be 1/16 in., 3/32 in. and
1/8 in. It is important to ensure that the collet size matches the accessory.
NOTE: This tool includes two of the most commonly used collets: 3/32 in. and 1/8 in.
WARNING! Using a collet that is tool large for the accessory will result in the accessory possibly
being thrown from the tool causing serious injury.
1. Turn the tool switch OFF and remove the plug from the
power source.
2. Depress the spindle lock button (1) and slowly turn the collet
nut (2) until the spindle lock button locks the spindle.
3. While holding the spindle lock button down, turn the collet nut
counter clockwise until it is removed.
4. Remove the collet (3) by pulling it out of the spindle (4).
5. Insert the replacement collet into the spindle and replace the
collet nut by turning it clockwise while holding the spindle lock
button down.
NOTE: Do not tighten the collet nut without an accessory installed in the collet. You will damage
the collet.

79 pc Rotary Tool and Accessory Kit
12
For technical questions call: 1-800-665-8685
8336851V 2.
7
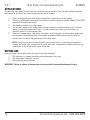
INSTALLING ACCESSORIES
1. Turn the switch OFF and disconnect the tool from the
power source.
2. Depress the spindle lock button (1) and slowly turn the collet
nut (2) until the spindle lock button locks the spindle.
3. While holding the spindle lock button down, turn the collet nut
counter clockwise until the collet is loose inside the collet nut.
4. Insert the accessory (3) into the collet.
NOTE: Make sure the correct collet is used for the accessory.
If the collet is too large, replace the collet with the next smaller
size.
5. Insert the accessory 3/4 in. into the collet.
6. Press the spindle lock button and engage it in the spindle. While holding the spindle lock button
down, hand-tighten the collet by turning it clockwise.
NOTE: Do not use pliers to tighten the collet nut. Use the small wrench (4) supplied. Over
tightening will cause damage to the tool.
7. Pull on the accessory to ensure that it is securely in place.
OPERATION
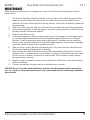
ON / OFF SWITCH
To turn the switch ON, push on the lower part of the ON / OFF switch
(1) (See Figure 4). To turn the switch OFF, push on the upper part of the
ON / OFF switch (2).
Fig.2
Fig. 4
Fig.3
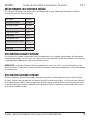
SPEED SELECTION
Set the rotary tool speed by rotating the variable speed control dial (1)
to the appropriate speed (See Figure 3). Position the speed control
dial at "1" for slowest speed, "3" for medium speed and "MAX" for the
highest speed.

79 pc Rotary Tool and Accessory Kit
13
Visit www.princessauto.com for more information
8336851 V 2.
7
SELECTING PROPER SPEEDS
Different speeds are required depending upon the type of operation being performed. The following chart
outlines those basic speeds:
Operation Speed
Cutting Metal 5 to MAX
Sanding Wood 5 to MAX
Cutting Hard Metal 5 to MAX
Engraving Metal 4 to 5
De-burring 4 to 5
Drilling Holes 4 to 5
Removing Rust 3 to 4
Sharpening 3 to 4
Polishing 1 to 2
HIGH SPEED USE
Higher speeds are better for carving, routing shaping or cutting wood. Hardwoods, metals and glass
require high-speed operation. Drilling should also be performed at high-speeds.
NOTE: Incoming voltage greatly affects the speed of the tool. Speed will drop in relation to a decrease in
voltage. If your tool appears to be running slowly, simply increase the speed setting accordingly.
LOW SPEED USE
Certain materials (some plastics, for example) require a relatively slow speed because at high speed
the friction of the tool generates heat and causes the plastic to melt. Slow speeds are usually best for
polishing operations with felt polishing accessories. They may also be best for working on such delicate
projects as delicate woodcarving and fragile model parts.

79 pc Rotary Tool and Accessory Kit
14
For technical questions call: 1-800-665-8685
8336851V 2.
7
APPLICATIONS
To select the right speed for each job, use a practice piece of material. Vary the tool’s speed to find the
best speed for the accessory you are using and the job to be done.
1. Plastic and materials that melt at low temperatures should be cut at low speeds.
2. Polishing, buffing and cleaning with a wire brush should be done at speeds below 15, 000 RPM
to prevent damage to the brush.
3. Soft wood should be cut at high speed.
4. Iron or steel should be cut at top speed if using a tungsten carbide accessory, but at slower
speed if using high-speed steel cutters. If a high-speed steel cutter starts to chatter, this
normally means it is running too slow.
5. Aluminum, copper alloys, lead alloys, zinc alloys, and tin may be cut at any speed, depending
on the type of cutting being done. Use paraffin or other suitable lubricant on the cutter to
prevent the cut material from adhering to the cutter teeth.
NOTE: Increasing the pressure on the tool is not the key when it is not cutting as expected.
Instead, exchange your cutting accessory with one more suitable for the material that you are
working on, or try adjusting the speed of the tool.
BEFORE USE
Every time you use the rotary tool, you should verify the following:
1. The accessory is in good condition and not damaged in any way.
2. The work piece is properly secured.
3. Safety glasses are being worn.
WARNING! Failure to adhere to these safety rules can greatly increase the chances of injury.

79 pc Rotary Tool and Accessory Kit
15
Visit www.princessauto.com for more information
8336851 V 2.
7
MAINTENANCE
Before making any adjustments or changing accessories, turn off the tool and disconnect it from its
power source.
1. The brushes should be checked periodically and worn-out brushes should be replaced. After
replacing, inspect whether the new brushes can move freely in the brush holder. Run the
motor for 15 minutes without load to shape the brushes, so that they are properly aligned with
the commutator.
2. Keep the vent passage clear from dirt. Clean off the accumulated dust and oil dirt periodically.
3. During normal operation, if anything happens, the power supply should be cut off at once and
the tool should be checked and repaired.
4. Clean the tool after each use.
5. Check for damaged parts. Before using any tool, any part that appears to be damaged should
be carefully checked to determine that it would operate properly and perform its intended
functions. Check for alignment and binding of moving parts, for broken parts or mounting
fixtures, or for any other condition that may affect proper operation. Any part that is damaged
should be repaired or replaced by a qualified technician.
6. When servicing, use only identical replacement parts. Only use accessories intended for use
with this tool. Replace damaged parts immediately.
7. Keep the tool clean. Wipe the tool with a clean cloth and periodically blow out all areas with
compressed air. If compressed air is not available, use a brush to remove dust from all areas.
Do not use harsh chemicals or solvents to clean the tool. These chemicals could seriously
damage the plastic housing.
8. Regularly inspect all mounting screws to ensure tightness. Should any screws become loose,
tighten immediately.
9. If repairs are required, bring your tool to an authorized service centre.
CAUTION! Do not at any time allow brake fluids, gasoline, petroleum-based products, penetrating
oils, etc. to come in contact with plastic parts. They contain chemicals that can damage, weaken or
destroy plastic.

79 pc Rotary Tool and Accessory Kit
16
For technical questions call: 1-800-665-8685
8336851V 2.
7
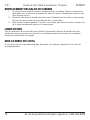
REPLACING CARBON BRUSHES
1. Using the parts list included, locate the carbon brushes. Remove the brush holder caps with
a screwdriver and inspect the carbon brushes. Replace them when they are worn up to about
one third.
2. Take the old brushes out and install the new brushes. Remove all of the brushes at the same
time. Make sure the brush slides freely within the brush housing.
3. Run the motor for 15 minutes without load to shape the brushes, so that they are properly
aligned with the commutator.
LUBRICATION
All of the bearings in this rotary tool are lubricated with a sufficient amount of high-grade lubricant for the
life of the unit under normal conditions. Therefore, no further lubrication is required.
DISPOSING OF THE TOOL
If your rotary tool has become damaged beyond repair, do not throw it out. Take it to the appropriate
recycling facility.

79 pc Rotary Tool and Accessory Kit
17
Visit www.princessauto.com for more information
8336851 V 2.
7
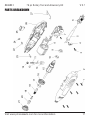
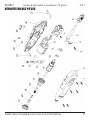
PARTS BREAKDOWN

79 pc Rotary Tool and Accessory Kit
18
For technical questions call: 1-800-665-8685
8336851V 2.
7
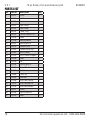
PARTS LIST
No. Part No. Description Qty.
1 500001 Screw 6
2 300036 Left Enclosure 1
3 500201 Screw 2
4 315001 Cord Clamp 1
5 322004 Cord Guard 1
6 160203 Power Plug 1
7 162822 Variable Speed PCB 1
8 110038 Stator 1
9 321006 Bearing Sleeve 1
10 520007 Bearing 606-2Z 1
11 342003 Carbon Brush 2
12 314502 Carbon Brush Cap 2
13 222803 Brush Holder 2
14 341503 Brush Holder Support 2
15 100038 Rotor 1
16 314009 Fan 1
17 520008 Bearing 626-2Z 1
18 213016 Output Shaft 1
19 216506 Collet 1
20 215065 Collet Nut 1
21 312824 Head Nut 1
22 241506 Shaft Lock Spring 1
23 215014 Shaft Locking Pin 1
24 312816 Shaft Lock Button 1
25 163612 Switch 1
26 300036 Right Enclosure 1
27 242529 Hook 1

8336851
Manuel d'utilisateur
Vous devez lire et comprendre toutes les instructions avant d'utiliser l'appareil.
Conservez ce manuel afin de pouvoir le consulter plus tard.
V 2,
7
Trousse d’outil
rotatif et accessoires,
79 pièces
LISTED

La page est en cours de chargement...
La page est en cours de chargement...
La page est en cours de chargement...
La page est en cours de chargement...
La page est en cours de chargement...
La page est en cours de chargement...
La page est en cours de chargement...
La page est en cours de chargement...
La page est en cours de chargement...
La page est en cours de chargement...
La page est en cours de chargement...
La page est en cours de chargement...
La page est en cours de chargement...
La page est en cours de chargement...
La page est en cours de chargement...
La page est en cours de chargement...
-
 1
1
-
 2
2
-
 3
3
-
 4
4
-
 5
5
-
 6
6
-
 7
7
-
 8
8
-
 9
9
-
 10
10
-
 11
11
-
 12
12
-
 13
13
-
 14
14
-
 15
15
-
 16
16
-
 17
17
-
 18
18
-
 19
19
-
 20
20
-
 21
21
-
 22
22
-
 23
23
-
 24
24
-
 25
25
-
 26
26
-
 27
27
-
 28
28
-
 29
29
-
 30
30
-
 31
31
-
 32
32
-
 33
33
-
 34
34
-
 35
35
-
 36
36


Power Fist 79 pc Manuel utilisateur
- Taper
- Manuel utilisateur
- Ce manuel convient également à
dans d''autres langues
- English: Power Fist 79 pc User manual
Documents connexes
Autres documents
-
Powerfist 9011438 Le manuel du propriétaire
-
Genesis GRT2103-40 Manuel utilisateur
-
Dremel Lite 7760 Operating/Safety Instructions Manual
-
Dremel 200-115 Mode d'emploi
-
Dremel 2050 Manuel utilisateur
-
Dremel 4300-5/40 Manuel utilisateur
-
-
Ryobi P460-PSK005 Le manuel du propriétaire
-
-
PowerStroke PSL1RT01 Le manuel du propriétaire