
AVerTV HD DVR
Quick Installation Guide | Guide d’installation rapide | Guía de instalación rápida |
1 Package Contents
Contenu de l’emballage | Contenido del paquete |
A • AVerTV HD DVR
B
• Quick Installation Guide
• Guide d’installation rapide
• Guía de instalación rápida
• 설치 안내서
C
• Installation CD
• CD d’installation
• CD de instalación
•
설치 CD
D
• 10-in-1 Cable
• Câble 10-en-1
• Cable 10 en 1
• 10-in-1 케이블
HDMI
AV_I R
E
• Low profile PCI-E short bracket
• Equerre pour Low Profile
• Tarjeta PCI-E de perfil bajo con Bracket adaptado
• PCI-E LP 브래킷
2 Hardware Installation
Hardware Installation | Instalación del Hardware |
Installing the device
Installation de l'appareil | Instalando el dispositivo |
Slot
1 Turn off and unplug the PC. Eteignez et débranchez votre PC. Apage y desenchufe el PC. 전원 종료 후 전원 케이블을
뽑으세요.
2 Remove the cover. Retirez le couvercle du boîtier. Quite la cubierta exterior del PC. PC 덮개 제거.
3
Insert the device into an empty
PCI-E expansion slot on the
motherboard.
Branchez l'appareil sur un slot
PCI-E libre de la carte mère.
Insertar el dispositivo dentro de una
ranura de expansión tipo PCI-E de la
placa base del ordenador.
메인보드의 빈 PCI-E 확장 슬롯에
장치를 장착 하십시오.
4 Replace the cover back. Replacez le couvercle. Vuelva a colocar la carcasa. 커버를 원 위치 합니다.
Model: C027
PN: 300AC027-DAD
Made in Taiwan

423 Dixon Landing Road
Milpitas, CA 95035
Tel: (408)263-3828
Support: (408)942-2121 / (877)774-4543
www.avermedia-usa.com/ avertv
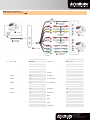
Making the Connections
Les connexions | Cómo hacer la conexión |
1 HDMI Cable (not supplied) Câble HDMI (non fourni) Cable HDMI (no suministrado) HDMI 케이블 (미 제공)
2 Console Console Consola 콘솔
3 10-in-1 Cable Câble 10-en-1 Cable 10 en 1 10-in-1 케이블
4 S-Video Connector (Black) Connecteur S-Vidéo (Noir) Conector S-Video (Negro) S-Video 커넥터 (검정색)
5 S-Video Cable (not supplied) Câble S-Vidéo (non fourni) Cable de S-Video (no suministrado) S-Video 커넥터 (미 제공)
6 Composite Connector (Red) Connecteur composite (Rouge) Conector Video Compuesto (Rojo) 컴포지트 커넥터 (빨간색)
7 Composite Connector (White) Connecteur composite (Blanc) Conector Video Compuesto (Blanco) 컴포지트 커넥터 (흰색)
8 Composite Connector (Yellow) Connecteur composite (Jaune) Conector Video Compuesto
(Amarillo)
컴포지트 커넥터 (노란색)
9 Composite Cable (Red) (not
supplied)
Câble Composite (Rouge) (non
fourni)
Cable Video Compuesto (Rojo) (no
suministrado)
컴포지트 케이블 (미 제공)
10 Composite Cable (White) (not
supplied)
Câble Composite (Blanc) (non
fourni)
Cable Video Compuesto (Blanco)
(no suministrado)
컴포지트 케이블(흰색) (미 제공)
11 Composite Cable (Yellow) (not
supplied)
Câble Composite (Jaune) (non
fourni)
Cable Video Compuesto (Amarillo)
(no suministrado)
컴포지트 케이블(노란색) (미 제공)
12 RCA Audio Connector (Red) Connecteur Audio RCA (Rouge) Conector Audio RCA (Rojo) RCA 오디오 커넥터 (빨간색)
13 RCA Audio Connector (White) Connecteur Audio RCA (Blanc) Conector Audio RCA (Blanco) RCA 오디오 커넥터 (흰색)
14 RCA Audio Cable (Red) (not
supplied)
Cable Audio RCA (Rouge) (non
fourni)
Cable Audio RCA (Rojo) (no
suministrado)
RCA 오디오 케이블 (미 제공) (미
제공)
15 RCA Audio Cable (White) (not
supplied)
Cable Audio RCA (Blanc) (non
fourni)
Cable Audio RCA (Blanco) (no
suministrado)
RCA 오디오 케이블(흰색) (미
제공)
16 Component Connector (Red) Connecteur composante (Rouge) Conector de Componente de Video
(Rojo)
컴포넌트 커넥터 (빨간색)
17 Component Connector (Blue) Connecteur composante (Bleu) Conector de Componente de Video
(Azul)
컴포넌트 커넥터 (파란색)
18 Component Connector (Green) Connecteur composante (Vert) Conector de Componente de Video
(Verde)
컴포넌트 커넥터 (녹색)
19 Component Cable (not supplied) Câble composante (non fourni) Cable de Componente de Video (no
suministrado)
컴포넌트 케이블 (미 제공)

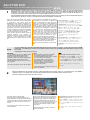
AVerTV HD DVR
Quick Installation Guide | Guide d’installation rapide | Guía de instalación rápida |
1
AVerTV HD DVR, compatible with all range of Audio-Video Receivers. Via HDMI* or Component** Inputs, you can enjoy High-Definition
Multimedia right on your desktop computer. For example without any delays in real time, you can Play Video Games Consoles (such as
PlayStation 3, Xbox 360 or Wii); enjoy watching Blue-ray movies through Blue-ray players. Even more, with AVerTV HD DVR, you can
record your home videos from Personal Camera connected via HDMI or Component connector.
AVerTV HD DVR equipped with standard definition S-Video and Composite inputs so you can transfer your favorite VCR Video Tapes in
Digital Format or record your success in winning Video Games from PlayStation 3 or Xbox 360.
AVerTV HD DVR est compatible avec n'importe
quelle source Audio-Video. Via une entrée HDMI*
ou Composante**, vous pourrez profiter des
MultiMedias en Haute Définition directement sur
votre ordinateur. Vous pourrez, par exemple, jouer
à votre console de jeu (comme la PS3, la Xbox 360
ou la Wii) et aussi visionner vos films depuis votre
lecteur Blu-ray, et tout ceci en temps réel. De plus,
avec AVerTV HD DVR, vous pourrez sauvergarder
vos vidéos personnelles depuis un caméscope
connecté soit en HDMI, soit en composante.
AVerTV HD DVR, équipé des entrées S-vidéo et
Composite standard, vous permettra de
transférer tous types de cassettes vidéo au format
numérique, ou même d'enregistrer vos exploits
réalisés dans les jeux depuis votre PS3 ou Xbox
360.
AVerTV HD DVR, es compatible con todo el rango
de Receptores de Audio-Video. Via HDMI ó vía
Entrada de Componentes de Video, usted puede
disfrutar a la perfección de la Alta Definición en
Multimedia, en su ordenador de sobremesa. Por
ejemplo, sin ningún retardo en tiempo real, usted
puede Reproducir Video proveniente de Consolas
de Juego tales como PlayStation 3, Xbox 360 or
Wii y disfrutar de la visualización de películas
Blue-Ray a través de los reproductores de tipo
Blue-Ray. Más aún, usted puede grabar sus
propios videos personales desde su Cámara
personal conectada vía HDMI ó a través de
los conectores de Componentes de Video.
AVerTV HD DVR está equipado con definición
estándar S-Video y entradas de Vídeo Compuesto
para que usted pueda transferir sus Cintas de
Vídeo (VHS,etc) preferidas a Formato Digital o al
formato que coincida con los propios de sus
Juegos de Video de la PlayStation 3 o de la Xbox
360.
AVerTV HD DVR 은 모든 범위의 오디오-비디오
수신기들과 호환됩니다. HDMI* 또는
컴포넌트** 입력을 통하여 사용자의 PC 에서
High-Definition 멀티미디어를 바로 즐기실 수
있으며 시간 지연 없이 플레이스테이션 3, XBOX
360 또는 Wii 와 같은 비디오 게임 콘솔을
플레이 할 수도 있고 블루레이 플레이어를
통하여 블루레이 영화를 감상하실 수도
있습니다. 또한 AVerTV HD DVR 로 HDMI
EHsms 컴포넌트 커넥터에 연결한 개인
카메라를 통해 홈 비디오를 녹화할 수도
있습니다.
AVerTV HD DVR 은 표준 S-Video 와 컴포지트
입력을 갖추고 있습니다. 이것으로 사용자는
좋아하는 VCR 비디오 테이프를 디지털
포맷으로 변환하거나 플레이스테이 3 또는
XBOX 360 의 게임 장면들을 녹화할 수도
있습니다.
NOTE:
* To preview HDMI source with HDCP (High-Bandwidth Digital Content Protection) encryption, a copy-protection scheme of HDMI
specification, your HDMI display devices must be HDCP compliant. Please note that HDMI contents with HDCP encryption cannot
be recorded.
** Copyrighted content cannot be recorded
REMARQUE:
* Pour prévisualiser une source en HDMI encryptée
par HDCP (High-Bandwidth Digital Content
Protection), schéma de protection de copie
spécifique au HDMI, votre module d'affichage doit
être HDCP capable. Veuillez notez que les
contenus HDMI encryptés par HDCP ne peuvent
être enregistrés.
** tout contenu protégé ne peut pas être enregistré.
NOTA:
*Para previsualizar la fuente de señal HDMI
con encriptación HDCP (Protección de
Contenidos Digitales de Banda Ancha ), definido
como una protección de copia para
especificación HDMI, su tipo de Display
debe amoldarse a las características de
HDCP. Por favor, sea consciente que los
contenidos HDMI con protección HDCP
no pueden ser grabados.
**Los Contenidos sujetos a derechos de Autor no
pueden ser grabados.
참고:
*HDCP (High-Bandwidth Digital Content
protection)로 암호화된 HDMI 소스를 미리
보기 위해서는 사용자의 HDMI 디스플레이
드라이버가 HDCP 호환이어야 합니다. HDCP
암호화된 HDMI 컨텐츠는 녹화할 수 없습니다.
**저작권 보호된 내용물은 녹화(녹음)할 수
없습니다.
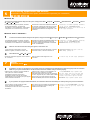
2
With AVer MediaCenter PIP (Picture-In-Picture) / PBP (Picture-By-Picture) display mode you can simultaneously enjoy HDMI or
Component video in one window and in the other window watch video from composite video or S-video sources.
For more information, please refer to the user’s manual.
Avec le PIP (Picture-In-Picture)/ PBP
(Picture-By-Picture) d'AVerMediaCenter, vous
pourrez afficher dans une fenêtre, la vidéo HDMI ou
composante, et dans une deuxième fenêtre, afficher
une vidéo provenant d'une source Composite ou
S-Vidéo.
Pour plus d'informations, veuillez vous référer au
manuel d'utilisation.
Con la funcionalidad de modo de visualización
PIP (Imagen sobre Imagen) ó PBP (Imagen por
Imagen) de AVer MediaCenter, usted puede
disfrutar simultáneamente de las fuentes de
señal HDMI o de Componentes de Video en una
ventana y en la otra ventana visualizar video
proveniente de señales de S-Video o Video
Compuesto.
Para más información, por favor consulte el
Manual de Usuario.
AVer MediaCenter PIP (Picture-In-Picture) /
PBP (Picture-By-Picture) 디스플레이 모드로
사용자는 HDMI 또는 컴포넌트 비디오를 하나의
창에서 감상하고 동시에 다른 창에서 컴포지트
비디오 또는 S-video 소스의 비디오를 감상하실
수 있습니다.
더 자세한 정보는 사용자 설명서를 참조하시기
바랍니다.

423 Dixon Landing Road
Milpitas, CA 95035
Tel: (408)263-3828
Support: (408)942-2121 / (877)774-4543
www.avermedia-usa.com/ avertv
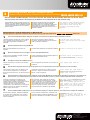
3 Installing Drivers and the Software Utility
Installation du logiciel et des pilotes | Instalando los Drivers y Software de Utilidad |
After the device is installed properly, turn on the computer. The system will automatically detect the new device. Simply
skip the wizard, and insert the accompanying installation CD to install the driver and software utility.
Après l’installation réussie du materiel, allumez votre
ordinateur. Le système détectera automatiquement le
nouveau périphérique. Ignorez simplement le Wizard,
et insérez le CD d'installation fourni pour installer le
pilote et le logiciel.
Despues de instalar correctamente el dispositivo,
encienda su ordenador. El sistema detectará
automaticamente el nuevo dispositivo. Simplemente
salte el asistente, e inserte el CD de Instalación
suministrado para instalar tanto los Drivers como el
Software de Utilidad.
장치가 정상적으로 설치된 후에 컴퓨터를 켜십시오.
시스템이 자동으로 새 장치를 찾아낼 것입니다.
마법사를 건너뛰고 제공된 설치 CD 를 넣어
드라이버와 소프트웨어 유틸리티 설치를
진행하십시오.
Installing Drivers and the Application in Windows XP
Installation des pilotes et Application sous Windows XP | Instalando los drivers y la aplicación en Windows XP | - Windows XP
1 The “Found New Hardware Wizard” dialog box will appear. Just click Cancel to skip the Wizard installation procedures.
La boîte de dialogue “Assistant du nouveau matériel
trouvé” apparaît. Cliquez simplement sur Annuler
pour passer les procédures d’installation de
l’assistant.
Aparecerá el “Asistente de Nuevo Hardware
encontrado”. Simplemente presione Cancelar para
omitir el asistente de instalación.
"새 하드웨어 발견 마법사" 대화 상자가
나타납니다. 취소을 클릭하여 마법사 설치 과정을
건너뜁니다.
2 Place the installation CD into the CD-ROM drive.
Placez le CD d’installation dans le lecteur de
CD-ROM.
Inserte el CD de instalación en la unidad de CD-ROM. CD-ROM 드라이브에 설치 CD 를 넣습니다.
3 When the installation main screen appears, choose Install AVer MediaCenter.
Lorsque l’écran d’installation apparaît, choisissez
Installer AVer MediaCenter.
Cuando la pantalla principal de instalación aparezca,
elija Instalar AVerMedia Center.
설치 화면이 나타나면 AVer MediaCenter
설치(Install AVer MediaCenter)를 선택합니다.
4 Click Next to continue the installation process.
Cliquez sur Suivant pour poursuivre le processus
d’installation.
Pulse en Siguiente para continuar con el proceso de
instalación.
다음을 선택하여 설치를 계속합니다.
5 Read the license agreement and if you agree to the terms select “I accept the terms of the license agreement” and then click Next.
Lisez l’accord de licence et si vous êtes d’accord
avec ses termes, sélectionnez « J’accepte les
termes de l’accord de licence » et cliquez ensuite sur
Suivant.
Lea los términos de licencia y si está de acuerdo
seleccione: “Acepto los términos del acuerdo de
licencia” y pulse en Siguiente.
라이센스 동의서를 읽고 조건에 동의하면 “I
accept the terms of the license agreement”를
선택하고 다음을 누르십시오.
6
Choose Complete to install all the necessary softwares, including AVer MediaCenter, Acrobat Reader, DirectX 9.0c and Drivers. Then click Next. For
advanced users, it is recommended to choose Custom to select the software you want. To choose a different destination folder, click Browse.
Choisissez Complète pour installer tous les
composants nécessaires, AVer MediaCenter,
Acrobat Reader, DirectX9.0c et les pilotes. Cliquez
ensuite sur Suivant. Pour les utilisateurs
expérimentés, il est recommandé de choisir
« Personnalisé » pour sélectionner les composants
désirés. Pour choisir un répertoire de destination
différent, cliquez sur Parcourir.
Elija “Completa” para instalar todo el software
necesario, incluidos AverMedia Center, Acrobat
Reader, DirectX 9.0c y los controladores. Después
pulse en Siguiente. Para usuarios avanzados, es
recomendable seleccionar “Personalizada” para
elegir los programas que desea. Para elegir un
directorio diferente de instalación elija Explorar.
전체 설치를 선택하여 AVer MediaCenter, Acrobat
Reader, DirectX 9.0c 와 드라이버를 포함하는
필요한 모든 소프트웨어를 설치하십시오. 그리고
다음을 누르십시오. 고급 사용자는 사용자 정의
설치를 선택하여 필요한 소프트웨어를 직접
선택하십시오. 다른 설치 폴더를 사용하려면
탐색을 누르십시오.
7 In the “InstallShield Wizard” dialog box, if you are instructed to restart your computer, select Yes. Then click Finish to complete the installation.
Dans la boîte de dialogue “Assistant InstallShield ”,
si vous êtes invité à redémarrer votre ordinateur,
sélectionner Oui. Puis cliquez sur Terminer pour
achever l’installation.
Si fuera necesario reiniciar el PC, seleccione Sí en
el cuadro de diálogo “Asistente InstallShield”. Luego,
haga clic en Finalizar para completar la instalación.
"InstallShield 마법사 완료" 대화 상자에서
컴퓨터를 다시 시작하라는 지시를 받은 경우 예를
선택합니다. 마침을 클릭하여 컴퓨터를 다시
시작합니다.

AVerTV HD DVR
Quick Installation Guide | Guide d’installation rapide | Guía de instalación rápida |
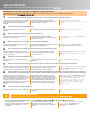
Installing Drivers and the Application in Windows Vista™/ Windows 7
Installation des pilotes et Application sous Windows Vista™/ Windows 7 | Instalando los drivers y la aplicación en Windows Vista™/ Windows 7|
Windows Vista™/ Windows 7
1 The “Found New Hardware Wizard” dialog box will appear. Just click Cancel to skip the Wizard installation procedures.
La boîte de dialogue “Assistant du nouveau matériel
trouvé” apparaît. Cliquez simplement sur Annuler
pour passer les procédures d’installation de
l’assistant.
Aparecerá el “Asistente de Nuevo Hardware
encontrado”. Simplemente presione Cancelar para
omitir el asistente de instalación.
"새 하드웨어 발견 마법사" 대화 상자가
나타납니다. 취소을 클릭하여 마법사 설치 과정을
건너뜁니다.
2 Place the installation CD into the CD-ROM drive.
Placez le CD d’installation dans le lecteur de
CD-ROM.
Inserte el CD de instalación en la unidad de CD-ROM. CD-ROM 드라이브에 설치 CD 를 넣습니다.
3 When the “AutoPlay” dialog box appears, select Run Autorun.exe.
Lorsque la boîte de dialogue “AutoPlay” apparaît,
sélectionnez Run Autorun.exe.
Cuando aparezca el cuadro de diálogo de
“Reproducción Automática” (“Autoplay”), seleccione
ejecutar Autorun.exe.
“자동 실행” 대화 상자가 나타나면 Autorun.exe
실행을 선택합니다.
4 When the installation main screen appears, choose Install AVer MediaCenter.
Lorsque l’écran d’installation apparaît, choisissez
Installer AVer MediaCenter.
Cuando la pantalla principal de instalación aparezca,
elija Instalar AVerMedia Center.
설치 화면이 나타나면 AVer MediaCenter
설치(Install AVer MediaCenter)를 선택합니다.
5 If the “User Account Control” dialog box appears, select Allow / Yes to continue the process.
Si la boîte de dialogue “Paramètres du Compte
Utilisateur” apparaît, choissisez “Autoriser / Oui” pour
continuer la procédure.
Si el cuadro de diálogo “control de cuentas de
usuario” aparece, seleccione Permitir / Sí para
continuar el proceso.
만일 “User Account Control” 대화 상자가 나타나면
Allow / Yes 를 선택하여 계속 진행하여 주십시오.
6 Click Next to continue the installation process.
Cliquez sur Suivant pour poursuivre le processus
d’installation.
Pulse en Siguiente para continuar con el proceso de
instalación.
다음을 선택하여 설치를 계속합니다.
7 Read the license agreement and if you agree to the terms, select “I accept the terms of the license agreement” and then click Next.
Lisez l’accord de licence et si vous êtes d’accord avec
ses termes, sélectionnez « J’accepte les termes de
l’accord de licence » et cliquez ensuite sur Suivant.
Lea los términos del acuerdo de licencia y si está
conforme seleccione: “Acepto los términos del
acuerdo de licencia” y pulse en Siguiente.
라이센스 동의서를 읽고 조건에 동의하면 “I accept
the terms of the license agreement”를 선택하고
다음을 누르십시오.
8
Choose Complete to install all the necessary softwares, including AVer MediaCenter, Acrobat Reader, DirectX 9.0c and Driver. Then click Next. For
advanced users, it is recommended that you choose Custom to select the software you want. To choose a different destination folder, click Browse.
Choisissez Complète pour installer tous les
composants nécessaires, AVer MediaCenter, Acrobat
Reader, DirectX9.0c et les pilotes. Cliquez ensuite sur
Suivant. Pour les utilisateurs expérimentés, il est
recommandé de choisir « Personnalisé » pour
sélectionner les composants désirés. Pour choisir un
répertoire de destination différent, cliquez sur
Parcourir.
Elija “Completa” para instalar todo el software
necesario, incluidos AverMedia Center, Acrobat
Reader, DirectX 9.0c y los controladores. Después
pulse en Siguiente. Para usuarios avanzados, es
recomendable seleccionar “Personalizada” para
elegir los programas que desea. Para elegir un
directorio diferente de instalación, elija Explorar.
전체 설치를 선택하여 AVer MediaCenter, Acrobat
Reader, DirectX 9.0c 와 드라이버를 포함하는
필요한 모든 소프트웨어를 설치하십시오. 그리고
다음을 누르십시오. 고급 사용자는 사용자 정의
설치를 선택하여 필요한 소프트웨어를 직접
선택하십시오. 다른 설치 폴더를 사용하려면
탐색을 누르십시오.
9 Then click Finish to complete the installation.
Puis cliquez sur Terminer pour achever l’installation. Luego, haga clic en Finalizar para completar la
instalación.
마침을 클릭하여 컴퓨터를 다시 시작합니다.
4 Activating the Application
Activation de l’Application | Activacion del Programa | Activación del Programa |
To run the application from the Programs menu, choose Start Æ Programs Æ AVerMedia Æ AVer MediaCenter Æ AVer MediaCenter.
Pour lancer l’application depuis le menu
Programmes, cliquez sur Démarrer Æ Programmes
Æ AVerMedia Æ AVer MediaCenter Æ AVer
MediaCenter.
Para ejecutar la aplicación desde el menú
Programas, pulse en InicioÆProgramas Æ
AVerMedia Æ AVer MediaCenter Æ AVerMedia
Center.
프로그램 메뉴에서 응용프로그램을 실행하려면
시작 Æ 프로그램 Æ AVerMedia Æ AVer
MediaCenter Æ AVer MediaCenter 를
선택하십시오.

423 Dixon Landing Road
Milpitas, CA 95035
Tel: (408)263-3828
Support: (408)942-2121 / (877)774-4543
www.avermedia-usa.com/ avertv
5 Uninstalling Application and Drivers
Désinstallation de l’application et des pilotes | Para desinstalar la aplicación y los controladores |
Windows XP
To remove the installed software utility from the system, simply choose Start Æ Programs Æ AVerMedia Æ AVer MediaCenter Æ Uninstaller Æ Remove
All Æ Next Æ OK Æ Finish.
Pour désinstaller le logiciel du système, choisissez
tout simplement Démarrer Æ Programmes
ÆAVerMedia Æ AVer MediaCenter Æ Désinstaller
Æ Supprimer ToutÆ SuivantÆ OK Æ Terminer.
Para eliminar el software de utilidades instalado en
su ordenador, simplemente seleccione Comenzar
ÆProgramasÆAVerMediaÆ AVer MediaCenter
ÆDisinstalaciónÆEliminar todoÆSiguiente Æ OK
ÆFinalizar.
설치되어있는 소프트웨어 유틸리티를 제거하려면
시작 Æ 프로그램 Æ AVerMedia Æ AVer
MediaCenter Æ 제거하기 Æ 모두제거 Æ 다음 Æ
예 Æ 마침을 선택하십시오.
Windows Vista™ / Windows 7
1 To remove the installed software utility from the system, simply choose Start Æ All Programs Æ AVerMedia Æ AVer MediaCenter Æ Uninstaller.
Pour désinstaller le logiciel du système, choisissez
tout simplement Démarrer Æ Tous les programmes
Æ AVerMedia Æ AVer MediaCenter Æ Désinstaller.
Para eliminar el software de utilidades instalado en su
ordenador, simplemente seleccione Comenzar
ÆTodos los programasÆAVerMediaÆ AVerMedia
Center Æ Desinstalación.
설치되어있는 소프트웨어 유틸리티를 제거하려면
시작 Æ 프로그램 Æ AVerMedia Æ AVer
MediaCenter Æ제거하기를 선택하십시오.
2 When the “User Account Control” dialog box appears, select Allow / Yes.
Lorsque la fenêtre “Paramètres du Compte
Utilisateur” apparaît, choisissez Autoriser / Oui.
Cuando aparezca el cuadro de diálogo “control de
cuentas de usuario”, seleccione Permitir / Sí.
“User Account Control” 대화 상자가 나타나면
Allow / Yes 를 선택하십시오.
3 Select Remove All Æ NextÆ OK Æ Finish.
Choisissez simplement Supprimer ToutÆ SuivantÆ
OK Æ Terminer.
Pulse en Eliminar todoÆSiguiente Æ OK
ÆFinalizar.
모두제거 Æ 다음 Æ 예 Æ 마침을 선택하십시오.
7 NOTE
REMARQUE | NOTA|
1
If DirectX 9.0c or above is not installed in your system, usually the installation CD will automatically install it during the process of installation.
Make sure your system has DirectX 9.0c or above installed so that the software utility can function properly.
Si DirectX 9.0c ou supérieur n’est pas installé sur
votre système, le cédérom l’installera
automatiquement pendant le processus
d’installation. Assurez-vous que votre système
possède DirectX 9.0c ou supérieur pour que le logiciel
puisse correctement fonctionner.
Si DirectX 9.0c o superior no está instalado en su
sistema, el CD de instalación lo instalará
automáticamente durante el proceso de instalación.
Por favor, asegúrese de que su sistema tiene instalado
Direct X 9.0C o una versión superior, para que el
software de Utilidad pueda funcionar correctamente.
시스템에 DirectX 9.0c 이상이 설치되어 있지
않은 경우 보통은 설치 CD 가 설치 과정 중에
자동으로 설치합니다. 소프트웨어 유틸리티의
정상적인 기능을 위하여 사용자의 시스템에
DirectX 9.0c 이상이 설치되어 있어야 합니다.
2 If your system is not equipped with Acrobat Reader, the installation wizard will automatically be called up during the process of installation.
Si votre système n’est pas équipé d’Acrobat
Reader, le wizard d’installation sera
automatiquement activé au cours de la procédure
d’installation.
Si su sistema no tiene instalado Acrobat Reader, el
proceso de instalación le abrirá el diálogo de
instalación automáticamente.
사용자의 시스템에 Acrobat Reader 가 설치되어
있지 않으면 프로그램 설치 도중 자동으로 설치
마법사가 나타납니다.

AVerTV HD DVR
Quick Installation Guide | Guide d’installation rapide | Guía de instalación rápida |
FCC NOTICE (Class B)
This device complies with Part 15 of the FCC Rules. Operation is subject to the following two conditions: (1) this device may not cause harmful interference, and (2) this device
must accept any interference received, including interference that may cause undesired operation.
Federal Communications Commission Statement
NOTE- This equipment has been tested and found to comply with the limits for a Class B digital device, pursuant to Part 15 of the FCC Rules. These limits are designed to provide
reasonable protection against harmful interference in a residential installation. This equipment generates, uses and can radiate radio frequency energy and, if not installed and used in
accordance with the instructions, may cause harmful interference to radio communications. However, there is no guarantee that interference will not occur in a particular installation. If this
equipment does cause harmful interference to radio or television reception, which can be determined by tuning the equipment off and on, the user is encouraged to try to correct the
interference by one or more of the following measures:
‧ Reorient or relocate the receiving antenna.
‧ Increase the separation between the equipment and receiver.
‧ Connect the equipment into an outlet on a circuit different from that to which the receiver is connected.
‧ Consult the dealer or an experienced radio/television technician for help.
CAUTION ON MODIFICATIONS
To comply with the limits for the Class B digital device, pursuant to Part 15 of the FCC Rules, this device must be installed in computer equipment certified to comply with the Class B limits.
All cables used to connect the computer and peripherals must be shielded and grounded. Operation with non-certified computers or non-shielded cables may result in interference to radio or
television reception.
Changes and modifications not expressly approved by the manufacturer could void the user’s authority to operate this equipment.
ICES-003
This B digital apparatus complies with Canadian ICES-003.
Cet appareil numerique de la B est conforme a la norme NMB-003 du Canada.
DISCLAIMER
No warranty or representation, either expressed or implied, is made with respect to the contents of this documentation, its quality, performance, merchantability, or fitness for a particular
purpose. Information presented in this documentation has been carefully checked for reliability; however, no responsibility is assumed for inaccuracies. The information contained in this
documentation is subject to change without notice.
In no event will AVerMedia be liable for direct, indirect, special, incidental, or consequential damages arising out of the use or inability to use this product or documentation, even if advised of
the possibility of such damages.
TRADEMARKS
AVerMedia is registered trademarks of AVerMedia TECHNOLOGIES, Inc. IBM PC is a registered trademark of International Business Machines Corporation. Macintosh is a registered
trademark of Apple Computer, Inc. Microsoft is a registered trademark and Windows is a trademark of Microsoft Corporation. DVB is a registered trademark of the DVB Project. All other
products or corporate names mentioned in this documentation are for identification and explanation purposes only, and may be trademarks or registered trademarks of their respective
owners.
COPYRIGHT
© 2009 by AVerMedia TECHNOLOGIES, Inc. All rights reserved. No part of this publication may be reproduced, transmitted, transcribed, stored in a retrieval system, or translated into any
language in any form by any means without the written permission of AVerMedia TECHNOLOGIES, Inc.
THE MARK OF CROSSED-OUT WHEELED BIN INDICATES THAT THIS PRODUCT MUST NOT BE DISPOSED OF WITH YOUR OTHER HOUSEHOLD WASTE. INSTEAD,
YOU NEED TO DISPOSE OF THE WASTE EQUIPMENT BY HANDING IT OVER TO A DESIGNATED COLLECTION POINT FOR THE RECYCLING OF WASTE ELECTRICAL
AND ELECTRONIC EQUIPMENT. FOR MORE INFORMATION ABOUT WHERE TO DROP OFF YOUR WASTE EQUIPMENT FOR RECYCLING, PLEASE CONTACT YOUR
HOUSEHOLD WASTE DISPOSAL SERVICE OR THE SHOP WHERE YOU PURCHASED THE PRODUCT.
-
 1
1
-
 2
2
-
 3
3
-
 4
4
-
 5
5
-
 6
6
-
 7
7


AVerTV MTVHDDVRR Manuel utilisateur
- Taper
- Manuel utilisateur
- Ce manuel convient également à
dans d''autres langues
- English: AVerTV MTVHDDVRR User manual
- español: AVerTV MTVHDDVRR Manual de usuario
Autres documents
-
Avermedia AVerTV Express mini Guide d'installation
-
Avermedia TD310 Guide de démarrage rapide
-
-
Avermedia F200 spécification
-
-
Bose TV Video Accessories AM301726 Manuel utilisateur
-
AVerMedia Technologies none Manuel utilisateur
-