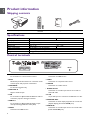
BenQ LU951ST Guide d'installation
- Catégorie
- Projecteurs de données
- Taper
- Guide d'installation

3
English
Table of Contents
Important safety instructions .............................................................................................. 4
Notice .................................................................................................................................... 5
Laser notice ................................................................................................................................................. 5
Cooling notice ............................................................................................................................................. 5
Product information............................................................................................................. 6
Shipping contents ....................................................................................................................................... 6
Specifications ............................................................................................................................................... 6
Control terminals ....................................................................................................................................... 6
Remote control .......................................................................................................................................... 7
Installation ............................................................................................................................. 8
Projection dimensions ............................................................................................................................... 8
Adjusting the projector position ..........................................................................................................10
LED Indicators .................................................................................................................... 11
Dimensions .......................................................................................................................... 12
Projector dimensions ..............................................................................................................................12
Ceiling mount installation diagram .......................................................................................................12
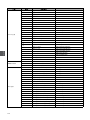
RS232 command ................................................................................................................. 13
RS232 pin assignment ..............................................................................................................................13
Regulatory Statements .....................................................................................................129
Please visit below website for latest version of User Manual / Installation Guide.
http://business-display.benq.com/
V1.01

4
English
Important safety instructions
Your projector is designed and tested to meet the latest standards for safety of information technology equipment. However,
to ensure safe use of this product, it is important that you follow the instructions mentioned in the user manual / installation
guide and marked on the product.
1. Please read the user manual / installation guide before you operate your projector. Save it for future
reference.
2. Do not look straight at the projector lens during operation. The intense light beam may damage your eyes.
3. Refer servicing to qualified service personnel.
4. Always open the lens shutter (if any) or remove the lens cap (if any) when the projector light source is
on.
5. The light source becomes extremely hot during operation.
6. In some countries, the line voltage is NOT stable. This projector is designed to operate safely within a mains voltage
between 100 to 240 volts AC, but could fail if power cuts or surges of ±10 volts occur. In areas where the mains
voltage may fluctuate or cut out, it is recommended that you connect your projector through a power
stabilizer, surge protector or uninterruptible power supply (UPS).
7. Do not block the projection lens with any objects when the projector is under operation as this could cause the
objects to become heated and deformed or even cause a fire. To temporarily turn off the light source, use the blank
function.
8. Do not operate light sources beyond the rated light source life.
9. Do not place this product on an unstable cart, stand, or table. The product may fall, sustaining serious damage.
10. Do not attempt to disassemble this projector. There are dangerous high voltages inside which may cause death if you
should come into contact with live parts.
Under no circumstances should you ever undo or remove any other covers. Refer servicing only to suitably qualified
professional service personnel.
11. Do not block the ventilation holes.
- Do not place this projector on a blanket, bedding or any other soft surface.
- Do not cover this projector with a cloth or any other item.
- Do not place inflammables near the projector.
If the ventilation holes are seriously obstructed, overheating inside the projector may result in a fire.
12. Do not stand the projector on end vertically. Doing so may cause the projector to fall over, causing injury or resulting
in damage to the projector.
13. Do not step on the projector or place any objects upon it. Besides probable physical damage to the projector, doing so
may result in accidents and possible injury.
14. When the projector is under operation, you may sense some heated air and odor from its ventilation grill. It is a
normal phenomenon and not a product defect.
15. Do not place liquids near or on the projector. Liquids spilled into the projector may cause it to fail. If the projector
does become wet, disconnect it from the power supply's power outlet and call BenQ to have the projector serviced.
16. This apparatus must be earthed.
17. Do not place this projector in any of the following environments.
- Space that is poorly ventilated or confined. Allow at least 50 cm clearance from walls and free flow of air around the
projector.
- Locations where temperatures may become excessively high, such as the inside of a car with all windows rolled up.
- Locations where excessive humidity, dust, or cigarette smoke may contaminate optical components, shorten the
projector's life span and darken the image.
- Locations near fire alarms
- Locations with an ambient temperature above 40°C / 104°F
- Locations where the altitudes are higher than 3000 m (10000 feet).

5
English
Notice
Laser notice
This symbol indicates that there is a potential hazard of eye exposure to laser radiation unless the
instructions are closely followed.
CLASS 1 LASER PRODUCT
Cooling notice
This Laser Product is designated as Class 1 during all procedures of operation.
LASER LIGHT - AVOID DIRECT EYE EXPOSURE.
Do not point laser or allow laser light to be directed or reflected toward other people or reflective objects.
Direct or scattered light can be hazardous to eyes and skin.
There is a potential hazard of eye exposure to laser radiation if the included instructions are not followed.
Caution – use of controls or adjustments or performance of procedures other than those specified herein
may result in hazardous radiation exposure.
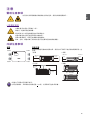
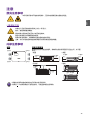
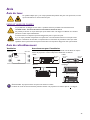
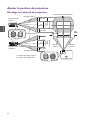
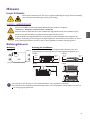
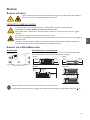
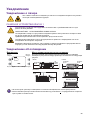
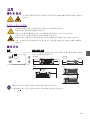
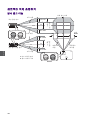
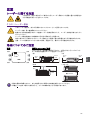
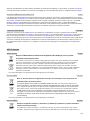
Ventilation Caution for installation
For proper ventilation of the projector, make sure to leave some space around the
projector as shown in the illustration below:
• Table • Table
• Ceiling • Stacking
• Avoid using the projector in a poorly ventilated or confined space.
• The light source life may be affected if the projector is used tilted at an angle of more than + 15 degrees.
Air inlet
Air inlet Air outlet
Air outlet
50 cm
above
70 cm
above
50 cm
above 50 cm
above
30 cm
above
50 cm
above
Minimum 100 mm

6
English
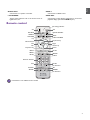
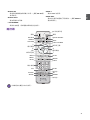
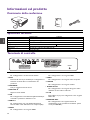
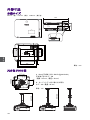
Product information
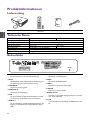
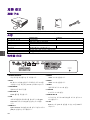
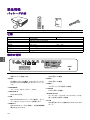
Shipping contents
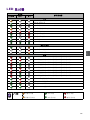
Specifications
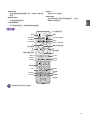
Control terminals
Projector Remote control and
batteries Installation guide Power cord
LU950/LU951 LU951ST
Display system 1-CHIP DMD
Resolution 1920 (H) x 1200 (V) WUXGA
Light source Laser diode
Throw ratio 1.36 ~ 2.18 0.81 ~ 0.89
Power consumption 530 W (Max); < 0.5 W (Standby)
Dimensions 490 mm (W) x 159 mm (H) x 380 mm (D)
Weight 9.4 Kg (20.7 lbs)
• WIRED REMOTE
For connection to a wired remote control.
• RS232
Standard 9-pin D-sub interface for connection to PC
control system and projector maintenance.
• USB MINI-B
For firmware upgrade only.
• USB TYPE A
Support 5V/2A output.
• LAN
For connection to RJ45 Cat5/Cat6 Ethernet cable to
control the projector through a network.
• HDBaseT
For connection to RJ45 Cat5/Cat6 cable to input
uncompressed high-definition video (HD).
• HDMI 2
Connection to HDMI source.
• HDMI 1
Connection to HDMI source.
• VIDEO
Connection to composite video source.
• S-VIDEO
Connection to S-Video source.
• AUDIO IN L/R
Connection to an audio input source via an audio or
audio L/R cable.
• PC IN
15-pin VGA port for connection to RGB source or PC.
• MONITOR OUT
Connection to other display equipment for concurrent
playback display. (Used with PC IN port.)
• AUDIO IN
Connection to an audio input source via an audio cable.
(Used with PC IN port.)

7
English
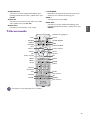
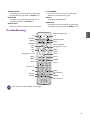
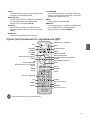
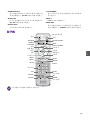
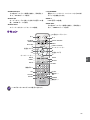
Remote control
• AUDIO OUT
Connection to a speaker or headset.
• 12V TRIGGER
Trigger external devices such as an electric screen or
light control, etc.
• HDMI 3
Connection to HDMI source.
• HDMI OUT
Connection to other display equipment for concurrent
playback display. (Used with HDMI 3 port.)
* This button is not available for this model.
On Off
PICTURE
ASPECT
Volume down
Up
Left
OK
Keystone key
MENU
MUTE
BACK
ALL
ZOOM+
ZOOM-
QUICK INSTALL
LIGHT SOURCE
Right
Down
AUTO
ID SET
3D
No function*
FREEZE
No function*
LIGHT
INFO
BLANK
Numeric buttons
SOURCE
Keystone key
Volume up
ID setting indicator

8
English
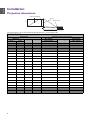
Installation
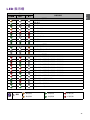
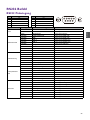
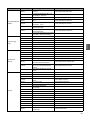
Projection dimensions
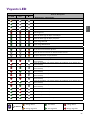
The screen aspect ratio is 16:10 and the projected picture is in a 16:10 aspect ratio
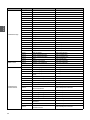
LU950/LU951
Screen size Distance from screen (mm)
Diagonal W (mm) H (mm) Min length Average Max length
Inch mm (max. zoom) (min. zoom)
30 762 646 404 879 1144 1409
40 1016 862 538 1172 1525 1878
50 1270 1077 673 1465 1906 2348
60 1524 1292 808 1758 2287 2817
80 2032 1723 1077 2343 3050 3756
90 2286 1939 1212 2636 3431 4226
100 2540 2154 1346 2929 3812 4696
110 2794 2369 1481 3222 4194 5165
120 3048 2585 1615 3515 4575 5635
130 3302 2800 1750 3808 4956 6104
140 3556 3015 1885 4101 5337 6574
150 3810 3231 2019 4394 5719 7043
160 4064 3446 2154 4687 6100 7513
170 4318 3662 2289 4980 6481 7982
180 4572 3877 2423 5273 6862 8452
190 4826 4092 2558 5566 7244 8922
200 5080 4308 2692 5859 7625 9391
250 6350 5385 3365 7323 9531 11739
300 7620 6462 4039 8788 11437 14087
H
WProjection distance
Center of lens
Screen
16:10 Screen diagonal

9
English
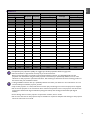
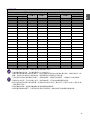
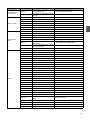
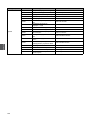
LU951ST
Screen size Distance from screen (mm)
Diagonal W (mm) H (mm) Min length Average Max length
Inch mm (max. zoom) (min. zoom)
30 762 646 404 523 549 575
40 1016 862 538 698 732 767
50 1270 1077 673 872 915 958
60 1524 1292 808 1047 1098 1150
80 2032 1723 1077 1396 1465 1534
90 2286 1939 1212 1570 1648 1725
100 2540 2154 1346 1745 1831 1917
110 2794 2369 1481 1919 2014 2109
120 3048 2585 1615 2094 2197 2300
130 3302 2800 1750 2268 2380 2492
140 3556 3015 1885 2443 2563 2684
150 3810 3231 2019 2617 2746 2875
160 4064 3446 2154 2791 2929 3067
170 4318 3662 2289 2966 3112 3259
180 4572 3877 2423 3140 3295 3451
190 4826 4092 2558 3315 3479 3642
200 5080 4308 2692 3489 3662 3834
250 6350 5385 3365 4362 4577 4792
300 7620 6462 4039 5234 5492 5751
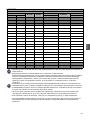
• To optimize your projection quality, we suggest you do the projection within non-gray area.
• All measurements are approximate and may vary from the actual sizes.
BenQ recommends that if you intend to permanently install the projector, you should physically test the
projection size and distance using the actual projector in situ before you permanently install it, so as to make
allowance for this projector's optical characteristics. This will help you determine the exact mounting position so
that it best suits your installation location.
• Ceiling installation must be done by a qualified professional. Contact your dealer for more information. It is not
recommended you install the projector yourself.
• Only use the projector on a solid, level surface. Serious injury and damage can occur if the projector is dropped.
• Do not use the projector in an environment where extreme temperature occurs. The projector must be used at
temperatures between 32 degrees Fahrenheit (0 degrees Celsius) and 104 degrees Fahrenheit (40 degrees
Celsius).
• Screen damage will occur if the projector is exposed to moisture, dust or smoke.
• Do not cover the vents on the projector. Proper ventilation is required to dissipate heat. Damage to the projector
will occur if the vents are covered.

10
English
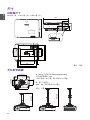
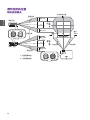
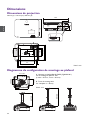
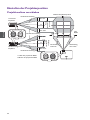
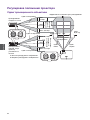
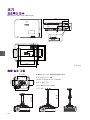
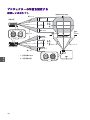
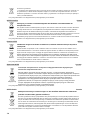
Adjusting the projector position
Shifting the projection lens
Desk-front
projection
Ceiling mount-front
projection
Vertical shift
Vertical shift
Vertical shift
Height of
projected
image
Max. 0.5V
Max. 0.5V
Max. 0.5V
Max. 0.5V
1V
1V
Effective projection position
Max. 0.23H
Max.
0.23H
Height of
projected
image
Width of projected image
1H
Shift to
left
Shift to
right
V: Height of projected image
H: Width of projected image

11
English
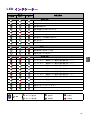
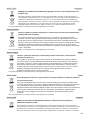
LED Indicators
Light Status & Description
Power events
Stand-by mode
Powering up
Normal operation
Normal power-down cooling
Downloading
Color wheel start fail
Phosphor Wheel start fail
Burn-in ON
Burn-in OFF
Light source events
Light source life exhausted
Light source error in normal operation
Light source is not lit up
Thermal events
Fan 1 error (the actual fan speed is outside the desired speed)
Fan 2 error (the actual fan speed is outside the desired speed)
Fan 3 error (the actual fan speed is outside the desired speed)
Fan 4 error (the actual fan speed is outside the desired speed)
Fan 5 error (the actual fan speed is outside the desired speed)
Fan 6 error (the actual fan speed is outside the desired speed)
Fan 7 error (the actual fan speed is outside the desired speed)
Fan 8 error (the actual fan speed is outside the desired speed)
Temperature 1 error (over limited temperature)
Thermal Sensor 1 open error
Thermal Sensor 1 short error
Thermal IC #1 I2C Connection error
: Off
: Orange On : Green On : Red On
: Orange Flashing : Green Flashing : Red Flashing

12
English
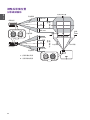
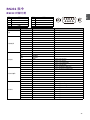
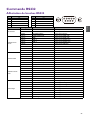
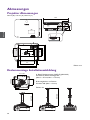
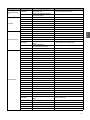
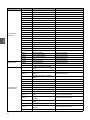
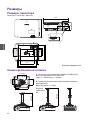
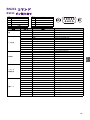
Dimensions
Projector dimensions
490 mm (W) x 159 mm (H) x 380 mm (D)
Ceiling mount installation diagram
490
122
159
84.50
90.70
13
380
330
315.8
169.5
115.48
15.29
73.57
12
384
363
277
160
169.5
Unit: mm
A
B B
B
A
AAB
277.00
160.00
427.30
591.50
383.00
169.50
A: BenQ ceiling mount CMG3 (5J.JAM10.001)
Ceiling mount screw: M4
(Max. L = 25 mm; Min. L = 20 mm)
B: Third party mounting holes
Screw: M6 (Max. L = 8 mm)
Unit: mm

13
English
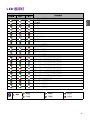
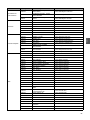
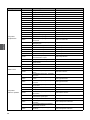
RS232 command
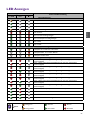
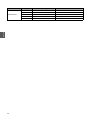
RS232 pin assignment
No. Serial No. Serial
1NC 6NC
2RX 7RTSZ
3TX 8CTSZ
4NC 9NC
5GND
Function Ty p e Operation ASCII
Power
Write Power On <CR>*pow=on#<CR>
Write Power off <CR>*pow=off#<CR>
Read Power Status <CR>*pow=?#<CR>
Source Selection
Write COMPUTER/YPbPr <CR>*sour=RGB#<CR>
Write HDMI <CR>*sour=hdmi#<CR>
Write HDMI 2 <CR>*sour=hdmi2#<CR>
Write HDMI 3 <CR>*sour=hdmi3#<CR>
Write Composite <CR>*sour=vid#<CR>
Write S-Video <CR>*sour=svid#<CR>
Write HDbaseT <CR>*sour=hdbaset#<CR>
Read Current source <CR>*sour=?#<CR>
Audio Control
Write Mute On <CR>*mute=on#<CR>
Write Mute Off <CR>*mute=off#<CR>
Read Mute Status <CR>*mute=?#<CR>
Write Volume + <CR>*vol=+#<CR>
Write Volume - <CR>*vol=-#<CR>
Write Volume level for customer <CR>*vol=value#<CR>
Read Volume Status <CR>*vol=?#<CR>
Audio
source select
Write Audio pass Through off <CR>*audiosour=off#<CR>
Write Audio-Computer1 <CR>*audiosour=RGB#<CR>
Write Audio-Video/S-Video <CR>*audiosour=vid#<CR>
Write Audio-HDMI <CR>*audiosour=hdmi#<CR>
Write Audio-HDMI2 <CR>*audiosour=hdmi2#<CR>
Write Audio-HDMI3 <CR>*audiosour=hdmi3#<CR>
Read Audio pass Status <CR>*audiosour=?#<CR>
Picture Mode
Write Presentation <CR>*appmod=preset#<CR>
Write sRGB <CR>*appmod=srgb#<CR>
Write Bright <CR>*appmod=bright#<CR>
Write DICOM <CR>*appmod=dicom#<CR>
Write Vivid <CR>*appmod=vivid#<CR>
Write User1 <CR>*appmod=user1#<CR>
Write User2 <CR>*appmod=user2#<CR>
Write 3D <CR>*appmod=threed#<CR>
Read Picture Mode <CR>*appmod=?#<CR>
12345
6789

14
English
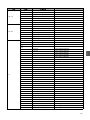
Picture Setting
Write Contrast + <CR>*con=+#<CR>
Write Contrast - <CR>*con=-#<CR>
Read Contrast value <CR>*con=?#<CR>
Write Brightness + <CR>*bri=+#<CR>
Write Brightness - <CR>*bri=-#<CR>
Read Brightness value <CR>*bri=?#<CR>
Write Color + <CR>*color=+#<CR>
Write Color - <CR>*color=-#<CR>
Read Color value <CR>*color=?#<CR>
Write Sharpness + <CR>*sharp=+#<CR>
Write Sharpness - <CR>*sharp=-#<CR>
Read Sharpness value <CR>*sharp=?#<CR>
Write Color Temperature-Warm <CR>*ct=warm#<CR>
Write Color Temperature-Normal <CR>*ct=normal#<CR>
Write Color Temperature-Cool <CR>*ct=cool#<CR>
Read Color Temperature Status <CR>*ct=?#<CR>
Write Aspect 4:3 <CR>*asp=4:3#<CR>
Write Aspect 16:9 <CR>*asp=16:9#<CR>
Write Aspect 16:10 <CR>*asp=16:10#<CR>
Write Aspect Auto <CR>*asp=AUTO#<CR>
Write Aspect Real <CR>*asp=REAL#<CR>
Read Aspect Status <CR>*asp=?#<CR>
Write Digital Zoom In <CR>*zoomI#<CR>
Write Digital Zoom out <CR>*zoomO#<CR>
Write Auto <CR>*auto#<CR>
Brilliant Color
Write Brilliant color on <CR>*BC=on#<CR>
Write Brilliant color off <CR>*BC=off#<CR>
Read Brilliant color status <CR>*BC=?#<CR>
Operation Settings
Write Projector Position-Front Table <CR>*pp=FT#<CR>
Write Projector Position-Rear Table <CR>*pp=RE#<CR>
Write Projector Position-Rear Ceiling <CR>*pp=RC#<CR>
Write Projector Position-Front Ceiling <CR>*pp=FC#<CR>
Write Quick auto search <CR>*QAS=on#<CR>
Write Quick auto search <CR>*QAS=off#<CR>
Read Quick auto search status <CR>*QAS=?#<CR>
Read Projector Position Status <CR>*pp=?#<CR>
Write Direct Power On-on <CR>*directpower=on#<CR>
Write Direct Power On-off <CR>*directpower=off#<CR>
Read Direct Power On-Status <CR>*directpower=?#<CR>
Write Signal Power On-on <CR>*autopower=on#<CR>
Write Signal Power On-off <CR>*autopower=off#<CR>
Read Signal Power On-Status <CR>*autopower=?#<CR>
Write Standby Settings-Network on <CR>*standbynet=on#<CR>
Write Standby Settings-Network off <CR>*standbynet=off#<CR>
Read Standby Settings-Network Status <CR>*standbynet=?#<CR>
Write Standby Settings-Monitor Out on <CR>*standbymnt=on#<CR>
Write Standby Settings-Monitor Out off <CR>*standbymnt=off#<CR>
Read Standby Settings-Monitor Out <CR>*standbymnt=?#<CR>
Function Ty p e Operation ASCII

15
English
Baud Rate
Write 9600 <CR>*baud=9600#<CR>
Write 14400 <CR>*baud=14400#<CR>
Write 19200 <CR>*baud=19200#<CR>
Write 38400 <CR>*baud=38400#<CR>
Write 57600 <CR>*baud=57600#<CR>
Write 115200 <CR>*baud=115200#<CR>
Read Current Baud Rate <CR>*baud=?#<CR>
Lamp Control
Read Lamp hour <CR>*ltim=?#<CR>
Write Normal mode <CR>*lampm=lnor#<CR>
Write Eco mode <CR>*lampm=eco#<CR>
Write Dimming mode <CR>*lampm=dimming#<CR>
Write Custom mode <CR>*lampm=custom#<CR>
Write Light level for custom mode <CR>*lampcustom=value#<CR>
Read Light level status for custom mode <CR>*lampcustom=?#<CR>
Read Lamp Mode Status <CR>*lampm=?#<CR>
Miscellaneous
Read Model Name <CR>*modelname=?#<CR>
Write Blank On <CR>*blank=on#<CR>
Write Blank Off <CR>*blank=off#<CR>
Read Blank Status <CR>*blank=?#<CR>
Write Freeze On <CR>*freeze=on#<CR>
Write Freeze Off <CR>*freeze=off#<CR>
Read Freeze Status <CR>*freeze=?#<CR>
Write Menu On <CR>*menu=on#<CR>
Write Menu Off <CR>*menu=off#<CR>
Write Up <CR>*up#<CR>
Write Down <CR>*down#<CR>
Write Right <CR>*right#<CR>
Write Left <CR>*left#<CR>
Write Enter <CR>*enter#<CR>
Write 3D Sync Off <CR>*3d=off#<CR>
Write 3D Auto <CR>*3d=auto#<CR>
Write 3D Sync Top Bottom <CR>*3d=tb#<CR>
Write 3D Sync Frame Sequential <CR>*3d=fs#<CR>
Write 3D Frame packing <CR>*3d=fp#<CR>
Write 3D Side by side <CR>*3d=sbs#<CR>
Write 3D inverter disable <CR>*3d=da#<CR>
Write 3D inverter <CR>*3d=iv#<CR>
Read 3D Sync Status <CR>*3d=?#<CR>
Write Remote Receiver-front+rear <CR>*rr=fr#<CR>
Write Remote Receiver-front <CR>*rr=f#<CR>
Write Remote Receiver-rear <CR>*rr=r#<CR>
Read Remote Receiver Status <CR>*rr=?#<CR>
Write AMX Device Discovery-on <CR>*amxdd=on#<CR>
Write AMX Device Discovery-off <CR>*amxdd=off#<CR>
Read AMX Device Discovery Status <CR>*amxdd=?#<CR>
Read Mac Address <CR>*macaddr=?#<CR>
Write High Altitude mode on <CR>*Highaltitude=on#<CR>
Write High Altitude mode off <CR>*Highaltitude=off#<CR>
Read High Altitude mode status <CR>*Highaltitude=?#<CR>
Function Ty p e Operation ASCII

16
English

17
繁體中文
目錄
重要安全說明 ........................................................................................................................ 18
注意 ....................................................................................................................................... 19
雷射注意事項 ..........................................................................................................................................19
冷卻注意事項 ..........................................................................................................................................19
產品資訊 ...............................................................................................................................20
包裝盒內容 ...............................................................................................................................................20
規格 .............................................................................................................................................................20
控制端子 ....................................................................................................................................................20
遙控器 ........................................................................................................................................................21
安裝 ....................................................................................................................................... 22
投影尺寸 ....................................................................................................................................................22
調整投影機位置 ......................................................................................................................................24
LED 指示燈 .......................................................................................................................... 25
尺寸 ....................................................................................................................................... 26
投影機尺寸 ...............................................................................................................................................26
天花板安裝圖 ..........................................................................................................................................26
RS232 指令 ........................................................................................................................... 27
RS232 針腳分配 .......................................................................................................................................27
Regulatory Statements ..................................................................................................... 129
如需最新版使用手冊 / 安裝指南,請造訪下列網站。
http://business-display.benq.com/
V1.01

18
繁體中文
重要安全說明
本投影機經設計完成及測試通過,符合資訊科技設備的最新安全標準。然而,為確保您安全地使用本產品,請務必
遵循本使用手冊 /安裝指南的指示與產品本身所標示的指示。
1. 操作投影機之前,請先閱讀本使用手冊 /安裝指南。請妥善保存本手冊,以供日後參考。
2. 操作時請勿直視投影機鏡頭。強光可能會造成您的視力受損。
3. 有關維修問題,請洽詢合格的維修人員。
4. 投影機的光源亮起時,請務必打開或移除鏡頭蓋 (如果有的話)。
5. 操作期間光源會變得很燙。
6. 有些國家的電壓不穩定。本投影機所設計安全操作的電壓區間為 100 至 240 伏特交流電,但如果發生斷電或功
率驟然起伏達 ±10 伏特就會發生故障。如果在主電壓可能會波動或中斷的區域使用本投影機,建議您經由穩壓
器、雷擊突波保護器或不斷電系統 (UPS) 連接電源。
7. 當投影機在運作中,請勿讓任何物品擋住投影的鏡頭,因為這樣可能會使得該物品遇熱變形甚至造成火災。若
要暫時關閉光源,請使用空白功能。
8. 請勿使用超過額定壽命的光源。
9. 請勿將投影機放置在不平穩的手推車、架子或桌子上。否則投影機可能會掉落,造成嚴重損壞。
10. 請勿打開投影機的機殼。機身內含有危險的高電壓配件,萬一接觸人體時可能會造成電擊死亡。
請勿在任何狀況下打開或移除其它部分的護蓋。有關維修問題,請洽詢合格專業的維修人員。
11. 請勿阻塞通風口。
- 請勿將投影機放置於毯子、寢具或其它柔軟物品的表面上。
- 請勿用布或其它物品覆蓋投影機。
- 請勿將易燃物放在投影機附近。
如果通風口嚴重阻塞而使投影機內部過熱,可能會引起火災。
12. 請勿將投影機直立擺放。因投影機可能會不穩摔落,導致人身受傷或投影機損壞。
13. 請勿踩在投影機上,或在上面放置任何物品。這樣除可能導致投影機損壞外,還可能造成意外及人身受傷。
14. 當使用投影機時,您也許會在通風口附近感覺到些微的熱風與氣味。此乃正常現象,並不是產品有瑕疵。
15. 請勿將液體放在投影機附近或放在投影機上。液體如果濺到投影機內,可能導致投影機故障。投影機如果不慎
弄濕,請立即拔掉電源線,並聯絡 BenQ,安排投影機的維修事宜。
16. 本裝置必須接地。
17. 請勿將本投影機放置在下列任何環境中。
- 不通風或密閉場所。投影機離牆面至少要有 50 公分的距離,且周圍空氣要流通。
- 過熱場所。例如:車窗緊閉的車內。
- 潮濕、多塵或煙霧瀰漫的場所。因為可能會污染光學元件,縮短投影機的使用壽命,並使投影影像變暗。
- 靠近火災警報器的場所。
- 周圍溫度超過 40°C/104°F 的場所。
- 海拔超過 3000 公尺 (10000 英呎)的場所。

19
繁體中文
注意
雷射注意事項
此符號代表眼睛暴露於雷射輻射的潛在危險,請務必嚴格遵循指示。
1 級雷射產品
冷卻注意事項
本雷射產品在運作全程屬於 1 級。
雷射光 - 避免眼睛直接暴露。
請勿朝其他人或反射物體發射或反射雷射光。
直射或散射的光線可能對眼睛和皮膚有害。
如果未遵循指示,眼睛可能暴露於雷射輻射。
警告 - 控制、調整或執行非指定的程序可能導致危險的輻射暴露。
通風 安裝注意
為使投影機達到適當的通風效果,請務必如下圖所示使投影機周圍保留一些
空間:
• 桌面 • 桌面
• 天花板 • 堆疊
• 避免在不通風或密閉場所使用。
• 使用投影機時,如果傾斜的角度超過 + 15 度,光源壽命可能會受影響。
進氣口
進氣口 出風口
出風口
50 公分
以上
70 公分
以上
50 公分
以上
50 公分
以上
30 公分
以上
50 公分
以上
至少 100 公釐

20
繁體中文
產品資訊
包裝盒內容
規格
控制端子
投影機 遙控器和電池 安裝指南 電源線
LU950/LU951 LU951ST
顯示系統 1-CHIP DMD
解析度 1920 (H) x 1200 (V) WUXGA
光源 雷射二極體
投影比例 1.36 ~ 2.18 0.81 ~ 0.89
耗電量 530 瓦 (最大);< 0.5 瓦 (待機)
尺寸 490 公釐 (寬) x 159 公釐 (高) x 380 公釐 (深)
重量 9.4 公斤 (20.7 磅)
• WIRED REMOTE
用來連接有線遙控器。
• RS232
標準 9 針 D-sub 介面,用於連接電腦控制系統及投
影機維護使用。
• USB MINI-B
僅適用於韌體升級。
• USB TYPE A
支援 5 V/2 A 輸出。
• LAN
用來連接 RJ45 Cat5/Cat6 乙太網路訊號線,以透過
網路控制投影機。
• HDBaseT
用來連接 RJ45 Cat5/Cat6 訊號線,以輸入無壓縮之
高解析視訊 (HD)。
• HDMI 2
連接 HDMI 信號源。
• HDMI 1
連接 HDMI 信號源。
• VIDEO
連接混合視訊來源。
• S-VIDEO
連接 S-Video 來源。
• AUDIO IN L/R
透過音訊或音訊 L/R 纜線連接音訊輸入來源。
• PC IN
15 針 VGA 埠,用於連接 RGB 或電腦。
• MONITOR OUT
連接其它顯示裝置進行同時播放。(搭配 PC IN 連
接埠使用)

21
繁體中文
遙控器
• AUDIO IN
透過音訊纜線連接音訊輸入來源。(搭配 PC IN 連
接埠使用)
• AUDIO OUT
連接到喇叭或耳機。
• 12V TRIGGER
啟動外接裝置,例如電動布幕或燈光控制等。
• HDMI 3
連接 HDMI 信號源。
• HDMI OUT
連接其它顯示裝置進行同時播放。(搭配 HDMI 3
連接埠使用)
* 該按鈕在此機型中無法使用。
開啟 關閉
PICTURE
ASPECT
調低音量
上
左
OK
梯形修正鍵
MENU
MUTE
BACK
ALL
ZOOM+
ZOOM-
QUICK INSTALL
LIGHT SOURCE
右
下
AUTO
ID SET
3D
無功能 *
FREEZE
無功能 *
LIGHT
INFO
BLANK
數字按鈕
SOURCE
梯形修正鍵
調高音量
ID 設定指示燈

22
繁體中文
安裝
投影尺寸
畫面縱橫比為 16:10,投影影像縱橫比為 16:10
LU950/LU951
螢幕尺寸 投影距離 (公釐)
對角線 寬
(公釐)
高
(公釐)
最小長度 平均值 最大長度
英吋 公釐 (使用最大鏡頭) (使用最小鏡頭)
30 762 646 404 879 1144 1409
40 1016 862 538 1172 1525 1878
50 1270 1077 673 1465 1906 2348
60 1524 1292 808 1758 2287 2817
80 2032 1723 1077 2343 3050 3756
90 2286 1939 1212 2636 3431 4226
100 2540 2154 1346 2929 3812 4696
110 2794 2369 1481 3222 4194 5165
120 3048 2585 1615 3515 4575 5635
130 3302 2800 1750 3808 4956 6104
140 3556 3015 1885 4101 5337 6574
150 3810 3231 2019 4394 5719 7043
160 4064 3446 2154 4687 6100 7513
170 4318 3662 2289 4980 6481 7982
180 4572 3877 2423 5273 6862 8452
190 4826 4092 2558 5566 7244 8922
200 5080 4308 2692 5859 7625 9391
250 6350 5385 3365 7323 9531 11739
300 7620 6462 4039 8788 11437 14087
高
寬投影距離
鏡頭中心
螢幕
16:10 螢幕對角線
La page est en cours de chargement...
La page est en cours de chargement...
La page est en cours de chargement...
La page est en cours de chargement...
La page est en cours de chargement...
La page est en cours de chargement...
La page est en cours de chargement...
La page est en cours de chargement...
La page est en cours de chargement...
La page est en cours de chargement...
La page est en cours de chargement...
La page est en cours de chargement...
La page est en cours de chargement...
La page est en cours de chargement...
La page est en cours de chargement...
La page est en cours de chargement...
La page est en cours de chargement...
La page est en cours de chargement...
La page est en cours de chargement...
La page est en cours de chargement...
La page est en cours de chargement...
La page est en cours de chargement...
La page est en cours de chargement...
La page est en cours de chargement...
La page est en cours de chargement...
La page est en cours de chargement...
La page est en cours de chargement...
La page est en cours de chargement...
La page est en cours de chargement...
La page est en cours de chargement...
La page est en cours de chargement...
La page est en cours de chargement...
La page est en cours de chargement...
La page est en cours de chargement...
La page est en cours de chargement...
La page est en cours de chargement...
La page est en cours de chargement...
La page est en cours de chargement...
La page est en cours de chargement...
La page est en cours de chargement...
La page est en cours de chargement...
La page est en cours de chargement...
La page est en cours de chargement...
La page est en cours de chargement...
La page est en cours de chargement...
La page est en cours de chargement...
La page est en cours de chargement...
La page est en cours de chargement...
La page est en cours de chargement...
La page est en cours de chargement...
La page est en cours de chargement...
La page est en cours de chargement...
La page est en cours de chargement...
La page est en cours de chargement...
La page est en cours de chargement...
La page est en cours de chargement...
La page est en cours de chargement...
La page est en cours de chargement...
La page est en cours de chargement...
La page est en cours de chargement...
La page est en cours de chargement...
La page est en cours de chargement...
La page est en cours de chargement...
La page est en cours de chargement...
La page est en cours de chargement...
La page est en cours de chargement...
La page est en cours de chargement...
La page est en cours de chargement...
La page est en cours de chargement...
La page est en cours de chargement...
La page est en cours de chargement...
La page est en cours de chargement...
La page est en cours de chargement...
La page est en cours de chargement...
La page est en cours de chargement...
La page est en cours de chargement...
La page est en cours de chargement...
La page est en cours de chargement...
La page est en cours de chargement...
La page est en cours de chargement...
La page est en cours de chargement...
La page est en cours de chargement...
La page est en cours de chargement...
La page est en cours de chargement...
La page est en cours de chargement...
La page est en cours de chargement...
La page est en cours de chargement...
La page est en cours de chargement...
La page est en cours de chargement...
La page est en cours de chargement...
La page est en cours de chargement...
La page est en cours de chargement...
La page est en cours de chargement...
La page est en cours de chargement...
La page est en cours de chargement...
La page est en cours de chargement...
La page est en cours de chargement...
La page est en cours de chargement...
La page est en cours de chargement...
La page est en cours de chargement...
La page est en cours de chargement...
La page est en cours de chargement...
La page est en cours de chargement...
La page est en cours de chargement...
La page est en cours de chargement...
La page est en cours de chargement...
La page est en cours de chargement...
La page est en cours de chargement...
La page est en cours de chargement...
La page est en cours de chargement...
La page est en cours de chargement...
La page est en cours de chargement...
La page est en cours de chargement...
La page est en cours de chargement...
La page est en cours de chargement...
La page est en cours de chargement...
La page est en cours de chargement...
La page est en cours de chargement...
La page est en cours de chargement...
La page est en cours de chargement...
La page est en cours de chargement...
La page est en cours de chargement...
-
 1
1
-
 2
2
-
 3
3
-
 4
4
-
 5
5
-
 6
6
-
 7
7
-
 8
8
-
 9
9
-
 10
10
-
 11
11
-
 12
12
-
 13
13
-
 14
14
-
 15
15
-
 16
16
-
 17
17
-
 18
18
-
 19
19
-
 20
20
-
 21
21
-
 22
22
-
 23
23
-
 24
24
-
 25
25
-
 26
26
-
 27
27
-
 28
28
-
 29
29
-
 30
30
-
 31
31
-
 32
32
-
 33
33
-
 34
34
-
 35
35
-
 36
36
-
 37
37
-
 38
38
-
 39
39
-
 40
40
-
 41
41
-
 42
42
-
 43
43
-
 44
44
-
 45
45
-
 46
46
-
 47
47
-
 48
48
-
 49
49
-
 50
50
-
 51
51
-
 52
52
-
 53
53
-
 54
54
-
 55
55
-
 56
56
-
 57
57
-
 58
58
-
 59
59
-
 60
60
-
 61
61
-
 62
62
-
 63
63
-
 64
64
-
 65
65
-
 66
66
-
 67
67
-
 68
68
-
 69
69
-
 70
70
-
 71
71
-
 72
72
-
 73
73
-
 74
74
-
 75
75
-
 76
76
-
 77
77
-
 78
78
-
 79
79
-
 80
80
-
 81
81
-
 82
82
-
 83
83
-
 84
84
-
 85
85
-
 86
86
-
 87
87
-
 88
88
-
 89
89
-
 90
90
-
 91
91
-
 92
92
-
 93
93
-
 94
94
-
 95
95
-
 96
96
-
 97
97
-
 98
98
-
 99
99
-
 100
100
-
 101
101
-
 102
102
-
 103
103
-
 104
104
-
 105
105
-
 106
106
-
 107
107
-
 108
108
-
 109
109
-
 110
110
-
 111
111
-
 112
112
-
 113
113
-
 114
114
-
 115
115
-
 116
116
-
 117
117
-
 118
118
-
 119
119
-
 120
120
-
 121
121
-
 122
122
-
 123
123
-
 124
124
-
 125
125
-
 126
126
-
 127
127
-
 128
128
-
 129
129
-
 130
130
-
 131
131
-
 132
132
-
 133
133
-
 134
134
-
 135
135
-
 136
136
-
 137
137
-
 138
138
-
 139
139
-
 140
140
-
 141
141
-
 142
142


BenQ LU951ST Guide d'installation
- Catégorie
- Projecteurs de données
- Taper
- Guide d'installation
dans d''autres langues
- italiano: BenQ LU951ST Guida d'installazione
- 日本語: BenQ LU951ST インストールガイド