Dyson 360 Heurist Manuel utilisateur
- Catégorie
- Aspirateurs robotiques
- Taper
- Manuel utilisateur

3
Grazie per aver scelto un robot Dyson
Per leggere il Manuale dell’utente in
italiano, andare a pagina 52.
Bedankt dat u voor een Dyson robot
hebt gekozen
Ga naar pagina 64 om de
gebruiksaanwijzing te lezen in
het Nederlands.
25.03.2019 12:50 - C91380_256713-06-02_RB02-X276-EU-USER-GUIDE-TEXT_15_4c0s

5
6
8
12
14
4
Thank you for choosing
to buy a Dyson robot
Download the Dyson Link app to get more
from your robot
How your robot works
Starting a clean
Maintaining your robot’s performance
Understanding your robot's lights
EN
25.03.2019 12:50 - C91380_256713-06-02_RB02-X276-EU-USER-GUIDE-TEXT_15_4c0s

5
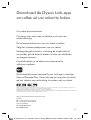
Download the latest Dyson Link app from the App Store
or Google Play. Open the app and follow the on-screen
instructions to connect to your robot.
Download the Dyson Link app
to get more from your robot
Personalise your robot.
Get step-by-step setup and support.
Control when your robot cleans.
Track your robot’s cleaning progress.
Extend run time, increase suction or reduce noise
by selecting from three different power levels.
Keep your robot up to date with automatic
software updates.
For further information and support:
Online
www.dyson.com
On the phone
Call our dedicated Helpline.
Apple and the Apple logo are trademarks of Apple Inc., registered in the U.S. and other
countries. App Store is a service mark of Apple Inc., registered in the U.S. and other countries.
Google Play and the Google Play logo are trademarks of Google Inc.
The Bluetooth
®
word mark and logos are registered trade marks owned by the Bluetooth SIG,
Inc. and any use of such marks by Dyson is under license.
25.03.2019 12:50 - C91380_256713-06-02_RB02-X276-EU-USER-GUIDE-TEXT_15_4c0s

6
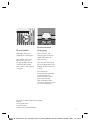
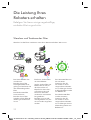
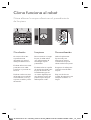
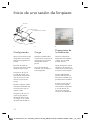
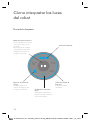
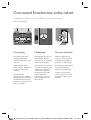
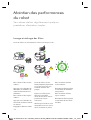
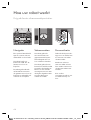
How your robot works
How to get the best cleaning performance.
Navigation
A specifically designed
vision system that guides
your robot around your
home.
Your robot views 360°
around to fix its location
in your home.
It also uses infrared
sensors to work out the
size of your home and
avoid obstacles such as
furniture.
Cleaning
Your robot uses a
combination of patented
Dyson technologies to
keep your home clean.
Your robot uses a full
width brush bar to clean
to the edges of the room
and a choice of power
levels from the Dyson
digital motor to clean all
floor types.
Personalisation
Use the Dyson Link app
to personalise how and
when your robot cleans.
Schedule your robot,
telling it when to clean.
Choose between three
power modes and adapt
your robot to your home.
25.03.2019 12:50 - C91380_256713-06-02_RB02-X276-EU-USER-GUIDE-TEXT_15_4c0s

7
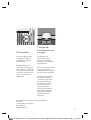
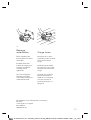
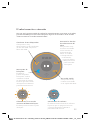
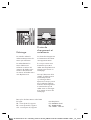
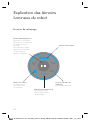
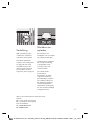
Illumination
LED lights help your
robot clean in low light.
Your robot senses low
light areas and uses
its ring of LED lights to
selectively illuminate
those areas, helping it to
navigate.
Runtime and
charging
The run times and
charging times of your
robot will always be
approximate.
You do not have to wait
for your robot to be fully
charged before starting
a clean.
Your robot will
automatically recharge
if started from the
dock. During a clean,
your robot will not
fully recharge before
resuming, to optimise the
time spent cleaning.
For further information and support:
Online
www.dyson.com
On the phone
Call our dedicated Helpline.
25.03.2019 12:50 - C91380_256713-06-02_RB02-X276-EU-USER-GUIDE-TEXT_15_4c0s

1 2
3
8
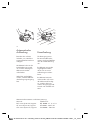
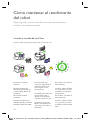
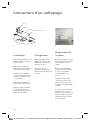
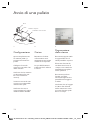
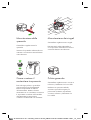
Starting a clean
Setting up
Open the dock fully to
90° and place it against
the wall.
Plug the charging cable
into either side of the
dock.
Ensure that the dock is
powered, indicated by a
blue light on the dock.
Tidy any surplus cable by
wrapping it around the
plug.
Ensure that no objects are
within approximately a
50cm radius of the dock.
Charging
Place your robot on the
dock with the clear bin
facing the wall.
The battery light will
indicate that your robot
is charging.
Preparing the
room
Remove thin rugs or
loose items that your
robot may suck up.
Tidy obstacles such
as shoe laces or thin
cables that may become
entangled in the brush
bar.
Clean any liquid spills
or sharp items that may
cause damage to your
robot.
Ensure that there are
no items such as bags
or shoes within 10cm of
any drops in the room.
No cables
Clear floors
Clear
edges
‘Power on’indicator
Cable
Dock
Plug
25.03.2019 12:50 - C91380_256713-06-02_RB02-X276-EU-USER-GUIDE-TEXT_15_4c0s

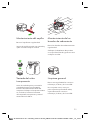
4
9
Automatic
recharge
Press the button to clean
all accessible areas.
Your robot will return
to the dock to recharge
when the battery is low.
Once recharged, your
robot will automatically
continue its clean.
Single charge
To clean a specific area,
start your robot away
from the dock.
Your robot will clean all
the accessible space it
can reach on a single
charge.
Your robot will not
recharge when the
battery is low, but return
to its starting point and
switch ‘OFF’.
For further information and support:
Online
www.dyson.com
On the phone
Call our dedicated Helpline.
25.03.2019 12:50 - C91380_256713-06-02_RB02-X276-EU-USER-GUIDE-TEXT_15_4c0s

10
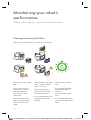
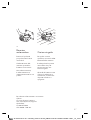
Maintaining your robot’s
performance
Follow a few regular, simple maintenance steps.
To remove the pre-motor
filter:
Press the bin release
button and remove the
filter behind the bin.
To remove the post-
motor filter:
Press the button on the
filter cover and remove.
Pull the filter from the
robot.
Wash the filters with cold
water, repeat until the
water runs clear.
Tap to remove excess
water and leave to dry
for at least 24 hours.
Ensure that the filters are
completely dry before
refitting.
To refit the pre-motor
filter:
Push the filter back into
position and refit the
clear bin.
To refit the post-motor
filter:
Push the filter back into
position and refit the filter
cover.
Washing and drying the filters
Wash filters with cold water at least once every month.
25.03.2019 12:50 - C91380_256713-06-02_RB02-X276-EU-USER-GUIDE-TEXT_15_4c0s

11
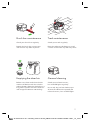
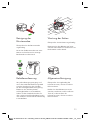
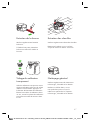
Brush bar maintenance
Check your brush bar regularly.
Detach the brush bar using a coin
and remove any debris by hand.
Track maintenance
Check your tracks regularly.
Place the robot upside down on a soft
surface and remove any debris by hand.
Emptying the clear bin
Before every clean and when the dirt
reaches the MAX mark. Press the bin
release button. Place the whole bin in a
bag, lift the cyclone out of the clear bin
and empty the contents into the bag.
General cleaning
Check your infrared sensors,
lens and LED lights regularly.
Use a soft, dry, lint free cloth to wipe
all over the robot and especially the
infrared sensors, lens and LED lights.
25.03.2019 12:50 - C91380_256713-06-02_RB02-X276-EU-USER-GUIDE-TEXT_15_4c0s

12
Maintaining your robot’s
performance
Continued.
Software updates
To get the best out of your robot,
update to the latest software.
Automatic updates via the
Dyson Link app
By downloading the Dyson Link app you
will be registered for automatic updates.
When an update becomes available
for your robot, it will automatically
download and install at the next
available opportunity (when the robot
is inactive, on the dock and connected
to Wi-Fi).
Manually update via USB
Check for software updates on the
Dyson website, www.dyson.com and
follow the step-by-step instructions.
For further information and support:
Online
www.dyson.com
On the phone
Call our dedicated Helpline.
25.03.2019 12:50 - C91380_256713-06-02_RB02-X276-EU-USER-GUIDE-TEXT_15_4c0s

13
25.03.2019 12:50 - C91380_256713-06-02_RB02-X276-EU-USER-GUIDE-TEXT_15_4c0s

14
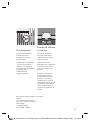
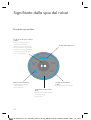
Understanding your
robot's lights
During a clean
Battery level
Returning to dock
Your robot is returning
to its dock to recharge.
Clean/Pause button
Press the button to
start a clean or pause
your robot.
To power off, press and
hold the button until the
lights go out.
Wi-Fi connection status
Get the Dyson Link app
for more information.
Cleaning status ring
Indicates your
robot's status.
25.03.2019 12:50 - C91380_256713-06-02_RB02-X276-EU-USER-GUIDE-TEXT_15_4c0s

15
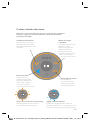
Airways blocked
Check for blockages in your
robot's airways. Clean your
robot's filters.
Tracks or robot stuck
Check for debris wrapped
around your robot’s tracks.
Recover your robot from
any obstacle and place it
nearby to resume cleaning.
Brush bar stuck
Check for debris
wrapped around your
robot’s brush bar.
Clean stopped
Your robot is unable
to complete its clean.
Return your robot to its
dock and start the next
clean as normal.
Software update
Your robot is updating its software.
Wait until the lights go out and start
a clean as normal.
Your robot needs your attention
Once you have finished looking after your robot, press the button to resume
cleaning. Follow the instructions in 'Maintaining your robot’s performance'.
Call the Dyson
Helpline
Your robot may need
help from Dyson.
25.03.2019 12:50 - C91380_256713-06-02_RB02-X276-EU-USER-GUIDE-TEXT_15_4c0s

17
18
20
22
26
16
DE/ AT/CH
Um Ihren Roboter optimal nutzen zu können,
laden Sie sich bitte die Dyson Link-App herunter
So funktioniert Ihr Roboter
Reinigung Ihres Roboters
Die Leistung Ihres Roboters erhalten
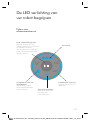
Die LED-Leuchten Ihres Roboters
Vielen Dank, dass Sie sich
für einen Roboter von Dyson
entschieden haben
25.03.2019 12:50 - C91380_256713-06-02_RB02-X276-EU-USER-GUIDE-TEXT_15_4c0s

17
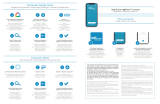
Laden Sie die neueste Dyson Link-App im App Store
bzw. in Google Play herunter. Die App öffnen und die
Bildschirmanweisungen befolgen, um eine Verbindung
zum Roboter herzustellen.
Um Ihren Roboter optimal nutzen
zu können, laden Sie sich bitte
die Dyson Link-App herunter
Personalisieren Sie Ihren Roboter.
Sie erhalten eine Schritt-für-Schritt-Einrichtung und
technische Unterstützung.
Steuern Sie, wann Ihr Roboter reinigen soll.
Verfolgen Sie den Reinigungsfortschritt Ihres Roboters.
Sie können die Laufzeit verlängern, die Saugleistung
erhöhen oder die Geräuschbelastung durch drei zur
Auswahl stehende Leistungsstufen verringern.
Halten Sie den Roboter mit automatischen Software-
Updates auf dem aktuellen Stand.
Weitere Informationen und Unterstützung:
Internet:
DE: www.dyson.de/support
AT: www.dyson.at/support
CH: www.dyson.ch/support
Apple und das Apple-Logo sind in den USA und anderen Ländern eingetragene Marken von Apple Inc. App Store ist
eine in den USA und anderen Ländern eingetragene Dienstleistungsmarke von Apple Inc.
Google Play und das Google Play-Logo sind Marken von Google Inc.
Die Bluetooth
®
Wortmarke und Logos sind eingetragene Marken der Bluetooth SIG, Inc. und werden von Dyson unter
Lizenz verwendet.
Telefonisch:
DE: 0800 - 3131318
AT: 0800 - 28 67 45
CH: 0800 - 740 183
25.03.2019 12:50 - C91380_256713-06-02_RB02-X276-EU-USER-GUIDE-TEXT_15_4c0s

18
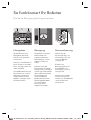
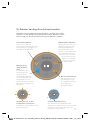
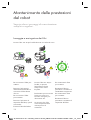
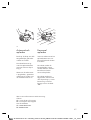
So funktioniert Ihr Roboter
Die beste Reinigungsleistung erreichen.
Navigation
Ihr Roboter nutzt zur
Navigation durch Ihr
Zuhause ein spezielles
Sichtsystem.
Damit er seine Position in
Ihrem Zuhause ermitteln
kann, verfügt er über ein
360°-Sichtfeld.
Zur Größenbestimmung
Ihres Zuhauses und zur
Kollisionsvermeidung
mit Hindernissen wie
Möbeln, verfügt er über
Infrarotsensoren.
Reinigung
Ihr Roboter nutzt eine
Kombination aus
patentierten Dyson-
Technologien, um Ihr
Zuhause sauber zu
halten.
Damit er auch die
Raumkanten gründlich
reinigen kann, verfügt er
auf der gesamten Breite
über eine Bürstenwalze.
Für die Reinigung
unterschiedlicher
Bodenarten kann der
Dyson Digitale Motor
an verschiedene
Leistungsstufen
angepasst werden.
Personalisierung
Nutzen Sie die
Dyson Link-App, um
einzustellen, wie und
wann Ihr Roboter
reinigen soll.
Erstellen Sie
Reinigungspläne für
Ihren Roboter, um
festzulegen, wann er
reinigen soll.
Sie können zwischen
drei Leistungsmodi
wählen, um den Roboter
so an Ihr Zuhause
anzupassen.
25.03.2019 12:50 - C91380_256713-06-02_RB02-X276-EU-USER-GUIDE-TEXT_15_4c0s

19
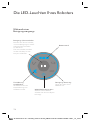
Beleuchtung
LED-Leuchten
unterstützen Ihren
Roboter bei der
Reinigung in schwach
beleuchteten Bereichen.
Ihr Roboter erkennt
Bereiche mit schwacher
Beleuchtung und schaltet
zur Unterstützung bei
der Navigation seine
LED-Leuchten ein.
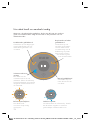
Laufzeit und
Ladung
Bei den Angaben zu den
Lauf- und Ladezeiten
handelt es sich immer
nur um Richtwerte.
Sie müssen nicht
warten, bis Ihr Roboter
vollständig aufgeladen
wurde, um eine
Reinigung zu starten.
Ihr Roboter wird
automatisch aufgeladen,
wenn er von der
Ladehalterung aus
gestartet wird. Zur
Optimierung der
Reinigungszeit wird Ihr
Roboter während eines
Reinigungsvorgangs
nicht vollständig wieder
aufgeladen.
Weitere Informationen und Unterstützung:
Internet:
DE: www.dyson.de/support
AT: www.dyson.at/support
CH: www.dyson.ch/support
Telefonisch:
DE: 0800 - 3131318
AT: 0800 - 28 67 45
CH: 0800 - 740 183
25.03.2019 12:50 - C91380_256713-06-02_RB02-X276-EU-USER-GUIDE-TEXT_15_4c0s

1 2
3
20
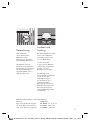
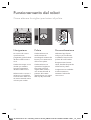
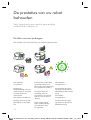
Reinigung Ihres Roboters
Einrichtung
Öffnen Sie die
Ladehalterung komplett
auf 90° und stellen Sie
sie an die Wand.
Stecken Sie das
Ladekabel auf
einer der Seiten der
Ladehalterung ein.
Vergewissern Sie sich,
dass die Ladehalterung
eingeschaltet ist. In
diesem Fall leuchtet
eine blaue LED an der
Ladehalterung.
Wickeln Sie
überschüssiges Kabel
um den Stecker.
Stellen Sie sicher, dass
sich in einem Radius
von 50 cm um die
Ladehalterung keine
Gegenstände befinden.
Aufladen
Platzieren Sie Ihren
Roboter mit dem
Auffangbehälter in
Richtung Wand auf der
Ladehalterung.
Die Batterieanzeige zeigt
an, dass Ihr Roboter
gerade aufgeladen wird.
Vorbereiten des
Raums
Entfernen Sie kleine
Teppiche oder lose
Gegenstände, die
von Ihrem Roboter
eingesaugt werden
könnten.
Räumen Sie Hindernisse
wie Schnürsenkel oder
dünne Kabel weg, die
sich in der Bürstenwalze
verfangen könnten.
Wischen Sie
Flüssigkeiten weg und
entfernen Sie scharfe
Gegenstände, durch die
Ihr Roboter beschädigt
werden könnte.
Stellen Sie sicher, dass
sich in einer Entfernung
von 10cm zu etwaigen
Höhenunterschieden
keine Taschen oder
Schuhe befinden.
Keine Kabel
Saubere Böden
Saubere
Kanten
Betriebsanzeige
Kabel
Netzstecker
Ladestation
25.03.2019 12:50 - C91380_256713-06-02_RB02-X276-EU-USER-GUIDE-TEXT_15_4c0s

4
21
Automatische
Aufladung
Drücken Sie auf den
Schalter, um sämtliche
zugängliche Bereiche zu
reinigen.
Ihr Roboter kehrt in die
Ladehalterung zurück,
um sich bei niedrigem
Akkustand wieder
aufzuladen.
Sobald er aufgeladen
wurde, setzt Ihr Roboter
den Reinigungsvorgang
fort.
Einzelladung
Zur Reinigung eines
bestimmten Bereichs,
starten Sie Ihren Roboter
von der Ladehalterung
aus.
Ihr Roboter reinigt die
zugängliche Fläche,
die er mit nur einer
Aufladung erreichen
kann.
Ihr Roboter lädt sich
nicht wieder auf, wenn
der Akkustand niedrig
ist, sondern kehrt zu
seinem Ausgangspunkt
zurück und schaltet sich
AUS.
Weitere Informationen und Unterstützung:
Internet:
DE: www.dyson.de/support
AT: www.dyson.at/support
CH: www.dyson.ch/support
Telefonisch:
DE: 0800 - 3131318
AT: 0800 - 28 67 45
CH: 0800 - 740 183
25.03.2019 12:50 - C91380_256713-06-02_RB02-X276-EU-USER-GUIDE-TEXT_15_4c0s

22
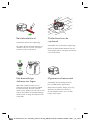
Die Leistung Ihres
Roboters erhalten
Befolgen Sie hierzu einige regelmäßige,
einfache Wartungsschritte.
Den Vormotorfilter her-
ausnehmen:
Drücken Sie auf die
Auffangbehälterverrie-
gelung und entfernen Sie
den dahinterliegenden
Filter.
Den Nachmotorfilter
herausnehmen:
Drücken Sie auf den
Schalter auf der Filterab-
deckung und entfernen
Sie sie.
Entfernen Sie den Filter
aus dem Roboter.
Spülen Sie den Filter mit
kaltem Wasser ab, bis
das Wasser klar ist.
Klopfen Sie überschüs-
siges Wasser ab und
lassen Sie den Filter
mindestens 24 Stunden
lang trocknen.
Die Filter müssen voll-
ständig trocken sein, be-
vor sie wieder eingesetzt
werden.
Den Vormotorfilter wie-
der einsetzen:
Setzen Sie den Fil-
ter wieder in seiner
vorgesehenen Position
ein und bringen Sie den
Auffangbehälter wieder
am Roboter an.
Den Nachmotorfilter
wieder einsetzen:
Setzen Sie den Fil-
ter wieder in seiner
vorgesehenen Position
ein und bringen Sie die
Abdeckung wieder am
Roboter an.
Waschen und Trocknen der Filter
Waschen Sie die Filter mindestens einmal im Monat mit kaltem Wasser aus.
25.03.2019 12:50 - C91380_256713-06-02_RB02-X276-EU-USER-GUIDE-TEXT_15_4c0s
La page est en cours de chargement...
La page est en cours de chargement...
La page est en cours de chargement...
La page est en cours de chargement...
La page est en cours de chargement...
La page est en cours de chargement...
La page est en cours de chargement...
La page est en cours de chargement...
La page est en cours de chargement...
La page est en cours de chargement...
La page est en cours de chargement...
La page est en cours de chargement...
La page est en cours de chargement...
La page est en cours de chargement...
La page est en cours de chargement...
La page est en cours de chargement...
La page est en cours de chargement...
La page est en cours de chargement...
La page est en cours de chargement...
La page est en cours de chargement...
La page est en cours de chargement...
La page est en cours de chargement...
La page est en cours de chargement...
La page est en cours de chargement...
La page est en cours de chargement...
La page est en cours de chargement...
La page est en cours de chargement...
La page est en cours de chargement...
La page est en cours de chargement...
La page est en cours de chargement...
La page est en cours de chargement...
La page est en cours de chargement...
La page est en cours de chargement...
La page est en cours de chargement...
La page est en cours de chargement...
La page est en cours de chargement...
La page est en cours de chargement...
La page est en cours de chargement...
La page est en cours de chargement...
La page est en cours de chargement...
La page est en cours de chargement...
La page est en cours de chargement...
La page est en cours de chargement...
La page est en cours de chargement...
La page est en cours de chargement...
La page est en cours de chargement...
La page est en cours de chargement...
La page est en cours de chargement...
La page est en cours de chargement...
La page est en cours de chargement...
La page est en cours de chargement...
La page est en cours de chargement...
-
 1
1
-
 2
2
-
 3
3
-
 4
4
-
 5
5
-
 6
6
-
 7
7
-
 8
8
-
 9
9
-
 10
10
-
 11
11
-
 12
12
-
 13
13
-
 14
14
-
 15
15
-
 16
16
-
 17
17
-
 18
18
-
 19
19
-
 20
20
-
 21
21
-
 22
22
-
 23
23
-
 24
24
-
 25
25
-
 26
26
-
 27
27
-
 28
28
-
 29
29
-
 30
30
-
 31
31
-
 32
32
-
 33
33
-
 34
34
-
 35
35
-
 36
36
-
 37
37
-
 38
38
-
 39
39
-
 40
40
-
 41
41
-
 42
42
-
 43
43
-
 44
44
-
 45
45
-
 46
46
-
 47
47
-
 48
48
-
 49
49
-
 50
50
-
 51
51
-
 52
52
-
 53
53
-
 54
54
-
 55
55
-
 56
56
-
 57
57
-
 58
58
-
 59
59
-
 60
60
-
 61
61
-
 62
62
-
 63
63
-
 64
64
-
 65
65
-
 66
66
-
 67
67
-
 68
68
-
 69
69
-
 70
70
-
 71
71
-
 72
72


Dyson 360 Heurist Manuel utilisateur
- Catégorie
- Aspirateurs robotiques
- Taper
- Manuel utilisateur
dans d''autres langues
- italiano: Dyson 360 Heurist Manuale utente
- English: Dyson 360 Heurist User manual
- español: Dyson 360 Heurist Manual de usuario
- Deutsch: Dyson 360 Heurist Benutzerhandbuch
- Nederlands: Dyson 360 Heurist Handleiding
Documents connexes
Autres documents
-
Neato Robotics 9450270 Manuel utilisateur
-
 Neato Robotics 945-0235 Manuel utilisateur
-
Rowenta RO7236EA Le manuel du propriétaire
-
ECOVACS N79WBUNDLE Le manuel du propriétaire
-
ECOVACS Deebot 500 (DC3G) Manuel utilisateur
-
Rowenta RG8021RH Le manuel du propriétaire
-
Philips FC8778/01 Manuel utilisateur
-
-
-
 Eziclean Aqua connect X850 Product information

