
EN
KO
RU
JA
ZH
IT
DE
FR
ES
PT
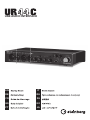
USB AUDIO INTERFACE

Explanation of Graphical Symbols
Explication des symboles
The lightning with arrowhead symbol within an equilateral triangle is intended to alert the user to the presence of uninsulated
“dangerous voltage” within the product’s enclosure that may be of su
cient magnitude to constitute a risk of electric shock to persons.
L’éclair avec une
èche à l’intérieur d’un triangle équilatéral est destiné à attirer l’attention de l’utilisateur sur la présence d’une
« tension dangereuse » non isolée à l’intérieur de l’appareil, pouvant être su
samment élevée pour constituer un risque d’électrocution.
The exclamation point within an equilateral triangle is intended to alert the user to the presence of important operating and maintenance
(servicing) instructions in the literature accompanying the product.
Le point d’exclamation à l’intérieur d’un triangle équilatéral est destiné à attirer l’attention de l’utilisateur sur la présence d’instructions
importantes sur l’emploi ou la maintenance (réparation) de l’appareil dans la documentation fournie.
IMPORTANT SAFETY
INSTRUCTIONS
1 Read these instructions.
2 Keep these instructions.
3 Heed all warnings.
4 Follow all instructions.
5 Do not use this apparatus near water.
6 Clean only with dry cloth.
7 Do not block any ventilation openings. Install in accordance with
the manufacturer’s instructions.
8 Do not install near any heat sources such as radiators, heat
registers, stoves, or other apparatus (including amplifiers) that
produce heat.
9 Do not defeat the safety purpose of the polarized or grounding-
type plug. A polarized plug has two blades with one wider than the
other. A grounding type plug has two blades
and a third grounding
prong. The wide blade or the third prong are provided for your
safety. If the provided plug does not fit into your outlet, consult an
electrician for replacement of the obsolete outlet.
10 Protect the power cord from being walked on or pinched
particularly at plugs, convenience receptacles, and the point where
they exit from the apparatus.
11 Only use attachments/accessories specified by the manufacturer.
12 Use only with the cart, stand, tripod, bracket, or
table specified by the manufacturer, or sold wi
th
the apparatus. When a cart is used, use caution
when moving the cart/apparatus combination to
avoid injury from tip-over.
13 Unplug this apparatus during lightning storms or
when unused for long periods of time.
14 Refer all servicing to qualified service personnel. Servicing is
required when the apparatus has been damaged in any way, such
as power-supply cord or plug is damaged, liquid has been spilled
or objects have fallen into the apparatus, the apparatus has been
exposed to rain or moisture, does not operate normally, or has
been dropped.
(UL60065_03)
PRÉCAUTIONS CONCER-
NANT LA SÉCURITÉ
1 Lire ces instructions.
2 Conserver ces instructions.
3 Tenir compte de tous les avertissements.
4 Suivre toutes les instructions.
5 Ne pas utiliser ce produit à proximité d’eau.
6 Nettoyer uniquement avec un chiffon propre et sec.
7 Ne pas bloquer les orifices de ventilation. Installer l’appareil
conformément aux instructions du fabricant.
8 Ne pas installer l’appareil à proximité d’une source de chaleur
comme un radiateur, une bouche de chaleur, un poêle ou tout autre
appareil (y compris un amplificateur) produisant de la chaleur.
9 Ne pas modifier le système de sécu
rité de la fiche polarisée ou de
la fiche de terre. Une fiche polarisée dispose de deux broches dont
une est plus large que l’autre. Une fiche de terre dispose de deux
broches et d’une troisième pour le raccordement à la terre. Cette
broche plus large ou cette troisième broche est destinée à assurer
la sécurité de l’utilisateur. Si la fiche équipant l’appareil n’est pas
compatible avec les prises de courant disponibles, faire remplacer
les prises par un électricien.
10 Acheminer les cordons d’alimentation de sorte qu’ils ne soient pas
piétinés ni coincés, en faisant tout spécialement attent
ion aux
fiches, prises de courant et au point de sortie de l’appareil.
11 Utiliser exclusivement les fixations et accessoires spécifiés par le
fabricant.
12 Utiliser exclusivement le chariot, le stand, le
trépied, le support ou la table recommandés par
le fabricant ou vendus avec cet appareil. Si
l’appareil est posé sur un chariot, déplacer le
chariot avec précaution pour éviter tout risque
de chute et de blessure.
13 Débrancher l’appareil en cas d’orage ou lorsqu’il
doit rester hors service pendant une période prolongée.
14 Confier toute réparation à un personnel qualifié. Faire réparer
l’appareil s’il a subi
tout dommage, par exemple si la fiche ou le
cordon d’alimentation est endommagé, si du liquide a coulé ou des
objets sont tombés à l’intérieur de l’appareil, si l’appareil a été
exposé à la pluie ou à de l’humidité, si l’appareil ne fonctionne pas
normalement ou est tombé.
(UL60065_03)
CAUTION:
TO REDUCE THE RISK OF ELECTRIC SHOCK,
DO NOT REMOVE COVER (OR BACK).
NO USER-SERVICEABLE PARTS INSIDE.
REFER SERVICING TO QUALIFIED SERVICE PERSONNEL.
ATTENTION :
POUR RÉDUIRE LES RISQUES D'ÉLECTROCUTION, NE PAS RETIRER
LE CAPOT (OU LE DOS). NE CONTIENT PAS DE PIÈCES NÉCESSITANT
L'INTERVENTION DE L'UTILISATEUR. POUR TOUTE INTERVENTION,
FAIRE APPEL À DES PROFESSIONNELS QUALIFIÉS.
ATTENTION
RISQUE DE CHOC
ELECTRIQUE-NE PAS OUVRIR
WARNING
TO REDUCE THE RISK OF FIRE OR ELECTRIC SHOCK, DO NOT
EXPOSE THIS APPARATUS TO RAIN OR MOISTURE.
AVERTISSEMENT
POUR RÉDUIRE LES RISQUES D’INCENDIE OU DE DÉCHARGE
ÉLECTRIQUE, N’EXPOSEZ PAS CET APPAREIL À LA PLUIE OU À
L’ H U M I D I T É .

UR44C Startup Guide 3
1. IMPORTANT NOTICE:
DO NOT MODIFY THIS UNIT!
This product, when installed as indicated in the
instructions contained in this manual, meets FCC
requirements. Modifications not expressly
approved by Yamaha may void your authority,
granted by the FCC, to use the product.
2. IMPORTANT: When connecting this product to
accessories and/ or another product use only high
quality shielded cables. Cable/s supplied with this
product MUST be used. Follow all installation
instructions. Failure to follow instructions could void
your FCC authorization to use this product in the
USA.
3. NOTE: This product has been tested and found to
comply with the requirements listed in FCC
Regulations, Part 15 for Class “B” digital devices.
Compliance with these requirements provides a
reasonable level of assurance that your use of this
product in a residential environment will not result
in harmful interference with other electronic
devices. This equipment generates/uses radio
frequencies and, if not installed and used according
to the instructions found in the users manual, may
cause interference harmful to the operation of other
electronic devices. Compliance with FCC
regulations does not guarantee that interference
will not occur in all installations. If this product is
found to be the source of interference, which can
be determined by turning the unit “OFF” and “ON”,
please try to eliminate the problem by using one of
the following measures:
Relocate either this product or the device that is
being affected by the interference.
Utilize power outlets that are on different branch
(circuit breaker or fuse) circuits or install AC line
filter/s.
In the case of radio or TV interference, relocate/
reorient the antenna. If the antenna lead-in is 300
ohm ribbon lead, change the lead-in to co-axial
type cable.
If these corrective measures do not produce
satisfactory results, please contact the local retailer
authorized to distribute this type of product. If you
can not locate the appropriate retailer, please
contact Yamaha Corporation of America, Electronic
Service Division, 6600 Orangethorpe Ave, Buena
Park, CA90620
The above statements apply ONLY to those
products distributed by Yamaha Corporation of
America or its subsidiaries.
* This applies only to products distributed by YAMAHA CORPORATION OF AMERICA. (class B)
FCC INFORMATION (U.S.A.)
COMPLIANCE INFORMATION STATEMENT
(DECLARATION OF CONFORMITY PROCEDURE)
Responsible Party : Yamaha Corporation of America
Address : 6600 Orangethorpe Ave., Buena Park, Calif. 90620
Telephone : 714-522-9011
Type of Equipment : USB AUDIO INTERFACE
Model Name : UR44C
This device complies with Part 15 of the FCC Rules.
Operation is subject to the following two conditions:
1) this device may not cause harmful interference, and
2) this device must accept any interference received including interference that may cause undesired
operation.
See user manual instructions if interference to radio reception is suspected.
* This applies only to products distributed by YAMAHA CORPORATION OF AMERICA. (FCC DoC)

4 UR44C Startup Guide
English
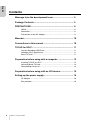
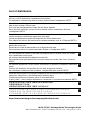
Contents
Message from the development team................................... 5
Package Contents................................................................... 5
PRECAUTIONS........................................................................ 6
Notice..................................................................................................... 8
Information............................................................................................. 8
Precautions for the AC Adaptor ............................................................. 9
Manuals................................................................................... 10
Conventions in this manual .................................................. 10
TOOLS for UR-C..................................................................... 11
Yamaha Steinberg USB Driver ............................................................. 11
Steinberg UR-C Applications ................................................................ 11
Basic FX Suite ...................................................................................... 11
Preparation before using with a computer.......................... 12
Installing TOOLS for UR-C ................................................................... 12
Activating Basic FX Suite...................................................................... 14
Downloading Cubase AI ....................................................................... 14
Preparation before using with an iOS device...................... 15
Setting up the power supply................................................. 16
AC Adaptor ........................................................................................... 16
Bus-powered......................................................................................... 16

Message from the development team
UR44C Startup Guide 5
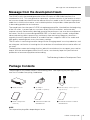
Message from the development team
The UR44C marks the second generation of the UR series of USB Audio Interface, first
introduced in 2011. This new generation represents a further evolution in the features to which
we have remained committed since the release of the first model in the UR series: high-quality
audio that is faithful to the source, and a reliable platform that provides stable operation even
in demanding production environments.
The sound input from the special D-PRE microphone preamplifier, inherited from the beginning
of the UR series, is processed at a maximum 32-bit/192 kHz resolution, and accurately
captures not only the beautifully detailed sound of the performers, but also the atmosphere of
the venue. Yamaha's custom-designed SSP3 DSP is also built into this model, and provides
advanced routing, effects processing, and latency-free monitoring. Moreover, the driver—
arguably the most important feature of an audio interface—supports USB 3.0 for stable and
high-quality recording even at very low latency settings.
The UR series is continuing to evolve along with the changing needs in music production, and
we take great satisfaction in knowing that this evolution will contribute to the creative efforts of
our users.
The behind-the-scenes technology that has led to this evolution exists to support your creative
output. With the second generation of the UR series, we sincerely hope that you find music
production to be more enjoyable and rewarding.
The Steinberg Hardware Development Team
Package Contents
The package of this product contains the following items. After opening the package, make
sure that it includes everything listed below.
NOTE
The shape of the plug differs depending on locale.
UR44C main unit AC adaptor
(PA-150B or equivalent)
USB 3.0 cable (3.1 Gen1, Type-C to
Type-A, 1.0 m)
UR44C Startup Guide
(this book)
CUBASE AI DOWNLOAD
INFORMATION
ESSENTIAL PRODUCT LICENCE
INFORMATION

PRECAUTIONS
6 UR44C Startup Guide
PRECAUTIONS
PLEASE READ CAREFULLY
BEFORE PROCEEDING
Please keep this manual in a safe place for
future reference.
WARNING
Always follow the basic precautions
listed below to avoid the possibility of
serious injury or even death from
electrical shock, short-circuiting,
damages, fire or other hazards. These
precautions include, but are not limited
to, the following:
If you notice any abnormality
• If any of the following problems occur,
immediately turn off the power switch and
disconnect the electric plug from the outlet.
If any of the following problems occur,
immediately turn off the power of the
amplifier.
- The power cord or AC adaptor becomes
frayed or damaged.
- Unusual smells or smoke are emitted.
- Some object, or water has been dropped
into the product.
- There is a sudden loss of sound during use
of the product.
- Cracks or other visible damage appear on
the product. Then have the product inspected
or repaired by qualified Yamaha service
personnel.
Power supply/AC adaptor
• Do not place the power cord near heat
sources such as heaters or radiators, and do
not excessively bend or otherwise damage
the cord, place heavy objects on it, or place it
in a position where anyone could walk on, trip
over, or roll anything over it.
• Only use the voltage specified as correct for
the product. The required voltage is printed on
the name plate of the product.
• Use the specified adaptor only. Using the
wrong adaptor can result in damage to the
product or overheating.
• Check the electric plug periodically and
remove any dirt or dust which may have
accumulated on it.
• Make sure to fully insert the electric plug to
prevent electric shocks or fire.
• When setting up the product, make sure that
the AC outlet you are using is easily
accessible. If some trouble or malfunction
occurs, immediately turn off the power switch
and disconnect the plug from the outlet. Even
when the power switch is turned off, as long
as the power cord is not unplugged from the
wall AC outlet, the product will not be
disconnected from the power source.
• Remove the electric plug from the outlet when
the product is not to be used for extended
periods of time.
• Do not touch the product or the electric plug
during an electrical storm.
Do not open
• This product contains no user-serviceable
parts. Do not attempt to disassemble the
internal parts or modify them in any way.
Water warning/Fire warning
• Do not expose the product to rain, use it near
water or in damp or wet conditions, or place
on it any containers (such as vases, bottles or
glasses) containing liquids which might spill
into any openings.
• Never insert or remove an electric plug with
wet hands.
• Do not place any burning items or open
flames near the product, since they may
cause a fire.
Hearing loss
• Before connecting the product to other
devices, turn off the power for all devices.
Also, before turning the power of all devices
on or off, make sure that all volume levels are
set to the minimum. Failing to do so may
result in hearing loss, electric shock, or device
damage.
• When turning on the AC power in your audio
system, always turn on the power amplifier
LAST, to avoid hearing loss and speaker
PA_en_9 1/2

PRECAUTIONS
UR44C Startup Guide 7
damage. When turning the power off, the
power amplifier should be turned off FIRST
for the same reason.
• Do not use headphones for a long period of
time at a high or uncomfortable volume level,
since this can cause permanent hearing loss.
If you experience any hearing loss or ringing
in the ears, consult a physician.
CAUTION
Always follow the basic precautions listed
below to avoid the possibility of physical injury
to you or others, or damage to the product or
other property. These precautions include, but
are not limited to, the following:
Power supply/AC adaptor
• Do not cover or wrap the AC adaptor with a
cloth or blanket.
• When removing the electric plug from the
product or an outlet, always hold the plug
itself and not the cord. Pulling by the cord can
damage it.
Location and connection
• Do not place the product in an unstable
position where it might accidentally fall over
and cause injuries.
• Keep the device out of reach of children. This
product is not suitable for use in locations
where children are likely to be present.
• Do not place the product in a location where it
may come into contact with corrosive gases
or salt air. Doing so may result in malfunction.
• Before moving the product, remove all
connected cables.
Maintenance
• Remove the power plug from the AC outlet
when cleaning the product.
Handling caution
• Do not rest your weight on the product or
place heavy objects on it.
Yamaha/Steinberg cannot be held responsible for dam-
age caused by improper use or modifications to the
product, or data that is lost or destroyed.
PA_en_9 2/2

PRECAUTIONS
8 UR44C Startup Guide
Notice
To avoid the possibility of malfunction/
damage to the product, damage to data, or
damage to other property, follow the notices
below.
Handling and maintenance
• Do not use the product in the vicinity of a TV,
radio, AV equipment, mobile phone, or other
electric products. Otherwise, the product, TV,
or radio may generate noise.
• Do not expose the product to excessive dust
or vibration, or extreme cold or heat (such as
in direct sunlight, near a heater, or in a car
during the day), in order to prevent the
possibility of panel disfiguration, unstable
operation, or damage to the internal
components.
• Condensation can occur in the product due to
rapid, drastic changes in ambient
temperature—when the product is moved
from one location to another, or air
conditioning is turned on or off, for example.
Using the product while condensation is
present can cause damage. If there is reason
to believe that condensation might have
occurred, leave the product for several hours
without turning on the power until the
condensation has completely dried out.
• Do not place vinyl, plastic or rubber objects
on the product, since this might discolor the
panel.
• When cleaning the product, use a dry and soft
cloth. Do not use paint thinners, solvents,
cleaning fluids, or chemical-impregnated
wiping cloths.
• To avoid generating unwanted noise, make
sure there is adequate distance between the
AC power adaptor and the product.
Connectors
• XLR-type connectors are wired as follows
(IEC60268 standard): pin 1: ground, pin 2: hot
(+), and pin 3: cold (-).
Information
About copyrights
• This manual is the exclusive copyrights of
Yamaha Corporation.
• Copying of the software or reproduction of this
manual in whole or in part by any means is
expressly forbidden without the written
consent of the manufacturer.
• This product incorporates and bundles
computer programs and contents in which
Steinberg Media Technologies GmbH and
Yamaha Corporation own copyrights or with
respect to which it has license to use others'
copyrights. Such copyrighted materials
include, without limitation, all computer
software, style files, MIDI files, WAVE data,
musical scores and sound recordings. Any
unauthorized use of such programs and
contents outside of personal use is not
permitted under relevant laws. Any violation of
copyright has legal consequences. DON'T
MAKE, DISTRIBUTE OR USE ILLEGAL
COPIES.
About this manual
• The illustrations and LCD screens as shown
in this manual are for instructional purposes
only.
• Steinberg Media Technologies GmbH and
Yamaha Corporation make no
representations or warranties with regard to
the use of the software and documentation
and cannot be held responsible for the results
of the use of this manual and the software.
• Steinberg, Cubase and Cubasis are
registered trademarks of Steinberg Media
Technologies GmbH.
• Windows is a registered trademark of
Microsoft® Corporation in the United States
and other countries.
• Apple, Mac, iPad, iPhone, and Lightning are
trademarks of Apple Inc., registered in the
U.S. and other countries.
• IOS is a trademark or registered trademark of
Cisco in the U.S. and other countries and is
used under license.

PRECAUTIONS
UR44C Startup Guide 9
• The company names and product names in
this manual are the trademarks or registered
trademarks of their respective companies.
• Software may be revised and updated without
prior notice.
About disposal
• This product contains recyclable components.
When disposing of this product, please
contact the appropriate local authorities.
(bottom_en_01)
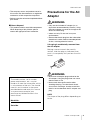
Precautions for the AC
Adaptor
WARNING
• Only use the included AC adaptor (or an
equivalent recommended by Yamaha). Using
the wrong adaptor can result in damage to the
device or overheating.
• Indoor use only. Do not use in any wet
environments.
• Remove the electric plug from the outlet when
the device is not be used for extended periods
of time, or during electrical storms.
If the plug is accidentally removed from
the AC adaptor
Making sure not to touch the metallic
section, slide the plug as indicated, then
push it in completely until you hear the click
sound.
WARNING
• Make sure to keep the plug attached to the
AC adaptor. Using the plug alone can cause
electric shock or fire.
• Never touch the metallic section when
attaching the plug. To avoid electric shock,
short circuit or damage, also be careful that
there is no dust between the AC adaptor and
plug.
NOTE
The shape of the plug differs depending on
locale.
The model number, serial number,
power requirements, etc., may be
found on or near the name plate, which
is at the bottom of the unit. You should
note this serial number in the space
provided below and retain this manual
as a permanent record of your
purchase to aid identification in the
event of theft.
Model No.
Serial No.

Manuals
10 UR44C Startup Guide
Manuals
The UR44C has the following two separate
manuals.
Startup Guide (this book)
Read this manual when setting up the
device. After finishing the setup as
indicated in this manual, read the Operation
Manual.
Operation Manual (PDF)
Read through this manual to understand how
to use the features of the product. You can
download the Operation Manual from the
Steinberg website:
http://www.steinberg.net/hardwaredownloads
NOTE
To view PDF files, you need to install Adobe
Reader on your computer. You can download
the latest version at the following website.
https://www.adobe.com/
Conventions in this
manual
Windows or Mac
When the procedures or explanations are
specific to only one of the platforms,
Windows or Mac, this is properly indicated
in the manual. When the platforms do not
appear, procedures or explanations are for
both Windows and Mac. This manual
predominantly uses screenshots of
Windows. However, Mac screenshots are
used when instructions of the function apply
only to the Mac.
Cubase series
The phrase “Cubase” in this manual applies
to all Cubase programs and versions
(except Cubase LE). If a specific version is
indicated, the version is described in the
text. This manual uses screenshots of
Cubase Pro 10 series. If you are using
another version of Cubase, the actual
screenshots might not be the same. For
details, refer to the Cubase manuals.
Cubasis series
This manual uses screenshots of Cubasis 2.
If you are using another version of Cubasis,
the actual screen shots might not be the
same.
Procedures
An arrow “” is shown for some procedures
in the manual. For example, the string
[Studio] [Studio Setup] [Control Panel]
indicates that you should perform the
procedures in the following order.
1. Click the [Studio] menu.
2. Select the [Studio Setup] option.
3. Click the [Control Panel] button.
Version information
The letters “x.x.x” and “x.xx” indicate the
version number.

TOOLS for UR-C
UR44C Startup Guide 11
TOOLS for UR-C
The software TOOLS for UR-C is necessary
for proper connection and use of the device
with a computer. Make sure to install it
before initially using the device (page 12).
You will need to download TOOLS for UR-C
beforehand from the Steinberg website
below.
http://www.steinberg.net/hardwaredownloads
When you install the TOOLS for UR-C, the
following three software programs will be
installed.
NOTE
• TOOLS for UR-C does not support iOS
devices.
• For the latest information on TOOLS for UR-
C, see the Steinberg website.
Yamaha Steinberg USB
Driver
This software allows communication
between the device and a computer.
Steinberg UR-C
Applications
This software allows setting the parameters
of the device from a computer or using the
Link function between the device and
Cubase series software. The software
consists of the following two components.
• Steinberg dspMixFx UR-C
This editing software lets you set the device
when using the device independently, or
when using it with a DAW (Digital Audio
Workstation) software other than Cubase
series. You can use Cubase and dspMixFx
UR-C at the same time.
• Steinberg UR-C Extension
This software allows you to link the device
with Cubase series (for versions which
supports the link function). To use this link
function, see the Steinberg web site below.
https://www.steinberg.net/
Basic FX Suite
Basic FX Suite is software consisting of
Plug-ins of various effects and sound
processing developed by Yamaha, some of
which fully utilize modeling technology.
When you install the Basic FX Suite, the
following three software programs will be
installed.
NOTE
AU (Audio Unit) Plug-ins are additionally
available, as well as VST Plug-ins, for use
with a Mac.
• Sweet Spot Morphing Channel Strip
This processing effect is a multi effect that
features a compressor and equalizer.
• REV-X
This processing effect is a digital reverb
platform developed by Yamaha for
professional audio devices.
• Guitar Amp Classics
This processing effect features guitar amp
simulations developed by Yamaha that fully
utilize modeling technology.

Preparation before using with a computer
12 UR44C Startup Guide
Preparation before
using with a computer
The following three setup procedures are
required before you can use the device with
a computer.
• Installing TOOLS for UR-C
• Activating Basic FX Suite
• Downloading Cubase AI (DAW)
Installing TOOLS for UR-C
Download TOOLS for UR-C beforehand
from the Steinberg website. Follow the
steps below to install the TOOLS for UR-C.
NOTE
• You are only permitted to use this software
pursuant to the terms and conditions of the
“License Agreement” shown during the
installation.
• Future upgrades of application and system
software and any changes in specifications and
functions will be announced at the following
website.
https://www.steinberg.net/
• The eLicenser Control Center (eLCC) for
controlling the product license is installed at
the same time.
Windows
1. Disconnect all USB devices other
than the mouse and keyboard
from the computer.
2. Start the computer and log on to
the Administrator account.
Exit any open applications and close
all open windows.
3. Extract the previously downloaded
TOOLS for UR-C.
4. Double click the [setup.exe] file in
the extracted folder to start the
installation.
5. Follow the on-screen instructions
to install the software.
NOTE
• While installing the software, the “eLicenser
Control Center” installation message
appears. Follow the onscreen instructions to
install the software.
• You can select the desired software to be
installed on the installation screen.
- Yamaha Steinberg USB Driver
- Steinberg UR-C Applications
- Basic FX Suite (VST3 Plug-ins)
6. When installation has been
completed, click [Finish].
If a window requiring you to restart your
computer appears, follow the onscreen
instructions and restart the computer.
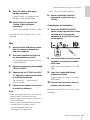
Confirmation of Installation
7. Move the [POWER SOURCE]
switch to the right and then insert
the plug of the included AC
adapter into the DC IN [12V] jack
on the device.
8. Connect the device directly to the
computer by using the included
USB cable.
Make sure not to connect it to a USB
hub.

Preparation before using with a computer
UR44C Startup Guide 13
9. Open the [Device Manager]
window as follows.
[Control Panel] ([Hardware and
Sound]) [Device Manager]
10. Click on the [>] mark next to
“Sound, video and game
controllers.”
Confirm that the device name is listed.
Installation of the TOOLS for UR-C is now
complete.
Mac
1. Disconnect all USB devices other
than the mouse and keyboard
from the computer.
2. Start the computer and log in to
the Administrator account.
Exit any open applications and close
all open windows.
3. Extract the previously downloaded
TOOLS for UR-C.
4. Double click the [TOOLS for UR-C
V**.pkg] file in the extracted folder
to start the installation.
The characters *** represent the
version number.
5. Follow the on-screen instructions
to install the software.
NOTE
• While installing the software, the “eLicenser
Control Center” installation message
appears. Follow the onscreen instructions to
install the software.
• You can select the desired software to be
installed on the installation screen.
- Yamaha Steinberg USB Driver
- Steinberg UR-C Applications
- Basic FX Suite (VST3/AU Plug-ins)
6. When installation has been
completed, click [Restart] or
[Close].
Confirmation of Installation
7. Move the [POWER SOURCE]
switch to the right and then insert
the plug of the included AC
adapter into the DC IN [12V] jack
on the device.
8. Connect the device directly to the
computer by using the included
USB cable.
Make sure not to connect it to a USB
hub.
9. Open the “Audio MIDI Setup”
window as follows.
[Applications] [Utilities] [Audio
MIDI Setup]
10. Confirm that the device name is
listed in the left column.
Installation of the TOOLS for UR-C is now
complete.

Preparation before using with a computer
14 UR44C Startup Guide
Activating Basic FX Suite
To use the Basic FX Suite programs which
are installed in “Installing TOOLS for UR-C,”
you will need to download the licenses for
them via the Internet. Use the Activation
Code provided on the ESSENTIAL
PRODUCT LICENSE INFORMATION.
1. Launch the “eLicenser Control
Center” as follows.
Windows
[All Programs] or [All apps]
[eLicenser] [eLicenser Control
Center]
Mac
[Applications] [eLicenser Control
Center]
2. Click [Enter Activation Code].
3. Enter the Activation Code
described on the included
ESSENTIAL PRODUCT LICENSE
INFORMATION.
4. Follow the on-screen instructions
to download the licenses.
NOTE
If you connect a USB-eLicenser (USB
protection device) to your computer, a window
requiring you to select the destination of the
license appears. Follow the on-screen
instructions to select the device. Keep in mind
that the license saved in the USB-eLicenser
cannot be transferred to the Soft-eLicenser.
Downloading Cubase AI
We are offering Cubase AI as a free
download via our website, specifically for
customers who have purchased the
UR44C. Cubase AI is software for music
production that allows you to record, play,
and edit sounds on a computer. In order to
download the software, you’ll need to first
create a MySteinberg account on the
Steinberg website. For the latest
information, see the Steinberg website
below.
http://www.steinberg.net/getcubaseai/
NOTE
A valid “Download access code” is required
for Cubase AI download. It is printed on the
included CUBASE AI DOWNLOAD
INFORMATION.
The setup is now complete.
For detailed instructions and information on
the functions of the product, read the
operation manual.

Preparation before using with an iOS device
UR44C Startup Guide 15
Preparation before
using with an iOS
device
The following preparations are required
before you can use the device with an iOS
device.
Apple accessories
These may be necessary for connecting the
device to an iOS device.
USB-C charge cable in the Apple product
box.
Lightning to USB Camera Adapter
(optional)
or
Lightning to USB 3 Camera Adapter
(optional)
Downloading Steinberg
dspMixFx UR-C (mixing
app)
Download from the App store.
Downloading DAW app as
necessary
Download from the App Store.
NOTE
• Installing the TOOLS for UR-C is not
necessary when connecting the device to an
iOS device.
• For the latest information on compatible iOS
devices, refer to the Steinberg Website
below.
https://www.steinberg.net/
The setup is now complete.
For detailed instructions and information on
the functions of the product, read the
operation manual. In the operation manual,
you can refer to the basic instructions for
operating with Cubasis (an iPad app sold
by Apple) as an example.

Setting up the power supply
16 UR44C Startup Guide
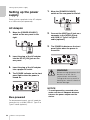
Setting up the power
supply
Power can be supplied via the AC adapter
or a USB cable (bus-powered).
AC Adaptor
1. Move the [POWER SOURCE]
switch on the rear panel to the
right.
2. Insert the plug of the AC adaptor
into the DC IN [12V] jack on the
rear panel.
3. Insert the plug of the AC adaptor
into a proper AC outlet.
4. The POWER indicator on the front
panel lights when the power is
turned on.
Bus-powered
For buspowered supply, you will need the
commercially available USB 3.1 Type-C to
Type-C cable (optional).
1. Move the [POWER SOURCE]
switch on the rear panel to the left.
2. Connect the USB Type-C jack on a
computer to the [USB 3.0] jack
with USB 3.1 Type-C to Type-C
cable (optional).
3. The POWER indicator on the front
panel lights when the power is
turned on.
NOTICE
• To avoid generating unwanted noise,
make sure there is adequate distance
between the power adaptor and the
device.
WARNING
Before turning the power of all
devices on or off, set all
volume levels to minimum.
Failing to do so may result in
hearing loss, electric shock, or
device damage.

(weee_eu_en_02)
Information for users on collection and disposal of old equipment:
This symbol on the products, packaging, and/or accompanying documents means that used electrical
and electronic products should not be mixed with general household waste.
For proper treatment, recovery and recycling of old products, please take them to applicable collection
points, in accordance with your national legislation.
By disposing of these products correctly, you will help to save valuable resources and prevent any
potential negative effects on human health and the environment which could otherwise arise from
inappropriate waste handling.
For more information about collection and recycling of old products, please contact your local
municipality, your waste disposal service or the point of sale where you purchased the items.
For business users in the European Union:
If you wish to discard electrical and electronic equipment, please contact your dealer or supplier for further information.
Information on Disposal in other Countries outside the European Union:
This symbol is only valid in the European Union. If you wish to discard these items, please contact your local authorities or
dealer and ask for the correct method of disposal.

► Warranty Terms and Conditions
available as printed PDF file at
www.steinberg.net/warranty
The Warranty Terms and Conditions available as printed PDF file at www.steinberg.net/ warranty
apply only for countries of the European Economic Area (EEA) and Switzerland.
► Gewährleistungsbestimmungen
finden Sie als druckbare PDF Datei unter
www.steinberg.de/warranty
Die Gewährleistungsbestimmungen in Schriftform sind als PDF-Datei unter www.steinberg.de/
warranty erhältlich und gelten nur für den Europäischen Wirtschaftsraum (EWR) und die Schweiz.
► Les conditions de garantie
se trouvent dans le document PDF imprimable sous
www.steinberg.net/warranty
Les conditions de garantie disponibles au format PDF à la page www.steinberg.net/ warranty
s’appliquent uniquement aux pays de l’Espace économique européen (EEE) et à la Suisse.
► Las condiciones de garantía
se encuentran en el documento PDF en
www.steinberg.net/warranty
Los términos y condiciones de la garantía como archivo PDF para su impresión en
www.steinberg.net/warranty sólo están disponible en países del Espacio Económico Europeo
(EEE) y Suiza.
► Termos e condições de garantia
arquivo PDF disponível no endereço
www.steinberg.net/warranty
O arquivo PDF com os Termos e condições de garantia disponibilizado no endereço
www.steinberg.net/warranty aplica-se somente aos países da Área Econômica Europeia (AEE) e
à Suíça.
► Termini e Condizioni di Garanzia
disponibili su file PDF stampabile all’indirizzo web
www.steinberg.net/warranty
termini e le condizioni della garanzia, disponibili in formato PDF all’indirizzo www.steinberg.net/
warranty, sono validi soltanto per I paesi dell’Area Economica Europea (EEA) e per la Svizzera.

List of distributors
https://www.steinberg.net/en/company/distributor.html
If you need support or further product information please contact the distributor in your
country. A list of distributors is available at this website.
For assistance in determining who to contact, please contact “Headquarter SMTG.”
Wenn Sie Unterstützung oder weitere Produktinformationen benötigen, wenden Sie sich
bitte an den Vertrieb in Ihrem Land.
Eine Liste der Vertriebspartner finden Sie auf dieser Website.
Wenn Sie Hilfe benötigen, an wen Sie sich wenden sollten, kontaktieren Sie bitte
„Headquarter SMTG“.
Pour toute demande d’assistance ou d’information supplémentaire sur les produits,
veuillez contacter le distributeur agréé dans votre pays.
La liste des distributeurs agréés est disponible sur le site Web suivant.
Pour obtenir de l’aide sur les ressources à contacter, adressez-vous au « Siège de SMTG ».
Para solicitar asistencia o más información sobre el producto, póngase en contacto con el
distribuidor de su país.
Encontrará una lista de distribuidores en el siguiente sitio web.
Para consultas sobre el contacto adecuado, diríjase a “Headquarter SMTG.”
Se você precisar de suporte ou de mais informações sobre o produto, entre em contato
com o distribuidor no seu país.
Há uma lista de distribuidores disponível neste site.
Para receber ajuda para determinar com quem entrar em contato, fale com a “Sede da
SMTG”.
Per ottenere assistenza o avere ulteriori informazioni sul prodotto, contattare il distributore
locale.
L’elenco dei distributori e disponibile sul sito Web al seguente indirizzo.
Per individuare il distributore da contattare, rivolgersi alla sede centrale SMTG.
Если вам необходима техническая поддержка или дополнительные сведения о
продуктах, обратитесь к дистрибьютору в вашей стране.
Список дистрибьюторов можно найти на этом веб-сайте.
Чтобы узнать, к кому следует обращаться, свяжитесь с центральным офисом
SMTG.
지원 또는 추가 제품 정보가 필요한 경우 해당 국가의 판매업체에 문의하십시오.
판매업체 목록은 다음 웹사이트에서 이용할 수 있습니다.
문의 판매업체를 결정하는 데 도움이 필요한 경우 "SMTG 본사"에 문의하십시오.
EN
DE
FR
ES
PT
ENIT
RU
ZH
KO
HEAD OFFICE: Steinberg Media Technologies GmbH
Beim Strohhause 31, 20097 Hamburg, Germany Tel: +49-(0)40-210 35 0

Steinberg Website
https://www.steinberg.net/
https://www.yamaha.com.cn
Manual Development Group
© 2019 Yamaha Corporation
Published 06/2019
2019 6
MWES-A1
VAD5080
-
 1
1
-
 2
2
-
 3
3
-
 4
4
-
 5
5
-
 6
6
-
 7
7
-
 8
8
-
 9
9
-
 10
10
-
 11
11
-
 12
12
-
 13
13
-
 14
14
-
 15
15
-
 16
16
-
 17
17
-
 18
18
-
 19
19
-
 20
20


