TANDBERG RDX QuikStation 4 Guide de démarrage rapide
- Taper
- Guide de démarrage rapide

Quick Start Guide
RDX
®
QuikStation
®
4
1U Storage Appliance
Step 1
Register the Unit
It is essential to activate your warranty. Technical and warranty
support are not available until the warranty is active:
1. Go to http://registration.tandbergdata.com/
.
2. Enter your
email address and
password, and click Sign In.
3. Click Register New Product.
4. Fill in the information (including
serial number) and click Submit.
Your warranty certificate will be
emailed to you. Follow the email
instructions to complete the
registration process.
Unpack the Unit
Place the unit and any supplied RDX cartridges on a secure surface.
Ensure that the airflow around the front and back of the unit is not
obstructed, there is minimal dust, and there is a minimum of 12cm free
space in front of the unit to allow the operators to safely remove the RDX
cartridges.
If using a desktop unit, proceed to Step 3.
WARNING: To reduce the risk of electric shock or damage to
equipment, always remove any power cords while working with
the unit.
WARNUNG: Um das Risiko eines elektrischen Schlags oder
Schäden am Gerät zu vermeiden, ziehen Sie stets den
Netzstecker, bevor Sie an der Einheit arbeiten.
AVERTISSEMENT: Pour réduire le risque de choc électrique ou
endommagement de l'équipement, retirez toujours les cordons
électriques en travaillant avec l'appareil.
Rack-mount
Desktop
Enter
Enter
Step 2
Install Rails in Rack
The rack-mounted RDX
QuikStation 4 is designed for use
in a a 19-inch rack using 1U of
rack space. The length of the
power cord and the Ethernet
cables may restrict placement.
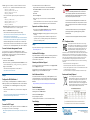
1. Determine the 1U area
where the QuikStation 4 is to be mounted and mark both sets of
first and third holes on the front.
2. At the rear, mark the same first and third holes.
3. Measure the gap between the
front and rear rack rails.
• If the measurement is less
than the length of the
QuikStation 4, secure the first
and third mounting rail holes
with M4x12 screws, washers,
and nuts.
• If the measurement is equal
or greater than the length of
the QuikStation 4, secure the
second and fourth mounting
rail holes with M4x12 screws,
washers, and nuts.
4. Align the left-front flange with the two marked holes on the front
rack rail and loosely attach the left-side mounting rail with two
screws.
5. Ensure the mounting rail is level and attach it loosely to the rack
rear with two screws.
6. Repeat Steps 4–5 for the right-side rail.
7. Verify both rails are level and securely tighten all screws.
Install the Unit in the Rack
1. Lift and position the unit onto the
rails and push it in until the front
brackets are touching the rails.
2. Using the two provided screws,
attach the QuikStation 4 brackets to
the bottom holes in the rack and
tighten them just enough to support
the appliance.
3. Verify that the appliance is level,
and tighten the screws evenly.
WARNING: Do not place anything on top of the rack-mounted unit
when it is extended from the rack.
WARNUNG: Stellen Sie nichts auf die Rack-Einheit, wenn diese aus
dem Rack herausragt.
AVERTISSEMENT: Ne rien poser sur l’unité installée dans le rack
lorsqu’elle est étendue du rack.
QuikStation 4
1U
Mark
Mark
(Front)
Use these holes if the
rack rail’s gap < unit length
Use these holes if the
rack rail’s gap ≥ unit length
Front
Step 3
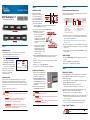
Connect Network and Power Cords
All power connections, cabling ports, and cooling vents are located on the
rear panel of the QuikStation 4.
1. Connect one or more of the 1 Gb Ethernet ports to the network
ports on a switch, hub, or router on the same LAN as the host system
used to manage the QuikStation.
NOTE: For failover protection and maximum performance, connect two
1GbE network ports.
2. Connect the appropriate power cord to the QuikStation, and plug the
power cord into either a UPS appliance or a properly grounded AC
power source.
3. Turn the power on by pressing the power button/LED on the front
center of the unit.
Install Cartridges
1. Position an RDX cartridge at an empty QuikStation 4 RDX dock
opening.
2. Slide the cartridge in until it locks in place.
3. Repeat Steps 1–2 for each remaining cartridge.
Step 4
Obtain the IP Address
The default QuikStation 4 network configuration is set for dynamic IP
addresses (DHCP), but static IP addresses are also supported. To
determine an IP address:
1. With the appliance off, attach a monitor to the VGA display port.
2. Attach a keyboard as appropriate.
3. Power on the unit by pressing the power button.
After the unit initializes, the IP addresses are displayed.
The IP address may also be obtained using a USB stick with a single
MBR partition formatted with either FAT32 or NTFS.
1. Create an empty network.info file on a USB stick.
2. Insert the stick in the USB port on the front of the unit and wait at
least 30 seconds for the network configuration to download to the
network.info file.
3. Move the USB stick to a host computer and scan the updated
network.info file to determine the available IP addresses.
Assign a Static IP Address
CAUTION: Make sure the file name network.conf is all
lowercase letters.
1 - AC Power Plug
2 - 1 Gb IPMI Port
3 - USB 2.0 Port (USB1)
4 - USB 2.0 Port (USB0)
5 - 1 Gb Ethernet Ports (eth2)
6 - 1 Gb Ethernet Ports (eth0)
7 - 1 Gb Ethernet Ports (eth3)
8 - 1 Gb Ethernet Ports (eth1)
9 - VGA/Display Port
129567 843
*10400874*
10400874

http://www.tandbergdata.com
©2019 Overland-Tandberg
10400874 RMN-A-01-14
If DHCP support is not enabled, set a static IP address for the unit:
1. Create a network.conf file on a USB stick with these entries:
BOND0_IP4_CONFIG=static
BOND0_IP4_ADDR=nnn.nnn.nnn.nnn
BOND0_IP4_GW=nnn.nnn.nnn.nnn
BOND0_IP4_PREFIX=nn
Insert your IP address, gateway, and prefix as required. For
example:
BOND0_IP4_CONFIG=static
BOND0_IP4_ADDR=192.168.10.111
BOND0_IP4_GW=192.168.10.1
BOND0_IP4_PREFIX=24
2. Insert the stick in the USB port on the front of the unit and wait at
least two minutes for the network.conf file to update.
3. Remove the USB stick from the front port.
The unit will restart with the updated network settings.
NOTE: If the unit does not reboot automatically, recheck network.conf
filename to ensure it is all lowercase letters.
You may need to use a Linux or MacOS host system to check a filename as
Windows OS can change the filename to uppercase but cannot display it.
The Remote Management Console should now be available at the
static IP address selected. For more information on how to configure
IP addresses, refer to the RDX QuikStation 4 & 8 Product Manual.
Connect to Remote Management Console
Use a web browser to connect to the RDX QuikStation 4 Remote
Management Console (RMC) from any computer on the same network as
the QuikStation 4. Supported operating systems include Microsoft
Windows, Linux, and Apple MacOS.
To connect to the RMC:
1. Obtain the unit’s IP address.
2. On a network host, type the RDX QuikStation IP address in a web
browser’s URL field (http://<RDX_QuikStation_IP_Address>).
3. Sign in to the Console.
The default user name/password is “Admin/Admin!”.
NOTE: Passwords are case-sensitive.
Step 5
Configure the RDX QuikStation 4
You can configure your RDX QuikStation 4 as RDX Disks (default) or
RDX Logical Volume (see the RDX QuikStation 4 & 8 Product Manual).
1. Using the RMC, select the device type from the dialog window.
2. Click
OK
.
The system restarts. When done, your selected device configuration
is shown.
NOTE: If you have any RDX cartridges loaded into the RDX QuikStation, the
system will eject the cartridges when it restarts.
Step 6
Connect to iSCSI Targets
In iSCSI terminology, a host computer is referred to as an initiator and
the storage device it connects to as the target.
NOTE: The RDX QuikStation and the host computers must reside on the same
network.
To establish an iSCSI connection in Windows Server:
1. Open the Microsoft iSCSI Initiator and click the
Discovery
tab.
2. Click
Discover Portal
to enter the IP address for the RDX
QuikStation 4.
3. Click
OK
.
4. Click the
Targets
tab.
5. Select the target you wish to connect to and click the
Connect
button.
For more information on how to connect to targets, refer to the RDX
QuikStation 4 & 8 Product Manual and your OS documentation.
Prepare for and Perform a Backup
1. If needed, install a backup application. Software compatibility
information is available at www.tandbergdata.com.
2. Launch and configure the backup application software to perform
a backup.
For questions regarding software installation, configuration, and
operation, refer to your backup software product documentation or
contact your software provider.
Step 7
For product information, support, and documentation, visit our website:
www.tandbergdata.com
Additional RDX Cartridges
To purchase RDX media cartridges, contact your Tandberg Data Partner
or go to
Products > RDX Solutions > RDX Media
on our website and
select the Where to Buy button.
Warranty and Technical Support
For warranty and technical support information, see our Support Tools
under the
Support
menu option.
For information on contacting Tandberg Data Support, see our Contact
Support web page under the
Contact
menu option.
User Guides and Articles
For detailed information on configuring your RDX QuikStation 4, refer
to the RDX QuikStation 4 and 8 Product Manual. The product manual,
this quick start guide, and other knowledge base articles are available
online at:
https://community.sphere3d.com/community/documentation/rdx
Product Information
Product name: RDX QuikStation 4
Model/Type Reference: RMN-A-01-14
Manufacturer: Tandberg Data
European Regulatory Address:
Tandberg Data GmbH, Feldstr. 81, 44141 Dortmund, Germany
Power Ratings
Input Voltage 100 - 240 VAC
Input Rated Current 2.0-1.0A
Rated Input Frequency 50-60 HZ
Safety Precautions
CAUTION: Be aware of the location of the power ON/OFF switch
on the front of the RDX QuikStation 4 chassis as well as the
room’s emergency power-off switch, disconnection switch, or
electrical outlet used. If an electrical accident occurs, you can
then quickly remove power from the system.
The rack version of the RDX QuikStation 4 is intended for use
when mounted in a standard rack. It may be used on a shelf or
table top as long as the area is free of clutter to ensure proper
ventilation.
The unit is intended for indoor use only. Use an appropriate
power supply cord with a grounded plug and a grounded
electrical outlet.
The outlet must be near the equipment and easily accessible.
FCC Compliance Notice
This equipment has been tested and found to comply
with the limits for a Class B digital device, pursuant to part
15 of the FCC Rules. These limits are designed to provide
reasonable protection against harmful interference in a
residential installation. This equipment generates, uses
and can radiate radio frequency energy and, if not
installed and used in accordance with the instructions, may cause harmful
interference to radio communications. However, there is no guarantee
that interference will not occur in a particular installation. If this equipment
does cause harmful interference to radio or television reception, which
can be determined by turning the equipment off and on, the user is
encouraged to correct the interference by one or more of the following
measures:
• Reorient or relocate the receiving antenna.
• Increase the separation between the equipment and receiver.
• Connect the equipment into an outlet on a circuit difference from that
to which the receiver is connected.
• Consult the dealer on an experienced radio/TV technician for help.
Environment Friendly Disposal
You can help protect the environment!
Please remember to respect the local regulations and
hand in the non-working electrical equipments to an
appropriate waste disposal center. The packaging
material is recyclable. Dispose of the packaging in an
environmentally friendly manner and make it available
for the recyclable material collection-service.
-
 1
1
-
 2
2


TANDBERG RDX QuikStation 4 Guide de démarrage rapide
- Taper
- Guide de démarrage rapide
dans d''autres langues
Documents connexes
Autres documents
-
Quantum RDX8000 Guide de démarrage rapide
-
Fujitsu S26113-F575-L10 Fiche technique
-
-
 Motorola Solutions RDU4100 Manuel utilisateur
-
-
 Motorola Solutions RDU4163d Manuel utilisateur
-
-
Motorola RMU2040 Mode d'emploi

