
V3 Basic
Quick Start Guide
V3 Basic クイックスタートガイド
Guide de démarrage rapide V3 Basic
Guida di avvio rapido V3 Basic
Guía de inicio rápido V3 Basic
V3 Basic Schnellstartanleitung
FR
IT
DE
SP
JP

2
Table of Contents
English
Overview
What’s in the Box
Camera Overview
Installation
Basic Operation
日本語
概説
本製品の同梱物
カメラの概説
画面のアイコン
基本操作
Français
Aperçu
Que contient la Boîte
Aperçu de la Caméra
Installation
Opération de Base
Italiano
Panoramica
Cosa c’è nella Scatola
Panoramica della Telecamera
Installazione
Operazioni di Base
page
4
5
6
8
12
18
19
20
22
26
32
33
34
36
40
46
47
48
50
54

3
Español
Visión General
Qué hay en la Caja
Resumen de la Cámara
Instalación
Operación Básica
Deutsch
Übersicht
Schachtelinhalt
Kamera Übersicht
Installation
Grundlegender Betrieb
60
61
62
64
68
74
75
76
78
84
page

4
Facebook Instagram Site
1. Overview
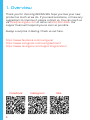
Thank you for choosing REXING! We hope you love your new
product as much as we do. If you need assistance, or have any
suggestions to improve it, please contact us. You can reach us
via [email protected] or call us at (203) 800-4466. Our
support team will respond you as soon as possible.
Always a surprise in Rexing. Check us out here.
https://www.facebook.com/rexingusa/
https://www.instagram.com/rexingdashcam/
https://www.rexingusa.com/support/registration/

5
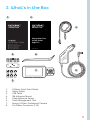
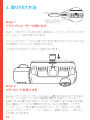
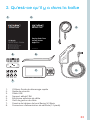
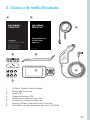
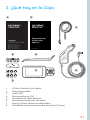
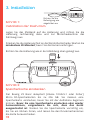
2. What’s in the Box
1. V3 Basic Quick Start Guide
2. Safety Guide
3. USB Cable
4. 3M Adhesive Mount
5. Cable Adhesive Spacer
6. Cable Management Tool
7. Rexing V3 Basic Dashboard Camera
8. Car Power Connector (12ft)
8.
1.
3.
2.
4.
5.
6.
7.
1. Overview

6
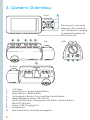
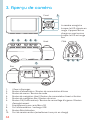
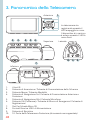
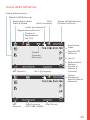
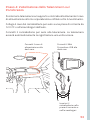
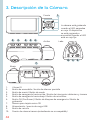
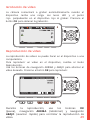
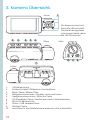
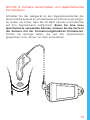
3. Camera Overview
1. 4 IR Lights
2. Power Button / Screen Toggle Button
3. Menu Button / Mode Button
4. Up Navigation Button / Front and Rear Switch Button
5. Down Navigation Button / Mic Button
6. OK (Conrm) Button / Emergency Lock Button / Record Button
7. Micro SD Card Slot
8. Power / USB Charging Port
9. Reset Button
10. Rear Camera Port (currently not support)
Top
7.
2. 4. 5.3. 6.
Bottom
Side
9.10. 8.
Front 1.
The camera is recording
when the LED is ashing
red. The device is charging
or powered on when the
LED is solid red.

7
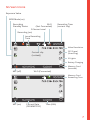
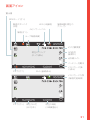
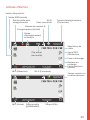
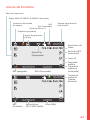
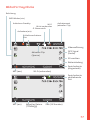
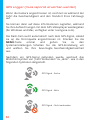
Screen Icons
Recording (on)
G Sensor Level
Wi-Fi
(Not Connected)
Wi-Fi (Connected)
Time (24h)MIC (on)
MIC (o)
Current Date
(DD/MM/YYYY)
Loop Recording
Time
Video Resolution
GPS Signal
(Searching)
IR Lights
Battery Charging
Memory Card
(Inserted)
Memory Card
Remaining Time
Recording Time
(current clip)
Current clip
(Locked))
Recording
Standby Status
WDR Mode (on)
Exposure Value

8
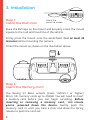
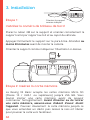
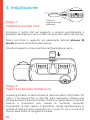
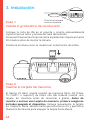
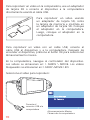
Step 1:
Install the Dash Cam
Place the 3M tape on the mount and properly orient the mount
square to the roof and hood line of the vehicle.
Firmly press the mount onto the windshield. Wait at least 20
minutes before mounting the camera.
Orient the mount as shown on the illustration above.
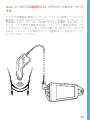
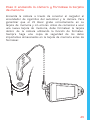
Step 2:
Insert the Memory Card
The Rexing V3 Basic accepts [Class 10/UHS-1 or higher]
Micro SD memory cards up to 256GB. You will need to insert
a memory card before you can begin recording. Before
inserting or removing a memory card, irst ensure
you’ve powered down the device. Gently push the
memory card in until you hear a click, and allow the spring
release to push the card out.
Orient the
mount as shown
3. Installation

9
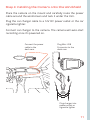
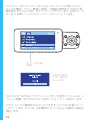
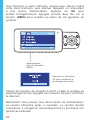
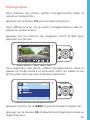
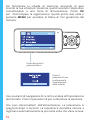
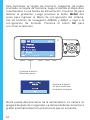
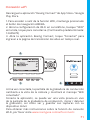
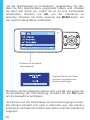
Step 3: Power the Camera and Format the Memory
Card
Power the camera by connecting the charger to the car cigarette
lighter and camera. To ensure the V3 Basic records to your
memory card properly and without error. Before you start
using a new memory card, you must format the card
within the camera using the format function. Always
backup important data stored on the memory card before
formatting.

10
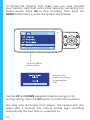
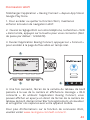
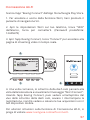
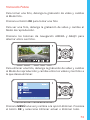
To format the memory card, make sure you have inserted
your memory card, then turn on the device by connecting to a
power source. Press OK to stop recording. Then press the
MENU button twice to enter the System Setup Menu.
Use the UP and DOWN navigation buttons and go to the
Format setting. Press the OK button to confirm the selection.
You may now disconnect from power. The camera will shut
down after 3 seconds. The camera should begin recording
automatically the next time it is powered on.
Press the OK
button to conrm
formatting the
card
Press the Menu
button twice

11
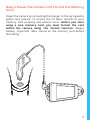
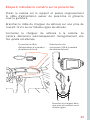
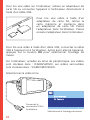
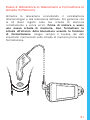
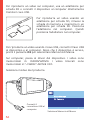
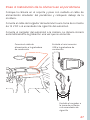
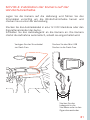
Step 4: Installing the Camera onto the Windshield
Place the camera on the mount and carefully route the power
cable around the windscreen and tuck it under the trim.
Plug the car charger cable to a 12V DC power outlet or the car
cigarette lighter.
Connect car charger to the camera. The camera will auto-start
recording once it’s powered on.
Connect the power
cable to the
dash cam
Plug Mini USB
Connector to the
dash cam
Plug charger into
power outlet or
cigarette lighter

12
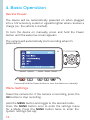
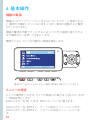
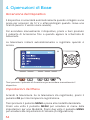
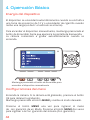
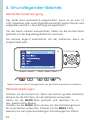
Device Power
The device will be automatically powered on when plugged
into a 12V accessory socket or cigarette lighter when receives a
charge (i.e.: the vehicle is started).
To turn the device on manually, press and hold the Power
button until the welcome screen appears.
The camera will automatically start recording when it’s
powered on.
Menu Settings
Power the camera On. If the camera is recording, press the
OK button to stop recording.
Hold the MENU button and toggle to the desired mode.
Press the MENU button once to enter the settings menu
for a Mode. Press the MENU button twice to enter the
System Settings (Set up).
4. Basic Operation
Press and hold the Power button to turn the device on manually

13
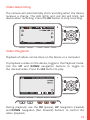
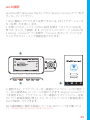
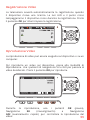
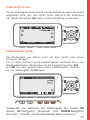
Video Recording
The camera will automatically start recording when the device
receives a charge. The LED lights and red dot will blink red
device when recording. Press the OK button to stop recording.
Video Playback
Playback of videos can be done on the device or a computer.
To playback a video on the device, toggle to the Playback mode.
Use the UP and DOWN navigation buttons to toggle to
the desired video. Press the OK button to play.
During playback, use the OK (pause), UP navigation (rewind)
and DOWN navigation (fast forward) buttons to control the
video playback.

14
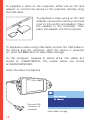
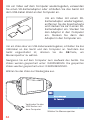
To playback a video using USB cable, connect the USB Cable to
the device and the computer. After the device is powered
on, press the OK button to select Mass Storage.
On the computer, navigate to device drive. The videos are
stored at: \CARDV\MOVIE. The locked videos are stored
at:\CARDV\MOVIE\RO.
Select the video to playback.
To playback a video on the computer, either use an SD card
adapter or connect the device to the computer directly using
the USB cable.
To playback a video using an SD card
adapter, remove the memory card and
insert it into an SD card adapter. Place
the adapter in the computer. Then
place the adapter into the computer.
Connect USB
connector to
computer Select Mass Storage

15
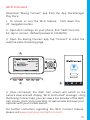
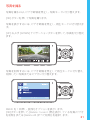
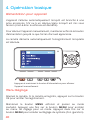
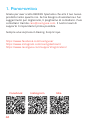
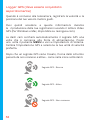
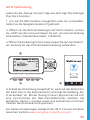
Wi-Fi Connect
Download “Rexing Connect” app from the App Store/Google
Play Store.
1. To access or exit the Wi-Fi feature, hold down the
UP navigation button.
2. Open Wi-Fi settings on your phone, find “SSID” from the
list, tap to connect. (Default password: 12345678)
3. Open the Rexing Connect app, tap “Connect” to enter the
realtime video streaming page.
4. Once connected, the dash cam screen will switch to the
camera view and will display “Wi-Fi Connected” message. Using
the Rexing Connect app, you can view a live preview of the dash
cam screen, start / stop recording, as well as view and save your
captures with your mobile device.
For further instruction regarding the Wi-Fi Connect feature,
please visit www.rexingusa.com/wi-connect/.
1.
2.
3.

16
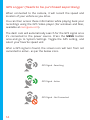
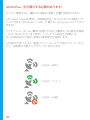
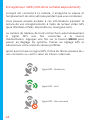
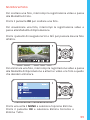
GPS Logger (Needs to be purchased separately)
When connected to the camera, it will record the speed and
location of your vehicle as you drive.
You can then access these information while playing back your
recordings using the GPS Video player (For windows and Mac,
available at rexingusa.com).
The dash cam will automatically search for the GPS signal once
it’s connected to the power source. Press the MENU button
once and go to System Settings. Toggle the GPS setting, and
select your favorite speed unit.
After a GPS signal is found, the screen icon will turn from not
connected to active - as per the below icons.
GPS Signal - Not Connected
GPS Signal - Active
GPS Signal - Searching

17
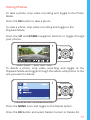
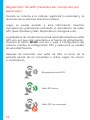
Taking Photos
To take a photo, stop video recording and toggle to the Photo
Mode.
Press the OK button to take a photo.
To view a photo, stop video recording and toggle to the
Playback Mode.
Press the UP and DOWN navigation buttons to toggle through
your photos.
To delete a photo, stop video recording and toggle to the
Playback Mode and toggle through the videos and photos to the
one you want to delete.
Press the MENU once and toggle to the Delete option.
Press the OK Button and select Delete Current or Delete All.

18
1. 概要
REXINGをお選びいただきありがとうございます! 私たちはお客様が
私たちと同じくらいこの新製品を気に入っていただくことを願ってい
ます。サポートが必要な場合、または製品を改善するための提案があ
る場合は、ご連絡ください。[email protected]に電子メールを送
ることができます。当社のサポートチームは、できるだけ早くお客様
からのお問い合わせにお答えいたします。
常にREXINGでサプライズを。こちらから最新情報をチェックしてく
ださい 。
https://www.facebook.com/rexingusa/
https://www.instagram.com/rexingdashcam/
https://www.rexingusa.com/support/registration/
Facebook Instagram ホームページ

19
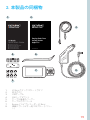
1. 概要 2. 本製品の同梱物
1. V3 Basicクイックスタートガイド
2. 安全ガイド
3. USBケーブル
4. 3Mテープマウント
5. ケーブル接着スペーサー
6. ケーブルガイドツール
7. Rexing ドライブレコーダー V3 Basic
8. 車載シガーライター用コネクター (12フィー
ト)
8.
1.
3.
2.
4.
5.
6.
7.

20
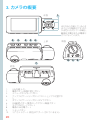
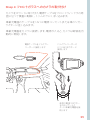
3. カメラの 概 要
1. 4 赤外線ライト
2. 電源ボタン/画面切替えボタン
3. メニューボタン/モードボタン
4. アップナビゲーションボタン/フロントとリアの切替ボタ
ン
5. ダウンナビゲーションボタン/マイクボタン
6. OK(確認)ボタン/緊急ロックボタン/録画ボタン
7. マイクロSDカードスロット
8. 電源/USB充電ポート
9. リセットボタン
10. リアカメラポート (現在はサポートされていません)
上部
7.
2. 4. 5.3. 6.
底面
側面
9.10. 8.
前面 1.
LEDが赤く点滅しているとき
はカメラが録画中です。LED
が赤色に点灯している場合、
機器は充電中または電源が
オンになっています。
La page charge ...
La page charge ...
La page charge ...
La page charge ...
La page charge ...
La page charge ...
La page charge ...
La page charge ...
La page charge ...
La page charge ...
La page charge ...
La page charge ...
La page charge ...
La page charge ...
La page charge ...
La page charge ...
La page charge ...
La page charge ...
La page charge ...
La page charge ...
La page charge ...
La page charge ...
La page charge ...
La page charge ...
La page charge ...
La page charge ...
La page charge ...
La page charge ...
La page charge ...
La page charge ...
La page charge ...
La page charge ...
La page charge ...
La page charge ...
La page charge ...
La page charge ...
La page charge ...
La page charge ...
La page charge ...
La page charge ...
La page charge ...
La page charge ...
La page charge ...
La page charge ...
La page charge ...
La page charge ...
La page charge ...
La page charge ...
La page charge ...
La page charge ...
La page charge ...
La page charge ...
La page charge ...
La page charge ...
La page charge ...
La page charge ...
La page charge ...
La page charge ...
La page charge ...
La page charge ...
La page charge ...
La page charge ...
La page charge ...
La page charge ...
La page charge ...
La page charge ...
La page charge ...
La page charge ...
-
 1
1
-
 2
2
-
 3
3
-
 4
4
-
 5
5
-
 6
6
-
 7
7
-
 8
8
-
 9
9
-
 10
10
-
 11
11
-
 12
12
-
 13
13
-
 14
14
-
 15
15
-
 16
16
-
 17
17
-
 18
18
-
 19
19
-
 20
20
-
 21
21
-
 22
22
-
 23
23
-
 24
24
-
 25
25
-
 26
26
-
 27
27
-
 28
28
-
 29
29
-
 30
30
-
 31
31
-
 32
32
-
 33
33
-
 34
34
-
 35
35
-
 36
36
-
 37
37
-
 38
38
-
 39
39
-
 40
40
-
 41
41
-
 42
42
-
 43
43
-
 44
44
-
 45
45
-
 46
46
-
 47
47
-
 48
48
-
 49
49
-
 50
50
-
 51
51
-
 52
52
-
 53
53
-
 54
54
-
 55
55
-
 56
56
-
 57
57
-
 58
58
-
 59
59
-
 60
60
-
 61
61
-
 62
62
-
 63
63
-
 64
64
-
 65
65
-
 66
66
-
 67
67
-
 68
68
-
 69
69
-
 70
70
-
 71
71
-
 72
72
-
 73
73
-
 74
74
-
 75
75
-
 76
76
-
 77
77
-
 78
78
-
 79
79
-
 80
80
-
 81
81
-
 82
82
-
 83
83
-
 84
84
-
 85
85
-
 86
86
-
 87
87
-
 88
88


REXING 6430225 Mode d'emploi
- Catégorie
- Enregistreurs de disque
- Taper
- Mode d'emploi
dans d''autres langues
- italiano: REXING 6430225 Guida utente
- español: REXING 6430225 Guía del usuario
- Deutsch: REXING 6430225 Benutzerhandbuch
- 日本語: REXING 6430225 ユーザーガイド
Documents connexes
-
REXING V3 Mode d'emploi
-
REXING M1 Pro 2K Dual Camera Mirror Dash Cam 12″ IPS Touch Screen Mode d'emploi
-
REXING S1 Mode d'emploi
-
-
REXING M1 Mode d'emploi
-
REXING V1 Mode d'emploi
-
REXING V1 Max Mode d'emploi
-
REXING V5C Guide de démarrage rapide
-
REXING V5 Mode d'emploi
-