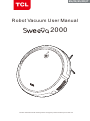
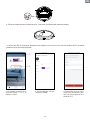
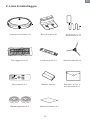
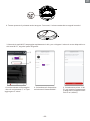
TCL Sweeva 2000 Robot Vacuum Manuel utilisateur
- Catégorie
- Aspirateurs robotiques
- Taper
- Manuel utilisateur

TCL
TCL
Robot Vacuum User Manual
2000
Please read this manual carefully before using this product and keep it for later use
EN/DE/ES/FR/IT


English
Robot Vacuum User Manual
Deutsch
Saugroboter Benutzerhandbuch
Español
Manual del usuario del robot aspirador
Français
Manuel d'utilisation de l'aspirateur robot
Italiano
Manuale d'uso dell'aspirapolvere robot
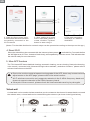
01-18
19-36
37-54
55-72
73-90


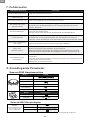
1. Production descripti no....................................
.Packaging list...........................................2
. S ........... . . . ................... . . .3 afety instructions
P ..........................................4. roduct use
M l ......................5. aintenance/replacing consumab es
.....................6. Maintenance and replacement frequency
T ......................................... 7. roubleshooting
8.asic parametersB........... . . . ................... . . . ...
Sweeva2000
Robot vacuum
Catalogue
02
03
04-06
07-14
15-17
17
18
18
.........................................
01
- 01 -
EN

- 02 -
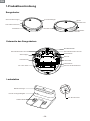
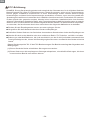
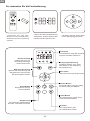
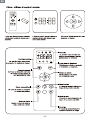
ON
OFF
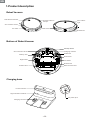
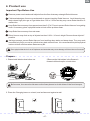
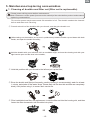
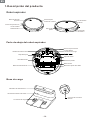
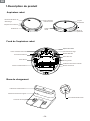
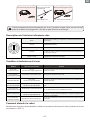
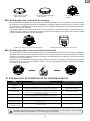
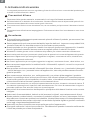
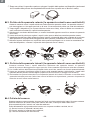
Forward collision
bumper
Start button/indicator
Anti-collision sensor
Air outlet Wall sensor
Dustbin box
Bottom of Robot Vacuum
Omni-direction wheel
Battery door
Right wheel
Power button
Anti-drop sensor
Charging contacts
Side brush
Wheel door
Left wheel
Roller brush
Roller brush Frame
Charging base
Power indicator
Signal emission window
Charging contacts
DC power jack
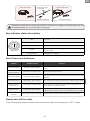
1.Product description
Robot Vacuum
EN
Wi-Fi status
light

- 03 -
EN
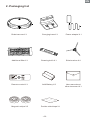
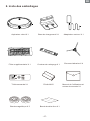
2. Packaging list
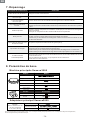
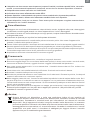
Robot vacuum X 1 Charging base X 1 Power adapter X 1
Additional filter X 1 Cleaning knife X 1 Side brushes X 4
Remote control X 1 AAA Battery X 2 User manual and
other document X 1
Magnetic stripe X 2 Double-sided tape X 1

- 04 -
EN
After reading this manual, please keep it in an easily accessible place.
This symbol is a warning symbo.This symbol warns you of potential hazards that may cause
property damage or serious injury or death.
Warning refers to a situation that, if not avoided, may result in death or serious injury.
Be careful of flashing indicator. It may cause slight or moderate injury if not avoided.
◆
◆
◆
◆
◆
◆
◆
◆
◆
◆
◆
◆
◆
◆
3. Safety instructions
The following precautions guide users on how to use the product safely and correctly to avoid the
risk of injury or damage.
Basic precautions
Warning
◆
◆
◆
◆
◆
Please read this manual carefully to learn about product use and precautions before using the product.
his product is not a toy. Children shall not play with the ppliance. Small T a children and pets should be supervised
when the robot is operating.
Children are prohibited from playing with the product package, otherwise it may cause suffocation.
◆
Please do not insert any body parts(such as hands or feet)under the brushes or wheels of the appliance when
it is operating.
Do not place any objects on the stationary or moving robot. Please do not sit or lean on the appliance.
Do not clean any burning objects.
Do not use the appliance to pick up hard or sharp objects, such as glass sheets, iron nails, etc.
Do not use this appliance in humid or flammable, explosive, corrosive environments, or in exposed power socket.
Do not spray or place flammable materials (gasoline, thinner, etc.), surfactants (cleaners, bathroom items, etc.)
or beverages around the appliance, otherwise it may cause fire or product failure.
Do not pour water, detergent, etc. into the appliance, otherwise it may cause product failure.
This product is for indoor use only. Do not use it outdoors or in a suspended environment without protective fences
to prevent it from falling. At the same time, physical barriers should be used to prevent it from entering the balcony
to ensure safe operation.
To avoid electric shock, do not expose the robot’s electronics, batteries or charging base. It is strictly prohibited for
users to repair the robot themselves. Please hand maintenance work over to qualified maintenance personnel. Do
not operate the robot with wet hands.
Do not clean or maintain the main machine and charging base with the power on.
Please make sure to use original adapters, batteries and other accessories. Do not use third-party accessories.
This product contains batteries. Please do not place the product in water or on fire. Please stop using this product
if there is any battery problem; the battery needs to be recycled separately. and the used battery should be put in
a sealed plastic bag and handled in accordance with local environmental laws and regulations.
Please only use a cloth dampened with clean water to clean the appliance.
Please note that the robot moves by itself. Take care when walking in the area the robot is cleaning to avoid
stepping on it or tripping over it.
This appliance can be used by children aged from 8 years and above Persons with physical, mental or sensory
impairments are prohibited from using or operating this product.
◆
The appliance is not to be used by persons (including children) with reduced physical, sensory or mental
capabilities, or lack of experience and knowledge, unless they have been given supervision or instruction.
The appliance is only to be used with the unit provided.
It must only be supplied at SELV.
This appliance contains batteries that are only replaceable by skilled persons.
For the purposes of recharging the battery, only use the detachable supply unit provided with this appliance.
This device is for indoor use only. It should be clean and maintained regularly. The appliance is only to be
used with the unit provided.
◆
◆
◆
◆
◆
◆
This appliance can be used by children aged from 8 years and above and persons with reduced physical,
sensory or mental capabilities or lack of experience and knowledge if they have been given supervision
or instruction concerning use of the appliance in a safe way and understand the hazards involved.
◆

- 05 -
EN
◆
◆
◆
◆
◆
Reminder
◆
◆
◆
◆
◆
◆
Empty the dustbin frequently and keep it clean. Do not usr the appliance when the dustbin is full.
Keep the main frame and charging terminal of the charging base away from metal objects.
This appliance is specifically designed to prevent floor scratching. however, we still recommend
that you use this appliance to clean a small area of the room before cleaning the entire room to
ensure that the floor is not scratched.
Please purchase and use the original consumables.
Before using this appliance, please check the following items:
Remove fragile or unnecessary objects from the cleaning area, including papers, blinds, or curtain
cords; remove expensive pottery, valuables and inflammables from the floor.
Do not use this appliance in a room where children sleep alone. otherwise, the child may be injured.
Check whether the battery power is sufficient. Please charge it if the power is low.
Please empty the dustbin box if it is full.
Please close the door of the room if you do not want the robot to enter. During cleaning, the robot may
enter other rooms and continue cleaning.
In most cases, the anti-fall sensor will prevent the robot from roller down the stairs. If the sensor is dirty
or used on a carpet or on a reflective / very dark floor, the effect of the sensor will be compromised it is
recommended to set up physical barriers where the robot may fall.
Please do not use the robot on the tassels of a carpet in the folding area, so at to prevent the robot
from being entangled. Avoid cleaning dark and high pile carpets or carpets thicker than 1.02/26mm,
as they may cause robot failure.
Be careful
◆
◆
◆
Carefully protect the power cord, avoid pulling, twisting, being caught by the door, or damage and crushing
caused by other heavy objects; Do not use the appliance if the cord is damaged.
If the charging base is not used for a long time, the power plug should be unplugged from the socket.
Please place the cleaning brush out of the reach of children.
Children shall not play with the appliance. Cleaning and user maintenance shall not be made by
children without supervision
◆
The battery must be removed from the appliance before it is scrapped;
The appliance must be disconnected from the supply mains when removing the battery;
The battery is to be disposed of safely.
◆
◆
◆
This symbol on the device or its packaging indicates: Do not dispose of electrical appliances
as unsorted municipal waste; use separate collection facilities. Contact your local authority
for information regarding the collection systems available. If electrical appliances are disposed
of in landfills or dumps, hazardous substances can leak into the groundwater and get into the
food chain, damaging your health and well-being. When replacing old appliances with new ones,
the retailer is legally obliged to take back your old appliance for disposal at least free of charge.
Notice
NOTE: This equipment has been tested and found to comply with the limits for a Class B digital
device, pursuant to part 15 of the FCC Rules. These limits are designed to provide reasonable
protection against harmful interference in a residential installation. This equipment generates
uses and can radiate radio frequency energy and, if not installed and used in accordance with
the instructions, may cause harmful interference to radio communications. However, there is
no guarantee that interference will not occur in a particular installation. If this equipment does
cause harmful interference to radio or television reception, which can be determined by turning
the equipment off and on, the user is encouraged to try to correct the interference by one or more
of the following measures:
FCC Statement

- 06 -
EN
Reorient or relocate the receiving antenna.
◆
Increase the separation between the equipment and receiver.
◆
Connect the equipment into an outlet on a circuit different from that to which the receiver is
connected.
◆
Consult the dealer or an experienced radio/TV technician for help.
◆
Changes or modifications not expressly approved by the party responsible for compliance
could void the user's authority to operate the equipment.
◆
RF Exposure Warning Statements:
This equipment complies with FCC radiation exposure limits set forth for an uncontrolled
environment. This equipment shall be installed and operated with minimum distance 20cm
between the radiator & body.
(1)This device may not cause harmful interference.
This device complies with Part 15 of the FCC Rules. operation is subject to the follow two conditions:
(2)This device must accept any interference received, including interference that may cause
undesired operation.

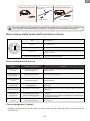
4. Product use
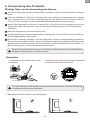
Important Tips Before Use
a
b
d
e
c
Fold tasseled edges of area rugs underneath to prevent tangling Robot Vacuum. Avoid cleaning very
dark-colored high-pile rugs or rugs thicker than 1.02 in / 26 mm as they may cause Robot Vacuum to
malfunction.
Remove power cords and small objects from the floor that may entangle Robot Vacuum.
Keep Robot Vacuum away from spaces lower than 2.87 in/73 mm to prevent Robot Vacuum from getting
stuck. If necessary, place a physical barrier to block off the problem areas.
Keep Robot Vacuum away from wet areas.
Robot Vacuum may climb on top of objects less than 0.63 in / 16 mm in height. Remove these objects if
possible.
f
Anti-drop sensors prevent Robot Vacuum from tumbling down stairs and steep drops. They may work
less effectively if dirty or used on reflective/very dark-colored floors. It is recommended to place physical
barriers to block off areas where Sweeva may fall.
Place physical barriers in front of fireplaces and areas that may cause damage to Robot Vacuum if entered.
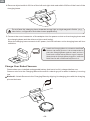
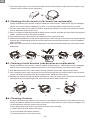
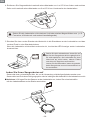
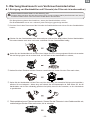
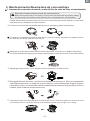
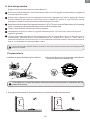
①
②
Before use, the user should remove the foam placed on both sides of the front bumper
ON
OFF
Prepare
3. Place the Charging base on a hard ,level surface and against a wall
1. Please install side brushes before use.
2.Remove the limit stripes in the Sweeva’s
forward collision bumper on both sides
- 07 -
EN

- 08 -
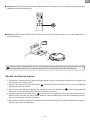
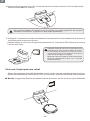
Sweeva has a pre-installed rechargeable battery that has to be fully charged before use.
Sweeva returns to the Charging Base at the end of a cleaning cycle or when its battery is running
low.
Charge Your Robot Vacuum
◆
Method 1: Attach Sweeva to the Charging Base by aligning its charging pins with the charging
pins on the base.
4.Remove objects within 3ft/1m of the left and right side and within 6ft/2m of the front of the
charging base.
Do not face the charging base owards strong light or high magnetic fields. (e.g. ,t
television, refrigerator and other home appliances)
5.Connect the round connector of the adapter into the power socket on the charging base and
the charging base and the other end into a wall outlet.
When the charging base connects to AC power, the LED indicator on the charging ase will turn b
solid blue.
Install the Charging Base in a location that Robot
Vacuum can easily access. It is recommended to
place the Charging Base against a wall, and on a
hard-level surface rather than on rugs or carpets.
Always keep the Charging Base plugged in, otherwise
Robot Vacuum will not automatically return to it.
EN

- 09 -
Method 2: robot vacuum to the Press the charging button on the remote control to return
Charging Base.
Method 3:Press and hold the start button on the machine for 3 seconds to return it to the
charging base.
Turn off the main powers witch if Sweeva will not be used for along period of time.
To preserve the battery’s lifespan, recharge at least once every 6 months.
◆
◆
How to start operating
1. Turn on: Turn on the rocker switch button at the bottom of the robot ( shift the gear to the “ ON ” state )
2. Start: Short press the “ Start button ” on the top of the robot to start the automatic cleaning mode.
3. Pause: When the robot is operating, short press the “start button” on top, the robot will pause
and enter the standby mode.
4. Recharge: Press and hold the “Start button” for three seconds, Once the device beeps once, release
the button, robot vacuum will enter recharge mode, It will automatically find its way back to the charging
base.
5. Sleep: If there is no operation within 90 seconds, the status light will turn off and the robot will enter
sleep mode.
EN

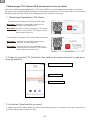
Download TCL Home APP and pair it with robot
You need to download the TCL Home APP with your mobile phone, and pair it with the robot through the
WiFi at home. Control the robot with the TCL Home APP. The process of downloading the APP and pairing
it with the robot it as follows:
1. Download TCL Home APP
Download and install TCL Home APP (ios)
Method1: Scan the QR code below and Install this app.
Method2: Tap the “App Store” icon on your iPhone.
Search “TCL Home” in the search bar.
Download and install TCL Home APP (Android)
Method1: Scan the QR code below and Install this app.
Method2: Tap the “Google Play” icon on your iPhone.
Search “TCL Home” in the search bar.
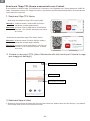
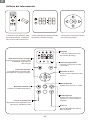
2. Create TCL account (Please refer to the in-app user instructions for more details)
Login
③
Select your region
①
Create account
②
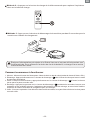
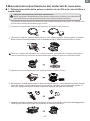
3. Pair the app with the robot
1. Press the rocker switch on the back of the Robot to ensure it is power on, the star / stop button will have
solid blue light;
- 10 -
EN

2. Press and hold the start / stop button for 7 seconds, the Robot will make two beeps.
ON
OFF
3. When the Wi-Fi indicator flashes blue rapidly; to connect your device and to Wi-Fi network,
please follow the steps below:
②
①
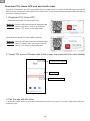
1. As shown in the picture,
click the button ① or ② to
add the "robot”
2. Select device: select
"Sweeva 2000" 3. Select Wi-Fi first, then
enter the password (the
device only supports 2.4
GHz Wi-Fi)
- 11 -
EN

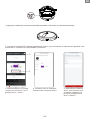
- 12 -
5. After setting the name
of the robot and names of
rooms, click the "Try Now"
button to start using it
③
②
①
6.The main operation
interface on Sweeva
2000 APP
(Notes: The detailed distribution network steps can be operated according to the steps on the app.)
4. When the figure turns 100%,
it means that the robot has been
successfully connected to the
Wi-Fi network
5. More APP functons
The TCL Home APP has scheduled cleaning, automatic cleaning, corner cleaning, fixed-point cleaning,
voice control ( connected with Alexa and Google voice assistant ) and other functions, please refer to
relevant instructions on the APP.
Due to the continuous development and upgrade of the APP, there may be some minor
adjustments on the APP page, please refer to the actual version.
◆
◆
◆
Wi-Fi wireless connection only supports networks in the 2.4GHz frequency band and
does not support networks in the 5GHz frequency band.
If the pair is unsuccessul, please check the Internet status and try to pair again.
4. Reset Wi-Fi
When the robot fails to be connected with the Internet, please press and hold it for 7 seconds before
the Wifi light turns off. Then, it starts to flash slowly, accompanied by a buzzer sound. This indicates that
the robot is ready for new connection.
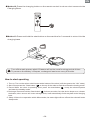
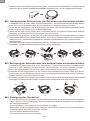
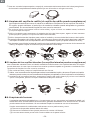
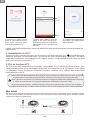
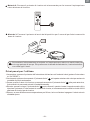
Virtual wall
A virtual wall can be used to isolate areas that you do not want to be cleaned.In areas that do not need
the robot to enter, a virtual wall can be created along the entrance (as shown in the figure below);
EN

- 13 -
3
2
1
44
Robot clean area
Restricted area
Robot clean area
Magnetic stripe
virtual wall
Double-sided tape
Stick the virtual device firmly on the floor. Please do not paste a virtual wall near the
charging based, so as not to affect recharge.
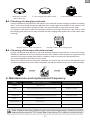
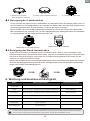
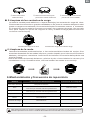
Red
Orange
Error warning
In low battery stat at working mode/standby mode/return to
charging base
Error Tones and Indicators
Roller brush stuck One beep, flash red light Turn off Sweeva s and remove any hair or debris from the roller '
brush.
Side brush failure Two beeps, flash red light Turn off Sweeva s and remove any hair or debris from the side '
brushes.
Forward collision
bumper stuck Four beeps, solid blue light After repairing the stuck forward collision bumperpress the
“ start button ” to restart the robot.
Low battery
warning Seven beeps, solid orange light Manually put the robot to the charging base for charging.
Key indicator status description
How to turn off the robot
Turn off the power button on the bottom side of the robot (turn the gear to “ OFF ” state)
Status
Blue
Red flashes Error warning
Orange flashes The appliance is charging
Buzzer alarm Action
Anti-drop
sensors are dirty Two beeps, solid blue light Clean the anti-drop sensors.
Side wheel failure Three beeps, flash red light
Turn off Sweeva s and remove any hair or debris from the wheel.'
Suction failure Five beeps, flash red light 1.Turn off Sweeva s, then remove and empty the dust collector.'
2.Make sure the suction inlet is not blocked by any hair or debris.
Normal power, can enter working mode/standby mode as
required
EN

- 14 -
EN
How to use the remote controlHow to use the remote control
1.Use two AAA battery for the
remote control. The battery
is included in the package.
2.Before using the remote,
please set the clock time to
be your local time zone.
3.Short press the Start Button
to start cleaning.
Clock setting
Screen
The screen will show icons
corresponds to button pressing
Schedule cleaning
Long press to start or cancel
schedule cleaning
Start button
Edge mode
Robot vacuum will clean along
the wall or furniture
Spot mode
Robot vacuum will clean a
spot in spiral path
Recharge
Robot vacuum will go back
to the charging base
Long press to enter
timing setting mode
Control the direction of
robot vacuum or setting the
clock & schedule cleaning.
Manual control and time setting
Auto mode
Robot vacuum will
clean in auto mode
Vacuum level
Adjust the vacuum level to
quite, standard, and turbo

- 15 -
EN
◆
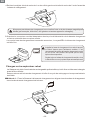
5. Maintenance/replacing consumables
The suction power may become weak if the dustbin is full. The dustbin needs to be cleaned
before and after each cleaning.
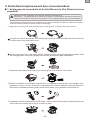
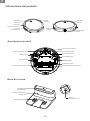
1. Cleaning of dustbin and filter net (filter net is replaceable)
①
Press the buckle of the dustbin with your thumb, and drag the dustbin out.
(When taking out the dustbin, do not turn it upside down) Hold the dustbin up and down with both
hands, and open the dustbin forcefully;
Hold the dustbin with your left hand, tilt it at a suitable angle, and use the cleaning tool with your
right hand to pour out the dust in the dustbin;
Hold this position with your thumb to the left and pull up the filter;
④
⑤
Rinse the dustbin and filter(not frequently, monthly cleaning is recommended), wash for at least
1 minute, and shake off the water drops. Please wait until the dust bin and filter are completely
dried(≥24h) before using it, to ensure their service life.
Filter installation/new filter net replacement: Insert the filter net into the housing slot, and then
fasten the filter downwards until it buckles into place.
⑥
Note: Please turn off the power (bottom rocker switch)of the robot before product maintenance
/replacing consumables.
Please power off the power before maintenance

- 16 -
EN
After closing the upper cover, push the dustbin into the main machine (make sure the dustbin is fully
inserted until it buckles into the right place).
⑦
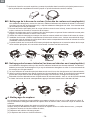
2. Cleaning of roller brush (roller brush are replaceable)
Foreign substances such as hair is easy to adhere to roller brushes. Roller brush may be damaged
if there is too much foreign substances on them. It is recommended to clean them once a week.
Turn the main machine over (with the bottom shell facing upwards), hold the buckle with both hands,
lift it up, and take out the brush cover.
Use your fingers to hold the bearing far away from the switch, and take the other end of the support
holder, and take out the roller brush upwards.
Use cleaning tools to clean the hair and other dirt on the roller brush slot.
Roller brush installation/new roller brush replacement: Insert one end of the roller brush square bearing
seat into the corresponding square slot of the roller brush slot and slide into place (reverse installation
does not work).
Make sure the main brush is aligned properly in the robot and then fasten the roller brush cover
downward.
①
②
③
④
⑤
① ② ③④ ⑤
3. Cleaning of side brushes (side brushes are replaceable)
Foreign substances such as hair is easy to adhere to side brushes. side brushes may be damaged
if there is too much foreign substances on them. It is recommended to clean them once a week.
With the bottom shell of the main machine facing upwards, pull out the side brush forcefully;
Use a cleaning tool to clean up the dirt on the side brush and the slot, and the hair on the side brush
can be cut off with a cleaning tool (dry brushing works, washing doesn’t work).
Reinstall the side brush/new side brush replacement: hold one corner of the side brush, and the other
side against the corresponding buckle, press the side brush down into the slot.
①
②
③
① ② ③
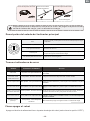
4. Cleaning of sensor
Foreign substances may adhere to the sensors on the bottom and side rear of the robot. If too much
foreign substances adhere to the sensor at the bottom of the robot, the robot may fall off ledges. It is
recommended to clean the sensors once a week.
Please gently wipe each sensor cover with a soft dry cloth, including:
(1) Wall sensors on both sides of the robot;
(2) Front infrared anti-collision sensors;
(3) 3 anti-fall sensors on the bottom side;
◆
◆
◆
La page est en cours de chargement...
La page est en cours de chargement...
La page est en cours de chargement...
La page est en cours de chargement...
La page est en cours de chargement...
La page est en cours de chargement...
La page est en cours de chargement...
La page est en cours de chargement...
La page est en cours de chargement...
La page est en cours de chargement...
La page est en cours de chargement...
La page est en cours de chargement...
La page est en cours de chargement...
La page est en cours de chargement...
La page est en cours de chargement...
La page est en cours de chargement...
La page est en cours de chargement...
La page est en cours de chargement...
La page est en cours de chargement...
La page est en cours de chargement...
La page est en cours de chargement...
La page est en cours de chargement...
La page est en cours de chargement...
La page est en cours de chargement...
La page est en cours de chargement...
La page est en cours de chargement...
La page est en cours de chargement...
La page est en cours de chargement...
La page est en cours de chargement...
La page est en cours de chargement...
La page est en cours de chargement...
La page est en cours de chargement...
La page est en cours de chargement...
La page est en cours de chargement...
La page est en cours de chargement...
La page est en cours de chargement...
La page est en cours de chargement...
La page est en cours de chargement...
La page est en cours de chargement...
La page est en cours de chargement...
La page est en cours de chargement...
La page est en cours de chargement...
La page est en cours de chargement...
La page est en cours de chargement...
La page est en cours de chargement...
La page est en cours de chargement...
La page est en cours de chargement...
La page est en cours de chargement...
La page est en cours de chargement...
La page est en cours de chargement...
La page est en cours de chargement...
La page est en cours de chargement...
La page est en cours de chargement...
La page est en cours de chargement...
La page est en cours de chargement...
La page est en cours de chargement...
La page est en cours de chargement...
La page est en cours de chargement...
La page est en cours de chargement...
La page est en cours de chargement...
La page est en cours de chargement...
La page est en cours de chargement...
La page est en cours de chargement...
La page est en cours de chargement...
La page est en cours de chargement...
La page est en cours de chargement...
La page est en cours de chargement...
La page est en cours de chargement...
La page est en cours de chargement...
La page est en cours de chargement...
La page est en cours de chargement...
La page est en cours de chargement...
La page est en cours de chargement...
La page est en cours de chargement...
La page est en cours de chargement...
La page est en cours de chargement...
-
 1
1
-
 2
2
-
 3
3
-
 4
4
-
 5
5
-
 6
6
-
 7
7
-
 8
8
-
 9
9
-
 10
10
-
 11
11
-
 12
12
-
 13
13
-
 14
14
-
 15
15
-
 16
16
-
 17
17
-
 18
18
-
 19
19
-
 20
20
-
 21
21
-
 22
22
-
 23
23
-
 24
24
-
 25
25
-
 26
26
-
 27
27
-
 28
28
-
 29
29
-
 30
30
-
 31
31
-
 32
32
-
 33
33
-
 34
34
-
 35
35
-
 36
36
-
 37
37
-
 38
38
-
 39
39
-
 40
40
-
 41
41
-
 42
42
-
 43
43
-
 44
44
-
 45
45
-
 46
46
-
 47
47
-
 48
48
-
 49
49
-
 50
50
-
 51
51
-
 52
52
-
 53
53
-
 54
54
-
 55
55
-
 56
56
-
 57
57
-
 58
58
-
 59
59
-
 60
60
-
 61
61
-
 62
62
-
 63
63
-
 64
64
-
 65
65
-
 66
66
-
 67
67
-
 68
68
-
 69
69
-
 70
70
-
 71
71
-
 72
72
-
 73
73
-
 74
74
-
 75
75
-
 76
76
-
 77
77
-
 78
78
-
 79
79
-
 80
80
-
 81
81
-
 82
82
-
 83
83
-
 84
84
-
 85
85
-
 86
86
-
 87
87
-
 88
88
-
 89
89
-
 90
90
-
 91
91
-
 92
92
-
 93
93
-
 94
94
-
 95
95
-
 96
96


TCL Sweeva 2000 Robot Vacuum Manuel utilisateur
- Catégorie
- Aspirateurs robotiques
- Taper
- Manuel utilisateur
dans d''autres langues
Documents connexes
Autres documents
-
Samsung SR8987 Manuel utilisateur
-
-
Samsung SR10F71UB Manuel utilisateur
-
-
Bosch BCR1ACG/02 Mode d'emploi
-
-
-
Samsung SR10J503AU Manuel utilisateur
-
Samsung SR20J9259U Manuel utilisateur
-
ProfiCare PC-BSR 3043 Manuel utilisateur