Nike HRM TRIAX 100 Instructions Manual
- Catégorie
- Moniteurs de fréquence cardiaque
- Taper
- Instructions Manual

1
HRM TRIAX 100
INSTRUCTIONS P.1
MODE D’EMPLOI P.21
HRM Triax 100 Digital
This device complies with part 15 of the FCC Rules. Operation is subject to the following
two conditions: (1) This device may not cause harmful interference, and (2) this device
must accept any interference that may cause undesired operation.
Tested to comply with FCC Standards. For home or office use.
FCC Warning: Changes or modifications not expressly approved by Nike could void
your authority to operate this device under FCC regulations.
© 2001 Nike, Inc. All rights reserved.
HRM100.English.US 7/17/01 10:05 AM Page 1

2
3
CONTENTS
Information is power.
HRM Triax 100 is engineered to provide quick, one-touch access to a variety
of critical information during training and in competition.
Used properly this heart rate monitor will help you train more effectively by
delivering accurate and timely heart rate readings. Whether your goal is to
increase your race performance using advanced training methods, improve
your fitness or just lose weight, you will find this to be a valuable tool.
This manual combines step-by-step operational instructions to help you
identify the programmable features and functions of each specific mode. It
is not the goal of this manual to provide all of the information necessary to
embark upon a training regimen. There are numerous books on the subject,
good information on the Internet, and professional trainers affiliated with
most health clubs. Remember, this heart rate monitor is just one part of an
intelligent exercise plan.
Before beginning any exercise regimen you should consult your physician
or health professional. There are numerous factors to consider when
determining your heart rate limits and exercise intensity level. Some of
these factors include your age, the frequency with which you exercise and
your overall physical fitness.
Throughout this manual look for the symbol to identify especially
useful and important information.
GETTING STARTED 4
THE CHEST TRANSMITTER 6
OPERATING INSTRUCTIONS
MODES 7
MAKING ADJUSTMENTS TO MODE SETTINGS 8
TIME 9
PULSE 9
GRAPH 12
CHRONOGRAPH 13
DATA 15
TIMER 16
ALARM 17
NIKE ELECTROLITE 18
TROUBLESHOOTING 18
SPECIFICATIONS 19
WARRANTY 19
REPAIR CENTERS 40
s
HRM100.English.US 7/17/01 10:05 AM Page 2

5
4
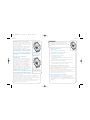
We’ve tried to make this watch as easy as possible to use. Great care has
been taken to make the button functions consistent and clear. Even if you
don’t read the whole manual, you should be able to work your watch if you
understand, in general, how the buttons work.
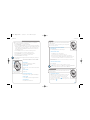
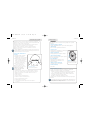
BUTTON FUNCTIONS, LEFT SIDE
ADJUST/RESET
Think of ADJUST/RESET as the button to use when you want to adjust, set
or reset something. For example, if you want to adjust the time, or reset
the chronograph. This button is a little different than the other buttons
because you usually have to press and hold it for a few seconds. This is so
you don’t accidentally reset or adjust something.
MODE/NEXT
The MODE/NEXT button will normally move you to the next mode. When
you are making adjustments or setting something, the MODE/NEXT button
will move you to the next adjustable element.
GETTING STARTED
BUTTON FUNCTIONS, RIGHT SIDE
The buttons on the right hand side of the watch have more functions than the
buttons on the left side. For that reason we’ve included all the details for quick
reference.
START/LAP
You can think of the START/LAP button as the “go”, “plus,” or “move forward”
button. It also functions as an on/off switch in some modes.
• In TIME mode, press to turn the chime on and off.
• In CHRON mode, press to start the chronograph and mark lap completion.
• In TIMER mode, press to start the countdown timer.
• In PULSE mode, press to view time of day.
• In GRAPH mode, press to move forward through the list of data points.
• In DATA mode, press to move through the list of data points for each run.
• In ALARM mode, press to turn the alarm on and off.
• When making adjustments, press to advance the blinking element.
STOP
The STOP button is the opposite of the START/LAP button. Think of it as the
“stop,” “minus,” or “go backwards” button. This button will also allow you to
alternate selections in some modes.
• In TIME mode, press and hold to select time zone 1 or 2.
• In CHRON mode, press to stop the chronograph and save run data to memory.
• In TIMER mode, press to stop the countdown timer.
• In PULSE mode, press to select zone 1 or 2.
• In GRAPH mode, press to move backwards through the list of data points.
• In ALARM mode, press to select alarm 1 or 2.
• In DATA mode, press to select run number.
• When making adjustments, press to reverse the blinking element.
ELECTROLITE BUTTON
The ELECTROLITE button is used to turn on the light.
If you press and hold the ELECTROLITE button, you can make the light come on
at the press of any button. It’s great for night use. We call it auto-Electrolite.
S
T
A
R
T
/
L
A
P
T
E
S
E
R
/
T
S
U
J
D
A
T
X
E
N
/
E
D
O
M
S
T
O
P
STOP
START/LAP
MODE/NEXT
ADJUST/RESET
ELECTROLITE
HRM100.English.US 7/17/01 10:05 AM Page 4

6
7
The chest transmitter enables your watch to provide information about your
heart rate. You can always use your watch without the transmitter as a
multi-function sport timepiece.
The chest transmitter will function automatically as long as it is being worn
correctly and is within several feet of the watch.
The grooved part of the chest transmitter houses sensors that time
electrical pulses in your heart to determine heart rate. This information is
then transmitted to your watch.
HRM Triax 100 will work best if both sensors on the grooved part of the
chest strap are wet. A few drops of water or saliva should be sufficient to
cover the sensors.
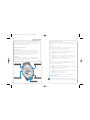
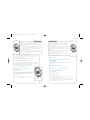
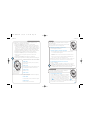
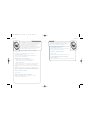
POSITIONING THE CHEST
TRANSMITTER
1: Attach the adjustable strap to the
transmitter.
2: Wet the grooved electrodes with
saliva or water.
3: Adjust the chest strap to fit
comfortably and securely. It should
be tight enough that it won’t slip
when you exercise.
4: Position the chest transmitter
below the breast so that it sits on
your rib cage.
Note: The chest strap is most effective when
worn directly against the skin.
Triax HRM 100 Digital (North American model only)
The strap and watch use a digital link to improve signal strength. If you
change the watch battery or reset the watch by pressing all 4 buttons,
you will need to "ID" the watch to the chest transmitter.
Follow these steps:
1. Remove the chest transmitter battery.
2. Replace the chest transmitter battery.
3. Go to PULSE mode on the watch.
4. Wait at least 30 seconds.
5. The blinking heart icon indicates a successful link. Repeat if necessary.
The various features of your watch are grouped into 7 different modes.
CYCLE TO A MODE
Press MODE/NEXT repeatedly until desired mode appears
TIME
Time and calendar information for two time zones
PULSE
View pulse, set and view zone training
information
GRAPH
View graphic display of heart rate
CHRON (CHRONOGRAPH)
Measure and record lap and split times
DATA
Recall lap, split and heart rate data
TIMER
5-segment countdown timer
ALARM
Features 2 alarms
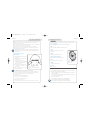
BATTERY CHANGE
If your heart rate display becomes erratic or stops it may be necessary to
replace the battery in the chest transmitter.
1: Open the battery lid on the chest transmitter with a coin by turning
counter-clockwise.
2: Insert a CR2032, 3V lithium battery with the writing facing you. Take
care not to touch the 2 contacts.
3: Replace the battery lid.
The chest transmitter is water resistant. Wipe dry after use.
For best results, Nike’s authorized center should change
the watch battery. See back page for contact information.
OPERATING INSTRUCTIONS
CYCLE TO
A MODE
Press MODE/NEXT to select
desired mode.
T
X
E
N
/
E
D
O
M
S
T
O
P
S
T
A
R
T
/
L
A
P
T
E
S
E
R
/
T
S
U
J
D
A
S
T
A
R
T
/
L
A
P
T
E
S
E
R
/
T
S
U
J
D
A
T
X
E
N
/
E
D
O
M
S
T
O
P
MODES
THE CHEST TRANSMITTER
CHEST TRANSMITTER
Fasten the chest transmitter snugly as
shown.
HRM100.English.US 7/17/01 10:05 AM Page 6

9
8
TIME
In TIME mode you can set the time and calendar information
for two time zones.
You can also set a chime to sound at the press of any button,
and on the hour, every hour.
SET TIME OF DAY AND CALENDAR
INFORMATION
See Making Adjustments to Mode Settings.
CHANGE TIME ZONES
1. In TIME mode, press and hold STOP.
The alternate time zone information appears.
2. Release the button when time zone indicator stops flashing.
3. Follow instructions in Making Adjustments to Mode Settings to set
the time and calendar information for the alternate time zone.
Hold STOP for fewer than 3 seconds for a brief display of alternate time
zone information.
TURN THE CHIME ON/OFF
Press START/LAP.
The toggles on and off each time the button is pressed.
Most people like easy access to TIME mode. Press and hold MODE/NEXT
for one second in any mode for quick return to TIME mode.
S
T
A
R
T
/
L
A
P
T
I
X
E
/
T
S
U
J
D
A
T
X
E
N
/
E
D
O
M
S
T
O
P
Within each mode there are various settings which you can adjust. All
these settings are adjusted in a similar way.
1: Press MODE/NEXT to select the desired mode.
2: Press and hold ADJUST/RESET for two seconds. A message like “HOLD to
ADJUST” or “HOLD to SET” is displayed. An element begins blinking. This
is the adjustable element. The symbols “+” and “-” will appear on the
display, indicating that START/LAP and STOP will increase or decrease
the adjustable element.
3: Press START/LAP to increase or advance the flashing element.
4: Press STOP to decrease or reverse the flashing element.
5: Press MODE/NEXT to cycle to the next adjustable element.
6: Repeat steps 3-5 until all adjustable elements are set.
7: Press ADJUST/RESET to save changes.
When adjusting mode settings the bottom line usually tells you what you
are adjusting!
ADJUSTABLE ELEMENTS IN EACH MODE
TIME MODE
Seconds, Hours, Minutes, Day, Month,
Day/Month, 12/24 and Year.
PULSE MODE
High Zone Limit, Low Zone Limit and Zone Alarm
on/off.
GRAPH MODE
Sample Time.
CHRONOGRAPH MODE
Recovery Timer on/off, Lap/SPLIT and LAP/Split.
TIMER MODE
Seconds, Minutes, Hours and Segment Number.
ALARM MODE
Hours, Minutes and Time Zone.
T
X
E
N
/
E
D
O
M
S
T
O
P
S
T
A
R
T
/
L
A
P
T
E
S
E
R
/
T
S
U
J
D
A
S
T
A
R
T
/
L
A
P
T
E
S
E
R
/
T
S
U
J
D
A
T
X
E
N
/
E
D
O
M
S
T
O
P
ADJUST
Press and hold ADJUST/RESET
to adjust mode settings.
MAKING ADJUSTMENTS TO MODE SETTINGS
PULSE MODE DISPLAY
HRM Triax 100 features a graphic display of where your
heart rate is within your exercise zone. If your heart
rate is higher than your upper limit the word "HI"
appears in the display with a . If your heart rate is
lower than your lower limit the word “LO” appears in the
display with an .
In PULSE mode you can view your heart rate and access zone
training information.
S
T
A
R
T
/
L
A
P
T
E
S
E
R
/
T
S
U
J
D
A
T
X
E
N
/
E
D
O
M
S
T
O
P
PULSE MODE
HRM100.English.US 7/17/01 10:05 AM Page 8

10
11
Press STOP to select a zone.
Follow instructions in Making Adjustments to Mode Settings to set zone
limits and activate and deactivate the audible alarm for the alternate
training zone.
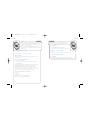
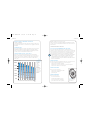
ZONE TRAINING
ABOUT ZONE TRAINING
You can set an upper and lower heart rate limit and control the intensity
of your workout so that your heart rate stays within that limit. This is
called “Zone Training.” Zone training allows you to pace yourself more
accurately, avoid over-exertion and in general have a more targeted and
therefore more productive workout.
Zone training is just one part of a structured fitness regimen. It is very
important that you train in a zone that is appropriate for your fitness
level and goals. Consult a doctor or health professional in order to
determine the best training zone for you.
HIGH INTENSITY
Exercise at high intensity only if you are in excellent physical condition.
Exercise at this intensity to:
• increase your peak performance.
• accustom your body to competition-level performance.
• increase your tolerance to lactic acid.
MEDIUM INTENSITY
Exercise at this intensity to:
• increase cardiovascular health.
• improve endurance.
• lose weight.
LOW INTENSITY
Exercise at this intensity:
• after an injury.
• when beginning an exercise regimen.
• during recovery sessions.
• to improve overall health.
ALTERNATE DISPLAY
Press START/LAP.
The default display shows your high and low limits. You can briefly view
the time of day and current zone number by pressing START/LAP.
AUDIBLE ZONE ALARM
You can set an audible alarm to sound when you are outside of your
training zone. Press any button to silence the alarm.
Follow directions in Making Adjustments to Mode Settings to set zone
limits and activate and deactivate the audible alarm.
SWITCH BETWEEN ZONE 1 AND ZONE 2
Your heart rate monitor allows you to set two different training zones. In
the course of a workout you may want to train in one zone for warm-up
and cool down and train in a different zone for the main portion of the
workout. Or, you may train in one zone for a few days of the week and in
a different zone on other days.
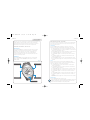
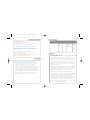
AGE
20 25 30 35 40 45 50 55 60 65 70
HEART RATE / BPM
200
180
160
140
120
100
80
HIGH INTENSITY
M
ED
IU
M
IN
TEN
SITY
LOW
INTENSITY
PERFORMANCE
GRAPH
This graph is for
general
reference only.
Appropriate
intensity levels
will vary
depending on
your physical
fitness, which
sport you
participate in
and what your
goals are.
S
T
A
R
T
/
L
A
P
T
E
S
E
R
/
T
S
U
J
D
A
T
X
E
N
/
E
D
O
M
S
T
O
P
PULSE MODE
Training zone display.
HRM100.English.US 7/17/01 10:05 AM Page 10

13
12
RESET THE BAR GRAPH
The bar graph will display your heart rate as soon as the watch begins
receiving a signal. You may want to reset the bar graph at the very
beginning of an exercise session.
Press and hold ADJUST/RESET until the bar graph disappears.
DETERMINE SAMPLING INTERVAL
In order to adjust the sampling time you must first reset the bar graph.
Press and hold ADJUST/RESET until the bar graph disappears. Continue to
hold ADJUST/RESET as “HOLD to SETUP” is displayed.
Follow directions in Making Adjustments to Mode
Settings to select the sample time.
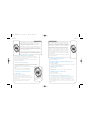
VIEW EXACT VALUE OF EACH BAR IN
THE GRAPH
Press STOP or START/LAP.
The number at the base of the display represents your
heart rate at the beginning of each sample time. The
number at the top shows the time elapsed since the
sample was taken.
After 10 seconds the display returns to the current
heart rate and bar graph display.
In GRAPH mode you can view a graphic representation of your
heart rate over a period of time which you determine. This
feature provides you with a quick and simple view of your
heart rate trend.
The bar graph can represent up to 28 data points. If you set a
sample time of 1 minute, the bar graph can show your heart
rate over the last 28 minutes. You can set a sampling time
from 10 seconds to 10 minutes.
You can also view the exact value of each bar in the graph.
The value of each bar in the graph represents your heart rate
at the beginning of each sample time.
S
T
A
R
T
/
L
A
P
T
E
S
E
R
/
T
S
U
J
D
A
T
X
E
N
/
E
D
O
M
S
T
O
P
GRAPH MODE
S
T
A
R
T
/
L
A
P
T
E
S
E
R
/
T
S
U
J
D
A
T
X
E
N
/
E
D
O
M
S
T
O
P
GRAPH DISPLAY
Example of the bar graph
display.
START MEASURING A LAP
Press START/LAP.
MARK LAP COMPLETION AND START NEXT LAP
MEASUREMENT
Press START/LAP.
Lap/split time appears for 5 seconds, then the display returns to the
overall time.
STOP TIME MEASUREMENT
Press STOP.
The counting stops. The lap time and split time appear.
RESTART TIME MEASUREMENT
Press START/LAP.
The counting continues.
SAVE DATA FOR A RUN
The chronograph must be stopped to save data for a run. If the
chronograph is running press STOP.
Press and hold STOP for 2 seconds. “HOLD to NEXT” is displayed. The
chronograph resets and the data is stored in memory. Your next times
will be stored as part of a new run.
In CHRONOGRAPH mode you can view heart rate, and
measure and record the lap, split and heart rate data for
individual runs. Runs are organized by date. Recorded data is
accessed in DATA mode.
Lap and split times are displayed simultaneously. The primary
display is centrally located and larger than the secondary
display. You can select whether lap or split time occupies the
primary display.
Lap time is the time required to go once around a track, or
complete a segment of a run. Split time is the total time
from the beginning of the run.
CHRONOGRAPH mode also features a heart rate recovery timer.
S
T
A
R
T
/
L
A
P
T
E
S
E
R
/
T
S
U
J
D
A
T
X
E
N
/
E
D
O
M
S
T
O
P
CHRONOGRAPH
HRM100.English.US 7/17/01 10:05 AM Page 12

14
RESET CHRONOGRAPH
You can reset the chronograph without saving any
data. The chronograph must be stopped to reset. If
the chronograph is running press STOP.
Press and hold ADJUST/RESET for 2 seconds. “HOLD
to CLEAR” is displayed. The chronograph resets.
SWITCH THE PRIMARY DISPLAY BETWEEN
LAP AND SPLIT TIME
Follow directions in Making Adjustments to Mode
Settings to adjust the chronograph display. The
chronograph must be stopped and reset to adjust
the display.
USING THE RECOVERY TIMER
The rate at which your heart rate returns to a
predetermined level after exercise is a good
indicator of physical fitness. As your fitness
improves your heart rate should decrease more
rapidly after exercise.
Your HRM Triax 100 will automatically begin
measuring the time it takes for your heart rate to
reach your predetermined recovery point as soon as
you stop the chronograph. Your heart rate recovery
time is accessed in DATA mode.
DETERMINE A HEART RATE RECOVERY
POINT
There are various formulas you can use to determine your heart rate
recovery point, depending on your fitness goals and the details of your
training regimen.
In general, your heart rate recovery point should be somewhere below your
normal exercise heart rate and above your resting heart rate. As long as
you consistently use the same recovery point you can make valid
comparisons of recovery time.
Follow directions in Making Adjustments to Mode Settings to activate or
de-activate the recovery timer, and to select a heart rate recovery point.
15
In DATA mode you can recall timing and heart rate data for
saved runs.
The HRM Triax 100 has a 100 lap memory, 32 run memory.
SELECT A RUN
Press STOP.
The run number and date of the run are displayed.
VIEW DATA POINTS
Press START/LAP repeatedly.
The following information is displayed:
• Date of run and run number
• Lap and split times and heart rate at each lap count
• Minimum and maximum heart rate for each run
• Best lap and average lap time
• Total time in zone and heart rate recovery time (if activated)
ERASE DATA FOR AN INDIVIDUAL RUN
Press the STOP button to select the run that you want to erase.
Press and hold ADJUST/RESET. “HOLD to CLEAR” flashes and you will hear
a confirmation tone to indicate that the data for the selected run has
been deleted.
Note: When you delete a run the next run takes its place. For example, if you delete
RUN 3 from memory, RUN 4 replaces RUN 3. If DATA memory becomes full during a run,
delete that run and begin a new run.
ERASE ALL DATA
Press and hold ADJUST/RESET button for an additional 4 seconds after
erasing an individual run.
You will hear a continuous tone. “HOLD to CLEAR ALL” flashes in the
display. After 7 seconds, [-- --] indicates that all data has been erased.
S
T
A
R
T
/
L
A
P
T
E
S
E
R
/
T
S
U
J
D
A
T
X
E
N
/
E
D
O
M
S
T
O
P
DATA MODE
RESET
WITHOUT SAVE
Press and hold ADJUST/RESET to
reset without saving any data.
T
X
E
N
/
E
D
O
M
S
T
O
P
S
T
A
R
T
/
L
A
P
T
E
S
E
R
/
T
S
U
J
D
A
S
T
A
R
T
/
L
A
P
T
E
S
E
R
/
T
S
U
J
D
A
T
X
E
N
/
E
D
O
M
S
T
O
P
RESET
WITH SAVE
Press and hold STOP to reset
and save run data.
T
X
E
N
/
E
D
O
M
S
T
O
P
S
T
A
R
T
/
L
A
P
T
E
S
E
R
/
T
S
U
J
D
A
S
T
A
R
T
/
L
A
P
T
E
S
E
R
/
T
S
U
J
D
A
T
X
E
N
/
E
D
O
M
S
T
O
P
HRM100.English.US 7/17/01 10:05 AM Page 14

SET AN ALARM
See Making Adjustments to Mode Settings.
Note: Each alarm is active only in the time zone for which it is set.
ADVANCE TO THE NEXT ALARM
Press STOP.
The next alarm number appears at the bottom of the display.
TURN THE ALARM ON AND OFF
Press START/LAP.
The word ON toggles off and on each time you press the button.
In ALARM mode you can set two distinct alarms that will
sound for 20 seconds, or until any button is pressed.
S
T
A
R
T
/
L
A
P
T
E
S
E
R
/
T
S
U
J
D
A
T
X
E
N
/
E
D
O
M
S
T
O
P
ALARM
16
TIMER mode features a 5-segment countdown timer. You can
use this as an interval training tool by exercising at a higher
intensity for a certain period of time, followed by a recovery
interval at a lower intensity level.
You can set up to 5 timed segments for your workout. As
each timer segment is completed the next begins. Set unused
segments to zero.
SELECT A TIMER
Press STOP.
The selected timer will be the first to count down.
SET THE TIMERS
Follow directions in Making Adjustments to Mode Settings to set each
countdown timer.
START THE COUNTDOWN TIMER
1. Set any or all 5 segments.
2. Press STOP to advance to the segment you want to start with.
3. Press START/LAP.
Countdown begins. When the countdown reaches zero, the timer beeps,
and the countdown begins for the next segment. The number of
completed timer cycles appears below the countdown display.
NOTE: When the countdown is complete for all 5 segments, the cycle repeats. For
example, when segment 1 is completed, segment 2 will begin. If segments 3, 4 and 5
are set to zero, segment 1 will begin at the completion of segment 2.
STOP THE TIMER DURING COUNTDOWN
Press STOP.
RESET TIMER
When timer is stopped, press ADJUST/RESET.
Display returns to the original starting point.
S
T
A
R
T
/
L
A
P
T
I
X
E
/
T
S
U
J
D
A
T
X
E
N
/
E
D
O
M
S
T
O
P
TIMER
17
HRM100.English.US 7/17/01 10:05 AM Page 16

ILLUMINATE THE DISPLAY
You can illuminate the display by pressing ELECTROLITE.
Activating the auto-Electrolite display feature illuminates the display at the
press of any button.
ACTIVATE THE AUTO-ELECTROLITE FEATURE
Press and hold ELECTROLITE for about 2 seconds.
The symbol appears. The Electrolite display will illuminate at the press of
any button.
DE-ACTIVATE THE AUTO-ELECTROLITE FEATURE
Press and hold ELECTROLITE for about 2 seconds. The symbol disappears.
Note: To conserve battery life the auto-Electrolite feature will automatically turn off after
12 hours.
18
NIKE ELECTROLITE DISPLAY
TROUBLESHOOTING
WHAT IF THERE IS NO HEART RATE READING OR IT IS
EXTREMELY ERRATIC?
• You may not have wet the sensors enough. If you are wearing the chest
transmitter over clothing, try getting the clothing wet also.
• Sources of electromagnetic fields like appliances, computers and power
lines can cause interference. Other heart rate monitors can cause
interference also.
• You may not have the chest transmitter positioned correctly. Make sure
the sensors (the grooved part) are flat against the skin.
• The battery on the chest transmitter may be weak. The battery should
last for about 16 months if used one hour per day.
19
WARRANTY
One Year Limited Warranty
Your NIKE watch is warranted to be free of defects in materials or
workmanship, under normal use, for a period of one year from the
date of original retail purchase. This limited warranty excludes
the battery, crystal, strap, or damage resulting from improper care
or handling, accidents, modification, unauthorized repairs, or
normal wear.
Return the defective watch and the store receipt to the place of
purchase. If there is a covered defect, the defective parts or watch
will be repaired or replaced, at Nike’s option, with the same
product (if available) or a similar product of equal price.
This limited warranty is in lieu of all other express or implied
warranties, and excludes refund of the purchase price. In no event
shall NIKE be liable for direct, indirect, incidental, or
consequential damages arising out of the use of the watch, and
any recovery is limited to the purchase price. No other person or
company is authorized to change this limited warranty, and your
dealer is solely responsible for any other warranties.
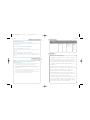
HRM Triax 100
5ATM CRYSTAL = Mineral Glass
CASE = Plastic Resin
CASEBACK = Stainless Steel
STRAP = Polyurethane
BUCKLE = Stainless Steel
Watch:
CR2032
Battery life:
Approximately
1-2 years.
Chest
Transmitter:
Battery life:
16 months at
1 hour/day
SPECIFICATIONS
MODEL
Materials
H
2
0
Resistance
Battery
Type
Timer = 23:59'59"
Chrono = 23:59'59"
Mode
Limits
HRM100.English.US 7/17/01 10:05 AM Page 18

20
HRM100.English.US 7/17/01 10:05 AM Page 20

21
NIKE TRIAX 100
INSTRUCTIONS P.1
MODE D’EMPLOI P.21
HRM Triax 100 Digital
Ce mécanisme est soumis à la section 15 des Règles FCC. Son fonctionnement est sujet
aux deux conditions suivantes : (1) Ce mécanisme ne doit pas causer d’interférence
dangereuse, et (2) ce mécanisme doit accepter toute interférence qui pourrait causer un
fonctionnement non souhaité.
Testé pour conformité aux normes FCC. A utiliser à domicile ou au bureau.
Avertissement FCC : Toute altération ou modification non expressément approuvée par
Nike risquerait d’annuler votre autorité à faire fonctionner ce mécanisme en vertu des
réglementations FCC.
© 2001 Nike, Inc. Tous droits réservés.
HRM100.French.US 7/17/01 10:08 AM Page 21

22
23
TABLE DES MATIÈRES
L'information fait la puissance.
La montre HRM Triax 100 vous permettra d'accéder rapidement aux
informations dont vous avez besoin pendant l'entraînement ou la compétition.
Utilisée correctement, la fonction de surveillance de la fréquence cardiaque
vous aidera à vous entraîner plus efficacement. Que votre objectif soit
d'améliorer vos performances à l'aide de méthodes d'entraînement poussées,
d'améliorer votre condition physique, ou tout simplement de perdre du poids,
vous trouverez cette montre très pratique.
Ce mode d’emploi contient des instructions détaillées qui vous aideront à
identifier les fonctions programmables et les fonctions de chaque mode. Le
but de ce document n'est pas de fournir toutes les informations nécessaires à
un programme d'exercice physique particulier. De nombreux ouvrages existent
à ce propos et vous pourrez également trouver de telles informations sur
Internet ou auprès d'un conseiller sportif dans un club de sport. N'oubliez pas
que cet instrument de surveillance de la fréquence cardiaque n'est qu'un
élément de votre programme d'exercice physique.
Consultez votre médecin ou un professionnel de la santé avant
d'entreprendre un effort physique. De nombreux facteurs sont à considérer
lors de l'établissement de limite de la fréquence cardiaque et du niveau
d'intensité des exercices. Ces facteurs sont – par exemple – votre âge, la
fréquence de vos activités physiques, et votre condition physique générale.
Le symbole identifie les informations particulièrement importantes et
pratiques.
PRISE EN MAIN 24
ÉMETTEUR DE POITRINE 26
INSTRUCTIONS
MODES 27
RÉGLAGE DES PARAMÈTRES 28
HEURE (TIME) 29
POULS (PULSE) 29
GRAPHIQUE (GRAPH) 32
CHRONOMÈTRE (CHRONOGRAPH) 33
DONNÉES (DATA) 34
COMPTE À REBOURSTIMER (TIMER) 34
ALARME (ALARM) 35
NIKE ELECTROLITE 36
DÉPANNAGE 36
SPÉCIFICATIONS 37
GARANTIE 37
CENTRES DE RÉPARATION 40
s
HRM100.French.US 7/17/01 10:08 AM Page 22

25
24
Nous avons conçu cette montre de façon à la rendre aussi facile que possible
à utiliser. Nous avons essayé de rendre les fonctions aussi cohérentes que
simples. Vous devriez pouvoir faire fonctionner votre montre sans lire tout le
mode d'emploi si vous comprenez les fonctions liées à chaque bouton.
FONCTIONS DES BOUTONS, CÔTÉ GAUCHE
ADJUST/RESET
Le bouton ADJUST/RESET est le bouton que vous devez utiliser pour régler,
programmer, ou réinitialiser, un élément. Par exemple, il vous permet de
régler l'heure ou de réinitialiser le chronomètre. La particularité de ce
bouton est qu'il doit généralement rester enfoncé pendant quelques
secondes. Cette différence fait que vous ne risquerez pas de régler ou de
réinitialiser un élément par erreur.
MODE/NEXT
Le bouton MODE/NEXT permet généralement de passer au mode suivant.
Lors des réglages, le bouton MODE/NEXT permet de passer à l'élément
réglable suivant.
PRISE EN MAIN
FONCTION DES BOUTONS, CÔTÉ DROIT
Les boutons du côté droit de la montre sont associés à un plus grand nombre
de fonctions que ceux du côté gauche. C'est pour cette raison que nous en
avons inclus tous les détails.
START/LAP
Le bouton START/LAP permet de démarrer, ou d'avancer. Il fonctionne
également comme bouton d'activation/désactivation dans certains modes.
• En mode TIME, appuyez sur ce bouton pour activer/désactiver le carillon.
• En mode CHRON, appuyez sur ce bouton pour démarrer le chronomètre et
marquer la fin d'un temps de segment.
• En mode TIMER, appuyez sur ce bouton pour démarrer le compte à rebours.
• En mode PULSE, appuyez sur ce bouton pour afficher l'heure.
• En mode GRAPH, appuyez sur ce bouton pour avancer dans la liste des
données.
• En mode DATA, appuyez sur ce bouton pour avancer dans la liste des
données pour chaque course.
• En mode ALARM, appuyez sur ce bouton pour activer/désactiver l'alarme.
• Au cours des réglages, appuyer sur ce bouton pour faire avancer l'élément
clignotant.
STOP
Le bouton STOP a la fonction inverse du bouton START/LAP. Il permet
d'arrêter, ou de revenir en arrière. Ce bouton vous permettra également de
passer entre différentes sélections dans certains modes.
• En mode TIME, appuyez sur ce bouton et maintenez-le enfoncé pour
changer de fuseau horaire.
• En mode CHRON, appuyez sur ce bouton pour arrêter le chronomètre et
enregistrer les données en mémoire.
• En mode TIMER, appuyez sur ce bouton pour arrêter le compte à rebours.
• En mode PULSE, appuyez sur ce bouton pour sélectionner la zone 1 ou 2.
• En mode GRAPH, appuyez sur ce bouton pour reculer dans la liste des
données.
• En mode ALARM, appuyez sur ce bouton pour sélectionner l'alarme 1 ou 2.
• En mode DATA, appuyez sur ce bouton pour sélectionner le numéro de
segment.
• Au cours des réglages, appuyer sur ce bouton pour faire reculer l'élément
clignotant.
ELECTROLITE
Le bouton ELECTROLITE permet d'éclairer l'écran.
Vous pouvez appuyer sur le bouton ELECTROLITE et le maintenir enfoncé pour
permettre l'éclairage lors d'une pression sur n'importe quel bouton. Cette
fonction Electrolite automatique est très pratique la nuit.
S
T
A
R
T
/
L
A
P
T
E
S
E
R
/
T
S
U
J
D
A
T
X
E
N
/
E
D
O
M
S
T
O
P
STOP
START/LAP
MODE/NEXT
ADJUST/RESET
ELECTROLITE
HRM100.French.US 7/17/01 10:08 AM Page 24

26
27
L'émetteur de poitrine est l'élément relayant les informations de fréquence
cardiaque à votre montre. Sans cet émetteur, votre montre peut tout de même
être utilisée comme tout autre montre de sport.
L'émetteur de poitrine fonctionne automatiquement, à condition qu'il soit
correctement porté et à une distance correcte de la montre.
La partie rainurée de l'émetteur contient des capteurs détectant les
impulsions électriques de votre cœur. Ces informations sont ensuite
transmises à votre montre.
La montre HRM Triax 100 fonctionnera encore mieux si les deux capteurs de
la partie rainurée de l'émetteur sont mouillés. Quelques gouttes d'eau ou de
salive devraient suffire à couvrir les capteurs.
POSITION DE L'ÉMETTEUR DE
POITRINE
1: Attachez la bande à l'émetteur.
2: Humidifiez les électrodes de
quelques gouttes d'eau ou de salive.
3: Réglez la bande afin d'obtenir une
position confortable et néanmoins
stable. Cette bande devrait être
assez serrée afin de ne pas glisser
pendant votre entraînement.
4: Placer l'émetteur sous le sein,
contre la cage thoracique.
Remarque : l'émetteur est plus efficace
lorsque porté directement contre la peau.
HRM Triax 100 numérique
(modèle pour l’Amérique du
Nord uniquement)
La bande et la montre utilisent un lien numérique destiné à renforcer le
signal. Si vous changez la pile de la montre ou réinitialisez la montre en
appuyant sur les 4 boutons, il vous faudra « identifier » la montre à
l’émetteur de poitrine.
Procédez comme suit :
1. Enlevez la pile de l’émetteur de poitrine.
2. Remplacez la pile de l’émetteur de poitrine.
3. Passez en mode PULSE sur la montre.
4. Attendez au moins 30 secondes.
5. L’icône du cœur clignotant indique un lien réussi. Répétez le
cas échéant.
Les différentes fonctions de votre montre sont groupées sous sept modes
différents.
PASSAGE ENTRE LES MODES
Appuyez sur MODE/NEXT jusqu'à ce que le mode souhaité apparaisse.
TIME (HEURE)
Heure et calendrier pour deux fuseaux horaires.
PULSE (POULS)
Affichage du pouls, programmation et affichage des
informations de zone d'entraînement.
GRAPH (GRAPHIQUE)
Affichage graphique de la fréquence cardiaque.
CHRON (CHRONOMÈTRE)
Mesure et enregistrement des temps de segment et
des temps intermédiaires.
DATA (DONNÉES)
Rappel des temps de segment, des temps
intermédiaires et des informations sur la
fréquence cardiaque.
TIMER (COMPTE À REBOURS)
Compteur à rebours à cinq segments.
ALARM (ALARME)
Deux alarmes.
REMPLACEMENT DE LA PILE
Un arrêt, ou une erreur, des informations de fréquence cardiaque peut
indiquer qu'il est temps de remplacer la pile de l'émetteur.
1: Ouvrez le couvercle du compartiment à pile de l'émetteur à l'aide d'une
pièce, en tournant dans le sens inverse des aiguilles d'une montre.
2: Insérez une pile lithium CR2032, 3V, côté imprimé vous faisant face.
Essayez de ne pas toucher les deux contacts.
3: Remettez le couvercle du compartiment en place.
L'émetteur résiste à l'eau mais devrait néanmoins être essuyé après chaque
utilisation.
Pour de meilleurs résultats, il est recommandé de faire changer la pile de la
montre par un centre homologué Nike. Consultez la couverture arrière pour
toute information concernant les contacts.
INSTRUCTIONS
PASSAGE
ENTRE LES MODES
Appuyez sur MODE/NEXT pour
sélectionner le mode souhaité.
T
X
E
N
/
E
D
O
M
S
T
O
P
S
T
A
R
T
/
L
A
P
T
E
S
E
R
/
T
S
U
J
D
A
S
T
A
R
T
/
L
A
P
T
E
S
E
R
/
T
S
U
J
D
A
T
X
E
N
/
E
D
O
M
S
T
O
P
MODES
ÉMETTEUR DE POITRINE
ÉMETTEUR DE POITRINE
Placez l'émetteur tel qu'illustré.
HRM100.French.US 7/17/01 10:08 AM Page 26

29
28
HEURE
Le mode TIME permet de programmer l'heure et la date pour
deux fuseaux horaires.
Vous pouvez également choisir qu'un carillon retentisse lorsque
vous appuyez sur un bouton ou à chaque heure.
RÉGLAGE DE L'HEURE ET DE LA DATE
Consultez Réglage des paramètres.
PASSAGE ENTRE LES FUSEAUX HORAIRES
1. En mode TIME, appuyez sur STOP et maintenez le bouton enfoncé.
Le second fuseau horaire apparaît.
2. Relâchez le bouton lorsque l'indicateur de fuseau horaire arrête de
clignoter.
3. Suivez les instructions de la rubrique Réglage des paramètres pour
régler l'heure et la date du second fuseau horaire.
Maintenez le bouton STOP enfoncé pendant moins de trois secondes pour
afficher momentanément les informations du second fuseau horaire.
ACTIVATION/DÉSACTIVATION DU CARILLON
Appuyez sur START/LAP.
Le symbole apparaît ou disparaît avec chaque pression sur le bouton.
La plupart des utilisateurs aiment pouvoir rapidement accéder au mode
TIME. Appuyez sur MODE/NEXT et maintenez le bouton enfoncé pendant une
seconde (dans n'importe quel mode) pour retourner au mode TIME.
S
T
A
R
T
/
L
A
P
T
I
X
E
/
T
S
U
J
D
A
T
X
E
N
/
E
D
O
M
S
T
O
P
Chaque mode est constitué de différents paramètres réglables. Tous ces
paramètres sont réglés d'une façon semblable.
1: Appuyez sur MODE/NEXT pour sélectionner le mode souhaité.
2: Appuyez sur ADJUST/RESET et maintenez le bouton enfoncé pendant deux
secondes. Un message semblable à "HOLD to ADJUST" ou "HOLD to SET" est
affiché. Un élément commence à clignoter. Il s'agit de l'élément réglable. Les
symboles "+" et "-" apparaissent à l'écran, indiquant que START/LAP et STOP
permettront d'augmenter ou de réduire la valeur de l'élément clignotant.
3: Appuyez sur START/LAP pour augmenter la valeur de l'élément clignotant.
4: Appuyez sur STOP pour réduire la valeur de l'élément clignotant.
5: Appuyez sur MODE/NEXT pour passer à l'élément réglable suivant.
6: Répétez les étapes 3 à 5 jusqu’à ce que toutes les valeurs soient
programmées.
7: Appuyez sur ADJUST/RESET pour enregistrer les modifications.
Lors des réglages, la ligne du bas vous indique généralement la valeur réglée.
ÉLÉMENTS RÉGLABLES DE CHAQUE MODE
MODE TIME
Secondes, heures, minutes, jour, mois, jour/mois,
12/24, et année.
MODE PULSE
Limite supérieure de zone, limite inférieure de zone,
et activation/désactivation de l'alarme de zone.
MODE GRAPH
Période de relevé.
MODE CHRON
Activation/désactivation du délai de récupération,
Lap/SPLIT et LAP/Split.
MODE TIMER
Secondes, minutes, heures, et numéro de segment.
MODE ALARM
Heures, minutes, et fuseau horaire.
T
X
E
N
/
E
D
O
M
S
T
O
P
S
T
A
R
T
/
L
A
P
T
E
S
E
R
/
T
S
U
J
D
A
S
T
A
R
T
/
L
A
P
T
E
S
E
R
/
T
S
U
J
D
A
T
X
E
N
/
E
D
O
M
S
T
O
P
ADJUST
Appuyez sur ADJUST/RESET
et maintenez le bouton
enfoncé pour régler les
paramètres du mode.
RÉGLAGE DES PARAMÈTRES
AFFICHAGE DU MODE PULSE
La montre HRM Triax 100 est équipé d'un écran indiquant
la position de votre fréquence cardiaque au sein de votre
zone d'exercice. Si votre fréquence cardiaque dépasse votre
limite supérieure, la mention "HI" apparaît, accompagnée
d'un . Si votre fréquence cardiaque n'atteint pas votre
limite inférieure, la mention "LO" apparaît, accompagnée d'un .
Utilisé de concert au chronomètre, le mode DATA affiche le temps que vous
avez passé dans vos zones d'entraînement.
Le mode PULSE permet d'afficher la fréquence cardiaque et
d'accéder aux informations d'entraînement.
S
T
A
R
T
/
L
A
P
T
E
S
E
R
/
T
S
U
J
D
A
T
X
E
N
/
E
D
O
M
S
T
O
P
MODE PULSE
HRM100.French.US 7/17/01 10:08 AM Page 28

30
31
Appuyez sur STOP pour sélectionner une zone.
Suivez les instructions de la rubrique Réglage des paramètres pour définir
les limites de zone et activer/désactiver l'alarme sonore de la seconde zone
d'entraînement.
ENTRAÎNEMENT DANS UNE ZONE
À PROPOS DE L'ENTRAÎNEMENT DANS UNE ZONE
Vous pouvez établir une limite de fréquence cardiaque supérieure et
inférieure et contrôler l'intensité de votre exercice de façon à rester dans des
limites raisonnables. L'entraînement dans une certaine zone vous permet de
suivre un rythme plus précis, d'éviter un exercice physique dépassant des
limites raisonnables, et d'obtenir ainsi un entraînement plus productif.
L'entraînement dans une zone donnée n'est qu'une partie d'un programme
d'exercice physique. Il est très important de s'entraîner dans une zone
correspondant à son niveau de condition physique et à ses objectifs.
Consultez votre médecin ou un professionnel de la santé avant de décider
d'une zone d'entraînement.
INTENSITÉ ÉLEVÉE
Ne vous exercez à un niveau d'intensité élevée que si vous vous trouvez en
excellente condition physique. Exercez-vous à ce niveau pour :
• améliorer vos performances maximum.
• habituer votre corps à des performances à un niveau compétitif.
• améliorer votre tolérance à l'acide lactique.
INTENSITÉ MOYENNE
Exercez-vous à ce niveau pour :
• améliorer votre santé cardio-vasculaire.
• améliorer votre endurance.
• perdre du poids.
INTENSITÉ MINIMALE
Exercez-vous à ce niveau :
• à la suite d'une blessure.
• au début d'un programme d'exercice.
• au cours de sessions de récupération.
• pour améliorer votre santé en général.
PASSAGE ENTRE LES DIFFÉRENTS AFFICHAGES
Appuyez sur START/LAP.
L'écran par défaut affiche vos limites supérieure et inférieure. Vous pouvez
brièvement afficher l'heure et le numéro de zone en appuyant sur le bouton
START/LAP.
ALARME DE ZONE
Vous pouvez programmer une alarme sonore indiquant votre sortie de la zone
d'entraînement. Appuyez sur n'importe quel bouton pour arrêter l'alarme.
Suivez les instructions de la rubrique Réglage des paramètres pour définir
les limites de zone et activer/désactiver l'alarme sonore.
PASSAGE ENTRE LA ZONE 1 ET LA ZONE 2
Votre montre vous permet de programmer deux zones d'entraînement
distinctes. Vous pourrez ainsi vous échauffer dans une zone, puis passer à
l'autre pour le reste de votre entraînement. Vous pourriez également vous
entraîner dans une zone certains jours de la semaine et dans l'autre les
autres jours.
AGE
20 25 30 35 40 45 50 55 60 65 70
HEART RATE / BPM
200
180
160
140
120
100
80
INTENSIT
É ÉLEVÉE
IN
TEN
S
IT
É M
O
YEN
N
E
INTENSIT
É M
INIM
ALE
GRAPHIQUE DES
PERFORMANCES
Ce graphique
est conçu
comme
référence
générale. Les
niveaux
appropriés
dépendent de
votre condition
physique, des
sports que vous
pratiquez, ainsi
que de vos
objectifs.
S
T
A
R
T
/
L
A
P
T
E
S
E
R
/
T
S
U
J
D
A
T
X
E
N
/
E
D
O
M
S
T
O
P
MODE PULSE
Affichage de la zone
d'entraînement.
HRM100.French.US 7/17/01 10:08 AM Page 30

33
32
RÉINITIALISATION DU GRAPHIQUE
La graphique affiche votre fréquence cardiaque dès la réception des
premiers signaux. Il pourra donc être bon de réinitialiser le graphique au
début de chaque session d'entraînement.
Appuyez sur ADJUST/RESET et maintenez le bouton enfoncé jusqu'à ce
que le graphique disparaisse.
CHOIX DE LA VALEUR DE RELEVÉ
Le graphique doit être réinitialisé avant le réglage de la valeur de relevé.
Appuyez sur ADJUST/RESET et maintenez le bouton enfoncé jusqu'à ce
que le graphique disparaisse. Gardez le bouton
ADJUST/RESET enfoncé pendant l'apparition de "HOLD to
SETUP".
Suivez les instructions de la rubrique Réglage des
paramètres pour sélectionner la valeur de relevé.
AFFICHAGE DE LA VALEUR DES BARRES
DU GRAPHIQUE
Appuyez sur STOP ou START/LAP.
Le chiffre affiché en bas de l'écran représente votre
fréquence cardiaque au début de chaque relevé. Le
chiffre affiché en haut indique le temps écoulé depuis le
dernier relevé.
Après dix secondes, l'écran affiche de nouveau la
fréquence cardiaque actuelle et le graphique.
Le mode GRAPH permet de consulter une représentation
graphique de votre fréquence cardiaque sur une période de
temps que vous avez déterminée. Cette fonction indique la
tendance de votre fréquence cardiaque.
Ce graphique peut représenter jusqu'à 28 points de données.
Avec une valeur de relevé à chaque minute, le graphique peut
représenter votre fréquence cardiaque au cours des 28 dernières
minutes. Vous pouvez choisir n'importe quelle valeur de relevé,
de 10 secondes à 10 minutes.
Vous pouvez également afficher la valeur exacte de chaque
barre du graphique. La valeur de chaque barre du graphique
représente votre fréquence cardiaque au début de chaque relevé.
S
T
A
R
T
/
L
A
P
T
E
S
E
R
/
T
S
U
J
D
A
T
X
E
N
/
E
D
O
M
S
T
O
P
MODE GRAPH
S
T
A
R
T
/
L
A
P
T
E
S
E
R
/
T
S
U
J
D
A
T
X
E
N
/
E
D
O
M
S
T
O
P
AFFICHAGE DU GRAPHIQUE
Exemple d'affichage du
graphique.
PRISE DE TEMPS D’UN SEGMENT
Appuyez sur START/LAP.
ARRÊT D’UN TEMPS DE SEGMENT ET DÉMARRAGE D’UN
NOUVEAU SEGMENT
Appuyez sur START/LAP.
Les temps de segment/intermédiaires apparaissent pendant 5 secondes, puis
le temps général est de nouveau affiché.
ARRÊT DE LA PRISE DE TEMPS
Appuyez sur STOP.
La prise de temps s'arrête. Le temps de segment et le total écoulé
apparaissent.
REDÉMARRAGE DE LA PRISE DE TEMPS
Appuyez sur START/LAP.
Les chiffres recommencent à défiler.
ENREGISTREMENT DES DONNÉES D'UNE COURSE
Le chronomètre doit être arrêté avant l'enregistrement des données d'une
course. Appuyez sur STOP si le chronomètre est en train de défiler.
Appuyez sur STOP et maintenez le bouton enfoncé pendant 2 secondes.
"HOLD to NEXT" est affiché. Le chronomètre est réinitialisé et les données
sont enregistrées en mémoire. Les temps suivants sont enregistrés pour une
nouvelle course.
Le mode CHRON permet d'afficher la fréquence cardiaque, mais
aussi de mesurer et d'enregistrer les temps de segment, les temps
intermédiaires et les informations sur la fréquence cardiaque des
différentes sessions. Les différentes sessions sont organisées par
date. Les données enregistrées sont accessibles en mode DATA.
Les temps de segment et les temps intermédiaires sont affichés
simultanément. L'écran principal est placé au centre et est plus
grand que le second écran. Vous pouvez indiquer si les temps de
segment ou les temps intermédiaires occupent la position principale.
Le temps de segment est le temps nécessaire à la couverture
d'un segment donné d’une course (comme un tour de circuit). Les
temps intermédiaires sont les temps cumulés totalisés depuis le
début de la course.
Le mode CHRON offre également un compteur de récupération
de la fréquence cardiaque.
S
T
A
R
T
/
L
A
P
T
E
S
E
R
/
T
S
U
J
D
A
T
X
E
N
/
E
D
O
M
S
T
O
P
CHRONOMÈTRE
HRM100.French.US 7/17/01 10:08 AM Page 32

34
RÉINITIALISATION DU CHRONOMÈTRE
Le chronomètre peut être réinitialisé sans enregistrer
les données. Le chronomètre doit être arrêté pour la
réinitialisation. Appuyez sur STOP si le chronomètre
est en train de défiler.
Appuyez sur ADJUST/RESET et maintenez le bouton
enfoncé pendant 2 secondes. "HOLD to CLEAR" est
affiché. Le chronomètre est réinitialisé.
PASSAGE ENTRE LES TEMPS DE SEGMENT ET
INTERMÉDIAIRES DANS L'ÉCRAN PRINCIPAL
Suivez les instructions de la rubrique Réglage des
paramètres pour régler l'affichage du chronomètre. Le
chronomètre doit être arrêté pour la réinitialisation
et le réglage.
UTILISATION DU COMPTEUR DE
RÉCUPÉRATION
La vitesse à laquelle votre cœur revient à un niveau
déterminé à l'avance à la suite de votre exercice est
une bonne indication de votre condition physique.
Votre fréquence cardiaque devrait diminuer plus
rapidement à la suite d'un exercice au fur et à mesure
que vous améliorerez votre condition physique.
Votre HRM Triax 100 commencera automatiquement à
mesurer le temps nécessaire au retour de votre
fréquence cardiaque au point de récupération déterminé
dès l'arrêt du chronomètre. Le temps de récupération de
la fréquence cardiaque est accessible en mode DATA.
ÉTABLISSEMENT D'UN POINT DE RÉ-
CUPÉRATION DE LA FRÉQUENCE CARDIAQUE
Plusieurs formules existent pour permettre d'établir le
point de récupération de votre fréquence cardiaque,
la formule appropriée dépendant de vos objectifs et des détails de votre
programme d'entraînement.
En général, le point de récupération de votre fréquence cardiaque devrait se
trouver entre votre fréquence cardiaque normale en cours d'exercice et votre
fréquence cardiaque au repos. L'utilisation d'un même point de récupération
vous permettra d'établir une comparaison au fil du temps.
Suivez les instructions de la rubrique Réglage des paramètres pour activer ou
désactiver le compteur de récupération et pour sélectionner un point de
récupération de la fréquence cardiaque.
35
Le mode DATA permet d'afficher les informations sur la
fréquence cardiaque et les temps des différentes sessions.
La montre HRM Triax 100 permet d’enregistrer 100 tours de circuit,
32 courses.
SÉLECTION D'UNE COURSE
Appuyez sur STOP.
Le numéro et la date de la course s'affichent.
AFFICHAGE DES POINTS DE DONNÉES
Appuyez plusieurs fois sur START/LAP.
Les informations suivantes sont affichées :
• Date et numéro de la course
• Temps de segment/intermédiaires des fréquences cardiaques pour
chaque segment
• Fréquence cardiaque minimum et maximum pour chaque segment
• Meilleur temps de segment et temps moyen
• Temps total passé dans la zone et durée de la récupération de la
fréquence cardiaque (si cette fonction est activée)
SUPPRESSION DES DONNÉES D'UNE COURSE
Appuyez sur STOP pour sélectionner la course à supprimer.
Appuyez sur ADJUST/RESET. "HOLD to CLEAR" clignote et un bip confirme la
suppression des données de la course sélectionnée.
Remarque : la course supprimée est remplacée par la course suivante. Par exemple, si
vous supprimez RUN 3 de la mémoire, RUN 4 remplace RUN 3. Si la quantité
d'informations dépasse la mémoire disponible de la fonction DATA en cours de course,
supprimez cette course et commencez-en une nouvelle.
SUPPRESSION DE TOUTES LES DONNÉES
Appuyez sur ADJUST/RESET et maintenez le bouton enfoncé pendant 4
secondes supplémentaires après avoir supprimé la première course.
Une confirmation sonore continue se fait entendre. "HOLD to CLEAR ALL"
clignote. Après 7 secondes, [-- --] indique que toutes les données ont été
supprimées.
S
T
A
R
T
/
L
A
P
T
E
S
E
R
/
T
S
U
J
D
A
T
X
E
N
/
E
D
O
M
S
T
O
P
MODE DATA
RÉINITIALISATION SANS
ENREGISTREMENT
Appuyez sur ADJUST/RESET et
maintenez le bouton enfoncé
pour réinitialiser sans enregis-
trer les données d'une course.
T
X
E
N
/
E
D
O
M
S
T
O
P
S
T
A
R
T
/
L
A
P
T
E
S
E
R
/
T
S
U
J
D
A
S
T
A
R
T
/
L
A
P
T
E
S
E
R
/
T
S
U
J
D
A
T
X
E
N
/
E
D
O
M
S
T
O
P
RÉINITIALISATION AVEC
ENREGISTREMENT
Appuyez sur STOP et main-
tenez le bouton enfoncé pour
réinitialiser et enregistrer les
données d'une course.
T
X
E
N
/
E
D
O
M
S
T
O
P
S
T
A
R
T
/
L
A
P
T
E
S
E
R
/
T
S
U
J
D
A
S
T
A
R
T
/
L
A
P
T
E
S
E
R
/
T
S
U
J
D
A
T
X
E
N
/
E
D
O
M
S
T
O
P
HRM100.French.US 7/17/01 10:08 AM Page 34

PROGRAMMATION DE L'ALARME
Consultez Réglage des paramètres.
Remarque : chaque alarme n'est active que dans le fuseau
horaire pour lequel elle est programmée.
PASSAGE À L'ALARME SUIVANTE
Appuyez sur STOP.
Le numéro de l'alarme suivante apparaît en bas de l'écran.
ACTIVATION/DÉSACTIVATION DE L'ALARME
Appuyez sur START/LAP.
La mention ON apparaît ou disparaît avec chaque pression sur le bouton.
Le mode ALARM vous permet de programmer deux alarmes qui
sonneront de façon intermittente pendant 20 secondes ou
jusqu'à ce que vous appuyiez sur un des boutons.
S
T
A
R
T
/
L
A
P
T
E
S
E
R
/
T
S
U
J
D
A
T
X
E
N
/
E
D
O
M
S
T
O
P
ALARME
36
Le mode TIMER est un compteur à rebours à cinq segments.
Vous pouvez utiliser cette fonction pour vous entraîner à un
niveau plus élevé pendant un certain temps, suivi d'un
intervalle de récupération à un niveau plus bas.
Vous pouvez programmer un maximum de cinq segments.
Un segment démarre lorsque le segment précédent se termine.
Donnez aux segments inutilisés une valeur de zéro.
SÉLECTION D'UN COMPTEUR À REBOURS
Appuyez sur STOP.
Le compteur à rebours sélectionné est le premier à démarrer.
Programmation du compteur à rebours
Suivez les instructions de la rubrique Réglage des paramètres pour
programmer chaque compteur à rebours.
DÉMARRAGE DU COMPTE À REBOURS
1. Programmez un ou plusieurs segments (maximum de 5).
2. Appuyez sur STOP pour passer au segment suivant.
3. Appuyez sur START/LAP.
Le compte à rebours commence. Lorsque le compte à rebours atteint zéro,
la montre émet un bip sonore et le compte à rebours suivant démarre.
Le nombre de comptes à rebours écoulés apparaît sous l'écran du compte
à rebours.
Remarque : le cycle reprend lorsque le compte à rebours est terminé pour les cinq
segments. Par exemple, lorsque le segment 1 est terminé, le segment 2 démarre. Si les
segments 3, 4 et 5 ont pour valeur zéro, le segment 1 démarre à la fin du segment 2.
ARRÊT DU COMPTE À REBOURS
Appuyez sur STOP.
RÉINITIALISATION DU COMPTE À REBOURS
Appuyez sur ADJUST/RESET lorsque le compte à rebours est arrêté.
L'écran affiche les valeurs de départ.
S
T
A
R
T
/
L
A
P
T
I
X
E
/
T
S
U
J
D
A
T
X
E
N
/
E
D
O
M
S
T
O
P
COMPTE À REBOURS
37
HRM100.French.US 7/17/01 10:08 AM Page 36
La page est en cours de chargement...
La page est en cours de chargement...
-
 1
1
-
 2
2
-
 3
3
-
 4
4
-
 5
5
-
 6
6
-
 7
7
-
 8
8
-
 9
9
-
 10
10
-
 11
11
-
 12
12
-
 13
13
-
 14
14
-
 15
15
-
 16
16
-
 17
17
-
 18
18
-
 19
19
-
 20
20
-
 21
21
-
 22
22


Nike HRM TRIAX 100 Instructions Manual
- Catégorie
- Moniteurs de fréquence cardiaque
- Taper
- Instructions Manual
dans d''autres langues
- English: Nike HRM TRIAX 100
Autres documents
-
Simrad IS20 Guide de démarrage rapide
-
Timex Ironman Race Trainer Pro HRM Mode d'emploi
-
-
-
Timex M185 Manuel utilisateur
-
-
-
-
-