Tunturi FitRow 50 Rowing Machine Manuel utilisateur
- Catégorie
- Fitness, gymnastique
- Taper
- Manuel utilisateur

FitRow 50
19 - 25
26 - 33
34 - 41
42 - 49
50 - 57
58 - 65
66 - 72
73 - 79
www.tunturi.com
Attention, Achtung, Attention, Attentie, Attenzione, Atención, Giv akt, Huomio
- Please read this user manual carefully prior to using this product.
- Lesen Sie sich vor dem Gebrauch des Produkts diese Bedienungsanleitung sorgfältig durch.
- Veuillez lire attentivement le présent manuel de l’utilisateur avant d’utiliser ce produit.
- Lees deze gebruikershandleiding zorgvuldig voordat u dit product gaat gebruiken.
- Leggere attentamente questo manuale dell’utente prima di utilizzare il prodotto.
- Antes de utilizar este producto, lea atentamente este manual de usuario.
- Läs den här användarhandboken noggrant före användning av den här produkten.
- Lue tämä käyttöohje huolellisesti ennen tämän tuotteen käyttöä.
WWW
GB User manual
DE Benutzerhandbuch
FR Manuel de l’utilisateur
NL Gebruikershandleiding
IT Manuale d‘uso
ES Manual del usuario
SV Bruksanvisning
SU Käyttöohje


A
3
FitRow 50

B
i
4
FitRow 50

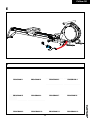
C
107 Allen Bolt MM10xP1.5x50mm (2) 108 Flat washer Ø10*Ø18*2T (2)
112 Cup (1) 113 Bolt Ø7.8*75 (2)
117 Acorn Nut for M8 bolt (4)
114 Sleeve Ø16*Ø13.5*45mm (2)
109 Knob M12*55mm (1)
120 Screwdriver (1)
111 Bolt Ø9.5*128mm (1)
121 Box Spanner (1)
122 Allen key (1)
110 Flat washer for
Ø13.5*Ø32*2T (1)
115 Flat washer for
Ø8*Ø19*2T (4)
116 Spring washer for
Ø8*Ø14*2T (4)
100 cm
100 cm
100 cm
100 cm
D-0
5
FitRow 50

D-1
3
107 108
67
107 Allen Bolt MM10xP1.5x50mm (2) 108 Flat washer Ø10*Ø18*2T (2)
112 Cup (1) 113 Bolt Ø7.8*75 (2)
117 Acorn Nut for M8 bolt (4)
114 Sleeve Ø16*Ø13.5*45mm (2)
109 Knob M12*55mm (1)
120 Screwdriver (1)
111 Bolt Ø9.5*128mm (1)
121 Box Spanner (1)
122 Allen key (1)
110 Flat washer for
Ø13.5*Ø32*2T (1)
115 Flat washer for
Ø8*Ø19*2T (4)
116 Spring washer for
Ø8*Ø14*2T (4)
6
FitRow 50

D-2
107 Allen Bolt MM10xP1.5x50mm (2) 108 Flat washer Ø10*Ø18*2T (2)
112 Cup (1) 113 Bolt Ø7.8*75 (2)
117 Acorn Nut for M8 bolt (4)
114 Sleeve Ø16*Ø13.5*45mm (2)
109 Knob M12*55mm (1)
120 Screwdriver (1)
111 Bolt Ø9.5*128mm (1)
121 Box Spanner (1)
122 Allen key (1)
110 Flat washer for
Ø13.5*Ø32*2T (1)
115 Flat washer for
Ø8*Ø19*2T (4)
116 Spring washer for
Ø8*Ø14*2T (4)
7
FitRow 50

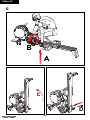
D-3
A
B
C
107 Allen Bolt MM10xP1.5x50mm (2) 108 Flat washer Ø10*Ø18*2T (2)
112 Cup (1) 113 Bolt Ø7.8*75 (2)
117 Acorn Nut for M8 bolt (4)
114 Sleeve Ø16*Ø13.5*45mm (2)
109 Knob M12*55mm (1)
120 Screwdriver (1)
111 Bolt Ø9.5*128mm (1)
121 Box Spanner (1)
122 Allen key (1)
110 Flat washer for
Ø13.5*Ø32*2T (1)
115 Flat washer for
Ø8*Ø19*2T (4)
116 Spring washer for
Ø8*Ø14*2T (4)
8
FitRow 50

D-4
Preassembled
Vormontiert
Pré assemblé
Voorgemonteerd
Pre-assemblato
Pre ensamblado
Förmonterad
Esikoottu
1x 26
1x 27
2x 28
2x 90
2x 92
107 Allen Bolt MM10xP1.5x50mm (2) 108 Flat washer Ø10*Ø18*2T (2)
112 Cup (1) 113 Bolt Ø7.8*75 (2)
117 Acorn Nut for M8 bolt (4)
114 Sleeve Ø16*Ø13.5*45mm (2)
109 Knob M12*55mm (1)
120 Screwdriver (1)
111 Bolt Ø9.5*128mm (1)
121 Box Spanner (1)
122 Allen key (1)
110 Flat washer for
Ø13.5*Ø32*2T (1)
115 Flat washer for
Ø8*Ø19*2T (4)
116 Spring washer for
Ø8*Ø14*2T (4)
9
FitRow 50

D-5
107 Allen Bolt MM10xP1.5x50mm (2) 108 Flat washer Ø10*Ø18*2T (2)
112 Cup (1) 113 Bolt Ø7.8*75 (2)
117 Acorn Nut for M8 bolt (4)
114 Sleeve Ø16*Ø13.5*45mm (2)
109 Knob M12*55mm (1)
120 Screwdriver (1)
111 Bolt Ø9.5*128mm (1)
121 Box Spanner (1)
122 Allen key (1)
110 Flat washer for
Ø13.5*Ø32*2T (1)
115 Flat washer for
Ø8*Ø19*2T (4)
116 Spring washer for
Ø8*Ø14*2T (4)
10
FitRow 50

D-6
X
107 Allen Bolt MM10xP1.5x50mm (2) 108 Flat washer Ø10*Ø18*2T (2)
112 Cup (1) 113 Bolt Ø7.8*75 (2)
117 Acorn Nut for M8 bolt (4)
114 Sleeve Ø16*Ø13.5*45mm (2)
109 Knob M12*55mm (1)
120 Screwdriver (1)
111 Bolt Ø9.5*128mm (1)
121 Box Spanner (1)
122 Allen key (1)
110 Flat washer for
Ø13.5*Ø32*2T (1)
115 Flat washer for
Ø8*Ø19*2T (4)
116 Spring washer for
Ø8*Ø14*2T (4)
11
FitRow 50

D-7
Preassembled
Vormontiert
Pré assemblé
Voorgemonteerd
Pre-assemblato
Pre ensamblado
Förmonterad
Esikoottu
4x 86
107 Allen Bolt MM10xP1.5x50mm (2) 108 Flat washer Ø10*Ø18*2T (2)
112 Cup (1) 113 Bolt Ø7.8*75 (2)
117 Acorn Nut for M8 bolt (4)
114 Sleeve Ø16*Ø13.5*45mm (2)
109 Knob M12*55mm (1)
120 Screwdriver (1)
111 Bolt Ø9.5*128mm (1)
121 Box Spanner (1)
122 Allen key (1)
110 Flat washer for
Ø13.5*Ø32*2T (1)
115 Flat washer for
Ø8*Ø19*2T (4)
116 Spring washer for
Ø8*Ø14*2T (4)
12
FitRow 50

D-8
107 Allen Bolt MM10xP1.5x50mm (2) 108 Flat washer Ø10*Ø18*2T (2)
112 Cup (1) 113 Bolt Ø7.8*75 (2)
117 Acorn Nut for M8 bolt (4)
114 Sleeve Ø16*Ø13.5*45mm (2)
109 Knob M12*55mm (1)
120 Screwdriver (1)
111 Bolt Ø9.5*128mm (1)
121 Box Spanner (1)
122 Allen key (1)
110 Flat washer for
Ø13.5*Ø32*2T (1)
115 Flat washer for
Ø8*Ø19*2T (4)
116 Spring washer for
Ø8*Ø14*2T (4)
13
FitRow 50

D-9
B
Preassembled
Vormontiert
Pré assemblé
Voorgemonteerd
Pre-assemblato
Pre ensamblado
Förmonterad
Esikoottu
1x 88 & 89
2x 87 A
107 Allen Bolt MM10xP1.5x50mm (2) 108 Flat washer Ø10*Ø18*2T (2)
112 Cup (1) 113 Bolt Ø7.8*75 (2)
117 Acorn Nut for M8 bolt (4)
114 Sleeve Ø16*Ø13.5*45mm (2)
109 Knob M12*55mm (1)
120 Screwdriver (1)
111 Bolt Ø9.5*128mm (1)
121 Box Spanner (1)
122 Allen key (1)
110 Flat washer for
Ø13.5*Ø32*2T (1)
115 Flat washer for
Ø8*Ø19*2T (4)
116 Spring washer for
Ø8*Ø14*2T (4)
14
FitRow 50

D-10
Preassembled
Vormontiert
Pré assemblé
Voorgemonteerd
Pre-assemblato
Pre ensamblado
Förmonterad
Esikoottu
1x 74
1x 88 & 89
2x 87
107 Allen Bolt MM10xP1.5x50mm (2) 108 Flat washer Ø10*Ø18*2T (2)
112 Cup (1) 113 Bolt Ø7.8*75 (2)
117 Acorn Nut for M8 bolt (4)
114 Sleeve Ø16*Ø13.5*45mm (2)
109 Knob M12*55mm (1)
120 Screwdriver (1)
111 Bolt Ø9.5*128mm (1)
121 Box Spanner (1)
122 Allen key (1)
110 Flat washer for
Ø13.5*Ø32*2T (1)
115 Flat washer for
Ø8*Ø19*2T (4)
116 Spring washer for
Ø8*Ø14*2T (4)
15
FitRow 50

D-11
107 Allen Bolt MM10xP1.5x50mm (2) 108 Flat washer Ø10*Ø18*2T (2)
112 Cup (1) 113 Bolt Ø7.8*75 (2)
117 Acorn Nut for M8 bolt (4)
114 Sleeve Ø16*Ø13.5*45mm (2)
109 Knob M12*55mm (1)
120 Screwdriver (1)
111 Bolt Ø9.5*128mm (1)
121 Box Spanner (1)
122 Allen key (1)
110 Flat washer for
Ø13.5*Ø32*2T (1)
115 Flat washer for
Ø8*Ø19*2T (4)
116 Spring washer for
Ø8*Ø14*2T (4)
16
FitRow 50

E
F
PROGRAM 1 PROGRAM 2 PROGRAM 3 PROGRAM 4
PROGRAM 5 PROGRAM 6 PROGRAM 7 PROGRAM 8
PROGRAM 9 PROGRAM 10 PROGRAM 11 PROGRAM 12
17
FitRow 50

G
A
B
C
D
18
FitRow 50

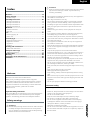
Index
Welcome .......................................................................... 19
Safety warnings ............................................................... 19
Electrical safety ................................................................................19
Assembly instructions ...................................................... 20
Description illustration A ..................................................................20
Description illustration B ..................................................................20
Description illustration C .................................................................. 20
Description illustration D .................................................................. 20
Workouts ......................................................................... 20
Exercise Instructions .........................................................................20
Heart rate .........................................................................................21
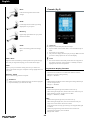
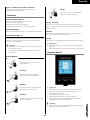
Use................................................................................... 21
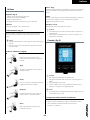
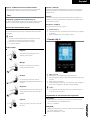
Power supply (Fig. E) ........................................................................ 21
How to row .......................................................................................21
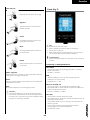
Console (g F) ................................................................. 22
Explanation Display functions ..........................................................22
Explanation of buttons .....................................................................23
Opperation ....................................................................................... 23
Programs ..........................................................................................23
Cleaning and maintenance ............................................... 24
Defects and malfunctions ................................................................. 24
Transport and storage ..................................................... 24
Additional information .....................................................................24
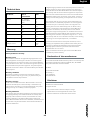
Technical data .................................................................. 25
Warranty .......................................................................... 25
Declaration of the manufacturer ..................................... 25
Disclaimer ........................................................................ 25
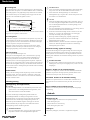
Welcome
Welcome to the world of Tunturi New Fitness!
Thank you for purchasing this piece of Tunturi equipment.
Tunturi offers a wide range of home fitness equipment, including
crosstrainers, treadmills, exercise bikes and rowers. The Tunturi
equipment is suitable for the entire family, no matter what fitness
level. For more information, please visit our website
www.tunturi.com
Important Safety Instructions
This Owner’s Manual is an essential part of your training equipment:
reading all instructions in this manual before you start using this
appliance. The following precautions must always be followed:
Safety warnings
⚠ WARNING
• Read the safety warnings and the instructions. Failure to follow
the safety warnings and the instructions can cause personal
injury or damage to the equipment. Keep the safety warnings
and the instructions for future reference.
⚠ WARNING
• Heart rate monitoring systems may be inaccurate. Over exercise
may result in serious injury or death. If you feel faint stop
exercising immediately.
- The equipment is suitable for domestic use only. The equipment is
not suitable for commercial use.
- Max. usage is limited to 3 hrs a day.
- The use of this equipment by children or persons with a physical,
sensory, mental or motorial disability, or lack of experience and
knowledge can give cause to hazards. Persons responsible for their
safety must give explicit instructions or supervise the use of the
equipment.
- Before starting your workout, consult a physician to check your
health.
- If you experience nausea, dizziness or other abnormal symptoms,
immediately stop your workout and consult a physician.
- To avoid muscular pain and strain, start each workout by warming
up and finish each workout by cooling down. Remember to stretch
at the end of the workout.
- The equipment is suitable for indoor use only. The equipment is
not suitable for outdoor use.
- Only use the equipment in environments with adequate ventilation.
Do not use the equipment in draughty environments in order not
to catch a cold.
- Only use the equipment in environments with ambient
temperatures between 10 °C ~ 35 °C. Only store the equipment in
environments with ambient temperatures between 5 °C ~ 45 °C.
- Do not use or store the equipment in humid surroundings. The air
humidity must never be more than 80%.
- Only use the equipment for its intended purpose. Do not use the
equipment for other purposes than described in the manual.
- Do not use the equipment if any part is damaged or defective. If a
part is damaged or defective, contact your dealer.
- Keep your hands, feet and other body parts away from the moving
parts.
- Keep your hair away from the moving parts.
- Wear appropriate clothing and shoes.
- Keep clothing, jewellery and other objects away from the moving
parts.
- Make sure that only one person uses the equipment at a time. The
equipment must not be used by persons weighing more than 120
kg (265lbs).
- Do not open equipment without consulting your dealer.
Electrical safety
(Only for equipment with electric power)
- Before use, always check that the mains voltage is the same as the
voltage on the rating plate of the equipment.
- Do not use an extension cable.
- Keep the mains cable away from heat, oil and sharp edges.
- Do not alter or modify the mains cable or the mains plug.
- Do not use the equipment if the mains cable or the mains plug
is damaged or defective. If the mains cable or the mains plug is
damaged or defective, contact your dealer.
- Always fully unwind the mains cable.
- Do not run the mains cable underneath the equipment. Do not run
the mains cable underneath a carpet. Do not place any objects on
the mains cable.
19
English

- Make sure that the mains cable does not hang over the edge of a
table.
- Make sure that the mains cable cannot be caught accidentally or
tripped over.
- Do not leave the equipment unattended when the mains plug is
inserted into the wall socket.
- Do not pull the mains cable to remove the mains plug from the wall
socket.
- Remove the mains plug from the wall socket when the equipment
is not in use, before assembly or disassembly and before cleaning
and maintenance.
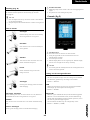
Assembly instructions
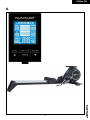
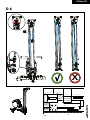
Description illustration A
The illustration shows what the trainer will looks like after the
assembly is completed.
You can use this as a reference during your assembly, but do follow
the assembly steps always in the correct sequence as showed in the
illustrations.
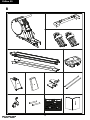
Description illustration B
The illustration shows what components and parts you should find
when un-boxing your product.
‼ NOTE
• Small parts can be hidden/ packed in hollow spaces in the
Styrofoam product protection
• If a part is missing, contact your dealer.
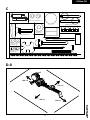
Description illustration C
The illustration shows the hardware kit that comes with your product.
The hardware kit contains bolts, washers, screws , nuts etc. and the
required tools to properly fit your trainer.
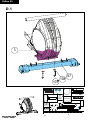
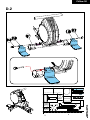
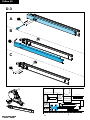
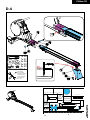
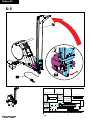
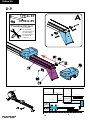
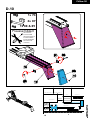
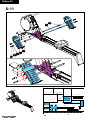
Description illustration D
The illustrations shows you in the correct following order how to
assembly your trainer best.
‼ NOTE
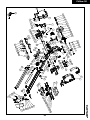
• Part numbers shown in the assembly steps are commencing with
the spare part drawing that can be found in the online version
user manual.
⚠ WARNING
• Assemble the equipment in the given order.
• Carry and move the equipment with at least two persons.
⚠ CAUTION
• Place the equipment on a firm, level surface.
• Place the equipment on a protective base to prevent damage to
the floor surface.
• Allow at least 100 cm of clearance around the equipment.
• Refer to the illustrations for the correct assembly of the
equipment.
‼ NOTE
• Save the tools provided with this product, after you completed
the product assembly, for future service purposes.
Workouts
The workout must be suitably light, but of long duration. Aerobic
exercise is based on improving the body’s maximum oxygen uptake,
which in turn improves endurance and fitness. You should perspire,
but you should not get out of breath during the workout.
To reach and maintain a basic fitness level, exercise at least three
times a week, 30 minutes at a time. Increase the number of exercise
sessions to improve your fitness level. It is worthwhile to combine
regular exercise with a healthy diet. A person committed to dieting
should exercise daily, at first 30 minutes or less at a time, gradually
increasing the daily workout time to one hour. Start your workout at
low speed and low resistance to prevent the cardiovascular system
from being subjected to excessive strain.
As the fitness level improves, speed and resistance can be increased
gradually. The efficiency of your exercise can be measured by
monitoring your heart rate and your pulse rate.
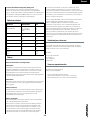
Exercise Instructions
Using your fitness trainer will provide you with several benefits, it will
improve your physical fitness, tone muscle and in conjunction with a
calorie controlled diet help you lose weight.
The warming up phase
This stage helps get the blood flowing around the body and the
muscles working properly. It will also reduce the risk of cramp and
muscle injury. It is advisable to do a few stretching exercises as shown
below. Each stretch should be held for approximately 30 seconds, do
not force or jerk your muscles into a stretch - if it hurts, STOP
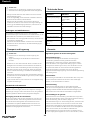
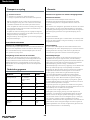
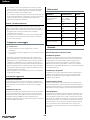
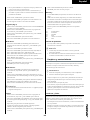
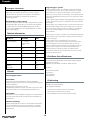
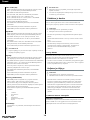
The exercise phase
This is the stage where you put the effort in. After regular use, the
muscles in your legs will become more flexible. Work to your but it is
very important to maintain a steady tempo throughout. The rate of
work should be sufficient to raise your heart beat into the target zone
shown on the graph below.
200
180
160
140
120
100
80
20 25 30 35 40 45 50 55 60 65 70 75
85 %
70 %
AGE
MAXIMUM
COOL DOWN
HEART RATE
TARGET ZONE
This stage should last for a minimum of 12 minutes though most
people start at about 15-20 minutes
The cool down phase
This stage is to let your Cardiovascular System and muscles wind
down. This is a repeat of the warm up exercise e.g. reduce your
tempo, continue for approximately 5 minutes. The stretching
exercises should now be repeated, again remembering not to force
or jerk your muscles into the stretch.
As you get fitter you may need to train longer and harder. It is
advisable to train at least three times a week, and if possible space
your workouts evenly throughout the week.
20
English
La page charge ...
La page charge ...
La page charge ...
La page charge ...
La page charge ...
La page charge ...
La page charge ...
La page charge ...
La page charge ...
La page charge ...
La page charge ...
La page charge ...
La page charge ...
La page charge ...
La page charge ...
La page charge ...
La page charge ...
La page charge ...
La page charge ...
La page charge ...
La page charge ...
La page charge ...
La page charge ...
La page charge ...
La page charge ...
La page charge ...
La page charge ...
La page charge ...
La page charge ...
La page charge ...
La page charge ...
La page charge ...
La page charge ...
La page charge ...
La page charge ...
La page charge ...
La page charge ...
La page charge ...
La page charge ...
La page charge ...
La page charge ...
La page charge ...
La page charge ...
La page charge ...
La page charge ...
La page charge ...
La page charge ...
La page charge ...
La page charge ...
La page charge ...
La page charge ...
La page charge ...
La page charge ...
La page charge ...
La page charge ...
La page charge ...
La page charge ...
La page charge ...
La page charge ...
La page charge ...
La page charge ...
La page charge ...
La page charge ...
La page charge ...
-
 1
1
-
 2
2
-
 3
3
-
 4
4
-
 5
5
-
 6
6
-
 7
7
-
 8
8
-
 9
9
-
 10
10
-
 11
11
-
 12
12
-
 13
13
-
 14
14
-
 15
15
-
 16
16
-
 17
17
-
 18
18
-
 19
19
-
 20
20
-
 21
21
-
 22
22
-
 23
23
-
 24
24
-
 25
25
-
 26
26
-
 27
27
-
 28
28
-
 29
29
-
 30
30
-
 31
31
-
 32
32
-
 33
33
-
 34
34
-
 35
35
-
 36
36
-
 37
37
-
 38
38
-
 39
39
-
 40
40
-
 41
41
-
 42
42
-
 43
43
-
 44
44
-
 45
45
-
 46
46
-
 47
47
-
 48
48
-
 49
49
-
 50
50
-
 51
51
-
 52
52
-
 53
53
-
 54
54
-
 55
55
-
 56
56
-
 57
57
-
 58
58
-
 59
59
-
 60
60
-
 61
61
-
 62
62
-
 63
63
-
 64
64
-
 65
65
-
 66
66
-
 67
67
-
 68
68
-
 69
69
-
 70
70
-
 71
71
-
 72
72
-
 73
73
-
 74
74
-
 75
75
-
 76
76
-
 77
77
-
 78
78
-
 79
79
-
 80
80
-
 81
81
-
 82
82
-
 83
83
-
 84
84


Tunturi FitRow 50 Rowing Machine Manuel utilisateur
- Catégorie
- Fitness, gymnastique
- Taper
- Manuel utilisateur
dans d''autres langues
- italiano: Tunturi FitRow 50 Rowing Machine Manuale utente
- español: Tunturi FitRow 50 Rowing Machine Manual de usuario
- Deutsch: Tunturi FitRow 50 Rowing Machine Benutzerhandbuch
- Nederlands: Tunturi FitRow 50 Rowing Machine Handleiding
- eesti: Tunturi FitRow 50 Rowing Machine Kasutusjuhend
- svenska: Tunturi FitRow 50 Rowing Machine Användarmanual
Documents connexes
-
Tunturi FitRow 70WTR Manuel utilisateur
-
-
-
-
-
-
-
Tunturi E60-R Le manuel du propriétaire
-
-