DJI Smart Controller
Quick Start Guide
快速入门指南
快速入
門
指南
クイックスタートガイド
퀵
스타트
가이드
Kurzanleitung
Guía de inicio rápido
Guide de démarrage rapide
Guida di avvio rapido
Snelstartgids
Guia de início rápido
Guia de Início Rápido
Краткое руководство пользователя
v1.0


1
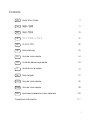
Contents
EN
KR
IT
CHT
ES
NL
CHS
DE
PT-PT
PT-BR
JP
FR
RU
Quick Start Guide
2
快速入门指南
11
快速入門指南
19
クイックスタートガイド
27
퀵 스타트 가이드
36
Kurzanleitung
45
Guía de inicio rápido
54
Guide de démarrage rapide
63
Guida di avvio rapido
72
Snelstartgids
81
Guia de início rápido
90
Guia de início rápido
99
Краткое руководство пользователя
108
Compliance Information
117

2
EN
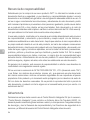
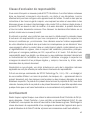
Disclaimer
Congratulations on purchasing your new DJI™ product. The information in this document
affects your safety and your legal rights and responsibilities. Read this entire document
carefully to ensure proper conguration before use. Failure to read and follow instructions
and warnings in this document may result in serious injury to yourself or others, damage
to your DJI product, or damage to other objects in the vicinity. This document and all other
collateral documents are subject to change at the sole discretion of DJI. Visit www.dji.com
for the latest information for this product.
By using this product, you hereby signify that you have read this disclaimer and warning
carefully and that you understand and agree to abide by the terms and conditions herein.
You agree that you are solely responsible for your own conduct while using this product,
and for any consequences thereof. You agree to use this product only for purposes
that are proper and in accordance with all applicable laws, rules, and regulations, and
all terms, precautions, practices, policies and guidelines DJI has made and may make
available. DJI accepts no liability for damage, injury or any legal responsibility incurred
directly or indirectly from the use of this product. The user shall observe safe and lawful
practices including, but not limited to, those set forth in this document.
Notwithstanding above, your statutory rights under applicable national legislation are not
affected by this disclaimer.
DJI is a trademark of SZ DJI TECHNOLOGY CO., LTD. (abbreviated as “DJI”) and its
afliated companies. Names of products, brands, etc., appearing in this document are
trademarks or registered trademarks of their respective owner companies. This product
and document are copyrighted by DJI with all rights reserved. No part of this product or
document shall be reproduced in any form without prior written consent of or authorization
from DJI.
Warning
Always stay alert when using the DJI Smart Controller (hereinafter referred as “Smart
Controller”) to control an Unmanned Aerial Vehicle (UAV). Carelessness may result in
serious harm to yourself and others. Always download and read the Disclaimer and Safety
Guidelines of the aircraft and the Smart Controller’s User Manual before use.
1. Fully charge the Smart Controller before each ight.

3
EN
2. If the Smart Controller is powered on and has not been used for ve minutes, it will
sound an alert. After six minutes, it will automatically power off. Move the sticks or
perform some other action to cancel the alert.
3. Ensure the antennas are unfolded and adjusted to the proper position to achieve the
optimal transmission quality.
4. Contact DJI support to repair or replace the antennas if they are damaged. Damaged
antennas will greatly decrease performance.
5. Link the Smart Controller and the aircraft again if you change the aircraft.
6. Ensure to power off the aircraft before the Smart Controller.
7. Fully charge the Smart Controller every three months.
8. Immediately charge the Smart Controller when its power level decreases to 0% to
prevent the Smart Controller from damage due to over discharge for an extended
period. Discharge the Smart Controller to a power level between 40% and 60% if
stored for an extended period.
9. DO NOT cover the air vent or the air intake on the Smart Controller. Otherwise, the
Smart Controller may become too hot, which could affect its performance.
10. DO NOT disassemble the Smart Controller without the assistance of a DJI authorized
dealer. Always contact DJI or a DJI authorized dealer to replace the Smart Controller’s
components.
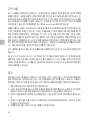
Introduction
The DJI Smart Controller features OCUSYNC™ 2.0 technology, capable of controlling
aircraft
that support the technology, and providing a live HD view from the aircraft's
camera. It can transmit image data at distances of up to 8 km and comes with a number
of aircraft and gimbal controls as well as some customizable buttons.
The built-in 5.5-inch high brightness 1000 cd/m² screen has a resolution of 1920×1080
pixels, featuring an Android system with multiple functions such as Bluetooth and GNSS. It
supports to connect to the Internet via Wi-Fi.
The Smart Controller has a maximum working time of 2.5 hours .

4
EN
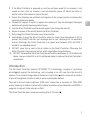
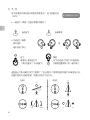
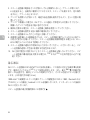
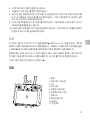
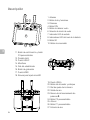
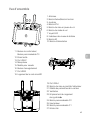
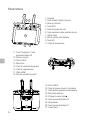
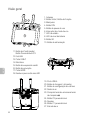
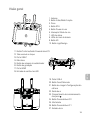
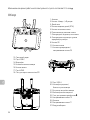
Overview
1. Antennas
2. Back Button / Function Button
3. Sticks
4. RTH Button
5. Flight Pause Button
6. Flight Mode Switch
7. Status LED
8. Battery Level LEDs
9. 5D Button
10. Power Button
11. Conrm Button / Customizable Button C3
12. Touch Screen
13. USB-C Port
14. Microphone
15. Gimbal Dial
16. Record Button
17. HDMI Port
18. MicroSD Card Slot
19. USB-A Port
20. Focus / Shutter Button
21. Camera Setting Dial
22. Air Vent
23. Sticks Storage Slot
24. Customizable Button C2
25. Speaker
26. Customizable Button C1
27. Air Intake
1
6
9999
1010101010101010101010101010
10
12
10
13
77
8
11
3
2
4
14
22
26
27
25
15
16
17
18
19
20
21
23
24
5
1
6
9999
1010101010101010101010101010
10
12
10
13
77
8
11
3
2
4
14
22
26
27
25
15
16
17
18
19
20
21
23
24
5
1
6
9999
1010101010101010101010101010
10
12
10
13
77
8
11
3
2
4
14
22
26
27
25
15
16
17
18
19
20
21
23
24
5

5
EN
①
Please refer to the Specications for details on supported aircraft.
②
The Smart Controller can reach its maximum transmission distance (FCC) in a wide open area with
no electromagnetic interference using a MAVIC
TM
2 at an altitude of about 100 meters.
③
The maximum working time was tested in a lab environment and is for reference only.
④
A pair of sticks are stocked in the Sticks Storage Slot before delivery. In the illustrations used in the
overview section, the sticks have already been mounted on the Smart Controller.
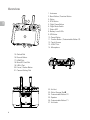
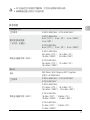
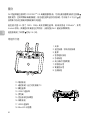
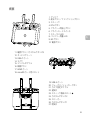
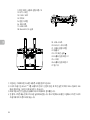
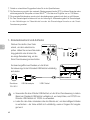
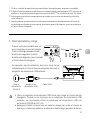
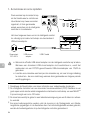
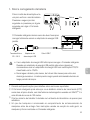
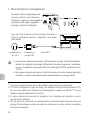
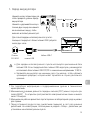
1. Battery Level and Charging
Press the power button once to check
the battery level.
Press and hold for two seconds or
press for a few seconds to power on
the Smart Controller.
Low
It takes about two hours to fully charge the Smart
Controller using the standard USB power adapter.
• Please use the ofcial USB power adapter to charge the Smart Controller. When a
standard USB power adapter is not available, it is recommended to use an FCC/
CE certied USB power adapter rated 12V/2A.
• Please recharge the battery at least every three months to prevent over
discharging - the battery will deplete when stored for an extended period.
Power Outlet
100~240 V
USB
Power Adapter
USB-C Cable
HighBattery

6
EN
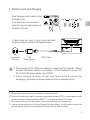
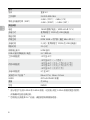
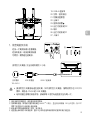
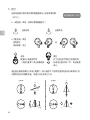
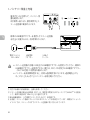
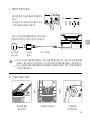
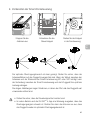
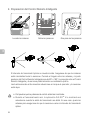
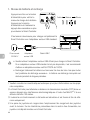
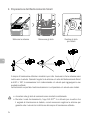
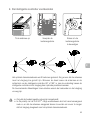
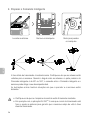
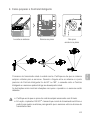
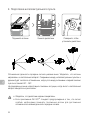
2. Preparing the Smart Controller
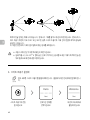
The optimal transmission range is shown above. Ensure the antennas are facing
towards the aircraft. When the angle between the antennas and the back of the Smart
Controller is 80° or 180°, the connection between the Smart Controller and the aircraft
can reach its optimal performance.
The illustrations above show situations where the operator and aircraft are far away.
Lift the antennas Remove the sticks Rotate to attach the sticks
•
Ensure the control sticks are rmly mounted.
•
In real operation, the DJI GO
TM
4 app will prompt to warn that the transmission
signal is weak, and please adjust the antennas to ensure that the aircraft is back
to the optimal transmission range.
80°

7
EN
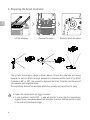
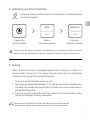
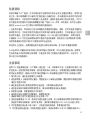
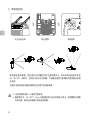
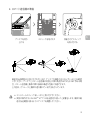
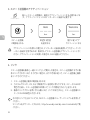
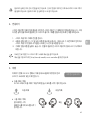
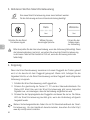
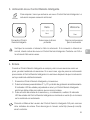
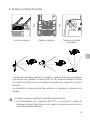
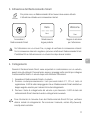
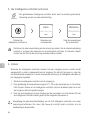
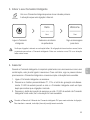
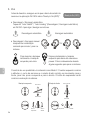
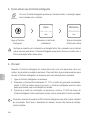
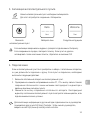
3. Activating your Smart Controller
4. Linking
Please check the internet connection if activation fails. If the internet connection is normal,
please retry to activate the Smart Controller. Contact DJI if activation fails several times over.
Internet
A brand new Smart Controller needs to be activated rst. Activation requires
an Internet connection.
When the Smart Controller is purchased together with an aircraft as a combo, it is
already linked to the aircraft. If not, please follow the steps below to link the Smart
Controller and the aircraft after successful activation.
1. Power on the Smart Controller and the aircraft.
2. Press down the customizable buttons C1, C2, and the record button simultaneously.
The status LED will blink blue and the Smart Controller will sound a double beep to
indicate that linking starts.
3. Press the aircraft’s linking button and then release. The Smart Controller’s status
LED will be solid green if linking is successful.
Power on the
Smart Controller
Select a
Preferable Language
Follow the
Prompts to Activate
Hello
Next
Welcome
Start
Please refer to the DJI Smart Controller User Manual for more linking methods.
To download the manual, please visit http://www.dji.com/dji-smart-controller.

8
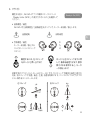
EN
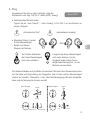
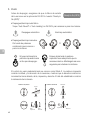
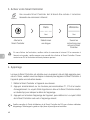
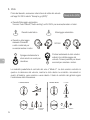
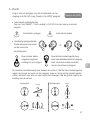
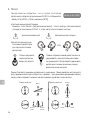
• Manual Takeoff/Landing
Combination stick command
to start/stop the motors.
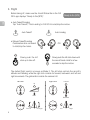
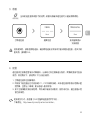
5. Flight
Before taking off, make sure the Aircraft Status Bar in the DJI
GO 4 app displays “Ready to Go (GPS)”.
Ready to Go (GPS)
• Auto Takeoff/Landing
Tap “Auto Takeoff”/ “Auto Landing” in DJI GO 4 to start/stop the motors.
Auto Takeoff
OR
Slowly push the left
stick up to take off.
Slowly push the left stick down until
the aircraft lands. Hold for a few
seconds to stop the motors.
Auto Landing
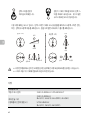
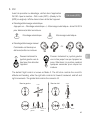
The default flight control is known as Mode 2. The left stick controls the aircraft’s
altitude and heading, while the right stick controls its forward, backward, and left and
right movements. The gimbal dial controls the camera’s tilt.
Left Stick
Up
Down
Turn Left
Turn Right
Right Stick
Forward
Backward
Left
Right

9
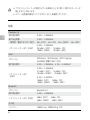
EN
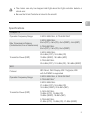
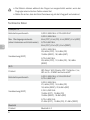
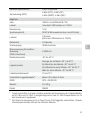
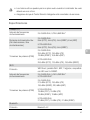
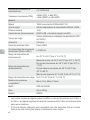
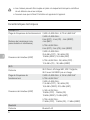
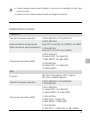
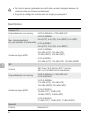
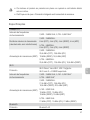
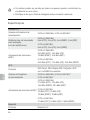
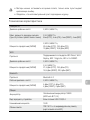
Ocusync 2.0
Operation Frequency Range 2.400-2.4835 GHz; 5.725-5.850 GHz*
Max Transmission Distance
(Unobstructed, free of interference)
2.400-2.4835 GHz:
8 km (FCC); 4 km (CE); 4 km (SRRC); 4 km (MIC)
5.725-5.850 GHz:
8 km (FCC); 2 km (CE); 5 km (SRRC)
Transmitter Power (EIRP)
2.400-2.4835 GHz:
25.5 dBm (FCC); 18.5 dBm (CE)
19 dBm (SRRC); 18.5 dBm (MIC)
5.725-5.850 GHz:
25.5 dBm (FCC); 12.5 dBm (CE); 18.5 dBm (SRRC)
Wi-Fi
Protocol
WiFi Direct, Wi-Fi Display, 802.11a/g/n/ac, WiFi
with 2×2 MIMO is supported
Operation Frequency Range
2.400-2.4835 GHz; 5.150-5.250 GHz*
5.725-5.850 GHz*
Transmitter Power (EIRP)
2.400-2.4835 GHz:
21.5 dBm (FCC); 18.5 dBm (CE)
18.5 dBm (SRRC); 20.5 dBm (MIC)
5.150-5.250 GHz:
19 dBm (FCC); 19 dBm (CE)
19 dBm (SRRC); 19 dBm (MIC)
5.725-5.850 GHz:
21 dBm (FCC); 13 dBm (CE); 21 dBm (SRRC)
• The motors can only be stopped mid-ight when the ight controller detects a
critical error.
• Be sure the Smart Controller is linked to the aircraft.

10
EN
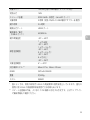
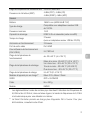
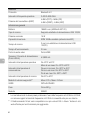
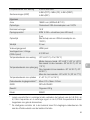
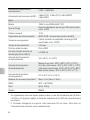
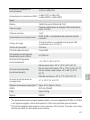
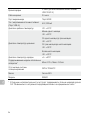
Bluetooth
Protocol Bluetooth 4.2
Operation Frequency Range 2.400-2.4835 GHz
Transmitter Power (EIRP)
4 dBm (FCC); 4 dBm (CE); 4 dBm (SRRC); 4 dBm
(MIC)
General
Battery 18650 Li-ion (5000 mAh @ 7.2 V)
Charge Type Supports USB power adapters rated 12V/2A
Rated Power 15 W
Storage Capacity ROM 16 GB + Scalable (MicroSD)
Charge Time 2 hours (Using a USB power adapter rated 12V/2V)
Working Time 2.5 hours
Video Output Port HDMI Port
Power Supply Current / Voltage
(USB-A port)
5 V/ 900 mA
Operation Temperature Range -4° to 104° F (-20° to 40° C)
Storage Temperature Range
Less than one month: -22° to 140° F (-30° to 60° C)
One month to three months: -22° to 113° F (-30° to
45° C)
Three months to six months: -22° to 95° F (-30° to
35° C)
More than six months: -22° to 77° F (-30° to 25° C)
Charging Temperature Range 41° to 104° F (5°~40° C)
Supported Aircraft Models** Mavic 2 Pro; Mavic 2 Zoom
GNSS GPS+GLONASS
Weight Approx. 630 g
Model RM500
* Local regulations in some countries prohibit the use of the 5.8 GHz and 5.2 GHz frequencies and in
some regions the 5.2 GHz frequency band is only allowed for indoor use.
** The Smart Controller will support more DJI aircrafts in future. Please visit the ofcial website for the
latest information.

CHS
11
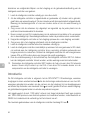
免责声明
感谢您购买 DJI
TM
产品。本文所提及的内容关系到您的安全以及合法权益与责任。使用本
产品之前,请仔细阅读本文以确保已对产品进行正确的设置。不遵循和不按照本文的说明
与警告来操作可能会给您和周围的人带来伤害,损坏本产品或其它周围的物品。本文档及
本产品所有相关的文档最终解释权归大疆
TM
创新(DJI)所有。如有更新,恕不另行通知。
请访问 www.dji.com 官方网站以获取最新的产品信息。
一旦使用本产品,即视为您已经仔细阅读本免责声明与警告,理解、认可和接受本声明全
部条款和内容。您承诺对使用本产品以及可能带来的后果负全部责任。您承诺仅出于正当
目的使用本产品,并且同意本条款以及大疆创新(DJI)制定的任何相关条例、政策和指引。
大疆创新(DJI)对于直接或间接使用本产品而造成的损坏、伤害以及任何法律责任不予负
责。用户应遵循包括但不限于本文提及的所有安全指引。
即使存在上述规定,消费者权益依然受当地法律法规所保障,并不受本免责声明影响。
DJI 是深圳市大疆创新科技有限公司及其关联公司的商标。本文出现的产品名称、品牌等,
均为其所属公司的商标或注册商标。本产品及手册为大疆创新版权所有。未经许可,不得
以任何形式复制翻印。
注意事项
使用 DJI 带屏遥控器(以下简称“遥控器”)时,如果操作不当,飞行器可能会对人身财
产造成一定程度的伤害和破坏,请在使用时务必注意安全,详情请查看飞行器的免责声明
与安全使用指引。请务必于官网下载并阅读《DJI 带屏遥控器用户手册》后再进行使用。
1. 每次飞行前,确保遥控器电量充满。
2. 遥控器闲置 5 分钟后将发出报警,闲置超过 6 分钟将自动关机。拨动摇杆可让遥控器恢
复为正常工作状态。
3. 确保遥控器天线展开并调整到合适的位置,以获得最佳的通信效果。
4. 遥控器天线如有损坏将影响使用性能,请及时联系售后技术支持。
5. 如更换飞行器,需要重新对频才能使用。
6. 确保每次先关闭飞行器电源,再关闭遥控器。
7. 请确保每隔三个月对遥控器进行完全充电一次。
8. 当遥控器电量为 0% 时请及时对遥控器进行充电,防止低电量长时间存放导致电池深度
过放导致设备损坏。长期不使用时,请将电池电量放至 40%~60% 左右进行存放。
9. 切勿遮挡遥控器出风口及入风口,以免遥控器温度过高,影响遥控器性能。
10. 切勿擅自拆装遥控器,如需更换遥控器部件,请务必联系 DJI 或 DJI 授权的维修中心。

CHS
12
简 介
DJI 带屏遥控器采用 OCUSYNC
TM
2.0 高清图传技术,可与支持该图传技术的飞行器
搭配
使用,并实时传输高清画面。配合遥控器完备的功能按键,可在最大 8 千米
通信距离内
完成飞行器与相机的操作与设置。
遥控器内置 5.5 英寸 1920×1080p 高亮触摸屏,最高亮度达 1000 cd/m
2
。采用 Android
系统,具备蓝牙及卫星定位等功能。支持通过 Wi-Fi 连接至互联网。
遥控器最长工作时间
约为 2.5 小时。
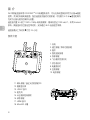
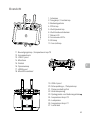
部件介绍
1. 天线
2. 退回按键 / 系统功能按键
3. 摇杆
4. 智能返航按键
5. 急停按键
6. 飞行模式切换开关
7. 状态指示灯
8. 电量指示灯
9. 五维按键
10. 电源按键
11. 确认按键 / 自定义功能按键 C3
12. 触摸显示屏
13. USB-C 接口
14. 麦克风
15. 云台俯仰控制拨轮
16. 录影按键
17. HDMI 接口
18. MicroSD 卡槽
1
6
9999
1010101010101010101010101010
10
12
10
13
77
8
11
3
2
4
14
22
26
27
25
15
16
17
18
19
20
21
23
24
5
1
6
9999
1010101010101010101010101010
10
12
10
13
77
8
11
3
2
4
14
22
26
27
25
15
16
17
18
19
20
21
23
24
5

CHS
13
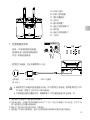
1. 检查电量及充电
短按一次电源按键检查电量。
短按再长按 / 或长按电源按键可
开启 / 关闭遥控器电源。
使用官方充电器,完全充满需要约 2 小时。
交流电源
100~240 V
USB 充电器 USB-C 连接线
19. USB-A 接口
20. 对焦 / 拍照按键
21. 相机设置拨轮
22. 出风口
23. 摇杆收纳槽
④
24. 自定义功能按键 C2
25. 扬声器
26. 自定义功能按键 C1
27. 入风口
① 当前支持飞行器型号,请查看技术规格章节。
② 在开阔无遮挡、无电磁干扰的环境操控 MAVIC
TM
2 飞行,并且飞行高度为 120 米左右,在 FCC 标
准下遥控器可以达到最大通信距离。
③ 最长可工作时间为实验环境下测得,仅供参考。
④ 遥控器出厂时默认未安装摇杆,图示中已将背面摇杆收纳槽中的摇杆安装于遥控器。
低 高电量
• 请使用官方充电器对遥控器进行充电。如不使用官方充电器,推荐使用符合 FCC/
CE 标准,规格为 12V/2A 的 USB 充电器。
• 为保持遥控器电池最佳状态,请确保每 3 个月对遥控器进行完全充电一次。
1
6
9999
1010101010101010101010101010
10
12
10
13
77
8
11
3
2
4
14
22
26
27
25
15
16
17
18
19
20
21
23
24
5

CHS
14
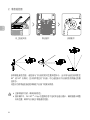
2. 准备遥控器
80°
向上抬起天线 取出摇杆 安装摇杆
获取最佳通信范围,遥控器与飞行器的相对位置如图所示,当天线与遥控器背面呈
80°或 180°夹角时,且天线平面正对飞行器,可让遥控器与飞行器的信号质量达到最
佳状态。
此图示为使用遥控器远距离操控飞行器下的建议角度。
• 注意将摇杆拧紧,确保安装到位。
• 实际操作中,DJI GO
TM
4 App 在图传信号不佳时将会进行提示,请根据提示调整
天线位置,确保飞行器处于最佳通信范围。

CHS
15
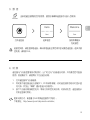
3. 激 活
4. 对 频
若激活失败,请检查网络连接。确认网络连接正常后再次尝试激活遥控器。若多次激
活失败,请联系 DJI。
全新的遥控器需激活才能使用,激活时请确保遥控器可以接入互联网。
遥控器与飞行器呈套装形式购买时,出厂时已与飞行器进行对频,开机激活后可直接
使用。其他情况下,请使用以下方法进行对频。
1. 打开遥控器和飞行器电源。
2. 同时按下遥控器自定义按键 C1、C2 和录影按键,此时遥控器状态指示灯显示蓝
灯闪烁,并发出“嘀嘀”提示音进入对频状态。
3. 按下飞行器对频按键后松开,等待几秒钟后完成对频。对频成功后,遥控器指示
灯将会呈绿灯常亮。
打开遥控器 选择语言 按照屏幕提示
完成激活
Internet
Hello
Next
Welcome
Start
更多对频方式,请查看《DJI 带屏遥控器用户手册》。
下载地址:http://www.dji.com/dji-smart-controller。

CHS
16
遥控器出厂默认操控方式为“美国手”。飞行过程中,可使用左摇杆控制飞行高度与方向,
右摇杆控制飞行器的前进、后退以及左右飞行方向。
5. 飞 行
起飞前请务必等待显示屏相机界面显示“ 起飞准备完毕
(GPS)”。
自动起飞 自动降落
起飞准备完毕(GPS)
• 一键起飞/降落(在显示屏相机界面中)
• 手动起飞 / 降落
掰杆动作
电机启动 / 停止
降落
向下拉动油门杆至飞行器落地,
在最低位置保持 2 秒,电机停止。
或
起飞
缓慢向上推动油门杆
(默认左摇杆)飞行器起飞
左摇杆 右摇杆
上升
下降
右转左转
前
后
右左

CHS
17
技术规格
Ocusync 2.0
工作频率 2.400-2.4835 GHz;5.725-5.850 GHz*
最大信号有效距离
(无干扰、无遮挡)
2.400-2.4835 GHz:
8 km(FCC);4 km(CE);4 km(SRRC)
4 km(MIC)
5.725-5.850 GHz:
8 km(FCC);2 km(CE);5 km(SRRC)
等效全向辐射功率(EIRP)
2.400-2.4835 GHz:
25.5 dBm(FCC);18.5 dBm(CE)
19 dBm(SRRC);18.5 dBm(MIC)
5.725-5.850 GHz:
25.5 dBm(FCC);12.5 dBm(CE)
18.5 dBm(SRRC)
Wi-Fi
协议
WiFi Direct, Wi-Fi Display, 802.11a/g/n/ac
支持 2 x 2 MIMO Wi-Fi
工作频率
2.400-2.4835 GHz;5.150-5.250 GHz*
5.725-5.850 GHz*
等效全向辐射功率(EIRP)
2.400-2.4835 GHz:
21.5 dBm(FCC);18.5 dBm(CE)
18.5 dBm(SRRC);20.5 dBm(MIC)
5.150-5.250 GHz:
19 dBm(FCC);19 dBm(CE)
19 dBm(SRRC);19 dBm(MIC)
5.725-5.850 GHz:
21 dBm(FCC);13 dBm(CE)
21 dBm(SRRC)
• 如飞行器在空中检测到严重故障,才可执行紧急停机掰杆动作。
• 请确保遥控器已成功与飞行器对频。

CHS
18
蓝牙
协议 蓝牙 4.2
工作频率 2.400-2.4835 GHz
等效全向辐射功率(EIRP)
4 dBm(FCC);4 dBm(CE)
4 dBm(SRRC);4 dBm(MIC)
其他参数
电池 18650 锂离子电池 (5000 mAh @ 7.2 V)
充电方式 使用规格为 12V/2A 的 USB 充电器
额定功耗 15 W
存储空间 ROM 16GB + 可扩展(通过 Micro SD 卡)
充电时间 2 小时(使用规格为 12V/2A 的 USB 充电器)
续航时间 2.5 小时
视频输出接口 HDMI 接口
USB-A 接口供电电流 / 电压 5 V / 900 mA
工作环境温度 -20℃至 40℃
存放环境温度
-30℃至 60℃ (一个月内)
-30℃至 45℃(大于一个月小于三个月)
-30℃至 35℃(大于三个月小于六个月)
-30℃至 25℃(大于六个月)
充电环境温度 5℃至 40℃
支持的 DJI 飞行器 ** Mavic 2 Pro;Mavic 2 Zoom
GNSS GPS+GLONASS 双模
重量 约 630 g
型号 RM500
* 部分地区不支持 5.2GHz 和 5.8GHz 频段,以及部分地区 5.2GHz 频段仅限室内使用,
详情请参考当地法律法规。
** 后续将会支持更多 DJI 飞行器,请留意官网获取最新信息。
La page est en cours de chargement...
La page est en cours de chargement...
La page est en cours de chargement...
La page est en cours de chargement...
La page est en cours de chargement...
La page est en cours de chargement...
La page est en cours de chargement...
La page est en cours de chargement...
La page est en cours de chargement...
La page est en cours de chargement...
La page est en cours de chargement...
La page est en cours de chargement...
La page est en cours de chargement...
La page est en cours de chargement...
La page est en cours de chargement...
La page est en cours de chargement...
La page est en cours de chargement...
La page est en cours de chargement...
La page est en cours de chargement...
La page est en cours de chargement...
La page est en cours de chargement...
La page est en cours de chargement...
La page est en cours de chargement...
La page est en cours de chargement...
La page est en cours de chargement...
La page est en cours de chargement...
La page est en cours de chargement...
La page est en cours de chargement...
La page est en cours de chargement...
La page est en cours de chargement...
La page est en cours de chargement...
La page est en cours de chargement...
La page est en cours de chargement...
La page est en cours de chargement...
La page est en cours de chargement...
La page est en cours de chargement...
La page est en cours de chargement...
La page est en cours de chargement...
La page est en cours de chargement...
La page est en cours de chargement...
La page est en cours de chargement...
La page est en cours de chargement...
La page est en cours de chargement...
La page est en cours de chargement...
La page est en cours de chargement...
La page est en cours de chargement...
La page est en cours de chargement...
La page est en cours de chargement...
La page est en cours de chargement...
La page est en cours de chargement...
La page est en cours de chargement...
La page est en cours de chargement...
La page est en cours de chargement...
La page est en cours de chargement...
La page est en cours de chargement...
La page est en cours de chargement...
La page est en cours de chargement...
La page est en cours de chargement...
La page est en cours de chargement...
La page est en cours de chargement...
La page est en cours de chargement...
La page est en cours de chargement...
La page est en cours de chargement...
La page est en cours de chargement...
La page est en cours de chargement...
La page est en cours de chargement...
La page est en cours de chargement...
La page est en cours de chargement...
La page est en cours de chargement...
La page est en cours de chargement...
La page est en cours de chargement...
La page est en cours de chargement...
La page est en cours de chargement...
La page est en cours de chargement...
La page est en cours de chargement...
La page est en cours de chargement...
La page est en cours de chargement...
La page est en cours de chargement...
La page est en cours de chargement...
La page est en cours de chargement...
La page est en cours de chargement...
La page est en cours de chargement...
La page est en cours de chargement...
La page est en cours de chargement...
La page est en cours de chargement...
La page est en cours de chargement...
La page est en cours de chargement...
La page est en cours de chargement...
La page est en cours de chargement...
La page est en cours de chargement...
La page est en cours de chargement...
La page est en cours de chargement...
La page est en cours de chargement...
La page est en cours de chargement...
La page est en cours de chargement...
La page est en cours de chargement...
La page est en cours de chargement...
La page est en cours de chargement...
La page est en cours de chargement...
La page est en cours de chargement...
La page est en cours de chargement...
La page est en cours de chargement...
La page est en cours de chargement...
La page est en cours de chargement...
La page est en cours de chargement...
La page est en cours de chargement...
La page est en cours de chargement...
-
 1
1
-
 2
2
-
 3
3
-
 4
4
-
 5
5
-
 6
6
-
 7
7
-
 8
8
-
 9
9
-
 10
10
-
 11
11
-
 12
12
-
 13
13
-
 14
14
-
 15
15
-
 16
16
-
 17
17
-
 18
18
-
 19
19
-
 20
20
-
 21
21
-
 22
22
-
 23
23
-
 24
24
-
 25
25
-
 26
26
-
 27
27
-
 28
28
-
 29
29
-
 30
30
-
 31
31
-
 32
32
-
 33
33
-
 34
34
-
 35
35
-
 36
36
-
 37
37
-
 38
38
-
 39
39
-
 40
40
-
 41
41
-
 42
42
-
 43
43
-
 44
44
-
 45
45
-
 46
46
-
 47
47
-
 48
48
-
 49
49
-
 50
50
-
 51
51
-
 52
52
-
 53
53
-
 54
54
-
 55
55
-
 56
56
-
 57
57
-
 58
58
-
 59
59
-
 60
60
-
 61
61
-
 62
62
-
 63
63
-
 64
64
-
 65
65
-
 66
66
-
 67
67
-
 68
68
-
 69
69
-
 70
70
-
 71
71
-
 72
72
-
 73
73
-
 74
74
-
 75
75
-
 76
76
-
 77
77
-
 78
78
-
 79
79
-
 80
80
-
 81
81
-
 82
82
-
 83
83
-
 84
84
-
 85
85
-
 86
86
-
 87
87
-
 88
88
-
 89
89
-
 90
90
-
 91
91
-
 92
92
-
 93
93
-
 94
94
-
 95
95
-
 96
96
-
 97
97
-
 98
98
-
 99
99
-
 100
100
-
 101
101
-
 102
102
-
 103
103
-
 104
104
-
 105
105
-
 106
106
-
 107
107
-
 108
108
-
 109
109
-
 110
110
-
 111
111
-
 112
112
-
 113
113
-
 114
114
-
 115
115
-
 116
116
-
 117
117
-
 118
118
-
 119
119
-
 120
120
-
 121
121
-
 122
122
-
 123
123
-
 124
124
-
 125
125
-
 126
126
-
 127
127


dji Assistant 2 For Mavic Mode d'emploi
- Taper
- Mode d'emploi
- Ce manuel convient également à
dans d''autres langues
- italiano: dji Assistant 2 For Mavic Guida utente
- English: dji Assistant 2 For Mavic User guide
- español: dji Assistant 2 For Mavic Guía del usuario
- Deutsch: dji Assistant 2 For Mavic Benutzerhandbuch
- русский: dji Assistant 2 For Mavic Руководство пользователя
- Nederlands: dji Assistant 2 For Mavic Gebruikershandleiding
- português: dji Assistant 2 For Mavic Guia de usuario
- 日本語: dji Assistant 2 For Mavic ユーザーガイド