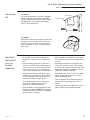
GE ZIS420NK Le manuel du propriétaire
- Catégorie
- Frigos
- Taper
- Le manuel du propriétaire

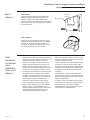
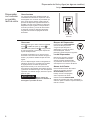
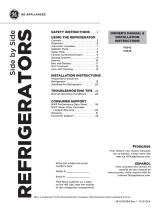
OWNER’S
MANUAL
Side-by-Side 36", 42", 48"
Built-In Refrigerators
Pour obtenir une version française de ce manuel, visitez notre site
Web sur Monogram.com.
Para consultar una version en español de este manual de
instrucciones, visite nuestro sitio de internet Monogram.com.
Monogram.com

2 49-60815 Rev. 1
Contents
Before
using your
refrigerator
Read this manual carefully. It is intended
to help you operate and maintain your new
refrigerator properly.
Keep it handy for answers to your questions.
If you don’t understand something or need
more help, there is a list of toll-free consumer
service numbers included in the back section
of this manual.
OR
Visit our website at: monogram.com
Consumer Information
Introduction
Your new Monogram refrigerator makes an eloquent statement of style, convenience and kitchen
planning flexibility. Whether you chose it for its purity of design, practical storage arrangements
or assiduous attention to detail—or for all of these reasons—you’ll find that your Monogram
refrigerator’s superior blend of form and function will delight you for years to come.
The information on the following pages will help you operate and maintain your refrigerator
properly.
If you have any other questions, visit our Website at: monogram.com
Consumer Services
Important Phone Numbers ............32
Model and Serial Numbers .............3
Problem Solver .....................24
Product Registration ..................3
Safety Instructions .................... 4
Smartwater Filter Performance
Data Sheet ........................30
Limited Warranty ....................31
Care and Cleaning
Cleaning—Outside and Inside. . . . . . . . . . 21
Preparation ........................23
Refrigerator Lights ...................22
Vacation. . . . . . . . . . . . . . . . . . . . . . . . . . . 22
Operating Instructions
Automatic Icemaker ..................14
Climate Control Drawer ...............15
Control Lock .......................16
Ice and Water Dispenser ..............12
Shelves and Bins. . . . . . . . . . . . . . . . . . . . 19
Storage Pans .......................17
Temperature Controls ................10
Water Filter Cartridge ................11
WiFi Connect .......................20
Built-In Refrigerators

49-60815 Rev. 1 3
If you
received a
damaged
refrigerator
Immediately contact the dealer (or builder) that
sold you the refrigerator.
Save time
& money
Before you request service, check the
Problem Solver in the back of this manual.
It lists causes of minor operating problems that
you can correct yourself.
If you
need
service
To obtain service, see the Consumer
Services page in the back of this manual.
We’re proud of our service and want you to be
pleased. If for some reason you are not happy
with the service you receive, here are steps to
follow for further help.
For customers in the USA:
FIRST, contact the people who serviced your
appliance. Explain why you are not pleased.
In most cases, this will solve the problem.
NEXT, if you are still not pleased, contact
Monogram.com or call 888.444.1875 during
normal business hours
For customers in Canada:
FIRST, contact the people who serviced
your appliance. Explain why you are not
pleased. In most cases, this will solve the
problem.
NEXT, if you are still not pleased, write all
the details—including your phone number
to:
Manager, Consumer Relations
Mabe Canada Inc.
1 Factory Lane, Suite 310
Moncton, N.B. E1C 9M3
Write
down the
model
& serial
numbers
You’ll see them on a label in the lower right
hand side of the fresh food compartment
beneath the climate control drawer.
Before sending in the Product Registration
card, please write these numbers here:
Model Number
Serial Number
Use these numbers in any correspondence or
service calls concerning your refrigerator.
Consumer Information
Built-In Refrigerators

4 49-60815 Rev. 1
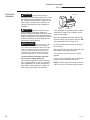
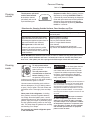
IMPORTANT SAFETY INSTRUCTIONS
READ AND SAVE THESE INSTRUCTIONS
CAUTION
To reduce the risk of injury when using your refrigerator, follow these basic safety precautions.
Ŷ 'RQRWFOHDQJODVVVKHOYHVRUFRYHUVZLWKZDUPZDWHU
when they are cold. Glass shelves and covers may
break if exposed to sudden temperature changes or
impact, such as bumping or dropping. Tempered
glass is designed to shatter into many small pieces if it
breaks.
Ŷ .HHSILQJHUVRXWRIWKH³SLQFKSRLQW´DUHDVFOHDUDQFHV
between the doors and between the doors and cabinet
are necessarily small. Be careful closing doors when
children are in the area.
Ŷ 'RQRWWRXFKWKHFROGVXUIDFHVLQWKHIUHH]HU
compartment when hands are damp or wet, skin may
stick to these extremely cold surfaces.
Ŷ 'RQRWUHIUHH]HIUR]HQIRRGVZKLFKKDYHWKDZHG
completely.
Ŷ ,QIUHH]HUVZLWKDXWRPDWLFLFHPDNHUVDYRLGFRQWDFW
with the moving parts of the ejector mechanism, or
with the heating element that releases the cubes. Do
not place fingers or hands on the automatic ice making
PHFKDQLVPZKLOHWKHIUHH]HULVSOXJJHGLQ
WARNING
To reduce the risk of fire, explosion, electric shock, or injury when using your refrigerator, follow
these basic safety precautions:
Ŷ 7KLVUHIULJHUDWRUPXVWEHSURSHUO\LQVWDOOHGDQGORFDWHG
in accordance with the Installation Instructions before it
is used.
Ŷ 8QSOXJWKHUHIULJHUDWRUEHIRUHPDNLQJUHSDLUVRU
cleaning.
NOTE: Power to the refrigerator cannot be
disconnected by any setting on the control panel.
NOTE: Repairs must be performed by a qualified
Service Professional.
Ŷ 5HSODFHDOOSDUWVDQGSDQHOVEHIRUHRSHUDWLQJ
Ŷ 'RQRWXVHDQH[WHQVLRQFRUG
Ŷ 'RQRWVWRUHRUXVHJDVROLQHRURWKHUIODPPDEOH
vapors and liquids in the vicinity of this or any other
appliance.
Ŷ 'RQRWVWRUHH[SORVLYHVXEVWDQFHVVXFKDVDHURVRO
cans with a flammable propellant in this appliance.
Ŷ 7RSUHYHQWVXIIRFDWLRQDQGHQWUDSPHQWKD]DUGVWR
FKLOGUHQUHPRYHWKHIUHVKIRRGDQGIUHH]HUGRRUVIURP
any refrigerator before disposing of it or discontinuing
its use.
Ŷ 7RDYRLGVHULRXVLQMXU\RUGHDWKFKLOGUHQVKRXOGQRW
stand on, or play in or with the appliance.
Ŷ &KLOGUHQDQGSHUVRQVZLWKUHGXFHGSK\VLFDOVHQVRU\
or mental capabilities or lack of experience and
knowledge can use this appliance only if they are
supervised or have been given instructions on safe
XVHDQGXQGHUVWDQGWKHKD]DUGVLQYROYHG
Ŷ 7KLVDSSOLDQFHLVLQWHQGHGWREHXVHGLQKRXVHKROG
and similar applications such as: staff kitchen areas in
VKRSVRIILFHVDQGRWKHUZRUNLQJHQYLURQPHQWVIDUP
KRXVHVE\FOLHQWVLQKRWHOVPRWHOVEHG
EUHDNIDVWDQGRWKHUUHVLGHQWLDOHQYLURQPHQWV
catering and similar non-retail applications.
Ŷ 'RQRWDSSO\KDUVKFOHDQHUVWRWKHUHIULJHUDWRU
Certain cleaners will damage plastic which may cause
parts such as the door or door handles to detach
unexpectedly. See the Care and Cleaning section for
detailed instructions.
INSTALLATION
WARNING
EXPLOSION HAZARD
Keep flammable materials and vapors, such as gasoline, away from refrigerator. Failure to do so can result in fire,
explosion, or death.
WARNING
Tip Over Hazard.
These appliances are top heavy, especially with any doors open, and must be secured to prevent tipping forward
which could result in death or serious injury. Read and follow the entire installation instructions for securing the
appliance with the anti-tip system.

49-60815 Rev. 1 5
IMPORTANT SAFETY INSTRUCTIONS
READ AND SAVE THESE INSTRUCTIONS
PROPER DISPOSAL OF YOUR OLD REFRIGERATOR
Do not, under any circumstances, cut or remove the third (ground) prong from the power cord. For personal
safety, this appliance must be properly grounded.
The power cord of this appliance is equipped with a
3-prong (grounding) plug which mates with a standard
SURQJJURXQGLQJZDOORXWOHWWRPLQLPL]HWKHSRVVLELOLW\
RIHOHFWULFVKRFNKD]DUGIURPWKLVDSSOLDQFH
Have the wall outlet and circuit checked by a qualified
electrician to make sure the outlet is properly grounded.
Where a standard 2-prong wall outlet is encountered, it
is your personal responsibility and obligation to have it
replaced with a properly grounded 3-prong wall outlet.
Do not use an adapter.
The refrigerator should always be plugged into its own
individual electrical outlet which has a voltage rating that
matches the rating plate.
$9ROW$&+]RUDPSIXVHGJURXQGHG
electrical supply is required. This provides the best
performance and also prevents overloading house wiring
FLUFXLWVZKLFKFRXOGFDXVHDILUHKD]DUGIURPRYHUKHDWHG
wires.
Never unplug your refrigerator by pulling on the power
cord. Always grip plug firmly and pull straight out from
the outlet.
Immediately discontinue use of a damaged supply cord.
If the supply cord is damaged, it must be replaced by a
TXDOLILHGVHUYLFHSURIHVVLRQDOZLWKDQDXWKRUL]HGVHUYLFH
part from the manufacturer.
When moving the refrigerator away from the wall, be
careful not to roll over or damage the power cord.
CONNECTING ELECTRICITY
WARNING
ELECTRICAL SHOCK HAZARD
Plug into a grounded 3-prong outlet
Do not remove the ground prong
Do not use an adapter
Do not use an extension cord.
Failure to follow these instructions can result in death, fire, or electrical shock.
WARNING
SUFFOCATION AND ENTRAPMENT HAZARD
Failure to follow these disposal instructions can result in death or serious injury
IMPORTANT: Child entrapment and suffocation are not
problems of the past. Junked or abandoned refrigerators
DUHVWLOOGDQJHURXVHYHQLIWKH\ZLOOVLWIRU³MXVWDIHZ
GD\V´,I\RXDUHJHWWLQJULGRI\RXUROGUHIULJHUDWRUSOHDVH
follow the instructions below to help prevent accidents.
Before You Throw Away Your Old Appliance
Ŷ7DNHRIIWKHIUHVKIRRGDQGIUHH]HUGRRUV
Ŷ Leave the shelves in place so that children may not
easily climb inside.
Refrigerant and Foam Disposal:
Dispose of appliance in accordance with Federal and Local Regulations. Contact your local authorities for the
environmentally safe disposal of your appliance.

6 49-60815 Rev. 1
IMPORTANTES CONSIGNES DE SÉCURITÉ
LIRE ET CONSERVER CES INSTRUCTIONS
AVERTISSEMENT
3RXUUpGXLUHOHULVTXHG¶LQFHQGLHG¶H[SORVLRQGHFKRFpOHFWULTXHRXGHEOHVVXUHVORUVTXHYRXVXWLOLVH]
YRWUHUpIULJpUDWHXUGHYHXLOOH]VXLYUHFHVFRQVLJQHVGHVpFXULWp
Ŷ &HUpIULJpUDWHXUGRLWrWUHFRUUHFWHPHQWLQVWDOOpFRQIRUPpPHQW
aux Consignes d’Installation avant toute utilisation.
Ŷ 'pEUDQFKH]OHUpIULJpUDWHXUDYDQWG¶HIIHFWXHUXQHUpSDUDWLRQ
de remplacer une ampoule ou de le nettoyer.
Remarque :/¶DOLPHQWDWLRQGXUpIULJpUDWHXUQHSHXWrWUH
déconnectée par aucune des fonctions sur le panneau de
commande.
Remarque /HVUpSDUDWLRQVGRLYHQWrWUHHIIHFWXpHVSDUXQ
professionnel qualifié.
Ŷ 5HPHWWH]WRXWHVOHVSLqFHVHWSDQQHDX[HQSODFHDYDQW
d’utiliser l’appareil.
Ŷ
1¶XWLOLVH]SDVXQFRUGRQGHUDOORQJH
Ŷ$EVWHQH]YRXVG¶HQWUHSRVHURXG¶XWLOLVHUGHO¶HVVHQFHRX
d’autres vapeurs et liquides inflammables aux alentours de
cet électroménager ou d’autres appareils.
Ŷ 1¶HQWUHSRVH]SDVGDQVFHWpOHFWURPpQDJHUGHVVXEVWDQFHV
explosives telles que des bombes aérosols qui contiennent
XQJD]SURSXOVHXU
Ŷ 3RXUpYLWHUOHVULVTXHVG¶DVSK\[LHHWG¶HQIHUPHPHQWSRXU
OHVHQIDQWV'pPRQWH]OHVSRUWHVGXFRQJpODWHXUHWGX
compartiment de réfrigération avant de le mettre au rebut ou
d’interrompre son utilisation.
Ŷ $ILQGHSUpYHQLUOHVDFFLGHQWVJUDYHVRXODPRUWOHVHQIDQWV
ne doivent pas se tenir ni jouer dans ou sur l’électroménager.
Ŷ/HVHQIDQWVHWOHVSHUVRQQHVGRQWOHVFDSDFLWpVVRQWUpGXLWHV
sur le plan physique, sensoriel ou mental, ou qui manquent
d’expérience ou de connaissances, peuvent utiliser cet
électroménager seulement si elles sont surveillées ou ont
reçues des consignes de sécurité sur son usage et les
risques y sont associés.
Ŷ&HWpOHFWURPpQDJHUHVWFRQoXSRXUXQHXWLOLVDWLRQ
domestique et applications similaires : salle du personnel
GDQVXQHXVLQHXQEXUHDXRXG¶DXWUHVOLHX[GHWUDYDLO
PDLVRQGHIHUPHFOLHQWVGDQVXQK{WHOXQPRWHOXQJvWH
WRXULVWLTXHHWG¶DXWUHVOLHX[UpVLGHQWLHOVDSSURYLVLRQQHPHQW
et applications similaires non reliées au commerce de détail.
Ŷ 1¶DSSOLTXH]SDVGHQHWWR\DQWVFRUURVLIVVXUOHUpIULJpUDWHXU
Certains nettoyants endommagent le plastique et peuvent
DLQVLFDXVHUOHGpWDFKHPHQWLQRSLQpGHSLqFHVWHOOHVTXH
SRUWHRXSRLJQpHVGHSRUWH9R\H]ODVHFWLRQ(QWUHWLHQHW
nettoyage pour des instructions détaillées.
INSTALLATION
AVERTISSEMENT
Risque de basculement
&HVpOHFWURPpQDJHUVVRQWORXUGVGDQVOHKDXWHQSDUWLFXOLHUDYHFXQHSRUWHRXYHUWHGHVRUWHTX¶LOVGRLYHQWrWUHIL[pV
DILQGHSUpYHQLUXQEDVFXOHPHQWYHUVO¶DYDQWSRXYDQWRFFDVLRQQHUGHVEOHVVXUHVJUDYHVRXODPRUW9HXLOOH]OLUHHW
suivre la totalité des instructions d’installation afin de fixer votre électroménager par un dispositif antibasculement.
ATTENTION
3RXUUpGXLUHOHULVTXHGHEOHVVXUHVORUVTXHYRXVXWLOLVH]YRWUHUpIULJpUDWHXUGHYHXLOOH]VXLYUHFHVFRQVLJQHV
de sécurité.
Ŷ 1HQHWWR\H]SDVOHVFOD\HWWHVRXOHVFRXYHUFOHVHQYHUUH
DYHFGHO¶HDXWLqGHTXDQGFHX[FLVRQWIURLGV/HVFOD\HWWHV
et couvercles en verre peuvent se casser s’ils sont exposés
à des changements soudains de température ou si vous les
FRJQH]RXOHVIDLWHVWRPEHU/HYHUUHWUHPSpHVWFRQoXSRXU
se briser en petits morceaux en cas de casse
Ŷ eORLJQH]OHVGRLJWVGHVSDUWLHVGXFRQJpODWHXURO¶RQSHXW
facilement se pincer : les espaces entre les portes, et entre
OHVSRUWHVHWOHVSODFDUGVVRQWWRXMRXUVpWURLWV6R\H]SUXGHQW
ORUVTXHYRXVIHUPH]OHVSRUWHVHQSUpVHQFHG¶HQIDQWV
Ŷ 1HWRXFKH]SDVOHVVXUIDFHVIURLGHVGXFRQJpODWHXUORUVTXH
YRXVDYH]OHVPDLQVKXPLGHVRXPRXLOOpHV/DSHDXULVTXH
G¶DGKpUHUjFHVVXUIDFHVH[WUrPHPHQWIURLGHV
Ŷ 1HUHFRQJHOH]SDVOHVDOLPHQWVVXUJHOpVTXLRQW
FRPSOqWHPHQWGpJHOp
Ŷ 6LYRWUHUpIULJpUDWHXUHVWGRWpG¶XQHPDFKLQHjJODoRQV
DXWRPDWLTXHpYLWH]OHFRQWDFWDYHFOHVSLqFHVPRELOHVGX
PpFDQLVPHpMHFWHXURXDYHFO¶pOpPHQWFKDXIIDQWTXLOLEqUH
OHVJODoRQV1HSRVH]SDVOHVGRLJWVRXOHVPDLQVVXUOH
mécanisme de la machine à glaçons automatique pendant
que le réfrigérateur est branché.
AVERTISSEMENT
RISQUE D’EXPLOSION
&RQVHUYH]OHVPDWpULDX[HWYDSHXUVLQIODPPDEOHVWHOVTXHO¶HVVHQFHjO¶pFDUWGHYRWUHUpIULJpUDWHXU8QHH[SORVLRQXQLQFHQGLH
voire la mort pourrait en résulter.

49-60815 Rev. 1 7
IMPORTANTES CONSIGNES DE SÉCURITÉ
LIRE ET CONSERVER CES INSTRUCTIONS
Ne coupez pas ou n’enlevez pas, sous aucun prétexte, la troisième broche de mise à la terre du cordon
d’alimentation. Pour des raisons de sécurité, cet appareil doit être correctement mis à la terre.
Le cordon d’alimentation de cet appareil est équipé d’une
fiche à trois broches (pour une mise à la terre) qui s’adapte à
la prise de courant standard à 3 broches (pour une mise à la
terre) pour minimiser les risques de chocs électriques par cet
appareil.
Faites vérifier la prise murale et le circuit électrique par
XQpOHFWULFLHQTXDOLILpSRXUV¶DVVXUHUTXHOHV\VWqPHHVW
correctement mis à la terre.
Dans le cas d’une prise biphasée, l’installateur a la
responsabilité et l’obligation de la remplacer par une prise
WULSKDVpHFRUUHFWHPHQWPLVHjODWHUUH1¶XWLOLVH]SDV
d’adaptateur.
/HUpIULJpUDWHXUGRLWWRXMRXUVrWUHEUDQFKpjVDSURSUHSULVH
électrique d’une tension nominale correspondant à celle
indiquée sur sa plaque signalétique.
8QHDOLPHQWDWLRQpOHFWULTXHjYROWV&$+]DYHF
XQIXVLEOHGHRXDPSqUHVHWXQHPLVHjODWHUUHHVW
nécessaire. Ceci permet d’obtenir un meilleur rendement et
évite de surcharger les circuits électriques du domicile qui
risque d’occasionner un incendie en surchauffant.
1HGpEUDQFKH]MDPDLVOHUpIULJpUDWHXUHQWLUDQWVXUOHFRUGRQ
G¶DOLPHQWDWLRQ3UHQH]WRXMRXUVIHUPHPHQWODILFKHHQPDLQHW
WLUH]SRXUODVRUWLUGHODSULVH
5pSDUH]RXUHPSODFH]LPPpGLDWHPHQWWRXWFRUGRQpOHFWULTXH
XVpRXHQGRPPDJp1¶XWLOLVH]SDVXQFRUGRQILVVXUpRX
présentant des dommages dus aux frottements soit sur sa
longueur ou aux extrémités.
/RUVTXHYRXVpORLJQH]YRWUHUpIULJpUDWHXUGXPXUIDLWHV
attention à ne pas le faire rouler sur le cordon d’alimentation
afin de ne pas l’endommager.
BRANCHEMENTS ÉLECTRIQUES
AVERTISSEMENT
RISQUE DE CHOC ÉLECTRIQUE
%UDQFKH]O¶DSSDUHLOGDQVXQHSULVHWULSOHDYHFWHUUH
1HUHWLUH]SDVODEURFKHGHWHUUH
1¶XWLOLVH]SDVG¶DGDSWDWHXU
1¶XWLOLVH]SDVXQFRUGRQGHUDOORQJH
/HQRQUHVSHFWGHFHVLQVWUXFWLRQVSHXWHQWUDvQHUGHVULVTXHVG¶LQFHQGLHVGHVFKRFVpOHFWULTXHVRXODPRUW
MISE AU REBUT APPROPRIÉE DE VOTRE ANCIEN RÉFRIGÉRATEUR
AVERTISSEMENT
RISQUE DE SUFFOQUER OU D’Y ÊTRE EMPRISONNÉ
/HQRQUHVSHFWGHFHVLQVWUXFWLRQVGpOLPLQDWLRQSHXWHQWUDvQHUODPRUWRXGHVEOHVVXUHVJUDYHV
IMPORTANT: /HVHQIDQWVSULVDXSLqJHRXPRUWVG¶DVSK\[LH
sont toujours d’actualité. Les réfrigérateurs et congélateurs
DEDQGRQQpVVRQWWRXMRXUVDXVVLGDQJHUHX[PrPHVLRQ
n’attend que «quelques jours» pour s’en débarrasser. Si vous
QHJDUGH]SDVYRWUHDQFLHQUpIULJpUDWHXURXFRQJpODWHXU
YHXLOOH]VXLYUHOHVGLUHFWLYHVFLGHVVRXVDILQGHSUpYHQLUOHV
accidents.
Avant de vous débarrasser de votre ancien appareil :
Ŷ'pPRQWH]OHVSRUWHVGXFRPSDUWLPHQWGHUpIULJpUDWLRQHWGX
compartiment de congélation.
Ŷ/DLVVH]OHVFOD\HWWHVHQSODFHDILQG¶HPSrFKHUOHVHQIDQWVGH
grimper à l’intérieur.
Mise au rebut des produits réfrigérants et en mousse
0HWWH]O¶pOHFWURPpQDJHUDXUHEXWFRQIRUPpPHQWjODUpJOHPHQWDWLRQIpGpUDOHHWORFDOH&RPPXQLTXH]DYHFOHVDXWRULWpVORFDOHV
SRXUFRQQDvWUHODIDoRQGHPHWWUHYRWUHpOHFWURPpQDJHUDXUHEXWTXLVRLWUHVSHFWXHXVHGHO¶HQYLURQQHPHQW

8 49-60815 Rev. 1
INSTRUCCIONES IMPORTANTES DE SEGURIDAD
LEA Y GUARDE ESTAS INSTRUCCIONES
PRECAUCIÓN
A fin de reducir el riesgo de lesión al usar su refrigerador, siga estas precauciones básicas de seguridad.
Ŷ1ROLPSLHODVUHSLVDVGHYLGULRQLODVWDSDVFRQDJXDFDOLHQWH
cuando estén frías. Las repisas de vidrio y las tapas se
pueden romper si son expuestas a cambios de temperatura
repentinos o a impactos, tales como sacudones o caídas. El
vidrio templado está diseñado para destruirse en pequeñas
SLH]DVHQFDVRGHURWXUD
Ŷ0DQWHQJDORVGHGRVIXHUDGHORVHVSDFLRVGH³ULHVJRGH
ODVWLPDGXUDV´ORVHVSDFLRVHQWUHODVSXHUWDV\HQWUHODV
puertas y el gabinete son necesariamente pequeños.
Tenga el cuidado de cerrar las puertas cuando los niños se
encuentren en el área.
Ŷ1RWRTXHODVVXSHUILFLHVIUtDVGHOFRPSDUWLPLHQWRGHOIUHH]HU
cuando las manos estén húmedas o mojadas, la piel podrá
quedar adherida a estas superficies extremadamente frías.
Ŷ1RYXHOYDDFRQJHODUFRPLGDVTXHKD\DQHVWDGRWRWDOPHQWH
congeladas en forma previa.
Ŷ(QIUHH]HUVFRQPiTXLQDVGHKLHORVDXWRPiWLFDVHYLWHHO
contacto con las partes móviles del mecanismo eyector o con
el elemento de calefacción que libera los cubos. No coloque
los dedos ni las manos en el mecanismo de la máquina
GHKLHORVDXWRPiWLFDPLHQWUDVHOIUHH]HUVHHQFXHQWUH
enchufado.
ADVERTENCIA
$¿QGHUHGXFLUHOULHVJRGHLQFHQGLRH[SORVLyQGHVFDUJDVHOpFWULFDVROHVLRQHVDOXVDUVXUHIULJHUDGRU
siga estas precauciones básicas de seguridad:
Ŷ (VWHUHIULJHUDGRUVHGHEHUiLQVWDODU\XELFDUDGHFXDGDPHQWH
de acuerdo con las Instrucciones de Instalación antes de ser
usado.
Ŷ'HVHQFKXIHHOUHIULJHUDGRUDQWHVGHUHDOL]DUVXOLPSLH]DR
reparaciones.
NOTA: La corriente al refrigerador no puede ser
desconectada a través de una configuración del panel de
control.
NOTA:/DVUHSDUDFLRQHVGHEHUiQVHUUHDOL]DGDVSRUXQ
Profesional del Servicio Técnico calificado.
Ŷ5HHPSODFHWRGDVODVSLH]DV\SDQHOHVDQWHVGHOXVR
Ŷ1RXVHXQSURORQJDGRU
Ŷ1RJXDUGHQLXVHJDVROLQDXRWURVYDSRUHV\OtTXLGRV
inflamables cerca de este o de otros electrodomésticos.
Ŷ1RJXDUGHVXVWDQFLDVH[SORVLYDVWDOHVFRPRODWDVGH
aerosoles con propelentes inflamables en este dispositivo.
Ŷ$ILQGHHYLWDUULHVJRVGHTXHORVQLxRVVXIUDQDVIL[LDR
queden atrapados, retire las puertas de alimentos frescos y
GHOIUHH]HUGHFXDOTXLHUUHIULJHUDGRUDQWHVGHGHVKDFHUVHGH
o de dejar de usar el mismo.
Ŷ$ILQGHHYLWDUOHVLRQHVJUDYHVRODPXHUWHORVQLxRVQRVH
deberán parar sobre, ni jugar en o con el electrodoméstico.
Ŷ/RVQLxRV\ODVSHUVRQDVFRQFDSDFLGDGItVLFDVHQVRULDOR
mental reducida o con falta de experiencia y conocimiento
podrán usar este electrodoméstico sólo si son supervisados
o les fueron dadas instrucciones sobre un uso seguro y
entienden los riesgos involucrados.
Ŷ(VWHHOHFWURGRPpVWLFRIXHGLVHxDGRSDUDXVRKRJDUHxR\HQ
unidades similares tales como: áreas de personal de cocina
HQWLHQGDVRILFLQDV\RWURVHVSDFLRVODERUDOHVFDVDVGH
FDPSRSRUFOLHQWHVHQKRWHOHVPRWHOHVKRVWDOHV\RWURV
espacios residenciales, catering y unidades no minoristas
similares.
ŶNo aplique limpiadores ásperos sobre el refrigerador. Ciertos
limpiadores dañarán el plástico, lo cual podrá hacer que
FLHUWDVSLH]DVWDOHVFRPRODSXHUWDRODVPDQLMDVGHODV
puertas se separen de forma inesperada. Para acceder
a instrucciones detalladas, lea la sección de Cuidado y
/LPSLH]D
INSTALACIÓN
ADVERTENCIA
RIESGO DE EXPLOSIÓN
Mantenga cualquier material y vapores inflamables, tales como gasolina, alejados del refrigerador. Si no se cumple con esto, se
podrá producir una explosión, un incendio o la muerte.
ADVERTENCIA
Riesgo de Caídas
Estos electrodomésticos son inestables, especialmente cuando una puerta se encuentre abierta, y deben estar asegurados a fin
de evitar caídas hacia adelante que podrían resultar en la muerte o en lesiones graves. Lea y siga las instrucciones de instalación
en su totalidad para asegurar el electrodoméstico con el sistema anti volcaduras.

49-60815 Rev. 1 9
INSTRUCCIONES IMPORTANTES DE SEGURIDAD
LEA Y GUARDE ESTAS INSTRUCCIONES
FORMA ADECUADA DE DESCARTAR SU ANTIGÜO Refrigerador
Nunca, bajo ninguna circunstancia, corte o elimine el tercer cable (tierra) del cable de corriente. Por seguridad personal,
este electrodoméstico debe estar adecuadamente conectado a tierra.
El cable de corriente de este electrodoméstico contiene un
enchufe de 3 cables (conexión a tierra) que se conecta a un
tomacorriente de pared estándar de 3 cables (conexión a
WLHUUDSDUDPLQLPL]DUODSRVLELOLGDGGHULHVJRVGHGHVFDUJDV
eléctricas por parte del mismo.
Contrate a un electricista calificado para que controle el
tomacorriente y el circuito eléctrico, a fin de asegurar que el
enchufe esté correctamente conectado a tierra.
En caso de contar con un tomacorriente de pared de 2 cables,
HVVXUHVSRQVDELOLGDG\REOLJDFLyQUHHPSOD]DUORSRUXQ
tomacorriente de pared de 3 cables correctamente conectado a
tierra. No use un adaptador.
El refrigerador deberá estar siempre conectado a un enchufe
específico con un índice de voltaje equivalente al que figura en
su etiqueta de especificaciones técnicas.
Se requiere un suministro eléctrico con fusible y conexión a
WLHUUDGHYROWLRVGH&$+]RDPSHUHV(VWR
JDUDQWL]DHOPHMRUIXQFLRQDPLHQWR\DGHPiVSUHYLHQHOD
sobrecarga de los circuitos del hogar, lo cual podría ocasionar
riesgos de incendio debido al recalentamiento de cables.
Nunca desenchufe el refrigerador tirando del cable de
corriente. Siempre tome su enchufe de manera firme y empuje
el mismo hacia fuera para retirarlo.
Inmediatamente interrumpa el uso de un cable de suministro
de corriente dañado. Si el cable de corriente se encuentra
GDxDGRVXUHHPSOD]RGHEHUiVHUUHDOL]DGRSRUXQSURIHVLRQDO
FDOLILFDGRGHOVHUYLFLRWpFQLFRXWLOL]DQGRXQDSLH]DGHOVHUYLFLR
WpFQLFRDXWRUL]DGDSRUHOIDEULFDQWH
Al alejar el refrigerador de la pared, se deberá tener cuidado
de que no ruede sobre ni dañe el cable de corriente.
CONEXIÓN DE LA ELECTRICIDAD
ADVERTENCIA
RIESGO DE DESCARGAS ELÉCTRICAS
Enchufe en un tomacorriente con conexión a tierra de 3 cables.
No elimine el cable de conexión a tierra.
No use un adaptador.
No use un prolongador.
Si no se siguen estas instrucciones, se podrá producir la muerte, incendios o descargas eléctricas.
ADVERTENCIA
RIESGO DE SOFOCACIÓN O DE QUEDAR ATRAPADO
Si no se siguen estas instrucciones de descarte, se podrá producir la muerte o lesiones graves.
IMPORTANTE: Que un niño quede atrapado o que sufra
una asfixia no son problemas del pasado. Los refrigeradores/
IUHH]HUVDQWLJXRVRDEDQGRQDGRVD~QVRQSHOLJURVRVLQFOXVR
DXQTXHVHFRQVHUYHQSRU³VyORXQRVSRFRVGtDV´6LVHGHVKDUi
de su antiguo refrigerador, siga las siguientes instrucciones a
fin de evitar accidentes.
Antes de Descartar su Antiguo Electrodoméstico
Ŷ5HWLUHODVSXHUWDVGHFRPLGDVIUHVFDV\GHOIUHH]HU
Ŷ'HMHODVUHSLVDVHQVXOXJDUGHPRGRTXHORVQLxRVQR
puedan trepar dentro con facilidad.
Cómo Eliminar Refrigerantes y Gomaespumas:
Descarte el electrodoméstico de acuerdo con las Regulaciones Federales y Locales. Comuníquese con las autoridades locales
para descartar su electrodoméstico de forma ambientalmente segura.

10 49-60815 Rev. 1
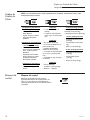
Controls
Push this button to activate Monogram
Connect. See page 20 for more information or
go to monogram.com/connect to download
the App.
Temperature
controls
To turn off the cooling system in both the
IUHH]HUDQGIUHVKIRRGFRPSDUWPHQWVSUHVV
either (+) pad until both displays show OFF.
To turn the cooling system on, press either
(-) pad. The preset temperatures of 0°F and
37°F will appear in the display.
NOTE: Frequent door openings or door left
open for periods of time may increase the
LQWHUQDOWHPSHUDWXUHRIWKHIUHH]HUDQGIUHVK
food compartments temporarily.
The actual temperature will vary from the set
temperature based on factors such as door
opening, amount of food, defrost cycling and
room temperature.
To change the temperature settings, press
the (+) or (-) pads to desired temperature set
SRLQWIRUIUHVKIRRGDQGIUHH]HUVHSDUDWHO\
Allow 24 hours for the refrigerator to reach the
temperature you have set.
NOTE: Setting the controls to OFF stops
cooling, but does not shut off electrical power
to the refrigerator.
Door
alarm
WiFi
Connect
To turn the Door Alarm feature on, press
DOOR ALARM once. The ACTIVE light will
come on. To turn it off, press it again.
On models with a dispenser, the Door Alarm
feature is located on the dispenser panel on
WKHIURQWRIWKHIUHH]HUGRRU
When the DOOR ALARM is active, the alarm
will flash and beep if you keep the door open
for more than 2 minutes.
Preset Settings:
Allow 24 hours to reach these preset temperatures.
Dispenser Models
Non-Dispenser Models
Temperature Ranges
Low High
34°F 42°F Fresh
Food
1°C 5°C
-6°F 4°F Freezer
-21°C -15°C
Built-In Refrigerators

49-60815 Rev. 1 11
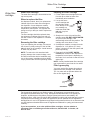
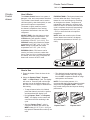
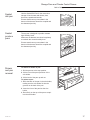
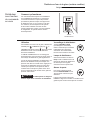
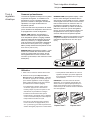
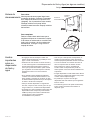
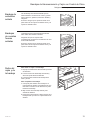
Water Filter Cartridge
Water filter
cartridge
Water filter cartridge
The water filter cartridge is located behind the
top access panel.
When to replace the filter
On dispenser models, there is a replacement
indicator light for the water filter cartridge on
the dispenser. On non-dispenser models,
the replacement indicator is located on the
temperature control panel. This light will turn
orange to tell you that you need to replace the
filter soon.
The filter cartridge should be replaced when
the replacement indicator light turns red or if
the flow of water to the dispenser or icemaker
decreases.
Removing the filter cartridge
If you are replacing the cartridge, first remove
the old one by slowly turning it to the left. Do
not pull down on the cartridge. A small amount
of water may drip down.
NOTE: To reduce the risk associated with
property damage due to water leakage, read
and follow instructions before installation and
use of this system. Installation and use MUST
comply with all state and local plumbing codes.
Installing the filter cartridge
1. Fill the replacement cartridge with water
from the tap to allow for better flow
immediately after installation.
2. Line up the arrow
on the cartridge and
the cartridge holder.
Place the top of the
new cartridge up
inside the holder. Do
not push it up into
the holder.
3. Slowly turn it to the right until the filter
cartridge stops. DO NOT OVERTIGHTEN.
As you turn the cartridge, it will
automatically raise itself into position. The
cartridge will move about 1/2 turn.
4. On dispenser models, run water from the
dispenser for 1-1/2 gallons (5.7 liters)
(about 3 minutes) to clear the system and
prevent sputtering.
4. Press and hold the RESET WATER
FILTER pad, located on the dispenser or
temperature control panel ,depending on
the model, for 3 seconds to clear the red or
amber light.
NOTE: A newly installed water filter cartridge
may cause water to spurt into the ice maker.
Filter bypass plug
You must use the filter bypass plug when a
replacement filter cartridge is not available.
The ice maker will not operate without the
filter or filter bypass plug.
)RUWKHPD[LPXPEHQH¿WRI\RXU¿OWUDWLRQV\VWHP*($SSOLDQFHVUHFRPPHQGVWKHXVHRI
*($SSOLDQFHVEUDQGHG¿OWHUVRQO\8VLQJ*($SSOLDQFHVEUDQGHG¿OWHUVLQ*($SSOLDQFHV
Hotpoint
®
, and Monogram refrigerators provides optimal performance and reliability. GE
$SSOLDQFHV¿OWHUVPHHWULJRURXVLQGXVWU\16)VWDQGDUGVIRUVDIHW\DQGTXDOLW\WKDWDUHLPSRUWDQW
IRUSURGXFWVWKDWDUH¿OWHULQJ\RXUZDWHU*($SSOLDQFHVKDVQRWTXDOL¿HGQRQ*($SSOLDQFHV
EUDQGHG¿OWHUVIRUXVHLQ*($SSOLDQFHVDQG+RWSRLQWUHIULJHUDWRUVDQGWKHUHLVQRDVVXUDQFHWKDW
QRQ*($SSOLDQFHVEUDQGHG¿OWHUVPHHW*($SSOLDQFHVVWDQGDUGVIRUTXDOLW\SHUIRUPDQFHDQG
reliability.
,I\RXKDYHTXHVWLRQVRUWRRUGHUDGGLWLRQDO¿OWHUFDUWULGJHVYLVLWRXUZHEVLWHDW
monogram.com or call Monogram Preferred Service, 800.444.1845. In Canada, call
866.777.7627..
Cartridge
Holder
Filter Bypass
Plug
SmartWater
Built-In Refrigerators

12 49-60815 Rev. 1
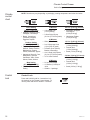
Ice & Water Dispenser (on some models)
Dispenser
with
glass-touch
controls
How it Works
The electronic controls on the dispenser are
truly interactive. The control panel is equipped
with a proximity sensor that causes the panel
to light up as you approach the dispenser
(approx. 2 inches or 50mm). To make a
selection, simply touch the graphic for the
feature you want, and the halo for that feature
will light up. When you walk away from the
refrigerator, the lighted graphics switch off
automatically.
Spill Shelf
How to Use
To dispense water or ice: select WATER ,
CUBED ICE or CRUSHED ICE . Then
press the glass gently against the top of the
dispenser cradle.
The spill shelf is not self-draining. To reduce
water spotting, the shelf and its grille should
be cleaned regularly.
If no water is dispensed when the refrigerator
is first installed, there may be air in the water
line system. Press the dispenser cradle for at
least two minutes to remove trapped air from
the water line and to fill the water system. To
flush out impurities in the water line, throw
away the first gallon of water.
CAUTION
Never put fingers or any
other objects into the ice crusher discharge
opening.
ATTENTION
Ne mettez jamais les doigts
ou d’autres objets dans l’ouverture du
distributeur.
PRECAUCIÓN
Nunca coloque los
dedos o cualquier otro objeto en la abertura de
descarga de la picadora de hielo.
Locking the Dispenser:
Touch CONTROL LOCK for
3 seconds to lock the dispenser
and control pad. To unlock, touch
it again for 3 seconds.
Dispenser Light:
This feature turns the light on
and off. The light also comes
on when the dispenser cradle is
pressed. If this light burns out,
contact factory service.
Door Alarm:
To turn the Door Alarm feature on,
touch DOOR ALARM once. To
turn it off, press it again.
When the DOOR ALARM is
active, the alarm will flash and
beep if you keep the door open
for more than 2 minutes.
Built-In Refrigerators

49-60815 Rev. 1 13
Ice & Water Dispenser (on some models)
Ice storage
bin
To remove:
Lift up the access door to reach the icemaker.
Set the icemaker power switch to the OFF
position. With the access door closed, support
the storage bin at the bottom while slightly
lifting. Pull bin straight out.
To replace:
Slide the bin back until the tab on the bin locks
into the slot on the shelf. If the bin does not
go all the way back, remove it and rotate the
drive mechanism 1/4 turn. Then push the bin
back again.
Important
facts about
your ice
& water
dispenser
• Do not add ice from trays or bags to the
storage bin. It may not crush or dispense
well.
• Avoid overfilling glass with ice and use of
narrow or extra-tall glasses. Backed-up ice
can jam the chute or cause the door in the
FKXWHWRIUHH]HVKXW,ILFHLVEORFNLQJWKH
chute, push it through with a wooden spoon.
• Beverages and foods should not be quick-
chilled in the ice storage bin. Cans, bottles
or food packages in the storage bin may
cause the icemaker or auger to jam.
• To keep dispensed ice from missing the
glass, put the glass close to, but not
touching, the dispenser opening.
• Some crushed ice may be dispensed even
though you selected CUBES. This happens
occasionally when a few cubes accidentally
get directed to the crusher.
• After crushed ice is dispensed, some water
may drip from the chute as small particles of
ice melt.
• Sometimes a mound of ice chips will form
on the door in the ice chute. This condition
is normal and usually occurs when you have
dispensed crushed ice repeatedly. The ice
chips will eventually evaporate.
• Dispensed water is not ice cold. For colder
water, simply add crushed ice or cubes
before dispensing water.
• The first glass of water dispensed may be
warmer than the following ones. This is
normal.
• To eliminate drips on the spill shelf, tilt the
glass in slightly when dispensing water.
Rotate
Drive
Mechanism
Ice Storage Bin
Access Door
Built-In Refrigerators

14 49-60815 Rev. 1
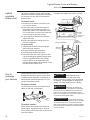
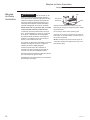
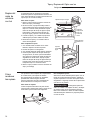
Automatic Icemaker
Built-In Refrigerators
Automatic
icemaker
CAUTION
Avoid contact with the
moving parts of the ejector mechanism, or with
the heating element (located on the bottom of
the icemaker) that releases the cubes. Do not
place fingers or hands on the automatic ice
making mechanism while the refrigerator is
plugged in.
ATTENTION
eYLWH]WRXWFRQWDFWDYHFOHV
SLqFHVPRELOHVGXPpFDQLVPHG¶pMHFWLRQRX
l’élément chauffant (situé dans le bas de la machine
jJODoRQVTXLOLEqUHOHVFXEHV1HSODFH]SDVOHV
doigts ou les mains sur le mécanisme de production
de glace automatique lorsque le réfrigérateur est
branché dans la prise électrique.
PRECAUCIÓN
Evite el contacto con las
partes en movimiento del mecanismo expulsor o
con el elemento de calefacción (ubicado en la parte
inferior de la máquina de hielos) que expulsa los
cubos. No coloque los dedos ni las manos en el
mecanismo de la máquina de hielos automática
mientras el refrigerador se encuentre enchufado.
A newly-installed refrigerator may take
12–24 hours to begin making ice.
The icemaker will produce seven cubes per
cycle—approximately 15 cycles in a 24-hour
SHULRGGHSHQGLQJRQIUHH]HUFRPSDUWPHQW
temperature, room temperature, number of
door openings and other use conditions.
If the refrigerator is operated before the water
connection is made to the icemaker, set the
power switch to OFF.
When the refrigerator has been connected to
the water supply, set the power switch to ON.
Throw away the first full bucket of ice.
Be sure nothing interferes with the sweep of
the feeler arm.
When the bin fills to the level of the feeler arm,
the icemaker will stop producing ice.
It is normal for several cubes to be joined
together.
If ice is not used frequently, old ice cubes will
become cloudy, taste stale and shrink.
NOTE: Icemaker works best between 40 and
120 PSI (275-827 kPa) home water pressure.
Feeler Arm
Icemaker
Power
Switch

49-60815 Rev. 1 15
Climate Control Drawer
Built-In Refrigerators
Climate
Control
drawer
How it Works
The Climate Control feature is a system of
dampers, a fan, and a temperature thermistor.
The Climate Control drawer can be used to
chill items quickly, thaw foods quickly or store
items at their optimum temperatures.
The drawer is tightly sealed to prevent
the drawer’s temperature from causing
temperature fluctuations in the rest of the
refrigerator.
SELECT TEMP—Use this feature to store
items at their optimum temperatures. The
CITRUS setting will maintain a drawer
temperature of 39-47°F (3.9 - 8.3°C). The
PRODUCE setting will maintain the drawer
temperature at 31-38°F (-0.6 - 3.3°C). The
MEAT setting will maintain the drawer
temperature at 27-37°F (-2.8 - 2.8°C).
EXPRESS CHILL—This feature can be
used to cool items in minutes, rather than
hours. Extra cool air is circulated throughout
the drawer. Once the cycle is complete, the
drawer will revert to the OFF mode.
EXPRESS THAW—This feature thaws items
in hours rather than days. Food is gently
thawed in a cool environment by circulating
air throughout the drawer. Temperature is
maintained in the drawer by cycling a small
heater off and on as needed. Once the thaw
cycle is complete, the pan will automatically
adjust to a temperature of 27–37°F (-2.8
- 2.8°C) to store the food at its optimum
temperature.
NOTE: When the controls on the Climate
Control drawer are turned off, the drawer
will maintain temperatures at 42-48°F (5.6 -
8.9°C).
How to Use
1 Empty the drawer. Place the items in the
drawer.
2 Select the Express Thaw,™ Express
Chill™ or Select Temp™ pad. The display
will come on. Press the pad until the light
appears next to the desired setting. Use
the chart on the next page to determine the
best setting.
• To stop a feature before it is finished,
press that feature’s pad until no options
are selected and the display is off.
• During Express Thaw™ and Express
Chill,™ the display on the controls will
count down the time remaining in the
cycle.
• After the Express Thaw™ cycle is
complete, the drawer will reset to the
MEAT setting (27-37°F [-2.8 - 2.8°C]) to
help preserve thawed items until they are
used.
• The displayed actual temperature of the
Climate Control drawer may vary slightly
from the SET temperature based on usage
and operation environment.
NOTE: For food safety reasons, it is
recommended that foods be wrapped in plastic
wrap when using Express Thaw™.This will
help contain meat juices and improve thawing
performance.
Express Thaw™
Express Chill™

16 49-60815 Rev. 1
Climate Control Drawer
Built-In Refrigerators
Climate
control
chart
NOTE: Results may vary depending on packaging, starting temperature and other food traits.
Citrus Setting
(39-47°F [3.9–8.3°C])
• Oranges, Lemons, Limes,
Pineapple, Cantaloupe
• Beans, Cucumbers,
Tomatoes, Peppers,
Eggplant, Squash
Produce Setting
(31–38°F [-0.6–3.3°C])
• Strawberries, Raspberries,
Kiwifruit, Pears, Cherries,
Blackberries, Grapes,
Plums, Nectarines, Apples
• Asparagus, Broccoli, Corn,
Mushrooms, Spinach,
Cauliflower, Kale, Green
Onions, Beets, Onions
Meat Setting
(27–37°F[-2.8–2.8°C])
• Raw Meat, Fish and
Poultry
15 Minutes
• 1 Beverage Can
R]>PO@
• 2 Small Juice Boxes
±R]>PO@HDFK
30 Minutes
• Wine (750 ml bottle)
• 2 to 6 Beverage Cans
R]>PO@HDFK
• 3ODVWLFR]PO
Bottles of Beverage
• 4 to 6 Small Juice Boxes
±R]>PO@HDFK
• 3 Foil Juice Packets
45 Minutes
• 2 Liter of Beverage
• 1/2 Gallon (1.9 liters) of
Juice
• Gelatin—1 package
0.5 Lbs. [0.23 kg] (4 hours)
• Individually Wrapped
Filet Mignon
(0.5 lb [0.23 kg])
• Hamburger Patties
(0.5 lb [0.23 kg])
1.5 Lbs. [0.68 kg] (8 hours)
• Chicken Breasts
(1.5 lbs [0.68 kg])
• Ground Beef
(1.5 lbs [0.68 kg])
• Steak (1.5 lbs [0.68 kg])
3.0 Lbs. [1.36 kg] (12 hours)
• Chicken Breasts
(3.0 lbs [1.36 kg])
• Ground Beef
(3.0 lbs [1.36 kg])
• Steak (3.0 lbs [1.36 kg])
Control
lock
Control Lock
Press and hold this pad for 3 seconds to lock
the settings for the Climate Control drawer. To
unlock, press and hold for another 3 seconds.

49-60815 Rev. 1 17
Storage Pans and Climate Control Drawer
Built-In Refrigerators
Sealed
deli pan
Use the Sealed Deli Pan for the convenient
storage of lunch meats and cheese, hors
d’oeuvres, spreads and snacks.
Excess water that may accumulate in the
bottom of the drawers should be emptied and
the drawers wiped dry.
Sealed
produce
pans
The top pan is designed to provide constant
high humidity levels.
Make sure the drawers are closed completely
to maintain the correct humidity level.
Excess water that may accumulate in the
bottom of the drawers should be emptied and
the drawers wiped dry.
Drawer
and pan
removal
To remove a drawer or pan:
1. Pull the pan out to the stop position.
2. Lift the front of the pan up and out of the
wire holder.
3. Lift the back of the pan up and out.
To replace a pan:
1. Place the back of the pan in the wire holder,
making sure the wire holder fits into the
grooves on the back of the pan.
2. Lower the front of the pan into the wire
holder.
3. Press firmly on the top of the pan to snap it
into the wire holder.

18 49-60815 Rev. 1
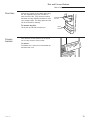
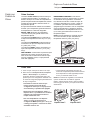
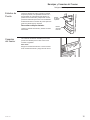
Lighted Drawer Cover and Shelves
Built-In Refrigerators
The lighted vegetable drawer shelf provides
lighting for the lower compartments. The lights
are recessed into the shelf to illuminate the
drawers below.
To remove shelf:
1. Remove the top drawer (see Drawer and
pan removal section).
2. Push down gently on the back center of
the climate control drawer top surface to
release the bottom of the water tank cover.
Pull out and down to remove the water tank
cover and expose the wire harness.
3. Lift the shelf and carefully pull forward to
expose the wires.
4. Unplug the shelf and carefully remove it
from the refrigerator.
To replace shelf:
1. Carefully set the shelf onto the side rails,
leaving the plug exposed.
2. Plug the shelf into the refrigerator.
3. Carefully slide the shelf into place.
4. Insert the water tank cover top first so that
it goes up behind the gasket hanging down
from the vegetable drawer shelf. Gently
push the bottom of the water tank cover
until the bottom snaps into the the top of the
Climate Control Drawer cover.
5. Replace the drawer (see Drawer and pan
removal section).
How to
rearrange
your shelves
Tempered glass shelves in the fresh food
FRPSDUWPHQWDQGZLUHVKHOYHVLQWKHIUHH]HU
compartment are adjustable, enabling you to
make efficient shelf arrangements to fit your
family’s food storage needs.
To remove shelves:
Tilt shelf up at front, then lift it up and out of
tracks on rear wall of refrigerator.
To replace shelves:
Select desired shelf height. With shelf front
raised slightly, engage top lugs in tracks at
rear of cabinet. Then lower front of shelf until it
locks into position.
CAUTION
Handle glass shelves
carefully. Glass shelves and covers may
break if exposed to impact, such as bumping
or dropping. Tempered glass is designed to
shatter into many small pieces if it breaks.
ATTENTION
0DQLSXOH]OHVWDEOHWWHVHQ
verre avec précaution. Les tablettes et couvercles
en verre peuvent se briser s'ils sont soumis à un
impact en les heurtant ou les échappant. S'il se
brise, le verre trempé est conçu pour se fracturer en
un grand nombre de petits éclats.
PRECAUCIÓN
Sostenga las repisas de
vidrio con cuidado. Las repisas de vidrio y las tapas
se pueden romper si son expuestas a impactos,
tales como sacudones o caídas. El vidrio templado
HVWiGLVHxDGRSDUDGHVWUXLUVHHQSHTXHxDVSLH]DV
en caso de rotura.
Lighted
vegetable
drawer shelf
Water Tank
Cover
Water Tank Cover
Climate
Control
Drawer Top
Surface
Lighted
Vegetable
Drawer Shelf

49-60815 Rev. 1 19
%LQVDQG)UHH]HU%DVNHWV
Built-In Refrigerators
All door bins, except for the deep gallon door
bin, are adjustable using one of 2 tabs on
each end of the bin. They can be moved up
and down to many different positions to meet
your storage needs. The deep gallon door bin
can be removed for cleaning.
To remove any bin:
Lift the bin up and slide it toward you.
Door bins
Adjustable
Door Bin
Gallon
Door Bin
)UHH]HU
baskets
:LUHVOLGHRXWIUHH]HUEDVNHWVFDQEHSXOOHG
RXWIRUHDV\DFFHVVWRIUR]HQIRRGV
To remove:
Pull basket out. Lift the front of the basket up
and then take it out.

20 49-60815 Rev. 1
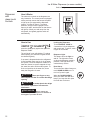
WiFi Connect
Built-In Refrigerators
WiFi
Connect
REGULATORY INFORMATION
FCC/IC Compliance Statement:
This device complies with Part 15 of the FCC Rules. Operation is subject to the following two
conditions:
1. This device may not cause harmful interference.
2. This device must accept any interference received, including interference that may cause
undesired operation.
This equipment has been tested and found to comply with the limits for a Class B digital
device, pursuant to Part 15 of the FCC Rules. These limits are designed to provide reasonable
protection against harmful interference in a residential installation. This equipment generates
uses and can radiate radio frequency energy and, if not installed and used in accordance with
the instructions, may cause harmful interference to radio communications. However, there is no
guarantee that interference will not occur in a particular installation. If this equipment does cause
harmful interference to radio or television reception, which can be determined by turning the
equipment off and on, the user is encouraged to try to correct the interference by one or more of
the following measures:
• Reorient or relocate the receiving antenna.
• Increase the separation between the equipment and receiver.
• Connect the equipment into an outlet on a circuit different from that to which the receiver is
connected.
• Consult the dealer or an experienced radio/television technician for help.
Labelling: Changes or modifications to this unit not expressly approved by the manufacturer
could void the user’s authority to operate the equipment.
ConnectPlus module only (or similar communication module)
5)([SRVXUH7KLVGHYLFHLVRQO\DXWKRUL]HGIRUXVHLQDPRELOHDSSOLFDWLRQ$WOHDVWFPRI
separation distance between the ConnectPlus device and the user’s body must be maintained
at all times.
*Select Models Only
Monogram WiFi Connect (for customers in the United States, its
territories and Canada):
Monogram WiFi Connect Enabled*
Your refrigerator is Monogram WiFi Connect Enabled. A WiFi communication card is built into
the product allowing it to communicate with your Smart Phone for remote monitoring, control, and
notifications. Please visit monogram.com/connect to learn more about connected appliance
features, and to learn what connected appliance App’s will work with your Smart Phone.
WiFi Connectivity: For assistance with the appliance or the network connectivity (for models
that are WiFi enable), please call 1-800-220-6899.
La page charge ...
La page charge ...
La page charge ...
La page charge ...
La page charge ...
La page charge ...
La page charge ...
La page charge ...
La page charge ...
La page charge ...
La page charge ...
La page charge ...
La page charge ...
La page charge ...
La page charge ...
La page charge ...
La page charge ...
La page charge ...
La page charge ...
La page charge ...
La page charge ...
La page charge ...
La page charge ...
La page charge ...
La page charge ...
La page charge ...
La page charge ...
La page charge ...
La page charge ...
La page charge ...
La page charge ...
La page charge ...
La page charge ...
La page charge ...
La page charge ...
La page charge ...
La page charge ...
La page charge ...
La page charge ...
La page charge ...
La page charge ...
La page charge ...
La page charge ...
La page charge ...
La page charge ...
La page charge ...
La page charge ...
La page charge ...
La page charge ...
La page charge ...
La page charge ...
La page charge ...
La page charge ...
La page charge ...
La page charge ...
La page charge ...
La page charge ...
La page charge ...
La page charge ...
La page charge ...
La page charge ...
La page charge ...
La page charge ...
La page charge ...
-
 1
1
-
 2
2
-
 3
3
-
 4
4
-
 5
5
-
 6
6
-
 7
7
-
 8
8
-
 9
9
-
 10
10
-
 11
11
-
 12
12
-
 13
13
-
 14
14
-
 15
15
-
 16
16
-
 17
17
-
 18
18
-
 19
19
-
 20
20
-
 21
21
-
 22
22
-
 23
23
-
 24
24
-
 25
25
-
 26
26
-
 27
27
-
 28
28
-
 29
29
-
 30
30
-
 31
31
-
 32
32
-
 33
33
-
 34
34
-
 35
35
-
 36
36
-
 37
37
-
 38
38
-
 39
39
-
 40
40
-
 41
41
-
 42
42
-
 43
43
-
 44
44
-
 45
45
-
 46
46
-
 47
47
-
 48
48
-
 49
49
-
 50
50
-
 51
51
-
 52
52
-
 53
53
-
 54
54
-
 55
55
-
 56
56
-
 57
57
-
 58
58
-
 59
59
-
 60
60
-
 61
61
-
 62
62
-
 63
63
-
 64
64
-
 65
65
-
 66
66
-
 67
67
-
 68
68
-
 69
69
-
 70
70
-
 71
71
-
 72
72
-
 73
73
-
 74
74
-
 75
75
-
 76
76
-
 77
77
-
 78
78
-
 79
79
-
 80
80
-
 81
81
-
 82
82
-
 83
83
-
 84
84


GE ZIS420NK Le manuel du propriétaire
- Catégorie
- Frigos
- Taper
- Le manuel du propriétaire
dans d''autres langues
- English: GE ZIS420NK Owner's manual
- español: GE ZIS420NK El manual del propietario
Documents connexes
-
GE ZIP360NH Le manuel du propriétaire
-
-
-
 GE Profile Series PWE23KYNFS Le manuel du propriétaire
-
-
GE GCE06GGHBB Le manuel du propriétaire
-
GE PSB42YSRSS Le manuel du propriétaire
-
-
GE ZISS480NMSS Le manuel du propriétaire
-
GE ZIR360NPLH Le manuel du propriétaire

Autres documents
-
 GE Monogram ZIRS360NBRH Le manuel du propriétaire
-
Hotpoint HME02GGMBB Le manuel du propriétaire
-
Monogram ZIR360NNLH Le manuel du propriétaire
-
Monogram ZIRS360NNLH Le manuel du propriétaire
-
 GE Monogram Refrigerator Side-by-Side Built-In Refrigerators Manuel utilisateur
-
GE Monogram ZISB420DK Le manuel du propriétaire
-

