Timex Automatic Le manuel du propriétaire
- Catégorie
- Montres
- Taper
- Le manuel du propriétaire
Ce manuel convient également à

W231 NA 714-095005-01
W231_NA_EN_W231_NA_EN 11/2/09 11:30 AM Page cvr1

English page 1
Français page 21
Español página 47
W231_NA_EN_W231_NA_EN 11/2/09 11:06 AM Page 3

TIMEX
®
WATCHES
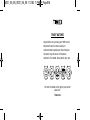
Congratulations on purchasing your TIMEX
®
watch.
Please read these instructions carefully to
understand how to operate your Timex timepiece.
Your watch may not have all of the features
described in this booklet. Please look for your style
For more information and to register your product
please visit:
Timex.com
STYLE 1 STYLE 2 STYLE 3 STYLE 4 STYLE 5
W231_NA_EN_W231_NA_EN 11/2/09 11:06 AM Page ENii

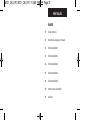
TABLE OF CONTENTS
1 Screw-Down Crown
2 Water and Shock Resistance
4 Automatic Style 1
7 Automatic Style 2
9 Automatic Style 3
11 Automatic Style 4
14 Automatic Style 5
15 How to Adjust Bracelets
17 Warranty
ENGLISH
W231_NA_EN_W231_NA_EN 11/2/09 11:06 AM Page ENiv

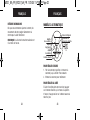
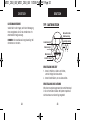
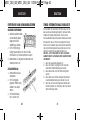
SCREW-DOWN CROWN
Some deep-depth water-resistant watches require
the setting crown to be screwed in to secure water-
resistance. If your watch case has a protrusion with
screw threads, the crown must be screwed in after
setting the watch.
To screw in, push the crown firmly against the
threaded protrusion and hold in while turning the
crown clockwise. Continue to screw in the crown
until it is tight. You will need to unscrew the crown
(counterclockwise) before pulling it out the next time
you want to set your watch.
1
ENGLISH
W231_NA_EN_W231_NA_EN 11/2/09 11:06 AM Page ENvi

1. Watch is water-resistant only as long as crystal,
crown and case remain intact.
2. Watch is not a diver watch and should not be
used for diving.
3. Screw-in setting crown and case back must be
screwed into case to assure water-resistance
(see Set Time for Style 1).
4. Rinse watch with fresh water after exposure to
salt water.
5. Shock-resistance will be indicated on the watch
face or caseback. Watches are designed to pass
ISO test for shock-resistance. However, care
should be taken to avoid damaging the crystal.
3
ENGLISH
2
ENGLISH
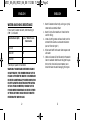
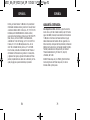
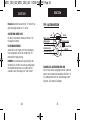
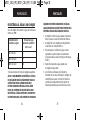
WATER AND SHOCK RESISTANCE
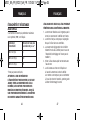
If your watch is water-resistant, meter marking or
(O) is indicated.
*pounds per square inch absolute
WARNING: TO MAINTAIN WATER-RESISTANCE
ON ANY WATCH, THE CROWN SHOULD NOT BE
PULLED OUT WHEN THE WATCH IS SUBMERGED
IN WATER. ADDITIONALLY, PUSHERS ON WATCH-
ES WITH A WATER-RESISTANCE DEPTH RATING
OF LESS THAN 200 METERS, SHOULD NOT BE
PUSHED WHEN SUBMERGED IN WATER. EITHER
OF THESE ACTIONS COULD RESULT IN WATER
ENTERING THE WATCH CASE.
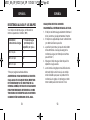
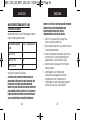
Water-Resistance Depth p.s.i.a. * Water Pressure
Below Surface
50m/164ft 86
100m/328ft 160
200m/656ft 284
W231_NA_EN_W231_NA_EN 11/2/09 11:06 AM Page 2

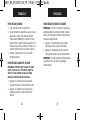
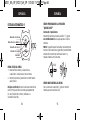
HOW TO SET “QUICK DATE
®
FEATURE”
3-Position Crown:
Unscrew crown until you reach position “2” and turn
counter clockwise until correct date appears.
NOTE: Date may need to be manually updated at
the end of each month by following above procedure
(otherwise it will continue to 31 and then roll over to
01 each month).
HOW TO WIND YOUR WATCH
From crown position 1, turn crown clockwise to wind
watch.
5
ENGLISH
4
ENGLISH
14
I
I
14
1 2 3
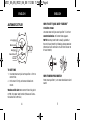
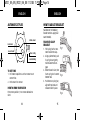
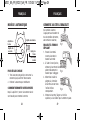
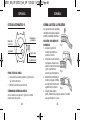
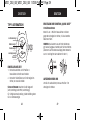
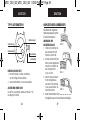
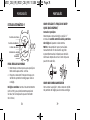
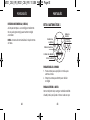
AUTOMATIC STYLE 1
TO SET TIME
1. Unscrew crown and pull out to position 3. Turn to
correct time.
2. Push crown in firmly and screw clockwise to
restart.
Watches with date: Note correct time of day (A.M.
or P.M.) for proper date function. (Please see illustra-
tion above for 24-HR dial.)
24 Hour Hand
Minute Hand
Hour Hand
Calendar
Power Indicator
1 2
3
W231_NA_EN_W231_NA_EN 11/2/09 11:06 AM Page 4

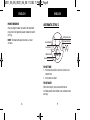
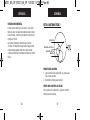
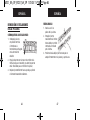
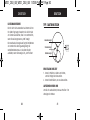
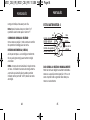
AUTOMATIC STYLE 2
TO SET TIME
1. Pull crown to position 2 and turn crown to set
correct time.
2. Push crown in to restart.
HOW TO WIND YOUR WATCH
From crown position 1, turn crown clockwise to
wind.
7
ENGLISH
POWER RESERVE
The watch is self-winding. If you wear your watch
every day, there should be no need to wind it every
24 hours, unless the power reserve shows “LOW”.
The maximum power reserve is at least 36 hours. The
power reserve indicator shows you how much power
remains. You should wind your watch when the indi-
cator hand is near “LOW”.
6
ENGLISH
Second Hand
Minute Hand
Hour Hand
2 1
W231_NA_EN_W231_NA_EN 11/2/09 11:06 AM Page 6

9
ENGLISH
POWER RESERVE
Once you begin to wear the watch, the movement
of your wrist will generate power to keep the watch
running.
NOTE: The maximum power reserve is at least
36 hours.
8
ENGLISH
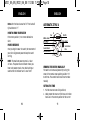
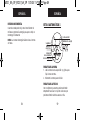
AUTOMATIC STYLE 3
TO SET TIME
1. Pull crown to position 2 and turn crown to set
correct time.
2. Push crown to restart.
TO SET DATE
With a blunt object, press recessed button at
8 o’clock position. Each button press advances date
one day.
Power Indicator
Retrograde date
1 2
Second Hand
Hour Hand
Minute Hand
Recessed button
W231_NA_EN_W231_NA_EN 11/2/09 11:06 AM Page 8

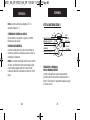
AUTOMATIC STYLE 4
WINDING THE WATCH MANUALLY
The watch can be manually wound by turning the
crown in the normal crown position (position 1) 15
to 20 times. The second hand should start to move
naturally.
SETTING THE TIME
1. Pull the crown out one click (position 2)
2. Slowly rotate the crown until the hour and minute
hands are in the correct position for the current
11
ENGLISH
Note: After the date has reached “31” the hand will
fly back down to “1”.
HOW TO WIND YOUR WATCH
From crown position 1, turn crown clockwise to
wind.
POWER RESERVE
Once you begin to wear the watch, the movement of
your wrist will generate power to keep the watch
running.
NOTE: The maximum power reserve is at least
36 hours. The power reserve indicator shows you
how much power remains. You should wind your
watch when the indicator hand is near “LOW”.
10
ENGLISH
Year
Minute Hand
Hour Hand
Day Hand
Second Hand
24 Hours Hand
Month
Date Hand
Sun & Moon
Disc
DA
CB
1 2
W231_NA_EN_W231_NA_EN 11/2/09 11:07 AM Page 10

1. Push button A to advance the Month display to
the correct Month
2. Push button D to advance the Year display to the
correct Year
NOTE: The Year display will correctly display the year
for a maximum of 12 years after the movement was
assembled.
13
ENGLISH
time. NOTE: AM / PM can be determined from the
position of the 24 hour time and the Sun / Moon
indicator on the sub-dial at the 6 o’clock position
3. Push the crown in one click, to the normal
position (position 1)
SETTING THE DATE AND DAY
NOTE: DO NOT set the Date and Day between
9 PM and 3 AM. Setting the Date and Day
during this time period will damage the
watch movement
1. Push button B to advance the date hand to the
correct day of the month
2. Push button C to advance the date hand to the
correct day of the week
SETTING THE MONTH AND YEAR
NOTE: The Month and Year do not automatically
advance. You must manually advance these displays
at the beginning of each Month and Year.
12
ENGLISH
W231_NA_EN_W231_NA_EN 11/2/09 11:07 AM Page 12

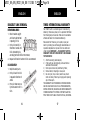
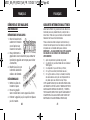
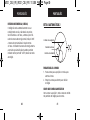
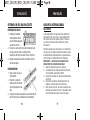
HOW TO ADJUST BRACELET
(Variations of the following
bracelet sections apply to all
watch models).
FOLDOVER CLASP
BRACELET
1. Find spring bar that con-
nects bracelet to clasp.
2. Using a pointed tool, push
in spring bar and gently
twist bracelet to disen-
gage.
3. Determine wrist size, then
insert spring bar in correct
bottom hole.
4. Push down on spring bar,
align with top hole and
release to lock in place.
15
ENGLISH
Fig. 1
Fig. 2
Fig. 3
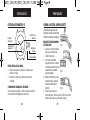
AUTOMATIC STYLE 5
TO SET TIME
1. Pull crown to position 2 and turn crown to set
correct time.
2. Push crown in to restart.
HOW TO WIND YOUR WATCH
From crown position 1, turn crown clockwise to
wind.
14
ENGLISH
Hour Hand
Second Hand
Minute Hand
1
2
Time Setting
Hand Winding
W231_NA_EN_W231_NA_EN 11/2/09 11:07 AM Page 14

TIMEX INTERNATIONAL WARRANTY
Your TIMEX
®
watch is warranted against manufacturing
defects by Timex Group USA, Inc. for a period of ONE YEAR
from the original purchase date. Timex and its worldwide
affiliates will honor this International Warranty.
Please note that Timex may, at its option, repair your
watch by installing new or thoroughly reconditioned and
inspected components or replace it with an identical or
similar model. IMPORTANT — PLEASE NOTE THAT THIS
WARRANTY DOES NOT COVER DEFECTS OR DAMAGES
TO YOUR WATCH:
1) after the warranty period expires;
2) if the watch was not originally purchased from an
authorized Timex retailer;
3) from repair services not performed by Timex;
4) from accidents, tampering or abuse; and
5) lens or crystal, strap or band, watch case, attach-
ments or battery. Timex may charge you for replacing
any of these parts.
THIS WARRANTY AND THE REMEDIES CONTAINED HEREIN
ARE EXCLUSIVE AND IN LIEU OF ALL OTHER WARRANTIES,
EXPRESS OR IMPLIED, INCLUDING ANY IMPLIED WARRANTY
OF MERCHANTABILITY OR FITNESS FOR PARTICULAR PUR-
POSE. TIMEX IS NOT LIABLE FOR ANY SPECIAL, INCIDENTAL
17
ENGLISH
BRACELET LINK REMOVAL
REMOVING LINKS:
1. Place bracelet upright
and insert pointed tool
in opening of link.
2. Push pin forcefully in
direction of arrow until
link is detached (pins
are designed to be difficult to remove).
3. Repeat until desired number of links are removed.
RE-ASSEMBLY:
1. Rejoin bracelet parts.
2. Push pin back into link
in opposite direction of
arrow.
3. Press pin down secure-
ly into bracelet until it is
flush.
16
ENGLISH
W231_NA_EN_W231_NA_EN 11/2/09 11:07 AM Page 16

Bermuda and the Bahamas, call (501) 370-5775 (U.S.). For
Asia, call 852-2815-0091. For the U.K., call 44 020 8687 9620.
For Portugal, call 351 212 946 017. For France, call
33 3 81 63 42 00. Germany/Austria: +43 662 88921 30.
For the Middle East and Africa, call 971-4-310850. For
other areas, please contact your local Timex retailer or
Timex distributor for warranty information. In Canada,
the U.S. and in certain other locations, participating
Timex retailers can provide you with a postage-paid,
pre-addressed Watch Repair Mailer for your convenience
in obtaining factory service.
EXTENDED WARRANTY
Available in U.S. only. Extend your warranty for an
additional 4 years from date of purchase for $5. You can
pay with AMEX, Discover, Visa or MasterCard by calling
1 800-448-4639 during normal business hours. Payment
must be made within 30 days of purchase. Name, address,
telephone number, purchase date, and 5-digit model
number required. You can also mail a check for $5 to:
Timex Extended Warranty, P.O. Box 1676, Dept. EF,
Little Rock, AR 72203.
© 2009 Timex Group USA, Inc. TIMEX and QUICK DATE are
registered trademarks of Timex Group USA, Inc. in the U.S.
and other countries.
19
ENGLISH
18
ENGLISH
OR CONSEQUENTIAL DAMAGES. Some countries and states
do not allow limitations on implied warranties and do not
allow exclusions or limitations on damages, so these
limitations may not apply to you. This warranty gives you
specific legal rights and you may also have other rights,
which vary from country to country and state to state.
To obtain warranty service, please return your watch to
Timex, one of its affiliates or the Timex retailer where the
watch was purchased, together with a completed original
Watch Repair Coupon or, in the U.S. and Canada only, the
completed original Watch Repair Coupon or a written
statement identifying your name, address, telephone
number and date and place of purchase. Please include
the following with your watch to cover postage and
handling (this is not a repair charge): a US$ 8.00 check or
money order in the U.S.; a CAN$7.00 cheque or money
order in Canada; and a UK£2.50 cheque or money order in
the U.K. In other countries, Timex will charge you for
postage and handling. NEVER INCLUDE A SPECIAL
WATCHBAND OR ANY OTHER ARTICLE OF PERSONAL
VALUE IN YOUR SHIPMENT.
For the U.S., please call 1-800-448-4639 for additional
warranty information. For Canada, call 1-800-263-0981.
For Brazil, call +55 11 5572 9733. For Mexico, call
01-800-01-060-00. For Central America, the Caribbean,
W231_NA_EN_W231_NA_EN 11/2/09 11:07 AM Page 18

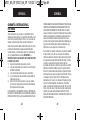
MONTRES TIMEX
®
Félicitations pour votre achat d’une montre TIMEX
®
.
Lire ces instructions attentivement pour bien com-
prendre le fonctionnement de cette montre Timex.
Il est possible que ce modèle ne présente pas toutes
les fonctions décrites dans le dépliant. Veuillez
chercher votre modèle.
Pour de plus amples renseignements et pour
enregistrer le produit, visiter le site :
Timex.com
MODÈLE 1 MODÈLE 2 MODÈLE 3 MODÈLE 4 MODÈLE 5
W231_NA_FR_W231_NA_FR 11/2/09 11:07 AM Page 20

FRANÇAIS
SOMMAIRE
25 Couronne Vissée
26 Étanchéité et Résistance Aux Chocs
28 Modèle 1 Automatique
31 Modèle 2 Automatique
33 Modèle 3 Automatique
35 Modèle 4 Automatique
38 Modèle 5 Automatique
39 Comment Ajuster le Bracelet
41 Garantie
FRANÇAIS
W231_NA_FR_W231_NA_FR 11/2/09 11:07 AM Page 22

COURONNE VISSÉE
Pour certaines montres étanches en eaux profondes,
la couronne de réglage doit être vissée afin d’en
garantir l’étanchéité. Si le boîtier présente un bouton
fileté, la couronne doit être vissée après le réglage
de la montre.
Pour visser, enfoncer fermement la couronne sur
le bouton fileté et la maintenir enfoncée tout en la
faisant tourner dans le sens horaire. Continuer à
visser la couronne jusqu’à ce qu’elle soit bien serrée.
Il faudra dévisser la couronne (dans le sens
anti-horaire) avant de la tirer la prochaine fois
que la montre doit être réglée.
25
FRANÇAIS
W231_NA_FR_W231_NA_FR 11/2/09 11:07 AM Page 24

L’EAU. DANS CES DEUX CAS, L’EAU POURRAIT
PÉNÉTRER DANS LE BOÎTIER DE LA MONTRE.
1. La montre est étanche aussi longtemps que le
verre, les couronnes et le boîtier sont intacts.
2. La montre n’est pas conçue pour la plongée.
Ne pas l’utiliser dans ces conditions.
3. La couronne de réglage et le dos du boîtier
doivent être vissés au boîtier pour en assurer
l’étanchéité (voir Réglage de l’heure pour le
modèle 1).
4. Rincer à l’eau douce après tout contact avec
l’eau de mer.
5. La résistance aux chocs est indiquée sur
la face de la montre ou le dos du boîtier.
Les montres sont conçues pour se conformer
à l’essai de choc ISO. Toutefois, prendre garde
à éviter d’endommager le verre.
27
26
FRANÇAIS
FRANÇAIS
ÉTANCHÉITÉ ET RÉSISTANCE
AUX CHOCS
Si la montre est étanche, la profondeur maximale
ou le symbole (O) est indiqué.
*livres par pouce carré (abs.)
ATTENTION : AFIN DE PRÉSERVER
L’ÉTANCHÉITÉ DE TOUTE MONTRE, IL NE FAUT
JAMAIS TIRER LA COURONNE SOUS L’EAU.
DE MÊME, LES BOUTONS POUSSOIRS DES
MODÈLES DE MONTRES ÉTANCHES JUSQU’À
UNE PROFONDEUR INFÉRIEURE À 200 MÈTRES
NE DOIVENT JAMAIS ÊTRE ENFONCÉS SOUS
Profondeur
d’étanchéité
Pression de l’eau sous
la surface en p.s.i.a.*
50m/164 (ft/pi) 86
100m/328 (ft/pi) 160
200m/656 (ft/pi) 284
W231_NA_FR_W231_NA_FR 11/2/09 11:07 AM Page 26

RÉGLAGE DE LA FONCTION « QUICK DATE
®
»
Couronne à 3 positions :
Tirer la couronne en position « 2 » et tourner dans le
sens anti-horaire jusqu’à ce que la date correcte
s’affiche.
REMARQUE : Il peut être nécessaire de mettre
la date à jour manuellement à la fin de chaque mois
en suivant les étapes décrites ci-dessus (sinon elle
continuera chaque mois jusqu’au 31 avant de
retourner au 01).
COMMENT REMONTER VOTRE MONTRE
Depuis la position 1, tourner la couronne dans le
sens horaire pour remonter la montre.
29
FRANÇAIS
28
FRANÇAIS
14
I
I
14
1 2 3
MODÈLE 1 AUTOMATIQUE
RÉGLAGE DE L’HEURE
1. Dévisser la couronne et la tirer en position 3.
Tourner jusqu’à afficher l’heure exacte.
2. Enfoncer fermement la couronne et visser dans
le sens horaire pour redémarrer.
Montres affichant la date : Tenir compte de
l’heure (AM ou PM) afin de régler la date correcte-
ment. (Veuillez vous reporter à l’illustration ci-dessus
pour l’affichage 24 heures.)
1 2
3
Aiguille 24 heures
Aiguille des minutes
Aiguille des heures
Indicateur de réserve
de marche
Calendrier
W231_NA_FR_W231_NA_FR 11/2/09 11:07 AM Page 28

MODÈLE 2 AUTOMATIQUE
POUR RÉGLER L’HEURE
1. Tirer la couronne en position 2 et tourner la
couronne jusqu’à afficher l’heure exacte.
2. Enfoncer la couronne pour redémarrer.
COMMENT REMONTER VOTRE MONTRE
Depuis la position 1, tourner la couronne dans le
sens horaire pour remonter la montre.
31
FRANÇAIS
RÉSERVE DE MARCHE
La montre se remonte automatiquement. Si la
montre est portée à tous les jours, il ne devrait pas
être nécessaire de la remonter toutes les 24 heures,
à moins que la réserve de marche indique « LOW ».
La réserve de marche maximale est d’au moins 36
heures. L’indicateur de réserve de marche signale la
capacité restante. La montre doit être remontée
lorsque l’aiguille de l’indicateur est proche de « LOW ».
30
FRANÇAIS
2 1
Aiguille des secondes
Aiguille des heures
Aiguille des minutes
W231_NA_FR_W231_NA_FR 11/2/09 11:07 AM Page 30
La page charge ...
La page charge ...
La page charge ...
La page charge ...
La page charge ...
La page charge ...
La page charge ...
La page charge ...
La page charge ...
La page charge ...
La page charge ...
La page charge ...
La page charge ...
La page charge ...
La page charge ...
La page charge ...
La page charge ...
La page charge ...
La page charge ...
La page charge ...
La page charge ...
La page charge ...
La page charge ...
La page charge ...
La page charge ...
La page charge ...
La page charge ...
La page charge ...
La page charge ...
La page charge ...
La page charge ...
La page charge ...
La page charge ...
La page charge ...
La page charge ...
La page charge ...
La page charge ...
La page charge ...
La page charge ...
La page charge ...
La page charge ...
La page charge ...
La page charge ...
La page charge ...
La page charge ...
La page charge ...
-
 1
1
-
 2
2
-
 3
3
-
 4
4
-
 5
5
-
 6
6
-
 7
7
-
 8
8
-
 9
9
-
 10
10
-
 11
11
-
 12
12
-
 13
13
-
 14
14
-
 15
15
-
 16
16
-
 17
17
-
 18
18
-
 19
19
-
 20
20
-
 21
21
-
 22
22
-
 23
23
-
 24
24
-
 25
25
-
 26
26
-
 27
27
-
 28
28
-
 29
29
-
 30
30
-
 31
31
-
 32
32
-
 33
33
-
 34
34
-
 35
35
-
 36
36
-
 37
37
-
 38
38
-
 39
39
-
 40
40
-
 41
41
-
 42
42
-
 43
43
-
 44
44
-
 45
45
-
 46
46
-
 47
47
-
 48
48
-
 49
49
-
 50
50
-
 51
51
-
 52
52
-
 53
53
-
 54
54
-
 55
55
-
 56
56
-
 57
57
-
 58
58
-
 59
59
-
 60
60
-
 61
61
-
 62
62
-
 63
63
-
 64
64
-
 65
65
-
 66
66


Timex Automatic Le manuel du propriétaire
- Catégorie
- Montres
- Taper
- Le manuel du propriétaire
- Ce manuel convient également à
dans d''autres langues
- español: Timex Automatic El manual del propietario
- Deutsch: Timex Automatic Bedienungsanleitung
- português: Timex Automatic Manual do proprietário
Documents connexes
-
Timex Sun and Moon Mode d'emploi
-
-
-
Timex Intelligent Quartz Tide Temp Compass Manuel utilisateur
-
-
-
Timex Expedition Rugged Metal Analog Manuel utilisateur
-
-
-
Autres documents
-
Marathon WW194026 Manuel utilisateur
-
Torgoen T42GR41L411 Le manuel du propriétaire
-
ORIENT Voyager FDH01001B0 Manuel utilisateur
-
ORIENT RA-AC0J09L Manuel utilisateur
-
ORIENT RE-BY0007A Manuel utilisateur
-
-
-
ORIENT EU0A003B Le manuel du propriétaire
-
-
ORIENT SEZ07001B0 Sport Armbanduhr Le manuel du propriétaire