Dremel 764 Manuel utilisateur
- Catégorie
- Outils électroportatifs
- Taper
- Manuel utilisateur
Ce manuel convient également à

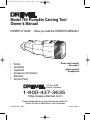
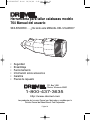
Model 764 Pumpkin Carving Tool
Owner’s Manual
HONESTLY NOW … Have you read this OWNER’S MANUAL?
•
Safety
• Assembly
•
Operation
•
Accessory Information
•
Warranty
• Service Parts
2 610 925 497 10/04 Printed in Mexico
Parlez-vous français?
Voir page 15
¿Habla español?
Vea página 29
Dremel brand products are manufactured and sold by the
Dremel Division of Robert Bosch Tool Corporation
P.O. Box 1468
Racine, Wisconsin
1-800-437-3635
http://www.dremel.com
DM 2610925497 10-04 10/18/04 4:41 PM Page 1

Page 2
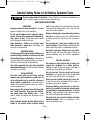
General Safety Rules for All Battery Operated Tools
Read and understand all instructions. Failure to follow all instructions listed below, may
result in electric shock, fire and/or serious personal injury.
SAVE THESE INSTRUCTIONS
!
WARNING
Work Area
Keep your work area clean and well lit. Cluttered
benches and dark areas invite accidents.
Do not operate power tools in explosive atmos-
pheres, such as in the presence of flammable liq-
uids, gases, or dust
. Power tools create sparks
which may ignite the dust or fumes.
Keep bystanders, children, and visitors away
while operating a power tool.
Distractions can
cause you to lose control.
Electrical Safety
A battery operated tool with integral batteries or a
separate battery pack must be recharged only with
the specified charger for the battery.
A charger that
may be suitable for one type of battery may create a
risk of fire when used with another battery.
Use battery operated tool only with specifically
designated battery pack.
Use of any other batteries
may create a risk of fire.
Personal Safety
Stay alert, watch what you are doing, and use
common sense when operating a power tool. Do
not use tool while tired or under the influence of
drugs, alcohol, or medication.
A moment of inat-
tention while operating power tools may result in
serious personal injury.
Dress properly. Do not wear loose clothing or jew-
elry. Contain long hair. Keep your hair, clothing,
and gloves away from moving parts.
Loose
clothes, jewelry, or long hair can be caught in mov-
ing parts.
Avoid accidental starting. Be sure switch is in the
locked or off position before inserting battery
pack.
Carrying tools with your finger on the switch
or inserting the battery pack into a tool with the
switch on invites accidents.
Remove adjusting keys or wrenches before turning
the tool on.
A wrench or a key that is left attached to
a rotating part of the tool may result in personal
injury.
Do not overreach. Keep proper footing and bal-
ance at all times.
Proper footing and balance enable
better control of the tool in unexpected situations.
Use safety equipment. Always wear eye protec-
tion.
Dust mask, non-skid safety shoes, hard hat, or
hearing protection must be used for appropriate
conditions.
Tool Use and Care
Use clamps or other practical way to secure and
support the workpiece to a stable platform.
Holding the work by hand or against your body is
unstable and may lead to loss of control.
Do not force tool. Use the correct tool for your
application.
The correct tool will do the job better
and safer at the rate for which it is designed.
Do not use tool if switch does not turn it on or off.
A tool that cannot be controlled with the switch is
dangerous and must be repaired.
Disconnect battery pack from tool or place the
switch in the locked or off position before making
any adjustments, changing accessories, or storing
the tool.
Such preventive safety measures reduce
the risk of starting the tool accidentally.
Store idle tools out of reach of children and other
untrained persons.
Tools are dangerous in the
hands of untrained users.
DM 2610925497 10-04 10/18/04 4:41 PM Page 2

Page 3
When battery pack is not in use, keep it away from
other metal objects like: paper clips, coins, keys,
nails, screws, or other small metal objects that
can make a connection from one terminal to
another.
Shorting the battery terminals together
may cause sparks, burns, or a fire.
Maintain tools with care. Keep cutting tools sharp
and clean.
Properly maintained tools with sharp
cutting edge are less likely to bind and are easier to
control.
Check for misalignment or binding of moving
parts, breakage of parts, and any other condition
that may affect the tool's operation. If damaged,
have the tool serviced before using.
Many acci-
dents are caused by poorly maintained tools.
Use only accessories that are recommended by
the manufacturer for your model.
Accessories that
may be suitable for one tool may create a risk of
injury when used on another tool.
Service
Tool service must be performed only by qualified
repair personnel.
Service or maintenance per-
formed by unqualified personnel may result in a risk
of injury.
When servicing a tool, use only identical replace-
ment parts. Follow instructions in the
Maintenance section of this manual.
Use of unau-
thorized parts or failure to follow Maintenance
Instructions may create a risk of shock or injury.
Safety Rules for Cordless Rotary Tools
Accessories must be rated for at least the speed
recommended on the tool warning label.
Wheels
and other accessories running over rated speed can
fly apart and cause injury.
Hold tool by insulated gripping surfaces when per-
forming an operation where the cutting tool may
contact hidden wiring.
Contact with a "live" wire will
make exposed metal parts of the tool "live" and shock
the operator. If cutting into existing walls or other
blind areas where electrical wiring may exist is
unavoidable, disconnect all fuses or circuit breakers
feeding this worksite.
Before changing accessories remove battery pack.
Accidental starting may occur because battery tools
with a battery inserted are in the operative condition.
Be aware of the switch location, when placing the
tool down or when picking the tool up.
You may
accidentally activate the switch.
Always hold the tool with two hands during start-
up
.
The reaction torque of the motor can cause the
tool to twist.
Always wear safety goggles and dust mask. Use
only in well ventilated area.
Using personal safety
devices and working in safe environment reduces
risk of injury.
After changing the bits or making any adjust-
ments, make sure the collet nut and any other
adjustment devices are securely tightened.
Loose
adjustment device can unexpectedly shift, causing
loss of control, loose rotating components will be
violently thrown.
Do not reach in the area of the spinning bit. The
proximity of the spinning bit to your hand may not
always be obvious.
Allow brushes to run at operating speed for at least
one minute before using wheel. During this time
no one is to stand in front or in line with the brush.
Loose bristles or wires will be discharged during the
run-in time.
DM 2610925497 10-04 10/18/04 4:41 PM Page 3

Wire and bristle brushes must never be operated
at speeds greater than 15,000/min. Direct the dis-
charge of the spinning wire brush away from you.
Small particles and tiny wire fragments may be dis-
charged at high velocity during the “cleaning” action
with these brushes and may become imbedded in
your skin. Bristles or wires will be discharged from
the brush at high speeds.
"Wear protective gloves and face shield with wire
or bristle brushes. Apply wire or bristle brushes
lightly to the work as only the tips of the wire/bris-
tles do the work.
“Heavy” pressure on bristles will
cause the wire or bristle to become overstressed,
resulting in a wiping action and will cause the bris-
tles/wire to be discharged."
Carefully handle both the tool and individual grind-
ing wheels to avoid chipping or cracking. Install a
new wheel if tool is dropped while grinding. Do not
use a wheel that may be damaged.
Fragments
from a wheel that bursts during operation will fly
away at great velocity possibly striking you or
bystanders.
Never use dull or damaged bits. Sharp bits must
be handled with care.
Damaged bits can snap dur-
ing use. Dull bits require more force to push the tool,
possibly causing the bit to break.
Use clamps to support workpiece whenever practi-
cal. Never hold a small workpiece in one hand and
the tool in the other hand while in use. Allow for
sufficient space, at least 6", between your hand
and the spinning bit.
Round material such as dowel
rods, pipes or tubing have a tendency to roll while
being cut, and may cause the bit to “bite” or jump
toward you. Clamping a small workpiece allows you
to use both hands to control the tool.
Inspect your workpiece before cutting. When cut-
ting irregularly shaped workpieces, plan your work
so it will not slip and pinch the bit and be torn from
your hand.
For example, if carving wood, make sure
there are no nails or foreign objects in the workpiece.
Nails or foreign objects can cause the bit to jump.
Never start the tool when the bit is engaged in the
material.
The bit cutting edge may grab the mater-
ial causing loss of control of the cutter.
Avoid bouncing and snagging the wheel, especial-
ly when working corners, sharp edges etc.
This can
cause loss of control and kick-back.
The direction of feed with the bit into the material
when carving, routing or cutting is very important.
Always feed the bit into the material in the same
direction as the cutting edge is exiting from the
material (which is the same direction as the chips
are thrown).
Feeding the tool in the wrong direction,
causes the cutting edge of the bit to climb out of the
work and pull the tool in the direction of this feed.
If the workpiece or bit becomes jammed or bogged
down, turn the tool “OFF” by the switch. Wait for
all moving parts to stop and unplug the tool, then
work to free the jammed material.
If the switch to
the tool is left “ON” the tool could restart unexpect-
edly causing serious personal injury.
Do not leave a running tool unattended, turn power
off.
Only when tool comes to a complete stop it is
safe to put it down.
Do not grind or sand near flammable materials.
Sparks from the wheel could ignite these materials.
Do not touch the bit or collet after use. After use the
bit and collet are too hot to be touched by bare
hands.
Regularly clean the tool's air vents by compressed
air.
Excessive accumulation of powdered metal
inside the motor housing may cause electrical fail-
ures.
Do not allow familiarity gained from frequent use
of your rotary tool to become commonplace.
Always remember that a careless fraction of a sec-
ond is sufficient to inflict severe injury.
Page 4
DM 2610925497 10-04 10/18/04 4:41 PM Page 4

Do not alter or misuse tool. Any alteration or mod-
ification is a misuse and may result in serious per-
sonal injury.
This product is not intended for use as a dental
drill, in human or veterinary medical applica-
tions.
Serious injury may result.
When using the steel saws, cutoff wheels, high
speed cutters or tungsten carbide cutters, always
have the work securely clamped. Never attempt to
hold the work with one hand while using any of
these accessories.
The reason is that these wheels
will grab if they become slightly canted in the
groove, and can kickback causing loss of control
resulting in serious injury. Your second hand should
be used to steady and guide the hand holding the
tool. When a cutoff wheel grabs, the wheel itself usu-
ally breaks. When the steel saw, high speed cutters
or tungsten carbide cutter grab, it may jump from
the groove and you could lose control of the tool.
Some dust created by power
sanding, sawing, grinding,
drilling, and other construction activities con-
tains chemicals known to cause cancer, birth
defects or other reproductive harm. Some
examples of these chemicals are:
• Lead from lead-based paints,
• Crystalline silica from bricks and cement and
other masonry products, and
• Arsenic and chromium from chemically-
treated lumber.
Your risk from these exposures varies, depending
on how often you do this type of work. To reduce
your exposure to these chemicals: work in a well
ventilated area, and work with approved safety
equipment, such as those dust masks that are
specially designed to filter out microscopic
particles.
This tool is not intended for use by children ages
14 and under.
Nickel-Cadmium Batteries
If equipped with a nickel-cadmium battery, the bat-
tery must be collected, recycled or disposed of in an
environmentally sound manner.
“The EPA certified RBRC Battery
Recycling Seal on the nickel-cad-
mium (Ni-Cd) battery indicates
Robert Bosch Tool Corporation is
voluntarily participating in an
industry program to collect and
recycle these batteries at the end of their useful
life, when taken out of service in the United States
or Canada. The RBRC program provides a conve-
nient alterative to placing used Ni-Cd batteries into
the trash or the municipal waste stream, which
may be illegal in your area.
Please call 1-800-8-BATTERY for information on Ni-
Cd battery recycling and disposal bans/restrictions
in your area, or return your batteries to a
Skil/Bosch/Dremel Service Center for recycling.
Robert Bosch Tool Corporation’s involvement in
this program is part of our commitment to
preserving our environment and conserving our
natural resources.”
Do not attempt to disassemble
the battery or remove any com-
ponent projecting from the battery terminals.
Fire
or injury may result. Prior to disposal, protect
exposed terminals with heavy insulating tape to
prevent shorting.
Alkaline Batteries
Commercially available alkaline cells can be
disposed of in a municipal solid waste stream.
Page 5
!
WARNING
Battery Disposal
!
WARNING
DM 2610925497 10-04 10/18/04 4:41 PM Page 5

Page 6
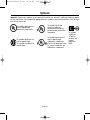
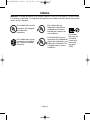
IMPORTANT: Some of the following symbols may be used on your tool. Please study them and learn their
meaning. Proper interpretation of these symbols will allow you to operate the tool better and safer.
Symbol Name Designation/Explanation
V Volts Voltage (potential)
A Amperes Current
Hz Hertz Frequency (cycles per second)
W Watt Power
kg Kilograms Weight
min Minutes Time
s Seconds Time
Diameter Size of drill bits, grinding wheels, etc.
n
0
No load speed Rotational speed, at no load
.../min Revolutions or reciprocation per minute Revolutions, strokes, surface speed,
orbits etc. per minute
0 Off position Zero speed, zero torque...
1, 2, 3, ... Selector settings Speed, torque or position settings.
I, II, III, Higher number means greater speed
Infinitely variable selector with off Speed is increasing from 0 setting
Arrow Action in the direction of arrow
Alternating current Type or a characteristic of current
Direct current Type or a characteristic of current
Alternating or direct current Type or a characteristic of current
Class II construction Designates Double Insulated Construction tools.
Earthing terminal Grounding terminal
Warning symbol Alerts user to warning messages
Ni-Cad RBRC seal Designates Ni-Cad battery recycling program
Symbols
A
0
A
0
A
0
A
0
A
A
A
DM 2610925497 10-04 10/18/04 4:41 PM Page 6

Page 7
Symbols
IMPORTANT: Some of the following symbols may be used on your tool. Please study them and learn their
meaning. Proper interpretation of these symbols will allow you to operate the tool better and safer.
This symbol designates
that this tool is listed by
Underwriters Laboratories.
This symbol designates that
this tool is listed by the
Canadian Standards
Association.
This symbol designates that this
tool is listed to Canadian
Standards by Underwriters
Laboratories.
This symbol
designates that
this tool
complies
to NOM
Mexican
Standards.
This symbol designates that this
tool is listed by Underwriters
Laboratories, and listed to
Canadian Standards by
Underwriters Laboratories.
DM 2610925497 10-04 10/18/04 4:41 PM Page 7

Page 8
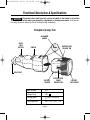
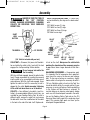
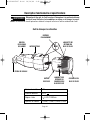
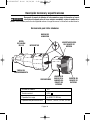
BATTERY PACK
RELEASE TAB
COLLET NUT
SWITCH
Functional Description & Specifications
Disconnect battery pack from tool or place the switch in the locked or off position
before making any assembly, adjustments or changing accessories
. Such preven-
tive safety measures reduce the risk of starting the tool accidentally.
!
WARNING
Pumpkin Carving Tool
Model number 764
Voltage rating 6.0 V
No load speed n
o
6,000-12,000/min
Collet Capacities 1/32”, 1/16”, 3/32”, 1/8”
BATTERY
HOLDER
BATTERY
PACK COVER
BATTERY PACK
COVER
RELEASE TAB
ALIGNMENT
MARKS
SHAFT
LOCK
BUTTON
DM 2610925497 10-04 10/18/04 4:41 PM Page 8

Page 9
Assembly
ALWAYS BE SURE THE TOOL IS
IN THE “OFF” POSITION
BEFORE CHANGING ACCESSORIES, CHANGING
COLLETS OR SERVICING YOUR CORDLESS
ROTARY TOOL.
WARNING
!
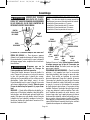
COLLET NUT— To loosen, first press shaft lock but-
ton and rotate the collet nut by hand until the lock
engages the shaft preventing further rotation.
Do not engage lock while the
Tool is running.
With the shaft lock engaged, loosen the collet nut by
hand. Change accessories by inserting the new one
into the collet as far as possible to minimize runout
and unbalance. With the shaft lock engaged, finger
tighten the collet nut until the accessory shank is
gripped by the collet.
Avoid excessive tightening
of the collet nut when there is no bit inserted.
COLLETS —
Four different size collets (see illus-
tration), to accommodate different shank sizes, are
available for your Cordless Rotary Tool. To install a
different collet, remove the collet nut and remove
the old collet. Insert the unslotted end of the collet
in the hole in the end of the tool shaft. Replace col-
let nut on the shaft.
Always use the collet which
matches the shank size of the accessory you plan
to use.
Never force a larger diameter shank into a
collet.
BALANCING ACCESSORIES — For precision work,
it is important that all accessories be in good bal-
ance (much the same as the tires on your automo-
bile). To true up or balance an accessory, slightly
loosen collet nut and give the accessory or collet a
1/4 turn. Retighten collet nut and run the Tool. You
should be able to tell by the sound and feel if your
accessory is running in balance. Continue adjusting
in this fashion until best balance is achieved. To
maintain balance on abrasive wheel points, before
each use, with the wheel point secured in the collet,
turn on the Cordless Rotary Tool and run the 415
Dressing Stone lightly against the revolving wheel
point. This removes high spots and trues up the
wheel point for good balance.
COLLET IDENTIFICATION CHART — Collet sizes
can be identified by the rings on the back end of
collet.
1/32" Collet has one (1) ring.
1/16" Collet has two (2) rings.
3/32" Collet has three (3) rings.
1/8" Collet has no rings.
(1/8" Collet is included with your tool)
!
CAUTION
SHAFT
LOCK
BUTTON
TO LOOSEN
TO TIGHTEN
COLLET
NUT
COLLET
COLLET
NUT
IDENTIFICATION
RINGS
480 1/8"
COLLET
481 3/32"
COLLET
482 1/16"
COLLET
483 1/32"
COLLET
DM 2610925497 10-04 10/18/04 4:41 PM Page 9

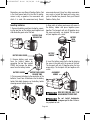
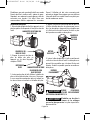
Inserting batteries
1. Remove the battery pack from the tool by squeez-
ing the two tabs on the battery pack together and
slide the battery pack out of the tool.
2. Remove battery pack cover
from the battery holder by
squeezing the two tabs marked
PRESS and remove the battery
cover from the battery holder.
3. Paying special attention to the orientation of the
batteries, insert four AA batteries into the battery
holder. Note both diagrams on the battery holder
showing correct battery direction.
4. Align notch in battery pack cover with arrow in
the battery holder and press together press
together. The two parts will only fit together when
the arrow and notch are aligned. The two parts
will join together with a click.
5. Insert the battery pack into the tool by aligning
the arrow in the pack with the arrow on the tool.
The two parts will only fit together when the two
arrows align. The two parts will join together with
a click.
RISK OF FIRE USE ONLY 1.5V
ALKALINE BATTERIES ONLY.
Do not install backwards,
charge or put in fire.
Batteries
may explode or leak.
Page 10
Remember, your new Dremel Cordless Rotary Tool
is the finest power tool of its kind. But its perfor-
mance is only as good as the accessories with
which it is used. We recommend only Dremel
accessories be used. Use of any other accessories
may create a hazard. We hope you’ll enjoy many
years of trouble free pleasure from your Dremel
Cordless Rotary Tool.
PRESS
WARNING
!
WARNING
!
BATTERY PACK
RELEASE TAB
BATTERY PACK COVER
BATTERY HOLDER
BATTERY PACK COVER
RELEASE TABS
BATTERY
PACK
COVER
BATTERY
HOLDER
ALIGNMENT
MARKS
DM 2610925497 10-04 10/18/04 4:41 PM Page 10

Page 11
Operation Instructions
Pumpkin Carving Kit Instructions
The Dremel Pumpkin Carving Kit comes with 5
templates included, so you can start carving right
away! Or you can find hundreds of additional
templates available wherever pumpkin carving
supplies are sold. A great source for free
templates is on the internet. You can easily create
your own templates as well! Any image you can
trace, you can use as a template. You can even
take a picture of your favorite person or thing,
scan it into a photo-editing program, and convert
it to black & white. There are many websites that
provide free templates or instructions how to
create your own templates. Use an internet search
engine and type in ‘Pumpkin Carving with Dremel’
or ‘Pumpkin Carving Templates’.
Important Note: The Dremel Pumpkin Carving Kit
should be used to “carve” layers of skin away from
your pumpkin so that light will “glow” through the
pumpkin. You do not cut all the way through the
pumpkin.
1. Use a knife to cut a lid for your pumpkin. Angle
the knife towards the center of the pumpkin as you
cut so that the lid will rest on top of the pumpkin
after the cut has been made.
2. Use a large spoon to clean out the entire inside
of the pumpkin. It is best if the walls of your
pumpkin are approximately 1/4”-1/2” thick.
3. Based on the size of your pumpkin, you can
enlarge or reduce the size of your template using a
copy machine if needed.
4. Using spray-on adhesive, apply your template to
the pumpkin.
5. Turn the tool on LOW and begin tracing the
areas to be removed.
6. You can use the HIGH setting for large area
material removal.
7. The key is to remove approximately the same
amount of material on your whole pumpkin to
achieve a uniform depth.
8. Once you’ve finished, remove the paper
template, place a light source, such as a candle, in
the pumpkin, dim the lights, and see how well the
light shines through your carving.
9. If you want more light to shine through, turn the
lights back on, remove the candle, and remove
additional material from your pumpkin.
DM 2610925497 10-04 10/18/04 4:41 PM Page 11

Page 12
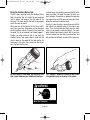
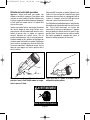
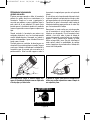
For best control in close work, grip the Rotary Tool
like a pencil between your thumb and forefinger.
The “handgrip” method of holding the tool is used
for operations such as cleaning a flat surface.
WARNING
Wear Eye Protection
Using the Cordless Rotary Tool
The first step in learning to use the Cordless Rotary
Tool is to get the “feel” of it. Hold it in your hand and
feel its weight and balance. Feel the taper of the
housing. This taper permits the tool to be grasped
much like a pen or pencil.
When you turn on the tool for the first time, hold it
away from your face. Accessories can be damaged
during handling, and can fly apart as they come up
to speed. This is not common, but it does happen.
Practice on scrap materials first to see how the
Cordless Rotary Tool works. Keep in mind that the
work is done by the speed of the tool and by the
accessory in the collet. You should not lean on or
push the tool into the work.
Instead, lower the spinning accessory lightly to the
work and allow it to touch the point at which you
want to begin. Concentrate on guiding the tool over
the work using very little pressure from your hand.
Allow the accessory to do the work.
Usually, it is best to make a series of passes with the
tool rather than attempt to do all the work in one
pass. Pass the tool back and forth over the work,
much as you would a small paint brush. For most
work, the deft, gentle touch is best. With it, you have
the best control, are less likely to make errors, and
will get the most efficient work out of the accessory.
DM 2610925497 10-04 10/18/04 4:41 PM Page 12

Page 13
Operating Speeds For Accessories
Set the speed indicator to fit the job to achieve the
best job results when working with different
materials.
To select the right speed for each job, use a prac-
tice piece of material. Vary speed to find the best
speed for the accessory you are using and the job
to be done.
On the Model 764, there is a LO and HI switch.
When the switch indicator is in position 1 or LO, the
tool runs at about 6,000 RPM. When the switch
indicator is in position 2 or HI, the tool runs at about
12,000 RPM.
NOTE: Speed is affected by voltage changes.
Weaker batteries with reduced voltage will slow the
RPM of the tool, especially at the lowest setting. If
your tool appears to be running more slowly than
normal, replace the batteries with fresh ones to
increase tool speed.
The speed of Model 764 is controlled by
setting this indicator on the housing.
Service
NO USER SERVICEABLE PARTS
INSIDE. Preventive mainte-
nance performed by unauthorized personnel may
result in misplacing of internal wires and compo-
nents which could cause serious hazard.
We
recommend that all tool service be performed by a
Dremel Service Facility.
D.C. motors
The motor in your tool has been engineered for
many hours of dependable service. To maintain peak
efficiency of the motor, we recommend it be exam-
ined every six months. Only a genuine Dremel
replacement motor specially designed for your tool
should be used.
Cleaning
To avoid accidents, always dis-
connect battery pack before
cleaning.
The tool may be cleaned most effectively
with compressed dry air.
Always wear safety gog-
gles when cleaning tools with compressed air.
Ventilation openings and switch levers must be kept
clean and free of foreign matter. Do not attempt to
clean by inserting pointed objects through opening.
Certain cleaning agents and sol-
vents damage plastic parts.
Some of these are: gasoline, carbon tetrachloride,
chlorinated cleaning solvents, ammonia and house-
hold detergents that contain ammonia.
!
WARNING
Maintenance
!
WARNING
!
CAUTION
DM 2610925497 10-04 10/18/04 4:41 PM Page 13

Page 14
Your Dremel product is warranted against defective material or workmanship for a period of two years from date of
purchase. In the event of a failure of a product to conform to this written warranty, please take the following action:
1. DO NOT return your product to the place of purchase.
2. Carefully package the product by itself, with no other items, and return it, freight prepaid, along with:
A. A copy of your dated proof of purchase (please keep a copy for yourself).
B. A written statement about the nature of the problem.
C. Your name, address and phone number to:
UNITED STATES
Dremel Service Center Dremel Service Center
4915 Twenty-First Street OR 4631 E. Sunny Dunes
Racine, Wisconsin 53406 Palm Springs, CA 92264
CANADA OUTSIDE
Giles Tool Agency CONTINENTAL UNITED STATES
6520 Lawrence Av. East See your local distributor or write
Scarborough, Ont. to Dremel, 4915 Twenty-First St.
Canada M1C 4A7 Racine, Wisconsin 53406
1-888-285-3476
We recommend that the package be insured against loss or in transit damage for which we cannot be responsible.
This warranty applies only to the original registered purchaser. DAMAGE TO THE PRODUCT RESULTING FROM
TAMPERING, ACCIDENT, ABUSE, NEGLIGENCE, UNAUTHORIZED REPAIRS OR ALTERATIONS, UNAPPROVED
ATTACHMENTS OR OTHER CAUSES UNRELATED TO PROBLEMS WITH MATERIAL OR WORKMANSHIP ARE NOT
COVERED BY THIS WARRANTY.
No employee, agent, dealer or other person is authorized to give any warranties on behalf of Dremel. If Dremel
inspection shows that the problem was caused by problems with material or workmanship within the limitations of
the warranty, Dremel will repair or replace the product free of charge and return product prepaid. Repairs made nec-
essary by normal wear or abuse, or repair for product outside the warranty period, if they can be made, will be
charged at regular factory prices.
DREMEL MAKES NO OTHER WARRANTY OF ANY KIND WHATEVER, EXPRESSED OR IMPLIED, AND ALL IMPLIED
WARRANTIES OF MERCHANTABILITY AND FITNESS FOR A PARTICULAR PURPOSE WHICH EXCEED THE ABOVE
MENTIONED OBLIGATION ARE HEREBY DISCLAIMED BY DREMEL AND EXCLUDED FROM THIS LIMITED WAR-
RANTY.
This warranty gives you specific legal rights and you may also have other rights which vary from state to state. The
obligation of the warrantor is solely to repair or replace the product. The warrantor is not liable for any incidental or
consequential damages due to any such alleged defect. Some states do not allow the exclusion or limitation of inci-
dental or consequential damages, so the above limitations or exclusion may not apply to you.
For prices and warranty fulfillment in the continental United States, contact your local Dremel distributor.
Exportado por: Robert Bosch Tool Corporation Mt. Prospect, IL 60056 -2230, E.U.A.
Importado en México por: Robert Bosch, S.A. de C.V., Calle Robert Bosch No. 405, Zona Industrial,
Toluca, Edo. de México, C.P. 50070, Tel. (722) 2792300
Dremel Limited Warranty
DM 2610925497 10-04 10/18/04 4:41 PM Page 14

Page 15
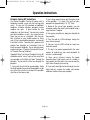
Outil à découper les citrouilles modèle 764
Mode d’emploi
SOYEZ FRANC … Avez-vous luce MANUEL ?
• Sécurité
• Assemblage
• Fonctionnement
• Informations sur les accessoires
• Garantie
• Pièces de service
P.O. Box 1468
Racine, Wisconsin 53401
1-800-437-3635
http://www.dremel.com
Les produits de marque Dremel sont fabriqués et commercialisés par la
Division Dremel de Robert Bosch Tool Corporation
DM 2610925497 10-04 10/18/04 4:41 PM Page 15

Page 16
Vous devez lire et comprendre toutes les instructions. Lenon-respect, même par-
tiel, des instructions ci-après entraîne un risque de choc életrique, d'incendie et/ou
de blessures graves.
CONSERVEZ CES INSTRUCTIONS
AVERTISSEMENT
!
Consignes générales de sécurité pour tous les outils à pile
Aire de travail
Veillez à ce que l'aire de travail soit propre et bien
éclairée. Le désordre et le manque de lumière
favorisent les accidents.
N'utilisez pas d'outils électriques dans une atmo-
sphère explosive, par exemple enprésence de liq-
uides, de gaz ou de poussières inflammables. Les
outils électriques créent des étincelles qui pourraient
enflammer les poussières ou les vapeurs.
Tenez à distance les curieux, les enfants et les visi-
teurs pendant que vous travaillezavec un outil élec-
trique. Ils pourraient vous distraire et vous faire faire
une fausse manoeuvre.
Sécurité électrique
Un outil à pile avec piles incorporées ou bloc-pile
distinct doit être rechargé uniquement avec le
chargeur indiqué pour la pile. Un chargeur qui peut
être adéquat pour un type de pile peut créer un risque
d'incendie lorsqu'il est utilisé avec une autre pile.
Utiliser un outil à pile uniquement avec le bloc-pile
désigné spécifiquement. L'emploi de toute autre pile
peut créer un risque d'incendie.
Sécurité des personnes
Restez alerte, concentrez-vous sur votre travail et
faites preuve de jugement. N'utilisez pas un outil
électrique si vous êtes fatigué ou sous l'influence de
drogues, d'alcool ou de médicaments. Un instant d'i-
nattention suffit pour entraîner des blessures graves.
Habillez-vous convenablement. Ne portez ni vête-
ments flottants ni bijoux. Confinez les cheveux longs.
N'approchez jamais les cheveux, les vêtements ou
les gants des pièces en mouvement. Des vêtements
flottants, des bijoux ou des cheveux longs risquent
d'être happés par des pièces en mouvement. Gardez les
poignées sèches, propres et exemptes d'huile et de
graisse.
Évitez la mise en marche accidentelle. Assurez-vous
que l'interrupteur est en position de blocage ou d'ar-
rêt avant d'insérer le bloc-pile. Il est dangereux de
transporter l'outil avec le doigt sur l'interrupteur ou
d'insérer le bloc-pile dans un outil alors que l'interrup-
teur est en position de marche.
Enlevez les clés de réglage ou de serrage avant de
démarrer l'outil. Une clé laissée dans une pièce tour-
nante de l'outil peut provoquer des blessures.
Ne vous penchez pas trop en avant. Maintenez un bon
appui et restez en équilibre entout temps. Un bonne
stabilité vous permet de mieux réagir à une situation
inattendue.
Utilisez des accessoires de sécurité. Portez toujours
des lunettes ou une visière. Selon les conditions,
portez aussi un masque antipoussière, des bottes de
sécurité antidérapantes, un casque protecteur et/ou un
appareil antibruit.
Utilisation et entretien des outils
Immobilisez le matériau sur une surface stable au
moyen de brides ou de toute autre façon adéquate. Le
fait de tenir la pièce avec la main ou contre votre corps
offre une stabilité insuffisante et peut amener un déra-
page de l'outil.
Ne forcez pas l'outil. Utilisez l'outil approprié à la
tâche. L'outil correct fonctionne mieux et de façon plus
sécuritaire. Respectez aussi la vitesse de travail qui lui
est propre.
N'utilisez pas l'outil si l'interrupteur ne le met pas
en marche ou à l'arrêt. Un outil qui ne peut être con-
trôlé par l'interrupteur est dangereux et doit être
réparé.
Débranchez le bloc-pile de l'outil ou mettez l'inter-
rupteur en position de blocage ou d'arrêt avant d'ef-
fectuer tout réglage, de changer les accessoires ou
de remiser l'outil. Ces mesures de sécurité préven-
tives réduisent le risque d'une mise en marche acci-
dentelle de l'outil.
DM 2610925497 10-04 10/18/04 4:41 PM Page 16

Rangez les outils hors de la portée des enfants et
d'autres personnes inexpérimentées. Les outils sont
dangereux dans les mains d'utilisateurs novices.
Lorsque le bloc-pile n'est pas en usage, tenez-le à
l'écart d'autres objets métalliques tels que trom-
bones, pièces de monnaie, clés, clous, vis ou autres
petits objets métalliques susceptibles d'établir une
connexion d'une borne à une autre. Le court-cir-
cuitage des bornes de batterie ensemble peut causer
des étincelles, des brûlures ou un incendie.
Prenez soin de bien entretenir les outils. Les outils de
coupe doivent être toujours bien affûtés et propres.
Des outils bien entretenus, dont les arêtes sont bien
tranchantes, sont moins susceptibles de coincer et plus
faciles à diriger.
Soyez attentif à tout désalignement ou coincement
des pièces en mouvement, à tout bris ou à toute autre
condition préjudiciable au bon fonctionnement de
l'outil. Si vous constatez qu'un outil est endommagé,
faites-le réparer avant de vous en servir. De nom-
breux accidents sont causés par des outils en mauvais
état.
N'utilisez que des accessoires que le fabricant
recommande pour votre modèle d'outil. Certains
accessoires peuvent convenir à un outil, mais être dan-
gereux avec un autre.
Réparation
La réparation des outils électriques doit être confiée
à un réparateur qualifié. L'entretien ou la réparation
d'un outil électrique par un amateur peut avoir des con-
séquences graves.
Pour la réparation d'un outil, n'employez que des
pièces de rechange d'origine. Suivez les directives
données à la section « Réparation » de ce manuel.
L'emploi de pièces non autorisées ou le non-respect
des instructions d'entretien peut créer un risque de
choc électrique ou de blessures.
Page 17
Les accessoires doivent être prévus pour au moins la
vitesse recommandée sur l'étiquette d'avertissement
de l'outil. Les meules et les autres accessoires utilisés
à une vitesse supérieure à la vitesse nominale peuvent
se détacher et provoquer des blessures.
Tenez l'outil par les surfaces isolées de prise en exé-
cutant une opération lorsque l'outil de coupe peut
venir en contact avec des fils cachés.
Le contact avec
un fil sous tension rendra les parties métalliques
exposées de l'outil sous tension et causera des sec-
ousses électriques à l'opérateur. Pour couper dans des
murs existants ou autres endroits aveugles pouvant dis-
simuler des fils électriques, débranchez tous les
fusibles ou les disjoncteurs alimentant ce lieu de travail.
Avant de changer les accessoires, retirez le bloc-pile.
Il peut y avoir mise en marche accidentelle parce que les
outils à pile avec pile insérée sont en état de marche.
Connaissez l'emplacement de l'interrupteur lorsque
vous déposez l'outil ou lorsque vous le reprenez.
Vous pouvez actionner l'interrupteur par mégarde.
Tenez toujours le couteau des deux mains durant la
mise en marche. Le couple de réaction du moteur peut
faire tordre l'outil.
Portez toujours des lunettes de sécurité et un masque
anti-poussières. N'utilisez l'outil qu'à un endroit bien
aéré. L'utilisation de dispositifs de sécurité personnelle
et le travail dans un environnement sûr réduisent les
risques de blessures.
Après avoir changé les lames ou effectué quelque
réglage que ce soit, assurez-vous que l'écrou de la
douille et tout autre dispositif de réglage sont bien
serrés. Un dispositif de réglage lâche peut bouger
soudainement et causer ainsi une perte de contrôle avec
projection violente des composants en rotation.
Ne placez pas la main à proximité de la mèche qui
tourne. Vous ne vous rendrez pas toujours compte de
cette proximité.
Laissez les brosses tourner à la vitesse de fonction-
nement pendant au moins une minute avant d’utiliser
la meule. Durant cette période, personne ne doit se
tenir devant la meule ou en ligne avec celle-ci.
Pendant la période de rodage, les poils ou fils de fer
seront éjectés de la brosse.
Les brosses (à poils standards ou métalliques) ne
doivent jamais être utilisées au-dessus de 15 000
Consignes de sécurité pour outil rotatif sans cordon
DM 2610925497 10-04 10/18/04 4:41 PM Page 17

Page 18
tr/min. Dirigez la décharge de la brosse métallique en
rotation en sens opposé à vous. Des petites particules
et des petits fragments de fil peuvent être déchargés à
grande vitesse durant l'action de « nettoyage » de ces
brosses et peuvent se loger dans votre peau. À haute
vitesse, les poils ou fils de fer mal attachés seront éjectés.
Portez des gants et un écran de protection quand vous
utilisez une brosse à poils standard ou une brosse
métallique. N’appuyez que légèrement la brosse à
poils standard ou la brosse métallique sur la pièce
car seuls les extrémités des brins sont actives. Si on
appuie trop fort, les brins subissent des contraintes
exagérées résultant en un mécanisme d’essuyage suivi
de l’éjection de brins.
Maniez soigneusement l'outil aussi bien que les
meules individuelles pour éviter les éclats ou les fis-
surations. Posez une nouvelle meule si l'outil tombe
pendant la rectification. N'utilisez pas une meule qui
peut être endommagée. Les fragments d'une meule
qui éclate durant le fonctionnement seront projetés à
grande vitesse et pourraient frapper des personnes
présentes ou vous-même.
N'utilisez jamais de lames émoussées ou abîmées.
Les lames affilées doivent être maniées soigneusement.
Les mèches abîmées peuvent se rompre brusquement
durant l'usage. Les lames émoussées nécessitent plus
de force pour pousser l'outil, causant éventuellement un
bris de la lame.
Utilisez des pinces pour supporter l'ouvrage autant
que possible. Ne tenez jamais un petit ouvrage d'une
main et l'outil de l'autre main pendant que celui-ci
est en usage. Prévoyez un espace suffisant, d'au
moins 150 mm, entre votre main et la mèche qui
tourne. Les pièces rondes, telles que tiges cylindriques,
tuyaux ou tubes, ont tendance à rouler pendant qu'on
les coupe et, de ce fait, la mèche peut « mordre » ou
sauter vers vous. En fixant un petit ouvrage, vous pour-
rez utiliser vos deux mains pour contrôler l'outil.
Inspectez l'ouvrage avant de le couper. Avant de
couper un ouvrage de forme irrégulière, planifiez
votre travail de manière à ce que l'ouvrage ne glisse
pas et ne vienne pas pincer la mèche qui sera
arrachée de votre main. Ainsi, si vous taillez du bois,
assurez-vous de l'absence de clous ou de corps
étrangers dans l'ouvrage. Sous l'effet du contact avec
des clous ou corps étrangers, la mèche peut sauter.
Ne mettez jamais l'outil en marche alors que la lame
est enfoncée dans le matériau. Le tranchant de la lame
peut se coincer dans le matériau et vous faire perdre le
contrôle du couteau.
Évitez de faire rebondir et de heurter la meule, surtout
en travaillant des coins, des arêtes vives, etc. Ceci
peut causer une perte de contrôle et un rebond.
Le sens d'avance de la mèche dans l'ouvrage lorsque
vous taillez, détourez ou coupez est très important.
Avancez toujours la mèche dans l'ouvrage dans le
sens dans lequel le tranchant sort de l'ouvrage (ce qui
correspond au sens d'éjection des copeaux). L'avance
de l'outil dans le mauvais sens fait sortir le tranchant de
la mèche de l'ouvrage et tire l'outil dans le sens de cette
avance.
Si le matériau ou la mèche se grippe ou se bloque,
mettez l'outil hors tension « OFF » par l'interrupteur.
Attendez que toutes les pièces mobiles s'immo-
bilisent et débranchez l'outil, procédez ensuite à
débloquer l'ouvrage bloqué. Si l'interrupteur de l'outil
est laissé en position de marche « ON », l'outil pourrait
se remettre en marche par mégarde et causer ainsi des
blessures graves.
Ne laissez pas un outil en marche sans surveillance,
mettez hors tension. L'outil peut être déposé en toute
sécurité uniquement lorsqu'il s'est arrêté complète-
ment.
Ne rectifiez et ne poncez pas à proximité de matières
inflammables. Les étincelles provenant de la meule
pourraient enflammer ces matières.
Ne touchez pas la mèche ou la douille après usage.
Après usage, la mèche et la douille sont trop chaudes
pour être touchées à mains nues.
Nettoyez régulièrement les prises d'air de l'outil à
l'aide d'air comprimé. Une accumulation excessive de
métal en poudre à l'intérieur du carter du moteur peut
causer des défaillances électriques.
Ne soyez pas dupé par la familiarité acquise par un
usage fréquent de votre outil rotatif. N'oubliez pas
qu'une fraction de seconde d'insouciance suffit à
infliger des blessures graves.
Ne modifiez pas l'outil et n'en faites pas un usage
erroné. Toute altération ou modification constitue un
DM 2610925497 10-04 10/18/04 4:41 PM Page 18

usage erroné et peut provoquer des blessures graves.
Ce produit n’a pas été conçu pour être utilisé comme
fraise de dentiste ou pour des applications médi-
cales sur des personnes ou des animaux. Il y a risque
de blessure grave.
Lorsque vous utilisez les scies en acier, les disques
de découpage, les couteaux à grande vitesse ou les
couteaux au carbure de tungstène, assurez-vous que
la pièce est toujours bien assujettie. Ne tentez jamais
de tenir la pièce d’une seule main tout en utilisant
l’un de ces accessoires. La raison en est que ces roues
grippent lorsqu’elles sont le moindrement inclinées
dans la rainure, et elles peuvent alors rebondir, vous
faisant ainsi perdre le contrôle et causant des blessures
graves. Votre autre main doit servir à stabiliser et guider
la main qui tient l’outil. Lorsqu’un disque de découpage
grippe, on peut généralement s’attendre à ce qu’il se
brise. Lorsque la scie en acier, les couteaux à grande
vitesse ou le couteau au carbure de tungstène grippent,
ils peuvent sauter hors de la rainure et vous pouvez per-
dre le contrôle de l’outil.
Les travaux à la machine
tel que ponçage, sciage,
meulage, perçage et autres travaux du bâtiment peu-
vent créer des poussières contenant des produits
chimiques qui sont des causes reconnues de cancer,
de malformation congénitale ou d’autres problèmes
reproductifs. Ces produits chimiques sont, par exem-
ple :
• Le plomb provenant des peintures à base de plomb,
• Les cristaux de silices provenant des briques et du
ciment et d’autres produits de maçonnerie, et
• L’arsenic et le chrome provenant des bois traités
chimiquement.
Le niveau de risque dû à cette exposition varie avec la
fréquence de ces types de travaux. Pour réduire l’expo-
sition à ces produits chimiques, il faut travailler dans un
lieu bien ventilé et porter un équipement de sécurité
approprié tel que certains masques à poussière conçus
spécialement pour filtrer les particules microscopiques.
Cet outil n’est pas prévu pour les enfants de moins de
15 ans.
Page 19
AVERTISSEMENT
!
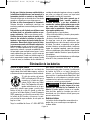
Piles nickel-cadmium
Si le produit est équipé d'une pile nickel-cadmium, la
pile doit être ramassée, recyclée ou mise au rebut d'une
manière qui ne soit pas nocive pour l'environnement.
“Le sceau RBRC de recyclage des
piles, homologué par l’EPA
(Agence pour la protection de l’en-
vironnement des États-Unis), qui
se trouve sur les piles au nickel-
cadmium (Ni-Cd) indique que
Robert Bosch Tool Corporation participe volontaire-
ment à un programme industriel de ramassage et de
recyclage de ces piles au terme de leur vie utile,
pourvu qu’elles soient mises hors service aux États-
Unis ou au Canada. Le programme du RBRC offre une
alternative pratique à la mise des piles au Ni-Cd usées
au rebut ou au ramassage d’ordures municipal, ce qui
pourrait être interdit dans votre région.
Veuillez appeler le 1-800-8-BATTERY pour obtenir de
plus amples renseignements sur le recyclage des piles
au Ni-Cd et sur les restrictions ou interdictions de
mise au rebut qui s’appliquent à votre région ou
renvoyez vos piles à un Centre de Service
Skil/Bosch/Dremel pour recyclage. La participation de
Robert Bosch Tool Corporation à ce programme s'in-
sère dans le contexte de notre engagement à préserv-
er notre environnement et à conserver nos ressources
naturelles.”
Ne tentez pas de
désassembler le bloc-piles
ou d’enlever tout composant faisant saillie des
bornes de piles, ce qui peut provoquer un incendie ou
des blessures. Avant la mise au rebut, protégez les
bornes exposées à l’aide d’un ruban isolant épais pour
prévenir le court-circuitage.
Pile alcalines
Les piles alcalines du commerce peuvent être mises
au rebut normalement avec les autres déchets solides
municipaux.
Mise au rebut des piles
AVERTISSEMENT
!
DM 2610925497 10-04 10/18/04 4:41 PM Page 19

Page 20
Symboles
IMPORTANT : Certains des symboles suivants peuvent être utilisés sur votre outil. Veuillez les étudier et
apprendre leur signification. Une interprétation appropriée de ces symboles vous permettra d'utiliser l'outil de
façon plus efficace et plus sûre.
Symbole Nom Désignation/Explication
V Volts Tension (potentielle)
A Ampères Courant
Hz Hertz Fréquence (cycles par seconde)
W Watt Puissance
kg Kilogrammes Poids
min Minutes Temps
s Secondes Temps
Diamètre Taille des mèches de perceuse, meules, etc.
n
0
Vitesse à vide Vitesse de rotation, à vide
.../min Tours ou mouvement alternatif par Tours, coups, vitesse en surface, orbites,
minute etc., par minute,
0 Position d'arrêt Vitesse zéro, couple zéro ...
1, 2, 3, ... Réglages du sélecteur Réglages de vitesse, de couple ou de position.
l, ll, lll, ... Un nombre plus élevé signifie une vitesse plus grande.
Sélecteur variable à l'infini avec arrêt La vitesse augmente depuis le réglage 0
Flèche Action dans la direction de la flèche
Courant alternatif Type ou caractéristique du courant
Courant continu Type ou caractéristique du courant
Courant alternatif ou continu Type ou caractéristique du courant
Construction classe II isolation Désigne des outils construits avec double
Borne de terre borne de mise à la terre
Symbole d'avertissement Alerte l'utilisateur aux messages d'avertissement.
Sceau Ni-Cad RBRCmc Désigne le programme de recyclage des piles Ni-Cad.
A
0
A
0
A
0
A
0
A
A
A
A
DM 2610925497 10-04 10/18/04 4:41 PM Page 20
La page charge ...
La page charge ...
La page charge ...
La page charge ...
La page charge ...
La page charge ...
La page charge ...
La page charge ...
La page charge ...
La page charge ...
La page charge ...
La page charge ...
La page charge ...
La page charge ...
La page charge ...
La page charge ...
La page charge ...
La page charge ...
La page charge ...
La page charge ...
La page charge ...
La page charge ...
La page charge ...
-
 1
1
-
 2
2
-
 3
3
-
 4
4
-
 5
5
-
 6
6
-
 7
7
-
 8
8
-
 9
9
-
 10
10
-
 11
11
-
 12
12
-
 13
13
-
 14
14
-
 15
15
-
 16
16
-
 17
17
-
 18
18
-
 19
19
-
 20
20
-
 21
21
-
 22
22
-
 23
23
-
 24
24
-
 25
25
-
 26
26
-
 27
27
-
 28
28
-
 29
29
-
 30
30
-
 31
31
-
 32
32
-
 33
33
-
 34
34
-
 35
35
-
 36
36
-
 37
37
-
 38
38
-
 39
39
-
 40
40
-
 41
41
-
 42
42
-
 43
43


Dremel 764 Manuel utilisateur
- Catégorie
- Outils électroportatifs
- Taper
- Manuel utilisateur
- Ce manuel convient également à
dans d''autres langues
- English: Dremel 764 User manual
- español: Dremel 764 Manual de usuario
Documents connexes
-
Dremel 764 Le manuel du propriétaire
-
DRE 754 Manuel utilisateur
-
Dremel 7700 Operating/Safety Instructions Manual
-
-
-
-
-
Dremel 800 Manuel utilisateur
-
-