KALON Caravan Assembly Instructions Manual
- Catégorie
- Meubles de bébé
- Taper
- Assembly Instructions Manual

ASSEMBLY
INSTRUCTIONS
CARAVAN
CRIB
INSTRUCTIONS
POUR LE MONTAGE
DU LIT
BÉBÉ CARAVAN
Model No.: Caravan Crib 041 | KALON STUDIOS
www.kalonstudios.com | [email protected]
P.O. Box 292612 | Los Angeles | CA 90029 | 866.514.2034
PRINTED WITH SOLAR POWER ON FSC CERTIFIED PAPER USING SOY BASED INK, AND LOVE

MAINTENANCE, CLEANING AND STORAGE
Please take care to periodically check the crib/toddler bed to
ensure that it is properly assembled and that no parts have
come loose. Verify that the crib/toddler bed parts remain t
snuggly against one another and tighten hardware if needed.
Clean with a rag dampened with warm water. Do not use soap or
harsh chemicals as they will remove the natural, wax-oil nish.
Maintain nish with wood oil of your choice or contact
[email protected] for recommendations.
For best storage, repack crib/toddler bed in original packaging
and/or store in a dry area, upright and at.
Do not allow to bend.
Keep instructions in pouch for future use.
ENTRETIENT, NETTOYAGE ET RANGEMENT
Veuillez inspecter régulièrement le meuble, s’assurer que les pièces
soient bien assemblées et que les composantes ne se soient pas
desserrées. Au besoin, utilisez un tournevis pour resserrer les pièces.
Nettoyez les surfaces à l’aide d’un chamois imprégné d’eau tiède.
Veuillez éviter l’utilisation de savon ou de nettoyants chimiques
qui risqueraient d’enlever le ni de cire et d’huile naturelle.
Vous pouvez redonner un lustre au ni en appliquant une huile
naturelle pour bois de votre choix ou nous contacter par courriel
à [email protected] pour des recommandations.
Pour optimiser l’entreposage, vous pouvez démonter et remettre
le meuble dans son emballage original et l’entreposer dans un
environnement sec en position verticale ou horizontale an
d’éviter toute déformation.
Veuillez conserver les instructions dans la pochette pour la
prochaine utilisation.

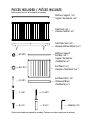
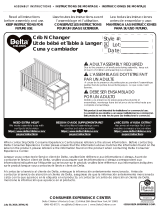
PIECES INCLUDED /
PIÉCES INCLUSES
Philips head screwdriver required for assembly.
Tournevis cruciforme requis pour le montage.
Mattress Support ( x1 )
Support de matelas ( x1)
Side Panel ( x2 )
Panneau latéral ( x2 )
End Panel ( x2 )
Panneau d’extrémité ( x2 )
End Panel Foot ( x2 )
Panneau inférieur
d’extrémité ( x2 )
Side Panel Foot ( x2 )
Panneau inférieur latéral ( x2 )
C ( x4 )
B ( x10 )
A1 ( x10 )
A2 ( x10 )
Allen Key ( x1 )
E ( x12 )
Refer to pouch for true to life diagram of hardware.
Mattress Support
End Rail ( x2 )
Support de matelas
d’extrémité ( x2)
G ( x4 )
D ( x4 )

E
E
E
E
E
E
E
E
E
E
A1
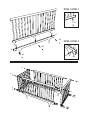
DETAIL /
DÉTAIL
2
B
B
B
G
G
A2
A2
A2
B
DETAIL /
D
É
TAIL 1
A2

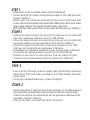
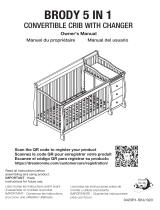
STEP 1
• Insert parts G into available holes at end of panel foot.
• Screw parts B into holes along bottom edge of the side and end
panels. (Detail 1)
• Insert parts A2 into large holes along inner face of all panel feet.
• Lower side and end panels onto panel feet sliding parts B through holes
along upper edge of foot panels and into hole in parts A2.
• With a philips head screw driver screw parts A1 into parts A2. (Detail 2)
ÉTAPE 1
• Insérez les pièces G dans les ouvertures prévues sur le côté exté-
rieur des panneaux inférieur pour le côté latéral.
• Vissez les pièces B dans les ouvertures prévues sur les côtés des
panneaux latéraux et des panneaux d’extrémité. (Détail 1)
• Insérez les pièces A2 dans les ouvertures prévues sur le côté
intérieur de l’ensemble des panneaux inférieurs.
• Assemblez les panneaux supérieurs avec les panneaux inférieurs
en insérant les pièces B dans l’ouverture correspondante.
• Utilisez un tournevis cruciforme pour xer les pièces A1 dans
l’ouverture correspondante dans les pièces A2. (Détail 2)
STEP 2
• Insert parts E through holes on outer side of End Panels and End
Panel Feet, then into holes on edge of Crib Side Panels and Side
Panel Feet.
• Using the supplied Allen Key, screw to tighten.
ÉTAPE 2
• Insérez les pièces E dans les ouvertures prévues sur le côté extérieur
des panneaux d’extrémité et des panneaux inférieur d’extrémitié,
et dans l’ouverture correspondante sur les panneaux latéraux et les
panneaux inférieur latéraux.
• Avec la clé Allen, vissez an de serrer les pièces.

C
D
D
C

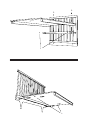
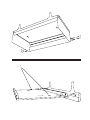
STEP 4 ADJUSTING MATTRESS HEIGHT- LOWER SETTING
• WARNING: If attached to crib, remove mattress support end rails.
• Insert parts C through holes at bottom of mattress support and into
holes on Crib Side panels.
• Using a philips head screw driver tighten parts C.
ÉTAPE 4 RÉGLER LA HAUTEUR DU MATELAS - POSITION BASSE
• MISE EN GARDE: S’ils sont attachés, retirez les supports de
matelas d’extrémité.
• Fixez le support de matelas sur les panneaux latéraux en insérant les
pièces C dans les ouvertures prévues.
• Utilisez un tournevis cruciforme pour xer les pièces C.
STEP 3 ADJUSTING MATTRESS HEIGHT- HIGHER SETTING
• Insert parts C through holes on the face of Mattress Support End
Rail and into holes on Crib End Panels.
• Using a philips head screw driver tighten parts C.
• Align holes on mattress support with those on the upper edge of Mat-
tress Support End Rail. Insert parts D through holes.
• Using a philips head screw driver tighten parts D.
ÉTAPE 3 RÉGLER LA HAUTEUR DU MATELAS - POSITION ÉLEVÉE
• Fixez le support d’extrémité de matelas sur les panneaux latéraux en
insérant les pièces C dans les ouvertures prévues.
• Utilisez un tournevis cruciforme pour xer les pièces C.
• Alignez les trous du support de matelas avec les trous sur le
bord supérieur du support d’extrémité de matelas. Insérez les
pièces D dans les ouvertures prévues.
• Utilisez un tournevis cruciforme pour xer les pièces D.

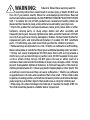
Failure to follow these warnings and the
assembly instructions could result in serious injury or death. DO NOT use
this crib if you cannot exactly follow the accompanying instructions. Read all
instructions before assembling crib. KEEP INSTRUCTIONS IN POUCH FOR FUTURE
USE. • To reduce the risk of SIDS, pediatricians recommend healthy infants be
placed on their backs to sleep, unless otherwise advised by your physician.
• Check this product for damaged hardware, loose joints, loose bolts or other
fasteners, missing parts, or sharp edges before and after assembly and
frequently during use. Securely tighten loose bolts and other fasteners. DO NOT
use crib if any parts are missing, damaged or broken. Contact Kalon Studios for
replacement parts and instructional literature if needed. DO NOT substitute
parts. • If refinishing, use a non-toxic finish specified for children’s products.
• Follow warnings on all products in a crib. • Infants can suffocate on soft bedding.
Never add a pillow or comforter. Never place additional padding under an infant.
• Strings can cause strangulation! DO NOT place items with a string around a
child’s neck, such as hood strings or pacifier cords. DO NOT suspend strings over
a crib or attach strings to toys. DO NOT place crib near or within reach of a
window or door where cords from blinds or drapes may strangle a child. • To help
prevent strangulation tighten all fasteners. A child can trap parts of the body or
clothing on loose fasteners. • Never use plastic shipping bags or other plastic film
as mattress covers because they can cause suffocation. • Infants can suffocate
in gaps between crib sides and a mattress that is too small. • When child is able
to pull to a standing position, set mattress to lowest position and remove bumper
pads, large toys and other objects that could serve as steps for climbing out.
• Stop using crib when child begins to climb out or reaches the height of 89 cm.
The child should be placed in a toddler bed or regular bed.
WARNING:

WARNING: Read all instructions before assembling toddler
bed. KEEP INSTRUCTIONS FOR FUTURE USE. • Failure to follow these
warnings and the assembly instructions could result in serious injury or
death. • INFANTS HAVE DIED IN TODDLER BEDS FROM ENTRAPMENT.
Openings in and between bed parts can entrap head and neck of
small child. • NEVER use bed with children younger than 15
months. • ALWAYS follow assembly instructions. • NEVER place
bed near windows where cords from blinds or drapes may strangle
a child. • NEVER suspend strings over bed. • NEVER place items
with string, cord, or ribbon, such as hood strings or pacifier cords,
around a child’s next. These items may catch on bed parts. • To
avoid dangerous gaps, any mattress used in this bed shall be a
full-size crib mattress at least 131 cm in length, 69 cm in width,
and 15c m in thickness. • Before each usage or assembly, inspect
toddler bed for damaged hardware, loose joints, missing parts or sharp
edges. • DO NOT use toddler bed if any parts are missing or broken. Ask
you dealer or write to Kalon Studios for replacement parts and instructional
literature if needed. DO NOT substitute parts. • Never use plastic shipping
bags or other plastic film as mattress covers because they can cause
suffocation. •DO NOT use a water mattress with this toddler bed.
CAUTION: Any mattress used in
this crib shall be at least 69cm by
131cm with a thickness not
exceeding 15cm.

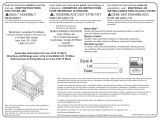
STEP 3
• Insert parts C through holes at bottom of mattress support and into
holes on Side Panel Feet.
• Using a philips head screw driver tighten parts C.
ÉTAPE 3
• Fixez le support de matelas sur les panneaux latéraux en insérant les
pièces C dans les ouvertures prévues.
• Utilisez un tournevis cruciforme pour xer les pièces C.
STEP 4 ATTACHING BACKREST
• When converting the Divan to be used with backrest remove parts
H and I.
• Insert parts E through holes on outer side of End Panels then into
holes on edge of Backrest.
• Using the supplied Allen Key turn parts E to tighten.
ÉTAPE 4 POUR FIXER LE PANNEAU D’APPUI
• Si elles sont attachées ensemble, séparez les pièces H et I.
• Insérez les pièces E dans les ouvertures prévues sur le côté
extérieur des panneaux d’extrémité, et dans l’ouverture
correspondante sur le panneau d’appui.
• Utilisez la clé Allen pour xer les pièces E.

C
E
E
E
E

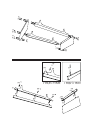
STEP 1
• Insert parts G into available holes at end of panel foot.
• Screw parts B into holes along bottom edge of the side rails and end
panels. (Detail 1)
• Insert parts A2 into large holes along inner face of all panel feet.
• Lower the side and end panels onto panel feet, sliding parts B
through holes along upper edge of foot panels and into hole in parts A2.
• With a philips head screw driver screw parts A1 into parts A2. (Detail 2)
ÉTAPE 1
• Insérez les pièces G dans les ouvertures prévues sur le panneau
d’extrémité.
• Vissez les pièces B dans les ouvertures prévues le long des pan-
neaux latéraux et des panneaux d’extrémité. (Détail 1)
• Insérez les pièces A2 dans les ouvertures prévues sur le côté intéri-
eur de l’ensemble des panneaux inférieurs.
• Assemblez les panneaux supérieurs avec les panneaux inférieurs
en insérant les pièces B dans l’ouverture correspondante.
• Utilisez un tournevis cruciforme pour xer les pièces A1 dans
l’ouverture correspondante dans les pièces A2. (Détail 2)
STEP 2
• Insert parts E through holes on outer side of End Panels,
then into holes on edge of Side Rails and Feet. Using the supplied
Allen Key turn to tighten.
• (If using backrest skip this step) Insert parts H and I into holes at top
corner of end panels. Using the supplied Allen Key turn to tighten.
ÉTAPE 2
• Insérez les pièces E dans les ouvertures prévues sur le côté extéri-
eur des panneaux d’extrémité, et dans les ouvertures prévues sur
les panneaux latéraux. À l’aide de la clé Allen, xez les pièces E.
• (Si vous utilisez le panneau d’appui, passez à l’étape suivante)
Insérez les pièces H et I dans les ouvertures prévues sur le côté
extérieur des panneaux d’extrémité. Avec la clé Allen, xez les
pièces H et I.

B
BB
B
B
B
DETAIL 1 /
DÉTAIL 1
DETAIL 2 /
DÉTAIL 2
A2
A2
A1
A2
A2
A2
A2
G
G
E
H
H
H
I
I
I
I
H
E
E
E
E
E

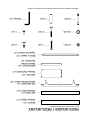
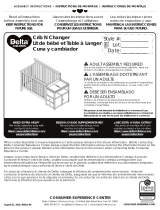
PIECES INCLUDED /
PIÉCES INCLUSES
Philips head screwdriver required for assembly.
Tournevis cruciforme requis pour le montage.
C ( x4 )
B ( x10 ) Allen Key ( x1 )
E ( x12 )
Refer to pouch for true to life diagram of hardware.
A1 ( x10 )
A2 ( x10 )
Mattress Support ( x1 )
Support de matelas ( x1)
Side Panel Foot ( x2 )
Panneau inférieur latéral ( x2 )
Backrest ( x1 )
Panneau d’appui ( x1 )
Side Panel ( x2 )
Panneau latéral ( x2 )
End Panel ( x2 )
Panneau d’extrémité ( x2 )
End Panel Foot ( x2 )
Panneau inférieur
d’extrémité ( x2 )
G ( x4 )
H ( x4 )
I ( x4 )

NOTES
• For maintenance, cleaning and storage information, please refer
to the first page of the Caravan Crib Assembly Instructions.
• According to CPSC regulations Toddler Beds are not intended for use
for children younger than 15 months or more than 50lbs.
• Not to be used as toddler bed beyond the 50lbs limit.
• Weight limit of Divan is 200lbs.
• Intended for use with full-size crib mattress having minimum
dimensions of 51 5⁄8 in. (1310 mm) in length and 27 1⁄4 in.
(690 mm) in width and 6 in. (150 mm) in thickness.
• Conversion Kit does not include a base or mattress support,
includes backrest, upper side and end panels only.
NOTES
• Pour l’entretien, le nettoyage et l’entreposage, veuillez vous référ-
er à la première page du manuel de montage du Lit Bébé Caravan.
• Le meuble n’est pas destiné à des enfants de moins de 15 mois ou
pesant plus de 23kg ou 50lbs.
• Le meuble requiert l’utilisation d’un matelas ayant les dimensions
minimales de 51 5/8 pouces (1310 mm) de long, 27 1/4 pouces (690
mm) de large et 6 pouces (150 mm) d’épaisseur.
• Le Kit de Transformation inclut le panneau d’appui, les panneaux
supérieurs et n’inclut pas de base ou de support de matelas.

PRINTED WITH SOLAR POWER ON FSC CERTIFIED PAPER USING SOY BASED INK, AND LOVE
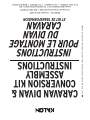
CARAVAN DIVAN &
CONVERSION KIT
ASSEMBLY
INSTRUCTIONS
INSTRUCTIONS
POUR LE MONTAGE
DU DIVAN
CARAVAN
ET KIT DE TRANSFORMATION
Model No.: Caravan Divan 043
& Caravan Conversion Kit 042 | KALON STUDIOS
www.kalonstudios.com | [email protected]
P.O. Box 292612 | Los Angeles | CA 90029 | 866.514.2034
-
 1
1
-
 2
2
-
 3
3
-
 4
4
-
 5
5
-
 6
6
-
 7
7
-
 8
8
-
 9
9
-
 10
10
-
 11
11
-
 12
12
-
 13
13
-
 14
14
-
 15
15
-
 16
16


KALON Caravan Assembly Instructions Manual
- Catégorie
- Meubles de bébé
- Taper
- Assembly Instructions Manual
dans d''autres langues
- English: KALON Caravan
Autres documents
-
Uncategorized Monterey Full Size Traditional Wood Crib #F10391 Manuel utilisateur
-
 Delta Children Mason Convertible Baby Crib N Changer Assembly Instructions
-
 Monbebe DA1526B4-W Manuel utilisateur
-
 Dream On Me 620 Manuel utilisateur
-
 Delta Children Mason Convertible Baby Crib N Changer Assembly Instructions
-
 Delta Children Hanover Park Crib 'N' More Assembly Instructions
-
 Delta Children Bentley S Crib N Changer Assembly Instructions
-
 Delta Children SIMMONS KIDS Slumber Time Crib ‘N’ More Assembly Instructions


