Signature Kitchen Suite SKSFD3604P Le manuel du propriétaire
- Catégorie
- Frigos
- Taper
- Le manuel du propriétaire
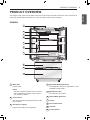
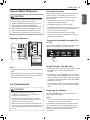
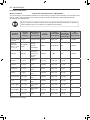
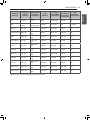
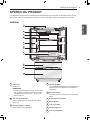
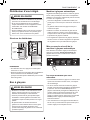
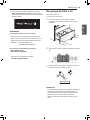
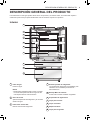
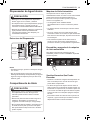
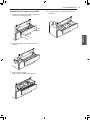
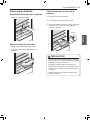
Vous trouverez ci-dessous des informations succinctes pour SKSFD3604P. Ce réfrigérateur intégré est équipé d'un distributeur d'eau filtrée, d'une alarme de porte et d'une fonction Ice Plus pour une production accrue de glace. Il dispose également d'un tiroir convertible pour stocker différents types d'aliments et d'un compartiment congélateur. L'appareil est compatible avec l'application SIGNATURE KITCHEN SUITE pour les fonctions intelligentes et les mises à jour du micrologiciel.
Vous trouverez ci-dessous des informations succinctes pour SKSFD3604P. Ce réfrigérateur intégré est équipé d'un distributeur d'eau filtrée, d'une alarme de porte et d'une fonction Ice Plus pour une production accrue de glace. Il dispose également d'un tiroir convertible pour stocker différents types d'aliments et d'un compartiment congélateur. L'appareil est compatible avec l'application SIGNATURE KITCHEN SUITE pour les fonctions intelligentes et les mises à jour du micrologiciel.


-
 1
1
-
 2
2
-
 3
3
-
 4
4
-
 5
5
-
 6
6
-
 7
7
-
 8
8
-
 9
9
-
 10
10
-
 11
11
-
 12
12
-
 13
13
-
 14
14
-
 15
15
-
 16
16
-
 17
17
-
 18
18
-
 19
19
-
 20
20
-
 21
21
-
 22
22
-
 23
23
-
 24
24
-
 25
25
-
 26
26
-
 27
27
-
 28
28
-
 29
29
-
 30
30
-
 31
31
-
 32
32
-
 33
33
-
 34
34
-
 35
35
-
 36
36
-
 37
37
-
 38
38
-
 39
39
-
 40
40
-
 41
41
-
 42
42
-
 43
43
-
 44
44
-
 45
45
-
 46
46
-
 47
47
-
 48
48
-
 49
49
-
 50
50
-
 51
51
-
 52
52
-
 53
53
-
 54
54
-
 55
55
-
 56
56
-
 57
57
-
 58
58
-
 59
59
-
 60
60
-
 61
61
-
 62
62
-
 63
63
-
 64
64
-
 65
65
-
 66
66
-
 67
67
-
 68
68
-
 69
69
-
 70
70
-
 71
71
-
 72
72
-
 73
73
-
 74
74
-
 75
75
-
 76
76
-
 77
77
-
 78
78
-
 79
79
-
 80
80
-
 81
81
-
 82
82
-
 83
83
-
 84
84
-
 85
85
-
 86
86
-
 87
87
-
 88
88
-
 89
89
-
 90
90
-
 91
91
-
 92
92
-
 93
93
-
 94
94
-
 95
95
-
 96
96
-
 97
97
-
 98
98
-
 99
99
-
 100
100
-
 101
101
-
 102
102
-
 103
103
-
 104
104
-
 105
105
-
 106
106
-
 107
107
-
 108
108
-
 109
109
-
 110
110
-
 111
111
-
 112
112
-
 113
113
-
 114
114
-
 115
115
-
 116
116
-
 117
117
-
 118
118
-
 119
119
-
 120
120
-
 121
121
-
 122
122
-
 123
123
-
 124
124
-
 125
125
-
 126
126
-
 127
127
-
 128
128
-
 129
129
-
 130
130
-
 131
131
-
 132
132


Signature Kitchen Suite SKSFD3604P Le manuel du propriétaire
- Catégorie
- Frigos
- Taper
- Le manuel du propriétaire
Vous trouverez ci-dessous des informations succinctes pour SKSFD3604P. Ce réfrigérateur intégré est équipé d'un distributeur d'eau filtrée, d'une alarme de porte et d'une fonction Ice Plus pour une production accrue de glace. Il dispose également d'un tiroir convertible pour stocker différents types d'aliments et d'un compartiment congélateur. L'appareil est compatible avec l'application SIGNATURE KITCHEN SUITE pour les fonctions intelligentes et les mises à jour du micrologiciel.
dans d''autres langues
Autres documents
-
Yes LRMDC2306S Le manuel du propriétaire
-
Yes LRFXS3106S Manuel utilisateur
-
-
-
-
LG URNTC2306N Le manuel du propriétaire
-
Haier PRFS25 Manuel utilisateur
-
LG LRFVC2406M Le manuel du propriétaire
-
-
LG LRFDS3006D Manuel utilisateur