
TECHNICAL FILE
R03.001_10/09/2012
Novolistel® 3
Stainless steel
Patent:
Community design
Nº0504253-0006(4)
Material: Stainless steel AISI 304
Lenght: 8’2” / 2,5 l.m.
Dimensions:
h: 5/16”, 3/8”, 1/2”, 9/16”
8, 10,12, 15 mm.
a: 3/8” - 10 mm
Packaging: 30 u/box
Finishes: High brightness/brushed
Applications
Technical Features and Tests
General Features
Page 1 of 4
Novolistel® 3 is the most versatile prole in the markets. It can be installed as:
- Decorative listello
- Edge protector
- Flooring separator*
- Stair nosing* or nishing edge (countertops, frame...)
Complementary pieces
Novolistel® 3 has complementary pieces available made of Zamak to get a perfect nish.
These pieces can be installed to nish two or three proles both in horizontal installations as in
vertical ones.
Corrosion Resistance Salt spray test
+504 hours without change
UNE 112017:92
Fire Resistance M0 (UNE 23-727-90)
UNE 23-727-90
Prole with squared section, made of AISI 304 stainless steel designed
to be installed as a decorative listello, as oor separator or as a stair
nosing, among others. This prole is easy to install during the tile work,
and protects the edges of ceramic installations. It is available in high
quality nishes like hight brightness and brushed, and also in the
exclusive “Futura” range with titanium.

TECHNICAL FILE
R03.001_10/09/2012
Novolistel® 3 Stainless steel
Installation
Page 2 of 4
Materials
1
2 3
4 5
Zamak
The complementary pieces of Novolistel® 3 are made of Zamak. Zamak is a non ferrous alloy of Zinc
with aluminium, magnesium and copper (UNE EN 1774). It is tough, has high hardness, high mechanical
strength and excellent plastic deformability.
The surface nish applied, protects the prole and is similar to Novolistel® 3’s nishes. We do not re-
commend installing natural nishes without aplying additional protection.
As a listello
1
2
3
4
As an edge
protector
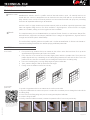
1. First spread a big amount of thin-set mortar on the surface to be tiled and then tile it up to the
approximated height where you’ll place the listello.
2. Place the tiles in the end of the next row, aligning them with the previous tiles. Then place the
prole aligned to them, embedding the anchoring wing between the wall and the tiles. Press the
prole to ensure the thin-set mortar passes through the holes of the anchoring wing.
3. Place the remaining tiles, pressing softly to get an optimal adhesion.
4. Then, continue tiling the wall up to the desired height.
5. Finally, clean the leftover material and let dry.
1. Spread a big amount of thin-set mortar on the surface to be tiled.
2. Align the prole with the corner and press it so the thin-set mortar passes through the holes of the
anchoring wing.
3. Place tiles on the xing wing and press them to get an optimal adhesion.
4. Continue tiling the wall.
5. Finally, clean the leftover material, remove the protective lm if necessary and let dry.
To see the video, capture this
image with your mobile phone
(QR code reader software is ne-
cessary) or click on it.
Stainless Steel
Novolistel® 3 Stainless Steel is a prole made of AISI-304 Stainless steel. All material batches are
tested with the chemical composition test to determine that they fulll with the specication of the
alloy. Stainless steel used in the Emac® products has been also tested with salt spray test, exceeding
500 hours of exposition without signs of corrosion.
Stainless steel is a highly durable and resistent material, with an excellent supercial appearance that
does not degrade along the time. The nish available is high brightness. All the nishes are slightly
porous and smooth, making easier the hygiene of the installation.

TECHNICAL FILE
R03.001_10/09/2012
Novolistel® 3 Stainless steel
Cleaning and maintenance
Page 3 of 4
1 2 3 4 5
As a ooring separator
Como remate de
peldaño o encimera
1 2 3 4 5
1. Spread a big amount of thin-set mortar on the surface to be tiled.
2. Then, place the prole and press it so the thin-set mortar passes through the holes of the anchoring
wing.
3. Place a tile on the anchoring wing and press it to get an optimal contact with the thin-set mortar.
4. Repeat the the previous step by placing tiles both sides the prole until the installation is complete.
5. Finally, clean the leftover material, remove the protective lm if necessary and let dry.
* If you are planning on polishing the oor, install the prole slightly below the tile.
To see the video, capture this
image with your mobile phone
(QR code reader software is ne-
cessary) or click on it.
1. Spread a big amount of thin-set mortar on the riser
2. Tile the riser.
3. Then, spread a big amount of thin-set mortar on the tread and align the prole on its vertex (Do not
let overhang, the leverage may remove the step and the tiles). Then press it so the thin-set mortar
passes through the holes of the anchoring wing
4. Place a tile on the tread, align it to the prole and press it to ensure a perfect adhesion. Continue
tiling.
5. Clean the leftover material, remove the protective lm if necessary and let dry
It’s necessary the immediate cleaning of the material after its installation to avoid that remainings of
mortar, concrete or iron particles from wool or tool could cause corrosion.
For outdoor applications, such as facades, the rain is an efcient cleaner. Pay special attention to
difcult access areas and be sure you remove all the remainings of dust and the rest of elements. You
can do this cleaning once per month.
For indoor applications, you can use water with detergent or liquid soap to remove dirtiness and
possible ngerprints marked on the surface. In highly brilliant nishes, you can use a glass cleaner.
There are specic cleaners in the markets for stainless steel which clean the material and reduce
possible stains. Whenever you clean stainless steel, ensure you rinse it well and dry totally to prevent
fogging.
Steel wool or similar products, are not recommended because they could scratch the surface and
create pitting corrosion. Pay special attention while using materials containing chlorides, they are not
indicated because could oxidize the material. Hydrochloric acid or iron products in a long contact with
the material are neither recommended. Do not use cleaners for common steel for the cleaning of
stainless steel.

TECHNICAL FILE
Technical Information
The data provided are for information only and have been obtained by our supplier or Emac®.
Does not constitute legal guarantee in terms of properties and / or functionality of the application of material
Emac Complementos S.L. (Spain) info@emac.es // Emac America L.L.C. (FL,USA) sales@emac.es // Emac Italia S.R.L. (Italy) [email protected]
www.emac.es
R03.001_10/09/2012
You can nd out more information about the technical features of Emac®’s products by downloading
their Technical File from www.emac.es
If you have any query, please contact our Technical Department in [email protected]
Novolistel® 3 Stainless steel
Indoors Outdoors Wall tiling Flooring Recyclable
Page 4 of 4
-
 1
1
-
 2
2
-
 3
3
-
 4
4


Emac NL38812 Guide d'installation
- Taper
- Guide d'installation
dans d''autres langues
- English: Emac NL38812 Installation guide
Documents connexes
-
Emac NL39012 Manuel utilisateur
-
-
-
-
-
-
-
-
-