
TECHNICAL FILE
R03.001_10/09/2012
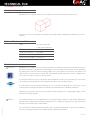
Prole with squared section, made of aluminum , designed to be
installed as a decorative listello, a oor separator or as a stair nosing,
among others. This prole is easy to install during the tile work and
protects the edges of ceramic installations. It is available in high quality
anodized and lacquered colors and also in exclusive ranges of color
such as the exclusive Sensations range or with antibacterial properties
for the sanitary and health establishments.
Novolistel® 3
Aluminum
Patent:
Community design
Nº0504253-0006(4)
Material:
Anodized aluminum
Lacquered aluminum
Natural aluminum
Lenght: 8’2” / 2,5 l.m.
Dimensions:
h: 5/16”*, 3/8”, 1/2”
8*,10,12 mm.
*only some nishes
a: 3/8” / 10 mm.
Packaging: 30 u/box
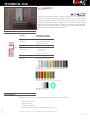
Finishes:
Applications
General Features
Page 1 of 4
Lacquered and anodized
Sensations range
Antibacterial range (*check the Technical File)
Novolistel® 3 is the most versatile prole in the markets. It can be installed as:
- Decorative listello
- Edge protector
- Flooring separator*
- Stair nosing* or nishing edge (countertops, frame...)
*The lacquered nishes are not recommended to be installed in oorings

TECHNICAL FILE
R03.001_10/09/2012
Novolistel® 3 Aluminum
Technical Features and Tests
Page 2 of 4
Materials
Aluminum Novolistel® 3 is a prole made by extrusion of aluminum. Anodizing improves the corrosion resistance,
mechanical resistance and appearance of proles. It has the quality seal Qualanod, which guarantees
the quality of the process and the resulting proles. This seal regulates several tests: appearance and
color, thickness measurements, sealing and impregnation control, abrasion resistance, lightfastness,
acetic saline chamber and nitric acid immersion.
The lacquered nishes have a high quality and homogeneus surface. The lacquering has the quality
seal Qualicoat, which guarantees the quality of the process and the nal products.
The natural nish has no surface treatment so is less resistant to corrosion and scratching. It is not
recommended installing natural nishes without the application of an additional protection.
Aluminum has excellent chemical, physical and mechanical properties. It is lightweight, tough, ductile,
malleable and highly durable
Zamak
The complementary pieces of Novolistel® 3 are made of Zamak. Zamak is a non ferrous alloy of Zinc
with aluminium, magnesium and copper (UNE EN 1774). It is tough, has high hardness, high mechanical
strength and excellent plastic deformability.
The surface nish applied, protects the prole and is similar to Novolistel® 3’s nishes. We do not re-
commend installing natural nishes without aplying additional protection.
*Anodized aluminum
Alloy: 6063 (AA and ASTM)
L-3441 (UNE 38-301-89)
Fire resistance: M0 (UNE 23-727-90)
Abrasion resistance*: Very good
Lightfastness*: Excellent
Appearance and color*: EN 12373-1
Complementary pieces
Novolistel® 3 has complementary pieces available made of Zamak to get a perfect nish.
These pieces can be installed to nish two or three proles both in horizontal installations as in verti-
cal ones.

TECHNICAL FILE
R03.001_10/09/2012
Novolistel® 3 Aluminum
Installation
Page 3 of 4
1
2 3
4 5
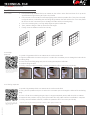
As a listello
1
2
3
4
As an edge
protector
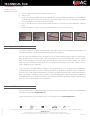
1 2 3 4 5
As a ooring separator
1. First spread a big amount of thin-set mortar on the surface to be tiled and then tile it up to the
approximated height where you’ll place the listello.
2. Place the tiles in the end of the next row, aligning them with the previous tiles. Then place the pro-
le aligned to them, embedding the anchoring wing between the wall and the tiles. Press the prole
to ensure the thin-set mortar passes through the holes of the anchoring wing.
3. Place the remaining tiles, pressing softly to get an optimal adhesion.
4. Then, continue tiling the wall up to the desired height.
5. Finally, clean the leftover material and let dry.
1. Spread a big amount of thin-set mortar on the surface to be tiled.
2. Align the prole with the corner and press it so the thin-set mortar passes through the holes of the
anchoring wing.
3. Place tiles on the xing wing and press them to get an optimal adhesion.
4. Continue tiling the wall.
5. Finally, clean the leftover material, remove the protective lm if necessary and let dry.
To see the video, capture this
image with your mobile phone
(QR code reader software is ne-
cessary) or click on it.
1. Spread a big amount of thin-set mortar on the surface to be tiled.
2. Then, place the prole and press it so the thin-set mortar passes through the holes of the anchoring
wing.
3. Place a tile on the anchoring wing and press it to get an optimal contact with the thin-set mortar.
4. Repeat the the previous step by placing tiles both sides the prole until the installation is complete.
5. Finally, clean the leftover material, remove the protective lm if necessary and let dry.
* If you are planning on polishing the oor, install the prole slightly below the tile.
To see the video, capture this
image with your mobile phone
(QR code reader software is ne-
cessary) or click on it.

TECHNICAL FILE
Technical Information
The data provided are for information only and have been obtained by our supplier or Emac®.
Does not constitute legal guarantee in terms of properties and / or functionality of the application of material
Emac Complementos S.L. (Spain) info@emac.es // Emac America L.L.C. (FL,USA) sales@emac.es // Emac Italia S.R.L. (Italy) [email protected]
www.emac.es
R03.001_10/09/2012
You can nd out more information about the technical features of Emac®’s products by downloading
their Technical File from www.emac.es
If you have any query, please contact our Technical Department in [email protected]
Novolistel® 3 Aluminum
Cleaning and maintenance
Indoors Outdoors Wall tiling Flooring Recyclable
Como remate de
peldaño o encimera
1 2 3 4 5
Page 4 of 4
1. Spread a big amount of thin-set mortar on the riser
2. Tile the riser.
3. Then, spread a big amount of thin-set mortar on the tread and align the prole on its vertex (Do not
let overhang, the leverage may remove the step and the tiles). Then press it so the thin-set mortar
passes through the holes of the anchoring wing
4. Place a tile on the tread, align it to the prole and press it to ensure a perfect adhesion. Continue
tiling.
5. Clean the leftover material, remove the protective lm if necessary and let dry
The proles should be cleaned periodically with a soft cloth. If you use a neutral liquid cleaner, you must
rinse the prole with cold water and dry to remove excess moisture.
You can clean the anodized nishes, if dirtiness persists, with a suitable slightly abrasive cleaning pro-
ducts or with specic metal cleaners. The lacquered nishes are more delicate and must be cleaned
with neutral detergents using soft cloths with no abrasive particles that could damage the surface
treatment. You can obtain a polished nish in natural nishes by using specic metal cleaners such as
magic cotton or generic polishers.
In all cases the steel wool, abrasive cleaners, souring products as well as strong acids (hydrochloric
and perchloric),strong bases (caustic soda or ammonia) or carbonated solutions are not recommen-
ded. Citric acid is not recommended because disolves the protective layer of the surface of aluminium.
Waxes, petrolatum, lanolin or similar substances are not appropriate. Solvents containing haloalkanes
(hydrouoroether and chlorinated solvents) and curing accelerators containing chlorides should not be
used (use special accelerators free of chlorides).
-
 1
1
-
 2
2
-
 3
3
-
 4
4


dans d''autres langues
- English: Emac NL31438 User manual
Documents connexes
-
Emac NR10AR1382 Guide d'installation
-
-
-
-
-
-
-
-
-