
OWNER’S GUIDE
MODEL
3806X
©
2014 Directed, All rights reserved.
The company behind Clifford
®
Auto Security
Systems is Directed.
Since its inception, Directed has had one purpose, to
provide consumers with the finest vehicle security and
accessories available. The recipient of nearly 100 pat-
ents and Innovations Awards in the field of advanced
electronic technology.
Quality Directed products are sold and serviced
throughout North America and around the world.
Call (800) 876-0800 for more information about our
products and ser vic es.
Directed is committed to delivering world class
quality products and services that excite and
delight our customers.
THE SCIENCE OF SECURITY
™
QRG3806XML 2014 02
Vista, CA 92081
www.clifford.com

i
© 2014 Directed. All rights reserved.
Congratulations
Congratulations on the purchase of your state-of-the-art security system.
Reading this Owner’s Guide prior to using your system will help maxi-
mize the use of your system and its many features. For any additional
questions please contact your authorized Directed dealer or contact
Directed at 1-800-753-0600 (US only).
Additional Guide Information
Only basic commands, features and essential information are covered
in this compact guide. Your product has many advanced features
which are not discussed here, please consult the expanded online ver-
sion for these on the website listed on the back cover. Most sections in
this guide also contain additional information which can be found in
the expanded online version.
Important information
Government Regulations and Safety information
Read the Government Regulations and Warning! Safety
First sections of this manual prior to operating this system.
Warning! Failure to heed this information can result in
death, personal injury or property damage and may also
result in the illegal use of the system beyond its intended
purpose.

ii
© 2014 Directed. All rights reserved.
Your Warranty
Your system comes with a warranty. The warranty terms are detailed at
the end of this guide. Make sure that you receive the proof of purchase
from your dealer, indicating the product was installed by an autho-
rized Directed dealer.
Replacement remote controls
Please see your authorized dealer or visit us at www.directedstore.
com to order additional remote controls. Remote control part numbers
are found on the back of the device.

Contents
Congratulations ................................................................................................... i
Additional Guide Information ................................................................................ i
Important information .......................................................................................... i
Government Regulations and Safety information .......................................i
Your Warranty ......................................................................................ii
Replacement remote controls ..................................................................ii
Responder LE 2-Way Remote Control ....................................................................2
Control Center .................................................................................................... 3
Using your System ............................................................................................... 4
Commands and Confirmations .............................................................. 4
Performing Commands ......................................................................... 4
Remote Control Command table ............................................................ 5
Basic Commands (Direct Access) ..........................................................................6
Arm ................................................................................................... 6
Disarm ............................................................................................... 6
Remote Start/Aux 1/Aux 4 ................................................................... 7
AUX/Trunk .......................................................................................... 7
Remote Control Configuration ..............................................................................8
Battery Information .............................................................................................. 8
Battery Disposal .................................................................................. 8
Patent Information ............................................................................................... 9
Government Regulations .................................................................................... 10
Additional Information ....................................................................................... 11
Interference ....................................................................................... 11
Upgrades ......................................................................................... 11
Water/Heat Resistance ...................................................................... 11
Limited lifetime consumer warranty ..................................................................... 12

2
© 2014 Directed. All rights reserved.
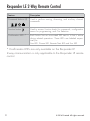
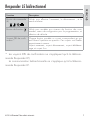
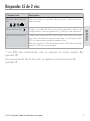
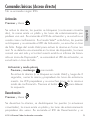
Responder LE 2-Way Remote Control
Feature Description
Command buttons (4)
A U X
Used to perform arming, disarming, and auxiliary channel
commands
Function button
Used to access function levels for commands, configuration
menus for programming, and Car Selection.
Confirmation LED’s * Each button has an associated LED next to it that is active
during related operations. These LED’s are labeled respec-
tively as:
Arm LED, Disarm LED, Remote Start LED and Aux LED
* Confirmation LED’s are only available on the Responder LE
2-way communication is only applicable to the Responder LE remote
control.

3
© 2014 Directed. All rights reserved.
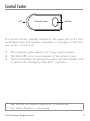
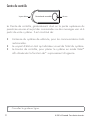
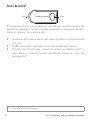
Control Center
Control CenterLED Button
The Control Center, typically located on the upper part of the front
windshield sends and receives commands or messages to and from
your system. It consists of:
• The In-vehicle system antenna, for 2 way communication.
• The Status LED, as a visual indicator of the system’s status.
• The Control button, for placing the system into Valet Mode* and
to perform the Emergency Override** operation.
* See “Remote and System Operations” in online guide.
** See
“Alarm Features” in online guide.

4
© 2014 Directed. All rights reserved.
Using your System
Commands and Confirmations
Commands, Basic or Advanced, are used to activate system features
and are performed by pressing one of the Command buttons. Basic
commands control the most often used security and remote start fea-
tures while Advanced commands control more specialized features
and request reports.
Confirmations for Basic or Advanced commands are indicated
first by siren chirps and parking light flashes, and then by illuminated
LED’s and beeps or tones on the remote control. A description of each
feature confirmation is found in the following Basic command and
Advanced command sections.
Performing Commands
Perform Basic commands by pressing a Command button (Confirma-
tion LED’s are off).
Perform Advanced Commands by first accessing Levels 1-4 using the
button and then by pressing a Command button while within a
Level.
Advanced command example: Silent Arm
1. Press the
button once to access Function Level 1.
2. Press the
button to perform the Silent Arm command.
3. The Arm LED illuminates to confirm when the Silent Arm mes-
sage from the system is received.

5
© 2014 Directed. All rights reserved.
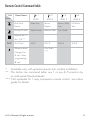
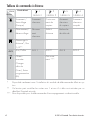
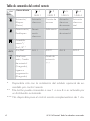
Remote Control Command table
Button
Level
Direct Access
x 1
LEVEL 1
x 2
LEVEL 2
x 3
LEVEL 3
x 4
LEVEL 4
Arm/Lock
(Panic)
Silent Arm Sensor
Bypass
Sensor Silent
Arm
Full Silent
Arm
Disarm/Unlock Silent Disarm Remote Valet Car Finder
Remote Start*/
Aux 1/4**
AUX
Aux/Trunk AUX 1 AUX 2 AUX 3 AUX 4
Advance Level,
Change Car
(3 sec), Enter
programming
(8 sec)
Arm Status
***
* Available only with optional remote start module installation
** This button can command either aux 1 or aux 4 if turned on by
an authorized Directed dealer.
*** Not available for 1-way companion remote control, see online
guide for details.

6
© 2014 Directed. All rights reserved.
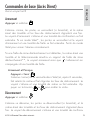
Basic Commands (Direct Access)
No confirmation LED’s on.
Arm
Press and release
The alarm arms, doors lock (if connected), and the siren chirps and
parking lights flash once. The Arm LED and beeps play to confirm. If
Valet mode* is On, the doors lock and the Arm LED and a fault tone
plays. Exit Valet mode to arm the alarm normally.
If a trigger zone fault is detected the siren chirps once again and the
remote will emit a Trigger Zone Fault Report*, the Arm LED and a fault
tone plays.
To Arm and Panic
Press and hold
The alarm Arms (or Locks in Valet) and, after two seconds, sounds
the siren and flashes the parking lights. The confirmation LED’s
flash and siren tones play to confirm. Press the
or button
to stop the output.
Disarm
Press and release
The alarm disarms, doors unlock (if connected), and the siren chirps
and parking lights flash twice. The Disarm LED and beeps play to
confirm. If Valet mode* is On, the doors unlock and the Disarm LED
and fault tones play.
An Alarm Report* will replace the disarm output if the alarm was trig-

7
© 2014 Directed. All rights reserved.
gered; the siren will chirp four or five times, and the Disarm LED and
four or five fault tones play to alert of the report.
Remote Start/Aux 1/Aux 4
Press and release
Remote Start **
Activates (or if On, deactivates) the remote starter. The engine
and parking lights turn On, or the engine and parking lights turn
Off accordingly.
AUX1/AUX4 ***
Activates (or if on, deactivates) the aux 1or aux 4 output.
AUX/Trunk
Press and hold AUX
The Trunk opens (if connected) when this button is pressed for 2 sec-
onds. The Aux LED and tones play to confirm.
* See online guide for details.
** Available only with optional Remote Start module installation.
*** This feature must be turned on by an authorized Directed dealer.

8
© 2014 Directed. All rights reserved.
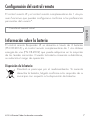
Remote Control Configuration
The Responder LE and 1-way companion remote controls have opera-
tions that can be configured to a user’s personal preferences*.
* See this section in online guide.
Battery Information
The Responder LE remote is powered by 2 batteries (PN CR-2016)
and the 1-way companion remote by 1 battery (PN CR-2032) that
can be purchased at most retailers. When the battery begins to weak-
en, the operating range will be reduced.
Battery Disposal
Directed cares about the environment. If you need to dis-
pose of the battery, please do so in accordance with your
municipal requirements for battery disposal.

9
© 2014 Directed. All rights reserved.
Patent Information
This product is covered by one or more of the following United States
patents:
Remote Start Patents:
5,349,931; 5,872,519; 5,914,667; 5,952,933; 5,945,936;
5,990,786; 6,028,372; 6,467,448; 6,561,151; 7,191,053;
7,483,783
Vehicle Security Patents:
5,467,070; 5,532,670; 5,534,845; 5,563,576; 5,646,591;
5,650,774; 5,673,017; 5,712,638; 5,872,519; 5,914,667;
5,952,933; 5,945,936; 5,990,786; 6,028,505; 6,452,484
Other patents pending.

10
© 2014 Directed. All rights reserved.
Government Regulations
This device complies with Part 15 of FCC rules. Operation is subject to the fol-
lowing two conditions: (1) This device may not cause harmful interference, and
(2) This device must accept any interference received, including interference
that may cause undesirable operation.
This equipment has been tested and found to comply with the limits for a class B
digital device, pursuant to Part 15 of the FCC Rules. These limits are designed
to provide reasonable protection against harmful interference in a residential
installation. This equipment generates and can radiate radio frequency en-
ergy and, if not installed and used in accordance with the instruction manual,
may cause harmful interference to radio communications. However, there is
no guarantee that interference will not occur in a particular installation. If this
equipment does cause harmful interference to radio or television, which can be
determined by turning the equipment OFF and ON, the user is encouraged to
try to correct the interference by one or more of the following measures:
• Reorient or relocate the receiving antenna.
• Increase the separation between the equipment and receiver.
• Connect the equipment into an outlet on a circuit different from that to which
the receiver is connected.
• Consult the dealer or an experienced radio / TV technician for help.
Remote Controls
To satisfy FCC RF exposure compliance requirements, this device should be
used in hand-held, hand operated configurations only. The device and its an-
tenna must maintain a separation distance of 20 cm or more from the person’s
body, except for the hand and wrists, to satisfy RF exposure compliance. This
device is designed to be used in a person’s hands and its operating configu-
rations do not support normal transmissions while it is carried in pockets or
holsters next to a person’s body.

11
© 2014 Directed. All rights reserved.
Control Center
To satisfy FCC RF exposure compliance requirements, the device and its an-
tenna must maintain a separation distance of 20 cm or more from the person’s
body, except for the hand and wrists, to satisfy RF exposure compliance.
This device complies with the Industry Canada Radio Standards Specification
RSS 210. Its use is authorized only on a no-interference, no-protection basis;
in other words, this device must not be used if it is determined that it causes
harmful interference to services authorized by IC. In addition, the user of this
device must accept any radio interference that may be received, even if this
interference could affect the operation of the device.
WARNING! Changes or modifications not expressly approved by the party
responsible for compliance could void the user’s authority to operate this de-
vice.
Additional Information
Interference
All radio devices are subject to interference which could affect proper
performance.
Upgrades
Any upgrades to this product must be performed by an authorized
Directed dealer. Do not attempt to perform any unauthorized modifica-
tions to this product.
Water/Heat Resistance
This product is not designed to be water and/or heat-resistant. Please
take care to keep this product dry and away from heat sources. Any
damage from water or heat will void the warranty.

12
© 2014 Directed. All rights reserved.
Limited lifetime consumer warranty
Directed Electronics. (“Directed”) promises to the original purchaser to repair or replace
(at Directed’s election) with a comparable reconditioned model any Directed unit (hereaf-
ter the “unit”), excluding without limitation the siren, the remote transmitters, the associated
sensors and accessories, which proves to be defective in workmanship or material under
reasonable use during the lifetime of the vehicle provided the following conditions are met:
the unit was purchased from an authorized Directed dealer, the unit was professionally
installed and serviced by an authorized Directed dealer; the unit will be profession¬ally
reinstalled in the vehicle in which it was originally installed by an authorized Directed
dealer; and the unit is returned to Directed, shipping prepaid with a legible copy of the
bill of sale or other dated proof of purchase bearing the following information: consumer’s
name, telephone number and address; the authorized dealers name, telephone number
and address; complete product description, including accessories; the year, make and
model of the vehicle; vehicle license number and vehicle identification number. All com-
ponents other than the unit, including without limitation the siren, the remote transmitters
and the associated sensors and accessories, carry a one-year warranty from the date of
purchase of the same. ALL PRODUCTS RECEIVED BY DIRECTED FOR WARRANTY REPAIR
WITHOUT PROOF OF PURCHASE FROM AN AUTHORIZED DEALER WILL BE DENIED.
This warranty is non-transferable and is automatically void if: the unit’s date code or serial
number is defaced, missing or altered; the unit has been modified or used in a manner
contrary to its intended purpose; the unit has been damaged by accident, unreasonable
use, neglect, improper service, installation or other causes not arising out of defects in
materials or construction. The warranty does not cover damage to the unit caused by
installation or removal of the unit. Directed, in its sole discretion, will determine what con-
stitutes excessive damage and may refuse the return of any unit with excessive damage.
TO THE MAXIMUM EXTENT ALLOWED BY LAW, ALL WARRANTIES, INCLUDING
BUT NOT LIMITED TO EXPRESS WARRANTY, IMPLIED WARRANTY, WARRANTY
OF MERCHANTABILITY, FITNESS FOR PARTICULAR PURPOSE AND WARRANTY OF
NON-INFRINGEMENT OF INTELLECTUAL PROPERTY, ARE EXPRESSLY EXCLUDED;
AND DIRECTED NEITHER ASSUMES NOR AUTHORIZES ANY PERSON OR ENTITY
TO ASSUME FOR IT ANY DUTY, OBLIGATION OR LIABILITY IN CONNECTION
WITH ITS PRODUCTS. DIRECTED DISCLAIMS AND HAS ABSOLUTELY NO LIABILITY
FOR ANY AND ALL ACTS OF THIRD PARTIES INCLUDING ITS AUTHORIZED
DEALERS OR INSTALLERS. DIRECTED SECURITY SYSTEMS, INCLUDING THIS UNIT,
ARE DETERRENTS AGAINST POSSIBLE THEFT. DIRECTED IS NOT OFFERING A
GUARANTEE OR INSURANCE AGAINST VANDALISM, DAMAGE OR THEFT OF THE
AUTOMOBILE, ITS PARTS OR CONTENTS; AND HEREBY EXPRESSLY DISCLAIMS ANY
LIABILITY WHATSOEVER, INCLUDING WITHOUT LIMITATION, LIABILITY FOR THEFT,
DAMAGE AND/OR VANDALISM. THIS WARRANTY DOES NOT COVER LABOR
COSTS FOR MAINTENANCE, REMOVAL OR REINSTALLATION OF THE UNIT OR

13
© 2014 Directed. All rights reserved.
ANY CONSEQUENTIAL DAMAGES OF ANY KIND. IN THE EVENT OF A CLAIM
OR A DISPUTE INVOLVING DIRECTED OR ITS SUBSIDIARY, THE VENUE SHALL BE
SAN DIEGO COUNTY IN THE STATE OF CALIFORNIA. CALIFORNIA STATE LAWS
AND APPLICABLE FEDERAL LAWS SHALL APPLY AND GOVERN THE DISPUTE. THE
MAXIMUM RECOVERY UNDER ANY CLAIM AGAINST DIRECTED SHALL BE STRICTLY
LIMITED TO THE AUTHORIZED DIRECTED DEALER’S PURCHASE PRICE OF THE UNIT.
DIRECTED SHALL NOT BE RESPONSIBLE FOR ANY DAMAGES WHATSOEVER,
INCLUDING BUT NOT LIMITED TO, ANY CONSEQUENTIAL DAMAGES, INCIDENTAL
DAMAGES, DAMAGE TO VEHICLE, DAMAGES FOR THE LOSS OF TIME, LOSS OF
EARNINGS, COMMERCIAL LOSS, LOSS OF ECONOMIC OPPORTUNITY AND THE
LIKE. NOTWITHSTANDING THE ABOVE, THE MANUFACTURER DOES OFFER A
LIMITED WARRANTY TO REPLACE OR REPAIR THE CONTROL MODULE SUBJECT TO
THE CONDITIONS AS DESCRIBED HEREIN. THIS WARRANTY IS VOID IF THE UNIT
HAS NOT BEEN PURCHASED FROM DIRECTED, OR AN AUTHORIZED DIRECTED
DEALER, OR IF THE UNIT HAS BEEN DAMAGED BY ACCIDENT, UNREASONABLE
USE, NEGLIGENCE, ACTS OF GOD, NEGLECT, IMPROPER SERVICE, OR OTHER
CAUSES NOT ARISING OUT OF DEFECT IN MATERIALS OR CONSTRUCTION.
Some states do not allow limitations on how long an implied warranty will last or the
exclusion or limitation of incidental or consequential damages. This warranty gives you
specific legal rights and you may also have other rights that vary from State to State.
This warranty is only valid for sale of product(s) within the United States of America and
in Canada. Product(s) sold outside of the United States of America or Canada are sold
“AS-IS” and shall have NO WARRANTY, express or implied.
For further details relating to warranty information of Directed products, please visit the
support section of Directed’s website at: www.directed.com
This product may be covered by a Guaranteed Protection Plan (“GPP”). See your
authorized Directed dealer for details of the plan or call Directed Customer Service at
1-800-876-0800.
920-10011-01 2011-06

14
© 2014 Directed. All rights reserved.

15
© 2014 Directed. All rights reserved.


Manuel D’Utilisation
La page est en cours de chargement...
La page est en cours de chargement...
La page est en cours de chargement...
La page est en cours de chargement...
La page est en cours de chargement...
La page est en cours de chargement...
La page est en cours de chargement...
La page est en cours de chargement...
La page est en cours de chargement...
La page est en cours de chargement...
La page est en cours de chargement...
La page est en cours de chargement...
La page est en cours de chargement...
La page est en cours de chargement...
La page est en cours de chargement...
La page est en cours de chargement...
La page est en cours de chargement...
La page est en cours de chargement...
La page est en cours de chargement...
La page est en cours de chargement...
La page est en cours de chargement...
La page est en cours de chargement...
La page est en cours de chargement...
La page est en cours de chargement...
La page est en cours de chargement...
La page est en cours de chargement...
La page est en cours de chargement...
La page est en cours de chargement...
La page est en cours de chargement...
La page est en cours de chargement...
La page est en cours de chargement...
La page est en cours de chargement...
La page est en cours de chargement...
La page est en cours de chargement...
La page est en cours de chargement...
La page est en cours de chargement...
La page est en cours de chargement...
-
 1
1
-
 2
2
-
 3
3
-
 4
4
-
 5
5
-
 6
6
-
 7
7
-
 8
8
-
 9
9
-
 10
10
-
 11
11
-
 12
12
-
 13
13
-
 14
14
-
 15
15
-
 16
16
-
 17
17
-
 18
18
-
 19
19
-
 20
20
-
 21
21
-
 22
22
-
 23
23
-
 24
24
-
 25
25
-
 26
26
-
 27
27
-
 28
28
-
 29
29
-
 30
30
-
 31
31
-
 32
32
-
 33
33
-
 34
34
-
 35
35
-
 36
36
-
 37
37
-
 38
38
-
 39
39
-
 40
40
-
 41
41
-
 42
42
-
 43
43
-
 44
44
-
 45
45
-
 46
46
-
 47
47
-
 48
48
-
 49
49
-
 50
50
-
 51
51
-
 52
52
-
 53
53
-
 54
54
-
 55
55
-
 56
56
-
 57
57


Clifford Matrix 3806X Le manuel du propriétaire
- Taper
- Le manuel du propriétaire
- Ce manuel convient également à
dans d''autres langues
Documents connexes
-
Clifford 5610P Le manuel du propriétaire
-
Clifford Matrix 5606X Le manuel du propriétaire
-
-
-
-
Clifford Matrix 5706X Le manuel du propriétaire
-
-
-
-
Clifford D9857V Le manuel du propriétaire
Autres documents
-
Python 5710P Le manuel du propriétaire
-
-
Automate 5104A Le manuel du propriétaire
-
-
Viper 5710V Le manuel du propriétaire
-
-
-
-