La page est en cours de chargement...

16.
15.
14.
13.
2.
OK
EasyShare 5500
E
All-in-One Printer
11.
10.
9.
8.
6.
7.
3.
4.
5.
12.
1.
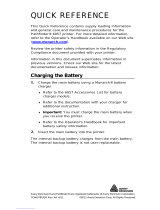
Identify main components
Hauptkomponenten
Identification des principaux composants
Belangrijkste onderdelen
FRANÇAIS
FR
ENGLISH
EN
1. Scanner glass
2. Control Panel
3. Output tray
4. Paper-width guide
5. Main tray
6. Photo tray
7. Paper-length guide
8. Photo tray light
9. USB drive/PictBridge port
10. Memory card slots
11. Memory card light
12. Printer access door
13. Automatic document feeder
14. USB port
15. Power connector
16. Rear access door
1. Scannerscheibe
2.
Funktionen des
Bedienfelds
3. Ausgabefach
4. Papierbreitenführung
5. Hauptfach
6. Fotopapierfach
7. Papierlängenführung
8. Anzeige am
Fotopapierfach
9. USB/PictBridge-Anschluss
10. Kamerakartensteckplätze
11. Speicherkartenanzeige
12. Druckerfach
13. Automatischer
Dokumenteneinzug
14.
USB-Anschluss
15. Netzanschluss
16. Hinteres Druckerfach
1. Vitre du scanner
2. Panneau de commandei
3. Réceptacle
4. Guide de largeur du
papier
5. Bac principa
6. Bac photo
7. Guide de longueur
8. Témoin du bac photo
9. Port USB/PictBridge
10. Logements de cartes
mémoire
11. Témoin de carte
mémoire
12. Trappe d'accès à
l'imprimante
13. Chargeur automatique
14. Port USB
15. Connecteur
d'alimentation
16. Rappe d'accès arrière
1. Glasplaat van scanner
2. Bedieningspaneel
3. Uitvoerlade
4. Papierbreedtegeleider
5. Hoofdplateau
6. Fotopapierlade
7. Papierlengtegeleider
8. Lampje van
fotopapierlade
9. Poort voor
USB-stick/PictBridge
10. Camerakaartsleuven
11. Geheugenkaartlampje
12. Printerklep
13. Automatische
documentinvoer
14. USB-poort
15. Voedingsconnector
16. Klep op achterkant
NEDERLANDS
NL
DEUTSCH
DE
www.kodak.com/go/aiosupport
2

1
2
3
4
5
6
7
8
9
0
#
*
abc
Phonebook
Attention
Cancel
Start
On/Off
jkl
def
mno
ghi
pqrs
Symbols
Space
wxyz
tuv
Transfer
Zoom
Rotate
Menu
Copy
Scan
Fax Phot o
OK
EasyShare 5500
All-in-One Printer
1
2
3
4
5
6
7
8
9
0
#
*
OK
EasyShare 5500
All-in-One Printer
abc
Phonebook
Attention
Cancel
Start
On/Off
jkl
def
mno
ghi
pqrs
Symbols
Space
wxyz
tuv
Transfer
Zoom
Rotate
Menu
Copy
Scan
Fax Photo
3
Unpack printer and install control panel
Drucker auspacken und Bedienfeld einsetzen
Déballage de l'imprimante et Mise en place du panneau de commande
De printer uitpakken en Het bedieningspaneel installeren
1
b) If not preinstalled, insert the control panel overlay, top end
first.
b) Setzen Sie die Bedienfeldauflage mit der Oberseite zuerst
ein, sofern es noch nicht eingesetzt ist.
b) S'il n'est pas pré-installé, insérez la façade amovible du
panneau de commande, en commençant par le bas.
b) Plaats de overlay van het bedieningspaneel, als dit nog niet
is gebeurd, met de bovenzijde eerst.
EN
DE
FR
NL
c) Press down on all edges of the overlay until it snaps
into position.
c) Drücke alle Ecken der Auflage nach unten, bis sie in ihrer
Position einrastet.
c) S'il n'est pas pré-installé, insérez la façade amovible du
panneau de commande, en commençant par le bas.
c) Druk op alle zijden van de overlay tot deze vastklikt.
EN
DE
FR
NL
a) See box flaps for unpacking instrctions.
Remove all orange shipping tape from the printer.
a) Anweisungen zum Auspacken finden Sie auf den Klappen
der Verpackung. Entfernen Sie sämtliches orangefarbenes
Verpackungsband vom Drucker.
a)
Consultez les instructions situées sur les rabats de
l'emballage pour obtenir des instructions sur le déballage.
Débarrassez l'imprimante de toute trace de bande de
transport orange.
a) Raadpleeg de doos voor instructies voor het uitpakken van
de printer. Verwijder alle oranje transporttape van de printer.
EN
DE
FR
NL
www.kodak.com/go/aiosupport
IMPORTANT: Do not connect the USB cable to the printer until instructed during software installation.
WICHTIG: Schließen Sie das USB-Kabel erst während der Software-Installation entsprechend der Anleitung an
den Drucker an.
IMPORTANT: ne connectez pas le câble USB à l'imprimante avant que cela ne vous soit spécifié au cours
de l'installation du logiciel.
BELANGRIJK: Sluit de USB-kabel niet aan op de printer tot u dit wordt gevraagd tijdens de software-installatie.

EasyShare 5500
OK
EasyShare 5500
OK
FR
EN
a) Lift photo tray lid until it remains standing without support.
Insert the photo paper glossy side down.
IMPORTANT: Do not overload the photo tray.
Max 20 sheets.
a)
Heben Sie die Abdeckung des Fotopapierfachs an, sodass
sie von alleine oen bleibt.
Legen Sie das Fotopapier mit der Glanzseite nach unten ein.
WICHTIG: Legen Sie nicht zuviel Papier in das
Fotopapierfach ein. Maximal 20Blätter.
a)
Relevez le couvercle du bac photo jusqu'à ce qu'il tienne
ouvert tout seul.
Retirez le papier photo face glacée vers le bas.
IMPORTANT: évitez de surcharger le bac photo.
20feuilles de papier au maximum.
a) Til het deksel van de fotopapierlade omhoog tot het blijft staan.
Plaats het fotopapier met de glanzende zijde naar beneden.
BELANGRIJK: Plaats niet te veel papier in e
fotopapierlade. Maximaal 20 vellen.
DE
NL
FR
EN
b) Push the photo tray in until it clicks into place.
NOTE: You can only print to the photo tray when the photo
tray is pushed in.
Lower the photo tray lid.
b) Schieben Sie das Fotopapier ein, bis es einrastet.
HINWEIS: Sie können nur mit dem Fotopapierfach drucken,
wenn es eingeschoben ist.
Klappen Sie die Abdeckung des Fotopapierfachs zu.
b) Poussez le bac photo jusqu'à ce qu'il s'enclenche.
REMARQUE: vous ne pouvez imprimer des photos que
lorsque le bac photo est bien poussé et enclenché.
Rabaissez le couvercle du bac photo.
b) Druk de fotopapierlade omlaag to deze vastklikt.
OPMERKING: U kunt alleen afdrukken via de fotopapierlade
als u deze hebt vastgeklikt.
Laat het deksel van de fotopapierlade zakken.
DE
NL
Load paper
Papier einlegen
Chargement du papier
Het papier plaatsen
2
4
www.kodak.com/go/aiosupport

DEDE
DENL
c) Load plain white paper into the main tray.
c) Klappen Sie die Abdeckung des Fotopapierfachs zu.
c) Chargez du papier blanc ordinaire dans le bac principal.
c) Plaats normaal wit papier in de hoofdlade.
FR
FR
EN
syShare 5500
All-in-One Printer
OK
EasyShare 5500
All-in-One Printer
OK
EasyShare 5500
All-in-One Printer
OK
EasyShare 5500
All-in-
One Printer
OK
5
www.kodak.com/go/aiosupport
Load paper
Papier einlegen
Chargement du papier
Het papier plaatsen

c) Pull on the orange tab to remove the protective retainer.
c) Ziehen Sie an der orangefarbenen Lasche, um den
Schutzbügel zu entfernen.
c) Introduisez le taquet orange pour supprimer la protection.
c) Trek aan het oranje lipje om de bescherming te verwijderen.
FR
FR
EN
DEDE
DENL
Install printhead
Druckkopf einsetzen
Installation de la tête d'impression
De printkop installeren
3
FR
FR
EN
b) Remove the printhead from its bag.
IMPORTANT: Insert the printhead immediately upon
opening sealed bag.
b) Entfernen Sie den Druckkopf aus der Verpackung.
WICHTIG: Setzen Sie den Druckkopf sofort nach dem
Önen der versiegelten Verpackung ein.
b) Sortez la tête d'impression de son emballage.
IMPORTANT: Sortez la tête d'impression de son
emballage.
b) Haal de printkop uit het zakje.
BELANGRIJK: Plaats de printkop onmiddellijk nadat
u het afgesloten zakje hebt geopend.
DEDE
DENL
FR
EN
IMPORTANT: The printhead is fragile. Handle carefully.
a) Lift the printer access door.
Make sure the orange tape is removed from the carriage.
WICHTIG: Der Druckkopf ist zerbrechlich. Behandeln
Sie ihn mit Sorgfalt.
a) Önen Sie das Druckerfach. Stellen Sie sicher, dass das
orangefarbene Klebeband vom Druckerschlitten entfernt
wurde.
IMPORTANT: la tête d'impression est fragile.
Manipulez-la avec précaution.
a) Soulevez la trappe d'accès à l'imprimante. Assurez-vous
que la bande adhésive orange a bien été retirée du chariot.
BELANGRIJK: De printkop is kwetsbaar. Ga er
voorzichtig mee om.
a) Til de printerklep omhoog. Zorg ervoor dat de oranje tape
van de wagen is verwijderd.
DE
NL
6
www.kodak.com/go/aiosupport

f) Push firmly against the back wall of the printhead
until it clicks into place
Tip: The printhead requires a firm push and makes an
audible click when locked into place.
f) Setzen Sie den Druckkopf in den Druckschlitten ein.
Tipp: Sie müssen kräftig gegen den Druckkopf drücken.
Er rastet hörbar in seiner Position ein.
f) Appuyez fermement contre la paroi de a tête d'impression
jusqu'à ce qu'elle s'enclenche.
Conseil: vous devez pousser la tête d'impression très
fermement, vous entendez un clic lorsqu'elle s'enclenche.
f) Druk stevig tegen de achterzijde van de printkop tot deze op
zijn plaats vastklikt.
Tip: U moet stevig op de printkop drukken. U hoort een klik
als de printkop vastklikt.
FR
FR
EN
NL
DE
e) Place the printhead into the carriage. Insert at the angle
shown.
e) Setzen Sie den Druckkopf in den Druckschlitten ein.
e) Insérez la tête d'impression dans le chariot. Respectez
l'angle indiqué.
e) Plaats de printkop in de wagen. Plaats de printkop onder
de afgebeelde hoek.
FR
DE
FR
FR
NL
EN
d) Carefully remove and discard the black plastic shield
and the orange protective cap.
IMPORTANT: Do not touch the copper-coloured contacts.
d) Entfernen und entsorgen Sie vorsichtig die schwarze
Kunststohülle und die orngefarbene Kappe.
WICHTIG: Berühren Sie niemals die kupferfarbenen
Kontakte.
d) Retirez avec précaution l'enveloppe en plastique noir et le
capuchon protecteur orange, puis jetez-les.
IMPORTANT: ne touchez pas aux contacts en cuivre
coloré.
d) Verwijder voorzichtig de zwarte plastic beschermhuls en het
oranje beschermkapje en gooi deze weg.
BELANGRIJK: Raak de koperkleurige contactpunten
niet aan.
FR
NL
FR
FR
EN
DEDE
7
www.kodak.com/go/aiosupport
Install printhead
Druckkopf einsetzen
Installation de la tête d'impression
De printkop installeren

10
Black Ink Cartridge
10
Black Ink Cartridge
10
Black Ink Cartridge
a) Remove the black ink cartridge from its bag.
IMPORTANT: Insert ink cartridges immediately upon
opening sealed bag.
a) Nehmen Sie die schwarze Tintenpatrone aus ihrer
Verpackung.
WICHTIG: Setzten Sie Tintenpatronen immer sofort
nach dem Önen der versiegelten Verpackung ein.
a) Retirez la cartouche d'encre noire de son emballage.
IMPORTANT: insérez les cartouches d'encre
immédiatement après avoir ouvert l'emballage scellé.
a) Haal de zwarte-inktcartridge uit het zakje.
BELANGRIJK: Plaats de inktcartridge onmiddellijk nadat
u het afgesloten zakje hebt geopend.
FR
FR
FR
NL
EN
DEDE
c) Insert the black ink cartridge into the printhead.
c) Setzen Sie die schwarze Tintenpatrone in den
Druckkopf ein.
c) Insérez la cartouche d'encre noire dans la tête
d'impression.
c) Plaats de zwarte-inktcartridge in de printkop.
FR
FR
EN
DEDE
NL
b) Carefully remove and discard the orange cap.
Handle ink cartridges carefully to avoid ink transfer.
b) Entfernen und entsorgen Sie die orangefarbene Kappe
vorsichtig. Gehen Sie sorgsam mit den Tintenpatronen um,
um ein Auslaufen von Tinte zu vermeiden.
b) Retirez délicatement le capuchon orange et jetez-le.
Manipulez les cartouche avec précaution pour éviter tout
transfert d'encre.
b) Verwijder voorzichtig het oranje kapje en gooi het weg.
Houd inktcartridges voorzichtig vast om te voorkomen dat
er inkt wordt gemorst.
FR
FR
EN
NL
DEDE
Install ink cartridges
Einsetzen der Tintenpatronen
Installation des cartouches d'encre
De inktcartridges installeren
4
8
www.kodak.com/go/aiosupport
10
B
la
ck In
k C
a
rtrid
g
e

10
Black Ink Cartridge
10
10
Black Ink Cartridge
Color Ink Cartridge
10
10
Black Ink Cartridge
10
C
o
lo
r
Ink
C
ar
t
ridg
e
FR
FR
EN
d) Press down on the ink cartridge until you hear
it click into position.
d) Drücken Sie die Patrone fest nach unten, bis sie hörbar
einrastet.
d) Appuyez sur la cartouche d'encre jusqu'à ce que vous
entendiez un «clic» indiquant qu'elle est en place.
d) Druk de inktcartridge naar beneden tot deze vastklikt.
DE
NL
FR
FR
EN
e) Open and uncap the colour ink cartridge.
Insert it into the printhead.
e) Nehmen Sie die Farbtinten-patrone aus der Verpackung, und
entfernen Sie die Kappe. Setzen Sie sie in den Druckkopf ein.
e) Déballez la cartouche d'encre couleur et retirez son opercule.
Insérez-la dans la tête d'impression.
e) Open de kleureninktcartridge en haal het kapje eraf. Plaats
de cartridge in de printkop.
DE
NL
f) Press down firmly on the ink cartridge until you hear it click
into position. It is normal for the printhead to flex when
inserting the cartridge. You will not damage the printer.
Close the printer access door.
f) Drücken Sie die Patrone fest nach unten, bis sie hörbar
einrastet. Beim Einsetzen der Patrone kann sich der
Druckkopf etwas biegen. Dadurch wird der Drucker nicht
beschädigt.
Schließen Sie das Druckerfach.
f) Appuyez fermement sur la cartouche d'encre jusqu'à ce
qu'elle s'enclenche. Il est normal que la tête d'impression
fléchisse lorsque vous insérez la cartouche.
Cela n'endommage pas l'imprimante.
Fermez la trappe d'accès à l'imprimante.
f) Druk de inktcartridge stevig naar beneden tot deze vastklikt.
Het is normaal dat de printkop meebeweegt wanneer u de
cartridge plaatst. De printer wordt hierdoor niet beschadigd.
Sluit de printerklep.
FR
FR
EN
DE
NL
9
www.kodak.com/go/aiosupport
Install ink cartridges
Einsetzen der Tintenpatronen
Installation des cartouches d'encre
De inktcartridges installeren

b) Insert the two-sided printing accessory by rotating it
towards you and engage the lower guide pins.
b) Legen Sie das Zubehörteil für beidseitigen Druck ein,
indem Sie es zu sich drehen und in die unteren
Führungsstifte einrasten.
b) Insérez l'accessoire d'impression recto verso en le faisant
pivoter vers vous et enclenchez les guides inférieurs.
b) Plaats het accessoire voor dubbelzijdig afdrukken door het
naar u toe te draaien en de geleidepinnen aan de onderzijde
te plaatsen.
NL
FR
EN
DE
FR
NL
EN
c) Press in until you hear the duplexer click into position.
c) Drücken Sie das Teil nach unten, bis sie den Duplexer
einrasten hören.
c) Appuyez jusqu'à ce que le dispositif soit bien enclenché
(vous entendrez un clic).
c) Druk op de duplexeenheid tot u deze hoort vastklikken.
DE
FR
NL
EN
a) Remove the rear access door.
a) Entfernen Sie das hintere Druckerfach.
a) Retirez la trappe d'accès arrière de l'imprimante.
a) Verwijder de printerklep.
DE
Insert two-sided printing accessory
Einsetzen des Zubehörteils für beidseitigen Druck
Insertion de l'accessoire d'impression recto verso
Het accessoire voor dubbelzijdig afdrukken plaatsen
5
10
www.kodak.com/go/aiosupport

4952368
OK
EasyShare 5500
All-in-One Printer
-ON
a) Connect the power supply and adaptor.
a) Schließen Sie das Netzteil an die Stromversorgung an.
a) Branchez le cordon d’alimentation et l'adaptateur.
a) Sluit de voeding en de adapter aan.
FR
FR
FR
NL
EN
DE
b) Remove the plastic film from the LCD display.
Position the LCD display.
b) Entfernen Sie die Schutzfolie vom LCD-Display.
Bringen Sie das LCD-Display in die richtige Position.
b) Retirez le film plastique de l'écran LCD.
Positionnez de l'écran LCD.
b) Verwijder het plastic beschermlaagje van het LCD-scherm.
Plaats het LCD-scherm.
FR
FR
EN
NL
DE
c) Press ON. If prompted, select your language.
Use the key to select a region.
c) Drücken Sie ON (EIN). Verwenden Sie zur Sprachauswahl die
Taste , wenn Sie dazu aufgefordert werden. Verwenden
Sie die Taste , um eine Region auszuwählen.
c) Appuyez sur ON (Marche). A l'invite, sélectionnez la langue
à l'aide du bouton .
Choisiss gion avec le bouton .
c) Druk op ON (AAN). Gebruik de toets om een taal te
selecteren als u hierom wordt gevraagd.
Gebruik de toets om een regio te selecteren.
FR
FR
FR
NL
EN
DE
Connect power
Stromversorgung anschließen
Branchement de l'alimentation
De netvoeding aansluiten
6
11
www.kodak.com/go/aiosupport

1-LINE
2-EXT
FR
LIGNE DE TELECOPIE SEPAREE:
Connectez votre imprimanteà la ligne téléphonique (comme
indiqué dans l'illustration) si vous avez une ligne de télécopie
séparée sur laquelle vous ne recevez aucun appel vocal et
qu'aucun autre appareil n'est connecté à cette ligne téléphonique.
a) Connectez un câble téléphonique à votre prise de téléphone
murale et au port portant la mention 1-LINE.
b) Réglez le paramètre Sonneries avant réponse en en suivant
cette procédure.
1) Appuyez sur Menu pour acher le menu principal.
2) Appuyez sur jusqu'à ce que l'option Paramètres de
télécopie soit achée.
3) Appuyez sur OK pour acher le menu Ajuster les
paramètres de télécopie.
4) Appuyez sur jusqu'à ce que l'option Sonneries avant
réponse soit sélectionnée.
5) Appuyez sur ou pour changer le nombre de
sonneries.
Lorsque le téléphone sonne, votre imprimante répond
automatiquement après le nombre de sonneries défini par le
paramètre Sonneries avant réponse. Elle émet ensuite une
tonalité de réception de télécopie en direction du télécopieur
expéditeur et reçoit la télécopie.
LIGNE PARTAGEE AVEC UN REPONDEUR AUTOMATIQUE
Connectez l'imprimante multifonction à la ligne téléphonique
(comme indiqué dans l'illustration) si vous recevez des appels
vocaux et de télécopie au même numéro de téléphone et qu'un
répondeur automatique est connecté à cette ligne.
a) Déconnectez le câble du téléphone de la prise reliant votre
modem à la prise du téléphone et branchez-le sur le port
portant la mention 2-EXT de votre imprimante multifonction.
b) Connectez le câble téléphonique à votre prise de téléphone
murale et au port portant la mention 1-LINE.
c) Activez le mode Répondeur automatique sur votre
imprimante multifonction.
d) Réglez l'imprimante multifonction de sorte qu'elle réponde
au téléphone après le répondeur automatique. Le nombre de
sonneries après lesquelles votre imprimante multifonction
EasyShare doit répondre à un appel doit être supérieur à
celui du répondeur automatique. Votre répondeur
automatique doit en eet pouvoir répondre avant
l'imprimante multifonction. Pour plus d'informations sur la
définition du nombre de sonneries avant réponse, consultez
la section Paramétrage des sonneries avant réponse du
guide d'utilisation.
14
www.kodak.com/go/aiosupport
1-LINE
2-EXT
1-LINE
2-EXT
Connect fax line
Fax-Leitung anschließen
Connexion de la ligne 0de télécopie
De netvoeding aansluiten

OK
EasyShare 5500
All-in-One Printer
b) Remove the calibration sheet from the output tray. Place it
face down and align to the back, left corner of the
scanner glass, as shown.
IMPORTANT: The blue arrow in the corner of the
calibration sheet must point to the registration marks
as shown.
b) Entfernen Sie die Kalibrierungsseite aus dem Ausgabefach.
Legen Sie es mit der bedruckten Seite nach unten auf das
Scannerglas und richten Sie es, wie angezeigt, an der linken
hinteren Ecke aus.
WICHTIG: Der blaue Pfeil in der Ecke der
Kalibrierungsseite muss wie angezeigt auf die Markierungen
zeigen.
EN
IMPORTANT: Make sure that the photo tray is
pushed in. The photo tray light should be lit.
a) Press Start.
Wait two minutes for the calibration sheet to print.
Tip: If the calibration sheet does not print properly, see the
Troubleshooting section in this setup guide.
WICHTIG: Stellen Sie sicher, dass das Fotopapierfach
eingeschoben ist. Die Anzeige am Fotopapierfach sollte
leuchten.
a) Drücken Sie Start. Warten Sie zwei Minuten, bis die
Kalibrierungsseite gedruckt wird.
Tipp: Wenn die Kalibrierungsseite nicht richtig gedruckt wird,
sehen Sie im Abschnitt „Fehlerbehebung“ auf dem
Einrichtungsposter nach, um das Problem zu beheben.
IMPORTANT: assurez-vous que le bac photo est bien
enfoncé. Le témoin du bac photo doit être allumé.
a) Appuyez sur Démarrer. L'impression de la page
d'étalonnage prend en ron deux minutes. Veuillez patienter.
Conseil: Appuyez sur Démarrer. L'impression de la page
d'étalonnage prend environ deux minutes. Veuillez patienter.
BELANGRIJK: De blauwe pijl in de hoek van het
kalibratievel moet zoals aangegeven naar de
registratiemarkeringen wijzen.
a) Druk op
Waarschuwig. Wacht tot het kalibratievel is
afgedrukt. Dit duurt ongeveer twee minuten.
Tip: Raadpleeg het gedeelte Problemen oplossen op deze
installatieposter als hezt kalibratievel niet goed wordt
afgedrukt.
FR
FR
FR
NL
EN
DE
DE
Calibrate printer
Drucker kalibrieren
Etalonner l'imprimante
Printer kalibreren
8
16
www.kodak.com/go/aiosupport

FR
FR
FR
NL
FR
NL
FR
NL
EN
FR
FR
FR
FR
EN
c) Lower the scanner lid and press Start. Remove the sheet
from the scanner glass when the calibration is complete.
c) Schließen Sie die Scannerabdeckung, und drücken Sie
„Start“. Entfernen Sie die Seite vom Scannerglas, nachdem
die Kalibrierung abgeschlossen ist.
c) Abaissez le capot du scanner et appuyez sur Start (Démarrer).
Retirez la page de la vitre lorsque l'étalonnage est terminé.
c) Laat de scannerklep zakken en druk op Start (Waarschuwig
).
Verwijder het vel van de glasplaat wanneer de kalibratie
is voltooid.
d) Lift the photo tray lid, then slide the photo tray toward you
to return to main tray operation. The photo tray light will
turn o.
d) Heben Sie die Abdeckung des Fotopapierfachs an und
ziehen sie das Fotopapierfach dann zu sich, um zum Betrieb
mit dem Hauptfach zurückzukehren. Die Anzeige des
Fotopapierfachs erlischt.
d) Relevez le couvercle du bac photo, puis tirez le bac photo
vers vous pour retourner au fonctionnement du bac principal
Le témoin du bac photo s'éteint.
d) Til het deksel van de fotopapierlade omhoog en schuif de
fotopapierlade naar u toe om af te drukken via de hoofdlade.
Het lampje van de fotopapierlade gaat uit.
4x6
(10cm x 15cm)
4x6
EasyShare 5500
OK
DE
DE
b) Retirez la page d'étalonnage du réceptacle. Placez-la face
contre la vitre et en l'alignant avec l'angle arrière gauche de
la vitre du scanner, comme indiqué.
IMPORTANT: la flèche bleue dans le coin de la page
d'étalonnage doit pointer vers les marques d'enregistrement,
comme indiqué.
b) Verwijder het kalibratievel uit de uitvoerlade. Plaats het met
de bedrukte zijde naar beneden in de linkerhoek aan de
achterzijde van de glasplaat, zoals aangegeven.
BELANGRIJK: De blauwe pijl in de hoek van het
kalibratievel moet zoals aangegeven naar de
registratiemarkeringen wijzen.
17
www.kodak.com/go/aiosupport
Calibrate printer
Drucker kalibrieren
Etalonner l'imprimante
Printer kalibreren

WINDOWSWINDOWS
WINDOWSWINDOWS
WINDOWSWINDOWS
WINDOWSWINDOWS
WINDOWSWINDOWS
WINDOWSWINDOWS
WINDOWSWINDOWS
WINDOWSWINDOWS
WINDOWSWINDOWS
WINDOWSWINDOWS
WINDOWSWINDOWS
WINDOWSWINDOWS
WINDOWSWINDOWS
WINDOWSWINDOWS
WINDOWSWINDOWS
WINDOWSWINDOWS
WINDOWSWINDOWS
WINDOWSWINDOWS
WINDOWSWINDOWS
EN
FR
a) Load the Kodak AiO Printer software CD into the CD-ROM
drive. Follow the on-screen prompts when the instructions
appear.
If instructions do not appear, click Start, then Run. Select
CD-ROM drive and type setup.exe, then press ENTER.
b) Connect the USB cable to the printer when instructed.
Continue to follow the on-screen prompts until installation
is complete.
a) Legen Sie die Software-CD für die Kodak All-in-One-
Druckerstation in das CD-ROM-Laufwerk ein. Befolgen Sie
die Anweisungen auf dem Bildschirm, wenn diese angezeigt
werden.
Falls keine Anweisungen angezeigt werden, klicken Sie auf
"Start" und anschließend auf "Ausführen". Wählen Sie das
CD-ROM-Laufwerk aus, geben Sie "setup.exe" ein, und
drücken Sie dann die Eingabetaste.
b) Schließen Sie das USB-Kabel am Drucker an, wenn Sie
dazu aufgefordert werden. Befolgen Sie die Anweisungen
auf dem Bildschirm, bis die Installation abgeschlossen ist.
a) Chargez le CD du logiciel de l'imprimante multifonction
Kodak dans le lecteur de CD-ROM. Lorsque les instructions
apparaissent, suivez les invites à l'écran.
Si aucune instruction n'apparaît, cliquez sur Démarrer, puis
sur Exécuter. Sélectionnez le lecteur de CD-ROM et tapez
setup.exe, puis appuyez sur ENTREE.
b) Lorsque vous y êtes invité, branchez le câble USB à votre
imprimante. Continuez de suivre les invites à l'écran jusqu'à
la fin de l'installation.
a) Plaats de cd met Kodak AiO-printersoftware in het cd-
romstation. Volg de aanwijzingen op het scherm.
Klik als de instructies niet worden weergegeven op Start en
vervolgens op Uitvoeren. Selecteer het cd-romstation en typ
setup.exe. Druk vervolgens op ENTER.
b) Sluit de USB-kabel aan op de printer wanneer u hierom
wordt gevraagd. Blijf de aanwijzingen op het scherm volgen
totdat de installatie is voltooid.
DE
NL
6
Install Windows software
Windows-Software installieren
Installation du logiciel Windows
De Windows-software installeren
WINDOWS
18
www.kodak.com/go/aiosupport
IMPORTANT: Do not connect the USB cable to the printer until instructed during software installation.
WICHTIG: Verbinden Sie das USB-Kabel erst mit dem Drucker, wenn Sie während der Software-Installation dazu
aufgefordert werden.
IMPORTANT: ne connectez pas le câble USB à l'imprimante avant que cela ne vous soit spécifié au cours
de l'installation du logiciel.
BELANGRIJK: Sluit de USB-kabel niet aan op de printer tot u dit wordt gevraagd tijdens de software-installatie.

Install Macintosh software
Macintosh-Software installieren
Installation du logiciel pour Macintosh
De Macintosh-software installeren
MACINTOSH
www.kodak.com/go/aiosupport
19
MACINTOSHMACINTOSH
MACINTOSHMACINTOSH
MACINTOSHMACINTOSH
MACINTOSHMACINTOSH
MACINTOSHMACINTOSH
MACINTOSHMACINTOSH
MACINTOSHMACINTOSH
MACINTOSHMACINTOSH
MACINTOSHMACINTOSH
MACINTOSHMACINTOSH
MACINTOSHMACINTOSH
MACINTOSHMACINTOSH
MACINTOSHMACINTOSH
MACINTOSHMACINTOSH
MACINTOSHMACINTOSH
MACINTOSHMACINTOSH
MACINTOSHMACINTOSH
MACINTOSHMACINTOSH
MACINTOSHMACINTOSH
MACINTOSHMACINTOSH
MACINTOSHMACINTOSH
MACINTOSHMACINTOSH
MACINTOSHMACINTOSH
a) Connect the USB cable to the printer and your computer.
a) Verbinden Sie den Drucker über ein USB-Kabel mit dem
Computer.
a) Branchez le câble USB à votre imprimante et à votre
ordinateur.
a) Sluit de USB-kabel aan op de printer en de computer.
b) Load the Kodak AiO Printer software CD into the CD-ROM
drive.
The Kodak AiO Printer software installer window should be
displayed. If not, double-click the Kodak AiO Printer
Software CD icon on the desktop. Follow the on-screen
prompts until installation is complete.
b) Legen Sie die Software-CD für die Kodak All-in-One-
Druckerstation in das CD-ROM-Laufwerk ein.
Nun sollte das Fenster zur Installation der Software der
Kodak All-in-One-Druckerstation angezeigt werden. Sollte
dies nicht der Fall sein, doppelklicken Sie auf das Symbol für
die Software-CD für die Kodak All-in-One-Druckerstation
auf dem Desktop. Befolgen Sie die Anweisungen auf dem
Bildschirm, bis die Installation abgeschlossen ist.
b) Chargez le CD du logiciel de l'imprimante multifonction
Kodak dans le lecteur de CD-ROM.
La fenêtre du logiciel d'installation de l'imprimante
multifonction Kodak doit s'acher. Si ce n'est pas le cas,
double-cliquez sur l'icône du CD du logiciel de l'imprimante
multifonction Kodak sur le bureau. Suivez les invites à
l'écran jusqu'à la fin de l'installation.
b) Plaats de cd met Kodak AiO-printersoftware in het
cd-romstation.
Het installatievenster van de Kodak AiO-printersoftware
wordt weergegeven. Als dit niet het geval is, dubbelklikt u
op het pictogram van de cd met Kodak AiO-printersoftware
op het bureaublad. Volg de aanwijzingen op het scherm
totdat de installatie is voltooid.
EN
FR
DE
NL
EN
FR
DE
NL

1
2
3
4
5
6
7
8
9
0
#
*
1.
abc
Phonebook
Attention
Cancel
Start
On/Off
jkl
def
mno
ghi
pqrs
Symbols
Space
wxyz
tuv
7.
13.
Transfer
Zoom
Rotate
Menu
Copy
Scan
Fax Photo
3.
4.
5.
6.
2.
9.
11.
10.
8.
OK
12.
EasyShare 5500
All-in-One Printer
Control panel features
Funktionen des Bedienfelds
Fonctions du panneau de commande
Functies van het bedieningspaneel
FRANÇAIS
FR
ENGLISH
EN
1. On/O
2. Phonebook
3. Fax
4. Copy
5. Zoom
6. Rotate
7. Cancel
8. Menu
9. Scan
10. Photo
11. Transfer
12. OK
13. Start
1. Ein/Aus
2. Telefonbuch
3. Fax
4. Kopieren
5. Zoom
6. Drehen
7. Abbrechen
8. Menü
9. Scannen
10. Foto
11. Übertragen
12. OK
13. Start
1. Marche/Arrêt
2. Répertoire téléphonique
3. Télécopie
4. Copie
5. Zoom
6. Rotation
7. Annuler
8. Menu
9. Numérisation
10. Photo
11. Transfert
12. OK
13. Démarrer
1. Aan/uit
2. Telefoonboek
3. Faxen
4. Kopiëren
5. Zoomen
6. Praaien
7. Annuleren
8. Menu
9. Scannen
10. Foto
11. Overbrengen
12. OK
13. Waarschuwig
NEDERLANDS
NL
DEUTSCH
DE
20
www.kodak.com/go/aiosupport

OK
All-in-One Printer
OK
All-in-One Printer
Helpful tips
Hilfreiche Tipps
Astuces utiles
Handige tips
21
www.kodak.com/go/aiosupport
Pull out the output tray extender to help collect your prints.
Ziehen Sie die Ausgabefach-Verlängerung nach außen, um Ihre
Abzüge im zu sammeln.
Déployez l'extension du plateau de sortie pour récupérer plus
facilement vos impressions.
Trek het verlengstuk van de uitvoerlade uit om uw afdrukken
van eenvoudiger uit de lade te kunnen nemen.
The photo tray light illuminates when the photo tray is pushed
in. To use the main paper tray, disengage the photo tray by
pulling it towards you.
Die Anzeige am Fotopapierfach leuchtet, wenn das
Fotopapierfach eingeschoben ist. Um über das Hauptpapierfach
zu drucken, nehmen Sie das Fotopapierfach heraus, indem Sie
es in Ihre Richtung ziehen.
Le voyant du plateau à papier photo s'allume lorsque le plateau
est en place. Pour utiliser le plateau principal, dégagez le
plateau à papier photo en le tirant vers vous.
Het lampje van de fotopapierlade brandt als u de fotopapierlade
hebt vastgeklikt. Maak de fotopapierlade los door deze naar u
toe te trekken als u de hoofdpapierlade wilt gebruiken.
EN
FR
FR
FR
EN
FR
NL
DE
NL
DE

Getting started
Erste Schritte
Mise en route
Aan de slag
22
www.kodak.com/go/aiosupport
You can access and use the AiO Home Center by double-clicking on the icon on your desktop.
Sie können das All-in-One Home Center mit einem Doppelklick auf das entsprechende Symbol auf Ihrem Desktop
aufrufen und verwenden.
Vous pouvez accéder au logiciel AiO Home Center et l'utiliser en cliquant deux fois sur l'icône placée sur votre bureau.
U kunt het AiO Home Center openen en gebruiken door op het pictogram op uw bureaublad te dubbelklikken.
DE
NL
EN
FR
NL
DE
EN
FR
FR
You can use Kodak Home Centre to browse, print, copy, scan, order supplies and
configure your AiO printer from the computer.
Mit dem Kodak Home Center können Sie Ordner durchsuchen, drucken, kopieren,
scannen, Zubehör bestellen und die Konfiguration Ihres All-in-One-Druckers über
den Computer ausführen.
Utilisez le logiciel Kodak Home Center pour rechercher, imprimer, copier, numériser,
commander des consommables et pour configurer votre imprimante multifonction
depuis votre ordinateur.
Met Kodak Home Center kunt u vanaf de computer door mediabestanden bladeren,
deze afdrukken, kopiëren, foto's scannen, benodigdheden bestellen en uw AiO-printer
configureren.
NL
DE
EN
FR
FR
You can use Kodak EasyShare to transfer, view and work with your digital pictures
and videos, if installed.
Wenn Kodak EasyShare installiert ist, können Sie Ihre Digitalbilder und Videos
übertragen, anzeigen und sie bearbeiten.
S'il est installé, utilisez le logiciel Kodak EasyShare pour transférer, visualiser et
travailler vos photos et vidéos numériques.
Als u Kodak EasyShare hebt geïnstalleerd, kunt u hiermee uw digitale foto's en video's
bekijken, bewerken en overbrengen.
Kodak Home Center
Software
EasyShare Software

25
www.kodak.com/go/aiosupport
Troubleshooting
Fehlerbehebung
Dépannage
Problemen oplossen
Pour toute question supplémentaire sur le dépannage de cet appareil, consultez notre site Internet à l'adresse
suivante : www.kodak.com/go/5500aiosupport
PROBLÈME :
Je ne parviens pas à imprimer une page d'étalonnage.
SOLUTION :
Lorsque cela est nécessaire, vous pouvez forcer l'impression d'une page d'étalonnage en reproduisant la procédure
suivante:
1. Appuyez sur Menu, sélectionnez Etalonner l'imprimante, puis appuyez sur OK.
2. Sélectionnez Imprimer une page d'étalonnage, puis appuyez sur OK.
3. Lorsque le tirage sort de l'imprimante, alignez-le avec l'angle arrière gauche de la vitre du scanner.
4. Fermez le couvercle du scanner et appuyez sur START (DEMARRER).
PROBLÈME :
Ma page d'étalonnage s'imprime sur du papier document blanc ordinaire.
SOLUTION :
L'étalonnage fonctionnera aussi bien sur du papier blanc ordinaire que sur du papier photo.
1. Lorsque le tirage sort de l'imprimante, alignez-le avec l'angle arrière gauche de la vitre du scanner.
2. Fermez le couvercle du scanner et appuyez sur START (DEMARRER).
PROBLÈME :
Je ne parviens pas à imprimer sur le type de papier que j'ai choisi.
SOLUTION:
Vérifiez que le bac photo est bien poussé. Pour ce faire, vérifiez que le témoin vert du bac photo est allumé. S'il est
allumé, toutes les impressions se feront à partir de ce bac. Si vous souhaitez imprimer à partir du bac principal, tirez
sur le bac photo en relevant son couvercle et en tirant le bac photo vers vous.
PROBLÈME :
Un bourrage papier s'est produit.
SOLUTION:
1. Pour retirer la porte d'accès arrière, appuyez sur ses taquets.
2. Dégagez délicatement le papier des rouleaux d'entraînement.
IMPORTANT : si le papier se déchire, vérifiez si des morceaux sont restés dans l'imprimante et, le cas échant,
retirez-les. S'il reste des morceaux de papier dans l'imprimante, d'autres bourrages risquent de se produire.
3. Remettez la trappe d'accès arrière en place. Repoussez délicatement la porte jusqu'à ce qu'elle s'enclenche.
Votre problème persiste?
Si vous avez besoin de plus d'informations pour vous aider à
répondre à vos questions, veuillez contacter notre Assistance
technique. Conservez votre numéro KSN (numéro assistance
Kodak) à portée de main. Vous trouverez votre numéro KSN
sur l'imprimante, en soulevant la trappe d'accès comme indiqué.
FR
KODAK SERVICE NUMBER
F330065

More accessories
More options
More convenience
The KODAK EasyShare All-in-One Printer gives you more. Be sure to visit our online store to select from our full line of
supplies and accessories at www.kodak.com/go/AiO
- Kodak's inkjet photo paper Get prints that look great the first time with Kodak's unique backprint technology that
automatically enables optimised prints.
- Value packs Save up to 50% on everything you print and pay as little as 7p per print with our ink and paper value packs.
- Wireless adaptor Go wireless with the Kodak wireless 2.0 USB Bluetooth adaptor.
Note: A USB 2.0 cable is required to connect your Kodak All-in-One printer to your Windows or Macintosh OS computer.
Available in the Kodak online store or see your local retailer.
Mit dem KODAK EasyShare All-in-One-Drucker haben Sie noch mehr Möglichkeiten. Besuchen Sie unbedingt unseren Online
Shop, und wählen Sie aus unserer umfangreichen Palette an Produkten aus: www.kodak.com/go/AiO
- Kodak Inkjet-Fotopapier Holen Sie das Optimale aus Ihren Bildern heraus. Durch die Rückseitenaufdrucke auf den Kodak
Inkjet-Papieren wird die Papierart automatisch erkannt, und der Drucker stellt sich auf das entsprechende Papier ein.
- Vorteilspacks Dank unserer Vorteilspacks aus Tintenpatroneund Papier sparen Sie bis zu 50 % bei jedem Ausdruck und
somit bares Geld.
- Wireless-Adapter Kabellose Technologie mit dem Kodak Wireless 2.0 USB Bluetooth-Adapter.
Hinweis: Sie benötigen ein USB2.0-Kabel, um Ihren Kodak All-iOne-Drucker an einen Windows- oder Macintosh-Computer
anzuschließen.
L'imprimante multifonction KodakEasyShare vous ore encore plus. Consultez notre boutique en ligne pour choisir parmi
notre ligne complète d'accessoires et de consommables, sur notre site Internet à l'adresse suivante: www.kodak.com/go/AiO
- Papier photo jet d'encre Kodak Obtenez des tirages réussis premier coup grâce à la technologie unique d'impression au
verso Kodak qui permet des tirages automatiquement optimisés.
- Lots spéciaux Value Packs Economisez jusqu'à 50% sur tous vos tirages et payez moins de 10centimes par tirage grâce
à nos lots spéciaux Value Pack encre et papier.
- Adaptateur sans fil Passez au sans fil avec l'adaptateur sans fil Kodak. Adaptateur Bluetooth USB2.0.
Remarque: un câble USB 2.0 est nécessaire pour brancher votre imprimante multifonctionKodak à votre ordinateur Windows
ou Macintosh OS. Disponible sur la boutique en ligne Kodak o auprès de votre revendeur Kodak le plus proche.
De KODAK EasyShare All-in-One printer biedt u meer. Ga naar onze online shop op www.kodak.com/go/AiO om uw keuze te
maken uit ons volledige assortiment benodigdheden en accessoires.
- Kodak-inkjetfotopapier Afdrukken die er meteen de eerste keer geweldig uitzien dankzij de unieke backprint-technologie
van Kodak die automatisch voor optimale afdrukken zorgt.
- Voordeelpakketten Bespaar tot 50% op al uw afdrukken en betaal slechts 10 cent per afdruk met onze voordeelpakketten
met inkt en papier.
- Draadloze adapter Ga voor draadloos met de draadloze 2.0 USB Bluetooth-adapter van Kodak.
Opmerking: U hebt een USB 2.0-kabel nodig om uw Kodak All-in-One printer aan te sluiten op uw computer met Windows
of Macintosh. Verkrijgbaar in de Kodak Online Shop of raadpleeg uw plaatselijke fotozaak.
Wireless 2.0 USB
Bluetooth adaptor
Plus d'accessoires
Plus d'options
Plus pratique
Meer accessoires
Meer opties
Meer gemak
Mehr Zubehör
Mehr Optionen
Mehr Komfort
www.kodak.com/go/aiosupport
27
/