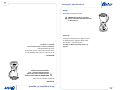
Oster 109478 Manuel utilisateur
- Catégorie
- Mélangeurs
- Taper
- Manuel utilisateur
Ce manuel convient également à

Mélangeur - robot
L’utilisation sans devinettes.
Programmes prévus pour résultats impeccables
www.oster.com LED
Notice d’emploi
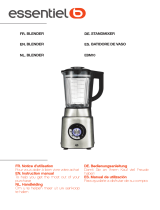
Blender / Food Processor
Ingredients in. Guesswork out.
Pre-programmed cycles for perfect results
P.N. 109478
P.N. 109478
www.oster.com LED
User Manual
Read all instructions before use
Lisez attentivement toutes les instructions avant l’utilisation.

i
IMPORTANT SAFEGUARDS
When using your blender, you should always follow basic safety precautions, including
the following:
• Read all instructions before use.
•To protect against electrical hazards, do not immerse the cord, plug or motor base in
water or other liquids.
• Always use the product on a clean, flat, hard, dry surface. There should be no
material such as a tablecloth or plastic between the unit and surface.
•Avoid contact with moving parts.
• Keep hands and utensils out of jar while blending to reduce the risk of:
– Severe personal injury
– Damage to the blender
• If scraping is necessary, turn the power OFF and use a rubber spatula only.
• Do not use the appliance:
– With a damaged cord or plug
– After the unit fails to work correctly
– After you drop or damage the product in any way
Return the product to your nearest Authorized Oster
®
Appliance Service Center
for a safety check, adjustment or repair.
•Triple blades are sharp. Handle them carefully.
•To reduce the risk of injury:
– Do not leave the triple blades sitting out or exposed
– Always completely assemble the blades to the jar before putting on the base
• Always put the lid on the jar before operating the blender.
• When blending hot liquids beware of steam. Remove the feeder cap from the lid to
allow steam to escape.
• Do not use outdoors.
• Do not allow the cord to touch hot surfaces or hang over the edge of a table or
counter.
• Unplug the blender when it is not in use, before taking off or putting on parts and
before cleaning.
• Never leave the appliance unattended while it is running.
•You risk personal injury, fire or electric shock if you use attachments, jars or parts
other than those recommended by Sunbeam.
• Supervise children closely when they use or are nearby appliances.
SAVE THESE INSTRUCTIONS
• This product is for household use only.
• The maximum rating marked on the product is based on the attachment that draws
the greatest load. Other attachments may draw less power.
i
CONSIGNES IMPORTANTES
L’utilisation d’un mélangeur exige l’observation de certaines précautions fondamentales,
y compris les suivantes:
• Lisez attentivement toutes les instructions avant l’utilisation.
• Pour vous protéger des chocs électriques, ne plongez jamais le cordon, la fiche ou
le socle-moteur dans l’eau ou dans tout autre liquide.
• Placez toujours l’appareil sur une surface propre, d’aplomb, stable et sèche. Ne le
posez jamais sur une surface recouverte d’une nappe en tissu ou en plastique.
• Évitez tout contact avec les pièces mobiles.
• Gardez mains et ustensiles hors du récipient pendant le travail, afin
– de réduire les risques de blessures corporelles graves; et
– de ne pas endommager le mélangeur
• Lorsqu’il est nécessaire de racler les parois, arrêtez l’appaeil et mettez-le hors
tension à OFF; servez-vous d’une spatule de caoutchouc pour faire le raclage.
• Ne vous servez pas de l’appareil
– si son cordon (ou sa fiche) est endommagé;
– s’il n’a pas fonctionné convenablement; ou
– si vous l’avez échappé ou endommagé de quelque façon
Portez-le au centre de service agréé Oster
®
pour le faire vérifier, ajuster ou réparer.
• Le couteau à trois lames est très tranchant. Manipulez-le prudemment.
• Pour réduire les risques de blessures:
– ne laissez pas le couteau à trois lames à découvert; et
– fixez le couteau au récipient avant d’adapter ce dernier sur le socle-moteur
• Posez toujours le couvercle sur le récipient avant la mise en marche.
• Lors du travail de liquides chauds, retirez le bouchon-mesure du couvercle afin que
la vapeur puisse s’échapper.
• Ne vous servez pas de l’appareil à l’extérieur.
•Veillez à ce que le cordon ne touche pas de surfaces chaudes et qu’il ne pende pas
au bord de la table ou du plan de travail.
• Débranchez le mélangeur quand il ne sert pas, avant de monter ou de démonter
toute pièce et avant de le nettoyer.
•Nelaissez jamais l’appareil sans surveillance quand il fonctionne.
•L’utilisation d’accessoires, de bocaux, ou de pièces autres que ceux et celles que
conseille Sunbeam entraîne des risques de blessures.
• Soyez très vigilant quand l’appareil est utilisé par des enfants ou près d’eux.
CONSERVEZ CES INSTRUCTIONS
• Cet appareil est uniquement destiné à l’usage domestique.
• La consommation maximale indiquée sur l’appareil est basée sur l’accessoire qui
utilise le plus d’énergie, d’autres accessoires peuvent en consommer moins.

ii
ii
Power Cord Instructions
Please follow the instructions below to ensure the safe use of the power cord.
• This blender has a power cord storage area that allows you to adjust the length of
the cord so that it is the appropriate length for your location. Try to position the
blender near the power source to reduce the hazards associated with power cords
(such as becoming entangled or tripping over a long power cord).
• Do not pull, twist or otherwise abuse the power cord.
• Do not wrap the power cord around the main body of the blender during or after
use.
This symbol has been placed in specific areas of the User Guide portion of this book.
Its purpose is to help you easily identify instructions that require your special attention.
Instructions relatives au cordon d’alimentation
Veuillez observer les instructions suivantes pour assurer une utilisation sans risques.
• Ce mélangeur est pourvu d’un range-cordon qui vous permet d’ajuster la longueur
du cordon avec précision selon l’emplacement de la prise de courant. Essayez de
mettre le mélangeur aussi près que possible de la prise afin de réduire les dangers
associés avec les cordons d’alimentation longs (risque de trébucher, et autres).
• Ne tirez pas brusquement sur le cordon, ne l’entortillez pas et ne le maltraitez pas.
• N’enroulez pas le cordon d’alimentation autour du mélangeur pendant ou après
le fonctionnement.
Ce symbole a été placé à certains endroits de la notice d’emploi. Il a pour but d’identifier
les instructions qui exigent une attention particulière.

Table of contents
iii
Table des matières
iii
Welcome . . . . . . . . . . . . . . . . . . . . . . . . . . . . . . . . . . . . . . . . . . . . . . . . . . .1
Learning About Your Product . . . . . . . . . . . . . . . . . . . . . . . . . . . . . . . . . . .2
Using Your Product . . . . . . . . . . . . . . . . . . . . . . . . . . . . . . . . . . . . . . . . . . .4
Assembly . . . . . . . . . . . . . . . . . . . . . . . . . . . . . . . . . . . . . . . . . . . . . . . . . . . . .4
Using the AUTOMATIC Programs . . . . . . . . . . . . . . . . . . . . . . . . . . . . . . . . . . . .5
Using MANUALLY . . . . . . . . . . . . . . . . . . . . . . . . . . . . . . . . . . . . . . . . . . . . . . . .8
Using the Low and High Buttons . . . . . . . . . . . . . . . . . . . . . . . . . . . . . . . . . . . .8
Using the Pulse Button . . . . . . . . . . . . . . . . . . . . . . . . . . . . . . . . . . . . . . . . . .10
After Use . . . . . . . . . . . . . . . . . . . . . . . . . . . . . . . . . . . . . . . . . . . . . . . . . . . .11
Caring for Your Product . . . . . . . . . . . . . . . . . . . . . . . . . . . . . . . . . . . . . .12
Cleaning . . . . . . . . . . . . . . . . . . . . . . . . . . . . . . . . . . . . . . . . . . . . . . . . . . . . .12
Checking the Triple Blades . . . . . . . . . . . . . . . . . . . . . . . . . . . . . . . . . . . . . . .12
Storing . . . . . . . . . . . . . . . . . . . . . . . . . . . . . . . . . . . . . . . . . . . . . . . . . . . . . .13
Servicing . . . . . . . . . . . . . . . . . . . . . . . . . . . . . . . . . . . . . . . . . . . . . . . . . . . .13
Blending Tips . . . . . . . . . . . . . . . . . . . . . . . . . . . . . . . . . . . . . . . . . . . . . .14
Liquids . . . . . . . . . . . . . . . . . . . . . . . . . . . . . . . . . . . . . . . . . . . . . . . . . . . . . .14
Using the Feeder Cap . . . . . . . . . . . . . . . . . . . . . . . . . . . . . . . . . . . . . . . . . . .14
Hot Foods . . . . . . . . . . . . . . . . . . . . . . . . . . . . . . . . . . . . . . . . . . . . . . . . . . . .15
Ingredients Quantity . . . . . . . . . . . . . . . . . . . . . . . . . . . . . . . . . . . . . . . . . . . .15
Foods Chart . . . . . . . . . . . . . . . . . . . . . . . . . . . . . . . . . . . . . . . . . . . . . . .16
Recipes . . . . . . . . . . . . . . . . . . . . . . . . . . . . . . . . . . . . . . . . . . . . . . . . . . .18
Frozen Drinks . . . . . . . . . . . . . . . . . . . . . . . . . . . . . . . . . . . . . . . . . . . . . . . . .18
Milk Shakes . . . . . . . . . . . . . . . . . . . . . . . . . . . . . . . . . . . . . . . . . . . . . . . . . . .20
Powder Drinks . . . . . . . . . . . . . . . . . . . . . . . . . . . . . . . . . . . . . . . . . . . . . . . . .21
Smoothies . . . . . . . . . . . . . . . . . . . . . . . . . . . . . . . . . . . . . . . . . . . . . . . . . . . .22
Salsa . . . . . . . . . . . . . . . . . . . . . . . . . . . . . . . . . . . . . . . . . . . . . . . . . . . . . . . .25
Soups . . . . . . . . . . . . . . . . . . . . . . . . . . . . . . . . . . . . . . . . . . . . . . . . . . . . . . .27
Baby Food . . . . . . . . . . . . . . . . . . . . . . . . . . . . . . . . . . . . . . . . . . . . . . . . . . . .29
Batter . . . . . . . . . . . . . . . . . . . . . . . . . . . . . . . . . . . . . . . . . . . . . . . . . . . . . . .31
Nuts/Crumbs . . . . . . . . . . . . . . . . . . . . . . . . . . . . . . . . . . . . . . . . . . . . . . . . . .32
Accessory . . . . . . . . . . . . . . . . . . . . . . . . . . . . . . . . . . . . . . . . . . . . . . . . .34
Blend-N-Go
TM
Cup . . . . . . . . . . . . . . . . . . . . . . . . . . . . . . . . . . . . . . . . . . . . . .34
Two-year Limited Warranty . . . . . . . . . . . . . . . . . . . . . . . . . . . . . . . . . . . .35
How to Obtain Warranty Service . . . . . . . . . . . . . . . . . . . . . . . . . . . . . . . . . . .35
Bienvenue . . . . . . . . . . . . . . . . . . . . . . . . . . . . . . . . . . . . . . . . . . . . . . . . . .1
Familiarisez-vous avec l’appareil . . . . . . . . . . . . . . . . . . . . . . . . . . . . . . . .2
Mode d’emploi de l’appareil . . . . . . . . . . . . . . . . . . . . . . . . . . . . . . . . . . . .4
Assemblage . . . . . . . . . . . . . . . . . . . . . . . . . . . . . . . . . . . . . . . . . . . . . . . . . . . .4
Programmes AUTOMATIQUES . . . . . . . . . . . . . . . . . . . . . . . . . . . . . . . . . . . . . . .5
Utilisation MANUELLE . . . . . . . . . . . . . . . . . . . . . . . . . . . . . . . . . . . . . . . . . . . . .8
Touches «Low» (bas) et «High» (haut) . . . . . . . . . . . . . . . . . . . . . . . . . . . . . .8
Touche «Pulse» (impulsions) . . . . . . . . . . . . . . . . . . . . . . . . . . . . . . . . . . . . .10
Après l’utilisation . . . . . . . . . . . . . . . . . . . . . . . . . . . . . . . . . . . . . . . . . . . . . .11
Soins à apporter à l’appareil . . . . . . . . . . . . . . . . . . . . . . . . . . . . . . . . . .12
Nettoyage . . . . . . . . . . . . . . . . . . . . . . . . . . . . . . . . . . . . . . . . . . . . . . . . . . . .12
Vérification du couteau . . . . . . . . . . . . . . . . . . . . . . . . . . . . . . . . . . . . . . . . . .12
Rangement . . . . . . . . . . . . . . . . . . . . . . . . . . . . . . . . . . . . . . . . . . . . . . . . . . .13
Réparations . . . . . . . . . . . . . . . . . . . . . . . . . . . . . . . . . . . . . . . . . . . . . . . . . .13
Conseils pratiques . . . . . . . . . . . . . . . . . . . . . . . . . . . . . . . . . . . . . . . . . .14
Liquides . . . . . . . . . . . . . . . . . . . . . . . . . . . . . . . . . . . . . . . . . . . . . . . . . . . . . .14
Utilisation du bouchon-mesure . . . . . . . . . . . . . . . . . . . . . . . . . . . . . . . . . . . .14
Aliments chauds . . . . . . . . . . . . . . . . . . . . . . . . . . . . . . . . . . . . . . . . . . . . . . .15
Quantités d’ingrédients . . . . . . . . . . . . . . . . . . . . . . . . . . . . . . . . . . . . . . . . . .15
Tableau des aliments . . . . . . . . . . . . . . . . . . . . . . . . . . . . . . . . . . . . . . . .16
Recettes . . . . . . . . . . . . . . . . . . . . . . . . . . . . . . . . . . . . . . . . . . . . . . . . . .18
Programme Frozen Drink (boisson frappée) . . . . . . . . . . . . . . . . . . . . . . . . . .18
Programme Milk Shake (lait fouetté) . . . . . . . . . . . . . . . . . . . . . . . . . . . . . . . .20
Programme Powder Drink (boisson en poudre) . . . . . . . . . . . . . . . . . . . . . . . .21
Programme Smoothie (frappé onctueux) . . . . . . . . . . . . . . . . . . . . . . . . . . . . .22
Programme Salsa (salsa) . . . . . . . . . . . . . . . . . . . . . . . . . . . . . . . . . . . . . . . .25
Programme Soup (soupe) . . . . . . . . . . . . . . . . . . . . . . . . . . . . . . . . . . . . . . . .27
Programme Baby Food (aliments pour bébés) . . . . . . . . . . . . . . . . . . . . . . . . .29
Programme Batter (pâte à crêpes) . . . . . . . . . . . . . . . . . . . . . . . . . . . . . . . . .31
Programme Nuts/Crumbs (noix et chapelure) . . . . . . . . . . . . . . . . . . . . . . . . .32
Accessoire . . . . . . . . . . . . . . . . . . . . . . . . . . . . . . . . . . . . . . . . . . . . . . . .34
Verre Blend-N-Go
TM
. . . . . . . . . . . . . . . . . . . . . . . . . . . . . . . . . . . . . . . . . . . . .34
Garantie limitée de deux ans . . . . . . . . . . . . . . . . . . . . . . . . . . . . . . . . . .35
Service prévu par la garantie . . . . . . . . . . . . . . . . . . . . . . . . . . . . . . . . . . . . .35

Bienvenue
1
Welcome
1
Congratulations on your purchase of an Oster
®
Model 6700-33 In2itive™
Blender/Food Processor. Your product includes the following technology and
features:
• An “In2itive
™
” technology takes the guesswork out of blending, giving you the
ability to make a variety of foods and drinks with consistent results every time.
•A user-friendly touchpad design walks you through the complete process,
whether you use the pre-programmed AUTOMATIC settings, the recipe section in
the instructions or your own recipes.
•A triple set of blades optimizes programmed food and drink preparation.
•A dynamic breaking function stops the blade quickly once the cycle is complete,
ensuring that the ingredients are not over processed.
•A 500-watt reversible motor keeps the ingredients near the blade by spinning at
very low speeds and gradually speeding up to the programmed level, ensuring
optimum results from smooth to chunky.
• MANUAL controls allow you to add additional time to AUTOMATIC programs or
allow you to operate MANUALLY for personal recipes.
•A PROGRESS indicator lets you estimate how much more programmed time
remains.
•A PAUSE/RESUME button lets you stop to add additional ingredients, then resume
at the same point to complete the AUTOMATIC program.
•A feeder cap lets you add ingredients without removing the jar lid.
Nous vous félicitons d’avoir porté votre choix sur un mélangeur-robot
culinaire In2itive
™ Oster
®
, modèle 6700-33, un appareil qui comprend la
technologie et les caractéristiques suivantes:
• La technologie de mélange «In2itive
™
» élimine les devinettes – elle vous permet
de travailler une variété de denrées et de boissons tout en obtenant des résultats
uniformes à tout coup.
• Un panneau de commande tactile convivial qui vous guide pas à pas, que vous
utilisiez les programmes AUTOMATIQUES, la section des recettes de cette notice
d’emploi ou vos propres recettes.
• Un couteau mixte à trois lames qui optimise la préparation des aliments et des
boissons quand vous avez recours aux programmes.
• Une fonction dynamique d’arrêt qui met rapidement le couteau au repos une
fois le cycle terminé afin que les ingrédients ne soient pas travaillés à l’excès.
• Un moteur réversible de 500 watts qui garde les ingrédients près du couteau
en tournant à de très basses vitesses puis en augmentant l’allure progressivement
jusqu’au niveau programmé, assurant l’obtention des résultats optimaux que vous
recherchiez un mélange homogène ou des ingrédients hachés.
• Des commandes MANUELLES qui vous permettent de prolonger la durée des
programmes automatiQUES et vous aident à contrôler manuEllEMENT l’appareil
pour l’exécution de vos recettes personnelles.
• Un indicateur de PROGRESSION grâce auquel vous pouvez estimer la durée
programmée restante.
• Un bouton ARRÊT-REPRISE très pratique pour ajouter des ingrédients puis
reprendre au même point pour terminer le programme AUTOMATIQUE.
• Un bouchon-mesure amovible grâce auquel il est possible d’ajouter des ingrédients
sans retirer le couvercle du récipient.

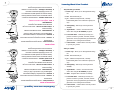
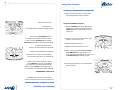
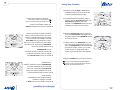
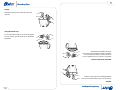
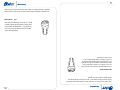
Learning About Your Product
2
Familiarisez-vous avec l’appareil
2
Polycarbonate Jar Models
1. Feeder Cap – Allows you to add ingredients during
use.
2. Lid – Seals the blender jar.
3. Jar – Made from Polycarbonate, a virtually
indestructible plastic. Has a maximum capacity of 6
cups.
4. Sealing Ring – Seals the jar to the triple blade
assembly.
5. Triple Blades – Creates a forward and reverse
action when using the AUTOMATIC programs.
6. Low Profile Base – Holds the jar securely in 6
positions. Contains a powerful, reversible, variable
speed motor. It uses programmed logic that takes the
guesswork out of creating foods and drinks.
7. Control Panel – Contains all the necessary controls
to operate your product.
Glass Jar Models
1. Feeder Cap – Allows you to add ingredients during
use.
2. Lid – Seals the blender jar.
3. Jar – Made from Polycarbonate, a virtually
indestructible plastic. Has a maximum capacity of 6
cups.
4. Sealing Ring – Seals the jar to the triple blade
assembly.
5. Triple Blades – Creates a forward and reverse
action when using the AUTOMATIC programs.
6. Skirt – Designed with a wide base for stability.
7. Low Profile Base – Holds the jar securely in 6
positions. Contains a powerful, reversible, variable
speed motor. It uses programmed logic that takes the
guesswork out of creating foods and drinks.
8. Control Panel – Contains all the necessary controls
to operate your product.
PulsePause
Resume
Low High
FOOD DRINK
MANUAL
SPEEDS
START
STOP
POWER
PROGRESS
AUTO
FOOD
AUTO
DRINK
Smoothie
Frozen
Drink
Powder
Drink
Ice
Crush
Milk
Shake
Nuts/
Crumbs
Soup
Baby
Food
Salsa
Batter
1
2
3
4
6
5
7
PulsePause
Resume
Low High
FOOD DRINK
MANUAL
SPEEDS
START
STOP
POWER
PROGRESS
AUTO
FOOD
AUTO
DRINK
Smoothie
Frozen
Drink
Powder
Drink
Ice
Crush
Milk
Shake
Nuts/
Crumbs
Soup
Baby
Food
Salsa
Batter
1
2
3
4
6
5
7
Polycarbonate Jar Models
1. Bouchon-mesure – Permet d’ajouter des ingrédients durant le
fonctionnement.
2. Couvercle – Ferme le récipient pour prévenir les éclaboussures.
3. Récipient – En polycarbonate, un plastique pratiquement
indestructible. Il a une contenance de 1,5 litre ou 6 tasses.
4. Joint d’étanchéité – Assure l’herméticité de l’ensemble
récipient et couteau.
5. Couteau mixte à trois lames – Tourne dans un sens puis
dans l’autre lors de l’utilisation des programmes
AUTOMATIQUES.
6. Socle-moteur surbaissé – Tient fermement le récipient à 6
positions. Renferme un moteur puissant, réversible et à vitesse
variable. Sa logique programmée élimine toute devinette en ce
qui concerne la préparation d’aliments et de boissons.
7. Panneau de commande – Comporte toutes les commandes
nécessaires au bon fonctionnement de l’appareil.
Glass Jar Models
1. Bouchon-mesure – Permet d’ajouter des ingrédients durant le
fonctionnement.
2. Couvercle – Ferme le récipient pour prévenir les éclaboussures.
3. Récipient – En polycarbonate, un plastique pratiquement
indestructible. Il a une contenance de 1,5 litre ou 6 tasses.
4. Joint d’étanchéité – Assure l’herméticité de l’ensemble
récipient et couteau.
5. Couteau mixte à trois lames – Tourne dans un sens puis
dans l’autre lors de l’utilisation des programmes
AUTOMATIQUES.
6. Skirt – Designed with a wide base for stability.
7. Socle-moteur surbaissé – Tient fermement le récipient à 6
positions. Renferme un moteur puissant, réversible et à vitesse
variable. Sa logique programmée élimine toute devinette en ce
qui concerne la préparation d’aliments et de boissons.
8. Panneau de commande – Comporte toutes les commandes
nécessaires au bon fonctionnement de l’appareil.
PulsePause
Resume
Low High
FOOD DRINK
MANUAL
SPEEDS
START
STOP
POWER
PROGRESS
AUTO
FOOD
AUTO
DRINK
Smoothie
Frozen
Drink
Powder
Drink
Ice
Crush
Milk
Shake
Nuts/
Crumbs
Soup
Baby
Food
Salsa
Batter
1
2
3
4
6
5
7
PulsePause
Resume
Low High
FOOD DRINK
MANUAL
SPEEDS
START
STOP
POWER
PROGRESS
AUTO
FOOD
AUTO
DRINK
Smoothie
Frozen
Drink
Powder
Drink
Ice
Crush
Milk
Shake
Nuts/
Crumbs
Soup
Baby
Food
Salsa
Batter
1
2
3
4
6
5
7

Familiarisez-vous avec l’appareil
3
Learning About Your Product
3
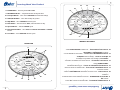
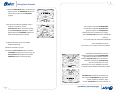
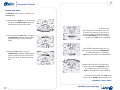
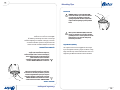
8. POWER Button – Turns the product On and Off.
9. PROGRESS Indicator – A segmented bar fills showing the status.
10. Touchpad Buttons – Use to select AUTOMATIC food and drink settings.
11. START/STOP Button – Use to Start and Stop the product.
12. High Button – Use to MANUALLY increase speed.
13. Pulse Button – Press and hold to Pulse, release the button to Stop.
14. Speed Indicator – Indicates MANUAL speed.
15. Pause/Resume Button – Use to Pause and Resume AUTOMATIC or MANUAL
function.
16. Low Button – Use to MANUALLY decrease speed.
PulsePause
Resume
Low High
FOOD DRINK
MANUAL
SPEEDS
START
STOP
POWER
PROGRESS
AUTO
FOOD
AUTO
DRINK
Smoothie
Frozen
Drink
Powder
Drink
Ice
Crush
Milk
Shake
Nuts/
Crumbs
Soup
Baby
Food
Salsa
Batter
8
9
10
11
12
13
14
15
16
Control Panel
PulsePause
Resume
Low High
FOOD DRINK
MANUAL
SPEEDS
START
STOP
POWER
PROGRESS
AUTO
FOOD
AUTO
DRINK
Smoothie
Frozen
Drink
Powder
Drink
Ice
Crush
Milk
Shake
Nuts/
Crumbs
Soup
Baby
Food
Salsa
Batter
8
9
10
11
12
13
14
15
16
Panneau de commande
8. Touche POWER (alimentation) – Met l’appareil sous tension (On) et hors
tension (Off).
9. Indicateur DE PROGRESSION – Une barre segmentée montre le déroulement de
l’opération.
10. Touches tactiles – Pour choisir les programmes AUTOMATIQUES et préparer
denrées et boissons.
11. Touche START/STOP (marche-arrêt) – Met l’appareil en marche et l’arrête.
12. Touche HIGH (augmentation de vitesse) – Vous permet d’augmenter
MANUELLEMENT l’allure.
13. Touche Pulse (impulsions) – Vous la pressez pour travailler le contenu par
impulsions et la relâchez pour mettre fin aux impulsions.
14. Indicateur de vitesse – Indique la vitesse MANUELLE.
15. Touche PAUSE/RESUME (arrêt-reprise) – Cette touche est utilisable avec les
fonctions AUTOMATIQUES et MANUELLES.
16. Touche LOW (ralentissement) – Pour réduire MANUELLEMENT l’allure.

Using Your Product
4
Before you use the product for the first time, separate
the lid, feeder cap, blades and sealing ring from the
jar. Wash in warm, soapy water. Rinse and dry well.
Assembly (Polycarbonate Jar Models)
1 Check to ensure the sealing ring is properly
seated in the channel surrounding the triple
blades. Caution: Blades are sharp. Handle
them carefully.
2 Hold the jar upright and position the plastic part
with the triple blades and sealing ring into the
bottom of the jar. Twist until the gray sealing ring
begins to compress.
3 Turn the jar upside down.
4 Turn the triple blades upside down and twist them
into the bottom of the jar. You can use the feeder
cap as a tool to twist the blades securely in place.
Be sure the triple blades are locked securely to
the jar before using.
5 Wrap the power cord around the cord storage
area on the base of the blender until the cord is
the length you desire.
6 Slide the jar onto the base.
7 Plug the power cord into a standard household
120/127-volt, 60 Hz. AC outlet. You are now ready
to start.
Pause
Resume
Pulse
Low High
FOOD DRINK
MANUAL
SPEEDS
START
STOP
POWER
PROGRESS
AUTO
FOOD
AUTO
DRINK
Smoothie
Frozen
Drink
Powder
Drink
Ice
Crush
Milk
Shake
Nuts/
Crumbs
Soup
Baby
Food
Salsa
Batter
Mode d’emploi de l’appareil
4
Pause
Resume
Pulse
Low High
FOOD DRINK
MANUAL
SPEEDS
START
STOP
POWER
PROGRESS
AUTO
FOOD
AUTO
DRINK
Smoothie
Frozen
Drink
Powder
Drink
Ice
Crush
Milk
Shake
Nuts/
Crumbs
Soup
Baby
Food
Salsa
Batter
Avant la toute première utilisation, démontez le
couvercle, le bouchon-mesure, le couteau, le joint
d’étanchéité et le récipient puis lavez-les à l’eau
savonneuse chaude. Rincez-les et asséchez-les.
Assemblage
1 Assurez-vous que le joint d’étanchéité soit
parfaitement placé dans la rainure qui entoure le
couteau à trois lames. Attention: Le couteau
est très tranchant. Maniez-le prudemment.
2 Tenez le récipient droit et positionnez la pièce de
plastique dotée du couteau triple et du joint
d’étanchéité au fond du récipient. Tournez
jusqu’à ce que vous commenciez à comprimer le
joint d’étanchéité gris.
3 Retournez le récipient.
4 Retournez le couteau et posez-le avec un
mouvement de torsion sur l’embouchure du
récipient. Vous pouvez utiliser le bouchon-mesure
pour placer convenablement le couteau.
Veillez à ce que le couteau à trois lames soit
solidement bloqué au récipient avant l’utilisation.
5 Enroulez l’excédent de cordon autour de
l’enrouleur, à la partie inférieure du socle-
moteur, jusqu’à ce qu’il ne reste que la longueur
requise.
6 Placez le récipient sur le socle-moteur.
7 Branchez le cordon sur une prise de courant
alternatif de 120/127 volts, 60 Hz. Vous pouvez
maintenant commencer à utiliser le mélangeur.
La page charge ...

Using Your Product
6
Utilisation de l’appareil
6
Removing the TRIPLE BLADES and SEALING RING
1 Follow the instructions above in reverse order,
but turn triple blades counter-clockwise.
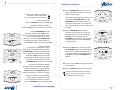
Using the AUTOMATIC Programs
1 Press the POWER button. All the lights blink on
briefly, and you will hear a greeting sound. The
POWER light stays on, meaning the product is
ready to use.
2 Choose a recipe from the recipe section of this
manual or use one of your own.
3 Put the ingredients into the jar.
4 Make sure the lid and feeder cap are on.
5 Press one of the programmed AUTO FOODS or
AUTO DRINKS buttons appropriate for your
recipe. A selection light confirms your choice and
the START/STOP light will blink. program.
6 To change your selection, press another button.
Cont’d. next page
Pause Pulse
START
STOP
POWER
PROGRESS
Frozen
Drink
Ice
Cru
Milk
Shake
Nuts/
Crumbs
Baby
Food
ter
PulsePause
Resume
Low High
FOOD DRINK
MANUAL
START
STOP
PROGRESS
AUTO
OOD
Froze
Drin
Milk
Shake
Nuts/
Crumbs
p
Baby
Food
Batter
Retrait du COUTEAU et du JOINT D’ÉTANCHÉITÉ
1 Inversez la marche à suivre préconisée ci-dessus
mais tournez le couteau en sens antihoraire.
Programmes AUTOMATIQUES
1 Mettez l’appareil sous tension en appuyant sur la
touche d’alimentation POWER. Tous les voyants
clignoteront brièvement et vous entendrez une
tonalité d’accueil. Le voyant POWER restera
allumé – l’appareil est alors prêt à l’emploi.
2 Choisissez une recette parmi celles qui sont
données dans cette notice, ou l’une des vôtres.
3 Mettez les ingrédients dans le récipient.
4 Fermez le récipient à l’aide du couvercle
(pourvu du bouchon-mesure).
5 Appuyez sur la touche programmée AUTO FOOD
(aliment) ou AUTO DRINK (boisson), selon la
recette. Un témoin confirmera votre sélection et
le voyant START/STOP (marche-arrêt)
6 Pour changer la sélection, il suffit d’appuyer sur
une autre touche.
(suite à la page suivante)
Pause Pulse
START
STOP
POWER
PROGRESS
Frozen
Drink
Ice
Cru
Milk
Shake
Nuts/
Crumbs
Baby
Food
ter
PulsePause
Resume
Low High
FOOD DRINK
MANUAL
START
STOP
PROGRESS
AUTO
OOD
Froze
Drin
Milk
Shake
Nuts/
Crumbs
p
Baby
Food
Batter

Utilisation de l’appareil
7
Using Your Product
7
7
Press the START/STOP button. The product will
begin to operate. The PROGRESS indicator bar
will show the progress of the AUTOMATIC
program.
8 To pause and add more ingredients, while a
program is in progress, press the
Pause/Resume button. The product will stop
and the Pause/Resume light blinks. The last
filled segment in the PROGRESS indicator bar
blinks, showing the product is paused.
9 Remove the feeder cap or lid to add the
additional ingredients.
10 Secure the feeder cap or lid.
11 Press the Pause/Resume button to finish the
AUTOMATIC program cycle of your recipe. The
Pause/Resume button light turns off and the
PROGRESS indicator continues growing.
PulsePause
Resume
START
STOP
POWER
PROGRESS
O
D
AU
DR
Frozen
Drink
Ice
Cru
Milk
Shake
Nuts/
Crumbs
Baby
Food
ter
Pulse
Low High
FOOD DRINK
START
STOP
POWER
PROGRESS
O
D
AU
DRI
S
Frozen
Drink
Ice
Crus
Milk
Shake
Nuts/
Crumbs
Baby
Food
er
Pause
Resume
PulsePause
Resume
START
STOP
POWER
PROGRESS
O
D
AU
DR
Frozen
Drink
Ice
Cru
Milk
Shake
Nuts/
Crumbs
Baby
Food
ter
Pulse
Low High
FOOD DRINK
START
STOP
POWER
PROGRESS
O
D
AU
DRI
S
Frozen
Drink
Ice
Crus
Milk
Shake
Nuts/
Crumbs
Baby
Food
er
Pause
Resume
7 Appuyez sur la touche START/STOP (marche-
arrêt). L’appareil se mettra en marche.
L’indicateur de PROGRESSION montrera l’état
de l’opération du programme AUTOMATIQUE.
8 Pour interrompre temporairement l’opération et
ajouter des ingrédients, alors que le programme
est en cours, appuyez sur la touche
Pause/Resume (arrêt-reprise). L’appareil
s’arrêtera et le voyant Pause/Resume clignotera.
Le dernier segment rempli de l’indicateur de
PROGRESSION clignotera également, signalant
lui aussi l’arrêt passager du programme.
9 Retirez le bouchon-mesure ou le couvercle pour
ajouter les ingrédients voulus.
10 Replacez sûrement le bouchon-mesure ou le
couvercle.
11 Appuyez sur la touche Pause/Resume (arrêt-
reprise) pour terminer le cycle du programme
AUTOMATIQUE. Le voyant de la touche
Pause/Resume s’éteindra et l’indicateur de
PROGRESSION continuera à donner l’état.

Using Your Product
8
Utilisation de l’appareil
8
PulsePause
START
STOP
POWER
PROGRESS
S
Frozen
Drink
Ice
Crus
Milk
Shake
Nuts/
Crumbs
Baby
Food
er
Pause
Resume
Low High
START
STOP
POWER
PROGRESS
TO
OD
AU
DR
Frozen
Drink
Ice
Cru
Milk
Shake
Nuts/
Crumbs
Baby
Food
ter
Pulse
PulsePause
START
STOP
POWER
PROGRESS
Frozen
Drink
Ic
Cr
Milk
Shake
Nuts/
Crumbs
Baby
Food
tter
12 Press the START/STOP button to cancel the
program at any time. You will hear a tone as the
blender returns to ready.
Once the program is finished, you will hear a tone
as the product AUTOMATICALLY stops. The
PROGRESS indicator will flash for about 20
seconds. You will then hear a second tone and
the product will exit the program, returning to the
ready state.
13 While the PROGRESS indicator flashes,
and before the second tone, you can process
ingredients longer by pressing and holding in
the Pulse button. During Pulse a single
PROGRESS indicator segment “runs” from left
to right. Be careful you do not over-process
your food or drinks.
14 Release the Pulse button when you are done.
The PROGRESS indicator bar will again flash for
about 20 seconds before resetting the unit. You
can continue Pulsing by pressing and holding in
the Pulse button while the PROGRESS bar is
flashing.
15 If you do not press Pulse, the product will return
to the ready state.
16 Press the POWER button to turn the product off.
If the jar is ever removed from the base while the
product is running, the motor will stop as quickly as
possible and 3 error tones will sound.
PulsePause
START
STOP
POWER
PROGRESS
S
Frozen
Drink
Ice
Crus
Milk
Shake
Nuts/
C
rumbs
Baby
Food
r
Pause
Resume
Low High
START
STOP
POWER
PROGRESS
O
D
A
U
D
R
Frozen
Drink
Ic
e
Cr
u
Milk
Shake
Nuts/
Crumbs
Baby
Food
t
er
Pulse
PulsePause
START
STOP
POWER
PROGRESS
Frozen
Drink
I
c
Cr
Milk
Shake
Nuts/
Crumbs
Baby
Food
t
ter
12 Appuyez sur la touche START/STOP (marche-
arrêt) pour annuler le programme, si vous le
désirez. Une tonalité vous signalera que le
mélangeur est de nouveau prêt à fonctionner.
En fin de programme, vous entendrez la tonalité
d’arrêt AUTOMATIQUE. L’indicateur D’ÉTAT
clignotera environ 20 secondes. Une nouvelle
tonalité tintera, signalant la fin du programme et
l’aptitude du mélangeur à fonctionner.
13 Alors que l’indicateur de PROGRESSION
clignote, et avant la deuxième tonalité, vous
pouvez prolonger le travail des ingrédients en
appuyant sur la touche Pulse (impulsions).
Pendant ce fonctionnement intermittent, un seul
des segments de l’indicateur de PROGRESSION
fournit le déroulement de gauche à droite. Veillez
surtout à ne pas travailler vos aliments ou
boissons à l’excès.
14 Relâchez la touche d’impulsions Pulse quand
vous désirez arrêter. La barre de l’indicateur de
PROGRESSION clignotera environ 20 secondes
avant le retour à l’état initial. Vous pouvez
continuer à travailler par impulsions en enfonçant
la touche Pulse sans la relâcher alors que la
barre de PROGRESSION clignote.
15 Si vous n’enfoncez pas la touche Pulse, l’appareil
reviendra à l’état prêt à l’utilisation.
16 Appuyez sur la touche POWER pour mettre
l’appareil hors tension.
Si le récipient est retiré de sa base au cours du
fonctionnement, le moteur s’arrêtera très
rapidement et 3 tonalités d’erreur retentiront.

Utilisation de l’appareil
9
Using Your Product
9
PulsePause
Resume
Low High
FOOD DRINK
MANUAL
SPEEDS
START
STOP
AUTO
OOD
Froze
Drin
Milk
Shake
Nuts/
Crumbs
p
Baby
Food
PulsePause
Resume
START
STOP
POWER
PROGRESS
O
D
AU
DRI
S
Frozen
Drink
Ice
Crus
Milk
Shake
Nuts/
Crumbs
Baby
Food
er
PulsePause
Resume
ow High
FOOD DRINK
MANUAL
SPEEDS
START
STOP
AUTO
DRINK
Smooth
Frozen
Drink
Po
D
Milk
Shake
/
bs
Baby
ood
Utilisation MANUELLE
«Low» (bas), «High» (haut) et «Pulse»
(impulsions) sont les touches MANUELLES. Ces
touches sont destinées à la préparation de vos recettes
personnelles et vous servent également à prolonger le
travail une fois le programme terminé.
1 Appuyez sur la touche POWER (alimentation).
2 Mettez vos ingrédients dans le récipient.
3 Placez le couvercle et le bouchon-mesure.
Utilisation des touches «Low» et «High»
1 Appuyez sur le touches «Low» (bas) et «High»
(haut) selon que vous désirez une allure plus
lente ou plus rapide. Le voyant START/STOP
(marche-arrêt) clignotera, indiquant que
l’appareil est prêt à fonctionner.
Utilisez les réglages les plus bas pour les
aliments, les plus hauts, pour les boissons.
2 Appuyez sur la touche START/STOP pour mettre
l’appareil en marche. Un seul segment de la
barre de PROGRESSION sera activé et le
mélangeur fonctionnera à la vitesse qu’indique
les voyants de vitesse.
3 Pour ajuster la vitesse au cours du
fonctionnement, il suffit d’appuyer sur la touche
Low (bas) ou High (haut).
PulsePause
Resume
Low High
FOOD DRINK
MANUAL
SPEEDS
START
STOP
A
UTO
OOD
Froz
e
Drin
Milk
Shake
Nuts/
Crumbs
p
Baby
Food
PulsePause
Resume
START
STOP
POWER
PROGRESS
O
D
A
U
DR
I
S
Frozen
Drink
Ice
Cru
s
Milk
Shake
Nuts/
Crumbs
Baby
Food
e
r
PulsePause
Resume
o
w High
FOOD DRINK
MANUAL
SPEEDS
START
STOP
AUTO
DRINK
Smoot
h
Frozen
Drink
P
o
D
Milk
Shake
/
b
s
aby
o
od
Using MANUALLY
The MANUAL buttons include, Low, High and Pulse.
Use these buttons for personal recipes or to continue
mixing after a program is finished.
1 Press the POWER button.
2 Add your ingredients.
3 Secure the lid and feeder cap.
Using the Low and High Buttons
1 Press the Low or High button to run the product
at a slower or faster speed. You will see the
START/STOP light blink indicating that the
product is ready to start.
Use lower settings for food, higher settings for
drinks.
2 Press the START/STOP button to start the
product. A single segment travels in the
PROGRESS indicator bar and the product will
run at the speed shown by the speed indicator
lights.
3 To adjust the speed while the product is running,
press the Low or High buttons.

Using Your Product
10
Utilisation de l’appareil
10
Pulse
Low High
START
STOP
POWER
PROGRESS
O
D
AU
DRI
S
Frozen
Drink
Ice
Crus
Milk
Shake
Nuts/
Crumbs
Baby
Food
er
Pause
Resume
PulsePause
Resume
START
STOP
POWER
PROGRESS
TO
OD
A
DR
Frozen
Drink
Ic
Cru
Milk
Shake
Nuts/
Crumbs
Baby
Food
tter
4 Continue to press the High or Low buttons to
gradually speed up or slow down the product,
as shown by the speed indicator lights.
5 To pause and add more ingredients, while in
progress, press the Pause/Resume button. The
Pause/Resume light blinks. One of the
segments on the PROGRESS indicator bar stops
and blinks, showing the product is paused.
6 Press the Pause/Resume button to finish your
recipe. The Pause/Resume button light turns off.
The paused segment on the PROGRESS indicator
bar continues to travel.
7 When you finish, press START/STOP. You will
hear a tone and the product will be ready to use
again. The START/STOP light will flash indicating
the product is ready to operate. You can make
another selection or change speeds. After 1
minute, the product will reset to the ready state.
8 Press the POWER button to turn the product off.
If the jar is ever removed from the base while the
product is running, the motor will stop as quickly as
possible and 3 error tones will sound.
Pulse
Low High
START
STOP
POWER
PROGRESS
O
D
AU
DR
I
S
Frozen
Drink
Ice
Cru
s
Milk
Shake
Nuts/
C
rumbs
Baby
Food
e
r
Pause
Resume
PulsePause
Resume
START
STOP
POWER
PROGRESS
T
O
O
D
A
D
R
Frozen
Drink
I
c
Cr
u
Milk
Shake
Nuts/
Crumbs
Baby
Food
t
ter
4 Continuez à appuyer sur les touches High ou
Low pour augmenter ou diminuer
progressivement la vitesse qu’indiquent les
voyants de vitesse.
5 Pour arrêter le mélange temporairement et
ajouter des ingrédients, appuyez sur la touche
Pause/Resume (arrêt-reprise). Son voyant
clignotera. L’un des segments de la barre de
PROGRESSION s’arrêtera et clignotera, signalant
un arrêt passager.
6 Appuyez sur la touche Pause/Resume pour
terminer la recette. Son témoin s’éteindra. Le
déroulement reprendra au segment d’arrêt de la
barre de PROGRESSION.
7 Le travail fini, appuyez sur la touche
START/STOP (marche-arrêt). Une tonalité vous
signalera alors que l’appareil est de nouveau prêt
à servir. Le témoin de la touche START/STOP
clignotera, indiquant que l’appareil est prêt à
fonctionner. Vous êtes libre de faire un nouveau
choix ou de changer de vitesse. Après 1 minute,
l’appareil reviendra à l’état prêt à fonctionner.
8 Appuyez sur la touche d’alimentation POWER
pour mettre le mélangeur hors tension.
Si le récipient est retiré de sa base au cours du
fonctionnement, le moteur s’arrêtera très
rapidement et 3 tonalités d’erreur retentiront.

Utilisation de l’appareil
11
Using Your Product
11
Pause
Resume
Low High
START
STOP
POWER
PROGRESS
O
D
AU
DR
Frozen
Drink
Ice
Cru
Milk
Shake
Nuts/
Crumbs
Baby
Food
ter
Pulse
Pause
Resume
Pulse
START
STOP
POWER
PROGRESS
O
D
AU
DR
S
Frozen
Drink
Ice
Crus
Milk
Shake
Nuts/
Crumbs
Baby
Food
er
PulsePause
Resume
Low High
FOOD DRINK
MANUAL
SPEEDS
START
STOP
O
D
AU
DR
Frozen
Drink
Milk
Shake
Nuts/
Crumbs
Baby
Food
Touche «Pulse» (impulsions)
Lors du fonctionnement MANUEL, servez-vous de la
touche Pulse pour obtenir de brèves impulsions.
1 Appuyez sur les touches Low (bas) ou High
(haut) pour choisir l’allure appropriée. Le
témoin START/STOP (marche-arrêt) clignotera
pour indiquer que l’appareil est prêt à démarrer.
2 Appuyez de façon continue sur la touche Pulse
(impulsions). Un segment de la barre de
PROGRESSION se déroulera de gauche à droite
au cours du fonctionnement au réglage choisi.
3 Relâchez la touche Pulse pour arrêter les
impulsions. Le témoin START/STOP clignotera,
indiquant que l’appareil est de nouveau prêt à
servir. Si vous ne le remettez pas en marche au
cours de la minute qui suit, il reviendra à l’état
prêt à fonctionner.
Pause
Resume
Low High
START
STOP
POWER
PROGRESS
O
D
AU
DR
Frozen
Drink
Ice
Cru
Milk
Shake
Nuts/
Crumbs
Baby
Food
ter
Pulse
Pause
Resume
Pulse
START
STOP
POWER
PROGRESS
O
D
AU
DR
S
Frozen
Drink
Ice
Crus
Milk
Shake
Nuts/
Crumbs
Baby
Food
er
PulsePause
Resume
Low High
FOOD DRINK
MANUAL
SPEEDS
START
STOP
O
D
AU
DR
Frozen
Drink
Milk
Shake
Nuts/
Crumbs
Baby
Food
Using the Pulse Button
To MANUALLY run the product in short bursts, use
the Pulse button.
1 Press the Low or High button to select a desired
speed level. The START/STOP light will flash to
indicate that the product is ready to start.
2 Press and hold in the Pulse button. A segment on
the PROGRESS indicator bar travels from left to
right as the product pulses at your selected
setting.
3 Release the Pulse button to stop. The
START/STOP light will blink, indicating that the
product is ready to start. If you do not use the
product for 1 minute, it will reset to the ready
state.

Using Your Product
12
Utilisation de l’appareil
12
POWER
PROGRESS
Ice
Crush
lk
Batter
4 Press the POWER button to turn the product off.
After Use
1 Lift the jar straight up from the base, remove the
lid and empty the jar.
2 If neccessary, use a rubber spatula to scrape
foods away from the sides of the jar.
Cleaning (Polycarbonate Jar Models)
Release the triple blades from the bottom of the jar by
turning counterclockwise. If necessary, use the feeder
cap as a tool to help remove the triple blades. The
feeder cap, lid, jar and blades are dishwasher safe.
Use the top rack of the dishwasher for the feeder cap,
lid and triple blades. Place sealing ring in bottom
basket of dishwasher.
You can also wash the parts in warm, soapy water.
Rinse well and dry. Wipe the base with a soft, damp
cloth to clean. Never submerge the low profile base in
a liquid.
Check the parts as you put them back together.
Make sure the feeder cap and lid fit tightly on the jar.
POWER
PROGRESS
Ice
Crush
Batter
4 Appuyez sur la touche d’alimentation POWER
pour mettre le mélangeur hors tension.
Après l’utilisation
1 Levez le récipient tout droit pour le sortir de la
base, retirez le couvercle et videz le récipient.
2 Si nécessaire, servez-vous d’une spatule de
caoutchouc pour racler le mélange qui adhère à
la paroi du récipient.
Nettoyage (Polycarbonate Jar Models)
Débloquez et retirez le couteau à trois lames du fond
du récipient en le tournant en sens antihoraire.
Servez-vous si nécessaire du bouchon-mesure pour le
desserrer. Le bouchon-mesure, le couvercle, le
récipient et le couteau sont lavables en machine (le
bouchon-mesure, le couvercle et le couteau
uniquement dans le panier supérieur du lave-
vaisselle). Placez le joint d’étanchéité dans le panier
du bas du lave-vaisselle.
Vous pouvez, bien sûr, laver les pièces à l’eau
savonneuse chaude si vous le préférez. Rincez-les bien
puis asséchez-les à fond. Passez un linge doux et
légèrement humidifié sur la base pour la nettoyer.
N’immergez surtout jamais la base surbaissée du
mélangeur.

Soins à apporter à l’appareil
13
Caring for Your Product
13
Cleaning (Glass Jar Models)
Release the triple blades from the bottom of the
jar by turning the skirt counterclockwise. The
lid, lid-within-a-lid, jar, blade, and skirt are
dishwasher safe. Use the top rack of the
dishwasher for the lid, lid-within-a-lid, multi-
functional blade, and skirt. Place sealing ring in
bottom basket of dishwasher.
You can also wash the parts in warm, soapy
water. Rinse well and dry. Wipe the base with a
soft, damp cloth to clean. Never submerge the low
profile base in a liquid.
Check the parts as you put them back together.
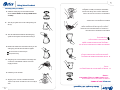
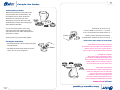
Checking the Triple Blades
•Turn the triple blades as shown, being careful of the
sharp blade edges.
• The blades should turn freely. If they are stuck or
hard to turn, do not use the product.
Nettoyage (Glass Jar Models)
Release the triple blades from the bottom of the
jar by turning the skirt counterclockwise. The
lid, lid-within-a-lid, jar, blade, and skirt are
dishwasher safe. Use the top rack of the
dishwasher for the lid, lid-within-a-lid, multi-
functional blade, and skirt. Place sealing ring in
bottom basket of dishwasher.
Vous pouvez, bien sûr, laver les pièces à l’eau
savonneuse chaude si vous le préférez. Rincez-
les bien puis asséchez-les à fond. Passez un linge
doux et légèrement humidifié sur la base pour la
nettoyer. N’immergez surtout jamais la base
surbaissée du mélangeur.
Examinez soigneusement les pièces lorsque vous les
remontez. Assurez-vous que le couvercle s’adapte
impeccablement sur l’embouchure du récipient et que
le bouchon-mesure ferme hermétiquement.
Vérification du couteau mixte à trois lames
•Tournez le couteau tel qu’illustré, prudemment car
les bords de ses branches sont très coupants.
• Le couteau devrait tourner librement. Si ce n’est
pas le cas – s’il est coincé ou difficile à tourner –
ne vous servez pas du mélangeur.

Caring for Your Product
14
Soins à apporter à l’appareil
14
Rangement
Remontez le mélangeur pour le ranger.
AVERTISSEMENT: Ne mettez jamais le récipient,
ou les autres pièces au four à micro-ondes.
Transvasez aliments et boissons – ne les
réfrigérez jamais dans le récipient.
Réparations
En cas de panne, ne confiez votre mélangeur qu’à un
centre de service agréé Oster
®
. Ne vous servez que de
pièces de remplacement Oster
®
.
Consultez la section «Service prévu par la
garantie» en page 35.
Pause
Resume
Pulse
Low High
FOOD DRINK
MANUAL
SPEEDS
START
STOP
POWER
PROGRESS
AUTO
FOOD
AUTO
DRINK
Smoothie
Frozen
Drink
Powder
Drink
Ice
Crush
Milk
Shake
Nuts/
Crumbs
Soup
Baby
Food
Salsa
Batter
Storing
Reassemble the blender for storage.
WARNING Never put the jar, or any other
parts, in a microwave oven. Never store foods
or drinks in the jar.
Servicing
If repairs are needed send your appliance only to
an Authorized Oster
®
Appliance Service Center.
Use only Oster
®
replacement parts.
See How to obtain warranty service on
page 35.
Pause
Resume
Pulse
Low High
FOOD DRINK
MANUAL
SPEEDS
START
STOP
POWER
PROGRESS
AUTO
FOOD
AUTO
DRINK
Smoothie
Frozen
Drink
Powder
Drink
Ice
Crush
Milk
Shake
Nuts/
Crumbs
Soup
Baby
Food
Salsa
Batter

Conseils pratiques
15
Blending Tips
15
Liquides
À moins que la recette n’indique autrement, placez les
ingrédients liquides en premier dans le récipient.
Utilisation du bouchon-mesure
N’enlevez le couvercle sous aucun prétexte au cours
du fonctionnement, le mélange risquerait de vous
éclabousser. Enlevez plutôt le bouchon-mesure pour
ajouter les ingrédients de faible taille.
Liquids
Put liquids into the jar first, unless the recipe says
otherwise.
Using the Feeder Cap
Do not remove the lid while in use. Food may splatter
if you do. Instead, open the feeder cap to add smaller
ingredients.

Blending Tips
16
Conseils pratiques
16
Hot Foods
WARNING When you work with HOT FOODS,
remove the feeder cap to vent steam. Tilt the
cap away from you partially covering the
opening. Keep hands and other exposed skin
away from the lid opening to prevent possible
burns.
When you work with HOT LIQUIDS, remove the
feeder cap and start at a Low speed, and then
gradually increase to a faster speed. Do not add
liquid over the 4 cup (1L) level. Always keep
hands away from steam.
Ingredients Quantity
Use only the amount of food suggested in the recipes.
If you want greater amounts, prepare in batches. Using
larger amounts may overload and strain the motor. You
might also get different results from those described.
Aliments chauds
AVERTISSEMENT: Enlevez le bouchon-mesure
quand vous mélangez des ALIMENTS CHAUDS,
afin que la vapeur puisse s’échapper. Inclinez le
bouchon pour fermer partiellement l’ouverture
de façon à éloigner la vapeur de vos mains et de
votre peau. La vapeur risquerait de vous brûler.
En présence de LIQUIDES CHAUDS, retirez le
bouchon-mesure, faites démarrer l’appareil à
petite vitesse puis augmentez l’allure
progressivement. Le niveau du liquide ne doit
pas dépasser 4 tasses (1 litre). Éloignez toujours
vos mains de la trajectoire de la vapeur.
Quantités d’ingrédients
Observez les quantités indiquées dans les recettes.
Ne surchargez pas le moteur, mélangez à plusieurs
reprises si nécessaire. Dépasser les quantités indiquées
fait peiner le moteur et entraîne des résultats qui
diffèrent de ceux que vous escomptez.

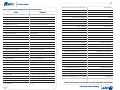
Tableau des aliments
17
Foods Chart
17
FOOD QUANTITY
Almonds, whole 1/2 cup
Apricots, dried 1 cup + 1 Tbs. flour or sugar
Apple 1 medium, cut into 4 pcs.
Basil leaves, fresh 1 cup, packed, tough stems removed
Breadcrumbs, hard or soft 2-3 slices bread; by hand, tear into jar
Cabbage, green/red 1/4 medium head, cut into 4 pcs.
Carrot 1 large, cut into 6 pcs.
Celery 1 stalk, cut into 4 pcs.
Cilantro/fresh Coriander 1 cup, packed
Cheese, Parmesan or Romano 4 oz.; by hand, break into jar
Citrus Peel (lemon, lime, orange) Peel of 1 large fruit + 1 Tbs. flour or sugar
Coconut 1 chunk, about 2 oz.
Cookies/Crackers, except Gingersnaps 18 - 20
Coffee Beans 1 cup
Cranberries, fresh or frozen 1 cup
Cranberries or Cherries, dried 1 cup + 1 Tbs. flour or sugar
Cucumbers or Zucchini 1 medium, cut into 8 pcs.
Dill, fresh 1 cup, packed
Garlic, peeled 5 medium cloves
Gingersnap cookies 12 - 14; by hand break into jar
Onion, white, red or yellow 1/2 large, cut into 2 pcs.
Parsley, fresh, curly or Italian 1 cup packed
Peanuts, oil roasted 1 cup
Peanuts, dry roasted 1 cup
Pecans, halves 1/2 cup
Peppers, bell 1 medium, cut into 4 pcs.
Peppers, chilies 2 - 3 small or 1 large, cut into 4 pcs.
Raisins 1 cup + 1 Tbs. flour or sugar
Tomatoes, regular 1 large, seeded, cut into 6 - 8 pcs.
Tomatoes, plum 1 large, seeded, cut into 4 pcs.
Walnuts, halves 1 cup
Basic ingredients processing chart for professional results
ALIMENT QUANTITÉ
Abricots secs 250 mL (1 t.)+ 1 c. à table de farine ou de sucre
Ail, épluché 5 gousses moyennes
Amandes, entières 125 mL (0,5 tasse)
Aneth frais 250 mL (1 tasse), tassé
Basilic, feuilles fraiches 250 mL (1 tasse), tassées, sans tiges dures
Biscuits au gingembre 12 à 14; cassés à la main dans le récipient
Biscuits (autres qu’au gingembre), craquelins 18 à 20
Cacahuètes, grillées à l’huile 250 mL (1 tasse)
Cacahuètes torréfiées 250 mL (1 tasse)
Café (grains) 250 mL (1 tasse)
Canneberges, fraîches ou congelées 250 mL (1 tasse)
Canneberges ou cerises sèches 250 mL (1 t.) +1 c. à table de farine ou sucre
Carotte 1 grosse, coupée en 6 tronçons
Céleri 1 tranche, coupée en 4 tronçons
Chou, vert ou rouge un quart de chou pommé, coupé en 4
Concombre ou courgette 1 de taille moyenne, coupé(e) en 8 tronçons
Coriandre fraîche 250 mL, bien tassée
Fromage, parmesan ou romano 120 g (4 oz), cassé à la main dans le récipient
Miettes de pain, molles ou dures 2-3 tranches de pain, cassées dans le récipient
Noix de coco 1 morceau d’environ 60 g (2 oz)
Noix, moitiés 250 mL (1 tasse)
Oignon (blanc, rouge ou jaune) la moitié d’un gros, coupé en 2
Pacanes, moitiés 125 mL (0,5 tasse)
Persil frais, feuilles frisées ou plates 250 mL, feuilles tassées
Piments rouges chipotle 2 ou 3 petits ou 1 gros, coupés en 4
Poivron 1 moyen, coupé en quatre
Pomme 1 moyenne, coupée en quatre
Raisins secs 250 mL + 15 mL de farine ou de sucre
Tomates oblongues 1 grosse épépinée, coupée en 4
Tomates ordinaires 1 grosse épépinée, coupée en 6 ou 8
Zeste d’agrumes zeste d’un gros fruit + 15 mL de farine ou de sucre
Méthode pour ingrédients de base et obtention de résultats professionnels
La page charge ...
La page charge ...
La page charge ...
La page charge ...
La page charge ...
La page charge ...
La page charge ...
La page charge ...
La page charge ...
La page charge ...
La page charge ...
La page charge ...
La page charge ...
La page charge ...
La page charge ...
La page charge ...
La page charge ...
La page charge ...
La page charge ...
-
 1
1
-
 2
2
-
 3
3
-
 4
4
-
 5
5
-
 6
6
-
 7
7
-
 8
8
-
 9
9
-
 10
10
-
 11
11
-
 12
12
-
 13
13
-
 14
14
-
 15
15
-
 16
16
-
 17
17
-
 18
18
-
 19
19
-
 20
20
-
 21
21
-
 22
22
-
 23
23
-
 24
24
-
 25
25
-
 26
26
-
 27
27
-
 28
28
-
 29
29
-
 30
30
-
 31
31
-
 32
32
-
 33
33
-
 34
34
-
 35
35
-
 36
36
-
 37
37
-
 38
38
-
 39
39
-
 40
40


Oster 109478 Manuel utilisateur
- Catégorie
- Mélangeurs
- Taper
- Manuel utilisateur
- Ce manuel convient également à
dans d''autres langues
- English: Oster 109478 User manual
Documents connexes
Autres documents
-
 Essentiel b EBM10 Le manuel du propriétaire
-
Black & Decker BL4000RC Mode d'emploi
-
Nesco BL-90 Manuel utilisateur
-
Sunbeam 250-22 Manuel utilisateur
-
Midea MBL17HS Mode d'emploi
-
 Détoximix 61176560 Mode d'emploi
-
Hamilton Beach 52754 Manuel utilisateur
-
KitchenAid 35 Manuel utilisateur
-
Cuisinart SPB-6C Manuel utilisateur
-
BLACK+DECKER XL BLAST Getting Started

