Targus AMB02EU Manuel utilisateur
- Catégorie
- Souris
- Taper
- Manuel utilisateur

USER GUIDE
Visit our Website at www.targus.com/emea
Features and specifications subject to change without notice.
© 2006 Targus Group International, Inc. and Targus Group (UK) Ltd.
AMB02EU / 410-0366-003A
Bluetooth
®
media
notebook mouse
30
Bluetooth Qualified Product ID# B02776

2
TABLE OF CONTENTS
English . . . . . . . . . . . . . . . . . . . . . . . . . 3
Deutsch . . . . . . . . . . . . . . . . . . . . . . . . 20
Español . . . . . . . . . . . . . . . . . . . . . . . . 37
Français . . . . . . . . . . . . . . . . . . . . . . . 54
Italiano . . . . . . . . . . . . . . . . . . . . . . . . 71
Nederlands. . . . . . . . . . . . . . . . . . . . . 88
Português. . . . . . . . . . . . . . . . . . . . . .105

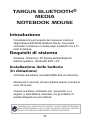
3
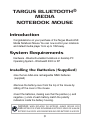
TARGUS BLUETOOTH
®
MEDIA
NOTEBOOK MOUSE
Introduction
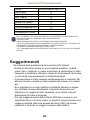
Congratulations on your purchase of the Targus Bluetooth®
Media Notebook Mouse. You can now control your notebook
and default media player from up to 10M away.
System Requirements
Hardware - Bluetooth-enabled notebook or desktop PC
Operating System - Windows® 2000 or XP
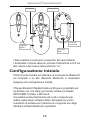
Installing the Batteries (Supplied)
•Use the two AAA-size rechargeable NIMH batteries
(supplied)
•Remove the battery cover from the top of the mouse by
sliding off the cover of the mouse
•Insert the batteries, making sure that the positive (+) and
negative (-) ends of each battery match the polarity
indicators inside the battery housing.
WARNINGS: WHEN REPLACING THE BATTERIES, ALWAYS REPLACE WITH
NiMH BATTERIES OR OTHER RECHARGEABLE BATTERIES. NEVER USE ALKALINE
BATTERIES IN A DEVICE. AVOID MIXING NEW AND USED BATTERIES IN A DEVICE

4
TARGUS BLUETOOTH
®
MEDIA NOTEBOOK MOUSE
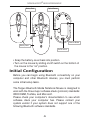
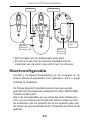
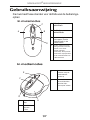
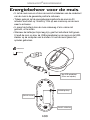
ON OFF
Connect Button
On/Off Switch
Optical Sensor
Battery Cover
Battery Slots
• Snap the battery cover back into position
• Turn on the mouse by sliding on/off switch on the bottom of
the mouse to the “on” position.
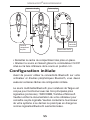
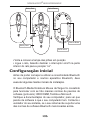
Initial Configuration
Before you can begin using Bluetooth connectivity on your
computer and other Bluetooth devices, you must perform
some initial setup tasks.
The Targus Bluetooth Media Notebook Mouse is designed to
work with the three major software stack (protocol) standards:
WIDCOMM, Toshiba, and Microsoft.
Please check your computer’s documentation to see which
software stack your computer has. Please contact your
system vendor if your system does not support one of the
following Bluetooth software standards.

5
TARGUS BLUETOOTH
®
MEDIA NOTEBOOK MOUSE
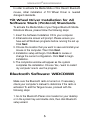
In order to activate the Media Mode of this Class II Bluetooth
mouse, initial installation of Tilt Wheel Driver is needed
disregard standards.
Tilt Wheel Driver Installation for All
Software Stack (Protocol) Standards
To activate the Media Mode of your Targus Bluetooth Media
Notebook Mouse, please follow the following steps:
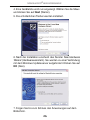
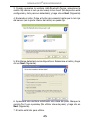
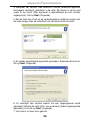
1. Insert the Software Installation CD to your computer.
2. Initial welcome screen will prompt. Please ensure you
have exit all Windows programs before running the set up.
Click Next.
3. Choose the location that you want to save and install your
mouse in the computer. Then Click Next.
4. Installation setup will begin. Click Back to review or
change the current configuration. Click Next to begin
installation.
5. The completion window will appear as the system
completes the installation. Choose Yes, I want to restart
my computer now to use the program.
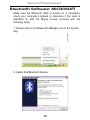
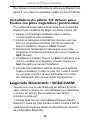
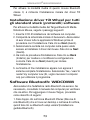
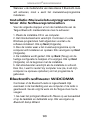
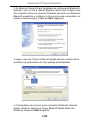
Bluetooth Software: WIDCOMM
Make sure the Bluetooth radio is turned on. If necessary,
check your computer’s manual to determine if the radio is
activated. To add the Targus mouse, proceed with the
following steps:
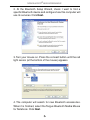
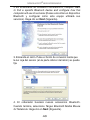
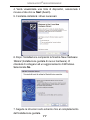
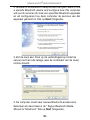
1. Go to the Bluetooth Places icon located on your desktop
or in the system tray and double click, then click Bluetooth
setup wizard.

6
TARGUS BLUETOOTH
®
MEDIA NOTEBOOK MOUSE
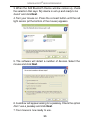
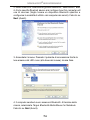
2. At the Bluetooth Setup Wizard, check I want to find a
specific Bluetooth device and configure how this computer will
use its services. Click Next.
3. Turn your mouse on. Press the connect button until the red
light sensor (at the bottom of the mouse) appears.
4. The computer will search for new Bluetooth accessories.
When it is finished, select the Targus Bluetooth Media Mouse
for Notebook. Click Next.

7
TARGUS BLUETOOTH
®
MEDIA NOTEBOOK MOUSE
5. Installation setup will begin. Click Back to review or change
the current configuration. Click Next to begin installation.
6. The confirmation window will appear as the system installs
the drivers. Click OK. When this is done, you can move the
cursor. Your Bluetooth Media Mouse has been successfully
installed.
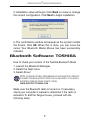
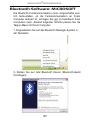
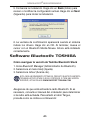
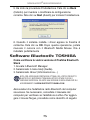
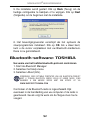
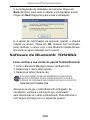
Bluetooth Software: TOSHIBA
How to check your version of the Toshiba Bluetooth Stack
1. Launch the Bluetooth Manager.
2. Select the Help menu.
3. Select About.
NOTE: TO ENSURE OPTIMAL PERFORMANCE OF YOUR BLUETOOTH PRODUCT
YOU NEED TOSHIBA BLUETOOTH STACK V3.20.00 OR HIGHER. IF YOU HAVE A
DIFFRERENT VERSION PLEASE UPDATE IT FROM
WWW.SUPPORT.TOSHIBA.COM
Make sure the Bluetooth radio is turned on. If necessary,
check your computer’s manual to determine if the radio is
activated. To add the Targus mouse, proceed with the
following steps:

8
TARGUS BLUETOOTH
®
MEDIA NOTEBOOK MOUSE
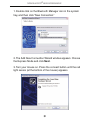
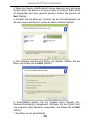
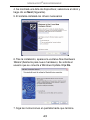
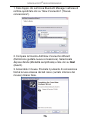
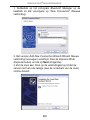
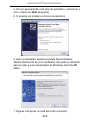
1. Double click on the Bluetooth Manager icon in the system
tray, and then click “New Connection.”
2. The Add New Connection Wizard window appears. Choose
the Express Mode and click Next.
3. Turn your mouse on. Press the connect button until the red
light sensor (at the bottom of the mouse) appears.

9
TARGUS BLUETOOTH
®
MEDIA NOTEBOOK MOUSE
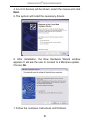
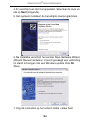
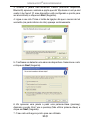
4. A List of devices will be shown, select the mouse and click
Next.
5. The system will install the necessary drivers.
6. After installation, the New Hardware Wizard window
appears. It will ask the user to connect to a Windows update.
Choose No.
7. Follow the onscreen instructions until finished.

10
TARGUS BLUETOOTH
®
MEDIA NOTEBOOK MOUSE
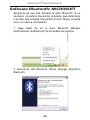
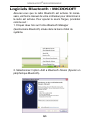
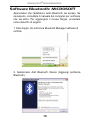
Bluetooth Software: MICROSOFT
Make sure the Bluetooth radio is turned on. If necessary,
check your computer’s manual to determine if the radio is
activated. To add the Targus mouse, proceed with the
following steps:
1. Double click on the Bluetooth Manager icon in the system
tray.
2. Select Add Bluetooth Device.

11
TARGUS BLUETOOTH
®
MEDIA NOTEBOOK MOUSE
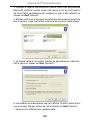
3. When the Add Bluetooth Device window comes up, check
the selection that says ‘My device is set up and ready to be
found.’ and click Next.
4. Turn your mouse on. Press the connect button until the red
light sensor (at the bottom of the mouse) appears.
5. The software will detect a number of devices. Select the
mouse and click Next.
6. A window will appear asking for a passkey. Check the option
Don’t use a passkey and click Next.
7. Your mouse is now ready to use.

12
TARGUS BLUETOOTH
®
MEDIA NOTEBOOK MOUSE
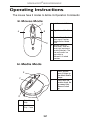
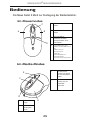
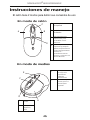
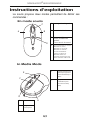
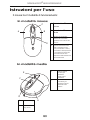
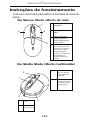
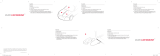
Operating Instructions
The mouse have 2 modes to define its Operation Commands:
In Mouse Mode
A
B
C
D
A
Left Button: Left Click
B
Right Button: Rick Click
C
Scroller Wheel: Scroll
(mini steps) Function
Middle Button: Middle
Click
D
Joystick: Scroll up,
scroll down, scroll left,
scroll right (continuous
scrolling function). The
side way scrolls are
equivalent to
Microsoft’s tilt wheel
functions
E
F
E
Press Joystick
once, it brings up
the default media
player.
F
Press down the
scroller wheel, the
on-screen Help
Menu will show
up
H
G
G
Right Click:
Stop
H
Left Click:
Play / Pause
In Media Mode

13
TARGUS BLUETOOTH
®
MEDIA NOTEBOOK MOUSE
I
J
I
Scroll up: to increase the audio
volume.
Scroll down: to decrease the
audio volume
J
Push up: Previous Track
Push down: Next Track
Push right: Fast Forward
Push left: Rewind
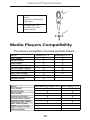
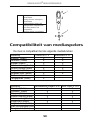
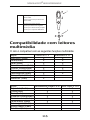
Media Players Compatibility
The mouse is compatible to the following Media Players:
Action iTunes v.6.0.1.3 Musicmatch v.10
Quintessential Player v.4.51 Real Player v.10.5
Windows Media Player v.10
Play (Audio) X X
X X
X
Pause (Audio) X X
X X
X
Stop (Audio) X X
X X
X
Volume Up (Audio) X X
X X
X
Volume Down (Audio) X X
X X
X
Previous Track (Audio) X X
X X
X
Next Track (Audio) X X
X X
X
Fast Forward (Video) X
X
Rewind (Video) X
Action
Play (Audio)
Pause (Audio)
Stop (Audio)
Volume Up (Audio)
Volume Down (Audio)
Previous Track (Audio)
Next Track (Audio)
Fast Forward (Video)
Rewind (Video)

TARGUS BLUETOOTH
®
MEDIA NOTEBOOK MOUSE
Windows Media Player v.10
X
X
X
X
X
X
X
X
Action
Play (Audio)
Pause (Audio)
Stop (Audio)
Volume Up (Audio)
Volume Down (Audio)
Previous Track (Audio)
Next Track (Audio)
Fast Forward (Video)
Rewind (Video)
NOTE: DEPENDING ON THE MEDIA PLAYERS’ SOFTWARE CAPABILITES, THE MOUSE
FUNCTIONALITIES CAN VARY.
INSTURCTIONS TO SET / CHANGE YOUR DEFAULT MEDIA PLAYER
• GO AND CLICK ON START BUTTON
• GO TO CONTROL PANEL, AND CHOOSE ADD/ REMOVE PROGRAM
• CLICK SET PROGRAM ACCESS AND DEFAULTS ON THE LEFT SIDE MENU. TO
PERSONALIZE, CHOOSE CUSTOM IN THE MAIN SCREEN
• CHOOSE YOUR DAULT PROGRAM FOR MEDIA PLAYER
• IF YOUR PREFERRED MEDIA PLAYER PROGRAM IS NOT ON THE LIST, CLICK HELP
FOR ASSISTANCE
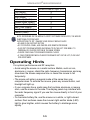
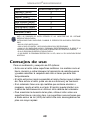
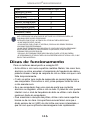
Operating Hints
For optimal performance and RF reception:
• Avoid using the mouse on a metal surface. Metals, such as iron,
aluminum or copper, shield the radio frequency transmission and may
slow down the mouse response time or cause the mouse to fail
temporarily.
• The mouse will enter a suspend mode at the same time your
computer does. To activate the mouse, press any mouse button, and
bluelight will light up.
• If your computer has a metal case that contains aluminum or magne
sium, use the mouse to the side. The display panel may interfere with
the radio frequency signal if you use the mouse directly in front of your
computer.
• To maximize battery life, use the mouse on a white, or light colored
surface. Dark surfaces cause the mouse’s light emitter diode (LED)
light to glow brighter, which causes the battery to discharge more
rapidly.
14

TARGUS BLUETOOTH
®
MEDIA NOTEBOOK MOUSE
15
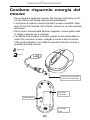
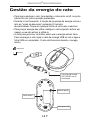
Mouse Power Management
• To power the mouse on and off, slide the on/off switch at the bottom
of the mouse to the desired position.
• During the operation, the beauty of Power Saving feature allows the
mouse goes into “sleep mode” after 20 minutes
of inactivity. Click any mouse button to re-activate the mouse.
• To save battery power, turn off the mouse while traveling or while not
in use.
• Scroller Wheel will glow once the power is low. To recharge the
mouse, plug in the USB Recharging Cable to the mouse, and plug the
USB tip to the computer. The mouse is operational while charging.
Notebook
Desktop
For USB Recharging Cable
(Power Use ONLY)
ON OFF
Connect Button
On/Off Switch
Optical Sensor

TARGUS BLUETOOTH
®
MEDIA NOTEBOOK MOUSE
16
Troubleshooting
The mouse is not working.
• Make sure that the polarity of the batteries is correct. The positive (+)
and negative (-) ends of each battery must match the positive (+) and
negative (-) connections in the battery housing.
• Verify that the computer is Bluetooth radio enabled.
• Verify that the device drivers are installed:
• Paired devices are always displayed in My Bluetooth Places, even if
the mouse is out of range or not powered up.
• Verify that the remote member of the pair is within range, and powered
up, and then attempt the connection again.
• Verify that batteries are properly installed. Recharge / Replace if
necessary.
1. Click Start/ Settings/ Control Panel/ System/ Hardware/ Device
Manager
2. Check under “Bluetooth Devices” that a “Targus Bluetooth Media
Notebook Mouse” is installed
The mouse does not work after it is paired with my Bluetooth
system.

TARGUS BLUETOOTH
®
MEDIA NOTEBOOK MOUSE
17
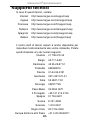
Technical Support
For technical questions, please visit:
Internet http://www.targus.com/support.asp
English http://www.targus.com/uk/support.asp
French http://www.targus.com/fr/support.asp
German http://www.targus.com/de/support.asp
Spanish http://www.targus.com/sp/support.asp
Italian http://www.targus.com/it/support.asp
Our knowledgeable staff is also available to answer your
questions through one of the following telephone
numbers.
Austria 01 795 676 42
Belgium 02-717-2451
Denmark 45 35-25-87 51
Finland 922948016
France 01-6453-9151
Germany 0211-6579-1151
Italy 02-4827-1151
Netherlands 02 0504 0671
Norway 022577729
Portugal +351 21 415 4123
Spain 91 745 6221
Sweden 08-751-4058
Switzerland 01-212-0007
United Kingdom 020-7744-0330
Eastern Europe & others +31 0 20 5040671

TARGUS BLUETOOTH
®
MEDIA NOTEBOOK MOUSE
18
Product Registration
Targus recommends that you register your Targus accessory
shortly after purchasing it. To register your Targus accessory, go
to: http://www.targus.com/registration.asp
You will need to provide your full name, email address, phone
number, and company information (if applicable).
Warranty
Targus warrants this product to be free from defects in materials
and workmanship for two years. If your Targus accessory is found
to be defective within that time, we will promptly repair or replace
it. This warranty does not cover accidental damage, wear and
tear, or consequential or incidental loss. Under no conditions is
Targus liable for loss of, or damage to a computer; nor loss of, or
damage to, programs, records, or data; nor any consequential or
incidental damages, even if Targus has been informed of their
possibility. This warranty does not affect your statutory rights.
Regulatory Compliance
This device complies with Part 15 of the FCC Rules. Operation is
subject to the following two conditions: (1) This device may not
cause harmful interference, and (2) This device must accept any
interference received, including interference that may cause
undesired operation.
FCC Statement
Tested to Comply
This equipment has been tested and found to comply with the
limits of a Class B digital device, pursuant to Part 15 of the FCC
Rules. These limits are designed to provide reasonable protection
against harmful interference in a residential installation. This
equipment generates, uses, and can radiate radio frequency
energy and if not installed and used in accordance with the
instructions, may cause harmful interference to radio
communications. However, there is no guarantee that
interference will not occur in a particular installation.
If this equipment does cause harmful interference to radio or
television reception, which can be determined by turning the

TARGUS BLUETOOTH
®
MEDIA NOTEBOOK MOUSE
19
equipment off and on, the user is encouraged to try to correct the
interference by one or more of the following measures:
• Reorient or relocate the receiving antenna;
• Increase the separation between the equipment and receiver;
• Connect the equipment into an outlet on a circuit different from
that to which the receiver is connected;
• Consult the dealer or an experienced radio/TV technician for
help.
Declaration of Conformity
Hereby, Targus, declares that this device is in compliance with the
essential requirements and other relevant provisions of Directive
1999/5/EC.
Targus Recycling Directive
At the end of this product’s useful life please dispose at an
appropriate recycling collection point provided in your country.
Targus recycling policy is available for viewing at:
www.targus.com/recycling
Features and specifications subject to change without notice. All trademarks and
registered trademarks are the property of their respective owners.
WIDCOMM and the WIDCOMM logo are trademarks of WIDCOMM, Inc. Bluetooth
and the Bluetooth logo are trademarks owned by Bluetooth SIG, Inc., U.S.A. and
licensed to WIDCOMM, Inc..
Microsoft, Windows, and Outlook are registered trademarks of Microsoft
Corporation. All other trademarks and registered trademarks are the property of
their respective owners.

20
TARGUS BLUETOOTH
®
MEDIA
NOTEBOOK-MAUS
Einleitung
Herzlichen Glückwunsch zum Kauf der Targus Bluetooth®
Media Notebook-Maus. Damit können Sie Ihr Notebook und
Standard-Mediaplayer in einem Abstand von max. 10 m
Systemvoraussetzungen
Hardware: Bluetooth-fähiges Notebook oder Desktop-PC
Betriebssystem: Windows® 2000 oder XP
Einlegen der Batterien
•Zwei aufladbare NiMH-Akkus der Größe AAA (im Liefer-
umfang enthalten) einsetzen
•Den Batteriefachdeckel oben an der Maus herunterschieben
•Die Batterien einsetzen und auf die richtige Polarität achten.
Die richtige Richtung wird im Batteriegehäuse durch ein
Plus- und Minuszeichen (+) bzw. (-) angezeigt.
ACHTUNG: BEIM BATTERIEWECHSEL IMMER NiMH BATTERIEN ODER ANDERE
AUFLADBARE BATTERIEN BENUTZEN. IN DIESEM GERÄT DÜRFEN KEINE ALKALINE-
BATTERIEN VERWENDET WERDEN. GEBRAUCHTE UND NEUE BATTERIEN NICHT
GEMISCHT VERWENDEN
La page est en cours de chargement...
La page est en cours de chargement...
La page est en cours de chargement...
La page est en cours de chargement...
La page est en cours de chargement...
La page est en cours de chargement...
La page est en cours de chargement...
La page est en cours de chargement...
La page est en cours de chargement...
La page est en cours de chargement...
La page est en cours de chargement...
La page est en cours de chargement...
La page est en cours de chargement...
La page est en cours de chargement...
La page est en cours de chargement...
La page est en cours de chargement...
La page est en cours de chargement...
La page est en cours de chargement...
La page est en cours de chargement...
La page est en cours de chargement...
La page est en cours de chargement...
La page est en cours de chargement...
La page est en cours de chargement...
La page est en cours de chargement...
La page est en cours de chargement...
La page est en cours de chargement...
La page est en cours de chargement...
La page est en cours de chargement...
La page est en cours de chargement...
La page est en cours de chargement...
La page est en cours de chargement...
La page est en cours de chargement...
La page est en cours de chargement...
La page est en cours de chargement...
La page est en cours de chargement...
La page est en cours de chargement...
La page est en cours de chargement...
La page est en cours de chargement...
La page est en cours de chargement...
La page est en cours de chargement...
La page est en cours de chargement...
La page est en cours de chargement...
La page est en cours de chargement...
La page est en cours de chargement...
La page est en cours de chargement...
La page est en cours de chargement...
La page est en cours de chargement...
La page est en cours de chargement...
La page est en cours de chargement...
La page est en cours de chargement...
La page est en cours de chargement...
La page est en cours de chargement...
La page est en cours de chargement...
La page est en cours de chargement...
La page est en cours de chargement...
La page est en cours de chargement...
La page est en cours de chargement...
La page est en cours de chargement...
La page est en cours de chargement...
La page est en cours de chargement...
La page est en cours de chargement...
La page est en cours de chargement...
La page est en cours de chargement...
La page est en cours de chargement...
La page est en cours de chargement...
La page est en cours de chargement...
La page est en cours de chargement...
La page est en cours de chargement...
La page est en cours de chargement...
La page est en cours de chargement...
La page est en cours de chargement...
La page est en cours de chargement...
La page est en cours de chargement...
La page est en cours de chargement...
La page est en cours de chargement...
La page est en cours de chargement...
La page est en cours de chargement...
La page est en cours de chargement...
La page est en cours de chargement...
La page est en cours de chargement...
La page est en cours de chargement...
La page est en cours de chargement...
La page est en cours de chargement...
La page est en cours de chargement...
La page est en cours de chargement...
La page est en cours de chargement...
La page est en cours de chargement...
La page est en cours de chargement...
La page est en cours de chargement...
La page est en cours de chargement...
La page est en cours de chargement...
La page est en cours de chargement...
La page est en cours de chargement...
La page est en cours de chargement...
La page est en cours de chargement...
La page est en cours de chargement...
La page est en cours de chargement...
La page est en cours de chargement...
La page est en cours de chargement...
La page est en cours de chargement...
La page est en cours de chargement...
-
 1
1
-
 2
2
-
 3
3
-
 4
4
-
 5
5
-
 6
6
-
 7
7
-
 8
8
-
 9
9
-
 10
10
-
 11
11
-
 12
12
-
 13
13
-
 14
14
-
 15
15
-
 16
16
-
 17
17
-
 18
18
-
 19
19
-
 20
20
-
 21
21
-
 22
22
-
 23
23
-
 24
24
-
 25
25
-
 26
26
-
 27
27
-
 28
28
-
 29
29
-
 30
30
-
 31
31
-
 32
32
-
 33
33
-
 34
34
-
 35
35
-
 36
36
-
 37
37
-
 38
38
-
 39
39
-
 40
40
-
 41
41
-
 42
42
-
 43
43
-
 44
44
-
 45
45
-
 46
46
-
 47
47
-
 48
48
-
 49
49
-
 50
50
-
 51
51
-
 52
52
-
 53
53
-
 54
54
-
 55
55
-
 56
56
-
 57
57
-
 58
58
-
 59
59
-
 60
60
-
 61
61
-
 62
62
-
 63
63
-
 64
64
-
 65
65
-
 66
66
-
 67
67
-
 68
68
-
 69
69
-
 70
70
-
 71
71
-
 72
72
-
 73
73
-
 74
74
-
 75
75
-
 76
76
-
 77
77
-
 78
78
-
 79
79
-
 80
80
-
 81
81
-
 82
82
-
 83
83
-
 84
84
-
 85
85
-
 86
86
-
 87
87
-
 88
88
-
 89
89
-
 90
90
-
 91
91
-
 92
92
-
 93
93
-
 94
94
-
 95
95
-
 96
96
-
 97
97
-
 98
98
-
 99
99
-
 100
100
-
 101
101
-
 102
102
-
 103
103
-
 104
104
-
 105
105
-
 106
106
-
 107
107
-
 108
108
-
 109
109
-
 110
110
-
 111
111
-
 112
112
-
 113
113
-
 114
114
-
 115
115
-
 116
116
-
 117
117
-
 118
118
-
 119
119
-
 120
120
-
 121
121


Targus AMB02EU Manuel utilisateur
- Catégorie
- Souris
- Taper
- Manuel utilisateur
dans d''autres langues
- italiano: Targus AMB02EU Manuale utente
- English: Targus AMB02EU User manual
- español: Targus AMB02EU Manual de usuario
- Deutsch: Targus AMB02EU Benutzerhandbuch
- Nederlands: Targus AMB02EU Handleiding
- português: Targus AMB02EU Manual do usuário
Documents connexes
-
Targus Ultra-Portable Laptop Mouse Mode d'emploi
-
-
-
-
-
-
-
-
Targus Bluetooth Comfort Laser Mouse Le manuel du propriétaire
-
Targus ACB20EU Mode d'emploi
Autres documents
-
Dicota BLUELIGHT Le manuel du propriétaire
-
Belkin F8E825VEAUSB Manuel utilisateur
-
RocketFish RF-BTCMBO Manuel utilisateur
-
Trendnet TBW-102UB Quick Installation Guide
-
Gyration GYM1100NA Manuel utilisateur
-
-
 Click Car Mouse CCM660219 Manuel utilisateur
-
BAZOO USB Dongle Le manuel du propriétaire
-
-
Elecom M-CCP1BBBK Le manuel du propriétaire
