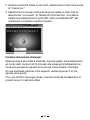
Dicota BLUELIGHT Le manuel du propriétaire
- Catégorie
- Souris
- Taper
- Le manuel du propriétaire

english
User’s Guide
Bluetooth Notebook Optical Mouse ……………………………………………………………… 2
deutsch
Bedienungsanleitung
Optische Bluetooth Notebook-Maus ………………………………………………………… 10
français
Guide d’utilisation
Souris optique Bluetooth pour ordinateur portable ………………………………… 18
español
Manual de instrucciones
Ratón óptico Bluetooth para portátiles ……………………………………………………… 26
italiano
Istruzioni per l’uso
Mouse ottico per Notebook con tecnologia Bluetooth…………………………… 34
česky
Manuál
Bluetooth optická myš pro notebook ………………………………………………………… 42
русский
Инструкция
Оптическая мышь Bluetooth для ноутбука …………………………………………… 50
magyar
Használati útmutató
Bluetooth Notebook Optikai Egér ………………………………………………………………… 58
polski
Przewodnik użytkownika
Optyczna mysz Bluetooth ……………………………………………………………………………… 66
slovensky
Návod na obsluhu
Bluetooth optická myš pre notebook ………………………………………………………… 74
中文
用户指南
蓝牙笔记本光电鼠标 ……………………………………………………………………………………… 82
BlueLight

english
Intro
Thank you for purchasing this product, it utilises the latest in Bluetooth
®
and Optical technology. This creative and easy-to-use Bluetooth
®
Mouse
will bring you a whole new wireless experience.
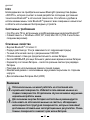
System requirements:
• Bluetooth
®
module enabled & embedded Notebook or PC
• Compatible with Windows
®
2000, XP, Vista; Mac OS X (10.4.0 or later)
Main features:
• Bluetooth
®
version 2.0 class II technology
• Up to 10 m wireless range (environment dependant)
• Precise optical sensor with 1000 dpi
• Provides excellent battery life
• ON/OFF button to further extend battery life
• Battery life indicator – glows red when the battery is running low
• Suitable for left or right hand operation
• Compact design with deluxe rubber coating on side
• AAA(LR03) Alkaline battery x 2
Precausion
The optical mouse cannot work on a glass or mirrored sur-
face. Avoid operating this mouse on a glossy surface. Other-
wise, this mouse may not operate normally..
In consideration of saving battery power, it is strongly recom-
mended to operate an optical mouse on a bright surface with
fine texture to achieve optimum operation. A very dark surface
will result in shorter battery life.
For a better transmission distance, avoid using this device on
a metal surface.
2

3
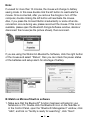
Installation guide
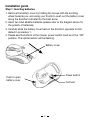
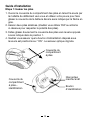
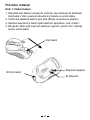
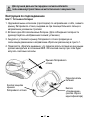
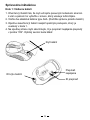
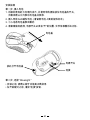
Step 1: Inserting batteries
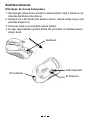
1. Remove the battery cover by holding the mouse with the scrolling
wheel towards you, and using your thumb to push out the battery cover
along the direction indicated by the bold arrow.
2. Insert two AAA alkaline batteries (please refer to the diagram above for
the polarity of batteries).
3. Carefully slide the battery cover back in the direction opposite to that
stated in procedure 1.
4. Please see the bottom of the mouse, power switch must be in the “ON”
position. The optical sensor will be flashing.
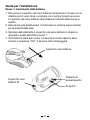
Battery cover
Push to open
battery cover
Power switch
Connect

4
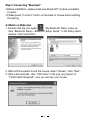
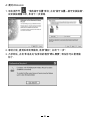
Step 2: Connecting “BlueLight”
• Before installation, please make sure Bluetooth
®
module is enabled
properly.
• Please press “Connect” button on the back of mouse before starting
the pairing.
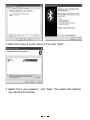
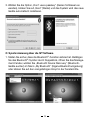
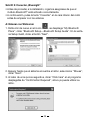
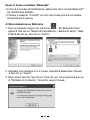
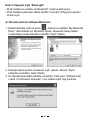
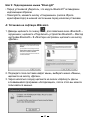
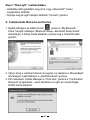
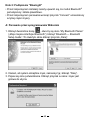
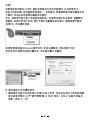
A: Match on Widcomm
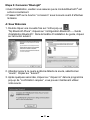
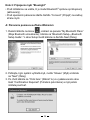
1. Double click the icon again , “My Bluetooth Place” pops up;
click “Bluetooth Setup---Bluetooth Setup Guide”. In the Setup Guild
window, click next button.
2. Wait until the system found the mouse, select “Mouse”, click “Next”.
3. After a few seconds, click “Click here” in the pop-up program of
“Confirmation Required”, now you can use your mouse.

5
Note:
If unused for more than 10 minutes, the mouse will change to battery
saving mode. In this case double click the left button to reactivate the
mouse. Once connected, after you remove the dongle or turn off the
computer, double clicking the left button will reactivate the mouse.
Also, if you press the Connect Button inadvertently or some other dis-
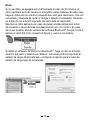
connection occurs during use, please reconnect the mouse. If this is not
available, please open the Bluetooth Dongle Software window, delete or
disconnect the mouse (as the picture shows), then reconnect.
If you are using the Widcomm Bluetooth
®
Software, click the right button
of the mouse and select “Status”, then you can check the power status
of the batteries and setup alarm for shortage of battery.
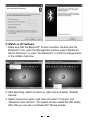
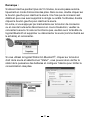
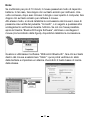
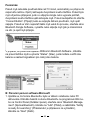
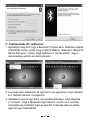
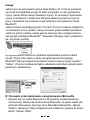
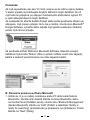
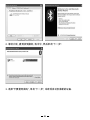
B: Match on Microsoft built-in software
1. Make sure that the Bluetooth
®
function has been activated in your
Notebook or PC. Double click the Bluetooth icon on the Task Bar or
in the Control Panel, open the “Bluetooth Management” window, click
“Add”, and tick on “facility is ready for searching”, click “Next”.

6
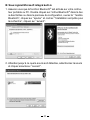
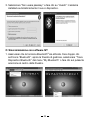
2. Wait until mouse is found, select it, then click “Next”.
3. Select “Don’t use a passkey”, click “Next”, the system will install the
new device automatically.

7
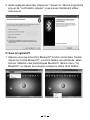
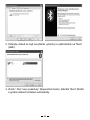
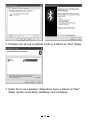
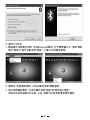
C: Match on IVT Software
1. Make sure that the Bluetooth
®
function is active. Double click the
Bluetooth
®
icon, open the Management window, select “Bluetooth
Device Discovery” in menu “My Bluetooth” or click the orange button
in the middle of window.
2. After searching, select mouse icon, right click and select “Refresh
Service”.
3. Select mouse icon again, right click and select “Connect” and
“Bluetooth Input Service”, the system will auto install the HID facility.
After that you can use your Bluetooth
®
Mouse at ease.

8
Smart power saving function
When the product is not used after 3 seconds, it will be entered into idle
mode. After 10 mins, it will be entered into power saving mode.
If you want to reactivate the device, please press left-click.
For long lasting power, it’s recommended to turn off the product when it’s
finished to use.

Disclaimer:
Information in this document is subject to change without notice. The
manufacturer does not make any representations or warranties (implied or
otherwise) regarding the accuracy and completeness of this document and
shall in no event be liable for any loss of profit or any commercial dama-
ge, including but not limited to special, incidental, consequential, or other
damage. No part of this document may be reproduced or transmitted in
any form by any means, electronic or mechanical, including photocopy-
ing, recording or information recording and retrieval systems without the
express written permission of the manufacturer.
N4029
This symbol (crossed out bin wheelie symbol according to
WEEE Directive 2002/96/EC and Battery Directive 2006/66/EC)
indicates separate collection of waste electrical and electronic
equipment as well as batteries in the EU countries. Please do
not throw the equipment respectively the batteries into the
domestic refuse. Please use the return and collection systems
available in your country for the disposal.
Customer service:
If you encounter any problem with your BlueLight, please contact our local
subsidiary, partner or dealer, or send us your inquiry to [email protected].
2 years warranty. Please find the complete text in our guarantee on the
internet: www.dicota.com.
All the products and software mentioned above are registered trademarks
of their respective owners. Errors and omissions excepted
9

deutsch
Intro
Vielen Dank, dass Sie sich für den Kauf des Produkts „BlueLight” aus
dem Hause DICOTA entschieden haben. BlueLight ist mit der neuesten
Bluetooth
®
- und Optical-Technologie ausgestattet ist. Diese innovative
und benutzerfreundliche Bluetooth
®
-Maus wird Sie in eine neue Ära des
kabellosen Arbeitens führen.
Systemvoraussetzungen
• PC oder Notebook mit Bluetooth
®
-Modul
•
Kompatibel mit Windows
®
2000, XP, Vista; Mac OS X (10.4.0 oder später)
Hauptmerkmale:
• Bluetooth
®
-Technologie Version 2.0 (Klasse II)
• Funkradius bis zu 10 m (umgebungsabhängig)
• Präziser optischer 1000-dpi-Sensor
• Hervorragende Batterielebensdauer
• An-/Aus-Taste zur Batterieschonung
• Batterieanzeige – rotes Leuchten bei schwacher Batterieleistung
• Für Links- und Rechtshänder geeignet
• Kompaktes Design mit Luxus-Gummibeschichtung an den Seiten
• 2 x AAA (LR03) Alkaline Batterien
Vorsicht
Die optische Maus funktioniert nicht auf Glas- oder Spiegel-
oberflächen und kann nicht auf glänzenden Oberflächen ver-
wendet werden, da diese vorübergehende Ausfälle der Maus
verursachen.
Für einen batteriesparenden Betrieb und eine optimale Funk-
tionsweise ist es ratsam, die optische Maus auf einer hellen
Oberfläche mit feiner Textur zu verwenden. Dunkle Ober-
flächen führen zu einem schnelleren Entladen der Batterien.
Verwenden Sie dieses Gerät nach Möglichkeit nicht auf
Metalloberflächen, um eine Übertragungsabschirmung zu
verhindern.
10

11
Batterieabdeckung
Knopf drücken
zum Öffnen
der Batterie-
abdeckung
An-/Aus-Schalter
Verbindungs-
knopf
Installationsanleitung
Schritt 1: Einsetzen der Batterien
1. Öffnen Sie das Batteriefach, indem Sie die Maus mit dem Scrollrad in
Ihre Richtung halten und die Abdeckung mit Hilfe Ihres Daumens in der
abgebildeten Richtung aus der Führung schieben.
2. Setzen Sie nun zwei Alkaline Batterien des Typs AAA ein. (Beachten Sie
dabei die in der Abbildung angegebene Polaritätskennzeichnung).
3. Schieben Sie die Abdeckung wieder vorsichtig entgegengesetzt der
unter Punkt 1 angegebenen Richtung in die Führung.
4. Der An-/Aus-Schalter auf dem Boden der Maus muss nun auf „AN“
gestellt sein. Der optische Sensor leuchtet auf.

12
Schritt 2: Verbinden der Maus „BlueLight“
• Stellen Sie vor der Installation sicher, dass das Bluetooth
®
-Modul richtig
aktiviert ist.
• Drücken Sie die „Connect”-Taste an der Unterseite der Maus, bevor sie
das Koppeln starten.
A: Synchronisierung über die Widcomm-Software
1. Das Symbol nochmals mit Doppelklick anwählen und die
Meldung „My Bluetooth Places“ (Bluetooth-Umgebung) erscheint;
„Bluetooth Setup – Bluetooth Setup Guide“ (Bluetooth-Setup
– Bluetooth-Setup-Assistent) anklicken. Im Fenster „Setup-Assistent“
auf „Next“ (Weiter) klicken.
2. Warten Sie, bis das System die Maus erkannt hat, wählen Sie
diese anschließend aus und klicken Sie auf „Next“ (Weiter).
3. Betätigen Sie nach ein paar Sekunden das Feld „Click here“
(Hier klicken) im Dialogfenster zur Bestätigung. Jetzt ist Ihre Maus
betriebsbereit.

13
Hinweis:
Ist die Maus länger als 10 Minuten inaktiv, schaltet sie sich automatisch in
den Batteriesparmodus. In diesem Fall kann die Maus durch Doppelklick
der linken Taste wieder aktiviert werden. Ist sie einmal verbunden, kann die
Maus nach Entfernen des Dongles oder Ausschalten des Computers durch
Doppelklick der linken Taste wieder aktiviert werden.
Bei versehentlicher Betätigung der „Connect“-Taste oder sonstiger un-
gewollter Trennung während der Verwendung, muss die Maus erneut
verbunden werden. Ist dies nicht möglich, so öffnen Sie das Fenster für die
Bluetooth-Dongle-Software, löschen Sie oder trennen Sie die Maus (gemäß
Abbildung) und verbinden Sie die Maus neu.
Anwender der Bluetooth
®
-Software von Widcomm klicken die rechte
Maustaste und wählen die Option „Status“. Hier können Sie den Batterie-
status prüfen und eine Batteriewarnung einrichten.

14
B: Synchronisierung über die vorinstallierte Microsoft-Software
1. Stellen Sie sicher, dass die Bluetooth
®
-Funktion Ihres Notebooks oder
PCs aktiviert ist. Wählen Sie das Bluetooth-Symbol in der Taskleiste
oder in der Systemsteuerung durch Doppelklick aus, öffnen Sie das
„Bluetooth Management“-Fenster, klicken Sie auf „Add“ (Hinzufügen)
und wählen Sie die Option „facility is ready for searching“ (Geräte
finden), anschließend „Next“ (Weiter).
2. Warten Sie, bis die Maus gefunden worden ist, wählen Sie diese
anschließend aus und gehen Sie auf „Next“ (Weiter).

15
3. Wählen Sie die Option „Don’t use a passkey“ (Keinen Schlüssel ver-
wenden), klicken Sie auf „Next“ (Weiter) und das System wird das neue
Geräte automatisch installieren.
C: Synchronisierung über die IVT Software
1. Stellen Sie sicher, dass die Bluetooth
®
-Funktion aktiviert ist. Betätigen
Sie das Bluetooth
®
-Symbol durch Doppelklick, öffnen Sie das Manage-
ment-Fenster, wählen Sie „Bluetooth Device Discovery“ (Bluetooth-
Geräte suchen) im Menü „My Bluetooth“ (Eigene Bluetoothumgebung)
oder klicken Sie auf den orangefarbigen Knopf in der Fenstermitte.

16
2. Klicken Sie nach erfolgter Suche auf das Maus-Symbol und wählen
Sie im Rechtsklickmenü die Option „Refresh Service“ (Dienste aktuali-
sieren).
3. Betätigen Sie erneut das Maus-Symbol und wählen Sie nach erfolgtem
Rechtsklick die Option „Connect“ (Verbinden) und „Bluetooth Human
Interface Device Service“ . Das System wird das HID-Gerät automa-
tisch installieren. Danach ist Ihre Bluetooth
®
-Maus einsatzbereit.
Energiesparfunktion:
Das Produkt schaltet sich nach 3 Sekunden in den Ruhezustand, wenn
es nicht verwendet wird. Nach 10 Minuten schaltet sich die Maus in den
Energiesparmodus.
Durch Linksklick wird das Gerät wieder aktiviert.
Für einen langewährenden Betrieb ist es ratsam, das Produkt nach seiner
Verwendung auszuschalten.

17
N4029
Haftungsausschluss:
Die Information in diesem Dokument kann ohne Vorwarnung geändert
werden. Der Hersteller übernimmt keine Verantwortung oder Gewähr
(weder implizit noch explizit) in Bezug auf die Genauigkeit und Vollständig-
keit und kann in keinem Fall für irgendeine Art von entgangenem Gewinn
oder gewerblichem Schaden, inklusive Schäden spezieller, zufälliger, als
Folge von oder einer sonstigen Schadensart haftbar gemacht werden. Kein
Teil dieses Dokuments darf in irgendeiner Form, weder elektronisch noch
mechanisch reproduziert oder übertragen werden, auch nicht durch Foto-
kopie, Aufnahme oder Informationsaufzeichnung, ohne die ausdrückliche
schriftliche Erlaubnis des Herstellers.
Dieses Symbol (durchgestrichene Mülltonne nach WEEE
Direktive 2002/96/EC und Batterie Direktive 2006/66/EC) weist
auf die getrennte Rücknahme elektrischer und elektronischer
Geräte sowie Batterien in EU Ländern hin. Bitte werfen Sie das
Gerät bzw. die Batterien nicht in den Hausmüll. Informieren Sie
sich über das in Ihrem Land gültige Rücknahmesystem und
nutzen dieses zur Entsorgung.
Kundenservice:
Sollten Sie Probleme im Umgang mit BlueLight haben, dann setzen Sie
sich mit Ihrem örtlichen Händler oder Distributor in Verbindung. Ansonsten
können Sie uns unter [email protected] kontaktieren.
2 Jahre Garantie. Sie finden den vollständigen Text zu unseren Garantie-
bedingungen im Internet: www.dicota.com.
Alle in diesem Dokument erwähnten Produkte und Software sind registrierte
Marken und gehören dem jeweiligen Markeninhaber. Fehler vorbehalten.

français
18
Intro
Merci d’avoir choisi cette souris BlueLight de la gamme DICOTA, elle
dispose des toutes dernières technologies optiques de pointe Bluetooth
®
.
Cette souris Bluetooth
®
ingénieuse et facile d’utilisation vous offre une
expérience tout à fait nouvelle de la connexion sans fil.
Configuration système requise
• Module Bluetooth
®
intégré & embarqué pour ordinateur portable ou PC
• Compatible Windows
®
2000, XP, Vista; Mac OS X (10.4.0 ou ultérieur)
Principales caractéristiques:
• Version Bluetooth
®
2.0 technologie classe II
• Jusqu’à 10 m de portée sans fil (en fonction de l’environnement)
• Senseur optique précis avec 1000 dpi
• Fournit une excellente longévité des batteries
• L’interrupteur marche/marche prolonge la longévité de la batterie
• Indicateur du niveau de batterie – le voyant rouge lumineux s’allume
lorsque la batterie est faible
• Convient aux gauchers et aux droitiers
• Design compact avec revêtement de luxe latéral en caoutchouc
• 2 x piles alcalines AAA (LR03)
Précautions
La souris optique ne peut pas fonctionner sur une surface en
verre ou en miroir. Il convient d’éviter l’utilisation de cette souris
sur une surface brillante. Sinon elle risque de ne pas fonctionner
normalement.
Afin de réaliser des économies d’énergie de la batterie, il est forte-
ment recommandé d’utiliser cette souris optique sur une surface
brillante avec une fine texture, afin d’obtenir un fonctionnement
optimal. Une surface très sombre réduit la longévité des piles.
Pour une meilleure transmission à distance, évitez d’utiliser cet
appareil sur une surface métallique.

19
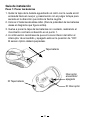
Couvercle du
compartiment
à piles
Couvercle du
compartiment
à piles –
identification
Interrupteur
marche/arrêt
Bouton
d’identification
Guide d’installation
Etape 1: Insérer les piles
1. Ouvrez le couvercle du compartiment des piles en tenant la souris par
la mollette de défilement vers vous et utilisez votre pouce pour faire
glisser le couvercle de la batterie dans le sens indiqué par la flèche en
gras.
2. Insérez deux piles alcalines. (Veuillez vous référer SVP au schéma
ci-dessous pour respecter la polarité des piles).
3. Faites glisser doucement le couvercle des piles vers le sens opposé
à celui indiqué dans la position 1.
4. Veuillez vous assurer que le bouton d’alimentation disposé sous
la souris est positionné sur “ON”. Le senseur optique clignote.

20
Etape 2: Connexion “BlueLight”
• Avant l’installation, veuillez vous assurer que le module Bluetooth
®
est
activé correctement.
• Pressez SVP sur le bouton “connexion” sous la souris avant d’effectuer
la liaison.
A: Sous Widcomm
1. Double cliquer une nouvelle fois sur l’icône pop-up ,
“My Bluetooth Place”; cliquez sur “configuration Bluetooth --- Guide
d’installation Bluetooth”. Dans la fenêtre d’installation du guide, cliquez
sur le bouton suivant.
2. Attendez jusqu’à ce que le système détecte la souris, sélectionnez
“souris”, cliquez sur “suivant”.
3. Après quelques secondes, cliquez sur “cliquez ici” dans le programme
pop-up de “confirmation requise”, vous pouvez maintenant utiliser
notre souris.
La page est en cours de chargement...
La page est en cours de chargement...
La page est en cours de chargement...
La page est en cours de chargement...
La page est en cours de chargement...
La page est en cours de chargement...
La page est en cours de chargement...
La page est en cours de chargement...
La page est en cours de chargement...
La page est en cours de chargement...
La page est en cours de chargement...
La page est en cours de chargement...
La page est en cours de chargement...
La page est en cours de chargement...
La page est en cours de chargement...
La page est en cours de chargement...
La page est en cours de chargement...
La page est en cours de chargement...
La page est en cours de chargement...
La page est en cours de chargement...
La page est en cours de chargement...
La page est en cours de chargement...
La page est en cours de chargement...
La page est en cours de chargement...
La page est en cours de chargement...
La page est en cours de chargement...
La page est en cours de chargement...
La page est en cours de chargement...
La page est en cours de chargement...
La page est en cours de chargement...
La page est en cours de chargement...
La page est en cours de chargement...
La page est en cours de chargement...
La page est en cours de chargement...
La page est en cours de chargement...
La page est en cours de chargement...
La page est en cours de chargement...
La page est en cours de chargement...
La page est en cours de chargement...
La page est en cours de chargement...
La page est en cours de chargement...
La page est en cours de chargement...
La page est en cours de chargement...
La page est en cours de chargement...
La page est en cours de chargement...
La page est en cours de chargement...
La page est en cours de chargement...
La page est en cours de chargement...
La page est en cours de chargement...
La page est en cours de chargement...
La page est en cours de chargement...
La page est en cours de chargement...
La page est en cours de chargement...
La page est en cours de chargement...
La page est en cours de chargement...
La page est en cours de chargement...
La page est en cours de chargement...
La page est en cours de chargement...
La page est en cours de chargement...
La page est en cours de chargement...
La page est en cours de chargement...
La page est en cours de chargement...
La page est en cours de chargement...
La page est en cours de chargement...
La page est en cours de chargement...
La page est en cours de chargement...
La page est en cours de chargement...
La page est en cours de chargement...
La page est en cours de chargement...
La page est en cours de chargement...
-
 1
1
-
 2
2
-
 3
3
-
 4
4
-
 5
5
-
 6
6
-
 7
7
-
 8
8
-
 9
9
-
 10
10
-
 11
11
-
 12
12
-
 13
13
-
 14
14
-
 15
15
-
 16
16
-
 17
17
-
 18
18
-
 19
19
-
 20
20
-
 21
21
-
 22
22
-
 23
23
-
 24
24
-
 25
25
-
 26
26
-
 27
27
-
 28
28
-
 29
29
-
 30
30
-
 31
31
-
 32
32
-
 33
33
-
 34
34
-
 35
35
-
 36
36
-
 37
37
-
 38
38
-
 39
39
-
 40
40
-
 41
41
-
 42
42
-
 43
43
-
 44
44
-
 45
45
-
 46
46
-
 47
47
-
 48
48
-
 49
49
-
 50
50
-
 51
51
-
 52
52
-
 53
53
-
 54
54
-
 55
55
-
 56
56
-
 57
57
-
 58
58
-
 59
59
-
 60
60
-
 61
61
-
 62
62
-
 63
63
-
 64
64
-
 65
65
-
 66
66
-
 67
67
-
 68
68
-
 69
69
-
 70
70
-
 71
71
-
 72
72
-
 73
73
-
 74
74
-
 75
75
-
 76
76
-
 77
77
-
 78
78
-
 79
79
-
 80
80
-
 81
81
-
 82
82
-
 83
83
-
 84
84
-
 85
85
-
 86
86
-
 87
87
-
 88
88
-
 89
89
-
 90
90


Dicota BLUELIGHT Le manuel du propriétaire
- Catégorie
- Souris
- Taper
- Le manuel du propriétaire
dans d''autres langues
- italiano: Dicota BLUELIGHT Manuale del proprietario
- English: Dicota BLUELIGHT Owner's manual
- español: Dicota BLUELIGHT El manual del propietario
- Deutsch: Dicota BLUELIGHT Bedienungsanleitung
- русский: Dicota BLUELIGHT Инструкция по применению
- slovenčina: Dicota BLUELIGHT Návod na obsluhu
- polski: Dicota BLUELIGHT Instrukcja obsługi
- čeština: Dicota BLUELIGHT Návod k obsluze
Documents connexes
-
Dicota BLUESTAR Le manuel du propriétaire
-
-
-
-
-
-
-
Dicota Stream Manuel utilisateur
-
-
Autres documents
-
Targus AMB02EU Manuel utilisateur
-
 RAPTURE RPT-GMSA3370xx- ASPIS Wireless Gaming Mouse Manuel utilisateur
-
Asus BX701 Manuel utilisateur
-
RocketFish RF-BTCMBO Manuel utilisateur
-
KeySonic ACK-340 BT Fiche technique
-
Kensington 72281US Fiche technique
-
KeySonic KSK-3201 RF Fiche technique
-
 OMOTON Clavier iPad AZERTY , Clavier Souris Bluetooth Manuel utilisateur
-
Targus Bluetooth Comfort Laser Mouse Le manuel du propriétaire
-
Kensington K72330US spécification

