Maytag MVWB300WQ2 Manuel utilisateur
- Catégorie
- Machines à laver
- Taper
- Manuel utilisateur

BRAVOS ®
AUTOMATIC
WASHER
LAVEUSE
AUTOMATIQUE
BRAVOS ®
USE & CARE GUIDE
FOR QUESTIONS ABOUT FEATURES,OPERATION/PERFORMANCE,
PARTS,ACCESSORIESOR SERVICECALL: 1.800.688.9900
OR VISIT OUR WEBSITE AT WWW.MAYTAG.COM
IN CANADA, CALL: 1.800.807.6777
OR VISIT OUR WEBSITEAT WWW.MAYTAG.CA
Quick Start Guide/Washer Use ............ pg. 5
Para una versi6n en espaffol, visite: www.whirlpool.com
NOmero de pieza W10092827B
TABLE OF CONTENTS
ASSISTANCE OR SERVICE .......................................................... 2
In the U.S.A ............................................................................ 2
In Canada ............................................................................... 2
Accessories ............................................................................. 2
WASHER SAFETY ....................................................................... 3
BENEFITS AND FEATURES ......................................................... 4
Benefits ................................................................................... 4
Features ................................................................................... 4
QUICK START GUIDE/WASHER USE......................................... 5
Starting Your Washer ................................................................ 7
Cycles ..................................................................................... 8
Additional Features ................................................................. 9
Modifiers ................................................................................. 9
Options ................................................................................. 10
Changing Cycles, Modifiers, and Options .............................. 10
Normal Sounds ...................................................................... 10
LAUNDRY TIPS ......................................................................... 11
WASHER CARE ......................................................................... 11
Cleaning your Washer ........................................................... 11
Water Inlet Hoses .................................................................. 12
Vacation, Storage, and Moving Care ...................................... 12
TROUBLESHOOTING .............................................................. 13
Washer and Components ...................................................... 13
Washer Operation ................................................................. 14
Clothing Care ........................................................................ 15
WARRANTY .............................................................................. 17
W10330932A
W10332291A - SP
GUIDE D'UTILISATION ET D'ENTRETIEN
AU CANADA, POUR ASSISTANCE, INSTALLATION OU SERVICE,
COMPOSER LE : 1.800.807.6777
OU VISITER NOTRE SITE INTERNET
WWW.MAYTAG.CA
Guide de d6marrage rapide/Utilisation de la laveuse .... pg. 21
TABLE DES MATIERES
ASSISTANCE OU SERVICE ....................................................... 18
Aux Etats-Unis ...................................................................... 18
Au Canada ............................................................................ 18
Accessoires ........................................................................... 18
SI_CURITI_ DE LA LAVEUSE ...................................................... 19
AVANTAGES ET CARACTI_RISTIQUES ...................................... 20
Avantages ............................................................................. 20
Caract6ristiques .................................................................... 20
GUIDE DE DI_MARRAGE RAPIDE/UTILISATION
DE LA LAVEUSE ....................................................................... 21
Mise en marche de [a [aveuse ............................................... 23
Programmes .......................................................................... 24
Caract6ristiques Supp[6mentaires .......................................... 25
Modificateurs ........................................................................ 25
Options ................................................................................. 26
Changement des programmes, modificateurs, et options ....... 26
Sons normaux ....................................................................... 27
CONSEILS DE LESSIVAGE ........................................................ 27
ENTRETIEN DE LA LAVEUSE .................................................... 28
Nettoyage de [a [aveuse ........................................................ 28
Tuyaux d'arriv6e d'eau .......................................................... 28
Pr6cautions _ prendre avant [es vacances,
un entreposage, ou un d6m6nagement .................................. 28
DI_PANNAGE ........................................................................... 29
I.a [aveuse et ses composants ................................................ 29
Fonctionnement de [a [aveuse ............................................... 31
Soin des v6tements ............................................................... 32
GARANTIE ............................................................................... 35

ASSISTANCE OR SERVICE
Before calling for assistance or service, please check "Troubleshooting." It may save you the cost of a service call. If you still need help, follow
the instructions below.
When calling, please know the purchase date and the complete mode[ and serial number of your appliance. This information will help us to
better respond to your request.
If you need replacement parts
If you need to order replacement parts, we recommend that you use only factory specified parts. Factory specified parts will fit right and work
right because they are made with the same precision used to build every new MAYTAG _k_appliance.
To locate factory specified parts in your area, ca[[ the following customer assistance telephone number or your nearest designated service center.
iiiH iii ¸ :i!!!iil....
Ca[[ Maytag Services, I_I_CCustomer Assistance to[[ free:
1-800-688-9900, or visit our website at www.maytag.com.
Our consultants provide assistance with:
• Features and specifications on our full line of appliances.
• Installation information.
• Use and maintenance procedures.
• Accessory and repair parts sales.
• Specialized customer assistance (Spanish speaking, hearing
impaired, limited vision, etc.).
• Referrals to local dealers, repair parts distributors, and service
companies. Maytag _k_appliances designated service technicians
are trained to fulfill the product warranty and provide after-
warranty service, anywhere in the United States.
To locate the Maytag <_appliances designated service company
in your area, you can also look in your telephone directory
Ye[ low Pages.
For further assistance
If you need further assistance, you can write to Maytag _ appliances
with any questions or concerns at:
Maytag Services, I.I_C
ATTN: CAI R_ Center
RO. Box 2370
Cleveland, TN 37320-2370
Please include a daytime phone number in your correspondence.
Call the Whirlpool Canada I_PCustomer Interaction Centre toll
free: 1-800-807-6777, or visit our website at www, whirlpool.ca.
Our consultants provide assistance with:
• Features and specifications on our full line of appliances.
• Use and maintenance procedures.
• Accessory and repair parts sales.
• Referrals to local dealers, repair parts distributors, and
service companies. Whirlpool Canada I_Pdesignated service
technicians are trained to fulfill the product warranty and
provide after-warranty service, anywhere in Canada.
For further assistance
If you need further assistance, you can write to Whirlpool Canada
I.P with any questions or concerns at:
Customer Interaction Centre
Whirlpool Canada I_P
1901 Minnesota Court
Mississauga, Ontario 1.5N 3A7
Please include a daytime phone number in your correspondence.
Enhance your washer with these premium accessories.
For more high-quality items or to order, call 1-800-901-2042, or visit us at www.maytag.com/accessories. In Canada, ca[[ 1-800-807-6777,
or visit us at www.whirlpoolparts.ca.
Pal! Numbe[ Accesso[y
8212638RP 6 ft (1.8 m) Nylon braided inlet hose, space-
saving 90 ° elbow, hypro-b[ue steel couplings.
(2 -pack)
8212487RP 5 ft (1.5 m) Nylon braided fill hose. (2-pack)
8212637RP 6 ft (1.8 m) Inlet hose, Black EPDM space-saving
90 ° elbow, hypro-b[ue steel couplings. (2-pack)
8212545RP 5 ft (1.5 m) Inlet hose, Red and Blue EPDM.
(2 -pack)
Part Numbe[ .............................Accesso[y
8212641RP 5 ft (1.5 m) Inlet hose, Black EPDM (2 pack)
8212546RP 4 ft (1.2 m) Inlet hose, Black EPDM (2 pack)
8212526 Washer drip tray, fits under all
31682 All purpose appliance cleaner
1903WH I.aundry supply storage cart
W10135699 AFFRESH <_washer cleaner

WASHER SAFETY
Your safety and the safety of others are very important.
We have provided many important safety messages in this manual and on your appliance. Always read and obey all safety
messages.
This is the safety alert symbol.
This symbol alerts you to potential hazards that can kill or hurt you and others.
All safety messages will follow the safety alert symbol and either the word "DANGER" or "WARNING."
These words mean:
You can be killed or seriously injured if you don't immediately
follow instructions.
You can be killed or seriously injured if you don't follow
instructions.
All safety messages will tell you what the potential hazard is, tell you how to reduce the chance of injury, and tell you what can
happen if the instructions are not followed.
IMPORTANT SAFETY INSTRUCTIONS
WARNING: To reduce the risk offire, electric shock, or injuryto persons when usingthe washer, follow basic precautions,
including the following:
• Read all instructions before using the washer.
• Do not wash articles that have been previously cleaned
in, washed in, soaked in, or spotted with gasoline,
dry-cleaning solvents, other flammable, or explosive
substances as they give off vapors that could ignite or
explode.
• Do not add gasoline, dry-cleaning solvents, or other
flammable, or explosive substances to the wash water.
These substances give off vapors that could ignite or
explode.
• Under certain conditions, hydrogen gas may be
produced in a hot water system that has not been used
for 2 weeks or more. HYDROGEN GAS IS
EXPLOSIVE. Ifthe hot water system has not been
used for such a period, before using the washing
machine, turn on all hot water faucets and let the water
flow from each for several minutes. This will release
any accumulated hydrogen gas. As the gas is
flammable, do not smoke or use an open flame during
Do not allow children to play on or in the washer. Close
supervision of children is necessary when the washer is used
near children.
Before the washer is removed from service or discarded,
remove the door or lid.
• Do not reach into the washer if the drum, tub or agitator is
moving.
• Do not install or store the washer where it will be exposed to
the weather.
• Do not tamper with controls.
• Do not repair or replace any part of the washer or attempt any
servicing unless specifically recommended in this manual or in
published user-repair instructions that you understand and
have the skills to carry out.
• See "Electrical Requirements" located in the installation
instructions for grounding instructions.
this time.
SAVE THESE INSTRUCTIONS
State of California Proposition 65 Warnings:
WARNING: This product contains a chemical known to the State of California to cause cancer.
WARNING: This product contains a chemical known to the State of California to cause birth defects or other reproductive harm.
3

BENEFITS AND FEATURES
Your washer has several benefits and features which are summarized here. Some items may not apply to your model.
High-Efficiency Wash System
Your new top loading, high-efficiency washer saves you time by
allowing you to do fewer; larger loads. It also conserves resources
and lowers your water and energy bills by using the following
innovations.
INTELLIFI LLTM Water Level Control
This washer senses the load size and composition through a series
of fills and wash motion. It then adjusts the water level for the best
cleaning and rinsing performance. It eliminates the guesswork. The
water level is just right for every wash load size.
NOTE: You may notice during a cycle that the wash load is not
completely submerged in water. This is normal for your washer.
Auto Temperature Control
The Auto Temperature Control system on this washer electronically
senses and maintains a uniform water temperature by regulating
incoming water temperatures. Using Auto Temperature Control will
help dissolve detergent.
Washer Impeller System
Your new washer works differently than most washers that you may
be accustomed to. The most striking difference is that the washer
has a washer impeller system. It uses this new innovative washer
impeller at the bottom of the wash basket to move your load
through a mixture of water and detergent. The load is moved from
the outside toward the middle with items coming up in the center
and down on the outside edges.
Dispensers
The dispensers make your washer truly automatic. It is unnecessary
for you to return to the washer during the cycle to add detergent,
bleach, fabric softener, laundry boosters, or oxi. I_aundry products
are added to the load at the proper time in the wash cycle.
Spin Speeds
This washer is preset to automatically select the spin speed based
on the cycle selected. Depending on your wash load, you can
change the preset speeds. The spin speed on this washer is nearly
twice as fast as that of a conventional washer. You may notice
different sounds during a spin cycle because of this higher speed.
High Efficiency (HE) Detergent
This washer is designed for High Efficiency (HE) detergent use only.
HE detergents are made to produce the right amount of suds and
give the best performance in low water wash systems.
Use only High Efficiency (HE) detergent
Innovative Features
Your new washer includes these features that help to reduce noise,
increase the ease of use, and improve wash performance.
Electronic Controls
Electronic controls with preset cycles are easy to use whether you
are a beginner or an "expert."
Quiet Operation
This washer is insulated with sound-dampening materials to reduce
washer operation sounds and noises.
Suspension System
To reduce washer "vibration," "walk," and "out of balance"
conditions, your new washer combines:
• 4 Spring damper struts to isolate vibration
• Balance ring at the top and bottom of the wash basket to
minimize vibration
• Operating software designed to sense and correct off-balance loads
Clean Washer with AFFRESH TM Cycle
This washer features an easy-to-use Clean Washer with AFFRESH TM
cycle that thoroughly cleans the inside of your washing machine
using higher water volumes in combination with AFFRESH _k_washer
cleaner or liquid chlorine bleach. The use of AFFRESH _k_washer
cleaner or liquid chlorine bleach with this cycle, will remove and
help avoid odor-causing residue.
Stainless Steel Basket
The stainless steel basket is corrosion resistant and enables higher
spin speeds for more water extraction, reducing drying time.
Self-clean Wash and Rinse Filter System
This washer filters 100% of the wash and rinse water. The water
is filtered then recirculated. The force filter traps sand and dirt,
flushing them down the drain, so they are not redeposited onto the
clean clothes.
End Signal - Off - On
The End Signal produces an audible sound when the wash cycle is
finished. This signal is helpful when you are removing items from
the washer as soon as it stops.
Water Save Spray Rinse
This washer is designed to have the option of saving water by
using a spray rinse instead of a deep water rinse. This option is
the default setting on some cycles. The option is selectable on
other cycles. When using fabric softene_; always select the Fabric
Softener button, or select Extra Rinse; both of these options will
dispense fabric softener in a deep rinse.

QUICK START GUIDE/WASHER USE
Fire Hazard
Never place items in the washer that are dampened
with gasoline or other flammable fluids.
No washer can completely remove oil.
Do not dry anything that has ever had any type of oil on
it (including cooking oils).
Doing so can result in death, explosion, or fire.
Electrical Shock Hazard
Plug into a grounded 3 prong outlet.
Do not remove ground prong.
Do not use an adapter.
Do not use an extension cord.
Failure to follow these instructions can result in death,
fire, or electrical shock.
For a summary of how to use your washer following installation, see the QUICK START GUIDE on the next page.
5

QUICKSTARTGUIDE
modifiers
estimated ti ..... ini"u Shee_avy duty _o1_ _ _otot_mpc_orol_
'o'y/.._-_.."XX°'o,s'to_e',.,°..°°°,.,..I _jxlct
power whites hwansdh star t L_
21 ) ......................
MAYTAG ........................ _ .... _" .......
BRAVOS
NOTE: The panel shown above may be different from that of your model.
r r r r r
WARNING: To reduce the risk of fire, electric shock, or injury to persons, read the IMPORTANT SAFETY INSTRUCTIONS
before operating this appliance.
The following is aguide to using your washer. Please refer to specific sections of this manual for more detailed information.

ii!iiiili!:,iii! iiiiiii :ii!!ill" iiilk: , i:i i i iii ii ¸.......
Your Maytag _"Washer is equipped with an "Auto Wake-up"
feature. Press any button or open and close the washer lid, and
the display will illuminate. The washer will automatically shut
down if a cycle is not selected and started right away.
• Your Maytag_'Washer will memorize and save all options
and modifiers that have been changed during setting mode
(exceptions apply to options for Super Wash, Rapid Wash,
and Normal cycles. They will default back to factory default
settings.)
Using the Proper Detergent
Use only High Efficiency detergents. The package for this type of
detergent will be marked "HE" or "High Efficiency." This wash
system, along with less water, will create too much sudsing
with a regular non-HE detergent. Using regular detergent will
likely result in washer errors, longer cycle times, and reduced
rinsing performance. It may also result in component failures and
noticeable mold or mildew. H E detergents are made to produce
the right amount of suds for the best performance. Follow the
manufacturer's instructions to determine the amount of detergent
to use. Remember, concentrated detergents such as 2x or higher
will use less detergent based on load size.
1o
Use only HE detergent.
Place a load of sorted clothes into the washer. See "l.aundry
Tips." For best performance, load garments in loose heaps
evenly around the basket wall.
2°
Pour measured powdered or liquid H Edetergent into the
High Efficiency detergent dispenser. Always use the detergent
dispenser, and do not put detergent directly onto clothes in the
washer.
NOTE: If you do not press Start/Pause within 5 minutes of pressing
Power/Cancel, the washer automatically shuts off.
3. Add color-safe bleach (powdered or liquid) to the detergent
dispenseb if needed. Be sure to match powdered color-safe
bleach with powdered detergent or match liquid color-safe
bleach with liquid detergent.
4. Pour measured liquid chlorine bleach into the liquid bleach
dispense_; if needed. Bleach is diluted and automatically
dispensed at the proper time during the wash cycle.
• I])o not overfill. I])o not dilute. I])o not use more than 1 cup
(250 ml.) for a full load. Use less with a smaller load size.
• Follow the garment and the chlorine bleach manufacturer's
directions for proper use.
• To avoid spilling, use a cup with a pouring spout. I])o not
let bleach splash, drip, or run clown into the washer basket.
• Atthe end of the cycle, a small amount of water may be
left in the dispenser. This is normal.
NOTE: Use only liquid chlorine bleach in this dispenser.
5o
Pour measured liquid fabric softener into the fabric softener
dispenser, if desired.
• If you are using fabric softene_; be sure to select Fabric
Softener from the options to assure proper dispensing.
NOTE:
I)o not overfill. I)o not dilute. The dispenser holds 3 oz
(94 ml.), or a capful of fabric softener.
Fabric softener is dispensed in a deep rinse when the Fabric
Softener option is selected. If Extra Rinse is selected, the
fabric softener will be dispensed during the final rinse.
I)o not use fabric softener dispensing balls in this washer.
Dispensing balls will not operate correctly with this washer.
I)o not spill or drip any fabric softener onto the clothes.
At the end of the cycle, a small amount of water may be left
in the dispenser. This is normal.
Use only liquid fabric softener in this dispenser.
7

6. Close the washer lid.
7. Select a Wash Cycle. See "Cycles."
8. Select the desired Modifiers. See "Modifiers."
9. Select an Option, if desired. See "Options." Select Fabric
Softener or Extra Rinse option if you are using liquid fabric
softener.
10. Select Delay Start, if desired. See "Delay Start" in the
"Modifiers" section.
11. Press START/PAUSE. The wash cycle begins, and the display
shows the estimated remaining time. The lid will lock.
NOTE: If you do not press START/PAUSE within 5 minutes of
pressing POWER/CANCEl., the washer automatically shuts off.
Turn the knob to choose the correct wash cycle for the type of
fabrics you are washing. When the knob points to a cycle, the
cycle and Start/Pause indicator lights will blink. If the default
settings for the Modifiers and Options are acceptable, you may
press START/PAUSE to begin the wash cycle.
normal
sheets _eavy duty
colors/towels
whites hand
wash
drain & spin
rinse & s[
_n washer
with affresh
Preset Cycle Settings
For ease of use, preset cycle settings provide the recommended
fabric care settings for each cycle.
To use the preset cycle settings:
1. Press POWER/CANCEl .....
2. Select the cycle you want by turning the knob. The preset cycle
settings will be displayed (see following chart).
NOTE: The preset times may vary slightly depending on your
model.
3. Press START/PAUSE. The wash cycle will begin.
Preset Cycle Settings
Cycle Preset Soil Level** Wash/Rinse
Minutes* Temp
Whites 1:16 Extra Heavy Hot/Cold
Bulky 0:52 Heavy Warm/Cold
Sheets 0:53 Heavy Warm/Cold
Normal 0:41 Heavy Warm/Cold
Heavy Duty 0:51 Heavy Warm/Cold
Colors/Towels 0:45 Heavy Warm/Cold
Hand Wash 0:36 I.ight Cool/Cold
Cycle Preset Soil Level** Wash/Rinse
Minutes* Temp
Clean Washer 1:02 Not Not
with AFFRESH TM applicable applicable
Rinse& Spin 0:24 Not Cool/Cold
applicable
Drain & Spin 0:13 Not Not
applicable applicable
*These times are for reference only and may not match your model
exactly.
**Cycle time in hours and minutes will appear in the display
while you are making selections. The total cycle time will appeab
including an estimated time for drain and fill times, once START/
PAUSE is pressed.
IMPORTANT: When washing waterproof/water-resistant items such
as plastic lined mattress pads, shower curtains, tarps, jackets, or
sleeping bags, select the lowest spin speed setting available for the
cycle and washer mode[ being used.
Whites
This cycle introduces liquid chlorine bleach to the load at the
proper time for improved whitening of your heavily soiled white
fabrics. This cycle combines high speed wash action and high
speed spin. For maximum soil and stain removal, liquid chlorine
bleach can be used in the liquid bleach dispenser. This cycle can
also be used for sturdy color fabrics such as towels without liquid
chlorine bleach.
Bulky
Use this cycle to wash large items such as comforters, sleeping
bags, and blankets. This cycle starts with a soak to thoroughly
saturate your large load. This is followed by medium wash action
and medium spin speeds to maintain load balance.
Sheets
Use this cycle for sheets, pillowcases, and light blankets or throws.
The wash action of this cycle is designed to keep large items from
tangling and bailing up.
IMPORTANT: For best performance, drop items in loose heaps
evenly around the basket wall. I)o not load items directly on the
impeller for this cycle.
Normal
Use this cycle for normally soiled cottons and mixed fabric loads.
This cycle combines high speed wash action and medium speed
spin. A Water Save Spray Rinse is a preset cycle setting for this
cycle.
Heavy Duty
Use this cycle for heavily soiled or sturdy cotton items. Cycle
combines high speed wash action and high speed spin. A Water
Save Spray Rinse is a preset cycle setting for this cycle.
Colors/Towels
Use this cycle for lightly soiled, colored clothing or towels. This
cycle is a good choice for garments with a wrinkle free finish. This
cycle uses medium speed wash action and medium speed spin.
Hand Wash
This cycle combines low-speed wash and low-speed spin action
to clean items labeled as "Machine Washable" on the garment
care label. Pre Soak and Deep Clean options are not available
in this cycle.

Clean Washer with AFFRESH TM
Use the Clean Washer with AFFRESH _ cycle once a month to keep
the inside of your washer fresh and clean. This cycle uses a higher
water [eve[. Use with AFFRESH ,k_washer cleaner tablet or liquid
chlorine bleach to thoroughly clean the inside of your washer.
This cycle should not be interrupted. See "Cleaning Your Washer."
IMPORTANT: Do not place garments or other items in the washer
during the Clean Washer with AFFRESH T'cycle. Use this cycle with
an empty wash tub.
Rinse & Spin
Use this option to get a deep rinse followed by a high-speed spin.
The time display will include an estimate of how long it will take
to fill and drain the washer.
When to use RINSE & SPIN:
• For loads that need rinsing only.
• For completing a cycle after the power has been off. The washer
will return to pause mode if the power was interrupted or
unplugged while cycle was running.
Drain & Spin
[)rain & Spin may help shorten drying times for some heavy fabrics
or special-care items. [)rain & Spin may also be used for draining
the washer after canceling a cycle or completing a cycle after a
power failure.
These lights show when the cycle is complete. They indicate when
you can add other garments to the wash load and remind you
when it's time to clean the washer.
• done • add a garment
• clean washer reminder
Indicator lights
An indicator light shows which Cycle, Modifiers, and Options you
have selected.
Clean Washer Reminder
Clean Washer Reminder indicator lights after 45 wash cycles
without a clean washer cycle. See the "Cleaning your washer"
section to run the clean washer cycle, or you can press the
Reminder Reset button to manually reset clean washer cycle
counter.
• done
• addagarment
[reminder}
• cleanwasherreminder reset
Estimated Time Remaining
When a wash cycle is started, the estimated time remaining for the
cycle, including fills and drains, will be displayed. The time will
count down to the end of the cycle.
estimated time remaining
Modifiers allow you to further customize your cycles and save energy.
modifiers
• cold
cold
• low
• light
(
• warm • hot | wash temp
cold cold [ rinse temp
m auto temp control m
• medium •max [ spin speed
extract
L
• medium • heavy [ soil level
]
}
}
Wash Temp/Rinse Temp
Select a water temperature based on the type of load you are
washing. Use the warmest wash water safe for fabrics. Follow
garment label instructions.
Warm rinses leave the loads drier and more comfortable to handle
than cold rinses. However, warm rinses also increase wrinkling.
Cold rinses may help with wrinkling and save energy.
___________________________________________________________________________________________________r
Wash Water Temperature Suggested Fabrics
Hot Whites and pastels
Warm Bright colors
Cold Colors that bleed or fade
NOTE: In wash water temperatures colder than 60°F (15.6°C),
detergents do not dissolve we[[. Soils may be difficult to remove.
Spin Speed
This washer automatically selects the spin speed based on the
cycle selected. The preset speeds can be changed. Spin speeds
may vary by cycle.
Soil Level
Soil I_eve[ (wash time) is preset for each wash cycle. See "Preset
Cycle Settings" in "Cycles." As you press the Soil I_eve[ pad,
the cycle time will increase or decrease in the Estimated Time
Remaining display and a different wash time will appear. To get
the minimum wash time, press the pad until the indicator light
next to I_ight illuminates. This is the shortest wash time available
for that cycle with the wash options selected.
• For most loads, use the time recommended in the preset cycle
settings.
• For heavy soil and sturdy fabrics, press Soil I.evel to select
more wash time, if needed.
• For light soil and delicate fabrics, press Soil I.evel to select less
wash time, if needed.
Auto Temperature Control
Auto Temperature Control (ATC) electronically senses and
maintains a uniform wash and rinse water temperature. ATC
regulates incoming hot and cold water. The ATC is automatically
turned On when a cycle is selected. (See "Preset Cycle Settings"
in "Cycles.")
9

ATC is available with Warm/Warm, and Warm/Cold settings. The
water temperature in the Hot/Cold and Cold/Cold settings depends
on the water temperature at the water inlet faucets.
• ATC ensures consistent cleaning.
• Heated water consumes the largest amount of energy that a
washer uses.
• Today's detergents work well at temperatures above 60°F
(15.6°C).
Use these pads to select or deselect the options for your wash
cycle. Options may add time to the wash cycle.
options
I abric I
softener
extra rinse
1
I end signal ]
on
end signal
off
Fabric Softener
Fabric Softener option must be selected if liquid fabric softener
is added to the fabric softener dispenser. Fabric softener will also
be dispensed in the last rinse of the Extra Rinse cycle, if selected.
This option flushes the dispenser at the correct time in a deep
water rinse for optimal distribution.
Extra Rinse
An Extra Rinse can be used to aid in the removal of detergent
or bleach residue, or particulates such as sand and lint, from the
load. This option provides an additional rinse with the same water
temperature as the first rinse. This is the default rinse setting for the
Whites cycle.
End Signal - On / End Signal - Off
The End Signal - On button produces an audible sound when
the wash cycle is finished. This signal is helpful when you are
removing items from the washer as soon as it stops. If you do not
want an audible sound when the wash cycle is finished, select the
End Signal - Off button.
You can change Cycles, Modifiers, and Options anytime before
START/PAUSE is pressed. Not all Modifiers and Options are
available for all cycles.
A short tone sounds when a change is selected. If you press
and hold the End Signal - Off option for more than five
seconds, all valid beeps will be eliminated. To turn the signals
back on, press and hold the End Signal - On button for five
seconds.
• Three short tones sound if an unavailable combination is
selected. The last selection will not be accepted.
To return all options and modifiers to Factory Default, press
POWER/CANCEl., select Drain & Spin cycle, and then press
Extra Rinse, Fabric Softener, Extra Rinse, Fabric Softener within
5 seconds. When done correctly, the 7-segment displays show
"Fd" for 3 seconds and then the unit returns to Standby Mode.
Changing Cycles after pressing Start
1. Press POWER/CANCEl. once to cancel the cycle. The washer
will drain.
2. Select the desired wash cycle.
3. Select the desired Modifiers and Options.
4. Press START/PAUSE.
The washer restarts at the beginning of the new cycle.
NOTE: If you do not press START/PAUSE within 5 minutes of
pausing the washer, the washer automatically shuts off.
Changing Modifiers and Options after pressing START/
PAUSE
You can change a Modifier or Option anytime before the selected
Modifier or Option begins, by choosing the desired Modifiers
and/or Options.
NOTE: An error tone will sound if your selection is unavailable.
To manually drain the washer and spin the load
1. Press POWER/CANCEl. once to cancel the wash cycle and
drain the washer.
2. Turn knob to select DRAIN & SPIN.
3. Press START/PAUSE.
When the spin is complete, the lid unlocks. Items can be removed
from the washer.
i _i! iiili_!i!i!i!i!iiil!i!i!i!i!iiiilililiii_i_iiiiiiiii_[iiii_!iilii_¸ii_i_¢iiiiiiiiiiiiiiiililil_ii_i;iii!!_¸
Your new washer may make sounds your old one didn't. Because
the sounds might be unfamiliar; you may be concerned about
them. These sounds are normal.
During washing
You will hear spin/spray noise throughout the cycle.
During drain
If water is drained quickly from your washer (depending on your
installation), you may hear air being pulled through the pump
during the end of draining.
During wash and spin
This washer does not have a transmission. The motor provides
direct drive for agitation and spin. You will hear sounds that are
different from those of a conventional washer.
10

LAUNDRY TIPS
Preparing clothes for washing
Follow these recommendations to help you prolong the life of your
garments.
Use only High Efficiency detergents. The package for this
type of detergent will be marked "HE" or "High Efficiency."
This wash system, along with less wateb will create too
much sudsing with a regular non-HE detergent. Using regular
detergent will likely result in washer errors, longer cycle
times, and reduced rinsing performance. It may also result
in component failures and noticeable mold or mildew. HE
detergents are made to produce the right amount of suds for
the best performance. Follow the manufacturer's instructions
to determine the amount of detergent to use. Remembeb
concentrated detergents such as 2x or higher will use less
detergent based on load size.
Use only HE detergent.
Close zippers, snaps, and hooks to avoid snagging other items.
Tie strings and sashesto avoid tangles.
Remove pins, buckles, and other hard objects to avoid
scratching the washer interior. Remove non-washable trim and
ornaments.
Empty pockets and turn them inside out; turn down cuffs. Turn
wool and synthetic knits inside out to avoid pilling.
Brush away lint and dirt. Treat spots and stains; stained or wet
garments should be washed promptly for best results.
Sorting
• Separate heavily soiled items from lightly soiled ones, even
if they would normally be washed together. Separate lint-
givers (towels, chenille) from lint-takers (corduroy, synthetics,
permanent press). When possible, turn lint-givers inside out.
• Separate dark colors from light colors, colorfast items from non
colorfast items.
• Sort by fabric and construction (sturdy cottons, knits, delicate
items).
• Separate bulky, nonabsorbent items such as comforters,
pillows, and poly-filled jackets. Use the Bulky cycle for these
items.
Separate sheets, pillowcases, and light blankets or throws and
use the Sheets cycle for these items. For best performance,
drop items in loose heaps evenly around the basket wall and
do not load items directly on the impeller for this cycle.
When washing waterproof/water-resistant items such as
plastic lined mattress pads, shower curtains, tarps, jackets, or
sleeping bags, select the lowest spin speed setting available for
the cycle and washer mode[ being used.
Loading/Unloading
• For best performance, load garments in loose heaps evenly
around the basket wall.
• Remove clothes from the washer after the cycle is completed.
Metal objects such as zippers, snaps, and buckles may rust if
left in the washer basket for a long time.
• Mend tears, loose hems, and seams.
WASHER CARE
_iiiiiiiiiiill
Washer Maintenance Procedure
This washer has a special cycle that uses higher water volumes,
in combination with AFFRESH <_washer cleaner or liquid chlorine
bleach to thoroughly clean the inside of the washer.
NOTES:
• Read these instructions completely before beginning the
cleaning process.
After every 45 cycles, the Clean Washer Reminder status light
glows. I_ight can be deactivated by running the Clean Washer
with AFFRESH r_, cycle or you can press the Reminder Reset
button and sta_l the Clean Washer Reminder cycle count over
again.
It is recommended that you allow the cleanout cycle to
complete without interruptions. If necessary, the cleanout cycle
may be cancelled by pressing the POWER/CANCEl. button
once.
IMPORTANT: If the cleanout cycle is cancelled, run a Rinse
& Spin cycle to ensure that all remaining washer cleaner or
bleach is rinsed from the washer.
Begin procedure
1. Open the washer lid and remove any clothing or items from
the washer.
2. Using the AFFRESH ':"washer cleaner (Recommended):
Add one AFFRESH <_washer cleaner tablet to the washer
basket.
If using liquid chlorine bleach:
Add 1 cup (250 ml.) liquid chlorine bleach to the bleach
dispenser.
NOTE: Do not add any detergent or load to this cleaning
cycle. Use of more than 1 cup (250 ml.) of bleach will cause
product damage over time.
3. Close the lid.
4.
Turn Cycle Control knob to Clean Washer with AFFRESH_
cycle.
• The Estimated Time Remaining display will show
approximately 1:02.
5. Press START/PAUSE.
• The cycle will begin and water will dispense in the washer
for a moment and pause, then the lid will lock and the
cycle will continue.
• Once the cleaning cycle has begun, allow the cycle to
complete. An estimated cycle time will appear on the
display.
11

Always do the following to maintain washer freshness
• Use only HE detergent when washing a clothes load.
• Repeat the cleaning procedure monthly, using one AFFRESH <_
clean washer tablet or 1 cup (250 ml.) of liquid chlorine
bleach.
• If the procedure does not sufficiently improve washer freshness,
evaluate your installation and usage conditions for other
causes.
Cleaning the exterior
Use a soft damp cloth or sponge to wipe up any spills.
Occasionally wipe the outside of your washer to keep it looking
new. Use mild soap and water. Do not use abrasive products.
Replace inlet hoses after 5 years of use to reduce the risk of hose
failure. Periodically inspect and replace inlet hoses if bulges,
kinks, cuts, wear, or leaks are found.
When replacing your inlet hoses, mark the date of replacement on
the label with a permanent marker.
Install and store your washer where it will not freeze. Because
some water may stay in the hoses, freezing can damage your
washer. If storing or moving your washer during freezing weather,
winterize it.
Non-use or vacation care:
Operate your washer only when you are at home. If you will be on
vacation or not using your washer for an extended period of time,
you should:
• Unplug washer or disconnect power.
• Turn off the water supply to the washer. This helps avoid
unintended flooding (due to a water pressure surge) while
you are away.
To winterize washer:
1. Shut off both water faucets.
2. Disconnect and drain water inlet hoses.
3. Put 1 qt (1 I.) of R.V.-type antifreeze in the basket.
4. Run washer on the Rinse & Spin setting for about 30 seconds
to mix the antifreeze and remaining water.
5. Unplug washer or disconnect power.
To use washer again:
1. Flush water pipes and hoses. Reconnect water inlet hoses. Turn
on both water faucets.
Electrical Shock Hazard
Plug into a grounded 3 prong outlet.
Do not remove ground prong.
Do not use an adapter.
Do not use an extension cord.
Failure to follow these instructions can result in death,
fire, or electrical shock.
2.
3.
Plug in washer or reconnect power.
Run the washer through the Bulky cycle to clean the washer
and remove the antifreeze, if used. Use only HE detergent.
Use I/2 the manufacturer's recommended amount for a
medium-size load.
To
1.
2.
3.
4.
5.
6.
7.
8.
transport the washer:
Shut off both water faucets.
Disconnect and drain water inlet hoses.
If the washer will be moved during freezing weatheb put 1 qt
(1 I.) of R.V.-type antifreeze in the basket. Run washer on the
Rinse & Spin setting for about 30 seconds to mix the antifreeze
and remaining water.
Disconnect the drain from the drain system.
Unplug the power cord.
Place the inlet hoses into the basket.
Drape the power cord and drain hose over edge into the
basket.
Place foam packing ring from the original shipping materials in
the top of washer. If you do not have the original foam packing
ring, place heavy blankets, towels, etc. into basket opening.
Close the lid and put a piece of tape over the lid and down
to the front of the washer. Keep lid taped until the washer is
placed into the new location.
Reinstalling the washer:
1. Follow the Installation Instructions to locate, level, and
connect the washer.
2.
Run the washer through the Bulky cycle to clean the washer
and remove the antifreeze, if used. Use only HE detergent.
Use % the manufacturer's recommended amount for a
medium-size load.
12

TROUBLESHOOTING
First try the solutions suggested here and possibly avoid the cost of a service call...
For additional recommendations, refer to your Installation Instructions.
iii_,_ii_Si_i!!i_:i!!!!ii!%iiii!!i_¸¸'¸¸_ii!iiiiiiiiiiii_ii:ilii!iiiiiiiiiii_ii_i_Tiiiiiiii:::ii_ii%_iiiii_ii!!i_iiiiiiiiiiiilili:_!_ •
Washer displaying code messages
• LF; "LF" (Washer is taking too long to fill) •
Check the following:
Are the hot and cold faucets turned on?
Are the water inlet hoses kinked or clogged?
Are the water inlet valve screens clear?
Press POWER/CANCEl. to clear display. •
• Ld "Ld" (Washer is taking too long to drain water from the
wash tub)
Check the following:
Is the drain hose kinked or clogged?
Is the drain hose installed properly? See "Connect the •
Drain Hose" in the Installation Instructions, Press
POWER/CANCEl_ to clear display.
• uL "uL" (Unbalanced Load)
If the load is unbalanced, the washer will display this code
while running an imba[anced load correction routine at the
end of the wash cycle and before the final spin. If the code
remains and the wash cycle dial is flashing after the recovery
routine has stopped, open lid and redistribute the load. Close
lid and press START/PAUSE.
NOTE: For best performance, load garments in loose heaps
evenly around the basket wall. •
• oL "oL" (Over Load)
The washer has attempted to fill and begin the wash cycle.
If the washer is tightly packed, it will drain any water and
detergent that was added during the fill. To correct the tightly
packed washe_, remove several items and add detergent.
Close lid and press START/PAUSE. •
• _d "Sd" (Suds Detected)
Did you use regular detergent?
Regular or non-HE hand-washing detergents are not
recommended for this washer.
Use only HE detergent.
Did you add too much detergent?
Always measure detergent precisely. Follow detergent
manufacturer's directions. Remember, concentrated detergents
such as 2x or higher will use less detergent based on load size.
If excessive suds are detected, the washer will display this
code while running a suds reduction correction routine at the
end of the wash cycle. The suds reduction routine removes
extra suds and assures proper rinsing of your garments. If the
code remains and the wash cycle dial is flashing after the
recovery routine has stopped, re-select your desired cycle
using cold water. Press START/PAUSE. Do not add detergent.
_d "lid" (Lid Opened)
Is the lid open? Close the lid to clear the display. If the lid
remains open for more than 10 minutes, water in the wash tub
will drain.
HE "HC" (Cold and Hot hoses switched)
This code will appear at the end of the wash cycle to indicate
that the cold and hot water inlet hoses are switched. See
"Connect the Inlet Hoses", in the Installation Instructions.
dL "dL" (Door/Lid cannot lock)
Indicates lid is not locked. Check for items caught in the lid
keeping it from closing. Press POWER/CANCEl. once to clear
the code.
dU "dU" (Door/Lid cannot unlock)
Is there excessive weight on the lid, such as a basket of
laundry? Excessive weight will keep the lid from unlocking.
Press POWER/CANCEl. once to clear the code.
___ "F##" code
Press POWER/CANCEl. once to clear code. Press
START/PAUSE to continue cycle. If code appears again,
ca[[ for service.
Fd "Fd" (Factory Default)
This code will appear when your washer sets back to factory
default.
To return all options and modifiers to Factory Default, press
POWER/CANCEl., select Drain & Spin cycle, and then press
Extra Rinse, Fabric Softener, Extra Rinse, Fabric Softener within
5 seconds. When done correctly, the 7-segment displays show
"Fd" for 3 seconds and then unit returns to Standby Mode.
Noisy, vibrating, off-balance
Is the washer level? Does the washer rock when pushed
against the corners?
The washer must be level. The front and rear feet must
be in firm contact with the floor. Check that the Iocknuts
are tightened. See "l.evel the Washer" in the Installation
Instructions.
Is the floor flexing, sagging, or not level?
Flooring that flexes or is uneven can contribute to noise and
vibration of the washer. A V4" (1 9 mm) piece of plywood
under the washer will reduce the sounds. See "l.ocation
Requirements" in the Installation Instructions.
Is the load balanced?
Evenly distribute the load in the washer basket.
Do you hear clicking or other noises when the cycle changes
from washing to draining or spinning?
When the drive system shifts or the washer basket settles
between cycles, you may hear noises that are different from
your previous washer. These are normal washer noises.
Is the washer gurgling or humming?
When the washer drains, the pump will make a continuous
humming with periodic gurgling or surging sounds as the final
amounts of water are removed. This is normal
• Are you washing a small load?
You will hear more splashing sounds when washing small
loads. This is normal.
• The washer basket moves while washing.
This is normal.
• Can you hear water spraying?
This is part of the wash action.
• Are you washing items with metal snaps, buckles, or zippers?
You may hear metal items touching the basket. This is normal
13

Did you pull the drain hose from the washer cabinet and
install it in a standpipe or laundry tub?
The drain hose should be pulled from the washer cabinet
and secured to the drainpipe or laundry tub. See "Connect
Drain Hose" and "Secure the Drain Hose" in the Installation
Instructions.
Is the sink or drain clogged?
Sink and drainpipe must be able to carry away 17 gal. (64 I_)of
water per minute. If sink or drainpipe is clogged or slow, water
can back up out of drainpipe or sink.
Is water splashing off the tub ring or the load?
Unbalanced loading can cause the basket to be out of
alignment and cause water to splash off tub.
Is the washer properly installed?
The washer must be [eve[. The feet should be properly
installed and the nuts tightened. See "l.eve[ the Washer" in the
Installation Instructions.
Check household plumbing (laundry tubs, faucets, drainpipe,
water pipes) for leaks.
Dispenser operation
• Did you select Fabric Softener option?
Always select Fabric Softener option when using liquid fabric
softener.
Are the laundry products in the correct dispensers?
Add the correct amounts of detergent (powdered or liquid),
liquid chlorine bleach, or fabric softener to the correct
dispenser. You can add powdered or liquid color-safe bleach to
the detergent dispenser. Be sure to match powdered color-safe
bleach with powdered detergent or match liquid color-safe
bleach with liquid detergent. Use only liquid chlorine bleach
in the bleach dispenser. Do not dilute fabric softener or bleach,
or they will siphon out and dispense at the wrong time.
• Is there water remaining in the bottom of a dispenser? Did the
dispenser drain properly?
A small amount of water may be left in a dispenser at the end
of the cycle. This is normal.
Washer odor
• See"Cleaning Your Washer."
Are you using AFFRESH k_washer cleaner on a regular basis?
AFFRESH _washer cleaner removes and avoids odor-causing
residue in all High Efficiency washers. For washers where odor
is present, use 3 tablets instead of 1 tablet. After the Clean
Washer with AFFRESH '" cycle is complete, wipe away residue
if necessary.
Are you using HE detergent?
Use of non-HE detergent can cause a film residue which can
result in odor.
Electrical Shock Hazard
Plug into a grounded 3 prong outlet.
Do not remove ground prong.
Do not use an adapter.
Do not use an extension cord.
Failure to follow these instructions can result in death,
fire, or electrical shock.
Washer won't fill, rinse, or agitate; washer stops
• Is the power cord plugged into a grounded 3 prong outlet?
Plug power cord into a grounded 3 prong outlet.
• Are you using an extension cord?
I)o not use an extension cord.
• Is there power at the plug?
Check electrical source or call electrician.
• Is the indicator on the Cycle Control knob properly lined up
with a cycle?
Turn the Cycle Control knob to the right slightly.
• Are the water inlet valve screens clogged?
Turn off the water and remove inlet hoses from the washer.
Remove any accumulated film or particles. Reinstall hoses,
turn on water, and check for leaks.
• Are the hot and cold water faucets turned on?
Turn on the water.
Is the water inlet hose kinked?
Straighten the hoses.
Does the water level seem too low, or does the washer appear
to not fill completely?
The Auto Water I_evel feature senses the size of the load and
adds the correct amount of water for the load size. You may
notice during a cycle that the wash load is not completely
submerged in water. This is normal and necessary for clothes
to move.
• Has a household fuse blown, or has a circuit breaker tripped?
Replace the fuse or reset the circuit breaker. If the problem
continues, call an electrician.
• Is the washer in a normal pause in the cycle?
The washer may pause during certain cycles. Allow the cycle
to continue.
Is the washer tightly packed?
Wash smaller loads. I.oad in loose heaps.
Is there over sudsing?
Cancel the current cycle. Select Drain & Spin to drain the load.
Re-select your desired cycle and press START/PAUSE. Do not
add detergent. Use cold water.
14

Is the lid open?
The lid must be closed during operation. The washer will not
operate with the lid open.
• Did you add more items to the load once the washer started?
Once the load is wet, there may appear to be space for more
items. Do not add more than 1 or 2 garments after the cycle
has started. For best results, determine load size with dry items
only.
Washer continues to fill or drain, or the cycle seems
stuck
• Is the top of drain hose lower than the control knobs on washer?
The top of the drain hose must be at [east 39" (991 ram) above
the floor. See "Drain System" in the Installation Instructions.
Does the drain hose fit too tightly in the standpipe, or is it
taped to the standpipe?
The drain hose should be loose yet fit securely. I::)o not sea[
the drain hose with tape. The hose needs an air gap. See
"Installation Instructions."
Washer won't drain or spin; water remains in washer
• Is the drain hose clogged, or the end of the drain hose more
than 96" (2.4 m) above the floor?
See "Drain System" in the Installation Instructions.
• Is the lid open?
The lid must be closed during operation. The washer will not
operate with the lid open.
• Is there excessive sudsing?
Always measure detergent. Follow detergent manufacturer's
directions. If you have very soft water, you may need to use less
detergent.
Use only HE detergent.
Wash/Rinse temperature
Are the hot and cold water inlet hoses reversed?
If the hot and cold water inlet hoses are reversed, the washer
will display an "HC" error code at the end of the cycle.
See "Connect the Inlet Hoses" in the Installation Instructions.
Are you washing many loads?
As your frequency of loads washed increases, the water
temperature may decrease for hot and warm temperatures.
This is normal
Do you have an ENERGY STAR _ qualified washer?
The wash water temperatures may fee[ cooler to you than those
of your previous washer. This is normal
Does the wash water temperature feel lower than usual?
As washing progresses, the wash temperature will decrease
slightly for hot and warm washes. This is normal To reduce
wrinkling, the warm rinse is regulated to be cooler than the
warm wash.
Excessive sudsing
• Did you use a non-HE detergent?
Regular or non-HE hand-washing detergents are not
recommended for this washer. Use only HE detergent.
Use only HE detergent.
Is there excessive sudsing?
Always measure detergent precisely. Follow detergent
manufacturer's directions. If you have very soft water, you
might need to use less detergent. Remember, concentrated
detergents such as 2x or higher will use less detergent based
on load size.
Selecting a Fabric Softener or Extra Rinse option will help flush
excess suds from your washer.
iiii:iI ii i ii¸
Load too wet
• Did you use the right spin speed for the load being washed?
Select a higher spin speed.
• Did you use a cold rinse?
Cold rinses leave loads wetter than warm rinses. This is normal
Did you wash an extra large load?
A large unbalanced load could result in a reduced spin speed
and wet clothes at the end of the cycle. Evenly distribute the
load so they are not tightly packed. Select Drain & Spin to
remove excess water from the load.
Residue or lint on load
• Did you add detergent to the dispenser?
For best results, use the dispenser to dissolve the detergent.
• Did you sort properly?
Sort lint givers (towels, chenille) from lint takers (corduroy,
synthetics). Also sort by color.
• Did you pack the load tightly when loading?
Add the load evenly around the basket wall in loose heaps.
Clothes should move freely. Lint or powdered detergent can be
trapped in the load if the washer is tightly packed.
• Did you use enough detergent?
Follow detergent manufacturer's directions. Use enough
detergent to hold the lint in the water.
• Did you line dry your clothing?
If so, you can expect some lint on the clothing. The air
movement and tumbling of a dryer removes lint from the load.
• Was paper or tissue left in pockets?
• Is your water colder than 60°F (15.6°C)?
Wash water colder than 60°F (15.6°C) may not completely
dissolve the detergent.
• Did you use the proper Soil Level and Wash Cycle for the load?
Reducing wash time (duration) and wash speed are ways to
reduce [int.
15

• Did you select a Water Save Rinse cycle?
For loads with particulates such as sand or lint, an Extra Rinse
cycle can be added to all wash cycles to aid in the removal of
particulates, detergent, and bleach residues.
toad is wrinkled, twisted, or tangled
HHHHHHHHHHHHHHHHHHHHHHHHHHHHHHHHHHHHHHHHHHHHHHHHHHHHHHHHHHHHHHHHHHHHHHHHHHHHHHHHHHHHHHHHHHHHHHHHHHHHHHHHHHHHHHHHHHHHH_
• Did you unload the washer promptly?
Unload the washer as soon as it stops.
• Did you use the right cycle for the load being washed?
To reduce wrinkling, tangling, and twisting, select a lower spin
speed on the selected cycle, or select a more delicate cycle
such as Hand Wash or Wrinkle Control
• Did you tightly pack the washer?
I.oad garments in loose heaps evenly around the basket wall.
Reduce tangling and wrinkling by mixing types of load items.
• Was the wash water warm enough to relax wrinkles?
If safe for the load, use warm or hot wash water. Use cold
rinse water.
• Are the hot and cold water hoses reversed?
Check that the hot and cold water hoses are connected to
the correct faucets. If the hot and cold water inlet hoses
are reversed, the washer will display an "HC" error code at
the end of the cycle. See "Connect the Inlet Hoses" in the
Installation Instructions. A hot rinse followed by spin will
cause wrinkling.
Stains, gray whites, dingy colors
• Did you properly sort the load?
The transfer of dye can occur when mixing whites and colors
in a load. Sort dark clothes from whites and lights.
Was the wash temperature too low?
Use hot or warm washes if safe for the load. Make sure your
hot water system is adequate to provide a hot water wash.
Did you use enough detergent, or do you have hard water?
Use more detergent for washing heavy soils in cold or hard
water. Water temperature should be at least 60°F (15.6°C) for
soap to dissolve and work properly. For best performance, use
the detergent manufacturer's recommended amounts.
Did you follow the manufacturer's directions when adding
detergent and fabric softener?
Measure detergent and fabric softener. Use enough detergent
to remove soil and hold it in suspension. Do not drip fabric
softener onto clothes.
• Is there above average iron (rust) in water?
You may need to install an iron filter.
• Did you add detergent to the dispenser?
For best results, use the dispenser to dissolve the detergent.
• Did you add fabric softener directly to the load?
Use your Fabric Softener dispenser and select Fabric Softener
option. Do not drip fabric softener onto clothes.
• Did you use a fabric softener dispensing ball?
Use the fabric softener dispenser provided with the washer.
Dispensing balls will not operate correctly with this washer.
• Did you unload the washer promptly?
To avoid the transfer of dye, unload the washer as soon as it stops.
Did you add detergent, chlorine bleach, or fabric softener,
too late in the cycle?
Detergent, chlorine bleach, or fabric softener should be added
to the dispensers before starting the washer.
Did you use Rapid Wash on a large load?
Rapid Wash is designed to wash only a few items for best results.
For heavily soiled garments, select an Extra Rinse to ensure
stains, soils, and detergents are thoroughly rinsed from the
load.
Garments damaged
Were sharp items removed from pockets before washing?
Empty pockets, zip zippers, snap or hook fasteners before
washing to avoid snagging and tearing of load.
Were strings and sashes tied to avoid tangling?
Straps and strings can easily become entangled in the load,
causing strain on seams and tearing.
Were items damaged before washing?
Mend rips and broken threads in seams before washing.
Did you tightly pack the washer?
I.oad garments in loose heaps evenly around the basket wall to
avoid fabric damage.
Did you add chlorine bleach properly?
Do not pour chlorine bleach directly onto load. Wipe up
bleach spills. Undiluted bleach will damage fabrics. Do not
place load items on top of the bleach dispenser when loading
and unloading the washer (on some modeis). Do not use more
than the manufacturer's recommended amount for a full load.
• Did you follow the garment manufacturer's care label
instructions?
Load not rinsed
• Did you use the proper detergent?
Regular or non-HE hand washing detergents are not recommended
for this washer.
Use only HE detergent.
Did you follow the manufacturer's directions when adding
detergent and fabric softener?
Always measure detergent and fabric softener precisely. Follow
detergent manufacturer's directions. If you have very soft wateb
you might need to use less detergent. Remembeb concentrated
detergents such as 2x or higher will use less detergent based on
load size.
Selecting a Fabric Softener or Extra Rinse option will help flush
excess suds from your washer.
Did you select the Fabric Softener button?
If liquid fabric softener is added to the dispenseb the Fabric
Softener option must be selected.
Was the Water Save Spray Rinse selected?
This spray rinse optimizes the water used for rinsing the load. If
extra rinsing is needed due to skin sensitivities, a high sudsing
detergent, or particulates in the load, such as sand or lint, select
the Extra Rinse option.
16

MAYTAG ®LAUNDRY LIMITED WARRANTY
This Maytag Limited Warranty supersedes and replaces the limited warranty printed in the Use and Care Guide for products sold
within the United States of America and Canada.
FIRST YEAR
For one year from the date of purchase, when this major appliance is operated and maintained according to instructions attached to or
furnished with the product, Maytag brand of Whirlpool Corporation or Whirlpool Canada I.P (hereafter "Maytag") will pay for factory
specified parts and repair labor to correct defects in materials or workmanship that existed when this major appliance was purchased.
SECOND THROUGH TENTH YEAR (DRUM MOTOR AND STAINLESS STEEL BASKET ONLY)
In the second through tenth years from the date of original purchase, when this major appliance is operated and maintained according to
instructions attached to or furnished with the product, Maytag will pay for the replacement of the drum motor (stator and rotor only) and
stainless steel basket (side walls only) to correct non-cosmetic defects in materials or workmanship in these parts that prevent function of the
washer and that existed when this major appliance was purchased. This limited 10-year warranty on the drum motor (stator and rotor only)
and stainless steel basket (side walls only) does not include [abon
YOUR SOI.E AND EXCI_USIVE REMEDY UNDER THIS I.IMITED WARRANTY SHAI.I_ BE PRODUCT REPAIR AS PROVIDED HEREIN. Service
must be provided by a Maytag designated service company. This limited warranty is valid only in the United States or Canada and applies
only when the major appliance is used in the country in which it was purchased. This limited warranty is effective from the date of original
consumer purchase. Proof of original purchase date is required to obtain service under this limited warranty.
ITEMS EXCLUDED FROM WARRANTY
This limited warranty does not cover:
1. Replacement parts or repair labor if this major appliance is used for other than normal, single-family household use or when it is used in
a manner that is inconsistent to published user or operator instructions and/or installation instructions.
2. Service calls to correct the installation of your major appliance, to instruct you on how to use your major appliance, to replace or repair
house fuses, or to correct house wMng or plumbing.
3. Service calls to repair or replace appliance light bulbs, air filters or water filters. Consumable parts are excluded from warranty coverage.
4. Damage resulting from accident, alteration, misuse, abuse, fire, flood, acts of God, improper installation, installation not in accordance
with electrical or plumbing codes, or use of products not approved by Maytag.
5. Cosmetic damage, including scratches, dents, chips or other damage to the finish of your ma'orj appliance, unless such damage results
from defects in materials or workmanship and is reported to Maytag within 30 days from the date of purchase.
6. Pick up and delivery. This major appliance is intended to be repaired in your home.
7. Repairs to parts or systems resulting from unauthorized modifications made to the appliance.
8. Expenses for travel and transportation for product service if your major appliance is located in a remote area where service by an
authorized Maytag servicer is not available.
9. The removal and reinstallation of your major appliance if it is installed in an inaccessible location or is not installed in accordance with
Maytag's published installation instructions.
10. Replacement parts or repair labor on major appliances with original model/serial numbers that have been removed, altered, or cannot be
easily determined.
DISCLAIMER OF IMPLIED WARRANTIES
IMPI.IED WARRANTIES, INCI_UDING ANY IMPI_IED WARRANTY OF MERCHANTABIIJTY OR IMPI_IED WARRANTY OF FITNESS FOR A
PARTICUI_AR PURPOSE, ARE IJMITED TO ONE YEAR OR THE SHORTEST PERIOD AM_OWED BY I.AW. Some states and provinces do not
allow limitations on the duration of implied warranties of merchantability or fitness, so this limitation may not apply to you. This warranty
gives you specific legal rights, and you also may have other rights that vary from state to state or province to province.
LIMITATION OF REMEDIES; EXCLUSION OF INCIDENTAL AND CONSEQUENTIAL DAMAGES
YOUR SOI_E AND EXCI_USIVE REMEDY UNDER THIS LIMITED WARRANTY SHAM_ BE PRODUCT REPAIR AS PROVIDED HEREIN.
MAYTAG SHAH_ NOT BE I.IABI_E FOR INCIDENTAl_ OR CONSEQUENTIAl_ DAMAGES. Some states and provinces do not allow the
exclusion or limitation of incidental or consequential damages, so these limitations and exclusions may not app ly to you. This warranty gives
you specific legal rights, and you also may have other rights that vary from state to state or province to province.
If outside the 50 United States and Canada, contact your authorized Maytag dealer to determine if another warranty applies.
If you think you need repair service, first see the "Troubleshooting" section of the Use & Care Guide. If you are unable to resolve the problem
after checking "Troubleshooting/' additional help can be found by checking the "Assistance or Service" section or by calling Maytag. In the
U.S.A., call 1-800-688-9900. In Canada, call 1-800-807-6777. 6/09
17

ASSISTANCE OU SERVICE
Avant de faire un ap.pel pour assistance ou service, veuillez v6rifier la section "l)6pannage". Cette v6rification peut vous faire 6conomiser
[e coot d'une visite de service. Si vous avez encore besoin d'aide, suivez [es instructions ci-dessous.
I.ors d'un appe[, veui[[ez conna?tre [a date d'achat et [es num6ros de mod6[e et de s6rie comp[ets de votre apparei[. Ces renseignements
nous aideront _ mieux r6pondre _ votre demande.
Si vous avez besoin de pi_ces de rechange
Si vous avez besoin de commander des pi6ces de rechange, nous vous recommandons d'uti[iser seu[ement des pi6ces sI.p6c!fi6es par
['usine. I.es pi6ces sp6cifi6es par ['usine conviendront et tonctionneront bien car e[[es sont fabriqu6es se[on [a meme precision
uti[is6e pour fabriquer chaque nouve[ apparei[ MAYTAG k_.
Pour [oca[iser despi6ces sp6cifi6es par ['usine dans votre r6gion, composer [e num6ro de t6[6phone d'assistance _ [a c[ient6[e suivant ou
appe[er [e centre de service d6sign6 [e plus proche.
iii!!!!!!!!!i:iii! iU iii
T616phoner sans frais au Centre d'assistance _ la client6le de
Maytag Services, IJ_C au : 1-800-688-9900 ou visiter notre site
Web _ www.maytag.com.
Nos consultants foumissent de I'assistance pour :
• Caract6ristiques et sp6cifications de notre gamme complete
d'apparei[s i-n6nager' s.
• Renseignements d'insta[[ation.
• Proc6d6s d'uti[isation et d'entretien.
• Vente d'accessoires et de pi6ces de rechange.
• Assistance sp6cialis6e au client (langue espagnole,
ma[entendants, ma[voyants, etc.).
• R6f6rences aux marchands Iocaux, aux distributeurs de pi6ces
de rechange, et aux compagnies de service. Les technicl"ens
de service d6sign6s par Maytag _ sont form6s p.our remplir la
garantie des produits et fournir un service apr6s [a garantie,
partout aux Etats-Unis.
Pour [oca[iser [a compa_nie de service d6si_n6e par Maytag '_k_
appliances dans votre re_,ion vous pouvez _ga[ement
consu ter es Pages jaunes.
Pour plus d'assistance
Si vous avez besoin de plus d'assistance, vous pouvez soumettre
par 6crit toute question ou pr6occupation _ Maytag __ ['adresse
suivante :
Maytag Services, I_LC
ATTN: CAIR '_Center
RO. Box 2370
Cleveland, TN 37320-2370
Veui[[ez inc[ure dans votre correspondance un num6ro de
t6[6phone o_ ['on peut vous joindre dans [a journ6e.
Veuillez appeler sans frais le Centre d'interaction avec la client6le
de WhMpool Canada LP au : 1-800-807-6777 ou visitez notre site
web _ www.whirlpool.ca.
Nos consultants vous renseigneront sur les sujets suivants :
• Caract6ristiques et sp6cifications sur route notre gamme
d'apparei[s 6[ectrom6nagers.
• Consignes d'uti[isation et d'entretien.
• Ventes d'accessoires et de pi6ces de rechange.
• R6f6rences aux marchands [ocaux, aux distributeurs de pi6ces
de rechange, et aux compagnies de service. Les techniclens de
service d6_ign6s par Whfilpoo[ Canada I_P sont form6s pour
remplir la garantie des produits et fournir un service apr6s la
garantie, partout au Canada.
Pour plus d'assistance
Si vous avez besoin de plus d'assistance, vous pouvez soumettre
par 6crit toute question ou pr6occupation _ Whirlpool Canada I.P
I'adresse suivante :
Centre d'interaction avec la client_'le
Whirlpool Canada I_P
1901 Minnesota Court
Mississauga, Ontario 1.5N 3A7
Veuillez inclure dans votre correspondance un num6ro de
t616phone o_ on peut vous joindre dans la journ6e.
Vous pouvez faciliter I'utilisation de votre laveuse avec ces accessoires de premi6re qualit6.
Pour vous informer au sujet des autres articles de qualit6 ou pour commander, composez le 1-800-901-2042 ou consultez le site
www.maytag.com/accessories. Au Canada, composez le 1-800-807-6777 ou consultez le site Internet www.whirlpoolparts.ca.
Pi6ce num_ro Accessoire
8212641RP Tuyau d'arriv6e d'eau EPDM noir de
5 pi (1,5 m) (I.ot de 2)
8212546RP Tuyau d'arriv6e d'eau EPDM noir de
4 pi (1,2 m) (I.ot de 2)
8212526 Plateau d'6gouttement de [a [aveuse, convient
tous[es mod6[es.
31682 Produit de nettoyage po[yva[ent pour apparei[s
m6nagers
1903WH Casier de rangement de fournitures de buanderie
W10135699 Nettoyant pour [aveuse AFFRESH ®)
18

SECURITE DE LA LAVEUSE
Votre sdcuritd et celle des autres est trbs importante.
Nous donnons de nombreux messages de securit6 importants dans ce manuel et sur votre appareil menager. Assurez-vous de
toujours lire tous les messages de securite et de vous y conformer.
Voici le symbole d'alerte de securite.
Ce symbole d'alerte de securite vous signale les dangers potentiels de deces et de blessures graves a vous
eta d'autres.
Tousles messages de securite suivront le symbole d'alerte de securite et le mot "DANGER" ou
"AVERTISSEMENT". Ces mots signifient :
Risque possible de deces ou de blessure grave si vous ne
suivez pas immddiatement les instructions.
Risque possible de decks ou de blessure grave si vous
ne suivez pas les instructions.
Tous les messages de securite vous diront quel est le danger potentiel et vous disent comment reduire le risque de blessure et
ce qui peut se produire en cas de non-respect des instructions.
IMPORTANTES INSTRUCTIONS DE SI:i:CURIT¢:
AVERTISSEMENT : Pour reduire les risques d'incendie, de choc electrique ou de blessures Iors de I'utilisation de la
laveuse, suivre les precautions fondamentales dont les suivantes '
• Lire toutes les instructions avant d'utiliser la laveuse.
• Ne pas laver des articles qui ont ete nettoyes ou
laves avec de I'essence ou imbibes d'essence,
solvants de nettoyage & sec, ou autres substances
inflammables ou explosives; ces substances
peuvent emettre des vapeurs susceptibles de
s'enflammer ou d'exploser.
• Ne pas ajouter d'essence, solvant de nettoyage &
sec ou autre produit inflammable ou explosif dans
I'eau de lavage. Ces substances peuvent emettre
des vapeurs susceptibles de s'enflammer ou
d'exploser.
•Dans certaines conditions, de I'hydrogene gazeux
peut se former dans un circuit d'eau chaude qui n'a
pas ete utilise pendant 2 semaines ou plus. LE GAZ
HYDROG#NE EST EXPLOSIBLE. Si le circuit d'eau
chaude n'a pas ete utilise pendant une telle periode,
avant d'utiliser la laveuse, ouvrir tousles robinets
d'eau chaude et laisser I'eau s'ecouler pendant
plusieurs minutes par chaque robinet. Ceci
permettra I'evacuation de I'hydrogene gazeux
accumule. Comme ce gaz est inflammable, ne pas
fumer ou utiliser une flamme nue au cours de cette
periode.
• Ne pas laisser des enfants jouer sur ou &I'interieur de la
laveuse. Bien surveiller les enfants Iorsque la laveuse est
utilisee & proximite d'enfants.
• Avant de mettre la laveuse au rebut ou hors de service,
enlever la porte ou le couvercle.
• Ne pas tenter d'atteindre un article 9.I'interieur de la cuve de
la laveuse Iorsque le tambour, la cuve ou I'agitateur est en
mouvement.
• Ne pas installer ou remiser cette laveuse & un endroit oQelle
serait exposee aux intemperies.
• Ne pas modifier les organes de commande.
• Ne pas reparer ou remplacer un composant quelconque de
la laveuse, ni entreprendre une operation de service, si ce
n'est specifiquement recommande dans ce manuel ou dans
un manuel d'instructions de reparations destine & I'utilisateur;
il est alors essentiel que la personne concernee comprenne
ces instructions et soit competente pour les executer.
• Pour les instructions de liaison & la terre, voir "Specifications
electriques" dans les instructions d'installation.
CONSERVEZ CES INSTRUCTIONS
Avertissements de la proposition 65 de I'€:tat de Californie :
AVERTISSEMENT " Ce produit contient url produit chimique connu par I'l_tat de Californie pour _tre &I'origine de cancers.
AVERTISSEMENT " Ce produit contient un produit chimique connu par I'€:tat de Californie pour etre & I'origine de malformations
et autres deficiences de naissance.
19

AVANTAGES ET CARACTERISTIQUES
Votre laveuse pr6sente plusieurs avantages et caract6ristiques qui sont r6sum6s ici. Certains articles peuvent ne pas s'appliquer _ votre mod61e.
Systi_me de lavage Haute efficacit_
Caract_ristiques innovantes
Votre nouvelle laveuse Haute efficacit6 _ chargement par le dessus
vous fair gagner du temps grace _ des charges moins nombreuses
et plus importantes. Grace aux innovations qui suivent, elle permet
aussi de pr6server les ressources et r6duit les factures d'eau et
d'6nergie.
Commande de niveau d'eau INTELLIFILL TM
Cette laveuse d6tecte le volume de la charge et sa composition
travers une s6rie de remp[issages et de mouvements de [avage. E[[e
ajuste ensuite [e niveau d'eau pour un rendement de nettoyage et
de rinqage optimal. Ceci 6[imine [es ca[cu[s approximatifs.
I.e niveau d'eau correspond exactement au volume de chaque
charge de [avage.
REMARQUE : Pendant un programme, i[ est possible de remarquer
que [a charge de [avage n'est pas comp[6tement immerg6e dans
['eau. Ceci est normal pour [a [aveuse.
Commande de temperature automatique
I.e syst_me de commande de temp6rature automatique sur cette
[aveuse d6tecte et maintient 6[ectroniquement une temp6rature
uniforme de ['eau en contrB[ant [es temp6ratures de ['eau d'arriv6e.
I[uti[isation de [a commande de temp6rature automatique
favorisera [a dissolution du d6tergent.
Systi_me de lavage par impulseur
Votre nouvelle laveuse fonctionne diff6remment de la plupart des
laveuses traditionnelles. I_adiff6rence la plus frappante est que
la laveuse comporte un syst_'me de lavage par impulseur. Elle a
recours _ cet impulseur innovant situ6 au fond du panier de lavage
pour d6placer la charge dans un m61ange d'eau et de d6tergent. I_a
charge est d6plac6e de I'ext6rieur vers le centre avec des articles
dirig6s vers le haut au centre et vers le bas sur les bords ext6rieurs.
Votre nouvelle laveuse pr6sente des caract6ristiques qui
aident _ r6duire [e bruit, faci[itent ['uti[isation, et am6[iorent [a
performance de [avage.
Commandes _lectroniques
I.es commandes 61ectroniques avec les programmes pr6r6g[6s
sont faci[es _ uti[iser, que vous soyez un d6butant ou un "expert".
Fonctionnement silencieux
Cette laveuse est insonoris6e _ I'aide de mat6riaux isolants afin
de r6duire les sons et bruits de fonctionnement de la laveuse.
Systi_me de suspension
Pour r6duire [a "vibration", [e "d6p[acement" ou [e
"d6s6qui[ibre"de [a nouve[[e [aveuse, ce[[e-ci combine:
4 jambes 6[astiques _ ressort pour iso[er [es vibrations
Un anneau d'6quilibrage en haut et au fond du panier
de lavage pour minimiser les vibrations
Un Iogiciel d'exploitation conqu pour d6tecter et corriger
les charges d6s6quilibr6es
Programme Clean Washer with AFFRESH TM
(nettoyage de la laveuse avec AFFRESH TM)
Cette laveuse comporte un programme de nettoyage de la laveuse
avec AFFRESH r_ facile _ utiliser qui nettoie _ fond I'int6rieur de la
machine _ laver en utilisant d'importants volumes d'eau combin6s
de I'agent de nettoyage pour laveuse AFFRESH ® ou de I'eau de
Javel. I_'utilisation de I'agent de nettoyage pour laveuse AFFRESH ®
ou d'eau de Javel avec ce programme permettra de retirer les
salet6s et d'6viter les r6sidus _ I'origine d'odeurs.
Distributeurs
I_es distributeurs rendent votre [aveuse v6ritablement automatique.
II n'est pas n6cessaire de retourner _ la laveuse pendant le
programme pour ajouter d6tergent, agent de blanchiment,
assouplissant de tissu, produit stimulant de lavage ou traitement
I'oxyg6ne. I.es produits de lessive sont ajout6s _ la charge au
moment appropri6 durant le programme de lavage.
Vitesses d'essorage
Cette laveuse est pr6r6gl6e pour s6lectionner automatiquement
la vitesse d'essorage en fonction du programme s61ectionn6. En
fonction de la charge de lavage, vous pouvez modifier les vitesses
pr6r6gl6es. I.a vitesse d'essorage sur cette laveuse est presque deux
fois plus rapide que celle d'une laveuse conventionnelle. II est
possible de remarquer des sons diff6rents pendant un programme
d'essorage en raison de la vitesse accrue.
D6tergent Haute efficacit6 (HE)
Cette [aveuse est con_:ue pour ['utilisation d'un d6tergent Haute
efficacit6 (HE) uniquement. I_esd6tergents HE sont con_:us pour
produire la quantit6 exacte de mousse et procurer le meilleur
rendement avec les syst&mes de lavage _ faible niveau d'eau.
Panier en acier inoxydable
I.e panier en acier inoxydable r6siste _ la corrosion et permet des
vitesses d'essorage plus 61evdes pour une meilleure extraction de
I'eau et une r6duction de la durde de s6chage.
Systi_me d'auto-lavage et filtre de rinqage
Cette laveuse filtre 100% de I'eau de lavage et de rinqage. I_'eau
est filtr6e puis redistribu6e. I_e filtre forc6 coince le sable et les
salet6s et les chasse par le tuyau d'6vacuation afin qu'ils ne se
red6posent pas sur les v6tements propres.
End Signal - Off - On (signal de fin de programme)
I_afin du programme de lavage est indiqu6e par un signal sonore.
Ce signal est utile [orsqu'on retire [es articles de [a [aveuse aussitBt
qu'e[[e s'arr6te.
Water Save Spray Rinse (rinqage par pulv6risation
6conomie d'eau)
Cette [aveuse est conque pour 6conomiser ['eau en rinqant
la charge par un rinqage par pulv6risation d'eau au lieu d'un
rin_:age en profondeur. Cette option est le r6glage par d6faut pour
certains programmes. Pour d'autres programmes, I'option peut
6tre s61ectionn6e. I.ors de I'utilisation d'un assouplissant de tissu,
toujours s61ectionner le bouton Fabric Softener ou Extra Rinse;
ces deux options distribueront de I'assouplissant de tissu dans un
grand volume d'eau de rinqage.
Utifiser uniquement un d6tergent Haute efficacit6 (H_).
2O
La page est en cours de chargement...
La page est en cours de chargement...
La page est en cours de chargement...
La page est en cours de chargement...
La page est en cours de chargement...
La page est en cours de chargement...
La page est en cours de chargement...
La page est en cours de chargement...
La page est en cours de chargement...
La page est en cours de chargement...
La page est en cours de chargement...
La page est en cours de chargement...
La page est en cours de chargement...
La page est en cours de chargement...
La page est en cours de chargement...
La page est en cours de chargement...
-
 1
1
-
 2
2
-
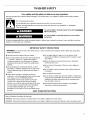 3
3
-
 4
4
-
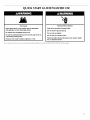 5
5
-
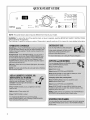 6
6
-
 7
7
-
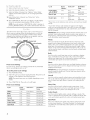 8
8
-
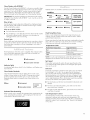 9
9
-
 10
10
-
 11
11
-
 12
12
-
 13
13
-
 14
14
-
 15
15
-
 16
16
-
 17
17
-
 18
18
-
 19
19
-
 20
20
-
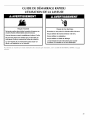 21
21
-
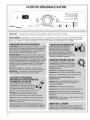 22
22
-
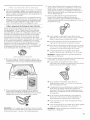 23
23
-
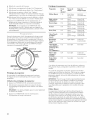 24
24
-
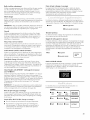 25
25
-
 26
26
-
 27
27
-
 28
28
-
 29
29
-
 30
30
-
 31
31
-
 32
32
-
 33
33
-
 34
34
-
 35
35
-
 36
36


Maytag MVWB300WQ2 Manuel utilisateur
- Catégorie
- Machines à laver
- Taper
- Manuel utilisateur
dans d''autres langues
- English: Maytag MVWB300WQ2 User manual
Documents connexes
-
Maytag W10092827B Manuel utilisateur
-
Maytag BRAVOS Manuel utilisateur
-
-
-
-
-
-
-
-