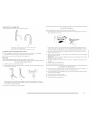
Maytag MHWE550WR00 Manuel utilisateur
- Catégorie
- Machines à laver
- Taper
- Manuel utilisateur
Ce manuel convient également à

PERFORMANCE SERIES
FRONT-LOADING AUTOMATIC WASHER
USE & CARE GUIDE
LAVEUSEAUTOMATIQUE A CHARGEMENT FRONTAL
GUIDE D'UTILISATION ET D'ENTRETIEN
i i
FOR QUESTIONS ABOUT FEATURES, OPERATION/PERFORMANCE, PARTS, ACCESSORIES OR SERVICE
CAll: 1.800.688.9900
IN CANADA, CAll: 1.800.807.6777
VISIT OUR WEBSITE AT WWW.MAYTAG.COM
IN CANADA, WWW.MAYTAG.CA
AU CANADA, POUR DES QUESTIONS APROPOS DES CARACTERISTIQUES, DU FONCTIONNEMENT/
RENDEMEN I, DES PIECES, DES ACCESSOIRES OU DU SERVICE, COMPOSEZ IE : 1.800.807.6777
OU VISITEZ NOTRE SITE INTERNET
WWW. MAYTAG. CA
Certified to Sanitize
Certifid pour aseptiser
Designed to useonly HE High Efficiency detergent
Con_:u pour I'utilisation d'un d6tergent haute efficacitd seulement
461970255092
W10286169 B

,i_!_ii!i!i!i!i!i!i!i!i!i!i!i!i!i!i!i!i!i!i!i!i!i!i!i_i_i_ii!i¸i!i!i!i!i!i!i!i_i_ii_ii_ii_ii_ii_ii_ii_ii_ii_ii_ii_ii_ii_ii_i_iiiiYiiiiii//li¸il¸iiii_ii,i_ii,i_ii,i_ii,i_ii,i_i_iii_i_ii_il'ii_i_iil'ii_i_iil_i_ii_i_ii_i_ii_ii_i_ii_:ii:_:i_:ii:_:i_:ii:_:i_:ii:_:i_:ii:_:i_:ii:_:i_:ii:_:i_:_:i:_,,i_i!i!i_,¸¸¸¸¸¸¸'_''_'_'_'_'_'_'_'_'_'_'_'_'_'_'_'__¸_¸_¸_¸_!iiiiiiiiiiiiiiil¸il¸ii_ii_ii¸I¸I¸il¸ii_ii¸ii_ii¸ii_ii¸ii_iil¸ii_i_iil¸I¸iiiii_iiiii_i_i_ii_i_iiiii_ii_iii_ii_iii_iiiiiiiiiiiiiiiiiiiiiiiiiiiiiiiiiiiiiiiiiiiiiiiiiiiiii_!i_!_!_
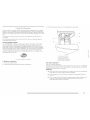
TABLE OF CONTENTS
WASHER SAFETY ...................................................................................................................... 3
INSTALLATION REQUIREMENTS ............................................................................................. 4
Tools and Parts ..................................................................................................................... 4
Options ................................................................................................................................ 5
I.ocation Requirements ......................................................................................................... 6
L-)rain System ........................................................................................................................ 8
Electrical Requirements ........................................................................................................ 8
INSTALLATION INSTRUCTIONS ............................................................................................. 9
Remove Transport System .................................................................................................... 9
Connect the Inlet Hoses ..................................................................................................... 10
Connect the L-)rain Hose ..................................................................................................... 10
Secure the L-)rain Hose ....................................................................................................... 11
I_eve[ the Washer ................................................................................................................ 11
Complete Installation ......................................................................................................... 11
FEATURES AND BENEFITS ...................................................................................................... 12
WASHER USE .......................................................................................................................... 12,
Starting Your Washer .......................................................................................................... 14
Using the Proper L-)etergent ................................................................................................ 14
Using the L-)ispenser ........................................................................................................... 15
Pausing or Restarting ......................................................................................................... 16
Changing Cycles, Options, and Modifiers .......................................................................... 16
Status Indicator ................................................................................................................... 17
Cycles ................................................................................................................................. 17
Options .............................................................................................................................. 19
Modifiers ............................................................................................................................ 19
LAUNDRY GUIDE .................................................................................................................. 20
LAUNDRY TIPS ....................................................................................................................... 21
I.oading .............................................................................................................................. 21
WASHER CARE ........................................................................................................................ 22
Cleaning Your Washer .........................................................................................................
Water Inlet Hoses ............................................................................................................... 23
Vacation, Storage, and Moving Care .................................................................................. 23
TROUBLESHOOTING ............................................................................................................. 24
ASSISTANCE OR SERVICE ....................................................................................................... 27
In the U.S.A ........................................................................................................................ 27
In Canada ........................................................................................................................... 27
WARRANTY ............................................................................................................................ 27
TABLE DES MATIERES
SI_CURITI_ DE LA LAVEUSE ..................................................................................................... 29
EXIGENCES DqNSTALLATION ............................................................................................... 31
Outillage et pi_ces .............................................................................................................. 31
Options .............................................................................................................................. 31
Exigences d'emplacement .................................................................................................. 32
Syst_'me de vidange ............................................................................................................ 34
Sp6cifications 6[ectriques ................................................................................................... 34
INSTRUCTIONS DqNSTALLATION ....................................................................................... 2,5
Elimination des accessoires de transport ............................................................................. 35
Raccordement des tuyaux d'a[imentation ........................................................................... 36
Raccordement du tuyau de vidange ................................................................................... 36
Immobilisation du tuyau de vidange .................................................................................. 37
R6g[age de ['aplomb de [a [aveuse ..................................................................................... 37
Achever ['installation .......................................................................................................... 38
CARACTI_RISTIQUES ET AVANTAGES ................................................................................... 2,8
UTILISATION DE LA LAVEUSE ............................................................................................... 2,9
Mise en marche de Ha[aveuse ............................................................................................ 40
Utilisation du d6tergent appropri6 ...................................................................................... 40
Uti[isation du distributeur ................................................................................................... 41
Pause ou remise en marche ................................................................................................ 42
Changement des programmes, options et modificateurs ..................................................... 42
T6moins [umineux .............................................................................................................. 43
Programmes ....................................................................................................................... 43
Options .............................................................................................................................. 45
Modificateurs ..................................................................................................................... 45
Guide de [essivage ............................................................................................................. 47
CONSEILS DE LESSIVAGE ....................................................................................................... 48
Chargement ........................................................................................................................ 48
ENTRETIEN DE LA LAVEUSE ................................................................................................... 49
Nettoyage de Ha[aveuse ..................................................................................................... 49
Tuyaux d'arriv6e d'eau ....................................................................................................... 50
Pr6cautions _ prendre avant [es vacances, un entreposage ou un d6m6nagement ............. 50
DI_PANNAGE .......................................................................................................................... 51
ASSISTANCE OU SERVICE ...................................................................................................... 54
Aux Etats-Unis .................................................................................................................... 54
Au Canada ......................................................................................................................... 55
GARANTIE ............................................................................................................................... 55

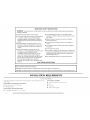
Your safety and the safety of others are very important.
We have provided many important safety messages in this manual and on your appliance. Always read and obey all safety
messages.
This is the safety alert symbol.
This symbol alerts you to potential hazards that can kill or hurt you and others.
All safety messages will follow the safety alert symbol and either the word "DANGER" or "WARNING."
These words mean:
You can be killed or seriously injured if you don't immediately
follow instructions.
You can be killed or seriously injured if you don't follow
instructions.
All safety messages will tell you what the potential hazard is, tell you how to reduce the chance of injury, and tell you what can
happen if the instructions are not followed.
iiiiiiiii!i!ill
iiiiiiiii!i'i

iMPORTANT SAFETY iNSTRUCTiONS
WARNING: To reduce the risk of fire, electric shock, or injury to persons when using the washer, follow basic precautions,
includingthe following:
[] Read all instructions before using the washer.
[] Do not wash articles that have been previously cleaned
in, washed in, soaked in, or spotted with gasoline,
dry-cleaning solvents, other flammable, or explosive
substances as they give off vapors that could ignite or
explode.
[] Do not add gasoline, dry-cleaning solvents, or other
flammable, or explosive substances to the wash water.
These substances give off vapors that could ignite or
explode.
[] Under certain conditions, hydrogen gas may be
produced in a hot water system that has not been used
for 2 weeks or more. HYDROGEN GAS IS
EXPLOSIVE. if the hot water system has not been
used for such a period, before using the washing
machine, turn on all hot water faucets and let the water
flow from each for several minutes. This will release
any accumulated hydrogen gas. As the gas is
flammable, do not smoke or use an open flame during
[] Do not allow children to play on or in the washer. Close
supervision of children is necessary when the washer is used
near children.
[] Before the washer is removed from service or discarded,
remove the door or lid.
[] Do not reach into the washer if the drum, tub or agitator is
moving.
[] Do not install or store the washer where it will be exposed to
the weather.
[] Do not tamper with controls.
[] Do not repair or replace any part of the washer or attempt any
servicing unless specifically recommended in this manual or in
published user-repair instructions that you understand and
have the skills to carry out.
[] See "Electrical Requirements" for grounding instructions.
this time.
SAVE THESEINSTRUCTIONS
State of California Proposition 65 Warnings:
WARNING: This product contains a chemical known to the State of California to cause cancer.
WARNING: This product contains a chemical known to the State of California to cause birth defects or other reproductive harm.
: ........................................................................................
INSTALLATION REQUIREMENTS
Gather the required tools and parts before starting installation. The parts supplied are in the
washer drum.
Tools needed for connecting the water inlet hoses
• Pliers (that open to 1'_/1_,"[39.5 mm])
• Flashlight (optional)
Tools needed for connecting the drain hose
• Locking pliers (that open to 1%6" [39.5 mm])
Tools needed for installation
• Open end wrenches 17 mm and 13 mm
• level
• Wood block
• Ruler or measuring tape
4

Parts supplied:
Pedestal
A pedestal will add to the total height of the washer for a total height of 53.5" (1359 mm).
A.Drain hose form
B.Inlet hose (2)
C.Inlet hose washers (4)
D. lTansport bolt hole plug (4)
E.Beaded strap
£ Drain hose
C. Hose clamp
Alternate Parts
Your installation may require additional parts. If you are interested in purchasing one of the
items listed here, call the toll-free number on the cover or in the "Assistance or Service"
section.
If You Have You Will Need to Buy
Laundry tub or standpipe Sump pump system (if not already available)
taller than 96" (2.4 m)
Overhead sewer Standard 20 gal. (76 I.), 30" (762 mm) tall drain tub or
utility sink and sump pump (available from local plumbing
suppliers)
Floor drain Siphon break, Part Number 285834; additional drain hose
Part Number 8318155; and connector kit,
Part Number 285835
Drain hose too short 4 ft (1.2 m) drain hose extension kit, Part Number 285863
Water faucets beyond reach 2 longer water fill hoses:
of fill hoses 6 ft (1.8 m) Part Number 76314,
10 ft (3.0 m) Part Number 350008
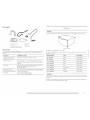
Optional pedestal
This pedestal is available in several colors.
To order; call the dealer from whom you purchased your washer or refer to the "Assistance
or Service" section.
Pedestal Height Color Part Number
10" (254 ram) White MHP1000SQ
10" (254 ram) Black MHP1000SB
15.5" (394 ram) White XHP1550VW
15.5" (394 ram) Black XHP1550VB
15.5" (394 mm) Slate XHP1550VE
15.5" (394 ram) Crimson Red XHP1550WR
15.5" (394 ram) Oxide XHP1550VJ
15.5" (394 ram) Evergreen XHP1550VP
Stack Kit
Are you planning to stack your Maytag washer and dryer? To do so you will need to purchase
a Stack Kit.
To order; call the dealer from whom you purchased your dryer or refer to the "Assistance or
Service" section. Ask for Part Number 8212640.
Z'I

Selecting the proper location for your washer improves performance and minimizes noise and
possible washer "walk."
Your washer can be installed under a custom counter, or in a basement, laundry room, closet,
or recessed area. See "Drain System."
Companion appliance location requirements should also be considered. Proper installation is
your responsibility.
You will need
• A water heater set to deliver 120°F (49°C) water to the washer.
• A grounded electrical outlet located within 6 ft (1.8 m) of where the power cord is
attached to the back of the washer. See "Electrical Requirements."
• Hot and cold water faucets located within 4 ft (1.2 m) of the hot and cold water fill valves,
and water pressure of 20-100 psi (137.9-689.6 kPa).
• A level floor with a maximum slope of 1" (250 mm) under entire washer. Installing the
washer on soft floor surfaces, such as carpets or surfaces with foam backing, is not
recommended.
fb
j:
38V4"
(970ram}
(820ram}
• A sturdy and solid floor to support the washer with a total weight (water and load) of
400 [bs (180 kg).
Do not operate your washer in temperatures below 32°F (0°C). Some water can remain in the
washer and can cause damage in low temperatures.
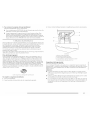
Installation clearances
• The location must be large enough to allow the washer door to be fully opened.
• Additional spacing should be considered for ease of installation and servicing.
• Additional clearances might be required for wall, doob and floor moldings.
• Additional spacing of 1" (25 mm) on all sides of the washer is recommended to reduce
noise transfer.
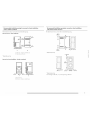
Recommended installation spacing for custom undercounter installation
The dimensions shown are for the recommended spacing.
Custom undercounter installation - Washer only
39"min.
(990 ram)
+
• Companion appliance spacing should also be considered.
1"---_t,_--_,. 27"--_1<-- 1"
(25ram} (686mm) (25mm)

Recommended installation spacing for recessed or closet installation,
with or without a pedestal
The dimensions shown are for the recommended spacing.
Recessed area or closet installation
*Required spacing
,,Z
11"I_-31Y2"-_14"1_--
(25mm)(800 mm)(i 02 mm)
48 in.2* -..9
(310cm2)
24 in.2 * ='
(155cm2)'
A B
A. Side view - closet or confined area
B.Closet door with vents
--_ 3"
{76ram)
--_ 3"
(76ram)
Recessed or closet installation - Washer on pedestal
1" _ 27"_
(25mm) (680mm)
A
(25ram)
18"rnin.)_
(457mm)
11"_ 311/2'' _1 4"1
(28mm){800ram)(102ram)
B
A. Recessed area
B. Side view - closet or confined area
Recommended installation spacing for recessed or closet installation,
with stacked washer and dryer
The dimensions shown are for the recommended spacing.
48 in.2 *
(310 cm 2)
V
T
24 in, 2*
(155cm2)
3"*(76ram)
o
3"*{76ram)
*Required spacing
,'i_¸¸¸¸J _' '___,ii_
5Y2"**-_,.-
(i40mm)
78" "_
(1930mm)
1"_ _ 27"-_
{25mm) {686mm) (25mm)
*Required spacing
** For venting out the side, 1" (25 mm) spacing is allowed.

Recommended installation spacing for cabinet installation
• The dimensions shown are for the recommended spacing.
• For cabinet installation, with a dooi; the minimum ventilation openings in the top are
7"(178ram) 7"(178ram}
required.
DD
4" 311/2'' 1"
(102 ram} (SOOram} (25 ram} (25 ram} (886 ram} (25ram}
1" 1" 27"
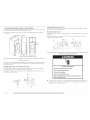
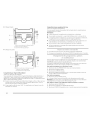
The washer can be installed using the standpipe drain system (floor or wall), the laundry tub
drain system, or the floor drain system. Select the drain hose installation method you need.
See "Tools and Parts."
Standpipe drain system - wall or floor (views A & B)
The standpipe drain requires a minimum diameter standpipe of 2" (50 mm). The minimum
carry-away capacity can be no less than 17 gal. (64 I_)per minute.
The top of the standpipe must be at least 30" (762 mm) high and no higher than 96" (2.4 m)
from the bottom of the washer.
A
T
39"rnin.
(762ira}
B
Laundry tub drain system (view C)
The laundry tub needs a minimum 20 gal. 176I.) capacity. The top of the laundry tub must
be at least 30" (762 mm) above the floor.
Floor drain system (view D)
The floor drain system requires a siphon break that may be purchased separately. See "Tools
and Parts."
The siphon break must be a minimum of 28" (711 mm) from the bottom of the washer.
Additional hoses might be needed.
iii7
D
Electrical Shock Hazard
Plug into a grounded 3 prong outlet.
Do not remove ground prong.
Do not use an adapter.
Do not use an extension cord.
Failure to follow these instructions can result in death,
fire, or electrical shock.
• A 120 volt, 60 Hz., AC only, 15- or 20-amp, fused electrical supply is required. Time-
delay fuse or circuit breaker is recommended. It is recommended that a separate circuit
serving only this washer be provided.
8

• Thiswasherisequippedwithapowersupplycordhavinga3pronggroundingplug.
• Tominimizepossibleshockhazard,thecordmustbepluggedintoamating,3prong,
grounding-typeoutlet,groundedinaccordancewithlocalcodesandordinances.Ifa
matingoutletisnotavailable,itisthepersonalresponsibilityandobligationofthe
customertohavetheproperlygroundedoutletinstalledbyaqualifiedelectrician.
• Ifcodespermitandaseparategroundwireisused,itisrecommendedthataqualified
electriciandeterminethatthegroundpathisadequate.
• Checkwithaqualifiedelectricianifyouarenotsurethewasherisproperlygrounded.
GROUNDING iNSTRUCTiONS
For a grounded, cord=connected washer:
This washer must be grounded. In the event of a malfunction
or breakdown, grounding will reduce the risk of electrical
shock by providing a path of least resistance for electric
current. This washer is equipped with a cord having an
equipment-grounding conductor and a grounding plug. The
plug must be plugged intoan appropriate outlet that is
properly installed and grounded in accordance with all local
codes and ordinances.
WARNING: improper connection of the equipment-
grounding conductor can result in a risk of electric shock.
Check with a qualified electrician or serviceman if you are in
doubt as to whether the appliance is properly grounded.
Do not modify the plug provided with the appliance - if it will
not fit the outlet, have a proper outlet installed by a qualified
electrician.
For a permanently connected washer:
This washer must be connected to a grounded metal,
permanent wiring system, or an equipment grounding
conductor must be run with the circuit conductors and
connected to the equipment-grounding terminal or lead on
the appliance.
INSTALLATION INSTRUCTIONS
Excessive Weight Hazard
Use two or more people to move and install washer.
Failure to do so can result in back or other injury.
IMPORTANT: Position the washer so that the rear of the washer is within approximately
3 ft (900 mm) of its final location.
There are 4 bolts in the rear panel of the washer that support the suspension system during
transportation. These bolts also retain the power cord inside the washer until the bolts are
removed.
1. Using a 13 mm wrench, loosen each of the bolts.
2. Once the bolt is loose, move it to the center of the hole and completely pull out the bolt,
including the plastic spacer covering the bolt.
H'_i
Xiiiiiii!i!ill
3. Once all 4 bolts are removed, discard bolt and spacers. Then pull the power cord through
the opening of the rear panel and close the hole with the attached cap.
4. Close the bolt holes with the 4 transport bolt hole plugs.
NOTE: If the washer is to be transported at a later date, call your local service center. To avoid
suspension and structural damage to your washer, it must be properly set up for relocation by
a certified technician.

1.
2.
3.
4.
5°
6.
7.
8.
Insert new flat washers (supplied) into each end of the inlet hoses. Firmly seat the washers
in the couplings.
A B
A. Coupling
B. Washer
Make sure the washer drum is empty.
Attach the hose with the red color indicator to the Hot ([eft) inlet valve. Attaching the red
coupling first makes it easier to tighten connection with pliers. Screw on coupling by
hand until it is seated on the washer.
Attach the hose with the blue color indicator to the Cold (right) water inlet valve. Screw
on coupling by hand until it is seated on the washer.
©
/
/
J (\
H. Hot water inlet
C. Cold water inlet
Using pliers, check the tightness of the hose couplings already attached to the washer.
NOTE: Do not overtighten. Damage to the coupling can result.
Attach hot water hose to the hot water faucet. Screw on coupling by hand until it is seated
on the washer.
Attach cold water hose to the cold water faucet. Screw on coupling by hand until it is
seated on the washer.
Using pliers, tighten the couplings with an additional two-thirds turn.
NOTE: Do not overtighten. Damage to the coupling can result.
9. Turn on the water faucets and check for leaks.
NOTE: Replace inlet hoses after 5 years of use to reduce the risk of hose failure.
Record hose installation or replacement dates on the hoses for future reference.
10. Periodically inspect and replace hoses if bulges, kinks, cuts, weab or leaks are found.
Remove drain hose from washer drum
1. Use locking pliers, squeeze hose clamp tabs together and insert over the end of drain
hose.
2. Slide drain hose onto washer connection.
3. Once drain hose is in place, release pliers.
4°
Washer drain system can be installed using a floor drain, wall standpipe, floor standpipe,
or laundry tub.
| 0

Laundry tub drain or standpipe drain
Connect the drain hose form to the corrugated drain hose.
B
A. Snap either end of the drain hose form to the drain hose at the
point where the conugation begins.
B. Bend drain hose over drain hose fom_ and snap into place.
To keep drain water from going back into the washer:
• Do not straighten the drain hose, and do not force excess drain hose into standpipe.
Hose should be secure, but loose enough to provide a gap for air.
• Do not lay excess hose on the bottom of the laundry tub.
Floor drain
You may need additional parts. See Floor drain under "Tools and Parts."
1.
2.
Drape the power cord over the washer top.
Secure the drain hose to the laundry tub leg or standpipe with the beaded strap provided.
(See illustrations A and B.)
A B C
If the washer faucets and the drain standpipe are recessed (see illustration C), put the
hooked end of the drain hose in the standpipe. Tightly wrap the beaded strap around the
water inlet hoses and the drain hose.
Do not force excess drain hose into the standpipe.
/
Properly leveling your washer avoids excessive noise and vibration.
1. Check the levelness of the washer by placing a [eve[ on the top edge of the washe_, first
side to side, then front to back.
2.
3.
4.
5.
6.
If the washer is against a wall, move the washer out slightly before tipping back. If the
washer is not [eve[, first prop the front with a wood block and adjust the feet as necessary;
then prop the back and adjust feet as necessary. Repeat this step until washer is [eve[.
Make sure all four feet are stable and resting on the floor. Then check that the washer is
perfectly [eve[ (use a [eve[).
After the washer is [eve[, use a 17 mm open-end wrench to turn the nuts on the feet tightly
against the washer cabinet.
IMPORTANT: All four feet must be tightened. If the nuts are not tight against the washer
cabinet, the washer may vibrate.
The washer should not move front to back, side to side, or diagonally when pushed on its
top edges.
Slide the washer to its final location.
Confirm the levelness of the washer.
1. Check the electrical requirements. Be sure that you have the correct electrical supply and
the recommended grounding method. See "Electrical Requirements."
2. Check that all parts are now installed. If there is an extra part, go back through the steps to
see which step was skipped.
3. Check that you have all of your tools.
4. Dispose of/recycle all packaging materials.
5. Check that the water faucets are on.
,,,i,_._,iiiiiiii_

6. Check for leaks around faucets and inlet hoses.
Electrical Shock Hazard
Plug into a grounded 3 prong outlet.
Do not remove ground prong.
Do not use an adapter.
Do not use an extension cord.
Failure to follow these instructions can result in death,
fire, or electrical shock.
9.
To test and clean your washeb make sure there are no clothes in the washer and add one
AFFRESH r,_ tablet to the washer drum. Select POWER/CANCEl_, the Clean Washer cycle,
and then select START/PAUSE. This cycle will take approximately 65 minutes to
complete. Allow the washer to complete the entire Clean Washer Cycle without
interruption.
7.
8.
Plug into a grounded 3 prong outlet.
Read "Washer Use."
FEATURES AND BENEFITS
Electronic Controls
Flexible electronic controls are easy to use whether you are a beginner or an expert.
Smart Dispensers
The Smart Dispensers make your washer truly automatic. This washer provides a three-
compartment dispenser which includes separate compartments for main wash detergent,
fabric softenec and chlorine bleach. The dispenser has large pour zones. The dispenser is
self-cleaning, and can be easily removed. I_aundry products are diluted with fresh water and
added to the load at the proper time in the wash cycle.
Steam Clean
This washer has a built-in steaming unit which is combined with the Steam Clean option to
provide multiple temperatures to help remove a variety of stains from garments. Steam Clean
may be active in the Whitest Whites, Heavy Duty, Normal/Casual, and Power Wash cycles.
Clean Washer with AFFRESH wMCycle
This cycle uses steam to raise the temperature of the unit and makes the washer self-cleaning,
flushing the machine's interior free of dirt and other residue. The use of AFFRESH r_, washer
cleaner or liquid chlorine bleach with this cycle will remove and help avoid odor-causing
residue.
Auto Water Level
This washer automatically adjusts water level for optimal cleaning and rinsing performance.
Two sensors determine load size, load composition, and suds level, then the sensors adjust
the water level to the proper setting. This eliminates guesswork. The water level is just right
for every wash load size.
Super Size Capacity
Since there is no agitator, you can wash largeb bulkier items such as a king-sized bedspread.
You are also able to wash more clothes at one time, which means fewer loads.
12

Smooth Balance _M Suspension System
To reduce washer "walk" and "off-balance" conditions, your new washer combines:
• 2 Springs to isolate vibration
• 4 Shock absorbers at the washer base to minimize movement
Commercial Quality Stainless Steel Drum
The commercial quality stainless steel drum eliminates corrosion and enables higher spin
speeds for more water extraction, reducing drying time compared to traditional front-load
washers.
High-Efficiency Wash System
Your new front-loading, high-efficiency washer saves time with fewer, larger loads, and lowers
your water and energy bills by helping conserve resources.
Spin Speeds
This washer automatically selects the spin speed based on the cycle selected. This factory
setting can be changed, however. This washer offers up to five different spin speed choices.
Heating Element
This washer has a heating element that automatically heats the water to the optimal
temperature on select cycles. This enables stepped cleaning, a process in which warm water
is brought in and mixed with detergent first, then the water is heated. Stepped cleaning starts
the wash cycle with warm water to help remove stains (such as blood and grass). This heater is
active in the Whitest Whites, Heavy Duty, Normal/Casual, and Power Wash cycles.
Automatic Temperature Control
The automatic temperature control electronically senses and maintains a uniform water
temperature. Automatic temperature control regulates incoming hot and cold water.
Automatic temperature control is automatically turned on when a cycle is selected.
Add Clothes
Clothes can be added to the load during the first 8 minutes of the cycle. During this time,
the Status Indicator will indicate it is okay to add clothes.
Special Cleaning Action with Sensi-Care 'M Wash System
This washer channels 100% of the water through the dispensers to assure thorough rinse-out
and mixture of all the laundry products before they touch any garments. The water is then
sprayed from the top front onto the center of the load, providing even distribution and
optimum cleaning performance. It is normal for small amounts of water to remain in the
dispensers when the wash cycle is complete.
Efficient Detergent System
This washer has a specially designed valve that closes during the wash portion of the cycle
so that 100% of the water and detergent mixture is used on the load. The Efficient Detergent
System ensures that no water or detergent is wasted.
Dynamic Off-Balance Detection
This washer uses two sensors to detect load size and the amount of off-balance within the
load. The suspension system and controls are specially designed to redistribute the load
automatically.
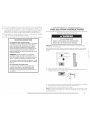
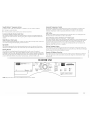
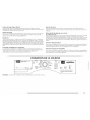
MCT MaytagC0m,,e calTechn0/ogy _" fresh hold
NOTE: The panel shown above may be different from that of your model.
start • paus__
Oo
estimated time rem_i_i._
sensln_estimatedtime U
de_aydaddsoth_was}, r_ns_,sp_ done
m_xextract
Imsa,,itlze @ h_,
m heavy _ ATChot _ medium
Ill norm_ m ATew_,m III _ow

Fire Hazard
Never place items in the washer that are dampened
with gasoine or other flammable fluids.
No washer can completely remove oil.
Do not dry anything that has ever had any type of oil on
it (including cooking oils).
Doing so can result in death, explosion, or fire.
WARNING: To reduce the risk of fire, electric shock, or injury to persons, read the
IMPORTANT SAFETY INSTRUCTIONS before operating this appliance.
The following is a guide to using your washer. Please refer to specific sections of this manual
for more detailed information.
Do not store laundry products on the top surface of this washer. Vibration is normal during
operation.
.... :_°°=S {1111 l"FO }I;=[ .... _:_....
Use only High Efficiency detergents. The package for this type of detergent will be marked
"HE" or "High Efficiency." This wash system, along with less water, will create too much
sudsing with a regular non-HE detergent. Using regular detergent will likely result in washer
errors, longer cycle times, and reduced rinsing performance. It may also result in component
failures and noticeable mold or mildew. HE detergents are made to produce the right amount
of suds for the best performance. Follow the manufacturer's instructions to determine the
amount of detergent to use. Remember, concentrated detergents such as 2x or higher will use
less detergent based on load size.
For All Wash Cycles
1. Open the washer door by pulling on the handle. Sort laundry according to color and type
of fabric. Place a load of sorted clothes in the washer. Do not overload washer.
Overloading can cause poor cleaning.
• The washer can be fully loaded, but not tightly packed. Washer door should dose easily.
• Mix large and small items and avoid washing single items. I_oad evenly.
• It is recommended that you wash small items such as infant socks in a mesh garment bag.
• When unloading garments, occasionally check under the gray colored sea[ at the
front of the tub for small items.
2. Close the washer door by pushing it firmly until the lock clicks. The washer door will
remain locked during the wash cycle.
NOTE: After any wash cycle is completed, the door must be opened and then closed
before a new cycle can begin. The door can be opened only if START/PAUSE or POWER/
CANCEl_ is selected while the Add Clothes light is illuminated or if the cycle was
canceled. See "To cancel a cycle" in Changing Cycles, Options, and Modifiers section.
3. Open the dispenser drawer and add laundry products to the main wash detergent,
chlorine bleach, or fabric softener compartments. Close drawer slowly to avoid spills. See
"Using the Dispenser."
4. Turn on the washer by selecting POWER/CANCEl_. Select one of the cycles by turning the
cycle selector. The indicator light for the selected cycle will illuminate. When selecting a
wash cycle, the preset Options, Wash Temp, Spin Speed, and Soil I.eve[ for the selected
cycle will illuminate. The display shows the estimated time remaining. The preset settings
provide the recommended fabric care for the selected cycle. See "Cycles."
5. Select the desired Options, such as Max Extract TM, Extra Rinse, and Steam Clean. Not all
options are available with all cycles. See "Options."
6. Select the desired Modifiers, such as Soil I_eve[, Wash Temp, and Spin Speed. Not all
modifiers are available with all cycles and options. See "Modifiers."
7. If desired, select SIGNAl_ ON/OFF. The signal is helpful when you are washing items that
should be removed from the washer as soon as it stops.
8. To begin the wash cycle immediately
Select START/PAUSE.
• If you do not select START/PAUSE within 60 minutes of choosing a cycle, the washer
automatically shuts off.
When the wash cycle is complete, the status indicator shows Done, the door unlocks,
and the wash load can be removed from the washer. The washer powers down
automatically 5 minutes after the cycle is complete and the Done light goes off. To
power down the washer manually after the wash cycle is complete, select POWER/
CANCEl. once.
Use only HE High Efficiency detergent.
First Wash Cycle Without Laundry
Before washing clothes for the first time, if not completed during the final installation step,
choose the Normal/Casual cycle and run it without clothes. Use only HE High Efficiency
detergent. Use V2 the manufacturer's recommended amount for a medium-size load. This
initial cycle serves to ensure the interior is dean before washing clothes.
14

Yournewwasherhasadispenserdrawerwiththreeseparatecompartmentsforyourlaundry
products--oneisfordetergent,oneisforliquidchlorinebleach,andoneisforliquidfabric
softener.I.aundryproductsaredilutedanddispensedautomaticallyatthepropertimeduring
thewashcycle,makingitunnecessaryforyoutoreturntothewasherduringthecycletoadd
them.
Itisnormalforsmallamountsofwatertoremaininthedispenserswhenthewashcycle
iscomplete.
I)onotputlaundryproductsdirectlyintothewashtub.Alwaysusetheproperdispensers
whenaddinglaundryproducts.
Choosing the Right Detergent
Use only High Efficiency detergents. The package for this type of detergent will be marked
"HE" or "High Efficiency." This wash system, along with less water, will create too much
sudsing with a regular non-HE detergent. Using regular detergent will likely result in washer
errors, longer cycle times, and reduced rinsing performance. It may also result in component
failures and noticeable mold or mildew. HE detergents are made to produce the right amount
of suds for the best performance. Follow the manufacturer's instructions to determine the
amount of detergent to use. Remember, concentrated detergents such as 2x or higher will use
less detergent based on load size.
Use only HE Hig,h Efficiency deter_ent.
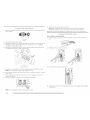
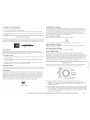
To fill dispenser compartments
1. Pull out the dispenser drawer.
2. Add the desired laundry product to the proper compartment.
3. Push in the dispenser drawer slowly and completely (to avoid a spill).
C
A
B
Dispenser
A. Detergent type selector
B. Main wash compartment
C. Dispenser release lever
D. Chlorine bleach compartment
E.F_bric softener compartment
Main wash compartment
(I.etter B in Dispenser Illustration)
Add liquid or powdered H Edetergent to this compartment for your wash cycle. The detergent
type selector (A) must always be in the correct position for the detergent type used. Slide the
detergent type selector to the correct position.
IMPORTANT:
• I.iquid or powdered color-safe bleach may be added to the Main Wash compartment
along with the same type of liquid or powdered detergent.
• Use the detergent and color-safe bleach manufacturer's recommended amount for
load size.
• If you are using the Delay Wash option, powdered laundry products should be used
in the main wash compartment because liquid products may seep out of the
compartment before the main wash begins.
::::ili ::ii{i!ill
Z'I

• liquid detergent:
Selector in position for liquid detergent
A. Detergent type selector
B. Main wash compartment
PREWASH A
MAiNWASHV
• Powdered detergent:
A ¸
g ¸
I
Selector in position for powdered detergent
A. Detergent type selector
B. Main wash compartment
LIQUI
SO
SO
Chlorine bleach compartment
(I.etter I]) in Dispenser Illustration)
Add no more than 2/3cup (160 ml.) liquid chlorine bleach to this compartment. The bleach
will be automatically diluted and dispensed at the best time during the first rinse after the
wash cycle. This compartment cannot dilute powdered bleach.
• Always measure liquid chlorine bleach. Use a measuring cup with a pour spout; do not
guess. Follow the manufacturer's directions for proper use.
• I])0 not fill beyond the "MAX" level. Overfilling could cause garment damage.
Fabric softener compartment
(I.etter E in Dispenser Illustration)
Pour measured liquid fabric softener into the fabric softener dispense_; if desired.
NOTES:
• Pour only liquid fabric softener into the dispenser.
• I)o not overfill. The dispenser holds V4 cup (60 ml.).
• The fabric softener is dispensed in the rinse cycle. If Extra Rinse is selected,
the fabric softener will be dispensed during the Extra Rinse.
• I)o not use fabric softener dispensing balls in this washer. Dispensing balls will not
operate correctly with this washer.
• I)o not spill or drip any fabric softener onto the clothes.
• At the end of the cycle, a small amount of water may be left in the dispenser.
This is normal.
1o
2.
To pause the washer at any time, select START/PAUSE.
To continue the cycle, select START/PAUSE (for approximately 1 second).
Not all Options and Modifiers are available with all cycles. Cycles, Options, and Modifiers
can be changed anytime before START/PAUSE is selected.
Options and Modifiers can be changed anytime after START/PAUSE is selected and before the
start of the selected Option or Modifier.
To cancel a cycle and begin a new cycle
1. Select POWER/CANCEl twice.
2. Select desired cycle.
3. Select the desired OPTIONS.
4. Select START/PAUSE (for approximately 1 second) to restart the washer at the beginning
of the new cycle.
To cancel a cycle
1. Select POWER/CANCEl once.
2. The washer powers down, the door unlocks, and clothes can be removed.
NOTE: If the water [eve[ or the temperature is too high, the washer will drain automatically
before the door unlocks.
To change Options or Modifiers after the cycle has started
1. Select START/PAUSE once.
2. Select the desired OPTIONS or MODIFIERS.
3. Select START/PAUSE (for approximately 1 second) to continue the cycle.
To drain the washer manually
1. Select START/PAUSE once.
2. Select DRAIN/SPIN.
3. Select START/PAUSE (for approximately 1 second) to begin the drain.
4. When the spin is complete, the door unlocks. Items can be removed from the washer.
16

This indicator shows which portion of the cycle the washer is operating and the estimated
time remaining. It also indicates when you can add an additional item to the wash cycle and
when the controls are locked.
estimated time remaining
sensing estimated time B
delay add wash rinse spin done
clothes
Adding items
This washer allows an 8-minute period in which other garments may be added to the load.
You can add items to the washer if the status indicator shows Add Clothes.
To add items
1. Select START/PAUSE once. The washer door unlocks, and items can be added.
2. To continue the cycle, close the door and select START/PAUSE (for approximately
1 second).
3. To unlock the door after the Add Clothes period, press POWER/CANCEl. twice.
This will cancel the Wash Cycle.
Cycle done
The cycle done indicator stays on for 60 minutes, until the door of the washer is opened,
or the Power/Cancel button is pressed.
Sanitize
Cycles certified by NSF International, an independent, third party testing and certification
organization are those with the sanitize temperature selection available. The certification
verified that these cycles reduce 99.9% of bacteria typically found on clothing, bedding,
and towels. There is no carryover of bacteria between loads after the cycle is complete. Only
cycles with sanitize wash temperature selected have been designed to meet the requirements
of NSF Protocol P172 for Sanitizing Efficacy.
Certified to Sanitize
Locking controls
The Control I_ock avoids unintended use of the washer. You can also use the control lock
feature to avoid unintended cycle or option changes during a cycle. When Control I.ock light
is lit during a cycle, all buttons are disabled except for the Control I.ock, Power/Cancel, and
Start/Pause buttons.
To lock the controls
Select and hold CONTROl. I.OCK button for 3 seconds.
©
control lack
hold 3 seconds
The CONTROl_ I_OCK status light illuminates.
To unlock the controls
Select and hold CONTROl. I.OCK for 3 seconds until the Control I.ock status light turns off.
Door Locked
When the status light illuminates, the door is locked.
Estimated time remaining
The cycle time varies automatically based on your water pressure, water temperature,
detergent, and clothes load. The cycle time will be extended if oversudsing occurs or the load
is unbalanced. The SUDs routine removes extra suds and assures proper rinsing of your
clothes. During the unbalance routine, the time displayed may pause until this activity is
complete, then resume with the cycle. These routines may add up to a half-hour to the default
cycle time.
Cycles can be selected by turning the Cycle control knob to the desired cycle. Each cycle
is designed for different types of fabric and soil levels.
normal
casua|
heavy_
d=tyi/
whitest f [
whites / [
:,!,,",!,,,:_',fi_J
soak \
drai.n\
&spin ',
rinse &spin
_ delicate
uickwash
power wash
clte:inmsw#sher
_.._j/p door locked
tess pause to unlock
Each cycle has a preset Soil Level (cycle time), Water Temperature, and Spin Speed, and
may have preset options. The preset settings provide the recommended fabric care for the
selected cycle.
The preset settings can be changed anytime before START is pressed. Not all options and
modifiers are available with all cycles. (To change settings after the cycle has started, press
PAUSE once, then select the desired settings. Press START again to continue the cycle.)
Whitest Whites
This cycle is especially designed for cleaning loads of soiled white fabrics with the addition of
bleach. Hot washing temperatures assure optimal bleach activity. An additional rinse provides
optimal rinse performance to avoid chlorine residues on your laundry. This cycle combines
high-speed tumbling, longer wash time, and fast-speed spin to shorten drying time.
/_,,,i?,,,i
]i[
]]i'i

Heavy Duty
Use this cycle to wash loads of sturdy, colorfast fabrics, and heavily soiled garments. This
cycle combines fast-speed tumbling, optimal wash time, and extra high speed spin to shorten
drying times. If the water temperature is lower than needed for this cycle, the heater will
warm the water to the optimum temperature.
Normal/Casual
Use this cycle to wash normally soiled cottons and linens. This cycle combines medium-
speed tumbling and high-speed spin.
Delicate
Use this cycle to wash no-iron fabrics and garments labeled "Permanent Press" or "Wrinkle
Free" or that indicate using a "Gentle" cycle on the care [abe[. This cycle combines low-speed
tumbling and medium-speed spin to help reduce wrinkling.
Quick Wash
Use this cycle to wash small loads of lightly soiled garments that are needed in a hurry. This
cycle combines fast-speed tumbling, a shortened wash time, and extra high speed spin to
shorten drying time.
Power Wash
Use this cycle to wash small loads of heavily soiled work wear such as overalls, coveralls,
sweatshirts, pants and outdoor garments. This cycle combines warm water temperature,
optimal rinses, and longer cycle time to help ensure the removal of all soil and stains from
your laundry.
Clean Washer with AFFRESH TM
Use this cycle once a month to keep the inside of your washer fresh and clean. This cycle uses
a higher water [eve[ in combination with AFFRESH TM washer cleaner or bleach and steam, to
thoroughly clean the inside of your washer. This cycle should not be interrupted. See
Cleaning Your Washer in the Washer Care section.
IMPORTANT: Do not place garments in the washer during the Clean Washer cycle.
Rinse & Spin
Use this cycle to get a rinse and spin only. This cycle combines fast-speed tumbling and extra
high speed spin. If desired, you can reduce the spin speed by selecting the speed you want
from the Spin Speed modifier.
A Rinse & Spin cycle is useful for:
• I.oads that need rinsing only, like swimsuits.
NOTE: For more delicate loads, when using a Rinse & Spin cycle to rinse swimwear,
change the Speed Spin Modifier setting to Medium or I.ow to avoid fabric stress.
• Adding fabric softener to a load.
Drain & Spin
Use this cycle to drain your washer or to drain and spin your wash load. The spin speed is
preset to extra high. If desired, you can reduce the spin speed by selecting the speed you want
from the Spin Speed modifier.
NOTE: I.oads of synthetics, delicate fabrics, hand washab[es, and washable woolens should
be drained with no spin or low spin speed to avoid fabric stress.
Soak
Use the Soak cycle to remove small spots of set-in stains on fabrics. This cycle provides a soak
time with warm or cold water followed by drain. Extra water, a short tumbling phase for equal
distribution of the laundry, and a soaking time without drum movement improve the removal
of set-in stains. Drain without spin assures gentle treatment, even for delicate articles.
Preset cycle settings
Each cycle has a preset Soil Level (cycle time), Water Temperature, and Spin Speed. The
preset settings provide the recommended fabric care for the selected cycle. See chart.
Cycles Soil Level Water Temp Spin Speed
(cycle time)
Whitest Whites Normal Hot/Cold Max Extract
(1:20)
Heavy Duty Heavy Warm/Cold Max Extract
(1:20)
Normal/Casual Normal Warm/Cold Max Extract
(0:50)
Delicate Normal Warm/Cold Medium
(0:40)
Quick Wash I_ight Warm/Cold Max Extract
(0:30)
Power Wash Heavy Hot/Cold Max Extract
(1:55)
Clean Washer N/A Sanitize N/A
with (1:05)
AFFRESHTM
Rinse& Spin N/A Cold/Cold Max Extract
(0:22)
Drain & Spin N/A N/A Max Extract
(0:13)
Soak Normal Warm/Cold No Spin
(0:30)
To change the preset cycle settings
Press the selector of each setting until the desired setting illuminates.
Normal Washer Sounds
As with any new product, you will hear sounds that you are not accustomed to. You may hear
various sounds when the door is locked and unlocked, and during the washing, rinsing, and
spinning process. Between changes in wash actions, there will be momentary pauses. You
will hear water spraying and splashing during the wash and rinse cycles. These new sounds
and pauses are part of normal washer operation.
18

You can customize your wash by adding options to your cycle selections. You can add or
change an option after starting a cycle anytime before the selected option begins. Not all
options are available with all cycles.
power, ca_ce[ normal, start • passe
'_j_ casual delicate 0
quick wash
whitest [ ]
_,es power wash quiet option
dean washer
soak with _f(fe@ I 1
drair extra rinse
[ freshhold] &spin
f I
sigoalon/offr,nse& spin doorlocked [ st....lean
press& hold presspause tounlock
3 seconds options
See the "l.aundry Guide" for an overview of possible options for each Wash Cycle
selection.
You can select more than one option for a cycle. Some options cannot be added to some
cycles; for example, Steam Clean cannot be added to the Quick Wash cycle.
If an option is available with a selected cycle, the light for that option will illuminate
when selected.
If an option is unavailable with a selected cycle, there will be a short tone, and the light
for that option will not illuminate when selected.
Fresh Hold
Use this option when you are not able to unload your clothes soon after the wash cycle ends.
This option provides periodic tumbling and airflow (aided by a quiet, ultra low energy fan) for
up to 10 hours to help freshen your clothes. During this time, "l)one" indicator remains
activated, the door remains locked, and the Fresh Hold indicator light will flash. The Fresh
Hold option will automatically stop and the door lock will be released after this time expires,
or if you press cancel at any time to unload your laundry.
Signal On/Off
Use this option to turn the buzzer indicating the end of the cycle on or off. To change, press
and hold the Fresh Hold button for three seconds.
Quiet Option
With this option, the washer will sense vibration in the wash cycle and may adjust the spin
speed to lower sound levels generated during the spin.
Preset cycle settings of Soil I.evel (cycle time), Wash Temperature, and Spin Speed can be
changed. You can change these settings by using modifiers. Modifiers can be changed before
or during the cycle until that part of the cycle starts. Not all modifiers are available with all
cycles and options.
[[_ max extract
R sanitize R high
m heavy m ATC hot _ medium
normal m ATC warm I[I low
light m cold _ no spin
soillevel ! [ wash temp
modifiers
To change Soil I.evel (cycle time), select the SOIl. I.EVEI. button until the desired setting
illuminates.
To change the water temperature, select the WASH TEMP button until the desired setting
illuminates.
To change the spin speed, select the SPIN SPEED button until the desired setting
illuminates.
Water Temp
Select a water temperature based on the type of load you are washing. Use the warmest wash
water safe for fabrics. Follow garment label instructions.
Warm rinses leave the loads drier than cold rinses. Warm rinses increase wrinkling. In cold
climates, a warm rinse makes the load more comfortable to handle. Cold rinses save energy.
• Cycles certified by NSF International, an independent, third party testing and certification
organization are those with the sanitize temperature selection available. The certification
verified that these cycles reduce 99.9% of bacteria typically found on clothing, bedding,
and towels. There is no carryover of bacteria between loads after the cycle is complete.
71!111
Z'I
Steam Clean
Use this option for heavily soiled loads that need improved stain treatment or loads with
multiple types of stains. When Steam Clean is selected, the water temperature of the selected
wash cycle is automatically set to warm. The water will then be slowly heated to the
temperature selected, along with steam, to aid in stain removal. This option will provide
optimal removal of organic stains such as blood and temperature-sensitive stains such as oil,
in the same cycle. This option is available on the following cycles: Normal/Casual, Heavy
Duty, Whitest Whites, and Power Wash.
Extra Rinse
A second rinse can be used to aid in the removal of detergent or bleach residue from
garments. This option provides an additional rinse with the same water temperature asthe
normal rinse. This is the default rinse setting for the Whitest Whites cycle.
Certified to Sanitize
• The Sanitize water temperature provides an extra high temperature wash to remove
99.9% of certain bacteria. It is recommended that you set your hot water heater to
120°t: (49°C) to ensure proper performance during this cycle.
• The Sanitize water temperature is extremely hot. Please check garment care labels to
avoid garment damage.
In wash water temperatures colder than 60°F (15.6°C), detergents do not dissolve well.
Soils may be difficult to remove. Only cycles with sanitize wash temperature selected
have been designed to meet the requirements of NSF Protocol P1 72 for Sanitizing
Efficacy.

WashWaterTemperature Suggested Fabrics
Wash Water Temperature Suggested Fabrics
SANITIZE Sturdy colorfast fabrics
Heavy soils
HOT Sturdy colorfast fabrics
Whites and pastels
Heavy soils
Automatic Temperature Control
The automatic temperature control electronically senses and maintains a uniform water
temperature. Automatic temperature control regulates incoming hot and cold water.
Automatic temperature control is automatically turned On when a cycle is selected.
See "Preset Cycle Settings" in Cycles.
• Automatic temperature control works for all wash and rinse temperature settings.
WARM Bright colors
Moderate to light soils
COLD Colors that bleed or fade
Light soils
In wash water temperatures colder than 60°F (15.6°C), detergents do not dissolve weft.
Soils may be difficult to remove.
LAUNDRY GUIDE
Refer to this chart for suggested load types and their corresponding cycles. Listed to the right are the options available to each of these washer cycles.
CYCLE SUGGESTED LOAD TYPE AVAILABLE OPTIONS
Signal Fresh Quiet Delay Extra Steam Max
ON/OFF Hold TM Option Start Rinse Clean Extract TM
Whitest Whites Heavily soiled white fabrics _/ _/ _/ _/ _/ _/ _/
Heavy Duty Heavily soiled underwear, towels, work clothes, _/ _/ _/ _/ _/ _/ _/
shirts, etc.
Normal/Casual Normally soiled blouses, shirts, overalls, etc., _/ _/ _/ _/ _/ _/ _/
made of polyester, nylon, linen, or cotton blends
Quick Wash I.ight[y soiled sports wear made of cotton, _/ _/ _/ _/ _/ _/
polyester, nylon, or cotton blends
Delicate Use this cycle to wash no-iron fabrics and _/ _/ _/ _/ _/
garments labeled "Permanent Press," or "Wrinkle
Free" or that indicate using a "Gentle" cycle on
the care [abe[.
Power Wash Small loads of heavily soiled work wear, such as _/ _/ _/ _/ _/ _/ _/
overalls, coveralls, sweatshirts, pants and outdoor
garments.
Soak Fabrics made of cotton linen, polyester, or nylon _ _
Rinse & Spin Fabrics made of cotton linen, polyester, or nylon d" d" d" d" d" d"
Drain & Spin Fabrics made of cotton linen, polyestec or nylon _ _ _ _
Clean Washer No clothes _/ _/ _/
20
La page est en cours de chargement...
La page est en cours de chargement...
La page est en cours de chargement...
La page est en cours de chargement...
La page est en cours de chargement...
La page est en cours de chargement...
La page est en cours de chargement...
La page est en cours de chargement...
La page est en cours de chargement...
La page est en cours de chargement...
La page est en cours de chargement...
La page est en cours de chargement...
La page est en cours de chargement...
La page est en cours de chargement...
La page est en cours de chargement...
La page est en cours de chargement...
La page est en cours de chargement...
La page est en cours de chargement...
La page est en cours de chargement...
La page est en cours de chargement...
La page est en cours de chargement...
La page est en cours de chargement...
La page est en cours de chargement...
La page est en cours de chargement...
La page est en cours de chargement...
La page est en cours de chargement...
La page est en cours de chargement...
La page est en cours de chargement...
La page est en cours de chargement...
La page est en cours de chargement...
La page est en cours de chargement...
La page est en cours de chargement...
La page est en cours de chargement...
La page est en cours de chargement...
La page est en cours de chargement...
La page est en cours de chargement...
-
 1
1
-
 2
2
-
 3
3
-
 4
4
-
 5
5
-
 6
6
-
 7
7
-
 8
8
-
 9
9
-
 10
10
-
 11
11
-
 12
12
-
 13
13
-
 14
14
-
 15
15
-
 16
16
-
 17
17
-
 18
18
-
 19
19
-
 20
20
-
 21
21
-
 22
22
-
 23
23
-
 24
24
-
 25
25
-
 26
26
-
 27
27
-
 28
28
-
 29
29
-
 30
30
-
 31
31
-
 32
32
-
 33
33
-
 34
34
-
 35
35
-
 36
36
-
 37
37
-
 38
38
-
 39
39
-
 40
40
-
 41
41
-
 42
42
-
 43
43
-
 44
44
-
 45
45
-
 46
46
-
 47
47
-
 48
48
-
 49
49
-
 50
50
-
 51
51
-
 52
52
-
 53
53
-
 54
54
-
 55
55
-
 56
56


Maytag MHWE550WR00 Manuel utilisateur
- Catégorie
- Machines à laver
- Taper
- Manuel utilisateur
- Ce manuel convient également à
dans d''autres langues
- English: Maytag MHWE550WR00 User manual
Documents connexes
-
Maytag MHWE450WJ00 Le manuel du propriétaire
-
-
-
-
-
-
-
-
-
Autres documents
-
Whirlpool Duet Steam Le manuel du propriétaire
-
-
-
-
Amana NFW7300WW01 Le manuel du propriétaire
-
-
Inglis IFW7300WW01 Le manuel du propriétaire